1
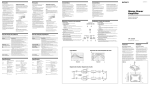
Specifications AUDIO POWER SPECIFICATIONS Especificaciones Sistema de circuito POWER OUTPUT AND TOTAL HARMONIC DISTORTION 50 watts per channel minimum continuous average power into 4 ohms, both channels driven from 20 Hz to 20 kHz with no more than 0.04% total harmonic distortion per Car Audio Ad Hoc Committee standards. Other Specifications Circuit system OTL (output transformerless) circuit Pulse power supply Inputs RCA pin jacks High level input connector Input level adjustment range 0.3 – 6 V (RCA pin jacks), 1.2 – 12 V (High level input) Outputs Speaker terminals Speaker impedance 2 – 8 Ω (stereo) 4 – 8 Ω (when used as a bridging amplifier) Maximum output Four speakers: 100 W × 4 (at 4 Ω) Three speakers: 100 W × 2 + 250 W × 1 (at 4 Ω) Rated output (supply voltage at 14.4 V) Four speakers: 50 W × 4 (20 Hz – 20 kHz, 0.04 % THD, at 4 Ω) 60 W × 4 (20 Hz – 20 kHz, 0.1 % THD, at 2 Ω) Frequency response 5 Hz – 80 kHz ( dB) Harmonic distortion 0.005 % or less (at 1 kHz, 4 Ω, 10 W) Low-pass filter 80 Hz, –18 dB/oct High -pass filter 80 Hz, –12 dB/oct Power requirements 12 V DC car battery (negative ground) Power supply voltage 10.5 – 16 V Current drain at rated output: 30 A (4 Ω, 50 W × 4) Remote input: 1 mA Dimensions Approx. 350 × 55 × 233 mm (13 7/8 × 2 1/4 × 9 1/4 in.) (w/h/d) not incl. projecting parts and controls Mass Approx. 3.1 kg (6 lb. 14 oz.) not incl. accessories Supplied accessories Mounting screws (4) High level input cord (1) Protection cap (1) Design and specifications are subject to change without notice. Features •Maximum power output of 100 W per channel (at 4 Ω). •This unit can be used as a bridging amplifier with a maximum output of 250 W. •Built-in Low-pass filter (80 Hz, –18 dB/oct) and High-pass filter (80 Hz, –12 dB/oct). •Built in protection circuit*. •Pulse power supply** for stable and regulated output power. •Direct connection can be made with the speaker output of your car audio if it is not equipped with the line output (High level input connection). * Protection circuit This amplifier is provided with a protection circuit that operates in the following cases: — when the unit is overheated — when a DC current is generated — when the speaker terminals are short circuited. The color of the POWER/PROTECTOR indicator will change from green to red, and the unit will shut down. If this happens, turn off the connected equipment, take out the cassette tape or disc, and determine the cause of the malfunction. If the amplifier has overheated, wait until the unit cools down before use. ** Pulse power supply This unit has a built-in power regulator which converts the power supplied by the 12 V DC car battery into high speed pulses using a semiconductor switch. These pulses are stepped up by the built-in pulse transformer and separated into both positive and negative power supplies before being converted into direct current again. This is to regulate fluctuating voltage from the car battery. This light weight power supply system provides a highly efficient power supply with a low impedance output. Circuito OTL (salida sin transformador) Suministro de alimentación por impulsos Entradas Tomas con terminales RCA Conector de entrada de alto nivel Margen de ajuste de nivel de entrada de 0,3 a 6 V (Tomas de pins RCA) de 1,2 a 12 V (Entrada de alto nivel) Salidas Terminales de altavoz Impedancia de altavoz de 2 a 8 Ω (estéreo) de 4 a 8 Ω (si se utiliza como amplificador en puente) Salida máxima Cuatro altavoces: 100 W × 4 (a 4 Ω) Tres altavoces: 100 W × 2 + 250 W × 1 (a 4 Ω) Salida nominal (tensión de suministro a 14,4 V) Cuatro altavoces: 50 W × 4 (de 20 Hz a 20 kHz, 0,04 % THD, a 4 Ω) 60 W × 4 (de 20 Hz a 20 kHz, 0,1 % THD, a 2 Ω) Respuesta de frecuencia de 5 Hz a 80 kHz ( dB) Distorsión armónica 0,005 % o inferior (a 1 kHz, 4 Ω, a 10 W) Filtro de paso bajo 80 Hz, –18 dB/oct Filtro de paso alto 80 Hz, –12 dB/oct Requisitos de alimentación Batería de automóvil de cc de 12 V (negativo a masa) Tensión de suministro de alimentación de 10,5 a 16 V Consumo de energía Con salida nominal: 30 A (4 Ω, 50 W × 4) Entrada remota: 1 mA Dimensiones Aprox. 350 × 55 × 233 mm (an/al/prf), componentes y controles salientes excluidos Masa Aprox. 3,1 kg accesorios excluidos Accesorios suministrados Tornillos de montaje (4) Cable de entrada de alto nivel (1) Cubierta protectora (1) Diseño y especificaciones sujetos a cambios sin previo aviso. Características • Salida de potencia máxima de 100 W por canal (a 4 Ω). • Esta unidad puede utilizarse como amplificador en monoaural con una salida máxima de 250 W. • Filtro de paso bajo (80 Hz, –18 dB/oct) y filtro de paso alto (80 Hz, –12 dB/oct) incorporados. •Circuito de protección* incorporado. • Suministro de alimentación por impulsos** para obtener una potencia de salida estable y regulada. • Es posible realizar una conexión directa con la salida de altavoz de un sistema de audio para automóvil si éste no está equipado con salida de línea (Conexión de entrada de alto nivel). * Circuito de protección Este amplificador dispone de un circuito de protección que se activa en los siguientes casos: — Si la unidad se calienta excesivamente — Si se genera corriente cc — Si se produce un cortocircuito en los terminales de altavoz. POWER/PROTECTOR indicator Installation Before Installation •Mount the unit either inside the trunk or under a seat. •Choose the mounting location carefully so the unit will not interfere with the normal movements of the driver and it will not be exposed to direct sunlight or hot air from the heater. •Do not install the unit under the floor carpet, where the heat dissipation from the unit will be considerably impaired. Indicador POWER/PROTECTOR Instalación First, place the unit where you plan to install it, and mark the positions of the four screw holes on the mounting board (not supplied). Then drill a 3 mm (1/8 in.) pilot hole at each mark and mount the unit onto the board with the supplied mounting screws. The mounting screws are all 15 mm (19/32 in.) long, so make sure that the mounting board is thicker than 15 mm (19/32 in.). Mount the unit as illustrated 1 Antes de realizar la instalación • Monte la unidad en el interior del maletero o debajo de un asiento. • Elija cuidadosamente el lugar de instalación de forma que la unidad no dificulte los movimientos normales del conductor y no quede expuesta a la luz solar directa ni al aire caliente de la calefacción. • No instale la unidad debajo de la moqueta del suelo, en cuyo caso la disipación de calor de la misma disminuirá considerablemente. Monte la unidad tal como se muestra en la ilustración. Fuse Replacement Sustitución del fusible If the fuse blows, check the power connection and replace both the fuses. If the fuse blows again after replacement, there may be an internal malfunction. In such a case, consult your nearest Sony dealer. Si el fusible se funde, compruebe la conexión de alimentación y sustituya ambos fusibles. Si el fusible se funde de nuevo después de sustituirlo, es posible que exista un fallo de funcionamiento interno. En este caso, póngase en contacto con el distribuidor Sony más próximo. Warning When replacing the fuse, be sure to use one matching the amperage stated above the fuse holder. Never use a fuse with an amperage rating exceeding the one supplied with the unit as this could damage the unit. El color del indicador POWER/PROTECTOR cambiará de verde a rojo y la unidad se desactivará. Si esto ocurre, desactive el equipo conectado, extraiga la cinta de casete o el disco y determine la causa del fallo de funcionamiento. Si el amplificador se ha sobrecalentado, espere hasta que la unidad se enfríe antes de volver a utilizarla. ** Suministro de alimentación por impulsos Esta unidad dispone de un regulador de potencia incorporado que convierte el suministro de alimentación de cc de 12 V de la batería del automóvil en impulsos de alta velocidad mediante un interruptor semiconductor. Estos impulsos se incrementan mediante el transformador de impulsos incorporado y se dividen en suministro de alimentación positiva y negativa antes de volver a convertirse en corriente directa. De esta forma, se regula la tensión fluctuante de la batería del automóvil. Este sistema de suministro de alimentación de peso ligero proporciona una alta eficacia del suministro con una salida de baja impedancia. Advertencia Al sustituir el fusible, asegúrese de utilizar uno cuyo amperaje coincida con el especificado en el portafusible. No utilice nunca un fusible con un amperaje superior al del suministrado con la unidad, ya que la disipción de calor podría dañarla. En primer lugar, coloque la unidad donde tenga previsto instalarla y marque sobre la superficie del tablero de montaje (no suministrado) las posiciones de los cuatro orificios para los tornillos. A continuación, perfore los orificios con un diámetro de aproximadamente 3 milímetros y monte la unidad sobre el tablero con los tornillos de montaje suministrados. Ya que la longitud de estos tornillos es de 15 mm, compruebe que el grosor del tablero de montaje sea superior a 15 mm. 1 3-263-283-11 (2) Troubleshooting guide The following checklist will assist in the correction of most problems which you may encounter with your unit. Before going through the checklist below, refer to the connection and operating procedures. Problem Cause/Solution The POWER/PROTECTOR indicator does not light up. The fuse is blown. t Replace the fuse with a new one. Stereo Power Amplifier The ground wire is not securely connected. t Fasten the ground wire securely to a metal point of the car. The voltage going into the remote terminal is too low. •The connected master unit is not turned on. t Turn on the master unit. •The system employs too many amplifiers. t Use a relay. Operating instructions Check the battery voltage (10.5 – 16 V). • The POWER/PROTECTOR indicator will change from green to red. • The unit becomes abnormally hot. Use speakers with suitable impedance. •Stereo operation: 2 – 8 Ω •Bridging operation: 4 – 8 Ω Alternator noise is heard. The power connecting wires are installed too close to the RCA pin cords. t Keep the wires away from the cords. Manual de instrucciones The speaker outputs are short-circuited. t Rectify the cause of the short-circuit. The ground wire is not securely connected. t Fasten the ground wire securely to a metal point of the car. Speaker wires are touching the car chassis. t Keep the wires away from the car chassis. Owner’s Record The model and serial numbers are located on the bottom of the unit. Record the serial number in the space provided below. Refer to these numbers whenever you call upon your Sony dealer regarding this product. Model No. XM-504Z Serial No. XM-504Z 2004 Sony Corporation Printed in China Guía de solución de problemas La siguiente lista le resultará útil para solucionar la mayoría de los problemas que pueda encontrar con la unidad. Antes de consultar la lista, examine los procedimientos de conexión y funcionamiento. Problema Causa/Solución El indicador POWER/ PROTECTOR no se ilumina. El fusible se ha fundido. t Sustitúyalo por otro nuevo. Parts for Installation and Connections Componentes de instalación y conexiones 1 2 ø 5 × 15 (× 4) El cable de toma a tierra no está firmemente conectado. t Conéctelo firmemente a un punto metálico del automóvil. La tensión que recibe el terminal remoto es demasiado baja. •No ha activado la unidad principal conectada. t Actívela. •El sistema emplea demasiados amplificadores. t Utilice un relé. Emplee altavoces con una impedancia adecuada. •Funcionamiento estéreo: de 2 a 8 Ω •Funcionamiento en puente: de 4 a 8 Ω Se escucha ruido del alternador. Los cables de conexión de alimentación se encuentran demasiado cerca de los cables con terminales RCA. t Manténgalos alejados entre sí. 0.2 m Dimensions Dimensiones 55 Compruebe la tensión de la batería (10,5 – 16 V). • El indicador POWER/ PROTECTOR cambia de verde a rojo. • La unidad se calienta de forma anormal. 3 (2 1/4) Unit: mm (in.) Unidad: mm 377.7 (14 7/8) 350 (13 7/8) 233 (9 1/4) El cable de toma a tierra no está firmemente conectado. t Conéctelo firmemente a un punto metálico del automóvil. 264.2 (10 1/2) Se produjo un cortocircuito en las salidas del altavoz. t Rectifique la causa del cortocircuito. Los cables del altavoz han entrado en contacto con el chasis del automóvil. t Manténgalos alejados del chasis. 350 (13 7/8) • Halogenated flame retardants are not used in printed wiring boards. • Halogenated flame retardants are not used in cabinets. • Corrugated cardboard is used for the packaging cushions. ø 6 (1/4) Connections Conexiones Precautions Precauciones •This unit is designed for negative ground 12 V DC operation only. •Use speakers with an impedance of 2 to 8 Ω (4 to 8 Ω when used as a bridging amplifier). •Do not connect any active speakers (with built-in amplifiers) to the speaker terminals of the unit. Doing so may damage the active speakers. •Avoid installing the unit in areas subject to: — high temperatures such as from direct sunlight or hot air from the heater — rain or moisture — dust or dirt. •If your car is parked in direct sunlight and there is a considerable rise in temperature inside the car, allow the unit to cool down before use. •When installing the unit horizontally, be sure not to cover the fins with the floor carpet etc. •If this unit is placed too close to the car radio or antenna, interference may occur. In this case, relocate the amplifier away from the car radio or antenna. •If no power is being supplied to the master unit, check the connections. •This power amplifier employs a protection circuit to protect the transistors and speakers if the amplifier malfunctions. Do not attempt to test the protection circuits by covering the heat sink or connecting improper loads. •Do not use the unit on a weak battery as its optimum performance depends on a good power supply. •For safety reasons, keep your car audio volume moderate so that you can still hear sounds outside your car. •Esta unidad está diseñada para utilizarse sólo con cc de 12 V negativo a masa. •Emplee altavoces con impedancia de 2 a 8 Ω (de 4 a 8 Ω cuando se utilice como amplificador en puente). •No conecte altavoces activos (con amplificadores incorporados) a los terminales de altavoz de la unidad, ya que puede dañar dichos altavoces. •Evite instalar la unidad en lugares expuestos a: — altas temperaturas, como a la luz solar directa o al aire caliente de la calefacción — la lluvia o la humedad — suciedad o polvo. •Si aparca el automóvil bajo la luz solar directa y se produce un considerable aumento de temperatura en el interior, deje que la unidad se enfríe antes de utilizarla. •Si instala la unidad horizontalmente, asegúrese de no cubrir las aletas con la moqueta del suelo, etc. •Si coloca la unidad demasiado cerca de la radio o antena del automóvil, pueden producirse interferencias. En este caso, aleje el amplificador de dicha radio o antena. •Si la unidad principal no recibe alimentación, compruebe las conexiones. •Este amplificador de potencia emplea un circuito de protección para proteger los transistores y los altavoces en caso de que dicho amplificador presente fallos de funcionamiento. No intente someter a prueba los circuitos de protección cubriendo el disipador de calor o conectando cargas inadecuadas. •No utilice la unidad si la batería se está agotando, ya que el rendimiento óptimo de dicha unidad depende de un buen suministro de alimentación. •Por razones de seguridad, mantenga el volumen del sistema de audio en un nivel moderado de forma que sea posible oír los sonidos del exterior del automóvil. If you have any questions or problems concerning your unit that are not covered in this manual, please consult your nearest Sony dealer. Caution •Before making any connections, disconnect the ground terminal of the car battery to avoid short circuits. •Be sure to use speakers with an adequate power rating. If you use small capacity speakers, they may be damaged. •Do not connect the # terminal of the speaker system to the car chassis, and do not connect the # terminal of the right speaker with that of the left speaker. •Install the input and output cords away from the power supply wire as running them close together can generate some interference noise. •This unit is a high powered amplifier. Therefore, it may not perform to its full potential if used with the speaker cords supplied with the car. •If your car is equipped with a computer system for navigation or some other purpose, do not remove the ground wire from the car battery. If you disconnect the wire, the computer memory may be erased. To avoid short circuits when making connections, disconnect the +12 V power supply wire until all the other wires have been connected. Power Connection Wires (not supplied) Cables de conexión de alimentación (no suministrados) Si desea realizar alguna consulta o solucionar algún problema relativos a la unidad que no aparezcan en este manual, póngase en contacto con el distribuidor Sony más próximo. Precaución •Antes de realizar las conexiones, desconecte el terminal de toma a tierra de la batería del automóvil para evitar cortocircuitos. •Asegúrese de utilizar altavoces con una potencia nominal adecuada. Si emplea altavoces de pequeña capacidad, pueden dañarse. •No conecte el terminal # del sistema de altavoces al chasis del automóvil, ni el terminal # del altavoz derecho al del altavoz izquierdo. •Instale los cables de entrada y salida alejados del cable de suministro de alimentación, ya que en caso contrario puede generarse ruido por interferencias. •Esta unidad es un amplificador de alta potencia. Por tanto, puede no funcionar a pleno rendimiento si se utiliza con los cables de altavoz suministrados con el automóvil. •Si el automóvil está equipado con un sistema de ordenador para la navegación o para otra finalidad, no desconecte el conductor de toma a tierra de la batería del automóvil. Si lo desconecta, la memoria del ordenador puede borrarse. Para evitar cortocircuitos al realizar las conexiones, desconecte el cable de suministro de alimentación de +12 V hasta conectar todos los cables. Make the terminal connections as illustrated below. Realice las conexiones de terminal como se ilustra a continuación. REM to a metal point of the car a un punto metálico del automóvil +12V GND 3 3 REM +12 V GN D c Remote output* Salida remota* (REM) Car audio Sistema de audio para automóvil Fuse (50 A) Fusible (50 A) +12 V car battery Batería de automóvil de +12 V * If you have the factory original or some other car audio without a remote output on the amplifier, connect the remote input terminal (REMOTE) to the accessory power supply. * Si dispone del sistema de audio para automóvil original de fábrica o de otro sistema sin una salida remota en el amplificador, conecte el terminal de entrada remota (REMOTE) al suministro de alimentación accesoria. Notes on the power supply • Connect the +12 V power supply wire only after all the other wires have been connected. • Be sure to connect the ground wire of the unit securely to a metal point of the car. A loose connection may cause a malfunction of the amplifier. • Be sure to connect the remote control wire of the car audio to the remote terminal. • When using a car audio without a remote output on the amplifier, connect the remote input terminal (REMOTE) to the accessory power supply. • Use a power supply wire with a fuse attached (50 A). • Place the fuse in the power supply wire as close as possible to the car battery. • During full-power operation, a current of more than 50 A will run through the system. Therefore, make sure that the wires to be connected to the +12 V and GND terminals of this unit are larger than 10-Gauge (AWG-10) or have a sectional area of more than 5 mm2. Level Adjustment Control Control de ajuste de nivel The input level can be adjusted with this control when using source equipment made by other manufacturers. Turn it in the clockwise direction when the output level of the car audio seems low. Es posible ajustar el nivel de entrada con este control al utilizar equipos fuente de otros fabricantes. Gírelo en el sentido de las agujas del reloj si el nivel de salida del sistema de audio para automóvil parece bajo. Pass the wires through the cap, connect the wires, then cover the terminals with the cap. Note When you tighten the screw, be careful not to apply too much torque* as doing so may damage the screw. * The torque value should be less than 1 N•m. 1 2 0.5 High Level Input Connector Conector de entrada de alto nivel 0.3V LEVEL FRONT Green Verde Gray Gris White Blanco FRONT L R REAR L R Purple Violeta Striped/Purple Con rayas/Violeta 1 2 0.5 4 6 Nota Al apretar el tornillo, tenga cuidado de no aplicar demasiada fuerza de torsión*, ya que puede dañarlo. * El valor de fuerza de torsión debe ser inferior a 1 N•m. Notas sobre el suministro de alimentación • Conecte el cable de suministro de +12 V sólo después de haber conectado los otros cables. • Asegúrese de conectar firmemente el cable de toma a tierra de la unidad a un punto metálico del automóvil. Una conexión floja puede causar fallos de funcionamiento del amplificador. • Compruebe que conecta el cable de control remoto del sistema de audio al terminal remoto. • Si utiliza un sistema de audio sin salida remota en el amplificador, conecte el terminal de entrada remota (REMOTE) al suministro de alimentación accesoria. • Emplee el cable de suministro de alimentación con un fusible fijado (50 A). • Coloque el fusible en el cable de suministro de alimentación lo más cerca posible de la batería del automóvil. • Durante el funcionamiento a pleno rendimiento, fluye por el sistema una corriente superior a 50 A. Por tanto, compruebe que los cables que va a conectar a los terminales de +12 V y GND de esta unidad tengan una capacidad superior a 10-Gauge (AWG-10) una zona de sección superior a 5 mm2. Striped/White Con rayas/Blanco 4 Pase los cables a través de la cubierta, conéctelos y cubra los terminales con dicha cubierta. 6 0.3V LEVEL REAR Striped/Gray Con rayas/Gris Striped/Green Con rayas/Verde Input Connections Conexiones de entrada High Level Input Connection (with Speaker Connection 1, 2 or 4) Conexión de entrada de alto nivel (con conexión de altavoces 1, 2 o 4) Front right speaker output Salida del altavoz delantero derecho Purple Violeta Car audio Sistema de audio para automóvil Striped Con rayas B Rear right speaker output Salida del altavoz trasero derecho Gray Gris Striped Con rayas Green Verde White Blanco Striped Con rayas A High Level Input Connection (with Speaker Connection 3) Conexión de entrada de alto nivel (con conexión de altavoces 3) Front left speaker output Salida del altavoz delantero izquierdo Rear left speaker output Salida del altavoz trasero izquierdo Striped Con rayas Left speaker output Salida del altavoz izquierdo Right speaker output Salida del altavoz derecho Gray Gris Purple Violeta Car audio Sistema de audio para automóvil Striped Con rayas Striped Con rayas White Blanco Green Verde Striped Con rayas Striped Con rayas 2 2 Line Input Connection (with Speaker Connection 1, 2 or 4) Conexión de entrada de línea (con conexión de altavoces 1, 2 o 4) C Car audio Sistema de audio para automóvil LINE OUT Line Input Connection (with Speaker Connection 3) Conexión de entrada de línea (con conexión de altavoces 3) Car audio Sistema de audio para automóvil LINE OUT LINE OUT Rear Traseros Front Delanteros D Left channel Canal izquierdo Note Make sure that the line output from the car audio is connected to the jack marked “L (BTL)” on the unit. Right channel Canal derecho Nota Compruebe que la salida de línea del sistema de audio está conectada a la toma con la marca “L (BTL)” de la unidad. Speaker Connections Conexiones de los altavoces Turn on or off the LPF and HPF switch at the unit rear as illustrated below. Encienda o apague los interruptores LPF (filtro de paso bajo) y HPF (filtro de paso alto) situados en la parte posterior de la unidad, como se muestra a continuación. 4-Speaker System (with Input Connection A or C) Sistema de 4 altavoces (con conexión de entrada A o C) 1 3-Speaker System (with Input Connection A or C) Sistema de 3 altavoces (con conexión de entrada A o C) 2 Full range speakers (min. 2 Ω) Altavoces de gama completa (mín. 2 Ω) Front speaker (min. 2 Ω) Altavoces delanteros (mín. 2 Ω) Left Izquierdo Right Derecho HPF (80Hz) Left Izquierdo Right Derecho HPF (80Hz) OFF OFF LPF(80Hz) ON OFF ON LPF(80Hz) ON OFF ON L R Subwoofer (min. 4 Ω) Altavoces potenciadores de graves (mín. 4 Ω) Left Izquierdo Right Derecho Notes • In this system, the volume of the subwoofer will be controlled by the car audio fader control. • In this system, the output signals to the subwoofer will be the combination of both the REAR L and R INPUT jacks or the REAR high level input connector signals. Rear speaker (min. 2 Ω) Altavoces traseros (mín. 2 Ω) 2-Speaker System (with Input Connection B or D) Sistema de 2 altavoces (con conexión de entrada B o D) 3 Notas • En este sistema, el volumen de los altavoces potenciadores de graves se controla mediante el control de equilibrio entre altavoces del sistema de audio. • En este sistema, las señales de salida que recibe el altavoz potenciador de graves serán la combinación de las tomas REAR L y R INPUT o de las señales del conector de entrada de nivel alto REAR. 2-Way System (with Input Connection A or C) Sistema de 2 vías (con conexión de entrada A o C) 4 Full range speakers (min. 2 Ω) Altavoces de gama completa (mín. 2 Ω) Left speaker (min. 4 Ω) Altavoz izquierdo (mín. 4 Ω) Left Izquierdo Right Derecho HPF (80Hz) HPF (80Hz) OFF ON LPF(80Hz) OFF L OFF ON LPF(80Hz) OFF R Left Izquierdo Right speaker (min. 4 Ω) Altavoz derecho (mín. 4 Ω) ON ON Right Derecho Subwoofer (min. 4 Ω) Altavoces potenciadores de graves (mín. 4 Ω) Note In this system, the volume of the subwoofer will be controlled by the car audio fader control. Nota En este sistema, el volumen de los altavoces potenciadores de graves se controla mediante el control de equilibrio entre altavoces del sistema de audio.