1
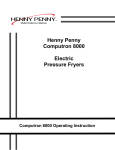
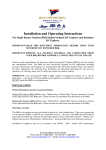
Complete user manual.qxd
22/9/10
13:18
Page 1
GREEN BEAN COFFEE
I N - H O U S E F R E S H LY R O A S T E D
U S E R ’ S
M A N U A L
GREEN BEAN COFFEE
I N - H O U S E F R E S H LY R O A S T E D
Email: [email protected]
Web: www.beans.net.au
Complete user manual.qxd
22/9/10
13:18
Page 2
WARNING!
SOME UNUSUAL CONDITIONS, SUCH AS DRASTICALLY OVERFILLING THE ROASTER, NOT CLEANING
THE CHAFF COLLECTOR AFTER EACH ROAST, OR BLOCKING THE ROASTER VENT, CAN CAUSE A FIRE
IN THE ROASTING CHAMBER. DO NOT LEAVE THE ROASTER TO RUN UNATTENDED. IN THE EVENT OF A
FIRE, TURN OFF THE ELECTRIC POWER AND GAS, AND ALLOW THE ROASTER TO COOL
COMPLETELY BEFORE TOUCHING IT.
TO REDUCE THE RISK OF FIRE OR ELECTRICAL SHOCK, DO NOT EXPOSE YOUR ROASTER TO RAIN OR
MOISTURE.
DO NOT REMOVE THE HOUSING COVER FROM THE ROASTER. THERE ARE NO USER SERVICEABLE
PARTS INSIDE. REFER SERVICING TO QUALIFIED SERVICE PERSONNEL.
THIS IS A GAS FIRED APPLIANCE, AND MUST NOT BE VENTED INTO A CLOSED SPACE.
SEE THE MANUAL FOR PROPER VENTING.
THE GLASS ROASTING CHAMBER AND THE METAL ABOVE THE ROASTING CHAMBER CAN CAUSE
BURNS IF TOUCHED DURING THE ROASTING CYCLE.
SIGNIFICANTLY OVER OR UNDER FILLING OF THE ROASTING CHAMBER WILL CAUSE THE ROAST TO
FAIL, AND MAY INCREASE THE RISK OF FIRE IN THE ROASTING CHAMBER.
ROASTERS IDENTIFIED AS NATURAL GAS ROASTERS MUST NOT BE RUN ON PROPANE (LPG). DOING
SO WOULD POSE A SERIOUS POTENTIAL FIRE HAZARD. BE SURE THAT YOU DO NOT USE A GAS
OTHER THAN THE ONE SPECIFIED ON THE BACK OF YOUR ROASTER.
Complete user manual.qxd
22/9/10
13:18
Page 3
CONTENTS:
1. Introduction to your new GREEN BEAN Coffee Roaster
2. Installation and accessories
3. Ordering green coffee
4. How to operate your roaster
5. Cleaning your roaster
6. Troubleshooting
7. If you need help
8. Replacement parts
9. Warranty information
10. Technical information
Complete user manual.qxd
22/9/10
13:18
Page 4
1. INTRODUCTION
Congratulations on your purchase of a new GREEN BEAN Coffee Roaster. The wonderful smell of fresh
roasted coffee will soon be a regular part of your life. If you are using our roaster as a commercial
machine, it will give you years of service, and dramatically demonstrate your commitment to freshness
and quality. Your customers will taste the freshest coffee they have ever had.
Depending on the degree of darkness of the roasted coffee, and the type of green coffee bean, it should
take between 15 and 20 minutes to roast and cool a 600 gram batch of coffee. In a ten-hour day, you can
easily produce10 - 12 Kilograms of high-quality roasted coffee with just one of our machines. (For best
results, by the way, we suggest you roast coffee for the next day - that is, let the newly roasted coffee sit
for 8 to 12 hours before grinding and brewing.) We are excited about bringing the producers and
consumers of coffee closer together, and restoring the idea of coffee as a locally roasted, varied and
impeccably fresh product.
We have written this manual to try to make learning about our machine a pleasant process, and our company is dedicated to helping you with all of the supplies and information you may need.
Three important points about our roaster:
1. A key feature of our roaster is the freshness of the coffee that it provides. Given that roasted
coffee loses its uniquely fresh-roasted flavour in about a week it is very important to keep track of the
age of your roasted coffee. If you are going to sell whole bean coffee, date stamp the bags! Then,
when someone buys coffee from your roaster, the flavor will be memorable.
2. Our roaster, because of the way it operates, can only do a single fixed amount of coffee at a time.
Always use the measuring can we have provided to measure out the green beans for each roast
cycle. Overfilling or under filling the machine will result in a spoiled roast.
3. Always use top quality green coffee. You will get better roast consistency, produce less smoke,
and get much better flavor out of clean, well-graded green coffees. The difference in price between
top quality green coffee and inferior stuff is definitely not worth the disappointment.
So, with those things in mind, Happy Roasting from us to you.
GREEN BEAN COFFEE
I N - H O U S E F R E S H LY R O A S T E D
Kirk Stuart
Managing Director
Email: [email protected]
Web: www.beans.net.au
Complete user manual.qxd
22/9/10
13:18
Page 5
2. INSTALLATION AND ACCESSORIES
Unpacking the box
The very first thing to do after removing your roaster from the carton (which may well be a two person
job, as the roaster weighs over 25 kilograms), is to check for any damage that might have occurred in
shipping. Let us know immediately if you Find anything wrong.
Locations for the roaster - basic requirements
We think the roaster will prove most valuable to your business if it is somewhere that your customers can
see it in operation. But you may or may not be able to do that. There are really only a few absolute
requirements for the installation.
They are:
A. The roaster must be in a sheltered location - it is not water-resistant.
B. It must have “breathing room” around the back of the roaster - not less than 7.6cm
to the nearest wall.
C. It must be level - check the top with a level to make sure. If it is not level, the motion
of the beans may be disrupted during the roasting cycle, and an uneven roast may result.
Connecting up the Roaster to Propane (LPG). The fitting on the back of propane roasters is designed to
take a standard propane flare fitting - like that found on the end of a standard regulator/hose combination.
The propane roaster can be run from the same sort of bottle- regulator-hose arrangement that is common
on gas barbecue grills. If you are using a propane roaster indoors, safety considerations require that the
propane bottle be outdoors, and plumbed to the location of the roaster. Bottles and regulator/hoses can be
ordered from us, or picked up at any hardware store. A 9.5 Kg bottle should produce at least 46 Kilograms
of roasted coffee.
Connecting the Roaster to Natural Gas: The natural gas roasters should be directly plumbed in to the
natural gas line, like any other gas fired appliance. This is a job for professionals, who will have the tools,
fittings and experience to provide a solid and safe installation. Make sure the machine you are connecting
to natural gas has been built for natural gas (it will say so on the back). There should be a vaIve in the line
to the roaster.
Electric Power: This is an easy one. Just plug it in. The roaster only draws about 3 amps at 115 volts a.c.,
so no special wiring is required. Roasters built for 240 volt, 50hz service will not run properly on 115
volts, 60hz and vice versa. Check the back panel of the machine for the voltage required.
Venting: There are several reasons to vent your roaster properly, unless you are using it outdoors. Venting
an indoor installation will prevent accumulation of carbon monoxide, and, in the unlikely event of a roaster
fire, will provide a safe escape route for the combustion products. The roaster can simply be placed under
a hood, like a stove or other gas appliance. Or, the roaster exhaust can be ducted through 10.2cm
diameter steel tubing to a nearby hood. Or, the roaster can be vented through a nearby outside wall, by
our qualified installers.
Complete user manual.qxd
22/9/10
13:18
Page 6
3. ORDERING GREEN COFFEE
Before you can operate your GREEN BEAN Coffee Roaster, you will need a supply of green (unroasted) coffee. Green coffee beans are like dried peas, in the sense that they store well for long periods of
time. So buying fairly large quantities to obtain a good price makes very good sense. They should be
stored in a closed container that will not allow outside odors to penetrate the coffee. We like to use new
metal garbage cans to store green coffee.
GREEN BEAN will maintain a supply of good quality green coffees. The beans can be ordered by
calling Syd 1800 787 738 or faxing (02) 9436 4127 our office.
It is important to know that while at least 95% of all coffee beans roast well in our machine, some do
not. By ordering through Green Bean, we guarantee our blends roast consistantly well.
* GREEN BEAN Coffee is available in 16 Kilogram Bags (Min of 2 per delivery).
4. HOW TO OPERATE YOUR ROASTER
INITIATES THE AUTOMATIC
ROASTING AND COOLING CYCLE
“DEGREE OF ROAST” NUMBER
WHEN SHOWING, INDICATES BURNER IS ON
THESE ARROW KEYS
ADJUST THE ROAST LEVEL
UP AN DOWN
TURNING THIS SWITCH OFF
DURING A ROAST WILL MANUALLY
STOP THE ROAST AND START THE
COOLING CYCLE
BOTH THESE SWITCHES
MUST BE ON FOR THE
ROASTER TO OPERATE
The GREEN BEAN Coffee Roaster has been designed for ease of operation.
Following four simple rules will help ensure that your roasts are always a success.
Complete user manual.qxd
22/9/10
13:18
Page 7
1. Some unusual conditions, such as drastically overfilling the roaster, not cleaning the chaff collector
after each roast, or blocking the roaster vent, can cause a fire in the roasting chamber. Do not leave the
roaster to run unattended. In the event of a fire, turn off the electric power and gas and allow the
roaster to cool completely before touching it.
2. Always use the measuring can supplied with the roaster to measure the amount of green coffee to be
placed in the glass roasting chamber. Fill the can to level with green coffee beans (do not fill it heaping
full). This will be about 600 grams of green coffee, which will typically produce about 500 grams of
roasted coffee.
3. Clean the chaff collector and screen after every roast, with the brush supplied with the roaster. This
will ensure proper airflow through the roaster, and more consistent roasts. During the course of
roasting, green coffee beans almost double in size, and they release varying amounts of papery chaff.
The purpose of the chaff collector assembly is to trap the chaff for disposal.
4. The roasting chamber itself is made of ceramic glass, like that in the door of a woodstove. It will not
break from thermal stress, no matter how hot the beans get, but it is very important that you not
scratch the glass with aggressive cleansers. If you crack it by dropping it, it must be replaced before
operating the roaster again.
LEVER “A”
FIGURE C
13:18
ROASTING CHAMBER
CHAFF COLLECTOR ASSEMBLY
22/9/10
FIGURE B
REMOVE BOTH THE ROASTING CHAMBER
AND THE CHAFF COLLECTOR TOGETHER
AFTER GENTLY RAISING LEVER “A”.
Complete user manual.qxd
Page 8
Complete user manual.qxd
22/9/10
13:18
Page 9
Ok, so now, how to start... The first thing to do is to gently lift the lever on the left side of the machine,
grasp the wooden handle on the roasting chamber, and remove the roasting chamber (with the chaff
collector assembly sitting on it) from the machine. (See figure B) Set the roasting chamber on the table,
and remove the chaff collector assembly from the top of the roasting chamber. (See figure C)
Then, measure out the appropriate* amount of green coffee beans (remember, level, not heaping) and
pour the green coffee beans into the glass roasting chamber. Replace the chaff collector assembly back on
top of the glass roasting chamber, gently raise the lever on the left side of the machine, and replace the
roasting chamber and chaff collector into the roasting machine.
Now the machine is loaded. It is time to move on to the electronic control. The control contains a
microprocessor that carries out the entire roast and cool down cycle without assistance, once started. The
microprocessor monitors the roast rate, pulses the gas to maintain an optimal level of heat, shuts off the
gas when the appropriate roast temperature is achieved and then initiates a seven minute cooling cycle. At
the conclusion of the cooling cycle, the machine shuts itself down.
So, in its simplest form, here’s what you do;
1. Use the measuring can to load the glass roasting chamber with the appropriate* amount of green
coffee beans.
2. Place the roasting chamber / chaff collector assembly in the roasting machine
3. Turn on the gas valve on your propane tank or natural gas line
4. Turn on both switches (“power” and “gas”)
5. Set the desired degree of roast using the arrow keys
6. Push the “Start” button (the full cycle will take approximately 20 minutes)
7. When the machine shuts itself off, empty out the cooled, roasted coffee and brush
out the chaff collector.
Roast Settings. The darkness of the roasted coffee is determined by the red LED number on the control
panel - from “0” to “9.” “0” will be a very light roast, and “9” will produce an extremely dark roast.
Different coffees will reach different degrees of darkness at the same setting, so you will have to learn the
appropriate setting for each type of coffee you will be roasting. This, of course, is a matter of taste.
The settings represent different finish temperatures for the roast. “0” sets the machine to finish the
roasting cycle at 193 degrees C, and each number up from there represents a 3.5 degree C increase in the
finish temperature. You can find out what setting is correct for the type of coffee you are roasting by a
couple of different methods. One is to start at a setting of “5” and, by trial and error, do roasts until you
find what number is right.
*Appropriate Amounts
models 1300/1400 1 can of green coffee beans
models 1500/1600 2 can of green coffee beans
Complete user manual.qxd
22/9/10
13:18
Page 10
A more systematic way of doing this would be to set the machine to roast level “9”, then roast the
unknown coffee until it looks right. Then, hold down both “arrow” keys at the same time. The LED window
will scroll off the temperature in degrees C. You can then use the “Gas” switch to cut off the roast and
start the cooling cycle. For the next roast, you can simply set the machine to terminate the roast cycle at
the temperature that you observed. Use the table below to convert the desired temperature to roast
setting.
Roast Setting / Cut-off Temperature
“0”
“1”
“2”
“3”
“4”
“5”
“6”
“7”
“8”
“9”
=
=
=
=
=
=
=
=
=
=
193ºC
196.5ºC
200ºC
203.5ºC
207ºC
210.5ºC
214ºC
217.5ºC
221ºC
224.5ºC
You’ll notice that a decimal point will appear in the LED display during the roast cycle. This indicates that
the burner is actually operating. The burner will have a number of six-second off pulses during the roast,
as microcomputer adjusts the roast rate. But if it is off for more than six seconds, you know the roast has
concluded, and that the machine is in the cooling cycle.
Because the roast cycle is controlled by temperature rather than time, the results of the machine are very
repeatable, although there can be some slight variation in colour if the machine is very cold at the start of
the roast.
There is no need to let the machine “rest” between roasts. It is built to withstand continuous operation.
Complete user manual.qxd
22/9/10
13:18
Page 11
Any time a roast is aborted, it is important to let the cooling cycle run its course. Never stop a roast by
turning off both switches. This will prevent the coffee from cooling properly, and will leave the
machine parts too hot to handle. The only reason to turn off both switches would be if, for some
reason, the beans caught fire. You would then want to turn off the blower to cut off the supply of
oxygen to the fire. The smouldering beans could then be removed from the machine and dumped,
after the machine has completely cooled.
In the event of some abnormal condition, the machine will flash error codes in the red LED window.
These codes are explained in more detail in the section on “Troubleshooting” But a common error
code that you may see is “E-2” - that is, an “E” followed by a “2” in the LED window. The machine will
completely shut down when this error code is shown. It is the result of a failure of the burner to ignite,
and may mean that you forgot to open the gas valve, or that you are out of propane. To clear the error
code, simply turn both switches off for 5 seconds, and then back on.
5. CLEANING YOUR ROASTER
As mentioned in the previous paragraph, the most important “cleaning” job associated with the roaster
is to empty and brush out the chaff collector after every roast. If you wish to give the chaff collector
more thorough cleaning every few months, don’t hesitate to put the various parts in the dishwasher.
When it comes time to clean the glass roasting chamber, we suggest that you hand wash it in a sink,
using detergent and a plain sponge. In the event the grime is more stubborn, you may use “Bon Ami”
brand cleanser, but no other cleanser! This is because “Bon Ami” will not scratch the glass, but other
cleansers frequently will. It is important to the thermal integrity of the glass that it not be scratched.
We don’t recommend putting the roasting chamber in a dishwasher simply because it will be hard on
the wooden handle.
After roasting a few hundred kilograms of coffee, you will notice the accumulation of some residue in
the upper portion of the roaster. It would be wise to keep an eye on the level of this residue, and brush
out the venting pipe if it gets too thick. BE CAREFUL NOT TO DAMAGE THE HEAT SENSOR IN THE
TOP PART OF THE ROASTER. The heat sensor sits in a bracket that holds it above the chaff collector
screen. You can identify it by looking for the two wires that end in a small cylindrical tube about the
size of a matchstick. Use nothing harsher than a soft brush to clean the area of the heat sensor.
Otherwise, the roaster can be cleaned as you would clean any other electrical appliance.
It is important that you keep the gauze screen on the chaff collector clean. Soak the screen overnight
once a week, and give it a good scrubbing with a fine wire bush in the morning. Another thing to be
aware of its that if the top part of the roaster is not seating flat on top of the screen ring, variation of
the roast may occur.
Also check that the thermistor holder does not get bent and the thermistor holder does not get bent
and the thermistor comes in contact with the screen. That may also lead to uneven results. The
thermistor should be about 1/4 inch (or 6mm) above the screen.
6. TROUBLESHOOTING
The GREEN BEAN Coffee Roaster has been designed and built to give you years of trouble free
service. It has also been provided with a number of safety features to protect you and your business in
the event of a problem.
Complete user manual.qxd
22/9/10
13:18
Page 12
Of course, the most important safety feature of the roaster is that in the unlikely event that the coffee
beans catch fire, the ceramic glass will not break, and the fire can safely burn itself out. Should a fire
occur, the machine is programmed to turn itself off, to deny oxygen to the fire. Should the circuit board
fail to do this, we recommend turning off the machine manually.
In addition, the internal gas valve and electronic ignition system are US made commercial gas furnace
items, with the standard safety features, like flame detect.
The error codes that may appear in the red LED window on the control (an “E” followed by a number),
reflect several software features that provide further protection. They are as follows:
“E-1” This error code indicates that the electronic control has detected an “out-of-range” condition on the
thermal sensor. It could be caused by a broken wire, or a broken or defective RTD (the temperaturesensin8 device). This is a serious fault. Call us, and we will either service or replace your machine.
“E-2” You may see this error code more frequently. When the machine starts up, it blows air for 5
seconds before igniting the gas. This is a safety precaution. After sending the signal to ignite the gas, the
control waits 15 seconds, then checks for an increase in temperature. If there is no temperature rise, it
shuts the machine down and flashes “E-2.” If you have a propane machine, this code probably means that
you are out of propane, or that you forgot to open the valve on the tank. Just switch the machine off (to
clear the error code), correct the problem, and turn the machine back on. Another possible cause of an
“E- 2” message would be a hugely oversize batch of beans in the roasting chamber. This would prevent
hot air from reaching the RTD.
“E-3” This code is used to indicate an excessively long roast (one hour).
“E-4” This code is similar to the “E-2” error code, in that it indicates that the temperature is falling when it
is supposed to be rising. Make sure that the supply of gas is adequate.
“E-5” The roaster is programmed to turn itself off and flash this code if the temperature rises when it
should be falling. It indicates the presence of a fire. A fire could result from dramatically overfilling the
roaster chamber, or failing to clean the chaff collector.
OTHER POTENTIAL PROBLEMS:
“The roast is taking forever.” Time it and make sure that it’s taking over 23 minutes to roast and cool the
coffee. If it is, then either you have under filled the roasting chamber, or the beans are of an unusual type
whose density or moisture content make them unroastable in our machine, or the there is a problem with
the gas being supplied to the roaster. If you can’t clear it up, give us a call If you are at an extreme
altitude, we may have to adjust the orifice size of your roaster.
‘DO NOT SPRAY AEROSOLS IN THE VICINITY OF THIS APPLIANCE WHILE IT
IS IN OPERATION’.
Complete user manual.qxd
22/9/10
13:18
Page 13
“The roasts aren’t coming out the same.” Make sure you are putting the same amount of coffee in the
roaster each time. Also, keep in mind that big variations in the ambient temperature may cause some
slight variation in the colour of the finished beans. Also, you will have to keep in mind that different kinds
of coffee will roast differently, because of varying density, size and moisture content.
7. IF YOU NEED HELP
If you have done your best to work out a problem or a question, but just don’t seem to be able to solve it,
we’ll be glad to help. First, try our tech support system through our email address at [email protected].
We will get back to you via e-mail within 24 hours. As an alternative, you can call our office at 1800 787
738 and we’ll get someone in touch with you as soon as possible.
8. REPLACEMENT PARTS
A number of replacement parts are available through GREEN BEAN, including new glass roasting
chambers, new chaff collector screens, control boards and some other items. Contact us, for price and
availability.
9. WARRANTY INFORMATION
GREEN BEAN warrants GREEN BEAN Coffee Roaster against defects in workmanship or materials for a
period of one year from the purchase date as follows:
1.
2.
3.
4.
If the product is determined to be defective, GREEN BEAN will repair or replace the product free of
charge.
If GREEN BEAN opts to replace the unit, the customer must ship the old unit back to
GREEN BEAN at his or her expense, using the box the replacement came in. If the unit is found to
be defective, GREEN BEAN will refund the shipping cost. If the unit is not defective, it will be
returned to the customer C.O.D., and the customer must cover all shipping costs.
This warranty does not cover replacement of the glass roasting chamber, the chaff screen or
gaskets.
This warranty does not cover problems brought about through damage to the machine through
incorrect installation or operator misuse.
Repair or replacement as provided under this warranty is the exclusive remedy of the purchaser.
GREEN BEAN shall not be liable for any incidental or consequential damages for breach of any express
or implied warranty on this product.
Complete user manual.qxd
22/9/10
13:18
Page 14
10. TECHNICAL INFORMATION
There are six models, at this time, of the Green Bean Coffee Roaster. They all have the same capacity - that
is, they will roast about 600 grams (models 1100, 1200 1300 & 1400), 1.2 kilograms (models 1500 &
1600) of green coffee per cycle. All of the machines will use about 350 watts of electrical power.
The four models are:
1. Model 1100 - Propane fired, 115 vac, 60hz
2. Model 1200 - Natural Gas fired, 115 vac, 60hz
3. Model 1300 - Propane fired, 240 vac, 50hz
4. Model 1400 - Natural Gas fired, 240 vac, 50hz.
5. Model 1500 - Propane fired, 240 vac, 50hz.
6. Model 1600 - Natural Gas fired, 240 vac, 50hz.
Units intended for 50hz usage will not operate properly on 60hz, and vice versa. Units intended for natural
gas could be dangerous if run on propane.
Units intended for propane will not operate properly on natural gas.
GREEN BEAN COFFEE
I N - H O U S E F R E S H LY R O A S T E D
Kirk Stuart
Managing Director
P.O. Box 4193
Macquarie Centre, North Ryde NSW 2113
Phone: 1800 787 738
Fax: 02 9436 4127
Mobile: 0412 87 87 38
Email: [email protected]
www.beans.net.au
Complete user manual.qxd
22/9/10
13:18
Page 15
GREEN BEAN COFFEE
I N - H O U S E F R E S H LY R O A S T E D
M A I N T E N A N C E
GREEN BEAN COFFEE
I N - H O U S E F R E S H LY R O A S T E D
Email: [email protected]
Web: www.beans.net.au
G U I D E
Complete user manual.qxd
22/9/10
13:18
Page 16
Complete user manual.qxd
22/9/10
13:18
Page 17
Complete user manual.qxd
22/9/10
13:18
Page 18
Complete user manual.qxd
22/9/10
13:18
Page 19
Complete user manual.qxd
22/9/10
13:18
Page 20
Complete user manual.qxd
22/9/10
13:18
Page 21
1300 (propane) and 1400 (natural gas)
1500 (propane) and 1600 (natural gas)
P.O. Box 4193
Macquarie Centre, North Ryde NSW 2113
Contact:Kirk Stuart
Phone: 1800 787 738
Fax: 02 9436 4127
Mobile: 0412 87 87 38
Email: [email protected]
www.beans.net.au
Complete user manual.qxd
22/9/10
13:18
Page 22
Complete user manual.qxd
22/9/10
13:18
Page 23
Installation
General Instructions
The appliance is to be installed only by an authorised person(s); in accordance with
the AS5601 / AG601 Gas Installations.
The appliance is designed and approved for commercial installations only.
Before installation, remove packaging and confirm the integrity of the appliance. If
the appliance is damaged in any way, contact the Distributor.
Ensure that the data plate shows the correct injector, test point pressure, and nominal
gas consumption for the type of gas labelled. These specifications should be as
tabulated below, if not contact Distributor.
Table 1 – Normal Burner Specifications (per burner)
Models
1300
1400
1500
1600
Gas Type
Propane
Natural
Propane
Natural
Injector Size
(mm)
1.70
3.5
1.95
2.1
3.7
Test Point
Pressure
2.52
0.96
2.52
1.00
0.96
Nominal Gas
Consumption
31.0
39.0
42.0
50.0
42.0
50.0
Overall Dimensions & Appliance Configurations
Table 2 – Appliance Configurations
Model
External
Dimensions
WXLXH
Total Flue
Dimensions
(mm) L X D
Number of
Burners
Total
Nominal Gas
Consumption
(MJ/h)
Net Weight
(kg)
1300
290x490x670
1
31.0
23
1400
290x490x670
8000x100
150
(3 bend +
cowl)
8000x100
150
(3 bend +
cowl)
1
39.0
23
1500
332 x 522 x
765
1
50.0
42.0
35
1600
332 x 522 x
765
8000x150
(3 bend +
cowl)
8000x150
(3 bend +
cowl)
1
50.0
42.0
35
Complete user manual.qxd
22/9/10
13:18
Page 24
Figure 1 - Overall Dimensions (mm). (Models 1300 + 1400)
Figure 1 – Overall dimensions, models 1500 and 1600
Complete user manual.qxd
22/9/10
13:18
Page 25
Clearances
A minimum clearance of 76 mm shall be provided adjacent to combustible walls at
the side(s) and rear of the appliance.
The appliance shall be installed on a floor or bench, capable of supporting the
appliance.
A flue (exhaust) system shall be connected in accordance with AS5601 / AG601 and
allow for correct operation of appliance.
Flue system
Made of 100mm OR 150mm for models 1300 & 1400 OR 1500 and 1600 respectively
internal diameter double skin flue pipe, comprising of a maximum of 4pipes of
1500mm length; 2pipes of 900mm length; 3 elbows and a standard flue cowl (Type:
A&B Flue Cowls –100mm AGA Approval No 4198).
Gas Connection
The Gas inlet Connection is a 1/2” BSP male thread (located at the rear left hand side
at back of the appliance.)
Gas Valve
The gas valve is a Robertshaw, provided for natural gas and propane appliances, for
setting and adjustment of gas pressure. Refer to table 1 in these instructions, and
Appendix B in the Appliance Specifications.
Pressure Test Point
A pressure test point is provided at the Robertshaw, gas valve outlet side. (See Figure
2 in these Instructions, and Appendix B of Specifications). The appliance test point
pressure should be checked as follows:
1. Remove the rear perforated panel on back of appliance, to gain access to the
gas valve and pressure test point
2. Remove the pressure test point screw and connect a manometer to the pressure
test point, using silicon tubing.
3. Run the appliance main burner (Refer to Lighting Instructions in Operation
Section).
4. Check the test point pressure with the appliance burner on. The test point
pressure should be 0.96 kPa for natural gas, and 2.52 kPa for propane gas. If
not, adjust the pressure at the appliance gas burner pressure screw, at the side
of the gas valve inside the appliance using the special crew driver provided in
the tool kit of appliance)
Complete user manual.qxd
22/9/10
13:18
Page 26
Complete user manual.qxd
22/9/10
13:18
Page 27
Complete user manual.qxd
22/9/10
13:18
Page 28
Complete user manual.qxd
22/9/10
13:18
Page 29
Complete user manual.qxd
22/9/10
13:18
Page 31