1
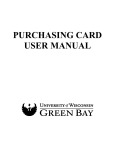
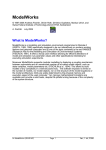
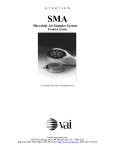
IPFW DIVISION OF CONTINUING STUDIES
Using the IPFW Polycom Room System
Distance Learning
Equipment
User Manual
Table of Contents
Interactive Video Instruction- An Overview ....................................................... 1
Basic Equipment Overview .................................................................................... 1
Operating Video Conference Equipment............................................................. 2
Using the AMX Touch Screen..................................................................... 2
Placing a Video Call ....................................................................................... 3
Ending a Video Call....................................................................................... 4
Adjusting a Camera........................................................................................ 4
Muting Audio.................................................................................................. 4
Sending Other Video to Your Students...................................................... 5
Making Eye Contact with Remote Audiences ........................................... 6
Using the Document Camera....................................................................... 6
Additional Equipment................................................................................... 7
Using the DVD Player ........................................................................ 7
Using the VCR ..................................................................................... 7
Sending Your Computer Image ................................................................... 7
Instructional Strategies for Interactive Video ...................................................... 8
Other Resources for Distance Learners.............................................................. 10
Contact Information
IPFW Division of Continuing Studies
2101 E Coliseum Blvd.
Fort Wayne, IN 46805
Phone: 260.481.6111
Fax: 260.481.6949
For More Information:
http://www.ipfw.edu/dcs/dlearn
http://videoinstructor.pbwiki.com
IPFW Learning Resource Center
2101 E Coliseum Blvd.
Fort Wayne, IN 46805
Sandy Schaufelberger
ACELINK Project Coordinator
Phone: 260.481.0747
Email: [email protected]
Leslie Raymer
Director of Credit Programs
Phone: 260.481.0616
Email: [email protected]
Lee Peitzman
Two-Way Video Support
Phone: 260-481-6524
Email: [email protected]
Saw Kapaw
Phone: 260-481-6184
Email: [email protected]
Created 25 September 2006
Last Updated 15 March 2007
Interactive Video Instruction –
An Overview
Indiana University-Purdue University Fort Wayne
(IPFW) has designed several state-of-the-art
Distance Teaching Rooms on the Fort Wayne
campus and at our Warsaw Center. These specially
equipped rooms have two-way videoconferencing
equipment, special audio and video enhancements,
as well as a wide array of peripherals that allow
faculty to integrate their existing technology with
instruction via two-way video. There is also a PC,
printer, fax machine and phone in each teaching
center. Faculty can also connect their own laptop
to the equipment if desired.
Kettler Hall, Room 227
All videoconference and Distance Education activities take place across the Internet
using the H.323 protocol.
IPFW’s Learning Resource Center staff is responsible for supporting the distance
learning equipment and helping faculty who teach in these classrooms. They typically
make all of the video connections for scheduled classes, and they remotely monitor call
quality and troubleshoot problems as needed.
The Center for the Enhancement of Teaching & Learning (CELT) can work with
faculty to develop or alter instructional strategies for the interactive, two-way
audio/video medium.
Basic Equipment Overview
IPFW’s electronic teaching equipment can all be
operated from a single AMX Touch Screen, which is
located on the podium in each multimedia classroom.
Users can project an image from a computer,
document camera, VCR, DVD, or other external
device (laptop, camcorder, etc.). The computer in the
room can be used to connect to the Internet and to
retrieve files and folders stored on the network or a
USB drive. The room also comes equipped with
tabletop area microphones and a lapel microphone.
1
Operating Videoconference
Equipment
The interactive videoconferencing equipment used by IPFW
is provided by Polycom. There is an audio/video CODEC
(coder, decoder) in the electronic equipment rack of the
teaching station. The Polycom should be operated through the AMX Touch Screen.
Using the AMX Touch Screen
Look for the Touch Anywhere to Start command on
the screen.
Select Distance Learning--Local Instructed.
This selection will activate the LCD projectors and turn
on all of the electronic equipment in the room except the
document camera. You can turn on the document
camera if needed using the power switch on the device.
2
The following electronic devices can
be controlled from this panel:
9 Personal Computer or
Laptop
9 DVD player
9 VCR player
9 Document Camera (Elmo)
9 Instructor camera
9 Student camera
9 Far site PC
9 CODEC (Polycom)
This is the main control panel for distance learning classes. To operate any
electronic equipment, push the appropriate button.
Push the CODEC button to operate the Polycom two-way video equipment. It will
bring up the Video Call Control Screen. If your call has already been established by the
LRC staff, then you can use this screen to Mute your microphone, control your
camera, reconnect a dropped connection, and more.
Placing a Video Call
There are two options for placing a video call from this
screen:
Use the Directory
a. Press Directory on the Touch Screen to bring up
the preformatted Address Book.
b. Find the site you want to call by using the arrow keys
on the Control Panel to scroll to the name.
c. Use the alphabet tabs to move through the Directory and scroll to the name you
want to call.
d. Press the Call button to activate the connection.
Entering a Number (Address)
a.
The most direct method for calling another site is with the entry of an IP address
using the address window and the numeric keypad. The numeric keys can be used to
3
enter numbers, decimals and delete characters. By pressing
any of the numeric keys it will enter the selected number.
b.
Press the Call button on the Control Panel or
remote to activate the connection.
Once the far site number has been identified, you “call” the
site by pressing the Call button on the Touch Screen.
User Tip
An IP address is a series of numbers, such as: 149.164.27.85. This unique address identifies a
specific piece of equipment available for your connection via the Internet. These addresses will
usually contain four sets of numbers, separated by a “dot”.
Ending a Video Call
Press Hang Up button on the Touch Screen to end a
connection.
Adjusting a Camera
In a point-point conference, you can control the remote (far)
site's pan-tilt-zoom camera. You can also select the remote site's
camera presets.
From the Touch Screen panel:
a. Press the "Far" button on the Video Control Panel.
b. Press the left/right/up/down or zoom +/- buttons to move the far camera.
Or, press a number button to choose a camera preset.
c. Press the “Near” button to return control to your location (near).
d. Press Zoom on the screen or remote to zoom in or out.
Muting Audio
Press the Mute/Privacy button in the center of the control
to mute the sound in your classroom. This will prevent noise
from causing problems at other sites in the call. The
appropriate protocol is to have your microphone muted unless your site is actively
engaged in a conversation.
This symbol shows that the far site’s audio has been muted. It
typically will appear in the lower left corner of the monitor/screen
you are watching. You will not be able to turn off the Mute
feature from your location.
4
User Tip
Many instructors use the Document camera to inform the far site that their microphone
is muted. Lay a white piece of paper under the document camera with instructions to
“Turn on your microphone.”
Sending Other Video to Your Students
You can use the Touch Screen to send other video sources to your far site
audience. Press the corresponding button to send the video source to your
remote audience.
Use the Instructor Camera and Student Camera options to select which view of
your room is shown to your far-site audience. In most IPFW video instruction
rooms, the Instructor Camera refers to the camera on a wall opposite the
presentation station.
The default image is the Instructor behind the podium. The
Student Camera view typically is located on a wall behind the
podium, and this will send an image of your students to the
far site.
Student View Camera
Instructor View Camera
5
Making Eye Contact with Remote Audiences
One of the most difficult adjustments to teaching in an interactive video
environment is making eye contact with your far site audience. You must look into
the Instructor view camera to connect with your remote students. If you have
students in both locations, you’ll need to balance looking at each site as much as
possible. It’s also important to instruct your local audience to look into the
Student View camera when they want to make eye contact.
Special Note – Student View: The table top microphones in IPFW’s classrooms
are programmed to activate pre-set camera positions when students push down to
talk. Students must press and hold down on the “Push to talk” button when
speaking to a remote audience. The Student View camera will automatically zoom
into the area of seats around the speaking student(s).
User Tip
If a student at either location will be making a special presentation, you can make
arrangements to have them stand as close to the camera as possible.
Using the Document Camera
The document camera can be used as a white board
or item projection space in a videoconference. To
send the Document Camera as a video source to
your far site audience, press the Document
Camera button on the control panel.
This panel can be used to adjust the image on your
camera—zoom, focus, and lighting. To use the surface
as a white board, write or draw on the plain white paper
provided by IPFW and lay it on the camera surface. DO
NOT use markers that can bleed through the paper.
To switch the video source back to Instructor or Student camera, press the
Instructor or Student camera button on the control panel.
User Tip
Use the document camera to display graphs, charts, pictures, etc. and zoom in as
large as possible for your remote audience.
6
Additional Equipment
You can show a DVD or VCR movie to your remote
audience using the equipment in the cabinet behind the
presenter station. This cabinet contains the Polycom
CODEC, VCR and DVD players, a DVD recorder,
audio controls, and more.
Using the DVD Player
You can send a DVD movie to your remote audience
by pressing the DVD Player button on the AMX
Touch Screen. This panel will give you normal
controls for the DVD.
Using the VCR
You can send a VCR movie to your remote audience
by pressing the VCR Player button on the AMX
Touch Screen. This panel will give you normal
controls for the VCR.
Sending Your Computer Image
Use the Resident PC button to send an image from the
personal computer to your far site. This includes
PowerPoint, Internet sites, or any other image you have
saved on the screen. If the image on your computer screen
doesn’t switch automatically, then use the Graphics Send
On/Off button.
If you plan to use PowerPoint for your lectures, then you should also make a
printed copy available to your students through your WebCT account or e-mail.
This will also provide an opportunity for students to review information or get
materials they missed if they are not able to attend a lecture.
7
Instructional Strategies for
Interactive Video
The following tips are offered to improve interaction with remote
locations/students:
9 Introduce everybody right away. Include remote site facilitators and/or
support staff.
9 Remind students that audio delays of one to two seconds are common, so
they should avoid interrupting and use visual cues (like nodding) instead of
verbal affirmations.
9 Assume when you walk in the room that you are on camera and that the
microphones are live!
9 Outline the ground rules before you start. Talk about microphone
courtesy, about how others can see you even if you can’t see them, and
about the need for face-to-face manners.
9 The speaker should identify him/herself and location whenever talking to
the group.
9 The instructor should acknowledge that a question has been asked and
repeat it if needed for all sites to hear.
9 After a question has been asked, acknowledged, and then answered,
confirm the answer.
9 Regularly acknowledge participants at remote sites.
Conferencing Etiquette
9 As you direct your comments around the room, remember there are
people in the room on the other side of the camera.
9 Be aware that microphones need to be turned off (mute) unless someone
at your site is speaking. If they are left on (check for red light) this will
create annoying background noise that could literally ruin the class.
Presentation Tips
9
9
9
9
Be prepared.
Relax and enjoy yourself.
Involve students.
Movement
o Be animated
o Use hand gestures
o Be mindful of facial gestures
o Move slowly because there is a slight delay in a videoconference.
8
9 Maintain as much eye contact as possible both with the camera and people
in your homeroom (if any).
9 Speaking
o Project your voice. Speak slower. Speak clearly. Repeat comments
if audio freezes temporarily.
9 Pacing
o Maintain active interest with those at the remote site
o Use a variety (every 15 minutes, or so) of instructional activities
o Employ a variety of visual materials
o Vary your pace
9 Your Appearance
o Wear clothing that’s comfortable (physically and mentally)
o Pastel or neutral colors seem to be preferable
o Keep jewelry and accessories to a minimum
o Don’t wear more makeup than you normally do
9 Don’t talk about a document if the people at the remote sites don’t have a
copy of it.
9 Identify the important components of your material.
9 Make sure people at remote sites can see you at regular intervals.
9 Don’t be a talking head. Do be creative.
9 As you present, keep an eye on the monitor for clarity of visuals.
Designing Visuals for Interactive Video
Whether you design your visuals using Microsoft PowerPoint or put them on
paper to display with a document camera, the principals of good design still apply.
Here are some useful and practical tips:
9 Use large, bold fonts
9 Use phrases with bullets
9 Use landscape mode for layout (horizontal)
9 Use colored paper & ink (if using the document camera)
9 Use graphics to create visual impact and plan to triple the visuals you
normally use in a face-to-face classroom
9 Clear the slide transitions and animated graphics you normally use. They
do not transfer well in an interactive video mode.
9
Other Resources for Distance
Instructors
The Center for the Enhancement of Learning and Teaching (CELT)
promotes excellence in teaching and learning by encouraging the creation and
sharing of knowledge. CELT has three major service components: faculty
development, support for teaching with technology, and media production. CELT
staff is available to assist faculty with modifying instructional materials and
adjusting pedagogy for interactive video instruction. For more information, see
their website at http://www.ipfw.edu/celt/.
WebCT Vista is available to all IPFW faculties for course management. If you are
not familiar with WebCT, you can access faculty tutorials with your IPFW user
name and password.
The Division of Continuing Studies has created an online student orientation
presentation which you can view at http://www.ipfw.edu/dlearning/orientation/.
There's also an online distance learning blog at the site.
Contact Information Technology Services (ITS) if you have network account or
access questions. They also provide training and support of software for faculty.
They are located in Kettler Hall, room 206, or by phone at 260-481-6030. You can
also visit their website at http://www.its.ipfw.edu.
Contact the Walter E. Helmke Library for assistance with online resources for
teaching and learning. They can be reached at 260-481-6505 or at
http://www.lib.ipfw.edu. They also have excellent online resources on several
information literacy topics, such as plagiarism, copyright, doing online research,
judging website credibility, etc. These and many more resources are found in the
How Do I section.
The IPFW Learning Resource Center (LRC) provides a wide variety of media
production services. Its staff of artists, photographers, videographers, and
technicians create high quality instructional graphics, print materials, slides, and
videos. The LRC is responsible for 3 videoconferencing sites and an interactive
classroom in support of video-based distance learning programs. The LRC web
site has more information at: http://www.ipfw.edu/lrc/.
The Learning Resource Center maintains the multimedia classrooms in Kettler,
Neff, Science, Classroom Medical, Engineering & Technology, and the Gates
Center. The LRC will also deliver audio-visual equipment to other classrooms.
You may schedule this service 2 days in advance by emailing
[email protected].
10