1
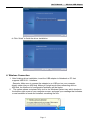
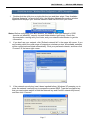
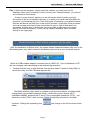
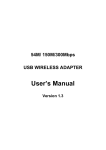
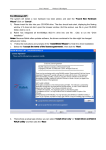
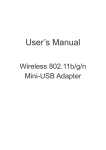
54M/150M/300Mbps USB WIRELESS ADAPTER User’s Manual Version 2.0 User’s Manual Wireless USB Adapter 1. Introduction Thank you for purchasing the IEEE 802.11b/g or 802.11n Wireless USB Adapter. This Wireless Adapter is easy to use and easy to setup. If you have been tired of dealing with all those messy wires to connect a laptop or PC to office or home network, this Wireless adapter is an ideal access solution for wireless Internet connection. A typical Internet access application for the USB wireless adapter is shown as the following figure: There are two different ways to access Internet: 1. With a wireless adaptor, receiving and transferring signal via a wireless router, then passed to an ADSL modem, then to local ISP (Internet service supplier) through a telephone line. 2. With a wireless adaptor, receiving and transferring signal via local AP (Access Point) or so called Hotpoint directly. Tips: An 802.11 LAN is based on a cellular architecture where the system is subdivided into cells, where each cell (called Basic Service Set or BSS) is controlled by a Base Station (called Access Point, or in short AP). 2. Package Contents: One 54 Mbps 802.11b/g or 150Mbps or 300Mbps 802.11n USB Wireless Adapter. Adapter Installation disc. User’s Manual. Antenna (optional) Warranty The warrants for the end user (“Customer”) that this hardware product will be free from defects in workmanship and materials, under normal use and service, for twelve (12) months from the date of purchase from its authorized reseller. Information in this document is subject to change without prior notice. Page 1 User’s Manual Wireless USB Adapter 3. Installation To install the driver of the USB adapter, please use administrator user account to login before the following steps: Tips: the latest original drivers can be down loaded from the website of Ralink chipset manufacturer. The current website is http://www.ralinktech.com/en/04_support/support.php?sn=500 To find a correct driver, please identify the chipset type applied in the adapter you have. For Windows 7: Once the wireless USB adapter be plugged into an USB port, the following message will appear on screen. For Windows XP: The system will detect a new hardware has been added, and start the “Found New Haerdware Wizard”. Click on “Cancel”. 1. Please insert the disc into your CD-ROM drive. The disc should auto start, dispaying the follwing window, If it does not start due to the system setting, open the browser window, find the autorun.exe file in your CD-ROM folder, click to run it. 2. Ralink has integrated all the 54Mbps 802.11b/g ,150Mbps or 300Mbps 802.11n driver into one file. Click to run the “Driver Installation” Notes: Because Ralink often updates software, the drivers contained in the disc might be changed without prior notice. 3. Follow the instructions and prompts of the “InstallShield Wizard” to finish the driver installation: a. Select the “I accept the terms of the license agreements”, then click the “Next”. b. There shows a setup type window, you can select “Install driver only” or “Install driver and Ralink WLAN utility” and then click the “Next”. Page 2 User’s Manual Wireless USB Adapter Tips: 1).The Windows XP utilizes a "Wireless Zero Configuration( WZC)" Service built into the operating system. Many wireless network adapter cards utilize this service. 2). Ralink- the chipset manufacturer has developed a utility for setting up wireless connection. If you select this item, you can switch between the Windows XP’s WZC service and the Ralink WLAN utility service later. c. Click the “Install” to confirm the installation, there shows the installation progress. Page 3 User’s Manual Wireless USB Adapter d. Click “finish” to finish the driver installation. 4. Wireless Connection 1. After finishing driver installation, insert the USB adapter to Notebook or PC that supports USB 2.0/1.1 interface. Remarks: Make sure to connect the adapter to an USB port on your computer directly rather than an USB hub. Although it might work when connecting with an USB hub, the likelihood of configuration problems will be higher. 2. The system shows a wireless utility icon in the Windows system tray, which locates in the bottom-right corner of your computer screen, and pops up a message that indicates a new hardware is found and installed, something like this: Page 4 User’s Manual Wireless USB Adapter Should the service " Wireless Zero Configuration ( WZC)" be applied. 1. Double-click the utility icon or right click the icon and then select “View Available Wireless Networks” to launch the utility, the Wireless Network Connection window appears and displays your wireless network listed with the SSID you chose. Notes: Before configuring your WiFi access, you need to have your network’s SSID (service set identifier), security key and authentication type handy. Check the documentation coming with your router, ask your network administrator to get the information. 2. If you don't see your network, click “Refresh network list” in the upper left corner. If you are locating within the valid range of hotspots or wireless routers, all available networks will be recognized and listed automatically. Click your preferred network, and then click “Connect” in the lower right corner. 3. If the network security key hasn’t been inputted before, Windows XP prompts you to enter the network’s security key to access the wanted SSID. Type the encryption key that you wrote down earlier in both the Network key and Confirm network key boxes, and then click “Connect”. Page 5 User’s Manual Wireless USB Adapter Tips: If there are free hotspots, simply select the network you want from the list displayed, then click Connecting. It tries to launch your Internet browser—you should be connected to the Internet. If there is a pay hotspot, signing in or up will require either to enter your login information-if you‘re an existing customer, or to enter your credit card information for payment, it is just decided by you. Then clicking the Connecting, your default Internet browser will launch and take you to the service provider’s login page. Most providers have very simple and step-by-step instructions for you to sign up and then to be connected. Another way to access the service provider’s login page is to simply launch your Internet browser, if there’s a pay network available, you’ll be taken directly to the login page. Should the service of Ralink wireless connection utility be applied. After the installation of Ralink utility, the system shows a special wireless utility icon in the Windows system tray, which locates in the bottom-right corner of your computer screen: When an USB wireless adapter is inserted into an USB 2.0/1.1 port of Notebook or PC, the icon changes colors according to the wireless signal quality. 1. Double-click the icon or right click the icon and then select “Launch Config Utility” to launch the utility, the RaUI window appears like: The Ralink wireless utility starts in compact mode as shown above, provides profile management, the available networks listing, a statistical counter display, Wi-Fi multimedia (WMM), protected Wi-Fi setup, Cisco compatible extensions (CCX), call admission control (CAC), radio controls, Ralink driver/utility information, and help functions. Clicking the expanding icon below: Page 6 can change to the full mode as shown User’s Manual Wireless USB Adapter In this utility, there are two applications can be selected: the Station mode and AP mode. Station mode (client Mode) : It is the default access way, the USB wireless adapter servers as a client to access Internet through other router or AP. AP mode: It sets the USB wireless adapter as an AP, which allows the other users can connect to Internet through your computer. Before using the mode, it must be available that an existed Internet connection via wire Ethernet connection or by 3G wireless connection. Tips: Point thecursor to the Ralink icon located on bottom-right corner of your computer screen, right click the mouse, from the pop up list, you can select the station mode or AP mode. For more details about the RaUI utility, please read the help information of the utility by clicking the Page 7 tap. User’s Manual Wireless USB Adapter 5. Tips for Wi-Fi users With a Wi-Fi connection, you can roam about 150 m around the access point (depends on different environment), so find a spot where you can work without any interruption. Then see how much work you can do, such as: Easily and quickly receive and transmit files within your local network — no problem for big files. Access your email and surf the web with the same speed as that connected with network cables. Synchronize data between devices. Take advantage of wireless printing — send files directly from your laptop PC to a wireless printer over Wi-Fi connection. 6. Warning Wi-Fi offers greater speed and range than Bluetooth, but it drains your portable device batteries a lot faster than Bluetooth does. In fact, if you use a Wi-Fi connection regularly on your laptop PC, you'll undoubtedly notice that you need to recharge more often. If you need to conserve battery life — on a long trip for example — turn off your Wi-Fi connection when you don't actually need it. 7. Security Because wireless networks rely on radio signals to transmit data, they are not as secure as wire network. Wireless networks are susceptible to viruses and breaches like eavesdropping and need to be protected in order to be secure. There are many security measures to safeguard wireless networks, protect the data, and keep unauthorized users out. Hotspots, on the other hand, are often free of standard security practices in an effort to make it easy for anyone to connect. It may be found that some pay hotspots administered by service providers offer have some level of security, however, when using a hotspot, it’s always a good idea to be proactive and to employ security measures of your own. 8. Key terms Wi-Fi: Short for “wireless fidelity,” a generic label that refers to wireless networks or networking. Hotspot: A specific geographic location in which an access point provides public wireless broadband network services to mobile visitors through a WLAN. Throughput: The amount of data transmitted in a set amount of time. Bandwidth: the amount of data that can be carried from one point to another in a given time period (usually a second). Chipset: A group of microchips that execute various functions (like memory) to support the CPU. Page 8 User’s Manual Wireless USB Adapter 9. Specifications (Typical): Protocol and Standards IEEE 802.11b/g or 802.11n Interface USB1.1, USB2.0 Frequency Band 2.412~2.4835GHz (Depends on different countries’ regulation) For 802.11b/g: Peak rate 54Mbps, Peak throughput: 27Mbps. Data Rate For 802.11n 1T1R. Peak rate: 150Mbps, Peak throughput: 90Mbps 1T2R. Peak rate: 300Mbps, Peak throughput: Rx 160Mbps 2T2R. Peak rate: 300Mbps, Peak throughput: Rx 260Mbps Transmit Power (Typical) 802.11b: 19dBm; 802.11g:16dBm ; 802.11n: 15dBm. Data Security WEP 64/128 , WPA, WPA2, 802.1X Power Consumption It depends on different adapter models, there are two typical values: 330mA and 110mA in full Transmit (TX), 290mA and 95mA in full Receive (RX) Transmission Distance Indoor up to 100m, outdoor up to 300m (Standard transmission distance, it is affected depending on different environment). Environment Operating Temperature: -10°C~60°C Storage Temperature: -20~80°C Operating Humidity: 10%~90% non-condensing Storage Humidity: 5%~95% non-condensing Operating System It supports : Windows XP/Vista/7,RT3x7x chipset supports Windows 2000; (Win CE driver to be offered upon special requirement); Mac OS X; Linux (Android, Soft_AP, WPS driver need to be specially applied for) Page 9