1
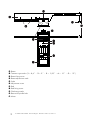
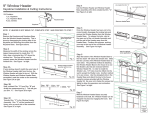
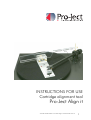
INSTRUCTIONS FOR USE Cartridge alignment tool Pro-Ject Align it © Audio Trade GmbH · Pro-Ject Align it · Revision 2013.3.15 1 Beam Tonearm type marks (1 = 8,6’’ - 2 = 9’’ - 3 = 9,35’’ - 4 = 10’’ - 5 = 12’’) Beam fixing screw Beam adjustment mark Scale Adjustment screw Rod Rod fixing screw Overhang marks Base with spindle hole Mirror 2 © Audio Trade GmbH · Pro-Ject Align it · Revision 15.06.11/15.07.11 Assembly Slide the beam into the groove in the base from the right (see diagram). Make sure that the beam fixing screw is loosened far enough to allow the beam to move easily. Using the tool Loosen the rod's fixing screw and remove the rod from the beam. Place the tool on the turntable platter so that the hole in the base fits over the record spindle. Re-fit the rod in the beam . By sliding the beam to and fro adjust the cup on the end of the rod until it covers the tonearm's upper bearing. After making sure that the base is flat on the platter, fix the rod's position by tightening the fixing screw . By reversing the rod so that the pointed end is downward the tool may be used to establish the vertical axis of Pro-Ject 8.6, 8.6s, 8.6 UniPivot and other manufacturer's tonearms. Adjusting for tonearm length (1" = 2,54cm) Make sure that the beam adjustment mark lines up with the tonearm type marks (1 – 5) on the beam. Now adjust the beam and its guide using the adjustment screw until its edge aligns with the uppermost line of the scale . Adjust the scale (1/3 – 5) to the mark given in the following table appropriate to the Pro-Ject turntable type: 1 For 0.5, 1, 1.2, 1.2 E, 1.2 Comfort, 1.9, RPM 1.3, Essential, Debut, Debut Carbon, Juke Box, Xpression, Xpression Comfort and models equipped with a 8,6" tonearm 2 For 6, 6.1, 6.9, Xperience, 2.9 Wood, 2.9 Classic, Perspective, PerspeX, RPM 4, RPM 5, RPM 5.1, RPM 6, RPM 6 SB, RPM 6.1 SB, RPM 9, RPM 9 Acryl (X), RPM 9.1, RPM 9.1 Acryl (X), RPM 9.2 Evolution, Studie and models equipped with a 9" tonearm 3 For 2 and models equipped with a 9.35" tonearm 4 For RPM 10, RPM 10.1 Evolution, Xtension 10 Evolution and models equipped with a 10" tonearm 5 For Studie, Xtension 12 Evolution and models equipped with a 12" tonearm After adjusting the scale, fix the beam's position by tightening the fixing screw . Cartridge alignment Mount the cartridge under the headshell. Tighten the screws only enough to just fix the cartridge. Now adjust the downforce approximately to the manufacturer's recommendation. Check the tonearm height adjustment and adjust if necessary. Both tasks are described in the instructions supplied with your Pro-Ject record player. Adjust the cartridge fore and aft using the elongated holes in the headshell so that the needle rests on the correct overhang mark for the tonearm type (1 – 4) when the arm is lowered. Now align the front edge of the cartridge to make it parallel to the lines which run the length of the base. This adjustment is easier to perform if a thin propelling pencil lead is attached with sticky tape to the front of the cartridge (provided that this has a flat front edge). Please remember to fasten the cartridge mounting bolts tightly after completing adjustment. Check the adjustment again after tightening the bolts. Adjusting azimuth Loosen the grub screw which fixes the tonearm tube in position as explained in the instructions for use accompanying your Pro-Ject record player. Lower the arm with the lift so that the needle comes to rest in the middle of the tool's mirror . Now revolve the tonearm until the needle is perpendicular to the mirror's surface or until the cartridge's bottom edge is parallel to it. Re-tighten the grub screw. Re-check all adjustments and repeat the procedures if necessary. PRO-JECT is a Registered Trademark of H. Lichtenegger. The information was correct at the time of going to press. The manufacturer reserves the right to make This guide was produced by: Audio Trade GmbH changes to the technical specification without prior Copyright © 2006. All rights reserved. notice as deemed necessary to uphold the ongoing process of technical development. © Audio Trade GmbH · Pro-Ject Align it · Revision 2013.3.15 3