1
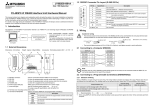
Nexus 1500+ Meter
®
I/O Option Card Quickstart Guide
Installation Steps
The Option cards are inserted into their associated Option card slots in the back of the
meter. See the note on the next page for Option card slot assignments.
IMPORTANT! Remove Voltage inputs and power supply to the meter before
performing card installation.
IMPORTANT! Supprimer les entrées de tension et l'alimentation au compteur avant
d'effectuer l'installation de la carte.
I/O Card Guide Track
Slide I/O card in track
I/O Card Guide Track
1. Remove the screws at the top and the bottom of the Option card slot covers.
2. There is a plastic "track" on the top and the bottom of the slot. The Option card fits
into this track.
CAUTION! Make sure the I/O card is inserted properly into the track to
avoid damaging the card's components.
3. Slide the card inside the plastic track and insert it into the slot. You will hear a click
when the card is fully inserted. Be careful: it is easy to miss the guide track. Refer
to the above drawing.
Refer to the meter’s User Manual for instructions on configuring the I/O Cards.
Electro Industries/GaugeTech
The Leader In Power Monitoring and Smart Grid Solutions
Doc# E154708
V.1.03
QS-1
NOTE: Refer to the following table for Option card slot assignments. If the card is not
recognized or does not work properly, make sure that it is inserted into the correct
slot.
I/O
Option
Card
Slot 1
Slot 2
Slot 3
Slot 4
485P: Pulse
Output/
RS485
Yes
No
No
No
NTRJ: RJ45
or
NTFO:
Fiber Optic
No
Yes
No
No
6RO1:
Relay
Output
No
No
Yes
Yes
16DI1:
Digital
Input
No
No
Yes
Yes
Nexus® is a registered trademark of Electro Industries/GaugeTech. The distinctive shape, style, and overall
appearance of the Nexus® 1500+ meter is a trademark of Electro Industries/GaugeTech.
Electro Industries/GaugeTech
The Leader In Power Monitoring and Smart Grid Solutions
Doc# E154708
V.1.03
QS-2