1
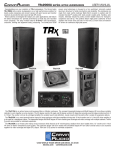
c
TRx3210 Line Array
Turnkey Systems
Made in USA
User Manual
76-03210D 091212
TRx3210 Line Array
Table of Contents:
Introduction ............................................................. 3
Unpacking ................................................................ 3
Concept ..................................................................... 3
Specifications............................................................ 4
The Line Array Effect - ........................................... 5
Pure Path Horn Lens and MF/LF Drivers
Safety - Stacking and Flying .................................. 6
Ground Stacking ...................................................... 7
SureFly™ Rigging
- Assembling an Array ...................................... 8-11
- T-Bar Hang Points ..............................................12
- Transportation.....................................................13
Amplification & Wiring
- Biamp....................................................................14
- Pin Flip/Mode Switch .........................................15
- Full Range Passive ...............................................16
- Processing and tuning .................................. 17-19
Amp Rack Packages ..............................................20
Accessories .............................................................21
Warranty .................................................................21
System Packages .............................................. 22-23
2
Introduction:
Congratulations on purchasing a TRX3000 Series loudspeaker from Carvin Professional Audio Products. The
TRx Series are designed to give you the best in audio quality and many years of reliable, trouble-free operation.
It offers excellent pattern control, simple ground stacking design as well as easy over-head suspension with
safe and practical rigging hardware, superior audio quality, full technical documentation, and the backing of a
world-class company with over 66 years of manufacturing experience and technology including a comprehensive warranty. Please read through this user manual carefully before you attempt to operate the loudspeaker
system. It contains valuable information which will enable you to easily and quickly connect the loudspeakers
along with important system set-ups, stacking and flying instructions.
Thank You
There are many options in the market place today for loudspeaker products and we thank you for choosing
Carvin Professional Audio Products for your loudspeaker choice.
Carvin professional audio products are proudly engineered and manufactured in San Diego, California, USA!
If you would like additional information about this or any other Carvin product, please contact us. Complete
and detailed product information is available on our web site.
Unpacking
Upon unpacking the unit, please check carefully for damage. If damage has occurred, please notify the delivery
service at once. You, the consignee, must handle any claim. Please retain packaging in case of future re-shipment.
TRx Line Array Concepts
Pulling from our TCS Audio engineering, Carvin has produced a modular line array loudspeaker system that
is very adaptable to almost any performance venue. Not every scenario requires a flown PA system. So with
that in mind, the TRx3210 Line array loudspeaker can easily be stacked or flown.
A new loudspeaker system can be an expensive investment. With the TRx3210 system, Carvin offers an extreme value allowing an affordable solution.
c
800.854.2235 carvinproaudio.com
USA contact: Tony Mirador
Office: 800.403.4484 x114
[email protected]
International contact: Joel Kiesel
Office: 760.522.5676
[email protected]
12340 World Trade Dr., San Diego, CA 92128
3
TRx3210 Specifications
TRx3210F - with SureFly™ hardware pre-installed
System Type: Dual 10-inch 3-Way, Reflex
Frequency Response: 70 Hz – 18.5 kHz (-10DB)
85 Hz – 16 kHz (-3 dB)
Coverage Pattern: 100˚ H x 10˚ V (single enclosure) Frequency Response
Crossover: 3-Way Quasi
Speaker Guard™ HF protection
Crossover Frequencies: 500Hz & 1.5 k Hz
Sensitivity (1w @ 1m): 98dB
Maximum SPL: 131dB Peak single enclosure
137dB Peak four enclosures
140dB Peak eight enclosures
LF Driver: 2x 10-inch 2-inch VC
TRx3210 Rear Plate
HF Driver: 2x 1-inch exit 1.75-inch VC
Nominal Impedances (Continuous/Program/Peak)
Full range: 8 ohms 500w /1000w /2000w
Bi-amp LF: 8 ohms 500w /1000w /2000w
Bi-amp HF: 8 ohms 120w /240w /480w
Enclosure: 13-Ply Russian Baltic Birch
Suspension/Mounting: 14 captive 3/8in-16 nut fly pts.
Two 1-3/8 pole mount cups
Finish: Black DuraTec™
UV, water resistant IP2
Transport: 2 Recessed Handles
Grill: Black powder coated steel
Dimensions
Acoustically Transparent Foam Backing
Connectors: Two 4-pin TwistLoc connectors
600mm
[23,50in]
Dimensions (H x W x D): 11.8 in x 23.5 in x 14.75 in
300 mm x 600 mm x 374 mm
Net Wt: 52 lb (24 kg) without hardware
Maximum Fly Capacity: 16 Frequency Response
Made in USA
Block Diagram in Full Range Mode
HORN DRIVERS
HIGH PASS
FILTER
1+
12+
2-
EQ AND
MATCHING
SPEAKER
GUARD
+
+
-
-
+
MID / LOW
PASS FILTER
MID / LOW
DRIVER
1+
12+
2-
+
LOW PASS
FILTER
LOW
DRIVER
-
Ten TRx3210 hang with 4
straight and 6 set at 5 degrees
SureFly Hardware
Four TRx3210’s
Stacked on TRx1121
575mm
[22,63in]
375mm
[14,75in]
See pages 14-16 for full range - pin flip mode and
bi-amp configuration
Side of TRx3210
with and without
SureFly hardware
4-pin TwistLoc
285mm
[11,25in]
TRx3210 Rear Plate
600mm
[23,50in]
Block Diagram in Full Range Mode
No hardware
needed. Feet fit into
cabinet below
HIGH PASS
FILTER
1+
12+
2-
EQ AND
MATCHING
MID / LOW
PASS FILTER
SPEAKER
GUARD
HORN DRIVERS
+
+
-
-
+
MID / LOW
DRIVER
1+
12+
2-
LOW PASS
FILTER
+
LOW
DRIVER
-
Ten TRx3210 hang with 4
straight and 6 set at 5 degrees
4
SureFly Hardware
Dimensions
600mm
[23,50in]
Four TRx3210’s
Stacked on TRx1121
575mm
The Line Array Effect
Line Array with
J curve
The line-array effect is achieved by the 0 degree coupling of the
enclosures in the array. The inherent advantage of a line array
design allows the rear audience to hear nearly the same levels as
the front. The PurePath™ horn produces a tight 10 degree vertical
x 100 degree horizontal pattern on a single cabinet. Conventional
enclosures drop 6dB when doubling the distance to the listener.
However, when coupled in a line array this pattern narrows further to produce the line array effect, which drops only 3dB when
doubling the distance to the listener. This effect is also present with
the tight coupling of the 10-inch drivers in an 11.8-inch vertical box.
Linear Curve
Array
When the straight line of the line array is broken as in the case of
a “J” curve, the elements curved at the bottom of the array behave
more as a “point source” loudspeaker producing normal output to
the closer listeners.
The TRx3210 can be deployed in a full curvilinear array at 12.5
degrees of angle between elements. This produces a smooth “point
source” array covering 50 degrees of vertical and 100 degrees of
horizontal coverage with only four enclosures.
The PurePath™ Horn Lens and dual 10” Drivers
The PurePath™ Horn Lens is a one-of-a-kind design. This horn lens is CNC machined in-house from acoustically
non-resonant Eastern Maple hardwood, providing a very smooth, equal path length wave guide for pure, natural
and cylindrically projected highs. The two HF Mylar compression drivers feature a 1-inch exit and a 1.75” voice
coil. The PurePath™ Horn Lens places the HF drivers in proper phase alignment with the 10-inch drivers.
PurePath Horn Lens
dual 10” 250w drivers
IP2 UV & Water Resistant
Two 10-inch MF/LF drivers feature 2-inch voice coils and power handling of 250w per driver. They are treated
for IP2 UV approval, which is water resistant. These drivers are front loaded and field replaceable. The front
steel grills are foam backed for added protection from the elements and are easily removed for service access.
5
Stacking and Flying
Overview
To take full advantage of the extremely flexible properties of the TRx3210 system, two modes of rigging systems have been developed.
The first mode utilizes the interlocking feet and pole mounts and the second mode is using the optional SureFly™ hardware. The two rigging systems allow either line arrays or virtual point source clusters to be assembled – intuitively, quickly and easily, and with an absolute
minimum of additional external parts to suit the coverage requirements of a huge variety of professional sound reinforcement situations.
The second mode using the optional SureFly™ hardware is inherently safe, flexible, self-contained and simple to use. The load is taken
entirely through the SureFly™ hardware and not through the cabinet’s woodwork. The rigging design allows the creation of clusters and
arrays that can be assembled quickly and with a minimum number of crew, and with full control of the vertical angles between enclosures
and the overall cluster inclination.
Safety Notes on Rigging - Important Please Read!
The Carvin SureFly™ rigging system has been designed and constructed to a high standard of safety and tested to the most demanding
conditions. As a very first concern and in order to ensure the highest safety standards, the information following on the assembly and safe
use of rigging accessories must be carefully understood and followed. Every user that operates, suspends, or lifts a TRx3210 loudspeaker
system needs to be properly trained before ever constructing and deploying the system in a working situation.
Only use Carvin recommended rigging accessories, which are specifically designed for their intended purpose. Do not use Carvin SureFly™ rigging with other types or brands of loudspeakers. This practice may compromise safety standards and Carvin will not be responsible for damage or injury as a result.
Do not modify the rigging accessories, or use them in any other way than described in this user manual. Rigging components supplied
as part of a complete assembly are non-interchangeable and must not be exchanged with the component parts of any other assembly.
The component parts of Carvin SureFly™ rigging accessory must only be assembled using the fasteners and methods of assembly recommended in this manual. The use of fasteners and methods of assembly not specified or approved by Carvin may result in an unsafe
rigging assembly. Welding, or any other means of permanently fixing rigging components to each other or to cabinet fixing points, is not
recommended.
Rigging assemblies must only be assembled using the appropriate parts and fixings as specified in this manual using the specific mounting instructions. Rigging components or assemblies must only be fixed to Carvin loudspeaker cabinets using the cabinet fixing points,
assembly methods and fasteners specified in this manual and the specific mounting instructions.
Walls, floors or ceilings must be capable of safely and securely supporting the actual load.
The rigging accessory used must be safely and securely fixed both to the loudspeaker and to the wall, floor or ceiling.
When mounting rigging components on walls, floors or ceilings ensure that all fixings and fasteners used are of an appropriate size and
load rating. Wall and ceiling claddings, and the construction and composition of walls and ceilings, all need to be taken into account
when determining whether a particular fixing arrangement can be safely employed for a particular load. Cavity plugs or other specialist
fixings, if required, must be of an appropriate type and must be fitted and used in accordance with the makers instructions. Use only the
rigging accessory fixing holes indicated in this manual and the specific mounting instructions to fix Carvin SureFly™ rigging accessories
to walls, floors or ceilings.
Where specified, the recommended maximum torque settings for screw fasteners must be strictly complied with.
Secondary Safeties
Best practice dictates in addition to the principle load bearing means of suspension, that all loudspeakers flown in theaters, studios or
other places of work and entertainment should (and where local laws apply), be provided with an independent, properly rated and securely attached secondary means of safety. Only steel wire ropes or steel chains of an approved construction and load rating may be used
as secondary safeties. Plastic covered steel wire ropes are not permitted for use as secondary safeties.
Safety Inspections
Carefully inspect rigging systems components and cabinets for defects or signs of damage before proceeding to assemble a flown array.
If any parts are damaged or suspect, DO NOT USE THEM.
Regular and more rigorous test and inspection of rigging components must also be carried out. Safety legislation, and test and inspection
requirements, will vary from country to country. In most cases, annual independent test and inspection by a suitably approved and qualified inspector will be required. Users must ensure compliance with all applicable safety requirements. Carvin recommends regular safety
inspections and further recommends that a logbook be kept detailing the test and inspection history of each Carvin rigging Component.
Always wear protective head-wear, footwear and eye protection in accordance with local regulations. Anyone involved in flying ANY
sound system, especially in a touring capacity, should take note of the following advice:
“ The rigging of a flown sound system may be dangerous unless undertaken by qualified personnel with the required
experience and certification to perform the necessary tasks. Fixing of hanging points in a roof should always be carried
out by a professional rigging specialist and in accordance with the local rules of the venue. The house rigger and/or
building manager must always be consulted.”
6
Stacking Array without hardware
Each TRx3210 features durable feet and align to interlock without the need for additional hardware. This is
ideal for stacking on top of a ground-stacked subwoofer or elevated using two SS4 poles.
Stacking with hardware
The SureFly™ hardware can also be utilized for ground stacking. The
SureFly™ T-bar can be used as a base for a ground stacked array.
7
Assembling an Array
Assembly and deployment of TRx3210 arrays are carried out one array module at a time or in pre assembled
groups of array modules. After installing the SureFly™ hardware kit to each enclosure, attach the T-bar to the top
array enclosure. The TRx3210F comes with preinstalled SureFlyTRx hardware. Each subsequent enclosure can be
pinned at different angles to accomplish wide vertical coverage angles and focus sound energy where needed.
Tighten bolts to 20 ft lbs
Step 1 (skip with TRX3210F preinstalled hardware)
Installing the SureFlyTRx rigging kit.
Each enclosure will require one SureFlyTRx rigging kit. The kit includes all mounting hardware and quick release pins. Drilling into
the TRx3210 enclosure is not required. All mounting points on the
TRx3210 enclosure have threaded inserts.
Set all quick release pins aside. As shown in the diagrams, assemble
the side panels of the SureFlyTRx kit using the included bolts and
washers. Insert the adjustment plate in-between the two mounting
plates. The lower bolt will function as a hinge. Hand tighten the bolts
and insert the quick release pins as shown. Once the side plates are
aligned by installing the Quick Release Pins into the positions shown,
use a torque wrench to tighten the bolts to 20ft. lbs. Repeat this proceedure on the other side of the enclosure. After the SureFlyTRx
hardware has been installed on all enclosures, they may be stacked
4 high by making sure both side adjustment plates slide in-between
the mounting plates of the enclosure below. Store pins in the handle
area after installation.
Step 2
Installing the T-Bar
Attach assembled T-Bar to first (top) array enclosure.
At the same time lower side plates of the T-Bar
evenly into the SureFly hardware. Attach the T-Bar
side plates using the bolts, washers and nuts supplied.
Using a torque wrench, tighten the bolts to 40ft lbs.
The T-bar side plates must insert between the two
plates of the array module hardware. Align holes and
secure with the included four (2 per side) quick release pins into both (A) and (B) holes.
2.
1.
2.
2.
1.
1.
1.
2.
2.
2.
1.
1.
Tighten bolts to 40 ft lbs
1.
1.
2.
8
Step 3
Installing the Shackle
Attach rated 5/8” shackle to lug # 4. Note:
this position sets a basic starting point for a
straight vertical hang.
Straight Vertical Hang
Lug #4
1
5/8” Shackle
# TCSHK58
2
Shackle
3
Finger tighten
shackle only.
Do not use a
tool to tighten
GROUND
Straight Vertical Hang
Step 4
Adding additional enclosures
Attach a rated chain motor or hoist hook to the
shackle. Using
Lug #4the chain motor or hoist, lift asShacklearray module. Place
sembly up to clear another
1
2
3
an array module underneath the first array
module assembly and lower suspended array
module. As you are lowering, align so feet mate
with foot receptacles on top of lower array module. Side adjustment plates must insert between
the two plates of the array module hardware.
See Step 5 for adjustment plate.
Attach to motor hoist
GROUND
Quick Release Pin
Press the button on the top of the pin with thumb to
insert and remove pin.
GROUND
9
Pin Storage
The quick-release pins
can be stored in the
handles on the inside
of the SureFly hardware
plates on each side of
the array module. This
keeps them from being
misplaced or damaged
during transport and
holds the inner adjustment plate from swinging down.
stment plate swin
g
Adju
wn
s do
Step 5
Remove the lower quick-release pin from the handle storage location to release the adjustment plate.
Allow the adjustment plate to swing down between
the two side plates on the lower enclosure. Adjust
enclosures to allow adjustment plate to capture the
lower enclosure with hook on adjustment plate.
GROUND
When the adjustment plate is fully in place, the “A”
location pin can be inserted. Repeat on opposite
side of array enclosure.
close up view
Step 6
Push the second quick-release pin into forward
hole labeled (A 0˚) on the upper enclosure. Repeat
on opposite side of array enclosure. This 0 degree
position is used for a straight Line-Array. This is
also storage and transport position when using the
DB3210 dolly board.
10
Adjustment plate
hook captures
lower enclosure
GROUND
GROUND
Step 6 continued
If you require a J curve at the bottom of a long array or a curve array, adjust the pins on the lower enclosures to
create the desired curve. There are 6 different angles that can be achieved between each enclosure by changing
both pin positions. With the lower enclosure in the “A” position, the upper enclosure’s pin positions/angles are:
0, 2.5, 5 degrees. When adjusting angle pin, lower the front of the bottom cabinet to the desired angle.
0 degree Pin position
2.5 degree Pin position
5 degree Pin position
With the lower cabinet in the “B” position the upper enclosure’s angle pin positions/angles are: 7.5, 10, 12.5
degrees. Caution when adjusting pin “A” or “B”. Support the weight of the lower enclosure. Do not adjust pin
“A” or “B” with additional enclosures attached below. This pin locks the adjustment plate to the lower enclosure.
7.5 degree Pin position
10 degree Pin position
12.5 degree Pin position
11
T-Bar Hang Points
To change the angle of the array, attach the shackle to the different lug holes as shown in the below diagram. The
further back from center, a larger degree of forward tilt is achieved.
By using two hang points and two chain motor hoists, the angle of the array can be changed by raising or lowering the front or back of the array by adjusting the chain motors. This requires the use of a second shackle as
shown in the diagram below.
To chain
motor hoist
8˚
1-POINT
HANG
(4 CABS)
8˚
12
0˚
29˚
23˚ 26˚
12˚ 16˚ 20˚
To chain
motor hoist
To chain
motor hoist
1-PO
HA
(4 CA
2-POINT
HANG
8˚
DB3210 Transport Dolly Board
(optional)
The optional Baltic Birch/Duratec™ DB3210 transport Dolly Board allows a block of up to four TRx3210 speaker
cabinets to be conveniently transported in a pre-rigged configuration and is recommended as the most efficient
way to truck and handle the cabinets. The transport dolly board is wide enough to allow the lock pins to be inserted in the SureFly™ hardware while on the dolly board, which makes it possible to lift the block of four cabinets
together while still being dimensioned to fit up to five-across for a standard truck pack.
strap slots
13
Full Range or Bi-Amp Configuration
Trx3210 Enclosures can be configured either in full range/passive mode or bi-amped 3-way mode. They ship
from the factory as standard in full range/passive mode. Selecting from one to the other is as simples as flipping
a concealed switch on the connection panel.
Bi Amp Operation:
Remove rubber plug marked Full Range/ BiAMP from connection panel. Using a small flat-head screw driver, carefully
insert screwdriver into opening and slide switch to the right
for Bi-Amp operation. Note: Mode switch must always be
in the UP (normal) position for Bi-Amp operation. Replace
rubber plug after change.
Bi-Amp Hook-up
(NORMAL, BIAMP)
CARVIN XD360 OUTPUTS
HI
FREQ
MID
FREQ
LOW
FREQ
NORM
BIAMP
not required with DCMLx amps
THRU
INPUT
INPUT
(NORMAL, BIAMP)
THRU
BRIDGE LIMITER GND PARALLEL
NORM
LIFT
1
INPUT
OUTPUT
BRIDGE
ONLY
2
THRU
INPUT
INPUT
THRU
AD45 ADAPTER
(1+,1-) to (2+,2-) for HI FREQ.
and
(1+,1-) to (1+,1-) for MID FREQ.
BRIDGE LIMITER GND PARALLEL
LIFT
1
INPUT
OUTPUT
BRIDGE
ONLY
2
DCM3800L
THRU
MID
FREQ
AMP
INPUT
INPUT
THRU
BRIDGE LIMITER GND PARALLEL
LIFT
1
DCM3800L
14
BIAMP
HI
FREQ
AMP
DCM2000L
INPUT
OUTPUT
BRIDGE
ONLY
2
LOW
FREQ
AMP
SUB
Pin Flip Switch
Carvin TRx3210 loudspeakers come with a speaker pin flip switch. In full range/passive mode, this switch
allows the user to select operation from either pins 1+ & 1- (standard) or pins 2+ & 2-. This can significantly
simplify speaker cable runs by half with 4-pin TwistLoc cables. Below are a few examples of how the pin flip
switch is used.
Remove rubber plug marked NORMAL/ PIN FLIP from connection panel. Using a small flat-head screw driver, carefully insert screwdriver into opening and slide switch to the down position for Pin Flip operation. This
will enable use of pin 2+ & 2- to drive this speaker module. Note: pins 1+ & 1- will be no longer used in this
cabinet. Replace rubber plug after change.
Full-Range Passive Hook-up in Pin Flip Mode
THRU
INPUT
INPUT
THRU
OLDER MODELS USE ADAPTER AD45
(before SEPT. 2012)
BRIDGE LIMITER GND PARALLEL
DCM3800L
LIFT
1
INPUT
OUTPUT
BRIDGE
ONLY
2
AD45 ADAPTER
(1+,1-) + (1+,1-)
to (1+,1- , 2+,2-)
CH.1 (1+,1-)
and
CH.2 (2+,2-)
AMP CH.2: PINS 2+, 2(PIN FLIP, FULL RANGE)
AMP CH.1: PINS 1+, 1NL4
NL4
AMP CH.2: PINS 2+, 2(PIN FLIP, FULL RANGE)
SP4
15
Full-Range Passive Hook-up 2 normal Pin Mode, 2 Pin Flip Mode
THRU
INPUT
INPUT
OLDER MODELS USE ADAPTER AD45
(before SEPT. 2012)
BRIDGE LIMITER GND PARALLEL
DCM3800L
LIFT
1
CH.1 (1+,1-)
and
CH.2 (2+,2-)
16
THRU
INPUT
OUTPUT
BRIDGE
ONLY
2
AD45 ADAPTER
(1+,1-) + (1+,1-)
to (1+,1- , 2+,2-)
AMP CH.1: PINS 1+, 1(NORMAL, FULL RANGE)
AMP CH.2: PINS 2+, 2(PIN FLIP, FULLRANGE)
AMP CH.1: PINS 1+, 1(NORMAL, FULL RANGE)
AMP CH.2: PINS 2+, 2(PIN FLIP, FULLRANGE)
Processor Settings for XD360, DCMLx or other speaker management systems
For optimum performance, a loudspeaker management processor is recommended. Carvin offers both an outboard processor such as the XD360 X-Drive™ as well as the DCMLx power amps that have on-board X-Drive™
processing. Carvin’s XD360 and DCMLx power amps will have the TRx3210 crossover settings as a preset. The
following charts provide a variety of settings that cover both full-range and bi-amping. The below settings apply
to all speaker management systems.
Stereo passive 2 array modules pole mounted on sub
LEFT TWO ON SUB
N/A (ch2)
RIGHT TWO ON SUB
OUTPUT
Main (ch1)
Output Gain
-3dB
0.0 dB
-3dB
0.0 dB
Input Source
A
A, A+B or
B
B, A+B or
(C for Aux sub)
(A for 8 mono)
(C for Aux
sub)
IN
OUT
IN
(Alt Source)
SUB (ch3)
Main (ch1)
N/A (ch5)
SUB (ch6)
Polarity
OUT
LPF frequency
20 KHz
80Hz
20 KHz
80Hz
LPF type
OUT
Linkwtz 24
OUT
Linkwtz 24
HPF frequency
80 Hz
32 Hz
80 Hz
32 Hz
HPF type
Linkwtz 24
Butter 18
Linkwtz 24
Butter 18
Limit Threshold
0dB
0dB
0dB
0dB
Output Delay
PEQ1 GAIN
6 dB
6 dB
PEQ1 FREQ
630 Hz
630 Hz
PEQ1 BW
0.16
0.16
PEQ2 GAIN
-9 dB
-9 dB
PEQ2 FREQ
2.7 KHz
2.7 KHz
PEQ2 BW
0.12
0.12
STEREO Bi Amp 4 array modules 2.5 - 12.5 degrees Curve array
LEFT FOUR
RIGHT FOUR
OUTPUT
HI (ch1)
LO-MID (ch2)
SUB (ch3)
HI (ch4)
LO-MID (ch5)
Output Gain
-15 dB
0.0 dB
0.0 dB
-15 dB
0.0 dB
0.0 dB
Input Source
A
A
A, A+B or
B
B
B, A+B or
(C for Aux sub)
(A for 8 mono)
IN
OUT
(Alt Source)
SUB (ch6)
(C for Aux sub)
Polarity
OUT
LPF frequency
20kHz
1.5kHz
80Hz
20kHz
1.5kHz
80Hz
LPF type
OUT
Butter 48
Linkwtz 24
OUT
Butter 48
Linkwtz 24
IN
IN
IN
HPF frequency
1.5 KHz
80 Hz
32 Hz
1.5 KHz
80 Hz
32 Hz
HPF type
Butter 48
Linkwtz 24
Butter 18
Butter 48
Linkwtz 24
Butter 18
Limit Threshold
-3
0
0
-3
0
0
Output Delay
84 uS
0.0 mS
0.0 mS
84 uS
0.0 mS
0.0 mS
PEQ1 GAIN
-6 dB
-9dB
-6 dB
-9dB
PEQ1 FREQ
2 KHz
315 Hz
2 KHz
315 Hz
PEQ1 BW
1
0.3
1
0.3
PEQ2 GAIN
12 dB
12 dB
PEQ2 FREQ
12 KHz
12 KHz
PEQ2 BW
3
3
17
Stereo passive 4 array modules 2.5 - 12.5 degree Curve array
LEFT (OR UPPER) FOUR
OUTPUT
Main (ch1)
Output Gain
Input Source
not used (ch2)
RIGHT (OR LOWER) FOUR
SUB (ch3)
Main (ch3)
0
0.0 dB
0
0.0 dB
A
A, A+B or
B
B, A+B or
(C for Aux sub)
(A for 8 mono)
(C for Aux sub)
(Alt Source)
SUB (ch6)
Polarity
OUT
IN
OUT
IN
LPF frequency
20 KHz
80Hz
20 KHz
80Hz
LPF type
OUT
Linkwtz 24
OUT
Linkwtz 24
HPF frequency
80 Hz
32 Hz
80 Hz
32 Hz
HPF type
Linkwtz 24
Butter 18
Linkwtz 24
Butter 18
Limit Threshold
0dB
0dB
0dB
0dB
Output Delay
PEQ1 GAIN
6 dB
6 dB
PEQ1 FREQ
630 Hz
630 Hz
PEQ1 BW
0.16
0.16
PEQ2 GAIN
-9 dB
-9 dB
PEQ2 FREQ
2.7 KHz
2.7 KHz
PEQ2 BW
0.12
0.12
Also works for 8 module passive mono hang using right as upper and left as lower.
4 enclosure Curve Array
18
not used (ch5)
Bi Amp 8 array modules straight hang
UPPER FOUR
LOWER FOUR (“J curve settings)
OUTPUT
HI (ch1)
LO-MID (ch2)
Output Gain
-9 dB
0.0 dB
Input Source
A
A
SUB (ch3)
not used
HI (ch4)
LO-MID (ch5)
SUB (ch6)
-9 dB (-15db)
0.0 dB
0.0 dB
A
A
(Alt Source)
Polarity
A
(C for Aux sub)
OUT
IN
OUT
IN
IN
20kHz
1.5kHz
20kHz
1.5kHz
80Hz
LPF frequency
OUT
Butter 48
OUT
Butter 48
Linkwtz 24
LPF type
1.5 KHz
80 Hz
1.5 KHz
80 Hz
32 Hz
HPF frequency
Butter 48
Linkwtz 24
Butter 48
Linkwtz 24
Butter 18
HPF type
Limit Threshold
-3
0
-3
0
0
84 uS
0.0 mS
84 uS
0.0 mS
0.0 mS
Output Delay
-6 dB
9 dB
-6 dB
9 dB (0db)
PEQ1 GAIN
2 KHz
400 Hz
2 KHz
400 Hz
PEQ1 FREQ
1
0.12
1
0.12
PEQ1 BW
PEQ2 GAIN
12 dB
12 dB
(-9dB)
12 KHz
12 KHz
(315 Hz)
(0.3)
PEQ2 FREQ
3
3
PEQ2 BW
0.12
0.12
Lower four cabinets can be adjusted for “J” curve see settings.
8 enclosure Line Array
19
Turnkey Factory
Assembled Amp Racks
AR AMP RACKS
ARAMPS
AMP&RACKS
DCM-L
XD360 Processor
DCM-L AMPS & XD360 Processor
AR AMP RACKS
DCM-L Amps & XD360 Processor
Configured for minimum of 4 ohm operation per amplifier channel.
Main AmpAmp
Rack
(6,600
Watts)
ARP-MAIN-BI
Rack
(6,600
Watts)
Main Amp Rack (6,600 Watts)
Front
Rear
SUB Amp Rack (15,200 Watts)
SUB
Amp
Rack
AR-S Sub
Amp
Rack(15,200
(15,200 Watts)
Watts)
Front
ARP-MAIN-BI (Biamp)
(1) DCM2004L†
AR-MAIN
(2) DCM3800L
AR-MAIN
(1)DCM2004L
(1) XD360
Processor
(1)DCM2004L
(2)DCM3800L
(1) (2)DCM3800L
IP340
Connect Panel
(1)XD360
(1) (1)XD360
C2U
USB 2ft cable
(1)IP340
(8) (1)IP340
C3XLR
3ft cable
(1)USB-CBL
(1) (1)USB-CBL
1U
Blank Panel
(8)C3XLR
(8)C3XLR
(1) 4U
Vented
Panel
(1)1U
Panel
Panel
(1)4UShock
Vented
Panel
(1) (1)1U
AR1
Rack
Case
(1)4U
Vented
Panel Rack
(1)AC3PH120*
(1) AR-ASSM Assembled
(1)AC3PH120*
(1) AR-PROG Program / Test
(1) AC3PH120 AC Panel*
*AR-MAIN-BI without AC3PH120
*†AR-MAIN (passive) without DCM2004L
& AC3PH120
AR-S
ARP-S
AR-S(Sub)
(4)DCM3800L (bridged)
(4) (4)DCM3800L
DCM3800L
(bridged)
(bridged)
(1)IP340
(1) (1)IP340
IP340
Connect Panel
(1)USB-CBL
(1) (1)USB-CBL
C2U
USB
2ft
cable
(4)C3XLR
(4) (4)C3XLR
C3XLR
3ft cable
(1)4U Vented
Panel
Vented
Panel
(1)AC3PH120*
(1) (1)4U
4U
Vented
Panel
(1) (1)AC3PH120*
AR1 Shock Rack Case
(1) AR-ASSM Assembled Rack
*Delete Option
Available
(1) *AR-PROG
Program
/ Test
Delete Option
Available
(1) AC3PH120 AC Panel*
Rear
ARX AMP RACKS
AMP(No
RACKS
DCM-LX ARX
DSP AMPS
XD360 required)
DCM-LX DSP AMPS (No XD360 required)
ARx AMP RACKS
DCM-Lx DSP Amps (XD360 not required)
Configured for minimum of 4 ohm operation per amplifier channel.
ARPx-MAIN-BI
Rack
(6,600Watts)
Watts)
Main AmpAmp
Rack
(6,600
Main Amp Rack (6,600 Watts)
Front
Rear
SUB Amp Rack (15,200 Watts)
SUB
Rack
(15,200
ARX-SAmp
Sub Amp
Rack
(15,200Watts)
Watts)
Front
Rear
*AR-S without AC3PH120
To power amps
AUX
IN 3
IN 2
ARPx-MAIN-BI (Biamp)
†
(1) DCM2004Lx
ARX-MAIN
ARX-MAIN
(2) DCM3800Lx
(1)DCM2004LX
(1)DCM2004LX
(2)DCM3800LX
(1) IP340
Connect Panel
(2)DCM3800LX
(1)IP340
(1) USB12HUB
(1)IP340
(1)USB-HUB
(3) C2U USB 2ft cable
(1)USB-HUB
(3)USB-CBL
(4) C3XLR
3ft cable
(3)USB-CBL
(4)C3XLR
(1) 2U
Blank
Panel
(4)C3XLR
(1)2U
Panel
(1) 4U
Vented
PanelPanel
(1)2U
Panel
(1)4U
Vented
(1)4U
Vented
Panel
(1) AR1
Shock
Rack
Case
(1)
AR1
Amp
Rack
(1)
AR1
Amp
Rack Rack
ASSM-AR
(1) AR-ASSM
Assembled
(1)
ASSM-AR
(1)AC3PH120*
(1) AR-PROG Program / Test
(1)AC3PH120*
(1) AC3PH120
AC Panel*
*ARx-MAIN-BI without AC3PH120
*†ARx-MAIN (passive) without DCM2004Lx
ARX-S
& AC3PH120
ARX-S
(4)DCM3800LX
(bridged)
(4)DCM3800LX
(1)IP340
ARPx-S
(Sub) (bridged)
(1)IP340 (bridged)
(1)USB-HUB
(4) DCM3800Lx
(1)USB-HUB
(4)USB-CBL
(1) IP340
Connect Panel
(4)USB-CBL
(4)C3XLR
(1) USB12HUB
(4)C3XLR
(1)4U
Vented Panel
(4) C2U
USB
2ft cable
(1)4U
Vented
Panel
(1)
AR1
Amp
Rack
(4) C3XLR
3ftAmp
cableRack
(1) ASSM-AR
AR1
(1) 4U(1)AC3PH120*
Panel
(1)Vented
ASSM-AR
(1)AC3PH120*
(1) AR1
Shock Rack Case
(1) AR-ASSM Assembled Rack
* Delete Option
Available
(1) AR-PROG
Program
/ Test
* Delete Option Available
(1) AC3PH120 AC Panel*
*ARx-SUB without AC3PH120
To power amps
IN 1
IP340 XLR Rear
MADE IN USA
• IP340 2U Interconnect XLR inputs and TwistLoc outputs • Fast and easy connections to rack gear
• Built-in rear TwistLoc cables connect to power amps • Front USB to computer, rear to USB hub
USB12HUB
12 port hub
MADE IN USA
TOP VIEW
• AC3PH120 2U AC power panel for 100-130VAC 50-60Hz • Saftey approvals ETL listed to UL standards.
• Designed for safe connections to the rack gear & house power. For use in other countries with approved adapters.
• 3 phase 120VAC/208VAC • Each phase (leg) supports one 20 amp breaker (3rd & 4th breaker on leg 3)
20
Components:
TRx3210
Main Enclosure
TRx3210F
Main Enclosure with SureFly™ hardware preinstalled
SUREFLYTRx
Optional side connecting fly hardware. One kit required per array enclosure. Includes 4 Quick Release Pins
SUREFLYTBAR Optional T-Bar suspension kit. One required per array. Hang up to 16 array modules. Includes 4 Quick Release Pins
TCSHK58 Anchor Pin Shackle 5/8” rated lifting shackle
Accessories:
SureFlypin
Extra Quick Release Pins
IP340 XLR/TwistLoc 2U interconnect panel with TwistLoc cables
AC3PH120 120v, 3-phase AC distribution panel
DB3210 Baltic Birch/Duratec™ transport dolly for up to four array modules
PR050TL-8
50 ft. NL8 Speaker cable 12 gauge
PRO100TL-8
100 ft. NL8 Speaker cable 12 gauge
PRO018TL
18” NL4 Speaker jumper cable 12 gauge
PRO25TL
25 ft NL4 Speaker Cable 12 Gauge
PRO50TL
50 ft NL4 Speaker Cable 12 Gauge
AD48
NL8 to (2) NL4 Y breakout
NL8MMX
NL8 male to male barrel connector
TRx-3X
Tri-Amp Only NL8 input Panel
Carvin Pro Audio Products - Warranty Information
The Carvin warranty on the professional TRx3000 series loudspeaker products remains in effect for five years from the date of the
first consumer purchase. Carvin DCM series power amplifiers are warranted for three years from the date of original purchase. All
all other Carvin products are warranted for one year from the date of original purchase.
WHO IS PROTECTED BY THIS WARRANTY?
Your Carvin TRx3210 warranty protects the original owner for five years so long as: A.) Your product has been purchased from
Carvin. B) The original dated sales invoice is presented whenever warranty service is required.
WHO PAYS FOR WHAT?
Carvin pays for all material expenses related to defective workmanship including drivers and crossovers. However, Carvin does not
pay for any driver with an open voice coil, rubbing voice coil, or drivers, which the owner may claim to be weak, which in all cases
is an indication that excessive power has been used.
WHAT DOES THE CARVIN WARRANTY COVER?
Except as specified, your Carvin Warranty covers all defects in material and workmanship. The following are not covered: Damage
caused by accident, misuse, abuse, product modification or neglect; damage occurring during shipment; damage resulting from
failure to follow instructions contained in your Instruction Manual; damage resulting from the performance of repairs by someone
not authorized by Carvin; claims based upon any misrepresentations by the seller; any Carvin product on which the serial number
has been defaced, modified or removed.
WARRANTY INFORMATION
If your Carvin product needs service, email [email protected] or [email protected] for international customers. Please do not
ship your Carvin product to the factory without prior authorization. You are responsible for shipping charges.
21
Turnkey Systems:
100 PPL Plus System
4 TRx3210 Array Modules
2 TRx2121 Subwoofers
1 ARX or AR Main Amp Rack
TRS300 Full Range - Tri-amp optional
300 Person Plus System
(4) TRx3210 Array Modules
(2) TRx2121 Subwoofers
(4) SS4 Poles
(1) ARx-MAIN Amp Rack
(2) PRO018TL
(2) PRO5TL
(2) PRO50TL
spare cable package
TRS300-CBL (for active & passive)
(2) PRO018TL
(2) PRO5TL
(2) PRO50TL
TRS1000
1,000 Seat Plus PA System
8 TRx3210 Array Module
4 Trx2218 Subwoofer
1 ARX or AR Main Amp Rack
Full
1 ARXRange
or AR SUB Amp Rack
TRS1000T
Tri-amp
1000 Person Plus System
(8) TRx3210F Array Modules
(4) TRx2218 Subwoofers
(1) ARx-MAIN-BI Amp Rack
(1) ARx SUB Amp Rack
(4) PRO018TL
(2) PRO50TL-8
(4) PRO50TL
(2) AD48
1000 Person Plus System
(8) TRx3210F Array Modules
(4) TRx2218 Subwoofers
(1) ARx Main Amp Rack
(1) ARx SUB Amp Rack
(6) PRO018TL
(2) PRO50TL
spare cable package
TRS1000B-CBL
(4) PRO018TL
(2) PRO50TL-8
(4) PRO50TL
(2) AD48
CARVIN
CARVIN
22
CARVIN
CARVIN
CARVIN
CARVIN
TRS2500
Full Range
2500 Person Plus System
(16) TRx3210F Array Modules
(8) TRx2218 Subwoofers
(2) ARx Main Amp Rack
(2) ARx SUB Amp Rack
(12) PRO018TL
(12) PRO50TL
TRS2500T
Tri-amp
2500 Person Plus System
(16) TRx3210F Array Modules
(8) TRx3218 Subwoofers*
(2) ARPx-MAIN-BI Amp Rack
(2) ARPx SUB Amp Rack
(8) PRO018TL
(4) PRO50TL-8
(8) PRO50TL
(4) AD48
spare cable package
TRS2500B-CBL
(8) PRO018TL
(4) PRO50TL-8
(8) PRO50TL
(4) AD48
CARVIN
CARVIN
CARVIN
CARVIN
CARVIN
CARVIN
CARVIN
CARVIN
CARVIN
CARVIN
CARVIN
CARVIN
CARVIN
CARVIN
CARVIN
CARVIN
CARVIN
CARVIN
CARVIN
CARVIN
CARVIN
CARVIN
*TRx3218 with Faital™ 18HP1030 18” 1200w drivers
System power: cont. 2400w, Prog. 4800w, Peak 9600w
CARVIN
CARVIN
CARVIN
CARVIN
CARVIN
CARVIN
CARVIN
CARVIN
CARVIN
CARVIN
CARVIN
CARVIN
CARVIN
CARVIN
CARVIN
CARVIN
TRS5000T
Tri-amp
5000 Person Plus System
(32) TRx3210F Array Modules
(16) TRx3218 Subwoofers*
(4) ARPx-MAIN-BI Amp Rack
(4) ARPx SUB Amp Rack
(16) PRO018TL
(8) PRO100TL-8
(16) PRO50TL
(8) AD48
spare cable package
TRS5000B-CBL
(16) PRO018TL
(8) PRO100TL-8
(16) PRO50TL
(8) AD48
*TRx3218 with Faital™ 18HP1030 18” 1200w drivers
System power: cont. 2400w, Prog. 4800w, Peak 9600w
23
Made in USA
c
800.854.2235 carvinproaudio.com
USA contact: Tony Mirador
Office: 800.403.4484 x114
[email protected]
24
International contact: Joel Kiesel
Office: 760.522.5676
[email protected]
12340 World Trade Dr., San Diego, CA 92128