1
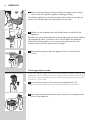
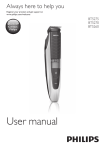
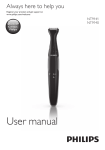
Always here to help you
Register your product and get support at
www.philips.com/welcome
BT9295
BT9290
BT9280
User manual
1
BT9295, BT9290, BT9280
English 6
Dansk 17
Deutsch 28
Ελληνικα 39
Español 51
Suomi 62
Français 72
Italiano 83
Nederlands 94
Norsk 105
Português 115
Svenska 126
Türkçe 136
6
English
Introduction
Congratulations on your purchase and welcome to Philips!
To fully benefit from the support that Philips offers, register your
product at www.philips.com/welcome.
General description (Fig. 1)
1 Precision trimming comb
2 Standard trimming comb
3 Turnable trimming head
4 Laser guide
5 Guiding groove for trimming comb
6 Length setting display
7 Zoom wheel for length setting
8 On/off button
9 Battery lights
10 Socket for small plug
11Adapter
12 Small plug
13 Cleaning brush
14 Storage pouch (BT925/BT9290 only)
Important
Read this user manual carefully before you use the appliance and save it for
future reference.
Danger
-- Keep the adapter dry.
Warning
-- Check if the voltage indicated on the adapter corresponds to the local
mains voltage before you connect the appliance.
-- The adapter contains a transformer. Do not cut off the adapter to
replace it with another plug, as this causes a hazardous situation.
-- This appliance is not intended for use by persons (including children)
with reduced physical, sensory or mental capabilities, or lack of
experience and knowledge, unless they have been given supervision or
instruction concerning use of the appliance by a person responsible for
their safety.
-- Keep the appliance and its cord out of the reach of children.
-- Do not use the appliance in the bath or in the shower.
Caution
-- Always check the appliance before you use it. Do not use the appliance
if any of its parts is damaged or broken, as this may cause injury.
-- Only use this appliance for its intended purpose as shown in the user
manual.
-- Use, charge and store the appliance at a temperature between 5°C
and 35°C.
-- Only use the adapter supplied to charge the appliance.
-- Make sure the appliance is switched off and disconnected from the
mains before you clean it under the tap.
-- If the appliance is subjected to a major change in temperature, pressure
or humidity, let the appliance acclimatise for 30 minutes before you use it.
English
7
-- If the adapter is damaged, always have it replaced with one of the
original type in order to avoid a hazard.
-- Never use compressed air, scouring pads, abrasivecleaning agents or
aggressive liquids such as petrol or acetone to clean the appliance.
-- Noise level: Lc= 65dB(A)
Compliance with standards
-- The appliance complies with the internationally approved IEC safety
regulations and can be safely cleaned under the tap.
-- This Philips appliance complies with all applicable standards and
regulations regarding exposure to electromagnetic fields.
Class 1 laser product
-- The product contains a class 1 laser guide which complies with
IEC60825-1.
-- To avoid all risks, point the laser beam away from your eyes and do not
stare directly into the laser beam.
Preparing for use
Charging
Charge the appliance fully before you use it for the first time and after a
long period of disuse.
Charging takes about 60 minutes if the appliance is completely empty.
1Make sure the appliance is switched off and the laser guide is in ‘off’
position.
2Insert the small plug into the appliance and put the adapter in the
wall socket.
,, First the bottom battery light flashes orange and white alternately.
8
English
,, After about 3 minutes the bottom battery light flashes white only.
At this point the battery contains enough energy for one cordless
trimming session.
,, When the charging process continues, more lights start flashing to
show that the charge level of the battery increases.
,, When the appliance is fully charged, all battery lights light up solid
white.
If the appliance is still connected to the mains when it is fully charged, the
battery lights go out after 30 minutes.
Battery low and battery empty signals
,, When the battery is almost empty, the bottom battery light starts
flashing orange. When you switch off the appliance, the bottom
battery light continues to flash orange for a few seconds.
,, The battery light at the bottom of the appliance flashes orange at a
higher frequency when the battery is empty and if you:
-- press the on/off button
-- turn the zoom wheel
-- activate the laser guide
Corded trimming
You can also operate the appliance from the mains.
1Insert the small plug into the socket of the appliance.
2Put the adapter in a wall socket.
3Press the on/off button to switch on the appliance.
English
9
Using the appliance
You can use the appliance to trim facial hair (beard, moustache and
sideburns). This appliance is not intended for trimming lower body parts or
scalp hair.
Trimming with the laser guide
You can use the laser guide to define the edges of your beard, sideburns
and moustache. The laser guide can be used with the 32mm (1.25in) side
as well as the 15mm (0.6in) side of the trimming head.
Note:The laser guide can only be used when you trim without comb.
Note: Although the light from the laser guide is not harmful to the eyes, we
advise you not to stare into the light and to avoid shining the light into your
eyes.
1Press the on/off button to switch on the appliance.
2To trim with the laser guide, press the top of the laser guide to
switch it on.
,, The laser guide pops up and its light shines over the top of the
trimming head.
Note: If you trim with the laser guide, make sure you push the laser guide to
‘off ’ position before you turn the trimming head.You may damage the laser
guide if you try to turn the trimming head while the laser guide is still
popped up.
10
English
3Start trimming where you want to define the edges of your beard
and use the laser guide to guide you during trimming.
Tip: Hold the appliance so that the laser light shines exactly on the edge you
want to trim and then place the trimming head on your skin.
4When you are finished, press the on/off button to switch off the
appliance.
Tip:When the motor of the appliance is not operating, the laser guide switches
off automatically within 3 minutes. In the 3 minutes before the automatic
switch-off of the laser guide, you can use the laser guide to check if the
contours of your beard are symmetrical or straight.
5Push down the top of the laser guide to lock it in ‘off’ position
(‘click’).
Trimming without comb
If you trim without comb, your hair is cut off close to the skin. The trimming
head has a 32mm (1.25in) side and a 15mm (0.6in) side. The 15mm (0.6in)
side of the trimming head allows more precise styling and contouring than
the 32mm (1.25in) side.
1If one of the combs is still on the trimming head, pull it off.
Never pull at the flexible top of the comb. Always pull at the sides.
2Turn the trimming head until the side you want to use points to the
front of the appliance.
English
11
3Press the on/off button to switch on the appliance.
4Hold the appliance in the position that is most convenient for the
area you want to trim and make strokes in the desired direction.
Tip: For a comfortable trim close to your skin, place the flat side of the
trimming head against your skin and make strokes in the desired direction.
5When you are finished, press the on/off button to switch off the
appliance.
Trimming with comb
The appliance comes with two combs: a standard comb and a precision
comb. These combs keep the trimming head at a certain distance from
your skin. This distance determines the remaining hair length and can be
adjusted by turning the zoom wheel.
-- Use the standard comb to trim your beard.
-- Use the precision comb to trim hard-to-reach areas, for instance under
your nose.
1Slide the comb into the guiding grooves on both sides of the
appliance (‘click’).
Note:The comb does not fit on the trimming head when the 15mm (0.6in)
side is pointing towards the front of the appliance. If this is the case, turn the
trimming head before you slide the comb onto the trimming head.
2Turn the zoom wheel to select a length setting.
-- The length setting selected lights up on the front of the appliance.
-- You can select a length from 0.4mm to 7mm (see table in section
‘Length settings’ below).
12
English
3Press the on/off button to switch on the appliance.
4To trim your beard, move the trimming comb through the hair
slowly.
5When you are finished, press the on/off button to switch off the
appliance.
Tips
-- Always make sure that the tips of the trimming comb point in the
direction in which you move the appliance.
-- Make sure that the flat part of the trimming comb is always in full
contact with the skin to obtain an even hair length result.
-- Since hair grows in different directions, you need to move the appliance
in different directions (upward, downward or across).
-- Trimming is easier when skin and hair are dry.
Length settings
mm
0.4
0.6
0.8
1.0
1.2
1.4
1.6
1.8
2.0
2.5
3.0
3.5
4.0
4.5
5.0
6.0
7.0
Cleaning and maintenance
Clean the appliance after every use.
Never use compressed air, scouring pads, abrasive cleaning agents or
aggressive liquids such as petrol or acetone to clean the appliance.
Note:The trimming head does not need any lubrication.
English
13
Cleaning the appliance and the combs
1Switch off the appliance.
2Pull the comb off the trimming head.
3Clean the trimming head under the tap with lukewarm water or
clean it with the cleaning brush supplied.
4Clean the trimming combs under the tap or clean them with the
cleaning brush supplied.
Tip:To make sure that the appliance is dry before you store it in the pouch,
let it dry in a well-ventilated room with the laser popped up.
Cleaning the trimming head connector
Note: Make sure you clean the trimming head connector at least once every
three months.
1Switch off the appliance.
2Pull the comb off the trimming head.
3Pull the trimming head off the appliance.
Note:To prevent damage to the laser guide, put the laser guide in ‘off ’ position
before you remove the trimming head.
14
English
4Clean the trimming head connector with the cleaning brush supplied.
5Clean the inside of the trimming head with the cleaning brush
supplied.
6After cleaning, put the trimming head back onto the appliance.
Ordering accessories
To buy accessories or spare parts, visit www.shop.philips.com/service
or go to your Philips dealer. You can also contact the Philips Consumer
Care Centre in your country (see the worldwide guarantee leaflet for
contact details).
Guarantee and support
If you need information or support, please visit the Philips website at
www.philips.com/support or read the worldwide guarantee leaflet.
Environment
-- Do not throw away the appliance with the normal household waste
at the end of its life, but hand it in at an official collection point for
recycling. By doing this, you help to preserve the environment.
-- The built-in rechargeable battery contains substances that may pollute
the environment. Always remove the battery before you discard and
hand in the appliance at an official collection point. Dispose of the
battery at an official collection point for batteries. If you have trouble
removing the battery, you can also take the appliance to a Philips
service centre. The staff of this centre will remove the battery for you
and will dispose of it in an environmentally safe way.
English
15
Frequently asked questions
Question
Answer
Is the laser light harmful
to my eyes?
No, it is not. The appliance has been thoroughly tested for home use.
Nevertheless, we advise you not to stare into the light and to avoid shining
the light directly into your eyes.
I cannot turn the
trimming head. Why?
You have to push the laser guide to ‘off ’ position before you can turn the
trimming head.
Can I clean this appliance The appliance is watertight and you can clean it under a running tap with
under a running tap?
lukewarm water.
Tip: To prevent condensation on the laser window of the laser guide, we
advise you not to rinse the appliance under the tap.
Why doesn’t the comb
The combs can only be used when the wide side of the trimming head
fit on the trimming head? points towards the front of the appliance. If the comb does not fit:
1) you may have tried to fit it onto the trimming head when the narrow
side of the trimming head points towards the front of the appliance. Turn the
trimming head to normal trimming position and then slide the comb onto it.
2) The laser guide is still on. To trim with one of the combs, you first have to
push the laser guide to ‘off ’ position.
What is the difference
between the combs?
The standard comb is most suitable for trimming your beard to an even
length. The precision comb is especially suitable for trimming hard-to-reach
areas, for instance beneath your nose.
Why can’t I see the laser
light?
The laser guide is in ‘off ’ position. Switch on the laser guide by pressing the
top of the laser guide.
You switched off the appliance with the laser guide still popped up.
After 3 minutes, the laser guide switches off automatically. Switch on
the laser guide by pressing the top of the laser guide.
You are using the appliance in a room or area where the light is very bright.
Move to a room or area where the light is less bright.
Why can’t I see the hairs You are probably using the appliance in a room or area that is too dark.
Switch on the light in the room or go to a room or area where there is
when I use the laser
more light.
guide?
How long does it take
to charge the appliance
for just one trimming
session?
This appliance has a quick-charge function. When the appliance starts
charging, the bottom light flashes orange and white alternately. After
3 minutes the bottom light stops flashing orange and only flashes white.
At this point, the battery contains enough energy for one trimming session.
16
English
Question
Answer
Why don’t I see a
straight uninterrupted
laser line?
The laser light from the laser guide may be interrupted because:
The laser window of the laser guide is dirty. Pop up the laser guide and wipe
the laser window clean with a cloth.
There is condensation behind the laser window. Pop up the laser guide and
let it dry in a well-ventilated room. The laser guide switches off automatically
after 3min.
You did not assemble the trimming head correctly. Push down the trimming
head to make sure it is assembled correctly.