Transcript
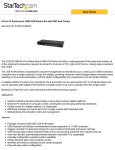
Installation
Specifications
Caution! Installing FAN7751U requires that you open your computer
case to disconnect and reconnect wires. If you are unfamiliar with this
kind of work, consider bringing your computer to your local computer
store for help.
CPU supported
Power Adapter
Cables
DC Fan Size
Base Material
Bearing Type
Speed
Noise Level
Air flow (Max.)
Rated Voltage
Intel Socket 775 Fan with Heatsink
FAN7751U
Introduction
Thank you for purchasing a 1U Intel Socket 775 CPU
Heatsink with Fan. Designed specifically for 1U rackmounted processors, this CPU Cooler supports Dual Core
and high-speed Pentium 4 processors, and features an
all-copper, skive fin heatsink, providing maximum heat dissipation for your hard working CPU.
1. Place the base clip
backing onto the backside
of the mainboard
2. Apply enough thermal
paste to the top of the CPU
to cover the entire top
surface.
3. Remove the protective film
from the CPU Cooler
4. Place the CPU Cooler over
the CPU, aligning the
holes on the CPU Cooler
with the base clip posts.
Features
• Thermal transfer compound ensures quick,
professional quality installation
• All-copper, skive fin heatsink
Before You Begin
System Requirements
• Socket T LGA 775 CPU
• 1 available TX3 power connector
•
Phillips screwdriver (optional)
Package Contents
•
Fan/heatsink (1)
•
Mounting bracket kit (1)
•
Screw-top fasteners (4)
•
Thermal compound (1)
•
Instruction Manual (1)
5. Fasten the CPU Cooler to 6. Connect the fan’s power
the posts, using the screwcable to the appropriate
tops provided. (Philips
socket on the mainboard.
screwdriver is optional)
7. Installation is complete.
Socket 775 (Socket T)
TX3
220-250mm
70x70x10mm
All copper (CU-1100)
Dual Ball Bearing
4500±10% RPM
<39 dBA
30.79 CFM
12V
Support, Warranty Information, and Regulatory Compliance
Statement
If you ever need help with your product, please contact 1-800-2651844 (In United States), 00 800 7827 8324 (in UK) or visit
www.startech.com/support and access our comprehensive selection of online tools, documentation, and downloads. This product is
backed by a one-year warranty. In addition, StarTech.com warrants its
products against defects in materials and workmanship for the periods noted, following the initial date of purchase. During this period,
the products may be returned for repair, or replacement with equivalent products at our discretion. The warranty covers parts and labor
costs only. StarTech.com does not warrant its products from defects
or damages arising from misuse, abuse, alteration, or normal wear
and tear. Limitation of Liability: In no event shall the liability of
StarTech.com Ltd. and StarTech.com USA LLP (or their officers,
directors, employees or agents) for any damages (whether direct or
indirect, special, punitive, incidental, consequential, or otherwise),
loss of profits, loss of business, or any pecuniary loss, arising out of
or related to the use of the product exceed the actual price paid for
the product. Some states do not allow the exclusion or limitation of
incidental or consequential damages. If such laws apply, the limitations or exclusions contained in this statement may not apply to you.
FCC Compliance Statement: This equipment has been tested and
found to comply with the limits for a Class B digital device, pursuant
to part 15 of the FCC Rules. These limits are designed to provide
reasonable protection against harmful interference in a residential
installation. This equipment generates, uses and can radiate radio
frequency energy and, if not installed and used in accordance with
the instructions, may cause harmful interference to radio communications. However, there is no guarantee that interference will not occur
in a particular installation. If this equipment does cause harmful interference to radio or television reception, which can be determined by
turning the equipment off and on, the user is encouraged to try to
correct the interference by one or more of the following measures:
• Reorient or relocate the receiving antenna.
• Increase the separation between the equipment and receiver.
• Connect the equipment into an outlet on a circuit different from that
to which the receiver is connected.
• Consult the dealer or an experienced radio/TV technician for help.
Revised: 2 November 2006 (A)