1
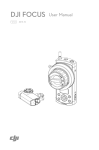
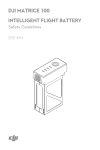
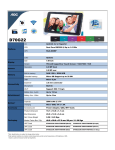
N1 Video Encoder
User Manual
V1.0
2015.8
Disclaimer
Thank you for purchasing the N1 Video Encoder. Users must comply with local radio
transmission laws and regulations when using this product. By using this product, you hereby
agree to this disclaimer and signify that you understand all points completely. Please use this
product in strict accordance with the manual and be sure to pay attention to the warnings.
When assembling and using this product, follow all instructions carefully. SZ DJI TECHNOLOGY
CO., LTD. and its affiliated companies assume no liability for damage(s) or injuries incurred
directly or indirectly from improper use of this product.
DJI is the registered trademark of SZ DJI TECHNOLOGY CO., LTD. (abbreviated as “DJI”).
Names of products, brands, etc., appearing in this manual are trademarks or registered
trademarks of their respective owner companies. This product and manual are copyrighted by
DJI with all rights reserved. No part of this product or manual shall be reproduced in any form
without the prior written consent or authorization of DJI.
This disclaimer is produced in various languages. In the event of divergence among different
versions, the Chinese version shall prevail when the product in question is purchased
in Mainland China, and the English version shall prevail when the product in question is
purchased in any other region.
2 © 2015 DJI. All Rights Reserved.
Product Profile
The N1 Video Encoder is intended for the DJI Matrice 100 (abbreviated as M100) and DJI N1
Flight Controller, for which it offers video signal transmission and firmware upgrade capabilities
if you are not using the Zenmuse X3 Gimbal with Camera as your recording device.
The AV or HDMI port on the encoder receives video input from the non-DJI camera to generate
a live HD video feed in the DJI GO app. In addition, users may utilise the Micro USB port on the
encoder to upgrade the firmware of various modules on the M100.
In the Box
N1 Video Encoder ×1
AV Cable ×1
Upgrade Cable ×1
Power Cable ×1
Video Cable ×1
Reserved Cable ×1
Overview
Status LED
HDMI IN
Micro USB Upgrade Port
AV IN
Reserved Port
Video OUT
Power IN
DO NOT connect the power cable to the reserved port. This will cause serious
damage to both the flight controller and the N1 Video Encoder.
The video and power cables are delicate parts. Handle with care.
© 2015 DJI. All Rights Reserved.
3
N1 Video Encoder User Manual
You will require a 2.0mm hex key and foam tape to install the N1 Video Encoder onto the M100.
If you are using HDMI IN, prepare an HDMI cable. If you are using AV IN, prepare a soldering
iron, some solder and heat shrink tubing for wiring.
Installation
1. Remove the two screws (M3x8 self-tapping) on the Aircraft Status Indicator, and then detach
it from the upper plate gently to avoid damaging the cable.
Handle the indicator
cable gently
Aircraft Status Indicator
2. Remove the 16 screws (M2.5x5) on the upper plate of the center frame, and the eight screws
(M2.5x8) on the mounting rails. Then remove the mounting rails and the upper plate.
M2.5x8
M2.5x5
4 © 2015 DJI. All Rights Reserved.
N1 Video Encoder User Manual
3. Connect one end of the N1 Video Encoder’s video and power cables to their corresponding
10-pin or 8-pin port on the N1 Flight Controller.
Flight Controller
10-pin Port
8-pin Port
4. Place the other end of the power and video cables near the mounting position of the N1
Video Encoder.
5. Re-mount the upper plate of the center frame, and tighten the 16 screws (M2.5x5). Orientate
the upper plate so that the notch faces the left of the aircraft (with its tail facing you). Then
place the mounting rails and tighten the 8 screws (M2.5x8). Refer to the figure in step 2 for
the screw positions.
Aircraft's Tail
Notch
6. Re-mount the Aircraft Status Indicator, and tighten the two screws (M3x8 self-tapping). Do
not overtighten the screws to avoid damaging the threads.
Aircraft Status Indicator
© 2015 DJI. All Rights Reserved.
5
N1 Video Encoder User Manual
7. Connect the other end of the power and video cables to the power and video ports of the N1
Video Encoder.
Power IN
Video OUT
The N1 Video Encoder only supports the DJI N1 Flight Controller. Please strictly follow
the steps above to supply power to the device.
8. Use foam tape to mount the N1 Video Encoder to the expansion bay, gimbal mounting plate
or other flat surfaces.
Usage
Video Encoding
1. Turn on the remote controller and then the Intelligent Flight Battery. Connect your mobile
device to the remote controller and turn on your camera.
2. Connect your camera to the N1 Video Encoder through the HDMI or AV port. The two video
ports cannot transmit together. See the Appendix for the pinout diagram of the AV port.
3. Launch the DJI GO app and enter Camer View. A live camera preview on the screen
indicates that the N1 Video Encoder is working normally.
If both the HDMI and the AV ports are connected, the HDMI signal will take priority.
Firmware Upgrade
Upgrading the Aicraft Firmware
1. Check the Battery Level and Storage Device
Ensure that the Intelligent Flight Battery has at least 50% battery level and that there is at
least 100MB of free space on your USB flash drive.
2. Prepare the Firmware Upgrade Package
1) Download the firmware upgrade package from the DJI Developer website.
(https://developer.dji.com/matrice-100/downloads)
2) Insert your USB flash drive into your PC. Extract all the downloaded files to the root
directory. While the M100 is powered off, remove the USB flash drive from your PC and
connect it to the upgrade port of the N1 Video Encoder using the upgrade cable.
6 © 2015 DJI. All Rights Reserved.
N1 Video Encoder User Manual
3. Upgrade the Aircraft
1) Ensure the remote controller is powered off, and then power on the aircraft. The firmware
upgrade will begin automatically once the aircraft is powered on.
2) The Status LED will blink red and green alternatively to indicate that the upgrade is in
progress. It will take approximately 12 minutes to complete the firmware upgrade.
3) The Status LED will blink green if the upgrade is successful, at which point you should
restart the aircraft. Check the upgrade result by opening the .txt file that is automatically
generated in the root directory of your storage device. The text “result: Success” indicates
that the upgrade is successful.
4) If the Status LED blinks red, the upgrade is unsuccessful. Run the firmware upgrade again.
Upgrading the Intelligent Flight Battery Firmware
The Intelligent Flight Battery firmware is upgraded during the aircraft firmware upgrade. It is
recommended to keep the upgrade package files on your USB flash drive after the firmware
upgrade.
Upgrade the firmware of an extra Intelligent Flight Battery as follows:
1. Power off all the Intelligent Flight Batteries.
2. Insert the battery that needs the firmware upgrade into the battery compartment connected
to the flight controller.
3. Power on the Intelligent Flight Battery in the battery compartment. The upgrade will start
automatically.
Remove the propellers before upgrading the firmware to avoid injuries. DO NOT touch
the motors during the firmware upgrade.
DO NOT start the motors while upgrading the firmware.
DO NOT use the N1 Assistant while upgrading the firmware.
Only USB flash drives formatted with FAT32 or exFAT file systems are supported.
Ensure that there is only one firmware upgrade package on your USB flash drive.
The remote controller may become unlinked from the aircraft after the firmware
upgrade. Re-link the remote controller and aircraft if necessary.
Appendix
Status LED Blinking Patterns
Blinking Pattern
Description
—— Solid Red
No video input
—— Solid Green
Video input detected
Blinking Red and Green Alternatively
Upgrading firmware
Blinking Green
Firmware upgrade successful
Blinking Red
Firmware upgrade failed
© 2015 DJI. All Rights Reserved.
7
N1 Video Encoder User Manual
Supported Video Inputs
Source
Video Formats
AV
PAL, NTSC
HDMI
720p50, 720p60, 1080i50, 1080i60, 1080p25,
1080p30, 1080p50, 1080p60
Specificaitions
Dimensions
65.2 mm × 45 mm × 10.7 mm
Weight
31.4 g
Operating Temperature
-10° to 40° C
Pinout Diagrams
AV Port
[1] GND
1
[2] AV IN
2
3
[3] GND
Reserved Port
[1] IO (RX)
[5] 12V
1
[2] IO (TX)
[6] GND
3
[3] GND
[7] IO (TX)
5
[4] 12V
[8] IO (RX)
8 © 2015 DJI. All Rights Reserved.
2
4
6
7
8
This content is subject to change.
Download the latest version from
https://developer.dji.com/matrice-100
If you have any questions about this document, please contact DJI by
sending a message to [email protected].
© 2015 DJI. All Rights Reserved.