Transcript
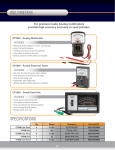
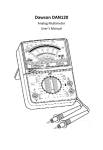
ANALOG MULTIMETER
CP7849
11.Function range switch: A 16 position switch located at the center of
the meter. This switch is used to select the function and range to be
measured.
12.DC milliamps: This function is used for measuring the DC Current
(Direct Current).
13.Mechanical adjuster: A screw located directly below the center of
the meter scale. The mechanical adjuster is used to set the meter
pointer to the Zero mark at the left side of the black scale.
Power supply: One 1.5V, size “AA” cell battery for Ohmmeter.
Size & Weight (with protective boot): 88mm x 155 mm x 49 mm, 288 g.
7. Do not check resistance when voltage or current is present in the
circuit.
8. Discharge a capacitor before measuring it.
9. When the multimeter is not in use, keep the function range switch in
the “OFF” position. This provides a direct short across the meter
movement, stabilizing the needle for minimum needle bounce when
transporting the multimeter.
10.If excessive voltage or current is accidentally applied on a certain
range, disconnect the leads from the circuit as quickly as possible.
Check the multimeter operation on that range by applying an appropriate input. If the multimeter does not operate properly, check the
fuse; if it is blown, replace it. (See Fuse Replacement)
most accurate reading on an ohmmeter ranges between the middle
of the scale and Zero Ohms.
BATTERY CHECK
1. Read all SAFETY PRECAUTIONS.
2. Set the selector switch to the appropriate BAT range.
3. Touch and hold the RED test lead to the (+) positive battery terminal
and the BLACK test lead to the (-) negative battery terminal.
4. Read the BAT scale to determine the battery condition. If the reading
is in the red “BAD” zone, the battery should be replaced. If the reading is in the green “GOOD” zone, the battery has considerable life
left. If the reading is in the “?” zone, the battery should be replaced
soon because the remaining power is very low.
SAFETY PRECAUTIONS
OPERATING INSTRUCTIONS
1. Always visually inspect the multimeter, test leads, and circuit under
test for damage prior to every use.
2. Turn off power and discharge any capacitors and inductors prior to
connecting or removing test leads from an electrical circuit or electronic equipment.
3. Always keep yourself isolated from an electrical circuit when making
measurements. When possible use one hand to make measurements.
4. Never allow yourself to be grounded when making electrical measurements. Stand on a rubber mat, wear dry clothing, use insulated
test probes, and be careful of all exposed metal when making electrical measurements.
5. Never hold multimeter when making electrical measurements. Place
the multimeter on a clean insulated surface before making any electrical measurements.
OPERATING PROCEDURES
DC VOLTAGE MEASUREMENT
1. Read all SAFETY PRECAUTIONS.
2. Set the function range switch to the appropriate DC voltage range. If
the voltage is unknown, use the highest range.
3. If the polarity of the circuit to be tested is known, connect the BLACK
probe to the (-) negative voltage side of the circuit, and the RED
probe to the (+) positive voltage side.
4. If the polarity of the circuit to be tested is not known, connect the
probes to opposite sides of the circuit and watch the meter pointer. If
the meter pointer deflects to the left, reverse the probes. The RED
probe will now be connected to the (+) positive voltage side.
5. Use the black scale for reading DC voltage measurements.
GENERAL DESCRIPTION
The CP7849 Analog Multimeter is a rugged, accurate, easy-to-operate,
compact instrument. The stable linear meter movement allows it to make
accurate measurements of AC and DC voltages, DC currents in the
milliamp range, resistance, and decibels. The multimeter uses the most
modern components and circuit techniques designed in a high-impact
case. If the tester is kept clean and is not subjected to extreme shock or
continuous vibration, it will provide many years of trouble-free service.
SPECIFICATIONS
ELECTRICAL
Range:
DC voltage:
AC voltage:
DC current:
Resistance:
Decibel:
Accuracies:
BAT test:
19 measuring ranges
0-2.5-10-50-250-500 volts
0-10-50-500 volts
0-0.5-10-250 mA
RX10 Ohm, RX1kOhm
-10 dB to 56 dB at AC volt ranges
DC V/mA, AC V, Resistance 5% of Full Scale
1.5V and 9V batteries 10% of Full Scale
MULTIMETER BASIC FUNCTIONS
1. Protective boot
2. Meter
3. OHMS: This function is used for measuring the resistance of a component.
4. Zero Adjuster: A thumbwheel adjustment located on the left side of
the multimeter. The zero adjuster is used to zero the meter pointer
when making resistance measurements.
5. AC VOLTS: This function is used for measuring AC (Alternating Current) voltages.
6. BAT: This function is used for testing 1.5V and 9V batteries under
load.
7. Protective Caps: Keep the caps on when the multimeter is not in
use.
8. Test leads
9. OFF: When the multimeter is not in use, keep the function range
switch in the OFF position.
10.DC VOLTS: This function is used to measure DC (Direct Current)
voltages.
ACTRON
CAUTION ! When making voltage or current measurements, form the
habit of turning off all power to the circuit under test, and discharge
any capacitors and inductors. Connect the test leads at the desired
points in the circuit and then turn on the power while taking readings.
Turn off the power and discharge any capacitors and inductors, before disconnecting the test leads from the circuit.
PRELIMINARY ADJUSTMENTS
Adjust the meter pointer to the Zero mark at the left side of the black
scale before making any measurements. First, check to see if the meter
pointer indicates Zero at the extreme left end of the black scale. If it is
off-Zero, use a small screwdriver to turn the mechanical adjuster screw
on the meter movement slowly CW (clockwise) or CCW (counterclockwise) until the meter pointer is exactly over the Zero mark.
INTERNAL BATTERY CHECK
Important: A 1.5V “AA” cell battery must be installed before using
the CP7849. (See Battery Replacement)
In order to check the battery condition, set the function range switch to
the RX10 position and touch the ends of the two test leads together.
Rotate the Zero Adjuster thumbwheel located on the left side of the
multimeter until the pointer indicates Zero on the green OHMS scale. If
the pointer cannot be brought to the Zero mark, replace the 1.5 volt size
“AA” cell battery. (See Battery Replacement)
1. No periodic maintenance is required other than replacement of the
battery, fuse, and visual inspection of the multimeter.
2. Keep the instrument clean and dry. Do not use solvent for cleaning;
use a damp cloth.
3. The only field replaceable parts are the 1.5V “AA” cell battery and the
Fast-Acting 5mm X 20mm, 500mA, 250V fuse.
BATTERY REPLACEMENT
1. Read all SAFETY PRECAUTIONS.
2. Set the function range switch to the appropriate DC mA range. If the
current is unknown, use the highest range.
3. Using the test leads, connect the multimeter in series with the circuit
under test. If the meter pointer deflects to the left, reverse the test probes.
4. Use the black scale for reading DC mA measurements.
Important: A 1.5V “AA” cell battery must be installed before using
the CP7849.
1. Rotate the function range switch to the OFF position.
2. Remove protective boot.
3. Remove screws from rear of multimeter and lift off the back cover.
4. Install a new 1.5V “AA” cell battery. Observe the polarity marks.
5. Carefully replace the back cover and tighten the screws. Be careful
not to over tighten the screws, because the threads in the case may
become stripped.
6. Replace protective boot.
AC VOLTAGE MEASUREMENT
FUSE REPLACEMENT
1. Read all SAFETY PRECAUTIONS.
2. Set the function range switch to the appropriate AC voltage range. If
the voltage is unknown, use the highest range.
3. Connect the RED and BLACK test probes to opposite sides of the AC
voltage source. (Polarity of test probes is not important when measuring AC voltage.)
4. Use the red scale for 10V AC voltage measurements. Use the black
scale for 50V and 500V AC voltage measurements.
Important: If the multimeter won’t work at all, check the fuse located
inside the multimeter. If the fuse is blown, all functions stop working.
1. Rotate the function range switch to the OFF position.
2. Remove protective boot.
3. Remove screws from rear of multimeter, and lift off the back cover.
4. Replace blown fuse with a new Fast-Acting 5mm X 20mm, 500mA,
250V fuse.
5. Carefully replace the back cover and tighten the screws. Be careful
not to over tighten the screws, because the threads in the case may
become stripped.
6. Replace protective boot.
DC CURRENT MEASUREMENT
OPERATING INSTRUCTIONS
MAINTENANCE
GENERAL
DECIBEL
1. Read all SAFETY PRECAUTIONS.
2. Set the function range switch to the appropriate AC voltage range for
the dB range you wish to measure.
3. For a function range switch setting of 10 AC V, read the dB directly
from the bottom red scale. For other AC V settings of the function
range switch, add the appropriate number of dB to the dB scale reading as noted on the chart at the lower right corner of the meter face.
RESISTANCE MEASUREMENT
OPERATING SUGGESTIONS
1. Set the range switch to the proper position before taking any measurement.
2. Never apply more voltage or current than the amount noted in each
position.
3. When the voltage or current to be measured is not known, always
start with the highest range in each case.
4. If the meter pointer is in the lower half of the scale and falls within
the range of a lower function range switch position, then rotate the
function range switch to the lower range for greatest accuracy.
5. If none of the multimeter functions work at all, check the fuse located inside the multimeter on the printed circuit board. If the fuse is
blown, replace it. (See Fuse Replacement)
6. Avoid placing the multimeter in a place where severe vibration is
encountered. Do not store it in excessively hot or damp places!
1. Read all SAFETY PRECAUTIONS.
2. Turn off all power in circuit before making resistance measurements.
3. Set the function range switch to the appropriate OHM range. If the
resistance is unknown, use the highest range.
4. Touch the ends of the two test leads together. Rotate the Zero Adjuster thumbwheel located on the left side of the multimeter until the
pointer indicates Zero on the green OHMS scale. If the pointer cannot be brought to the Zero mark, replace the 1.5 volt size “AA” cell
battery. (See Battery Replacement)
5. Connect the test probes across the resistance to be measured.
6. Take a reading on the green OHMS scale and multiply it by the multiplication factor indicated by the function range switch. Multiply reading by 1K (1000 ) for the RX1K position and, by 10 for the RX10
switch position. The units for the RX10 position are Ohms “ ”.
7. If there is little or no meter pointer movement from the left side of
the green OHMS scale, rotate the function range switch to a higher
range in an effort to get a greater deflection of the meter pointer. The
HAND TOOLS