Transcript
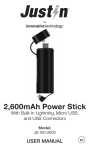
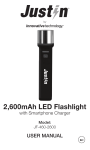
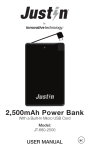
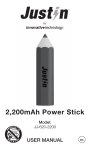
TM
By Innovative Technology
Model No. ITSS-9500
User Manual
This package includes:
(1) One unit of Laptop Lock Alarm,
Specification
Power: 3 x AAA batteries(not included)
34 inch long retractable cable
100dB siren
(2) One unit of Personal alarm
Specification
Power: 4 x LR41 button cell
3mm super bright LED torch
100dB siren
Laptop Lock Alarm
8 8 8 8
7 7 7 7
6 6 6 6
OPEN
Cable lock head
Release button
8 8 8 8
7 7 7 7
6 6 6 6
Cable plug head
Combination set
button
Trigger
Battery cover
Speaker
Alarm button
Laptop Lock Alarm comes with the combination 0000 preset.
You should set a new combination before using the lock.
You need to use the supplied Laptop Lock Adapter to secure a
notebook computer. You can provide physical security without
using batteries. Select an object in the room to which you will
secure your property with the Laptop Lock Alarm.
Using Laptop Lock Alarm
1. Locate the combination dials at the top of the lock.
2. Using the dials, enter the current combination.
3. Press the cable trigger and extend the cable to the
required length
4. Wrap the cable around your property and the selected
object.
5. Insert the plug head into the lock part until you hear a
"click". If batteries are installed in the Laptop Lock Alarm,
3 “beep” sounds and LED light will indicate it’s triggered
6. Turn the dials to conceal your combination
For added security, you can activate the motion alarm. The
Laptop Lock Alarm requires three AAA batteries which provides
alarm function . The alarm active when:
- The steel cable is cut.
- The Laptop Lock Alarm is tilted, shaken or moved while
the optional motion alarm feature is set. (This feature is
unsuitable for use in moving vehicles where vibration can
trigger the alarm).NOTE: Wrap the cable around a part of
the object that will prevent a thief from slipping the cable
off (for example, a table or de sk leg with a cross bar).
Setting the Combination
1. Make sure the Laptop Lock is unlocked and the cable is
fully retracted. (The preset combination 0000).
2. Using the dials, enter the
current combination.
1 1 1 1
0000
9 9 9 9
Security Lock top view
3. Press and firmly hold the
Combination set button located next to the cable. Enter the
new combination using the dials. Do not release the button
until after you have set all your combination dials to the new
code.
4. Release the combination set button, or pull the cable plug
head up, to save the new combination.
5. Record the combination in either the space provided at the
user manual or another e asy-to-find place.
6. Test the combination BEFORE attaching the lock to an item.
Unlocking the Laptop Lock
1. Using the dials, enter the current combination.
2. Press the release button to release the plug head.
3. Retract the cable by pressing and holding the trigger while
guiding the cable into the unit.
4. Release the trigger when the cable is fully retracted
CAUTION: The cable retracts quickly and may cause the plug
head to whip around if not controlled.
Adjusting the Cable Length
Befor e adj ustin g the cabl e leng th , e nter the c urr ent
combination and unlock the Laptop Lock.
To extend the cable:
1. Press and hold down the trigger.
2. Pull the cable away from the unit.
3. Release the trigger to set the cable length.
To retract the cable, or sho rten the length,
1. Press and hold down the trigger while guiding the cable into
the unit.
2. Release the trigger when you finish rewinding the cable.
CAUTION: The cable retracts quickly and may cause the plug
head to whip around if not controlled. To avoid possible
property damaging or personal injury when retracting the
cable, press and release the trigger in a pulsing motion so that
it rewinds slowly.
Adding or Changing Batteries
To prevent a potential thief from silencing the alarm, the
battery cover is designed to lock when the Laptop Lock is
locked. To add or change batteries.
1. Using the dials, enter combination.
2. Press and hold down the release button.
3. Slide the battery cover from the body of the Laptop lock and
then let go of the release button.
4. Remove existing batteries, if any.
5. Insert new batteries. Press and hold d own the release button again and slide the battery cover back in place.
6. Release trigger button and check that the battery cover is
secure.
Using the Security Lock Motion Alarm Feature
If the steel cable is cut, the siren will sound immediately. The
Laptop lock features a two-level sensitivity motion alarm. The
alarm activate when detects vibration:
* Beeps 5 times, then siren for 40 seconds, and then
* Rearms itself to the current sensitivity l evel
Activating the Motion Alarm
CAUTION: Never activate the motion alarm in a moving
vehicle as the vibrations may trigger the alarm.
2 sensitivity levels are available:
Level 1 - Low Sensitivity
To set the motion alarm for low sensitivity (Alarm to be
activated by 10 seconds continues movement):
1. Secure and lock the Laptop Lock.
2. Press and hold the activate motion alarm button until
you hear two beeps.
3. Release the button.
The status light cyclically flashes twice indicating that
the motion alarms armed at level 1.
Level 2 - High Sensitivity
To set motion alarm for high sensitivity. (Alarm to be activat ed by 10 seconds continues movement):
1. Secure and lock the Security Lock.
2. Press and hold the activate motion alarm button until you
hear two beeps for the second time.
3. Release the button.
The status light cyclically flashes three times indicating
that the motion alarm’s armed at level 2.
Changing the Motion Alarm from Low to High Sensitivity
Press and hold the motion alarm button until you hear three
beeps. The status light flashes three times every second
indica ting that the motion alarm is armed to high sensitivity.
Disarming the Motion Alarm
To neutralize the motion alarm and turn off the siren, unlock
the Security Lock.
Using the Laptop Lock Adapter
1. Locate the laptop lock slot at your computer.
2. Unlock the Laptop Lock Adapter by
pulling the black plastic out of the
Lock shaft.
Unlock the SLA
3. Insert the Laptop Lock Adapter into
your computer's
Security lock slot.
Notebook security
lock slot
4. Lock the Laptop Lock Adapter by pushing the black plastic
piece back into the lock shaft.
5. Thread the Laptop Lock cable
through the hole in the Laptop
Lock Adapter.
6. Security the Laptop Lock set on the motion alarm, if
desired.
Record of Combination Code
0
0
0
0
Disclaimer: laptop Lock/ Alarm has been designed as a
deterrent to theft. The manufacturer or supplier cannot accept
any liability for personal injury, property damage or loss.
Troubleshooting
Alarm doesn't sound or only makes a "clicking" sound
when activated.
Check battery life and replace the batteries if necessary. If
battery life is OK, Remove and refit batteries to reset.
The steel cable will not totally retract back into the main
unit
Whilst pressing the cable trigger button gently pull some of the
cable out again and then allow it to retract back slowly into the
unit. Repeat several time if necessary pulling out less cable
each time.
Using Personal Alarm
Operation procedure
To activate the unit
Remove the tag.
Siren
To operate the unit
(1) To trigger the alarm,
Just pull out the strap
(2) To use as Light ,
Just press the button
To replace batteries
++ ++
Open the back
cover with a small
screwdriver
Replace with
4 x LR41
Cover the back
cover
WARNING
This Personal Alarm has a vey loud siren which may cause
ear damage if used al close range and or prolonged periods
of time. Do not ho ld close to ears and keep away from
childr en and pets.
Disclaimer: The Personal Alarm has been designed as a
deterrent against attack. It does not in any way guarantee
protection. It is purely an alarm signaling device. The
manufacturer or supplier cannot accept any liability for
personal injury, damage or loss.
This Class B digital apparaties with Canada ICES- 003
Innovative Technology Electronics Corp.
Limited Warranty: 90 Days Labor, One Year Parts
Innovative Technology Electronics Corp. (IT) warrants the
product to be free from "Defects" in materials under normal
use for a period of "One Year" from the date of the original
purchase. The Warranty is "Not" transferable. IT agrees,
within the initial "90 Day" period, to repair or re place the
product if it is determined to be defective at "No Charge". It is
further agreed that IT will cover the cost to repair or replace
damaged "Parts" only for a total period of "One Year" from the
date of the original purchase. The warranty does not cover
cosmetic damage, antennas, AC cords, cabinets, headbands,
ear-pads, or damage due to line power surges, connection to
improper voltage sup ply or settings, misuse, mishandling,
accident, acts of God or attempted repair by an unauthorized
service agent.
To obtain service, the purchaser MUST present an
original sales receipt / proof of purchase. Please contact
us at www.ithomeproducts.com to request an RMA
( R e t u r n M a t e r i a l Au t h o r i z a t i o n ) n um b e r t o r e t u r n
products for service or replacement. Returns without an
RMA number on the package will be refused and returned to
sender. Upon receipt of the returning item and our full
inspection (IT) may issue a replacement to customer for the
same item or of one that has equivalent value and features. To
return an item, supply full name, return address, phone
number, item purchased, receipt of purchase and reason for
return to obtain RMA number.
All returns must be in the original packaging or reason-able
substitute to prevent damage.
Customer "Must" include full name, shipping address and
telephone number inside of package. No return will be
shipped back to a PO Box or APO address.
Please include your check or money order in the amount of
USD$5.00 for items $10.00 to $39.99 (Price Paid Per Unit)
USD$10.00 for items $40.00 to $99.99. (Price Paid Per Unit)
USD$16.00, for items $100.00 and up. (Price Paid Per Unit)
Shipping fees are non-refundable
to be payable to Innovative Technology Electronics Corp.(for
handling and return shipping charges) (IT) will not be
responsible for delays or unprocessed claims resulting from a
purchaser's failure to provide any / all of the necessary
information.
Send all inquiries or RMA request via our website
www.ithomeproducts.com/support.
Innovative Technology Electronics Corp.
1 Channel Drive
Po rt Washington, NY 11050
Toll free: 1-877-483-2497
Website for support: www.ithomeproducts.com/support
There are no express warranties except as listed above.
REPAIR OR REPLACEMENT AS PROVIDED UNDER THIS
WARRANTY IS THE EXCLUSIVE REMEDY OF THE
CUSTOMER, (IT) SHALL NOT BE LIABLE FOR ANY
INCIDENTAL OR CONSEQUENTIAL DAMAGES FOR
BREACH OF ANY EXPRESS OR IMPLIED WARRANTY ON
THIS PRODUCT EXCEPT TO THE EXTENT PROHIBITED BY
APPLICABLE LAW. ANY IMPLIED WARRANTY OF
MERCHANTABILITY OR FITNESS FOR A PARTICULAR
PURPOSE ON THIS PRODUCT IS LIMITED IN DURATION
TO THE DURATION OF THIS WARRANTY.
Some states do not allow the exclusion or limitation of
incidental or consequential damages, or limitations on how
long an implied warranty lasts, so the above exclusions or
limitations may not apply to you. This warranty gives you
specific legal rights and you may also h ave other rights, which
vary from state to state.
FCC Statement
Warning: Changes or modifications to this unit not expressly
approved by the party responsible for compliance could void
the user authority to operate the equipment.
NOTE: This equipment has been tested and found to comply
with the limits for Class B digital device, pursuant to part 15 of
the FCC Rules. These limits are designed to provide
reasonable protection against harmful interference in a
residential installation.
This equipment generates, uses and can radiate radio
frequency energy and, if not installed and used in accordance
with the instructions, may cause harmful interference
to radio or television reception, which can be determined by
turning the equipment off and on, the user is encouraged to try
to correct the interference by one or more of the following
measures:
- Reorient or relocate the receiving antenna.
- Increase the separation between the equipment and the
receiver.
- Connect the equipment into an outlet on a circuit different
from that to which the receiver is connected.
- Consult the dealer or an experienced radio/TV technician for
help.