1
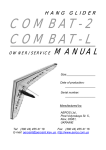
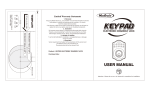
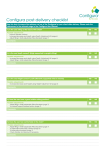
Pilot Handbook:Handbook
10/7/08
02:22
Page 44
Chapter 7: Safety equipment
Emergency parachutes
An emergency parachute gives you a second chance, perhaps a final
chance, when some catastrophe occurs. This section details the
important points about buying, installing, maintaining and using a
parachute. Hopefully this will increase the chances of the emergencyparachute system working successfully if it is ever needed.
The basic parachute system comprises the canopy and its lines, its bridle
and the attachment to the harness. The system is completed by the
deployment bag, which holds the packed canopy and lines, all stowed in
a container which is fitted securely to the pilot’s harness.
The early emergency parachutes produced for hang gliding used round
or ‘conical’ shaped canopies. Since the late 1980s virtually all emergency
parachutes produced for hang gliding and paragliding are of the pulleddown-apex design (or variations on it). A central line holds the middle
of the open canopy more or less level with the skirt, so that air pressure
forces the skirt out and the canopy presents the maximum drag area
for the smallest amount of material. Such designs are also very rapid
opening. The downside of these types is that some designs can be very
unstable and can produce massive opening shocks: both of these can be
catastrophic, so it is important that you buy a properly independently
tested and approved product.
conical
pulled-apex
Figure 7.1 Conical and pulled-apex emergency parachutes
44
Pilot Handbook:Handbook
10/7/08
02:22
Page 45
Chapter 7: Safety equipment
Choosing a parachute
Buying a parachute that is clearly marked as conforming to the CEN
standard EN12491 is strongly recommended. Such parachutes will have
passed rigorous speed of opening tests, descent rate tests (max. 5.5m/s),
stability tests and strength tests. In the strength test the manufacturer
has the choice of two test speeds, and the successfully certified
parachutes therefore carry on the certification label the warning: ‘not
suitable for speeds in excess of 32m/s (115km/h)’ OR ‘not suitable for
speeds in excess of 49m/s (176km/h)’. Other than checking the
certification label and deciding whether you will be happy with the
lower speed certification or whether you want the added strength of the
higher speed tested alternatives, the final very important thing you need
to do is check that it is available in a size suitable for your total weight
in flight (this figure includes the weight of your glider).
If you buy a parachute not certified to EN12491 then the earlier DHV
and AFNOR standards give some measure of quality assurance, but you
must be careful to ensure that the parachute you select will give an
acceptable descent rate at your total weight in flight. Look for one with
documented rates of descent at different loads, and choose one that will
give a descent rate of less than 7.5m/sec (ideally around 5.5m/sec) at
your total weight in flight.
Descent rates / equivalent fall height: As the expected descent rate
increases, so does the likelihood of injury and its severity. A descent rate
of approximately 5.5m/s (18ft/s) is recommended as this keeps the likelihood of injury low while keeping all the other design factors (parachute
bulk, weight) manageable. Slightly higher descent rates are acceptable,
but a descent rate of 7.5m/s (24.5ft/s) should be regarded as being the
maximum limit: any existing parachute system that will, at your all-up
weight, give you a sea-level descent rate greater than 7.5m/s should be
replaced.
It is sometimes easier to visualise vertical descent rates by equating
them to stepping off a wall of a certain height. 5.5m/s (18ft/s or 12.3mph)
is your velocity when you hit the ground after stepping off a wall 1.5m
(5ft) high. A descent rate of 7.5m/s is equivalent to a drop of 2.5m (8.2ft).
When you have imagined falling from this height onto your feet and
doing a PLF, try imagining falling from this height onto your back, or
your side, or your head…
You should also bear in mind that in an actual emergency, factors such
as lift, sink, altitude, a semi-inflated paraglider or a damaged hang
glider may all conspire to increase or decrease your descent rate.
45
Pilot Handbook:Handbook
10/7/08
02:22
Page 46
Section 2: Know Your Equipment
Buying second-hand
There is nothing intrinsically wrong with buying a second-hand
parachute, but you are strongly advised to have it inspected by a BHPAlicensed ‘Parachute Systems Checker and Packer’. Many parachutes sold
to hang glider pilots in the 1990s were far too small and could produce
fearsome descent rates if ever used at typical hang glider payloads,
assuming the opening shock did not burst them or break the pilot’s
harness. These should be avoided. The licensed packer will check that
the parachute is the right size for you, has been well looked after, is not
too old (ten years should be considered as the total life of a canopy –
those without dates of manufacture, the manufacturer’s name and serial
numbers should be avoided) and that it is in good serviceable condition.
Checking parachute area
There are many ways of measuring parachutes. To avoid confusion,
BHPA-licensed packers all take the following simple steps:
1 Measure from the peripheral hem
in the centre of a gore up to the
very apex of the parachute
(including the lines). This gives the
y dimension.
2 Measure the width of the gore at
the peripheral hem, and halve this
figure. This gives the x dimension.
y
3 Multiply x by y to give the surface
area of the individual gore.
4 Multiply the result by the number
of gores to get the total surface
area of the parachute.
x
Figure 7.2 Measuring the surface area of a gore
46
Pilot Handbook:Handbook
10/7/08
02:22
Page 47
Chapter 7: Safety equipment
Estimating descent rates where no data is available
The graph below can be used to indicate the likely descent rate of a
typical PDA canopy given your total weight in flight and the canopy area.
(Check that your parachute area is measured using the BHPA method.)
135
130
imum
)
125
90
m/
rec
95
5.5
100
(BH
105
(BHP
A-re
load (kg)
110
sd
es
ce
nt
om
rat
me
e
nd
ati
on
)
7.5m
/s de
scen
com
t rate
men
ded
abso
lute
max
115
PA
-
120
85
80
75
70
15
20
25
30
35
40
45
PDA canopy area (m2)
50
55
60
65
Figure 7.3 Graph of canopy area against load for typical pulleddown-apex parachutes
This graph is based on a Cd (Coefficient of drag) of 1.2, typical of many
simple pulled-down-apex designs, although the actual Cd of a particular
canopy will depend on a number of factors, including canopy shape,
fabric permeability, line lengths and drive. (‘Drive’ means that the PDA
canopy glides – usually contrary to the designer’s intent and expectation
– and so creates lift, which helps reduce the descent rate: the downside
is that your ground impact energy may be increased because of the
lateral velocity, which may be significant.) The real descent rate is
further complicated by stability. Live drop tests have shown that there
can be a huge disparity in the way parachutes descend: whilst some are
stable, many oscillate or ‘cone’ (a swirling sycamore-like action) which
can greatly affect the descent rate. So this graph can only provide a ‘ballpark’ indication.
47
Pilot Handbook:Handbook
10/7/08
02:22
Page 48
Section 2: Know Your Equipment
The graph should not be used when actual data is available, nor
for anything other than conventional (non-slotted, non-steerable)
PDA canopy types.
User manual
Ensure you receive a user manual with your parachute: this should
contain instructions for installing it, using it and re-packing it, as well as
data on performance, size and recommended load.
Make sure that the parachute has the correct bridle for your glider type:
• Hang-glider parachutes require a six-metre bridle to keep the
parachute clear of the wreckage.
• Single-riser paraglider parachutes require a short bridle with an
additional Y-bridle to connect it to the two harness-attachment
points.
• Multi-riser paraglider parachutes connect the appropriate risers
directly to the left and right harness-attachment points.
The complete system
Having the perfect parachute is not much use if it won’t fit in your
harness, or if you can’t get it out of your harness when you need to, or
if the connections to your harness are not strong enough. Emergency
parachutes must be regarded as part of a complete system. For this
reason you are strongly advised to buy a system from a BHPA-licensed
packer, who will have the knowledge required to sort out the whole
package, rather than just selling you an expensive component which
may actually be of little or no use to you.
Installing
Always unpack and inspect a parachute before fitting it to your harness:
it is not unusual to find faults in brand-new equipment, so check
carefully. Be aware that many parachutes are shipped ‘packed for
transit’ and look ready for use but are not!
The parachute’s outer container must be mounted in a suitable place
on the harness (although in many cases it is built into the harness). It
may be on the front or on either side; with paraglider harnesses it could
also be on the back or even under the seat. All of these positions have
advantages and disadvantages:
• Does the pack get in the way during take-off, flight or landing?
• Does the pack location involve extra connections when putting the
harness on for flight (which might be forgotten)?
48
Pilot Handbook:Handbook
10/7/08
02:23
Page 49
Chapter 7: Safety equipment
• Is the mounting secure, so that the deployment bag can be
extracted easily?
• Can you see the handle?
• Can you easily reach the handle with either hand? If you can only
reach it with one hand, you have only half the chance of a
successful deployment!
• Is the handle likely to get accidentally caught and cause
inadvertent deployment?
Make sure that the parachute fits properly in the harness: quite a few
harnesses have been manufactured with parachute containers which
are far too small, and you may need to have such a container enlarged
so that you can fit a parachute of suitable size.
Make sure your emergency-parachute riser is correctly attached to your
harness. Modern certified paraglider harnesses are supplied with tested
loops on the shoulders: you must attach the parachute to both of these
so the load is spread equally. With hang-glider harnesses the emergency
parachute is connected to the main harness suspension point, using a
separate steel maillon connector. The bridle(s) must be carefully routed
to ensure that no twists will occur as your emergency parachute deploys
and that the bridle(s) will not get tangled with your paraglider
risers/hang glider hang-strap – or with you, the pilot – you do not want
the bridle around your neck! (See the section on connectors in Chapter
8.)
Check the whole system when it is put together, with you suspended in
the harness in full flying kit:
• Is the strop on the deployment handle strong enough to withstand
the force of the pull?
• Is the strop on the deployment handle the right length? It must pull
the outer-cover closure pins completely clear before starting to
drag the deployment bag out. If not, it will be impossible to extract
the parachute no matter how hard you pull!
• Can you easily deploy with either hand?
If you are not 100% confident that you fully understand the whole list of
items that must be matched and checked to create an effective
emergency parachute system, then get a BHPA-licensed packer to install
it properly for you and explain the system to you. In fact, even if you
have put the system together yourself and feel confident that you have
done a good job, why not invest in your future by having an independent
49
Pilot Handbook:Handbook
10/7/08
02:23
Page 50
Section 2: Know Your Equipment
pair of eyes give it a check-over? Pilots of all abilities have been
responsible for the many packing and installation errors discovered over
the years.
Maintenance and repacking
Ideally every pilot should learn how to repack his or her own parachute,
and so become completely familiar with the system. You can learn how
to do this at a parachute-repacking evening organised by your local club
(make sure that a BHPA-licensed packer will be supervising the
evening). Alternatively, take your equipment to a BHPA-licensed packer
and get the packer to show you how to repack it. (If you really don’t
want to understand your emergency system, simply get the packer to
do a full inspection and repack.)
Repacking should be carried out at the intervals recommended in the
parachute’s user manual. In the absence of such recommendations,
check and repack your parachute every six months. (If it has become
damp it should be aired immediately and repacked when completely
dry.) Repacking provides an opportunity for a close examination of the
entire parachute system for general viability and wear and tear. It also
allows replacement of the rubber bands, which perish, with new bands
of exactly the correct specification.
By fitting a parachute your chances of surviving an in-flight catastrophe
have been increased, but you are now exposed to the danger of
experiencing an in-flight emergency in the form of an unintentional
deployment. Approximately one in three deployments are unintentional!
– this is mainly because pilots fail to check and maintain their equipment adequately.
Pre-flight checks
As part of your pre-flight actions:
• Check that your parachute container is properly closed and that
any closure pins are secure and free to release.
• Check that the deployment handle is accessible.
• Check that no slack loops of riser have slipped out of your
parachute container.
• Check that you have easy access to your hook knife.
Be particularly careful with Velcro closure systems. As Velcro gets old, it
can get clogged. It can also lock together over time, so a pull that is easy
50
Pilot Handbook:Handbook
10/7/08
02:28
Page 51
Chapter 7: Safety equipment
when the parachute is first assembled can become almost impossible
after six months. Pin closures are generally much better, but still need
constant vigilance.
Don’t be the next pilot to end up dangling beneath your ‘chute when you
least expect it!
Using your emergency parachute
Practising
Once you’ve got your system sorted out, the next job is to learn how to
use it. Your emergency parachute’s user manual should advise you how
to deploy for real, and how to practise (on the ground). Some clubs and
schools have built suspended systems that you can strap into for
practising deployment. Make full use of any simulator to which you have
access: practise looking, grabbing and activating your parachute handle
with first your right hand and then your left hand. Make sure you know
whether the container requires you to pull in a certain direction. The
slowest elements in deploying the emergency parachute are invariably:
• making the decision
• getting the parachute out of the harness and thrown.
Time and effort spent in practising these actions and improving these
parts of the system will pay the biggest dividends.
When to deploy
With situations such as a structural failure of your hang glider or
paraglider, the appropriate action is clear: deploy the parachute!
With paragliders there is a range of less clear situations where control
of the canopy has been lost but may be regained. The decision whether
or not to deploy will depend on the height that will be lost during your
attempts at recovery and your initial proximity to the ground. Several
pilots have been killed (and many injured) impacting the ground while
still trying to recover control of their paragliders, when their parachutes
would almost certainly have saved them. The crucial point is that any
efforts to regain control of the paraglider must be secondary to the
key concern of monitoring your height. Recovering from a complete
mess is very satisfying if you have plenty of height to play with; however,
descent rates can be extremely fast when a canopy is spinning out of
control. Don’t leave deployment to the last minute.
If in doubt, throw it out!
51
Pilot Handbook:Handbook
10/7/08
02:28
Page 52
Section 2: Know Your Equipment
Cumulonimbus
Do not deploy your parachute as a method of escaping from a cumulonimbus (not that you should ever allow yourself to get anywhere near
one!). You will in all probability be swept up into the thundercloud while
dangling powerlessly underneath your parachute.
In such an emergency situation hang-glider pilots are probably best
advised to try to fly away from the danger, while a paraglider pilot’s best
option is probably to use the spiral dive rapid-descent technique. This
will give a much higher descent rate than a parachute – perhaps 15m/s
(50ft/s). Of course, if you have suffered catastrophic structural failure in
the cloud your outlook is rather bleaker – you can throw the parachute
and risk being swept up, or delay the throw and risk your parachute
and/or harness being shredded by the opening shock. Whilst the latest
CEN certified parachutes will survive an opening after a very few
seconds of free-fall, most will not. And few, if any, current paraglider
and hang-glider harnesses are designed to take free-fall parachuting
shock loads. So keep clear of cu-nimbs.
Deploying your parachute
1 LOOK for the deployment-bag handle. Harnesses (especially
paraglider harnesses) can have a number of adjustment straps that
may easily be confused with the parachute deployment handle in
an emergency. Be sure to look for the correct handle so you don’t
waste precious time tugging on the wrong strap – many
parachutists have died through pulling a strap instead of the
correct handle.
2 Reach and grab the handle securely. If your right hand is not
available, use your left!
3 Get the parachute out. Some container systems require you to pull
the handle in a certain direction to release the curved pins (safety
locks) before you can extract your parachute. Some Velcro
configurations require you to peel the opening flap downward to
extract the parachute. It may even be that you need to use both
hands to get the parachute out! Make sure that you know your
equipment.
4 Look for clear air and throw the parachute out towards it.
Throw hard. If it is possible, throw the parachute towards the sky,
or upwards and out.
– You can throw better if you grab the whole parachute deployment
bag using both hands.
52
Pilot Handbook:Handbook
10/7/08
02:28
Page 53
Chapter 7: Safety equipment
– Your riser(s) should come to full extension followed by your lines
and canopy. If you get a good throw away from you, your system
will open with less loss of height. If you drop your emergency
parachute below you, you risk entanglement. You will also fall a
greater distance before the parachute inflates and takes your
body weight.
– You may want to avoid throwing the parachute down between
your legs.
– Hang glider pilots may wish to avoid throwing the parachute
through the control frame as this could result in the glider
inverting, which usually limits the pilot’s ability to adopt a
sensible landing position.
5 Look to make sure your parachute has opened. The deployment
bag should release and the canopy start to deploy as soon as the
bridle is at full stretch. If it does not, try yanking the bridle several
times very hard. Hopefully, the parachute will inflate and the bridle
will be yanked out of your hand. If this does not release the
deployment bag, pull the parachute back in, hand over hand. Throw
the parachute again.
– If the deployment bag has released but your canopy has not yet
inflated, yank vigorously on the bridle. This will help to spread
the suspension lines and open an air channel.
– If you are pulling on a parachute bridle, never wrap the line
around your hand and let it go immediately the parachute starts
inflating. The parachute will inflate with tremendous energy.
6 Prepare for impact. Paraglider pilots should assume the PLF
position (see ‘Keep practising your PLFs!’ on page 11). Hang-glider
pilots should unzip their harness and climb into the control frame,
keeping their weight distributed towards both corners of the basebar. If this is not possible, concentrate on getting into a footdown/head-up position with your feet together and your knees
slightly bent. Keep your arms and head tucked in. Try to use your
legs as shock-absorbers by allowing them to flex as you impact.
Allow your body to roll in the direction of the impact.
After you impact, disconnect from the glider immediately (getting
injured by being dragged across the countryside after a successful
emergency-parachute descent would be a shame). Do whatever you
need to do to get away from the glider and parachute, even if it means
cutting the bridle or cutting your harness (use your hook knife). Deflate
53
Pilot Handbook:Handbook
10/7/08
02:28
Page 54
Section 2: Know Your Equipment
the parachute by grabbing the hem at one side and taking it forward
into the wind.
Radio your friends to let them know your position and condition. You
should also contact the local police, who may be launching a full-scale
search if a member of the public has seen your descent and reported it.
Preventing paraglider re-inflation
With paraglider emergency-parachute systems it is possible for the
paraglider to re-inflate after the emergency parachute has been
deployed, and then for the two to ‘fight’ during the descent, sometimes
with disastrous results. Various methods of disabling your paraglider to
prevent this happening have been suggested, but the most important
point here is that this problem is far less likely to occur if your parachute
is the correct size for you. The lower your rate of descent under
parachute, the less likely your paraglider will want to continue ‘flying’.
If you do find yourself under your emergency parachute, and needing to
disable a re-inflated paraglider, you must avoid any asymmetric action
which could result in a free wing-tip thrashing around uncontrollably.
Pulling both ‘C’-risers (to create a ‘C’-line stall) has been recommended
by European test pilots, and may give additional drag, further slowing
your descent.
Steerable/gliding emergency parachutes
Any steerable/gliding emergency parachute will have twin risers, or
possibly four risers. As with most parachute design alternatives, the
steerable emergency parachute concept has a trade-off. The main
reason for having a steerable emergency parachute is so you can steer
yourself away from any danger during the descent. The disadvantages
are:
• Because these parachutes rely on forward glide for them to create
lift, they require the paraglider to be disabled or released,
otherwise it will re-inflate
• They tend to be complicated to re-pack, with more chance of
difficulties when opening
• If you do not have the space to manoeuvre for a landing into wind,
an uncontrolled landing is likely to be downwind, at wind speed
plus glide speed.
Because of the hang-gliding requirement for a long single bridle, a
steerable emergency parachute is not an option for hang-glider pilots.
54
Pilot Handbook:Handbook
10/7/08
02:28
Page 55
Chapter 7: Safety equipment
Paraswivels
Some hang-glider emergency parachutes are supplied with a swivel
fitted into the bridle. It is not unusual for a broken hang glider to spin
like a sycamore seed as it descends under an emergency parachute, and
the swivel is intended to prevent the parachute suspension lines being
twisted together if this happens. Such twisting could ultimately result in
the canopy mouth being closed, with obvious dangers. Paraswivels are
more common in countries where high-altitude flights are made
regularly, and where a parachute descent is likely to take tens of
minutes rather than the tens of seconds likely in the UK.
Summary
• An emergency parachute should be part of your flying equipment.
• Choose one that will give you a true (non-gliding) descent rate of
around 5.5m/sec (never more than 7.5m/sec) at your total weight in
flight - including the weight of your glider.
• Preferably choose a certified emergency parachute
• Make sure that it is correctly connected to your harness and
correctly installed (so that it can be deployed when you want, and
won’t deploy unintentionally.)
• Maintain it properly (which includes having it repacked regularly).
• Make sure you know how to use it, and use it when you need to!
Helmets
Over the past forty years there has been a great deal of research into
helmet technology, and the recent European CE standard ‘Helmets for
Airborne Sports’ (EN 966) has benefited enormously from this
accumulated knowledge.
A helmet’s effectiveness can only be measured by expensive controlled
testing of transmitted ‘g’ loads and other parameters, so you should
place your trust in the CE standard and should only consider buying a
helmet that conforms and is marked accordingly.
The helmet’s function
We wear helmets to try to prevent head injury, especially brain damage.
The major cause of brain injury in an accident is through acceleration
or deceleration of the brain. Think of the brain as a jelly in a jar: if a
person falls over and bangs their head on a kerbstone, then the head is
55