1
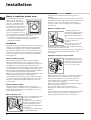
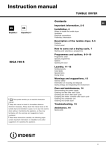
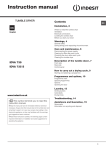
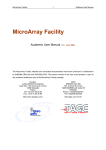
Instruction manual TUMBLE DRYER Contents EN English, 1 EN IInstallation, 2-3 Where to install the tumble dryer Ventilation Electrical connections Levelling the tumble dryer Preliminary information Description of the tumble dryer, 4-5 Front side Rear side Control panel How to carry out a drying cycle, 6 Starting and selecting a programme Programmes and options, 7-8-9 IDVA 735 IDVA 735 S Programme chart Special programmes Options Opening the door Laundry, 10-11 Sorting laundry Care labels Special items Drying times Warnings and suggestions, 12 General safety Information on recycling and disposal Saving energy and respecting the environment Care and maintenance, 13 Keep this manual at hand for immediate reference whenever necessary. Always store this manual close to the tumble dryer and remember to pass it on to any new owners when selling or transferring the appliance, so they may familiarise with the warnings and suggestions herein contained. Disconnecting the power supply Cleaning the filter after each cycle Checking the drum after each cycle Cleaning the tumble dryer Troubleshooting, 14 Assistance and Guarantee, 15-16-17 Spare parts Read these instructions carefully: the following pages contain important information on installation and useful suggestions for operating the appliance. 1 Installation Install the dryer far from gas ranges, stoves, radiators or hobs, as flames may damage it. If the dryer is installed below a worktop, ensure there are 10 mm between the upper panel of the dryer and any objects above it, and 15 mm between the sides 15 mm 15 mm of the machine and the walls or furniture units adjacent to it. This ensures adequate air circulation. Make sure the air inlets on the rear panel are not blocked or obstructed. • You should also make sure that the room in which the tumble dryer is installed is not damp, and that it is adequately ventilated. 10 mm EN Where to install the tumble dryer Ventilation This appliance gently dries laundry by taking in cold, clean and relatively dry air, heating it and passing it through the fabric. To facilitate the drying process, damp air is expelled at the rear, through a ventilation hose. It is important that the room in which the tumble dryer is used is adequately ventilated, in order to avoid the recirculation of waste gases expelled by other appliances. Mobile ventilation system When using the tumble dryer with the mobile ventilation system, a ventilation hose must be connected. The hose should be securely fastened to the ventilation hole at the rear of the appliance (see Description of the tumble dryer). We recommend the hose is connected to an outlet near the tumble dryer, if possible. If it cannot be installed in a permanent spot, the tumble dryer will still function perfectly well if the ventilation hose is passed through a partially-opened window. Make sure you do not point the ventilation hose towards the air inlet, which is located on the rear of the appliance. The ventilation hose should not exceed a maximum length of 2.4 metres; it should also be shaken frequently to remove any fluff, dust or water deposits inside it. Make sure you do not crush the hose. Fixed ventilation system We recommend the ventilation hose is connected to a ventilation system for windows or doors, available from the retailer which originally sold you the appliance or from your local spare parts stockist. Wall ventilation hole B A 2 1. Leave an opening in the wall to the left of the tumble dryer installation site. 2. Make the hose as short and straight as possible, in order to prevent any dampness from condensing and leaking back into the appliance. 3. The hole in the wall must also be straight and pointing downwards, so that the flow of air coming out is not impeded. Areas A and B should be checked frequently, to prevent the accumulation of fluff or debris, particularly if the tumble dryer is used very often. The hose adaptor must be fitted correctly, in order to prevent damp air from coming back into the room. Window ventilation hole 1. Theoretically, when the tumble dryer is operating with a full load, the ventilation hole should be directly behind the fan. 2. It is therefore important that the hose is as short as possible. Make sure you do not push the tumble dryer too far backwards, as this could lead to the ventilation hose being crushed, bent or even disconnected. There should be no cuts, bottlenecks or U-shaped bends in the hose, as these could impede ventilation or trap condensation. Ventilation through an open window The end of the hose must be facing downwards, in order to prevent the hot, damp air from forming condensation in the room or the tumble dryer. Make sure that the tumble dryer is adequately ventilated, and that the end of the ventilation hose is not pointing towards the air inlet pipe on the rear of the appliance. The ventilation hose must always be fitted to ensure correct tumble dryer operation. Make sure that the ventilation hose and the air inlet pipes are not obstructed or blocked. Do not let the tumble dryer recirculate foul air. Improper use of the tumble dryer may result in fire hazards. The air emitted by the tumble dryer should not be expelled in the same duct as used for the fumes produced by different appliances which burn gas or other fuels. Electrical connections Levelling the tumble dryer Before plugging the appliance into the socket, check the following: Make sure your hands are dry. The socket must have an earth connection. The socket must be able to withstand the machines maximum power output as indicated on the data plate (see Description of the tumble dryer). The power supply voltage must fall within the values indicated on the data plate (see Description of the tumble dryer). The socket must be compatible with the dryers plug. Should this not be the case, replace the plug or the socket. Do not use extension cords. The dryer must not be installed outdoors, even if the space is sheltered. It can be very dangerous if exposed to rain or storms. Once installed, the dryers electrical wire and plug must be within reach. The power cord must not be bent or squashed. The power cord is supplied fitted with a BS1363 plug and with a 13 amp BS1362 fuse. If it is necessary to fit a replacement fuse, it must be a 13 Amp ASTA approved to BS1362 type. WARNING: The plug must not be used without a fuse cover. If a replacement fuse holder/cover is required, it must be of the same colour coding or wording as shown on the base of the plug. Replacements are available from authorised dealers. The tumble dryer should be installed level in order to operate correctly. EN After installing the tumble dryer in its permanent position, make sure it is level; check its side-to-side levelling first, followed by front-to-back. If the tumble dryer is not perfectly level, use a wooden block to support it while you adjust the two front feet, making them taller or shorter as necessary. Moulded plug Preliminary information Once the tumble dryer is installed, clean the inside of the drum before operating it and remove any dirt accumulated during transportation. Changing the plug The wires in the power cord are coloured in accordance with the following. Green and Yellow (Earth) wire to terminal marked E, symbol x, or coloured green and yellow. 13A ASTA approved fuse to BS 1362. GREEN & YELLOW BROWN Blue (Neutral) wire to terminal marked N or coloured black. BLUE 13 ampere fuse CROSS-BAR CORD GRIP Brown (live) wire to teminal marked L or coloured red. If the plug being replaced is a non-rewirable type, then the cut-off plug must be disposed of safely. DO NOT leave it where it can be inserted into a socket and create a shock hazard. The power cord should be checked periodically and replaced by a cord specially prepared for this dryer and fitted only by authorized technicians (see Service). New or longer power cords are supplied at an extra charge by authorized dealers. The manufacturer denies any responsibility should any of these rules not be followed. If in doubt about any of the above consult a qualified electrician. 3 Description of the tumble dryer Front side Rear side EN Control panel Serial number and model number Drum Operating functions Air inlet Caution, high temperature Filter Connection for ventilation hose Control panel On/Off button Programme selection knob Options buttons and indicator lights Start/Pause button and indicator light Clean filter indicator light Drying phase or delayed start indicator lights 4 ON/OFF/Reset button Pressing the button normally will cause the machine to switch on or off. If the button is pressed for 3 seconds while the dryer is in function, the machine will switch off and the running cycle will reset. Programme selection knob Allows for setting the programme: turn until the indicator points towards the desired programme (see Starting and selecting a programme). Options buttons Allow for selecting the options available for the selected programme. The relative indicator lights turn on when the option has been selected (see Programmes and options). START/PAUSE button and indicator light When the green light flashes slowly, press the button to start the programme. When the cycle is under way, the indicator light remains on. To put the programme into pause mode, press the button again; the indicator light will turn orange and start flashing again. To resume the programme from the point it was interrupted, press the button again (see Start and programme selection). Indicator lights The indicator lights provide important information. They indicate the following: Clean filter indicator light Before each programme, the Clean filter indicator light dryer (see Care and maintenance). signals that it is essential to clean the filter each time before using the tumble Drying phases indicator lights indicator light signals that the drying phase is running. The The indicator light signals that the cooling phase is running. The END indicator light signals that the programme has ended. Delay start indicator light If the Delay start option has been activated (see Programmes and options), after the programme has started, the indicator light corresponding to the chosen delay time will start flashing: As time passes, the remaining delay will be displayed and the corresponding indicator light will flash: Once the set delay time ends, the flashing LED will turn off and the set programme will start. 5 EN How to carry out a drying cycle Starting and selecting a programme EN 1. Plug the dryer into the power supply socket. 2. Select the programme according to the type of laundry (see Laundry). 3. Open the door, ensure that the filter is clean and securely placed. 4. Load the machine, making sure that no piece of laundry gets between the door and the relative seal. Close the door. 5. Press the ON/OFF button to start the machine. 6. After consulting the programme chart and the indications for each type of fabric (see Laundry), turn the Programme selection knob towards the programme corresponding to the type of laundry to be dried (see Programmes and options). Warning: If the position of the programme selection knob changes after pressing the START/PAUSE button, the selected programme will NOT be modified. To modify the programme, press the START/PAUSE button to put the programme in pause mode (the indicator light flashes orange), then select a new programme and the relative options. Press the START/PAUSE button to start the new programme. 7. If necessary, set the time of the delayed start and any other options (see Programmes and options). 8. Press the START/PAUSE button to start the drying cycle. Laundry can be checked while the drying programme runs and any garments already dry can be removed, while drying continues for the remaining items. After closing the door, press the START/PAUSE button to resume machine operation. 9. The final COLD DRYING phase (i.e. the fabrics are cooled) activates during the last few minutes of the drying programme; always allow this phase to terminate. 10. When the END indicator light turns on, the programme has ended. Open the door, remove the laundry then clean the filter and replace it. If the Post anti-crease option was selected and laundry is not removed immediately, the drum will rotate garments at intervals for 10 hours or until the door is opened. 11. Disconnect the dryer from the power supply. 6 Programmes and options Programme chart Programme Max. load (kg) Compatible options EN Cycle duration Daily 1 Ready to wear Max. Pre anti-crease – Post anti-crease – Delay start 160’ 2 Cotton Cupboard dry Max. Pre anti-crease – Post anti-crease – Delay start 145’ 3 Cotton Iron dry Max. Pre anti-crease – Post anti-crease – Delay start 108’ 4 Synthetics Cupboard dry 3 Pre anti-crease – Post anti-crease – Delay start 65’ 5 Synthetics Iron dry 3 Pre anti-crease – Post anti-crease – Delay start 55’ Special 6 Eco Time 2 Pre anti-crease – Post anti-crease – Delay start 60’ 7 Wool 1 - 60’ Sport 8 Sport Intensive 4 Pre anti-crease – Post anti-crease – Delay start 80’ 9 Sport Light 4 Pre anti-crease – Post anti-crease – Delay start 70’ 10 Special Shoes 2 pairs - 100’ - - 20’ - All option are available Partial Refresh Timed drying 30 - 60 - 90 - 120 - 150 minutes Special/Sport/Partial Programmes Eco Time Programme This programme is ideal for safely drying small loads in a short time, thereby optimising energy consumption. Suitable for loads of up to 2 kg, it lasts about 60 minutes. The programme may last longer depending on the size and density of the load and on the spin speed used during the wash cycle We recommend checking whether garments are labelled with the symbol and to turn them inside out before drying them. Wool Programme This programme is specific for items that withstand tumble drying and are labelled with the symbol. It is suitable for loads of up to 1 kg (about 3 jerseys). We recommend turning the garments inside out before drying them. This programme lasts about 60 minutes, although it may last longer depending on the size and density of the load and on the spin speed used during the wash cycle. Garments dried with this programme are usually ready to be worn, although the edges of heavier garments may be slightly damp. Leave them to dry naturally, as an additional drying process may damage them. Unlike other materials, the shrinking process in wool is irreversible, i.e. the garment does not resume its original dimension and shape. This programme is not suited for acrylic items. 7 EN Sport Intensive Programme This programme is designed for safely drying garments such as tracksuits and shorts bearing the symbol. It is ideal for clothes which do not need to be dried fully. Suitable for loads of up to 4 kg, it lasts about 80 minutes, although it may last longer depending on the size and density of the load and of the spin speed used during the wash cycle. We suggest turning garments inside out before drying them. Sport Light Programme This programme is designed for safely drying garments such as tracksuits and shorts bearing the symbol. It is ideal for those garments that do not need to be dried fully or which have to be ironed. Suitable for loads of up to 4 kg, it lasts about 70 minutes, although it may last longer depending on the size and density of the load and of the spin speed used during the washing cycle. We suggest turning garments inside out before drying them. Special Shoes Programme This programme is specific for drying sports shoes of sizes 37-46. The shoes must have been previously washed and spun at a minimum spin speed of 400 revolutions. A specific shoe rack is provided and must be used, otherwise the dryer will be damaged if shoes are dried in the drum. Remove the filter from its holder on the front part of the dryer and position the shoe rack. Place shoelaces inside the shoes then load with the tips of the shoes facing downwards and the soles frontwards. Drying times vary according to the shape and type of the shoe. If the shoes are not completely dry at the end of the programme, restart the programme. Do not dry shoes that have gel or flashing lights inside them. Only dry shoes made of synthetic material or rope. Once the programme ends, remove the shoe rack and replace the filter into its holder. Refresh A short programme suitable for refreshing fibres and garments through the emission of cool air. It lasts about 20 minutes. As this is not a drying programme, it is not to be used for garments that are still wet. Timed drying cycle (30 - 60 - 90 - 120 - 150) This programme can be used instead of the automatic programmes when you desire setting a time for the drying cycle. It is ideal for drying damp laundry with the low heat setting or for small loads. The duration of the timed drying cycle to be selected depends on the size of the load and on the fabric to be dried (see Table). The cold drying cycle runs during the final 10 minutes of the programme. For large loads, select the High Heat option if available. Fabric Cotton – high heat Cotton – low heat Synthetics – low heat Acrylics – low heat 8 1 kg 30 or 60 minutes 30 or 60 minutes 30 or 60 minutes 30, 60 or 90 minutes 2 kg 60 or 90 minutes 30 or 60 minutes 30 or 60 minutes 60, 90 or 120 minutes Load 3 kg 60 or 90 minutes 60 or 90 minutes 60 or 90 minutes - 4 - 5 kg 90 or 120 minutes 6 - 7 kg 120 or 150 minutes - - - - - - Options The options allow for customising the selected programme according to ones own needs. EN Delay start The start of some programmes (see Programmes and options) may be delayed up to 9 hours. Press the button repeatedly to enter the desired delay time. Before setting a delayed start, make sure that the water container is empty and that the filter is clean. Post Anti-Crease When this option is selected, the drum rotates garments at intervals after the cold drying cycle has ended, in order to avoid creases forming on garments if they cannot be immediately removed at the end of the programme. During this phase, the indicator light is turned on. Pre Anti-Crease When this option is selected in addition to the Delay start option, the drum rotates garments at intervals during the delay period to avoid creases forming. High Heat When a drying time is selected, pressing this button sets high heat drying and the indicator light above the button lights up. The timed programmes are pre-set to low heat. Not all options are available on all programmes (see Programmes and options). Opening the door If the door is opened (or the START/PAUSE button is pressed) while a programme is running, the dryer stops and the following may occur: The START/PAUSE button flashes orange. When a delayed start is running, the delay countdown continues. It is necessary to press the START/PAUSE button to resume the Delay start programme. One of the Delay start indicator light flashes to signal the delay time entered. It is necessary to press the START/PAUSE button to resume the programme. The progress indicator lights signal the running phase and the START/PAUSE indicator light stops flashing and turns green. During the post anti-crease phase, the programme ends. Pressing the START/PAUSE button reactivates a new programme from the beginning. By turning the Programme selection knob, a new programme is selected and the START/PAUSE indicator light flashes green. This procedure can be used to select the Cold drying programme to cool garments if they are judged to be dry enough. Press the START/PAUSE button to start the new programme. Note: In the event of a power cut, turn the power switch off and remove the plug; when the electricity supply returns, press the START/PAUSE button to resume the programme. 9 Laundry EN Sorting laundry Care labels Check the symbols on the care labels of the various garments to verify whether the garments can be safely tumble dried. Sort laundry according to the type of fabric. Empty all pockets and check for loose buttons. Close zips and hooks and fasten belts and strings without tightening them. Wring out garments to remove the maximum amount of water possible. Always check the care labels, especially when placing garments in the tumble dryer for the first time. Below are the most commonly used symbols: Do not load the dryer when garments are dripping wet. Maximum load sizes Do not overload the drum. The following values indicate the weight of dry garments: Natural fibres: maximum 7 kg Synthetic fibres: maximum 3 kg May be tumble dried. Do not tumble dry. Tumble dry high heat. Tumble dry low heat. Do not overload the dryer as this may result is reduced Items not suitable for tumble drying: Items containing rubber parts or similar materials, or plastic film covering (pillows, cushions or PVC sports jackets), any type of inflammable object or objects containing inflammable substances (used towels containing hairspray). Typical weights Glass fibres (certain types of draperies). Note: 1 kg = 1000 g Items which have been previously dry cleaned. drying performance. Garments Blouse Cotton Other Dress Cotton Other 150 100 500 350 g g g g Jeans 700 g 10 Nappie 1,000 g Shirt 300 g 200 g Cotton Other T-shirt 125 g Household linen Duvet cover (double bed) Cotton Other 1,500 g 1,000 g Large tablecloth 700 g Small tablecloth 250 g Tea cloth 100 g Bath towel 700 g Hand towel 350 g Double bed sheet 500 g 350 g Single bed sheet When mixing synthetic fibres with cotton garments, the latter may still be damp at the end of the drying cycle. If this happens, simply put them through a short drying cycle. Note: when setting the duration of the drying cycle, remember that the cold drying phase runs during the last 10 minutes, during which the dryer does not dry the garments. 10 Items marked with the ITLC symbol (Special garments) , which may be washed using special household products. Follow instructions carefully. Large bulky items (duvets, sleeping bags, pillows, cushions, etc.) that expand when dried and hamper air circulation inside the tumble dryer. Special items Amount of laundry: single items and small loads may take longer to dry. Blankets and bedcovers: acrylic items (Acilian, Courtelle, Orion, Dralon) must be dried with great care at low heat. Avoid drying for long periods. Creased or pleated garments: read the drying instructions supplied by the manufacturer. Starched garments: do not dry together with nonstarched items. Remove the maximum amount of starch solution possible before placing these items in the dryer. Do not over-dry: starch turns powdery leaving garments limp this defeats its purpose. Drying times Drying times are approximate and may vary depending on the following: Amount of water retained by items after the spin cycle: towels and delicate items retain a lot of water. Fabrics: items of the same fabric, but with different texture and thickness may have different drying times. Drying: if items are to be ironed, they can be removed from the dryer while still slightly damp. Items that require complete drying can be left longer. Heat setting. Temperature of the room: the lower the temperature of the room, the longer it will take for the dryer to dry clothing. Bulk: certain bulky items require special care during the drying process. We suggest removing these items and replacing them in the dryer once they have been shaken out: repeat this procedure several times during the course of the drying cycle. Do not over-dry items. All fabrics contain natural dampness which helps to keep them soft and fluffy. The drying times provided refer to the automatic Cupboard dry programmes. The weight refers to dry items. Automatic drying times Cotton High heat 1 kg 30 - 50 minutes Synthetics High heat 2 kg 50 - 70 minutes 1 kg 30 - 40 minutes Drying times after 800-1000 rpm wash cycles Half load 3 kg 4 kg 5 kg 70 - 80 80 - 100 100 - 120 minutes minutes minutes Drying times after wash cycles at lower speeds Half load 2 kg 40 - 50 minutes 6 kg 120 - 140 minutes Full load 7 kg 140 - 150 minutes Full load 3 kg 50 - 70 minutes Delicates Low heat Drying times after wash cycles at lower speeds Half load Full load 1 kg 2 kg 40 - 80 minutes 80 - 140 minutes 11 EN Warnings and suggestions This appliance was designed and manufactured in EN compliance with current international safety standards. The following information is provided for safety reasons and must be read carefully. General safety This tumble dryer must not be used by persons (including children) with physical, sensory or mental impairments or with little experience and knowledge of the appliance, unless they are supervised or have been adequately instructed on its use by the person responsible for their safety. This tumble dryer is designed for domestic and nonprofessional use. Do not touch the appliance while barefoot or with wet hands or feet. Unplug the appliance by pulling on the plug, not the cord. Do not allow children near the appliance while it is in function. After use, switch the appliance off and unplug it. Keep the appliance door closed to prevent children using it as a toy. Children must be supervised to ensure that they do not play with the appliance. The appliance must be correctly installed and receive adequate ventilation. The air intake on the front part of the dryer and the air vents on the rear must never be obstructed (see Installation). Never use the dryer on carpeting with high pile as this may prevent air from entering the dryer from the base. Check whether the dryer is empty before loading it. The rear part of the dryer may become very hot: do not touch it while the appliance is in function. Do not use the dryer unless the filter, water container and condenser are properly positioned (see Maintenance). Do not use liquid fabric softener in the dryer; add it to the final rinse of the wash cycle. Do not overload the dryer (see Laundry for the maximum load sizes). Do not add items that are dripping wet. Tumble dry items only if they have been washed with water and detergent, and have been rinsed and put through a spin cycle. Drying items that have NOT been washed with water may cause the risk of fire. Always read the instructions on the care label carefully (see Laundry). Do not tumble dry items that have been treated with chemical products. Never tumble dry items that are contaminated with inflammable substances (cooking oil, acetone, alcohol, petrol, kerosene, stain removers, turpentine, waxes, wax removers and hairspray), unless they have been washed in hot water with an extra amount of detergent. Do not tumble dry rubber, rubber-backed articles and garments, cushions with foam rubber padding, latex foam, rubber, plastic, shower caps, water-resistant fabrics, nappy pants or liners, polyethylene and paper. Remove all objects from pockets, particularly lighters (risk of explosion). Do not tumble dry large, excessively bulky items. Do not tumble dry acrylic fibres at high temperatures. 12 Complete each programme with the relative cold drying phase. Do not switch the tumble dryer off if items that are still warm are inside it. Clean the filter after each use (see Care and maintenance). Empty the water container and put it back in place after each use (see Care and maintenance). Clean the condenser unit regularly (see Care and maintenance). Do not allow lint to build up around the tumble dryer. Avoid climbing on the top of the dryer as this may damage the appliance. Always comply with electrical regulations and requirements (see Installation). Always purchase original accessories and spare parts (see Assistance). WARNING: Never stop the dryer before the end of the drying cycle unless all items have been quickly removed and hung in order to dispel heat. Information on recycling and disposal As part of our continual commitment towards environmental protection, we reserve the right to use recycled quality components to reduce costs for our customers and to minimise materials wastage. Disposing of the packaging materials: follow local regulations to allow for recycling of packaging materials. In order to minimise the risk of injury to children, remove the door and plug, then cut the power supply cord flush with the appliance. Dispose of these parts separately to prevent the appliance from being connected to a power supply socket. Disposal of old household appliances European Directive 2002/96/EC concerning Waste Electrical and Electronic Equipment (WEEE) states that household appliances should not be disposed of using the normal solid urban waste cycle. Exhausted appliances should be collected separately in order to optimise the cost of re-using and recycling materials comprising the machine, while preventing potential damage to public health and the environment. The crossed-out wheeled bin symbol appears on all products to remind owners of the obligations regarding separate waste collection. Owners should contact their local authorities or appliance dealers for further information concerning the correct disposal of household appliances. Saving energy and respecting the environment Wring out items before tumble drying them to remove the maximum amount of water possible (if they are previously washed in a washing machine, select a spin cycle). This ensures that energy is saved during tumble drying. Always use the tumble dryer at full load to save energy: single items and small loads may take longer to dry. Clean the filter at the end of each cycle to reduce energy consumption costs (see Care and maintenance). Care and maintenance Disconnecting the power supply Disconnect the dryer when not in use or during cleaning and maintenance operations. EN Cleaning the filter after each cycle The filter is a fundamental component of the dryer: its function is to collect lint and fluff that form during drying. Clean the filter once drying is completed, by rinsing it under running water or cleaning it with a vacuum cleaner. Should the filter become clogged, the flow of air inside the dryer will be seriously hampered: drying times becomes longer and more energy is consumed. Moreover, the dryer may become damaged. The filter is located in front of the dryer seal (see Picture). Removing the filter: 1. Pull the filters plastic handle upwards (see Picture). 2. Clean the fluff off the filter and replace it correctly. Ensure that the filter is placed flush with the dryer seal. Do not use the dryer unless the filter has been replaced in its holder. Checking the drum after each cycle Rotate the drum manually to remove smaller items (handkerchiefs) that could have been left inside the dryer. Cleaning the drum Avoid using abrasives, steel wool or stainless steel cleaning agents to clean the drum. A coloured film may appear on the stainless steel drum surface: it may be caused by a combination of water and/or cleaning agents such as wash-softeners. This coloured film does not affect the dryers performance. Cleaning the tumble dryer The external metal and plastic parts and the rubber parts can be cleaned with the aid of a damp cloth. Do not use solvents or abrasives. Have the dryer checked regularly by authorised technical personnel in order to ensure that the electrical and mechanical parts work safely (see Assistance). 13 Troubleshooting EN If you feel that the dryer is not working properly, consult the following troubleshooting suggestions before contacting the Technical Assistance Centre (see Assistance). Problem: Possible causes / Solutions: The dryer does not start. The drying cycle does not start. A delayed start time has been set (see Programmes and options). The START/PAUSE button has been pressed; a short delay follows before the dryer starts running. Wait for the drying cycle to start; do not press the START/ PAUSE button otherwise the dryer switches to the pause mode and the drying cycle will not start. Drying times are too long. The filter has not been cleaned (see Care and maintenance). The heat setting is not suited to the type of fabric to be dried (see Programmes and options). An incorrect drying time was selected for the type of load (see Laundry). The flexible ventilation hose may be blocked (see Installation). The air inlet may be blocked or obstructed (see Installation). The fixed ventilation flap, on the protective weatherproof cover, may be obstructed (see Installation). The items are too wet (see Laundry). The dryer is overloaded (see Laundry). The programme is finished but the items are damper than expected. For safety reasons, the dryer programmes last a maximum of 4 hours. If an The Options and START/ PAUSE indicator lights flash and one of the Maintenance or Drying phases indicator lights turns on without flashing. Switch the appliance off and unplug it, then clean the filter (see Care and Maintenance). Reinsert the plug, switch the appliance on and start another programme. If the problem persists, contact the Technical Assistance Service. The dryer is noisy during the first few minutes of operation. This is normal, especially if the dryer has not been used for a long time. If the noise persists during the entire cycle, contact the Technical Assistance Centre. 14 The plug has not been inserted far enough into the socket to make contact. There has been a power cut. The the fuse has blown. Try connecting another appliance to the same socket. If an extension cord is used, try connecting the dryer plug directly into the socket. The door has not been closed properly. The programme has not been set correctly (see How to carry out a drying cycle). The START/PAUSE button has not been pressed (see How to carry out a drying cycle). automatic programme has not detected the final dampness level required in this interval, the dryer completes the programme and stops. Check the above points and repeat the programme; if the items are still damp, contact the Technical Assistance Centre (see Assistance). Assistance Before contacting the Technical Assistance Centre: Follow the troubleshooting guide to check whether problems can be solved personally (see Troubleshooting). If not, switch the dryer off and contact the Technical Assistance Centre closest to you. Provide the following data when contacting the Technical Assistance Centre: Spare parts This dryer is a complex machine. Attempting to repair it personally or having an unqualified person may put the safety or people at risk, damage the machine or invalidate the spare parts guarantee. Always contact a qualified technician when experiencing problems with this machine. The spare parts were designed exclusively for this machine and should not be used for any other purpose. name, address and postal code telephone number type of malfunction date of purchase the appliance model (Mod.) the dryers serial number (S/N) This information can be found on the data plate located behind the door. Comparative programmes recommended programmes for the EN61121 comparative test. Programme (EN61121) Programme to be selected Load size Cotton drying cycle Cotton Cupboard dry 7 kg Cotton drying ironing Cotton Iron dry 7 kg Easy care fabric Synthetic Cupboard dry 3 kg Note: this is not a complete list of the programme options (see Starting and selecting a programme). This appliance conforms to the following EEC directives: - 2006/95/EC (Low Voltage Directive) - 89/336/EEC, 92/31/EEC, 93/68/EEC (Electromagnetic Compatibility Directive). 15 EN Guarantee 12 Months Parts and Labour Guarantee EN Your appliance has the benefit of our manufacturers guarantee, which covers the cost of breakdown repairs for twelve months from the date of purchase. This gives you the reassurance that if, within that time, your appliance is proven to be defective because of either workmanship or materials, we will, at our discretion, either repair or replace the appliance at no cost to you. This guarantee is subject to the following conditions: - The appliance has been installed and operated correctly and in accordance with our operating and maintenance instructions. The appliance is used only on the electricity or gas supply printed on the rating plate. The appliance has been used for normal domestic purposes only. The appliance has not been altered, serviced, maintained, dismantled, or otherwise interfered with by any person not authorised by us. Any repair work must be undertaken by us or our appointed agent. Any parts removed during repair work or any appliance that is replaced become our property. The appliance is used in the United Kingdom or Republic of Ireland. - The guarantee does not cover: - Damage resulting from transportation, improper use, neglect or interference or as a result of improper installation. Replacement of any consumable item or accessory. These include but are not limited to: plugs, cables, batteries, light bulbs, fluorescent tubes and starters, covers and filters. Replacement of any removable parts made of glass or plastic. - THIS GUARANTEE WILL NOT APPLY IF THE APPLIANCE HAS BEEN USED IN COMMERCIAL OR NON-DOMESTIC PREMISES. 5 Year Parts Guarantee Indesit also offers you a free 5 year parts guarantee. This additional guarantee is conditional on you registering your appliance with us and the parts being fitted by one of our authorised engineers. There will be a charge for our engineer's time. To activate the extra parts warranty on your appliance, simply call our registration line on 08448 24 24 24 (Republic of Ireland 01 230 0800) Extended Guarantees We offer a selection of repair protection plans that enable you to fully cover yourself against the expense of repair bills for the life of your policy. To find the ideal plan for you please call our advice line on 08448 226 226 (Republic of Ireland 01 230 0233). Free Helpdesk Service We have a dedicated team who can provide free advice and assistance with your appliance if you experience any technical difficulties within the first 90 days of ownership. Simply call our Indesit Service Hotline on 08448 224 224 (Republic of Ireland 0818 313 413)for telephone assistance, or, where necessary, to arrange for an engineer to call. 16 After Sales Service No one is better placed to care for your Indesit appliance during the course of its working life than us - the manufacturer. Essential Contact Information Indesit Service We are the largest service team in Europe offering you access to 400 skilled telephone advisors and 1100 fully qualified engineers on call to ensure you receive fast, reliable, local service. UK: 08448 224 224 Republic of Ireland: 0818 313 413 www.indesitservice.co.uk Please note: Our advisors will require the following information: Model number: Serial number: Parts and Accessories We supply a full range of genuine replacement parts as well as accessory products that protect and hygienically clean your appliance to keep it looking good and functioning efficiently throughout its life. UK: 08448 225 225 Republic of Ireland: 0818 313 413 www.indesitservice.co.uk Appliance Registration We want to give you additional benefits of Indesit ownership. To activate your free 5 year parts guarantee you must register your appliance with us. UK: 08448 24 24 Republic of Ireland: 01 230 0800 www.indesitservice.co.uk Indesit Company UK Ltd. Morley Way, Peterborough, PE2 9JB Indesit Company Unit 49 Airways Industrial Estate, Dublin 17 Recycling & Disposal Information As part of Indesit's continued commitment to helping the environment, Indesit reserves the right to use quality, recycled components to keep down customer costs and minimise material wastage. Please dispose of packaging and old appliances carefully. To minimise the risk of injury to children, remove the door, plug and cut the mains cable off flush with the appliance. Dispose of these parts separately to ensure that the appliance can no longer be plugged into a mains socket, and the door cannot be locked shut. 17 EN EN 18 EN 19 195075036.00 02/2009 - Xerox Fabriano EN 20