1
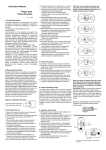
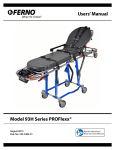
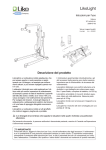
User and maintenance manual 26 Proflexx Roll-in stretcher March 2007 Doc. N. MU-058-A Roll-in Stretcher - 26 Proflexx THANK YOU FOR HAVING CHOSEN FERNO! FERNO is committed to continually improving its products and services to fully satisfy customers. Please do not hesitate to contact your nearest Service Centre for all your installation, usage, maintenance and staff training needs. Our technicians will be at your disposal. Don’t forget to send off the Product Registration and Warranty form attached to this manual by fax or post. You will then be tracked by the Distribution Centre and continually updated on Ferno products intended for Medical Emergency Services. WARNING Before using the stretcher operators must read this manual carefully, follow the instructions contained in it and become familiar with the correct use and maintenance procedures. Ferno Washington Italia S.r.l. Via B. Zallone 26, Pieve di Cento 40066 Bologna / Italy Telephone . . . . . . . . . . . . . +39 051 6860028 Fax . . . . . . . . . . . . . . . . . +39 051 6861508 Website . . . . . . . . . . . . . . . . . www.ferno.it Email . . . . . . . . . . . . . . . . . . [email protected] Toll-free number . . . . . . . . . . . . . 800-501711 2 of 28 © Ferno Washington Italia S.r.l., MU-058-A - March 2007 Roll-in Stretcher - 26 Proflexx INDEX 1. SAFETY INFORMATION ..................................................................................................... 5 1.1. Warnings ......................................................................................................................... 5 1.2. Important......................................................................................................................... 5 1.3. Warning for blood transmitted diseases............................................................................ 5 1.4. Instruction and safety label .............................................................................................. 5 1.5. Compliance with regulations in force on the subject of safety .......................................... 5 2. ABILITY AND TRAINING OF OPERATORS ...................................................................... 6 2.1. Ability ............................................................................................................................. 6 2.2. Training........................................................................................................................... 6 2.3. - Considerations on the height and strength of operators .................................................. 6 3. PRODUCT DESCRIPTION.................................................................................................... 7 3.1. Introduction ..................................................................................................................... 7 3.2. Technical specifications................................................................................................... 7 3.3. Technical features............................................................................................................ 9 3.3.1. Leg locking bar ........................................................................................................ 9 3.3.2. Leg operating levers................................................................................................. 9 3.3.3. Safety stick ............................................................................................................ 10 3.3.4. Swing-down sidearms ............................................................................................ 10 3.3.5. Adjustable backrest ................................................................................................ 10 3.3.6. Tilting frame.......................................................................................................... 11 3.3.7. Shock frame........................................................................................................... 11 3.3.8. Wheel locking brake .............................................................................................. 12 4. PATIENT HARNESSES....................................................................................................... 13 4.1. How to use..................................................................................................................... 13 5. USING THE STRETCHER................................................................................................... 15 5.1. Before putting the stretcher into operation ..................................................................... 15 5.2. General guidelines for using the stretcher....................................................................... 15 5.3. Moving patients ............................................................................................................. 16 5.4. Transporting the stretcher .............................................................................................. 17 5.5. Lifting the stretcher........................................................................................................ 18 5.6. Closing the stretcher ...................................................................................................... 18 5.7. Changing the position of the stretcher ............................................................................ 18 5.8. Loading the stretcher into an ambulance ........................................................................ 19 5.9. Unloading the stretcher from an ambulance ................................................................... 19 6. MAINTENANCE.................................................................................................................. 20 6.1. Maintenance plan........................................................................................................... 20 6.2. Disinfecting and cleaning stretchers............................................................................... 20 6.3. Disinfecting and cleaning harnesses............................................................................... 20 6.4. Disinfecting and cleaning the mattress ........................................................................... 20 6.5. Safety and operation check ............................................................................................ 22 6.6. Lubricating the stretcher ................................................................................................ 22 6.7. Delivery checks ............................................................................................................. 22 7. SPARE PARTS AND SERVICE........................................................................................... 22 7.1. Spare parts and service in Italy....................................................................................... 23 8. ACCESSORIES .................................................................................................................... 23 9. CUSTOMER SERVICE........................................................................................................ 24 10. WARRANTY CONDITIONS ............................................................................................... 25 10.1. Warranty restrictions.................................................................................................. 25 10.2. Warranty restrictions.................................................................................................. 25 10.3. Liability restrictions................................................................................................... 25 10.4. Permission to return ................................................................................................... 25 © Ferno Washington Italia S.r.l., MU-058-A - March 2007 3 of 28 Roll-in Stretcher - 26 Proflexx 11. SHEET FOR RECORDING ACTIVITY............................................................................... 26 11.1. Maintenance work record........................................................................................... 26 11.2. Training activity record.............................................................................................. 27 4 of 28 © Ferno Washington Italia S.r.l., MU-058-A - March 2007 Roll-in Stretcher - 26 Proflexx 1. SAFETY INFORMATION 1.1. Warnings 1.2. Important The following safety warnings are contained in this manual: Important warnings like those shown below indicate information that is considered important. WARNING Untrained staff may cause damage to themselves or other people. Only allow trained staff to use the stretcher Incorrect use of the stretcher may cause damage to people and things. Only use the stretcher as described in this manual. Incorrect use may cause injuries. Only operate the stretcher as described in this manual. A patient left alone may injure themselves. Never abandon patients when they are staying at the hospital, for any reason. Any patient not secured with the correct harnesses may fall off the stretcher and injure themselves. Use the harnesses described in this manual to secure the patient to the stretcher. Occasional helpers may cause accidents or hurt themselves. Keep the stretcher under control and direct all assistants Incorrect maintenance may cause accidents. Carry out maintenance on the stretcher as described in this manual. Spare parts or incorrect maintenance service may cause damage. Only use original Ferno spare parts and technical assistance. Changing the stretcher can cause injuries and harm. Only use the stretcher as made by Ferno. Applying the wrong accessories may cause accidents. Keep this manual for consultation and support when training staff. Attach it to the product in the event of sale or transfer to new users. © Ferno Washington Italia S.r.l., MU-058-A - March 2007 IMP ORTAN T Always support the weight of the stretcher before operating the control levers. 1.3. Warning for blood transmitted diseases Regulations in force require all employers to protect their staff from exposure to blood transmitted diseases in the workplace, such as HIV – 1 and Hepatitis. To reduce the risk of exposure when using the product follow the cleaning and disinfecting instructions shown in this manual. 1.4. Instruction and safety label Some labels on the stretcher contain information contained in the User manual. Read and follow the instructions on the labels. Replace worn or damaged labels immediately. New labels are available from Ferno W. Italia (see page 22) Ferno. A label with informative data on the stretcher (serial number) is affixed to the stretcher (see page 22). 1.5. Compliance with regulations in force on the subject of safety The backboard was designed and built by Ferno Washington Italia S.r.l. in accordance with the safety requirements laid down in EEC Directive 93/42/EEC of 14/-6/93 (class I) concerning medical devices. All the materials used, sized to work correctly within the load limits shown in the technical specifications are flame-resistant, do not emit any toxic or polluting substances and are protected to offer high resilience to wear and tear and corrosion. When making the stretcher sharp edges were avoided as they may cause accidental lesions to the staff using it. 5 of 28 Roll-in Stretcher - 26 Proflexx 2. ABILITY AND TRAINING OF OPERATORS 2.1. Ability Operators that use the stretcher must: have a practical knowledge of the emergency patient intervention procedures be able (professionally and physically) to WARNIN G Untrained staff may cause damage to themselves or other people. Only allow trained staff to use the stretcher help the patient. have acquired complete familiarity with the procedures described in this manual. 2.2. Training Operators must: follow a training plan approved by the Training manager for the Medical Emergency Service. read this manual. To request other manuals free of charge call Ferno customer services (see page 25) be trained in using the stretcher before putting it into regular use. keep a record of training performed. An example of the training activities record form is shown at the end of this manual. have a practical knowledge of emergency patient handling procedures. read this manual and become fully familiar with the procedures described within it. have undergone a training check. WARNIN G At least two operators in a good state of health are need to operate the stretcher safely. Unusual circumstances or excessive patient weight may require the use of other staff to ensure the patient’s comfort and safety. 2.3. - Considerations on the height and strength of operators When the stretcher is unloaded the operator must raise and support the entire weight of the stretcher, patient and equipment, high enough to enable the trolley wheel to open fully. Lifting the stretcher may require greater effort for a short person compared to a tall person. A short person must raise their arms more than a tall person to enable the wheels to open up. If the ambulance is parked on an uneven surface the operator foot end (and helpers) may need to lift the stretcher more than normal to enable the legs to fully open and then lock. Note: Use extra helpers if necessary to lift the weight of the stretcher, patient and any other equipment fixed to the stretcher safely. (See section 5.4). 6 of 28 © Ferno Washington Italia S.r.l., MU-058-A - March 2007 Roll-in Stretcher - 26 Proflexx 3. PRODUCT DESCRIPTION . 3.1. Introduction The 26 Proflexx stretcher is an instrument for transporting ill and/or injured people in transit in a lying position, safely and comfortably, promoting their care. A mattress and a set of harnesses which are not included, are also required For more detail on the model please refer to the following sections. The stretcher is intended to be used professionally and, when the patient is loaded onto it at least two operators need to be present at the same time. It may be lowered to make the patient go up and down and loaded onto a means of rescue. The stretcher is designed to be used on-board rescue means with a locking device approved by Ferno (not included). WARNIN G Incorrect use of the stretcher may cause damage to people and things. Only use the stretcher as described in this manual. 3.2. Technical specifications Features Height (cm) Load data Value Maximum Length of loading * Loading height 83.5 cm 39 cm 61 cm Overall length (cm) 193 cm Overall width (cm) 55 cm Weight (Kg) 36 Kg Load limit (Kg) * The loading height is the distance between the ground and the lower part of the loading castors. ** The weight of the stretcher is considered without mattress and harnesses. The height is measured from the ground to the patient level. *** The load limit includes the weight of the stretcher, the patient, the equipment and, in some rescue situations, the rescuer. Exceeding this limit can cause damage to the patient and/or the stretcher. The dimensions are rounded to whole numbers. As a result of product improvements the afore-mentioned specifications are subject to changes without warning. For more information contact customer services (see “Customer Services” section on page 25). © Ferno Washington Italia S.r.l., MU-058-A - March 2007 250 Kg LOAD LIMIT EMB Check the stretcher if the load limit has been exceeded. (See section General specifications shown above for the load limit and the section “Stretcher safety and operation” for checking methods) 7 of 28 Roll-in Stretcher - 26 Proflexx Figure 1 – Measurements for the stretcher in “lifting” position Figure 2 – Stretcher length and width measurements. Figure 3 – Measurements for the stretcher in “on the ground” position 8 of 28 © Ferno Washington Italia S.r.l., MU-058-A - March 2007 Roll-in Stretcher - 26 Proflexx 3.3. Technical features The stretcher is equipped with: • Leg locking bar • Adjustable backrests • • Leg operating levers Safety stick • • Tilting frame Shock frame • Swing-down sidearms • Wheel locking brake 3.3.1. Leg locking bar The leg locking bar is a device that keeps legs in a tilted position. This enables operators (and helpers) to lift and transport the stretcher and stretcherbearers across difficult terrains or paths with obstacles. To work the leg locking bar: 1. Position the stretcher in the "on the ground" loading position. 2. Lift the handle of the bar (Fig. 4). 3. Check that it locked.. To deactivate the leg-locking bar push the handle on the bar NOTE: Do not operate the leg locking bar when the stretcher is loaded on an ambulance. Check that the leg locking bar is off before unloading the stretcher from an ambulance Figure 4 – Bar handle 3.3.2. Leg operating levers The two operating levers are positioned on the foot end of the stretcher. These work on the mechanism that enables the legs to open and close. Given the position of the rescuer to the patient’s feet, the lever on the right of the rescuer controls the legs head end of the patient while the left one controls the legs foot end of the patient. These levers can be operated only after the safety system on the right-hand side of the stretcher have been unlocked. If you want to change the height of the stretcher, both operators must grip the frame of the stretcher with hands facing up. The operator on the foot end works both levers at the same time (see Fig. 5). When the stretcher is loaded or unloaded from an ambulance the operator works one lever at a time (see instructions in sections 5.8 and 5.9). Figure 5 – Lever operation. © Ferno Washington Italia S.r.l., MU-058-A - March 2007 9 of 28 Roll-in Stretcher - 26 Proflexx 3.3.3. Safety stick The safety stick is located under the patient’s bed right side of the operator. The engaged safety stick prevents accidental closure of the legs due to accidental operating of the levers. The safety stick is inserted automatically when the stretcher moves from the closed to the open position. Keep the safety stick engaged for all stages that do not expressly require it to be unlocked. To disengage the safety stick pull the end of it towards the foot end of the stretcher. (Fig. 6). Whee Figure 6- Safety stick Swing-do 3.3.4. Swing-down sidearms The swing-down sidearms (Fig. 7) ensure the patient’s comfort and safety. Keep the sidearms raised except when transferring a patient from or to the stretcher. To lower the sidearms operate the lever (Fig. 8a) and lower them (Fog. 8b) until the position in Figure 8c is reached. To lift the sidearms perform the reverse movement, it is not necessary to operate the lever. Figure 7 – Swing-down sidearms 3.3.5. Adjustable backrest The backrest is adjustable to an infinite number of positions between 0° and 87° with micrometric adjustment. To make an adjustment: 1. Support the backrest while operating the unlocking lever if the patient is on the stretcher (Fig. 9a). 8a 8b 8c Figure 8 – Lowering sidearms 2. Raise or lower the backrest to the desired position by applying necessary force to the frame and not to the piston release lever (Fig. 9b). 3. Release the lever in the new position. Figure 9 a – Operating the release lever Figure 9 b – Lifting/lowering the backrest 10 of 28 © Ferno Washington Italia S.r.l., MU-058-A - March 2007 Roll-in Stretcher - 26 Proflexx 3.3.6. Tilting frame Use the tilting frame to reduce the length of the stretcher when working in confined spaces such as lifts or narrow corridors. 1. Raise the backrest. 2. Support the front of the frame and operate the locking lever pulling it towards the front part of the stretcher. (Fig. 10a) 3. Lower the tilting part of the frame carefully to stop it falling freely (Figures 10 b/c/d). The frame can be lowered in two positions a) intermediate position (Fig. 11a) complete position. (Fig 11 b) Figure 11 a – Intermediate Position 10 a 10 b 10 c Figure 11 b – Complete Position 10 d Figures 10 – Lowering the frame 3.3.7. Shock frame To place the patient in the shock position (legs raised) use the shock frame. Grip the frame with palms facing up and maintain the grip whether raising or lowering. Support system Always lift the shock frame from the foot end, never sideways. To raise 1. Unfasten the safety harnesses 2. Raise the frame from the grip points shown in Figure 12. 3. Raise until you feel the support system locking shown by the arrow in Figure 12. 4. Replace and adjust the harnesses Figure 12- Raising the shock frame To lower the shock frame: 1. Tightly grip the corners of the frame near the support bars (Fig. 13a). 2. Release the supporting bars by raising them and lower the shock frame. (Fig. 13 b) 3. Hold on to the frame until the end position. Figure 13 b – Releasing support bar 4 Adjust the safety harnesses. Figure 13 a – Gripping the frame © Ferno Washington Italia S.r.l., MU-058-A - March 2007 11 of 28 Roll-in Stretcher - 26 Proflexx 3.3.8. Wheel locking brake The wheel locking brake prevents the stretcher from moving accidentally. Use the wheel locking brakes to help keep the stretcher still when it is on an uneven surface, when transferring the patient on to stretchers or supports at the same height of the stretcher and during medical procedures on the patient. Lock the wheel brake only when the stretcher is in a stationary position (stationary), do not use the wheel locking brake as a means of slowing down when moving. To operate the wheel locking brake press the foot point towards the end of the lever (Figure 15). To release it use the foot point to lift the lever and put it back in the released position. l locking brake Figure 14 – Wheel locking brake Figure 15- Operating the brake 12 of 28 © Ferno Washington Italia S.r.l., MU-058-A - March 2007 Roll-in Stretcher - 26 Proflexx 4. PATIENT HARNESSES 4.1. How to use The use of the correct harnesses is required when using the stretcher, which are not supplied with the stretcher. Ferno recommends using three harnesses with the stretcher: one with four points for the chest (Ferno Model 417-1) and two harnesses for the shoulders and legs (Ferno Model 430 series). (see Figures 16 and 17) See Chapter 9 “Accessories” to order harnesses for the stretcher. Keep the harnesses fastened when not in use to prevent them interfering with stretcher operations. Install, use and perform maintenance operations as described in the user manuals for the harnesses. You can request other copies of the manuals for the harnesses free of charge from Ferno. A summary of the usage methods for the harnesses is defined below. Figure 16 – Harness model 430 series Figure 17 – Harness model 417-1 To fasten the harness: FOR THE 430 SERIES HARNESSES 1. Slide the clasp for the buckle in the slot for the receiving part of the buckle and press until it locks into position with an audible click (Figures 18 and 20). 2. Always check that the buckle is securely fastened Figure 18 – Harness model 430 series FOR 417-1 HARNESSES 1. Place the shoulder harnesses above the patient’s shoulders and position them until they are meet. The connections must be centred on the sternum. 2. Fasten the harness by putting the clasp into the connections and insert it in the fastening buckle until it locks in position (Figs. 19 and 21). 3. Always check that the buckle is securely fastened Figure 19 - Harness parts To unfasten the harness: FOR 430 SERIES HARNESSES 1. Press the square button on the centre of the receiving part of the buckle. 2. Pull the clasp from the slot of the receiving part of the buckle (Figures 18 and 20). Figure 20 –Fastening and unfastening harness 430 series FOR 417-1 HARNESSES 1. Press the release button in the central part of © Ferno Washington Italia S.r.l., MU-058-A - March 2007 13 of 28 Roll-in Stretcher - 26 Proflexx the buckle. 2. Pull the clasp from the connections To lengthen the harness: 1. Unfasten the harness. 2. Grip the clasp and turn it until it is perpendicular to the belt. Pull the clasp in the opposite direction to the anchor point until the harness is at the desired length (Figure 22). To shorten the harness: Take the sewn end and pull the belt through the rolling bar until it is the desired length (Figure 23). Figure 21 –Fastening and unfastening 417-1 harness Securing the harness Secure the harness to the equipment (stretcher) in the points ensuring a strong anchoring and correct securing of the patient. Make sure that the harness does not interfere with the use of equipment and accessories Secure the harness to a second piece according to local protocols. To secure the belt with two pieces: 1. Unfasten the buckle, separate the two parts. 2. Wind the end into the shape of a loop around the anchoring point selected on the equipment (stretcher). 3. Keep the loop open and move it through the buckle (Fig. 24). 4. Pull the belt through the loop until it locks around the securing point. 5. Repeat stages from 2 to 4 with the other side of the harness. 6. Secure the other harness according to instructions 1 to 5. 7. Make sure that all the harnesses are secured properly Figure 22 - Lengthening the harness Figure 23 - Shortening the harness Figure 24 - Securing the harness 14 of 28 © Ferno Washington Italia S.r.l., MU-058-A - March 2007 Roll-in Stretcher - 26 Proflexx 5. USING THE STRETCHER 5.1. Before putting the stretcher into operation • • • • • • • Staff using the toboggan stretcher must read this manual. Follow the instructions that apply to the stretcher model that you have bought (see pages 11-16). Entrust suitably trained staff with the task of checking that the stretcher works correctly (follow the instructions “Stretcher safety and operation check” on page 21). Install the mattress and the harnesses (not included). See section 4 “Patient harnesses”. The 26 Proflexx stretcher is for professional use only. Carefully read the instructions and practise the correct usage procedures. Only use the stretcher when it is in perfect working order and receiving correct maintenance. 5.2. General guidelines for using the stretcher • Using the stretcher requires a minimum of two trained operators. In some rescue situations the operators will need additional help. For information on the availability and direction of travel for assistants see the “Stretcher transport” section on page 16. • Follow local protocols and emergency procedures for standard patient handling when using the stretcher. Stay with the patient for the whole time they are on the stretcher. Always use the harnesses required by this manual to secure the patient to the stretcher. • • © Ferno Washington Italia S.r.l., MU-058-A - March 2007 WARNIN G Incorrect operation may cause injuries. Only operate the stretcher as described in this manual. WARNIN G A patient left alone may injure themselves. Never abandon patients when they are staying at the hospital, for any reason. WARNIN G Any patient not secured with the correct harnesses may fall off the stretcher and injure themselves. Use the harnesses described in this manual to secure the patient to the stretcher. WARNIN G Not securing the patient correctly may aggravate their condition. Only use the stretcher as described in this manual and follow the procedures approved by the Medical Emergency Services WARNIN G Perform the procedures approved by the Medical Emergency Services for securing and moving patients. 15 of 28 Roll-in Stretcher - 26 Proflexx 5.3. Moving patients The patient’s condition will determine the most suitable method for transporting the patient in the stretcher. In many cases the priorities of the first operation will be that of stabilising the patient’s condition by means of suitable immobilisation PATIENT IMMOBILISATION Where necessary, the application of a backboard or a stretcher scoop 65 EXL (see Figures 25) may be required to stabilise the patient's condition or a Ferno decompression mattress. • Patient immobilisation must be performed according to local protocols. • Ferno immobilisation products compatible with the 26 Proflexx stretchers are shown in Figure 25. Wizloc cervical collar mod. 449-I Stretcher mod. 65-EXL PREPARING THE STRETCHER FOR RECEIVING A PATIENT 1. Bring the stretcher close to the patient. 2. Lower the stretcher. 4. Place the stretcher as close to the patient as possible. 4. Unfasten all the harnesses and arrange them so that they do not interfere with the patient's movement. 5. Lower the sidearms. MOVING THE PATIENT The patient’s condition and the rescue situation will determine which method is most suitable for moving the patient onto the stretcher. • Assistants may use different approved techniques for lifting, follow the local protocols or the guidelines from your medical manager to identify the one most suited to the situation. • Using immobilisation devices offer suitable opportunities for manual support. • Practise and become familiar with these to determine how they are suitably positioned on the bottom of the toboggan stretcher. POSITIONING AND SECURING THE PATIENT Backboard and Head Hugger mod. 445 (can be bought separately) Model 125 KED Figure 25 – Ferno immobilisation products compatible with 26 Proflexx stretchers IMPORTANT An ill or injured patient must always be secured with harnesses, without taking into account the apparent ease with which transport can be carried out. 1. Lift the sidearms. 2. Adjust the backrest and shock frame as needed. 3. Secure the patient to the stretcher with the correct harnesses. Adjust the harnesses so that the patient is secure in line with the necessary clinical manoeuvres. 4. Bring the stretcher to the raised position for movement or use the leg locking stick to lock the legs, thus enabling its use as a stretcherbearer. 5. Before starting to move release the wheels by operating the levers for the wheel locking brakes IMPORTANT To reduce fears and anxieties in the patient it is necessary to warn them each time adjustments are performed of position changes and movements. 16 of 28 © Ferno Washington Italia S.r.l., MU-058-A - March 2007 Roll-in Stretcher - 26 Proflexx 5.4. Transporting the stretcher • • • • To transport the stretcher with the patient requires at least two trained operators positioned at opposite ends of the stretcher, facing the patient. Avoid uneven surfaces, where possible. Overcome small obstacles (such as a doorway) supporting the weight of the stretcher and softly rolling the wheels over the obstacle. Avoid tall obstacles (steps) where possible. Lift the stretcher to overcome obstacles of this type. • If the patient to be transported is heavy or the stretcher has to be transported over long distances, uneven or obstacle-ridden terrains extra help will be needed. • The team head must check the stretcher and direct all the assistants. • The assistants should be positioned so that they can keep the stretcher balanced as much as possible and in line with the ground. • See Figure 26 for the suggested arrangement of the operators and assistants TO MOVE THE STRETCHER 1 Fasten all the patient harnesses. 2. Put the stretcher in the "high" position. 3. The main operator must be positioned at the foot end of the stretcher, grip the main frame or the correct handle and pull the stretcher. 4. The second operator must be positioned at the side of the stretcher near the chest and at the patient’s head to help then and/or contribute to moving the stretcher. © Ferno Washington Italia S.r.l., MU-058-A - March 2007 O = OPERATOR H =HELPER P = PATIENT Figure 26 – Arrangement of operators and assistants IMPORTANT The assistants may cause injuries or be damaged. Check the stretcher and direct all assistants IMPORTANT To reduce fears and anxieties in the patient it is necessary to warn them each time adjustments are performed of position changes and movements. 17 of 28 Roll-in Stretcher - 26 Proflexx 5.5. Lifting the stretcher Grip the main frame of the stretcher with palms facing up, in the correct position. With a coordinated movement both operators lift the stretcher until the legs are open and locked in the ‘high’ position and have prevented the safety click taking place. Lift the stretcher until the wheels are lifted off the ground. (see Figure 27) Figure 27 – Lifting the stretcher 5.6. Closing the stretcher The operator foot end operates the safety stick (see section 3.3.3) pulling it in the direction of the foot end enabling the safety device to be released. When the foot end operator works both control levers (Fig.28) both operators, firmly supporting the main frame with palms facing up, lower the stretcher until it is in the ‘closed’ position on the ground 5.7. Changing the position of the stretcher If it is titled, put it back to the “Tilting frame" horizontal position. Changing the position of the stretcher with the patient requires a minimum of two correctly trained operators. The following instructions are directed at both operators. The operators will be positioned at the head-foot ends of the stretcher so that they are one in front of the other. If there are more operators follow the diagram shown in section 5.4 Grip the main frame with both hands keeping palms facing up. Be ready and keep control of the stretcher during normal weight transfer of the stretcher legs to the rescuers with consequent movement towards the bottom when working the control levers. Figure 28 – Closing the stretcher IMPORTANT Always support the weight of the stretcher before operating the control levers. IMPORTANT Both operators must be ready to keep control of the stretcher. IMPORTANT When putting the stretcher in the "up" position, before loosening the grip on the frame, check again that both pairs of legs are locked Do not attempt any manoeuvre if you are not sure you can support the weight of the patient and the stretcher. Only lift the weight that you can support it safely. Use extra helpers if needed (see section 5.4) 18 of 28 © Ferno Washington Italia S.r.l., MU-058-A - March 2007 Roll-in Stretcher - 26 Proflexx 5.8. Loading the stretcher into an ambulance 1. Lift the tilting frame to restore it to the horizontal position (if it is in inclined). 2. Bring the stretcher towards the ambulance compartment until the loading wheels are resting on the load floor and the front legs are touching the rear end of the ambulance. 3. Release the safety stick (see section 3.3.3.). 4. Work the right-hand lever to release the head end wheels. Lifting the weight push the stretcher inside the ambulance. 5. Work the left-hand lever to release the foot side trolley, finish loading by pushing the stretcher until the locking system is secured (see Figures 29 and 30). Figure 29 – Loading the stretcher 5.9. Unloading the stretcher from an ambulance 1. Release the stretcher from the locking. 2. Pull the stretcher towards the outside of the ambulance. Before bringing the stretcher outside of the patient area, check that the leg lock stick is not engaged (see section 3.3.3). 3. Securely grip the main frame and slowly pull the stretcher outside of the ambulance taking care that the loading wheels remain on the floor until both sets of legs are open and locked in position. Keep the feet parts raised enough so that each set of legs is not in contact with the ground so that they can turn freely towards the bottom and lock in position. Use extra help, if necessary, to support the weight of the stretcher (see section 5.4). 4. Check both trolleys are locked in position and that the safety bar is in the locking position. 5. Delicately place the wheels on the ground and completely remove the stretcher from the patient section. Figure 30 – Locking the stretcher with the SLAM system Figure 31 – Unloading the stretcher IMPORTANT When unloading keep the loading rollers supported on the floor of the ambulance until both sets of stretcher legs are open and locked in position © Ferno Washington Italia S.r.l., MU-058-A - March 2007 19 of 28 Roll-in Stretcher - 26 Proflexx 6. MAINTENANCE 6.1. Maintenance plan 6.2. Disinfecting and cleaning stretchers The Proflexx stretcher requires ordinary maintenance. Establish and follow a maintenance programme. 1 Periodic maintenance is essential to preserve the product’s efficiency and prolong its duration. The table below shows the minimum maintenance: 2 When needed Cleaning (sect. 6.2) Safety and operation check (sect. 6.4) Lubrication Every month After each use Disinfection (sect. 6.2). DISINFECTING Go over all surfaces with disinfectants after each use. Follow the disinfectant manufacturer’s instructions. When disinfecting check that there is no damage to the stretcher. 3 Allow the stretcher and all related parts to dry completely before storing it. 1 Remove the harnesses and the mattress. To clean these products follow the instructions in the user manual Clean all of the stretcher surfaces using warm water and a mild detergent. If necessary, use a brush with hard bristles (not metal) or a mild solvent to remove any stains. CLEANING 2 3 4 5 Rinse with warm water. Dry with a cloth or leave to dry in the air. 6.3. Disinfecting and cleaning harnesses When products are used for maintenance follow the manufacturer’s instructions and read the instructions shown in the product’s safety sheet. To disinfect and clean the harnesses follow the maintenance instructions in the user manual supplied with the harnesses. Contact Ferno for information about disinfectants and cleaning products. Always remove the harnesses from the stretcher before disinfecting or cleaning. WARNIN G Incorrect use and maintenance may cause damage to people and things. Use and carry out maintenance only as instructed in this manual, and only use FERNO spare parts and service IMPORTANT Disinfectants containing chlorine, phenol or iodine may cause damage to the stretcher creating dangerous situations. Disinfect the stretcher using products not containing these chemical products. The buckles must be disinfected and cleaned by spraying the disinfectant with a clean cloth following the disinfectant manufacturer’s instructions. The harness belts must be immersed (not the harnesses) in a disinfectant solution (disinfectant cleaner in hot water in portions prescribed by the disinfectant manufacturer) for the time set out in the instructions. Then place the belt in clean water to rinse off. Hang the harnesses up to dry. Do not put the harnesses in a dryer. You can request other copies of the manuals for the harnesses free of charge from Ferno. Keep a record of maintenance carried out. An example of a maintenance activities record form is shown at the end of this manual. 6.4. Disinfecting and cleaning the mattress IMPORTANT To disinfect the mattress use a suitable disinfectant following the manufacturer’s instructions. Do not use high pressure water or steam. Steam and high pressure water penetrate the joints, remove lubricators and corrode. 20 of 28 © Ferno Washington Italia S.r.l., MU-058-A - March 2007 Roll-in Stretcher - 26 Proflexx To clean the mattress: 1. Wash the mattress with warm soapy water and a damp cloth. 2. Rinse the mattress with clean water. 3. To dry the mattress use a cloth or hang it up. © Ferno Washington Italia S.r.l., MU-058-A - March 2007 21 of 28 Roll-in Stretcher - 26 Proflexx 6.5. Safety and operation check The inspection must include a search for anything that could compromise the condition and correct operation of the stretcher. The inspection must take place monthly or more often if the product is subjected to particularly heavy usage. Make staff from the maintenance department carry out the following checks: Are all the parts present and complete? Are all the screws, nuts, bolts, rivets and elastic plugs securely positioned? Do all the parts move normally and in the correct way? Does the stretcher have any worn out parts? Do the wheels turn well? Are the loading rollers worn out? Does the safety stick work? Does each pair of legs close well? Does the shock frame work well? Does the tilting frame work well? Are the harness belts in a good condition with no tears or rough edges? Do the harness buckles have any visible damage and do they work properly? All the parts are complete and working correctly? Do the accessories installed work well without interfering with the operation of the stretcher? Is the ambulance correctly equipped for the stretcher (Ferno approved locks installed)? If the check shows damage or excessive use, immediately take the stretcher out of service until it is repaired. With the only exception of the replacement of accessories (harnesses, mattress), the Proflexx stretcher is not considered a tool that can be repaired on site. If there were issued raised by the technicians during the check call FERNO support for any repairs and factory checks. 6.6. Lubricating the stretcher Lubricants: A Synthetic lubricating oil B White lithium grease 4A KEY The number corresponds to the part to be lubricated. The letter indicates the type of lubricant to be used. Parts that do not need lubricating are not listed. 2B Leg locking stick (rear part) 1B Leg closure control unit connection 3A Swing-down sidearms release pin 4A Tilting frame hinge (2) 5B T casting for legs Figure 32 – Lubricating the stretcher 6.7. Delivery checks Remove the product from the original packaging and check that all parts have been received. If all the parts are there the cardboard and the rest of the packaging can be used for recycling. If the product has been damaging during shipment, keep the cardboard and the rest of the packaging and contact the transporter within 48 hours of delivery. Before putting the stretcher into service inspect it (see sect. 6.5). 7. SPARE PARTS AND SERVICE 22 of 28 © Ferno Washington Italia S.r.l., MU-058-A - March 2007 Roll-in Stretcher - 26 Proflexx WARNIN G 7.1.Spare parts and service in Italy Spare parts can only be ordered from Ferno W. Italia authorised by Ferno W. Inc. to manage, service and repair Ferno products. Qualified Ferno W Italia technicians use procedures and spare parts approved by Ferno. To order a spare part the model number and the stretcher's serial number must be provided as well as its description. Spare parts or incorrect maintenance service may cause damage. Only use original Ferno spare parts and technical assistance. WARNIN G Changing the stretcher can cause injuries and harm. Only use the stretcher as made by Ferno. 8. ACCESSORIES Consult the catalogue or the distributor for the product number and the full description of each part. Ferno offers a full range of accessories (locks, drip-holder stand, immobilisers, covers, etc.) approved for use with the stretcher. Always follow the instructions in the packaging of the accessories. Keep these instructions together with this manual. When using the stretcher with the accessories take account of the new encumbrances. Contact Ferno for more information on products: SLAM 26 SLAM 26P/PAS MN26-P LBS Model 417-1 Model 430 series Model 513-10 Locking system Locking system for PAS arrangements Black mattress 26P Lengthened arrangement for patient Black harness with straps (4 point) Harness Drip-holder stand Model 514 Oxy Clip cylinder holder Model 274 Instrument holder arrangement © Ferno Washington Italia S.r.l., MU-058-A - March 2007 23 of 28 Roll-in Stretcher - 26 Proflexx 9. CUSTOMER SERVICE Customer services and technical support are important features of each individual Ferno product. The Customer Support Centre is available for further information on usage, maintenance and support for this product. For more information contact Ferno customer services. Telephone (Freephone) ................800-501711 Telephone ……………………….....+39 051 6860028 Fax………………………………….. +39 051 6861508 Website ......................................... www.ferno.com Before contacting Ferno customer services note down the serial number that is found on your stretcher; also do not forget to mention it in any written communication. 24 of 28 © Ferno Washington Italia S.r.l., MU-058-A - March 2007 Roll-in Stretcher - 26 Proflexx 10.WARRANTY CONDITIONS 10.1.Warranty restrictions The valid warranty restrictions for FERNO products are provided with each product along with the registration form. Outside these warranty conditions FERNO does not provide other forms of warranty either explicit or implicit. FERNO will not be liable in any case for any damages suffered, indirectly or consequently that occur relating to delivery, usage or your product’s performance. 10.2.Warranty restrictions The conditions recalled in the previous point only apply when the product is used in accordance with what is established in this manual. FERNO is not liable for damages suffered during shipment or through improper use of the product. 10.3.Liability restrictions FFERNO’s liability, under the warranty conditions referred to above, is restricted to the replacement or repair of a product or a faulty part, or if decided by FERNO, reimbursement of the purchase price. Recourse to the repair or replacement of a faulty product or reimbursement of the purchase price are exclusive and all inclusive. FERNO’s liability will never exceed the sales price of the faulty product. Any legal action due to lack of compliance with the warranty conditions must commence within a year of the date on which the fault was discovered. FERNO does not issue implied marketability warranties and adaption to special purposes. For any request whereby the warranty conditions are valid contact the Customer Services Department. 10.4.Permission to return No product will be accepted without prior approval from FERNO. If the product can be repaired the customer will be supplied with a quotation of the costs before carrying out the repair. The warranty period for repairs is 12 months. © Ferno Washington Italia S.r.l., MU-058-A - March 2007 25 of 28 Roll-in Stretcher - 26 Proflexx 11.SHEET FOR RECORDING ACTIVITY 11.1.Maintenance work record Date 26 of 28 Type of operation Performed by © Ferno Washington Italia S.r.l., MU-058-A - March 2007 Roll-in Stretcher - 26 Proflexx 11.2.Training activity record Date Name © Ferno Washington Italia S.r.l., MU-058-A - March 2007 Type of training 27 of 28 User and maintenance manual for the product, needed for safe operation, maintain the product’s efficiency and reliability and render the warranty terms valid MU-058-A March 2007 Ferno Washington Italia S.r.l. Via B. Zallone 26, Pieve di Cento 40066 Bologna – Italy Telephone Fax Website Email Freephone number 28 +39 051 6860028 +39 051 6861508 www.ferno.it [email protected] 800-501711 © Ferno Washington Italia S.r.l., MU-058-A - March 2007