1
http://rubis.objectweb.org
RUBiSVA
A virtual appliance of the RUBiS benchmark
USER’S MANUAL
May 28th 2008
Revision Sheet
Revision Sheet
Release No.
Rev. 1.0
Date
5/28/2008
Revision Description
RUBiSVA 1.0 . first packaging
i|Page
USER'S MANUAL
TABLE OF CONTENTS
Contents
1.0
Introduction.....................................................................................................................................2
1.1
Targeted Audience.....................................................................................................................2
1.2
Structure of the document ........................................................................................................2
1.3
Further Readings .......................................................................................................................2
2.0
RUBIS..............................................................................................................................................4
2.1
QUICK INTRODUCTION.......................................................................................................4
2.2
AVAILABLE IMPLEMENTATIONS ....................................................................................4
3.0
GETTING STARTED .....................................................................................................................6
3.1
Overview.....................................................................................................................................6
3.2
REQUIREMENTS.....................................................................................................................6
3.2.1
A Linux server ....................................................................................................................................... 7
3.2.2
XEN kernel for your Linux server ......................................................................................................... 7
3.2.3
DHCP .................................................................................................................................................... 7
3.3 RUBiSVA distribution................................................................................................................................... 9
3.3
RUBiSVA configuration..........................................................................................................10
3.3.1
3.3.2
3.3.3
Create a bridge between eth0 and your subnet..................................................................................... 10
RUBiSVA configuration file ............................................................................................................... 10
Exchanging SSH keys with the VA reference...................................................................................... 11
3.4
DEPLOYING RUBiSVA.........................................................................................................12
3.5
RUNNING TESTS ...................................................................................................................12
4.0
BUILDING YOUR OWN RUBISVA............................................................................................17
4.1
4.1.1
4.1.2
4.1.3
4.1.4
4.2
Components..............................................................................................................................17
RUBiS client........................................................................................................................................ 17
Apache Web frontend .......................................................................................................................... 17
Application Server (JBOSS)................................................................................................................ 17
Database Backend................................................................................................................................ 18
Building your own RUBiS Virtual Appliance step by step..................................................18
4.2.1
Install the VA Linux distribution ......................................................................................................... 18
4.2.2 Install JAVA JDK ..................................................................................................................................... 20
4.2.2 Install HTTPD .......................................................................................................................................... 20
4.2.3 Install MYSQL AND PHP........................................................................................................................ 21
4.2.4 Install JBOSS AND ANT: ........................................................................................................................ 21
4.2.5 Install RRD, PHP AND GANGLIA ......................................................................................................... 21
4.2.5 MOD_JK................................................................................................................................................... 21
ii | P a g e
4.2.5 Uploading RUBiS snapshot and needed scripts ........................................................................................ 21
4.3 The deployment procedure ............................................................................................................22
4.3.1 Step 1: Copy.............................................................................................................................................. 22
4.3.2 Step 2: The network .................................................................................................................................. 22
4.3.3 Step 3: Start domU.................................................................................................................................... 22
4.3.4 Step 4: Assign roles, configure and start appropriates services. ............................................................... 22
5.0
REFERENCES .............................................................................................................................24
Figures
Figure 1: RUBiS overview............................................................................................................................1
Figure 2: RUBiSVA deployment ................................................................................................................12
Figure 3: RUBiS web output page ..............................................................................................................14
Figure 4: RUBiS using Ganglia for resource usage ....................................................................................15
Figure 5: Fedora xenguest-install................................................................................................................19
Figure 6: autodeploy scenario 1 ....................................................................................................................1
iii | P a g e
1.0 Introduction
1.0
INTRODUCTION
1|Page
Page |2
1.0
INTRODUCTION
RUBiS is an auction site prototype modeled after eBay.com that is used to evaluate
application design patterns and application server’s performance scalability.
The RUBiSVA brings more simplicity in term of installation, deployment and monitoring.
People have been struggling to get the RUBiS benchmark working. With this version, we are
offering a Virtual Appliance with everything installed inside and ready to go. A virtual appliance
consists of an image disk of a preinstalled system. Like software appliances, virtual appliances
are aimed to eliminate the installation, configuration and maintenance costs associated with
running complex stacks of software.
1.1
Targeted Audience
This document is targeting two types of audience:
• People who just want to use right away the RUBiS virtual appliance. This is for those who will
use the provided RUBiSVA image file directly to deploy it on their cluster.
• People who would like to modify the appliance to fit their particular needs. You may want to
change a little bit our RUBiSVA image file to add some functionality or replace a component
with another one.
1.2
Structure of the document
This document will walk you over:
• An introduction to RUBiS in section 2.0, for people who have never used RUBiS before.
• How to install and run RUBiSVA version 1.0 (RUBiSVA 1.0 ) in section 3.0, for people who are
not going to make any change to the provided RUBiSVA image
• How to build such appliance so that it fits your needs in section 4.0, for people who are planning
to make changes to the provided RUBiSVA image
• How to add, change or replace components based on RUBiSVA 1.0 in section 4.0
1.3
Further Readings
The following links give more in-depth details about the technologies used in RUBiSVA like: cluster
workload, virtual appliances and metric tools.
•
•
•
•
•
Ganglia : http://ganglia.wiki.sourceforge.net/
IBM work on ganglia : http://www-941.ibm.com/collaboration/wiki/display/WikiPtype/ganglia
Nagios : http://www.nagios.org/about/
Xen Virtualization user manual: http://tx.downloads.xensource.com/downloads/docs/user/
Systat tutorial: http://perso.orange.fr/sebastien.godard/
2|Page
2.0 RUBiS
2.0
RUBiS
3|Page
2.0 RUBiS
2.0
RUBIS
2.1
QUICK INTRODUCTION
RUBiS is an auction site benchmark that implements the core functionality of an auction site:
selling, browsing and bidding. It does not implement complementary services like instant messaging or
newsgroups. It distinguishes between three kinds of user sessions: visitor, buyer, and seller. For a visitor
session, users need not register but are only allowed to browse. Buyer and seller sessions require
registration. In addition to the functionality provided during visitor sessions, during a buyer session users
can bid on items and consult a summary of their current bids, rating and comments left by other users.
Seller sessions require a fee before a user is allowed to put up an item for sale. An auction starts
immediately and lasts typically for no more than a week. The seller can specify a reserve (minimum)
price for an item.
For further reading about RUBiS, please look at the following site:
http://rubis.objectweb.org/doc/index.html
2.2
AVAILABLE IMPLEMENTATIONS
You may find available information and descriptions about older RUBiS versions at
http://rubis.objectweb.org/doc/install.html . Other than the RUBiSVA 1.0 you will find multiple
versions using different technologies listed below:
• EJB 2.0 [ http://www.madplanet.com/jboss-docu-wiki/Wiki.jsp?page=40.EJB2 ]
• EJB 2.1
• EJB 3. Note that in general, the EJB3 approach is easy to implement and the compiler does a lot
for you already. E.g. you may replace a lot of classes required in the version 2.1 by tags
@something, and the compiler will generate the code for you at deployment time.
[ http://docs.jboss.org/ejb3/app-server/tutorial/index.html ]
• PHP [ http://www.php.net/docs.php ]
• Servlet [ http://www.apl.jhu.edu/~hall/java/Servlet-Tutorial/ ]
• Servlet_Hibernate (the one we are using inside the VA1 version)
[ http://proton.inrialpes.fr/~jphilipp/dev/rubis-hibernate/index.xhtml ]
1
Virtual Appliance
4|Page
3.0 Getting Started
3.0
GETTING STARTED
5|Page
4.0 Building your own RUBiSVA
3.0
GETTING STARTED
In this part, you will dive right into the configuration and running part. This supposes you don’t want to
modify the provided RUBiSVA image. The latter namely rubisva_1.0.img will be called RUBiSVA
image reference.
3.1
Overview
This version has been done to reduce complexity when it comes to using RUBiS. It could be used
right away on any Linux machine with XEN2 kernel (see the requirements in section 3.2 for more
information). It offered four layers:
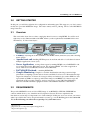
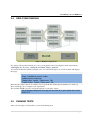
Client(s)
•
WEB
Server(s)
Application
Server(s)
DB
Figure 1: RUBiS overview
Client(s): injecting the workload thanks to the RUBiS Client (written in java) and collecting
metric results.
•
•
•
•
3.2
Apache front end: handling HTTP requests from client and able to load balance between
multiple Application servers (A.S.).
Server Application: serving client request by running RUBiS server. In RUBiSVA 1.0,
we are using the Servlet_Hibernate version. We are using JBOSS3 4.4.2 GA as application
server. Thus we used its Bundled Tomcat4 and its Hibernate.
DATABASE Backend: containing RUBiS DB.
Ganglia Monitoring: Ganglia is a scalable distributed monitoring system for highperformance computing systems such as clusters and Grids. It is based on a hierarchical design
targeted at federations of clusters. It leverages widely used technologies such as XML for data
representation, XDR for compact, portable data transport, and RRDtool for data storage and
visualization. We are using ganglia to grab resource usage on any VM (Virtual Machine).
Therefore all VMs will have a ganglia software called GMond installed for this matter.
REQUIREMENTS
The provided RUBiSVA version 1.0 is a XEN image of our RUBiSVA. XEN like VMWARE are
software which allows you to virtualize an OS (Operation System). We have explained in the
introduction section why it is important to use such technique. In this part, we focus on how you can use
what is provided in the VA for deeper information you may go over the Building part in the section 4.0.
To do the following you will need root privileges of your Linux server.
2
http://xen.org/
http://www.jboss.com/products/platforms/application
4
http://tomcat.apache.org/
3
6|Page
4.0 Building your own RUBiSVA
3.2.1 A Linux server
The distribution doesn’t matter. Note that they might be some differences across distributions, when it
comes to configure your XEN Linux server. We will be explaining the process for a “Fedora core 5”5
distribution.
3.2.2 XEN kernel for your Linux server
In order to run a virtual appliance with XEN, you will need to install a XEN kernel. You will have thus to
boot your Linux server into this kernel later on. Let’s see how it works.
“The Xen Virtualization user manual 3.0”6 tell you all about what you need to know for this step.
The following is what has been done on a Linux Fedora 5. We use the yum installer to get quite quickly
the Linux XEN up running. This is strongly inspired from the “XEN Fedora Quickstart”7.
• Install the kernel xen as follows:
yum install kernel-xen0
•
Since the XEN kernel is not always enable by default, you will need to change default
parameter in /boot/grub/grub.conf from default=1 to default=0, as follows.
default=0
timeout=5
splashimage=(hd0,0)/grub/splash.xpm.gz
hiddenmenu
title Fedora Core (2.6.20-1.2320.fc5xen0)
root (hd0,0)
kernel /xen.gz-2.6.20-1.2320.fc5
module /vmlinuz-2.6.20-1.2320.fc5xen0 ro root=/dev/VolGroup00/LogVol00 3
module /initrd-2.6.20-1.2320.fc5xen0.img
title Fedora Core (2.6.15-1.2054_FC5smp)
root (hd0,0)
kernel /vmlinuz-2.6.15-1.2054_FC5smp ro root=/dev/VolGroup00/LogVol00 rhgb quiet
initrd /initrd-2.6.15-1.2054_FC5smp.img
Note: It is really important to change the red line as in the grub.conf
sample above such that the kernel will boot on runlevel 3 and not rhgb like
the fc5smp.
•
Reboot your machine
3.2.3 DHCP
•
In order to have the internet in your virtual appliance cluster later on, you need to have the DHCP server
installed on your Linux Server. The DHCP server will help you to assign dynamically an IP address to each
5
http://docs.fedoraproject.org/release-notes/fc5/
http://tx.downloads.xensource.com/downloads/docs/user/
7
http://fedoraproject.org/wiki/FedoraXenQuickstartFC5#Quick_Start
6
7|Page
4.0 Building your own RUBiSVA
Virtual machine (VM) in your RUBiS’s cluster. The following DHCP site (http://tldp.org/HOWTO/DHCP/
) tells you more about DHCP and how to install it.
In Fedora you could use yum instead of making install from a the tar ball source.
yum install dhcp
You will be then able to restart your DHCP server as followed:
service dhcpd restart
If you have a freshly installed DHCP, you can overwrite your own dhcpd.conf with the one provided in
rubisva_1.0.tar, located in the package folder rubisva/scripts/dom0/ (see the section 3.3 to view the
architecture of this tar ball). Thus you may run these commands:
[note] : the following commands supposed your dhcp conf file is under /etc.
tar –xvf rubisva_1.0.tar;
cp -rf rubisva_1.0/rubisva/scripts/dom0/* /etc/xen/auto/;
cd /etc/xen/auto;
cp –rf dhcpd.conf /etc/dhcpd.conf;
If you are using your DHCP for other purposes already, just append the subnet declaration part from the
rubisva_1.0/rubisva/scripts/dom0/dhcpd.conf in your own dhcpd.conf. If you are using already the
subnet 192.168.1.0 change it to something else but remember you will have to change some scripts.
These changes will be pointed out later in the document.
subnet 192.168.1.0 netmask 255.255.255.0 {
option subnet-mask 255.255.255.0;
option broadcast-address 192.168.1.255;
option routers 192.168.1.1;
option domain-name "rubisva.ch";
range 192.168.1.50 192.168.1.100;
option domain-name-servers 128.178.15.227,128.178.15.229;
#option domain-name-servers 192.168.1.1;
}
To finish your DHCP configuration, you need to change the “option domain-name-servers”.
To know what your DNS8 servers are, run the following command:
more /etc/revolv.conf;
#the output looks like
search foo.ch
nameserver 123.123.123.123
nameserver 124.124.124.124
In this case you will replace the line “option domain-name-servers 128.178.15.227, 128.178.15.229;”
with “option domain-name-servers 123.123.123.123, 124.124.124.124”. Note that you can have one or
more DNS servers.
8
http://www.dns.net/dnsrd/docs/whatis.html
8|Page
4.0 Building your own RUBiSVA
3.3 RUBiSVA distribution
The root password of your VA is “rubisva”.
The VNC password of your VA is “rubisva”.
The RUBiSVA distribution is inside the rubisva_1.0.tar downloadable from the same location as this
document. Here is the structure of the rubisva_1.0.tar:
rubisva_1.0.tar
|_rubisva
|_rubisva_1.0.img
|_scripts
|_dom0
|_rubisva
|_dhcpd.conf
|_ssh-keyswap.sh
|_vif-bridge-rubis.sh
|_do_cross_config.sh
|_check_finger_print.sh
|_autodeploy.sh
|_shutdown_all_vm.sh
|_domU
|_setdbip.sh
|_sethostname.sh
|_setjbossnodeid.sh
|_setjbossworkernode.sh
|_setapacheclient.sh
|_sethosts.sh
|_ganglia-metric
|_disk_metrics.sh
|_disk_metric_daemaon.sh
If you read the XEN user’s manual mentioned above, you probably already know about XEN.
Once you installed the kernel XEN and booted it, you have basically booted into the dom0. Therefore
the dom0 is the domain of your new Linux XEN server. The term domU or guest will be associated to all
virtual machines that you are running from the dom0.
Under rubisva/scripts/dom0, you will find the following files
rubisva
dhcpd.conf
ssh-keyswap.sh
9
An example of XEN configuration to boot the domU image
(see section 3.3.2)
The DHCP9 configuration file for the RUBiSVA cluster subnet
(see section 3.2.3)
Since you need to SSH 10without authenticating to all domUs while
deploying them, you will need to exchange key with the image
reference: rubisva_1.0.img. This script will help doing that quite
easily. (see section 3.3.3)
http://tldp.org/HOWTO/DHCP/
http://www.openssh.org/
10
9|Page
4.0 Building your own RUBiSVA
vif-bridge-rubis.sh
check_finger_print.sh
autodeploy.sh
3.3
It Creates a bridge for your subnet toward the eth0 interface
(see section 3.3.1)
Contains the fingerprint of the image reference. You do not need to
change it if you are not creating a new image ref. It is used by the
autodeploy.sh to be aware of the fingerprint of all domU it creates.
This is useful to SSH without having to confirm the new domU host
fingerprint. You could read about this technique at
http://www.csua.berkeley.edu/~ranga/notes/ssh_nopass.html.
This is the file you are going to use to deploy the cluster and run tests.
See section 3.4 more details about this on the deployment procedure.
RUBiSVA configuration
3.3.1 Create a bridge between eth0 and your subnet
Now that you have your DHCP all set, you need to run the vif-bridge-init.sh as follow. This script will
create a bridge between eth0 and your subnet, and configure your iptable so that the network will be
available in all your subnet.
[you need to have the DHCP as service. If you do not, please start manually your DHCP after you run
this].
./vif-bridge-init.sh start
xend restart
Note that if you were using the subnet 192.168.1.0 already for other purposes, you must have changed
the rubis subnet to something else. If you are in this case, you have to edit the vif-bridge-init.sh and
change the red line (below) so it matches the subnet you choosed.
….
brctl addbr rubisbr0
ip addr add 192.168.1.1/24 dev rubisbr0
ip link set rubisbr0 up
iptables -t filter -F
iptables -t mangle -F
iptables -t nat -F
iptables -t filter -P FORWARD DROP
iptables -t mangle -A FORWARD -i rubisbr0 -o eth0 -j MARK --set-mark 1
iptables -t filter -A FORWARD -m state --state ESTABLISHED,RELATED -j ACCEPT
iptables -t filter -A FORWARD -m mark --mark 1 -j ACCEPT
iptables -t nat -A POSTROUTING -m mark --mark 1 -j MASQUERADE
service dhcpd restart
xend stop
xend start
…
10 | P a g e
4.0 Building your own RUBiSVA
3.3.2 RUBiSVA configuration file
Now you have the network available in your cluster. One more step and you are done with the
configuration. The last step is to copy the rubisva configuration file namely rubisva to the right directory.
If you have followed the instructions so far you should have this file in your /etc/xen/auto directory. Just
copy it into /etc/xen/. This is important since all xen VA config file should be in this directory.
cd /etc/xen/auto ; cp rubisva /etc/xen/
The rubisva_1.0.img file is the VA reference image file. In this example we supposed we are in the
directory where I unpacked the package rubisva_1.0.tar, and we want to copy the reference image on
under /srv/xen/own/.
cp -rf rubisva_1.0/rubisva/rubisva_1.0.img /srv/xen/own/
The rubisva conf file should then looks like this.
name = "rubisva"
memory = "256"
disk = [ 'tap:aio:/srv/xen/own/rubisva.img,xvda,w' ]
dhcp = "dhcp"
vif = [ 'mac=00:16:3e:41:29:54' ]
#uuid = "035c6690-81ca-2dc8-87d5-2cff62ed48df"
bootloader="/usr/bin/pygrub"
on_reboot = 'restart'
on_crash = 'restart'
3.3.3 Exchanging SSH keys with the VA reference
Since you need to SSH 11 without authenticating to all domUs while deploying them, you will need to
exchange key with the VA reference first. ssh-keyswap.sh will help you achieving that. You need to
follow these steps to: start your VA, exchange keys, and close the VA.
xm start -c rubisva
#when the VA is started run the following on your dom0.
cd /etc/xen/auto
./ ssh-keyswap.sh 192.168.1.99 #if 192.168.1.99 is the ip of your VA
xm shutdown rubisva
11
http://www.openssh.org/
11 | P a g e
4.0 Building your own RUBiSVA
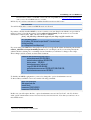
3.4
DEPLOYING RUBiSVA
Figure 2: RUBiSVA deployment
If you have followed the instructions so far, you should have the following files inside /etc/xen/auto:
autodeploy.sh, do_cross_config.sh and check_finger_print.sh.
You will work directly with the autodeploy.sh. You can run autodeploy.sh as follow and it will display
the usage.
$> ./autodeploy.sh
Usage: ./autodeploy.sh scenario_number
available scenario_number are:
1: deploy 1 client - 1 apache - 2 jboss server - 1 db
2: deploy 2 client - 1 apache - 2 jboss server - 1 db
Basically this script is based on scenarios. If you open the file, all the global variables are on the top.
Those will help you to configure your deployment.
The variable ALLIP is used to specify the pattern of your rubis_cluster.
# in the following example from left to right, we will create 1 db 2 jboss 1 apache and 2 clients
ALLIP='1 2 1 2'
3.5
RUNNING TESTS
After you have deployed all domUs, you can start running tests.
12 | P a g e
4.0 Building your own RUBiSVA
To run a test, you need to know a little bit about RUBiS Client properties. You will find in the VM under
/root/rubis/RUBIS/Client/Client.
The rubis.properties will help you to configure your experiment.
You will then be able to set up the up ramp, down ramp, the experiment duration, the number of users per
nodes… Here are some important configuration fields.
…
# Workload: precise which transition table to use
workload_number_of_clients_per_node = 10000
…
workload_transition_table = workload/TransitionTables/default_transitions_03.txt
workload_number_of_columns = 27
…
workload_up_ramp_time_in_ms = 6000
workload_up_ramp_slowdown_factor = 2
workload_session_run_time_in_ms = 300000
workload_down_ramp_time_in_ms = 6000
workload_down_ramp_slowdown_factor = 3
...
The best way is to do the configuration in your RUBiSVA REF so you could just SSH to run the
simulation once you have deployed your rubis_cluster. Then, you just need to run the ant build.xml from
your dom0 as follows.
#no parameter is need by default the client emulator is launched
$> ssh rubis_client1 “cd /root/rubis/RUBIS/Client/Client; ant;”
At the end of the experiment you can open the local link to an index file mentioned in the output (in red)
Buildfile: build.xml
init:
[copy] Copying 1 file to /root/rubis/rubis-cvs-2008-02-25/Client/Client/build/RUBiSVA_1.0
compile:
emulator:
[java] RUBiS client emulator - (C) Rice University/INRIA 2001
[java] Creating report directory bench/2008-6-4@1:5:29/
[java] Redirecting output to '/root/rubis/rubis-cvs-2008-0225/Client/Client/bench/2008-6-4@1:5:29/index.html'
[java] Please wait while experiment is running ...
[java] Initializing XPCOM from location : /opt/MozillaHtmlParser/mozilla.dist.bin.lin...
BUILD SUCCESSFUL
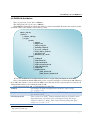
You could possibly connect to the Client domU if you have the vncviewer on the dom0. VNC 12is a tool
allowing you to remotely and graphically connect to a computer and take control of the latter. For more
13 | P a g e
4.0 Building your own RUBiSVA
information on VNC, go to the following link: http://www.realvnc.com/index.html . We have installed a
vncserver in the RUBiSVA image reference that we start in the deployment procedure. Run the following
command if you want to connect to the domU (knowing its hostname) using VNC.
vncviewer HOSTNAME:1 &
Figure 3: RUBiS web output page
12
http://www.realvnc.com/
14 | P a g e
4.0 Building your own RUBiSVA
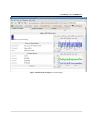
Figure 4: RUBiS using Ganglia for resource usage
15 | P a g e
4.0 Building your own RUBiSVA
4.0
BUILDING YOUR OWN RUBiSVA
16 | P a g e
4.0 Building your own RUBiSVA
4.0
BUILDING YOUR OWN RUBISVA
The VA build in this section is based on a fedora core 5. Before you start building your VA, you will
need to follow requirements for the dom0 specified in section 3.2. This will help you to install XEN
kernel.
4.1
Components
4.1.1 RUBiS client
The following components are required on the client box:
• Java JDK [ http://java.sun.com/javase/downloads/index.jsp ]
• Apache Ant [ http://ant.apache.org/manual/ ]: to build and run the project
• Ganglia GMetad and GMond [ http://ganglia.wiki.sourceforge.net/ ]
o Ganglia Gmond will collect metrics on your computer and publish them via udp.
o Ganglia Gmetad will gather data published via the udp channel and persist them
into a RRD (round-robin database).
•
•
•
•
•
RRD
o The round robin database
o A tool to output graphics from persisted data.
Apache HTTP server [ http://httpd.apache.org/docs-project/ ] : needed by the Ganglia
web frontend. The latter presents GMetad data in a nice web page.
Mozilla HTML parser [ http://mozillaparser.sourceforge.net/quickstart.html ] : used by
the RUBiS client to represent the html page as an XML DOM Object.
The client RUBiS Snapshot provided with this document.
Vncserver: because it is handy to graphically connect to the client box so you can use the
browser to view experiment results.
4.1.2 Apache Web frontend
The following components are required on the apache web frontend box:
• Apache HTTP server
• Mod_JK Connector
• Ganglia GMond
4.1.3 Application Server (JBOSS)
The following components are required on the JBOSS Application server box:
•
•
13
JBoss Application Server13
Ganglia GMond
http://www.jboss.org/jbossas/downloads/
17 | P a g e
4.0 Building your own RUBiSVA
4.1.4 Database Backend
The following components are required on the Backend box:
• MySQL or PostgreSQL database.
• Ganglia GMond
4.2
Building your own RUBiS Virtual Appliance step by step
In this part we show you how to build a RUBiSVA. We use JBOSS 4.2.2GA as the application server
and MySQL as the Database. The idea is to combine all components in one VM so that we will be able to
configure each copy of it individually at deployment time.
4.2.1 Install the VA Linux distribution
We have chosen to use a Fedora 5 core in our reference VA. You have two options:
• Either download a preinstalled Linux distribution XEN image
• Or build your guest system by yourself.
Prior to run what follows, you should install XEN kernel in your Linux server. You will need to read the
section 3.2.2 to achieve that.
If you want to download preinstalled Linux distribution XEN images, take a look at the following links:
• http://www.jailtime.org/
• http://xen.org/download/
If you want to build your own fedora guest system yourself, you can either follow the XEN user manual:
http://tx.downloads.xensource.com/downloads/docs/user/, or use xenguest installer.
We will show you in this part how to use xenguest installer for this purpose.
With Fedora Core 5, installation of Xen guests using anaconda is supported, although with a few known
bugs. The xen package includes a script for starting guest installs. You can run it with
/usr/sbin/xenguest-install.py
You will then be prompted to answer a few questions regarding the virtual machine you are trying to
create. This information can all be passed as command line options; run with an argument of --help for
more details. In particular, kickstart options can be passed with -x ks=options.
• What is the name of your virtual machine? This is the label used for display in the various xm
commands as well as being used as the name of the domain config file in /etc/xen. Use rubisva.
• How much RAM should be allocated (in megabytes)? This is the amount of RAM to be allocated
for the guest instance in megabytes (eg, 256). Note that installation with less than 256 megabytes
is not recommended (or likely to work with test2).
• What would you like to use as the disk (path)? The local path and file name of the file to serve as
the disk image for the guest (eg, /home/franck/rubisvaown1.img). This will be exported as a full
disk to your guest. Note you will need to speciy this path in the autodeploy.sh script.
• How large would you like the disk to be (in gigabytes)? The size of the virtual disk for your guest
if the file specified above does not already exist. The amount to specify depends on what you
intend to install. 4.0 gigabytes is a reasonable guess for a "default" install
18 | P a g e
4.0 Building your own RUBiSVA
•
What is the install location? This is the path to a Fedora Core 5 installation tree in the format
used by anaconda. NFS, FTP, and HTTP locations are all supported. For Fedora 5 distribution:
http://download.fedora.redhat.com/pub/fedora/linux/core/5/i386/os/.
If you get an error at this point saying 'The privileged domain did not balloon!', you may need to
resize one or more of your existing VMs' memory limits in order to free up RAM for the new
guest VM. For instance, to resize dom0 to use only 256 megs of RAM, you could run:
xm mem-set 0 256
Once you have shrunk your existing domains, you should be able to re-try the xenguestinstally.py script.
After this, the install kernel and initrd will be grabbed from your install tree and the installer will
start.
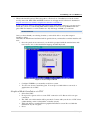
• Once the questions are answered, you should be prompted with the standard anaconda
text screen to choose the installation language and then keyboard.
Figure 5: Fedora xenguest-install
•
•
Configure TCP/IP as you normally would for a system.
You are now about to install the guest. You can proceed with either a text mode or
graphical mode via VNC.
Graphical Mode Installation via VNC
•
•
•
•
•
Select Start VNC
Now provide a password for a secure VNC connection or No Password for an open
connection
The VNC server information will be presented. Connect with your choice of VNC client
(either running on the local machine or another system).
VNC will display a standard Fedora graphical installation screen. Proceed with the
installation of your xen guest.
Notes
19 | P a g e
4.0 Building your own RUBiSVA
o
The xvda device is the file identified during the install-script.py process. It
appears to the guest as an entire disk, not just as a partition; you can partition it
or carve it up with LVM just like a normal disk. The first time you use it, you
will need to partition and format it during the install process.
4.2.2 Install JAVA JDK
• go to Sun's Java download site and download J2SE for Linux:
http://java.sun.com/j2se/1.4.2/download.html.
From here on, we will assume that you have got the SDK version, and are not using
any RPMs. The file you will have will be called j2sdk-1_4_2_01-linux-i586.bin.
• Install the J2SDK. Copy the .bin file from the previous step to /usr/local/, then run it:
cp -p j2sdk-1_4_2_01-linux-i586.bin /usr/local/
./j2sdk-1_4_2_01-linux-i586.bin
This creates /usr/local/j2sdk-1_4_2_01.
• Set JAVA_HOME as an environment variable, pointing to the location of the J2SDK you just
installed, in this case /usr/local/j2sdk-1_4_2_01. If you want this environment variable to be
available to every user system-wide, then put the following two lines into /etc/profile (for bash users)
•
JAVA_HOME=/usr/local/j2sdk-1_4_2_01
export JAVA_HOME
Verify that JAVA_HOME is set:
echo $JAVA_HOME
You should see the value /usr/local/j2sdk-1_4_2_01 returned. If you don't, go back through the
steps until JAVA_HOME resolves to the correct value.
SETTIING UP THE JAVA CLASSPATH (for bash users)
[root@ns1 root]# more ~/.bash_profile
# .bash_profile
# Get the aliases and functions
if [ -f ~/.bashrc ]; then
. ~/.bashrc
fi
# User specific environment and startup programs
PATH=$PATH:$HOME/bin
BASH_ENV=$HOME/.bashrc
USERNAME="root"
export USERNAME BASH_ENV PATH
PATH=$PATH:/usr/local/java/j2sdk1.4.1_06/bin
export PATH
export LD_LIBRARY_PATH=$CATALINA_HOME/common/lib
4.2.2 Install HTTPD
Run
yum install httpd
20 | P a g e
4.0 Building your own RUBiSVA
or download httpd tar ball and install it manually as shown in the following tutorial:
http://httpd.apache.org/docs/2.0/install.html
4.2.3 Install MYSQL AND PHP
MySQL could be installed straight when you are installing your Linux fedora 5 guest using
xenguest-install python script.
You can run the following command to install mysqld and php, all in once.
yum -y install php mysql mysql-server php-mysql
4.2.4 Install JBOSS AND ANT:
Please follow carefully this document.
http://www.jboss.org/fileaccess/default/members/jbossas/freezone/docs/Installation_Guide/beta422/html/index.html
4.2.5 Install RRD, PHP AND GANGLIA
As mentioned previously, Ganglia will need RRD to store metric values.
Do not forget that on fedora core the yum installer might help you to skip lots of the following
installation links.
Here is an excellent document about ganglia:
http://people.web.psi.ch/markushin/hpc/docs/Ganglia_VM_20070116.pdf .
To install RRDTool, follow instruction at this link: http://search.cpan.org/src/NICOLAW/RRD-Simple1.44/INSTALL
To install PHP, follow this link: http://dan.drydog.com/apache2php.html.
Finally you can install ganglia GMond, GMetad and web front end from rpms. You may download those
file from: http://sourceforge.net/project/showfiles.php?group_id=43021
After you download your rpm files run for each one:
rpm –Uhv YOUR_RPM_FILE.rpm
Note that you may need other files for dependency purposes such as gexec lib. You will find them in the
same location.
If the rpm do not work, download the Ganglia src from the same location and make install. To achieve
your compilation and installation successfully, take a look at the README and INSTALL files inside
the Ganglia src tar ball.
4.2.5 MOD_JK
This will help you to load balance between to JBOSS AS. This is the link we use to configure our modjk.
http://wiki.jboss.org/wiki/UsingMod_jk1.2WithJBoss.
4.2.5 Uploading RUBiS snapshot and needed scripts
21 | P a g e
4.0 Building your own RUBiSVA
Inside the rubisva_1.0.tar copy domU scripts inside /opt as follows:
cp –rf rubisva_1.0/rubisva/scripts/domU/* /opt/
Copy the RUBiS snapshot as follows
mkdir –p /root/rubis/
cp rubis-snapshot.tgz /root/rubis/
cd / root/rubis/
tar –xvfz rubis-snapshot.tgz
Now you will be able to populate your database by running successively the following scripts inside
/root/rubis/RUBIS/database: rubis.sql, regions.sql, categories.sql.
4.3 The deployment procedure
4.3.1 Step 1: Copy
To deploy the script starts by copying as many domU as it needs in a temporary directory. You can either
choose to keep existing image copies or not. This means that e.g. if you have 5 domU images in this
directory names: rubisva_1[2 or 3 or 4 or 5].img, the script will keep them if it has to create them so you
will be saving some time when deploying.
4.3.2 Step 2: The network
We chose to assign dynamically ip address to each domU. This could be replaced by a static address
pretty quickly but we have to deal with the bridge for the subnet.
4.3.3 Step 3: Start domU
After the copy, the script creates a config file for each domU to include in the cluster. Those files are
stored in your /etc/xen directory (this is mandatory). After that, all domU can be started using “xm -c
create” command. The default configuration on domU is using DHCP to assign addresses. If your DHCP
is well configured, you should have a functional network inside your domU after you started it .
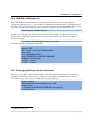
4.3.4 Step 4: Assign roles, configure and start appropriates services.
Now that all domU are up running and can access internet, you can assign a role to each VM. Note that
this is done automatically, all you have to do is to choose a scenario. The scenario is proposed to you
when you are running the script. Right now there are 3 scenarios. Please see section 3.4 for more
information.
JBoss
Client
DB
apache
JBoss
Figure 6: autodeploy scenario 1
22 | P a g e
4.0 Building your own RUBiSVA
Since all boxes are created from the same VM image, it is pretty simple to configure them. This is done
thanks to all scripts inside in domUs callable from ssh.
23 | P a g e
5.0 References
5.0
5.0
•
•
•
•
•
•
•
•
•
•
•
•
•
•
•
•
•
•
•
•
•
•
•
•
•
•
•
REFERENCES
REFERENCES
Ganglia : http://ganglia.wiki.sourceforge.net/
IBM work on ganglia : http://www-941.ibm.com/collaboration/wiki/display/WikiPtype/ganglia
Xen Virtualization user manual: http://tx.downloads.xensource.com/downloads/docs/user/
Systat tutorial: http://perso.orange.fr/sebastien.godard/
http://www.madplanet.com/jboss-docu-wiki/Wiki.jsp?page=40.EJB2
http://docs.jboss.org/ejb3/app-server/tutorial/index.html
http://www.php.net/docs.php
http://www.apl.jhu.edu/~hall/java/Servlet-Tutorial/
http://proton.inrialpes.fr/~jphilipp/dev/rubis-hibernate/index.xhtml
Virtual Appliance
http://xen.org/
http://www.jboss.com/products/platforms/application
http://tomcat.apache.org/
http://docs.fedoraproject.org/release-notes/fc5/
http://tx.downloads.xensource.com/downloads/docs/user/
http://fedoraproject.org/wiki/FedoraXenQuickstartFC5#Quick_Start
http://tldp.org/HOWTO/DHCP/
http://www.openssh.org/
http://www.dns.net/dnsrd/docs/whatis.html
http://www.realvnc.com/
http://java.sun.com/javase/downloads/index.jsp
http://ant.apache.org/manual/
http://ganglia.wiki.sourceforge.net/
http://httpd.apache.org/docs-project/
http://mozillaparser.sourceforge.net/quickstart.html
http://www.ceylonlinux.com/pdf/apache_java_tomcat_mod_jk.pdf
http://www.jboss.org/jbossas/downloads/
24 | P a g e