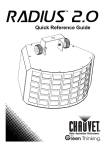
1
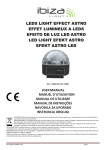
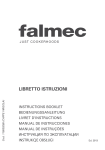
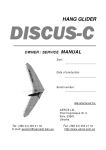
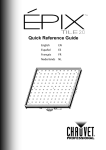
Quick Reference Guide
Cubix™ 2.0 QRG
EN
About This The Cubix™ 2.0 Quick Reference Guide (QRG) has basic product
Guide information such as mounting, menu options, and DMX values. Download
the User Manual from www.chauvetlighting.com for more details.
Disclaimer The information and specifications contained in this QRG are subject to
change without notice.
Safety Notes These Safety Notes include important information about installation, use, and
maintenance.
·
·
·
·
·
·
·
·
·
This product is not intended for permanent installation.
ONLY connect this product to a grounded and protected circuit.
Always disconnect from power before cleaning or replacing the fuse.
DO NOT look at the light source when the product is on.
Make sure the power cord is not crimped or damaged.
Never disconnect this product from power cord by pulling or tugging on
the cord.
Use a safety cable when mounting this product overhead.
DO NOT allow flammable materials close to the unit while operating.
DO NOT touch this product when it is operating because it may be hot.
·
Contact
The voltage of the outlet to which you are connecting this product must
be within the range stated on the decal or rear panel of the product.
· This product is for indoor use only! (IP20) To prevent risk of fire or
shock, do not expose this product to rain or moisture.
· Always mount this product in a location with adequate ventilation, at least
20 in (50 cm) from adjacent surfaces.
· Be sure that no ventilation slots on the unit’s housing are blocked.
· Never connect this product to a dimmer or rheostat.
· Replace the fuse with the same type and rating.
· ONLY use the hanging/mounting bracket to carry this product.
· The maximum ambient temperature is 104 °F (40 °C). Do not operate this
product at higher temperatures.
· In the event of a serious operating problem, stop using immediately.
· DO NOT open this product. It contains no user-serviceable parts.
· To eliminate wear and improve its lifespan, during periods of non-use
completely disconnect from power via breaker or by unplugging it.
Outside the U.S., United Kingdom, Ireland, Mexico, or Benelux, contact your
distributor to request support or return a product. Visit
www.chauvetlighting.com for contact information.
What Is · Cubix™ 2.0
Included · Power Cord
·
·
2
Warranty Card
Quick Reference Guide
Cubix™ 2.0 QRG
EN
To Begin Unpack your Cubix™ 2.0 and make sure you have received all parts in good
Product
Description
condition. If the box or contents appear damaged, notify the carrier
immediately, not Chauvet.
The Cubix™ 2.0 is a multicolor centerpiece that combines two different
effects. With centrally mounted LEDs and a surrounding quad-sided derby
effect, the Cubix™ 2.0 allows for various effects, all independently
controllable.
Microphone
LED Display
Control
Buttons
Sound Sensitivity
Knob
Safety Loop
Fuse Holder
DMX In/Out
Power In/Out
Product Overview
AC Power This product has an auto-ranging power supply that can work with an input
voltage range of 100–240 VAC, 50/60 Hz.
To eliminate wear and improve its lifespan, during periods of non-use
completely disconnect from power via breaker or by unplugging it.
Power Linking For the maximum number of Cubix™ 2.0 products that you can power link at
Fuse
Replacement
Control Panel
Description
each voltage, see the User Manual or the sticker on the product.
To replace the fuse in the Cubix™ 2.0:
1. Disconnect the product from power.
2. Wedge the tip of a flat-head screwdriver into the slot of the fuse holder.
3. Pry the safety cap out of the housing.
4. Remove the blown fuse from the clip on the front of the safety cap and
replace with a fuse of the exact same type and rating.
5. Re-insert the fuse holder and reconnect power.
Button
<MENU>
<UP>
<DOWN>
<ENTER>
Function
Exits from the current menu or function
Navigates upwards through the menu list and increases the
numeric value when in a function
Navigates downwards through the menu list and decreases the
numeric value when in a function
Enables the currently displayed menu or sets the currently
selected value
3
Cubix™ 2.0 QRG
EN
Menu Options
Main Level
Programming Levels
DMX Address
512
Auto Programs
d 1–d512
AUTO
Auto Program Speed
Sound-Active Mode
S--
Description
Sets the DMX starting address
Sets Auto program
S 1–S100
SNd
Selects Auto program speed (slow to fast)
Sets Sound-Active mode
DMX Linking The Cubix™ 2.0 can work with a DMX controller when linked by DMX
serial connections. Instructions for connecting and configuring this product
for DMX operation are in the User Manual. If you are not familiar with DMX,
download the DMX Primer from www.chauvetlighting.com.
To ensure full access to all channels in each DMX mode, the highest
recommended DMX address is 506.
Starting
Address
Master/Slave The Cubix™ 2.0 uses the DMX data connection for its Master/Slave mode.
Connection Instructions for connecting and configuring this product for Master/Slave
operation are in the User Manual.
DMX Values
7-CH
Channel Function
1
Colors
2
Strobe
3
Motor Rotation
4
Auto Programs
Value
000 ó 004
005 ó 028
029 ó 056
057 ó 084
085 ó 112
113 ó 140
141 ó 168
169 ó 197
198 ó 224
225 ó 255
000 ó 004
005 ó 255
000 ó 127
128 ó 255
000 ó 014
015 ó 020
021 ó 026
027 ó 032
033 ó 038
039 ó 044
045 ó 050
051 ó 056
057 ó 062
063 ó 068
069 ó 074
4
Percent/Setting
No function
Red
Green
Blue
Cyan
Purple
Yellow
White
3-Color switching
7-Color switching
No function
0–30 Hz
Rotation with indexing
Back and forth with
increasing distance
Blackout
Auto program 1
Auto program 2
Auto program 3
Auto program 4
Auto program 5
Auto program 6
Auto program 7
Auto program 8
Auto program 9
Auto program 10
Side Lenses
Middle Lens
Cubix™ 2.0 QRG
7-CH
(cont.)
EN
Channel Function
4
(cont.)
Auto Programs
(cont.)
5
Auto Program
Speed
6
Strobe
7
Auto Programs
(All Lenses)
Value
075 ó 080
081 ó 086
087 ó 092
093 ó 098
099 ó 104
105 ó 110
111 ó 116
117 ó 122
123 ó 128
129 ó 134
135 ó 140
141 ó 146
147 ó 152
153 ó 158
159 ó 164
165 ó 170
171 ó 176
177 ó 182
183 ó 188
189 ó 194
195 ó 200
201 ó 206
207 ó 212
213 ó 218
219 ó 224
225 ó 230
231 ó 236
237 ó 242
243 ó 248
249 ó 255
000 ó 015
016 ó 255
000 ó 015
016 ó 255
000 ó 009
010 ó 250
251 ó 255
5
Percent/Setting
Auto program 11
Auto program 12
Auto program 13
Auto program 14
Auto program 15
Auto program 16
Auto program 17
Auto program 18
Auto program 19
Auto program 20
Auto program 21
Auto program 22
Auto program 23
Auto program 24
Auto program 25
Auto program 26
Auto program 27
Middle Lens
Auto program 28
Auto program 29
Auto program 30
Auto program 31
Auto program 32
Auto program 33
Auto program 34
Auto program 35
Auto program 36
Auto program 37
Auto program 38
Auto program 39
Auto program 40
No function
0–100%
(when Ch. 4 is 015-255)
No function
0–30 Hz
No function
Auto programs (slow–fast) All Lenses
Sound-active
Cubix™ 2.0 QRG
EN
Mounting Before mounting this product, read the Safety Notes.
Safety Cable
Mounting Clamp
Product
Mounting
Diagram
Mounting Bracket
Bracket Adjustment Knob
6
Cubix™ 2.0 GRR
ES
Acerca de Esta La Guía de Referencia Rápida (GRR) del Cubix™ 2.0 contiene información
Guía básica sobre el producto, como montaje, opciones de menú y valores DMX.
Descargue el manual de usuario de www.chauvetlighting.com para una
información más detallada.
Exención de La información y especificaciones contenidas en esta GRR están sujetas a
Responsabilidad cambio sin previo aviso.
Notas de Estas notas de seguridad incluyen información importante sobre el montaje,
Seguridad uso y mantenimiento.
·
·
·
·
·
·
·
·
·
Este producto no está concebido para una instalación permanente.
Conecte este producto SOLO a un circuito con toma de tierra y
protegido.
Desconecte siempre de la alimentación antes de la limpieza o sustitución
del fusible.
NO mire a la fuente de luz cuando el producto esté encendido.
Asegúrese de que el cable de alimentación no está retorcido ni
estropeado.
Nunca desconecte este producto del cable de alimentación agarrando o
tirando del cable.
Use un cable de seguridad cuando monte este producto en lo alto.
NO permita la presencia de materiales inflamables cerca de la unidad
cuando esté en funcionamiento.
NO toque este producto cuando esté en funcionamiento, pues podría estar
caliente.
7
Cubix™ 2.0 GRR
ES
·
·
·
·
·
·
·
·
·
·
·
La tensión del enchufe al que conecte este producto ha de estar en el
rango establecido en el grabado o en el panel posterior de producto.
¡Este producto es para uso en interiores solamente! (IP20) Para evitar
riesgos de incendio o descarga, no exponga este producto a la lluvia o la
humedad.
Monte siempre este producto en una ubicación con ventilación adecuada,
al menos a 20'' (50 cm) de superficies adyacentes.
Asegúrese de que ninguna ranura de ventilación en la carcasa de la
unidad queda bloqueada.
Nunca conecte este producto a un atenuador o reostato.
Sustituya el fusible con uno del mismo tipo y categoría.
Use SOLAMENTE los soportes de colgar/montar para mover este
product.
La máxima temperatura ambiente es de 104 °F (40 °C). No haga
funcionar este producto a temperaturas más altas.
En caso de un problema grave de funcionamiento, deje de usarlo
inmediatamente.
NO abra este producto. No contiene piezas reparables por el usuario.
Para evitar un desgaste innecesario y alargar su vida útil, desconecte
complemente el producto de la alimentación, mediante el interruptor o
desenchufándolo, durante los periodos en los que no se use.
Contacto Fuera de EE.UU, Reino Unido, Irlanda, Mexico o Benelux, póngase en
contacto con su distribuidor para solicitar asistencia o devolver el producto.
Visite www.chauvetlighting.com para información de contacto.
· Tarjeta de Garantía
Qué va · Cubix™ 2.0
Incluido · Cable de Alimentación
· Guía de Referencia Rápida
Para Empezar Desembale su Cubix™ 2.0 y asegúrese de que ha recibido todas las partes en
Descripción
del Producto
buen estado. Si la caja o los componentes parecen dañados, notifíqueselo al
transportista inmediatamente, no a Chauvet.
El Cubix™ 2.0 es un aparato de iluminación central multicolor que combina
dos efectos diferentes. Con LEDs montados en el centro, rodeados por cuatro
lados de un efecto Derby, el Cubix™ 2.0 permite varios efectos, todos
controlables de forma independiente.
8
Cubix™ 2.0 GRR
ES
Pantalla LED
Visión General del
Producto
Micrófono
Botones de
Control
Mando de
Sensibilidad
al Sonido
Gancho de
Seguridad
Portafusibles
Entrada/Salida
DMX
Entrada/Salida
Alimentación
Corriente Este producto tiene una fuente de alimentación con detección automática que
Alterna puede funcionar con un rango de tensión de entrada de 100~240 VCA,
50/60 Hz.
Para evitar un desgaste innecesario y alargar su vida útil, desconecte
complemente el producto de la alimentación, mediante el interruptor o
desenchufándolo, durante los periodos en los que no se use.
Alimentación en Para saber el máximo número de productos Cubix™ 2.0 que para cada
Cadena tensión puede conectar alimentando en cadena, consulte el Manual de
Usuario o el adhesivo del producto.
Sustitución del Para sustituir el fusible del Cubix™ 2.0:
Fusible 1. Desconecte el producto de la alimentación.
2. Haga cuña con la punta de un destornillador plano en la ranura del
portafusibles.
3. Saque la tapa de seguridad de la carcasa.
4. Quite el fusible fundido de la sujeción en la parte frontal de la tapa de
seguridad y sustituya el fusible con otro del mismo tipo y categoría.
5. Vuelva a insertar el portafusibles y conecte de nuevo la alimentación.
9
Cubix™ 2.0 GRR
Descripción
del Panel de
Control
ES
Botón
Función
<MENU>
<UP>
<DOWN>
<ENTER>
Sale del menú o función actual
Navega hacia arriba por la lista de menú y aumenta el valor
numérico cuando está en una función
Navega hacia abajo por la lista de menú y disminuye el valor
numérico cuando está en una función
Habilita el menú actualmente en pantalla o configura el valor
seleccionado actualmente
Opciones de Menú
Nivel Principal
Dirección DMX
Niveles de Programación
512
Programas
Automáticos
Velocidad
Programa
Automático
Modo Activo por
Sonido
d 1–d512
AUTO
S--
Descripción
Configura la dirección inicial DMX
Configura el Programa Automático
S 1–S100
SNd
Selecciona la velocidad del Programa
Automático (lento a rápido)
Configura el modo Activo por Sonido
Enlace DMX El Cubix™ 2.0 puede funcionar con un controlador DMX cuando se enlaza
por conexiones serie DMX. Las instrucciones para conectar y configurar este
producto para funcionamiento DMX están en el Manual de usuario. Si no
está familiarizado con DMX, descargue el Manual DMX de
www.chauvetlighting.com.
Para asegurarse acceso total a todos los canales en cada modo DMX, la
dirección DMX más recomendable es 506.
Dirección de
Inicio
Conexión El Cubix™ 2.0 usa la conexión de datos DMX para su modo
Maestro/Esclavo Maestro/Esclavo. Las instrucciones para conectar y configurar este producto
para funcionamiento Maestro/Esclavo están en el Manual de Usuario.
10
Cubix™ 2.0 GRR
ES
Valores DMX
7-C
Canal
Función
1
Colores
2
Estroboscopio
3
Rotación del Motor
4
Programas
Automáticos
Valor
000 ó 004
005 ó 028
029 ó 056
057 ó 084
085 ó 112
113 ó 140
141 ó 168
169 ó 197
198 ó 224
225 ó 255
000 ó 004
005 ó 255
000 ó 127
128 ó 255
000 ó 014
015 ó 020
021 ó 026
027 ó 032
033 ó 038
039 ó 044
045 ó 050
051 ó 056
057 ó 062
063 ó 068
069 ó 074
075 ó 080
081 ó 086
087 ó 092
093 ó 098
099 ó 104
105 ó 110
111 ó 116
117 ó 122
123 ó 128
129 ó 134
135 ó 140
141 ó 146
147 ó 152
153 ó 158
159 ó 164
11
Porcentaje/Configuración
Sin función
Rojo
Verde
Azul
Cian
Violeta
Amarillo
Lente Lateral
Blanco
Conmutación de 3 Colores
Conmutación de 7 Colores
Sin función
0–30 Hz
Rotación con indexación
De Ida y Vuelta al aumentar
la distancia
Blackout
Programa automático 1
Programa automático 2
Programa automático 3
Programa automático 4
Programa automático 5
Programa automático 6
Programa automático 7
Programa automático 8
Programa automático 9
Programa automático 10
Programa automático 11
Programa automático 12
Lente Central
Programa automático 13
Programa automático 14
Programa automático 15
Programa automático 16
Programa automático 17
Programa automático 18
Programa automático 19
Programa automatico 20
Programa automático 21
Programa automático 22
Programa automático 23
Programa automático 24
Programa automático 25
Cubix™ 2.0 GRR
7-C
(cont.)
ES
Canal
4
(cont.)
Función
Programas
Automáticos
(cont.)
Valor
165 ó 170
171 ó 176
177 ó 182
183 ó 188
189 ó 194
195 ó 200
201 ó 206
207 ó 212
213 ó 218
219 ó 224
225 ó 230
231 ó 236
237 ó 242
243 ó 248
249 ó 255
000 ó 015
5
Velocidad
Programa
Automático
6
Estroboscopio
7
Programas
Automáticos
010 ó 250
(Todas las Lentes)
251 ó 255
016 ó 255
000 ó 015
016 ó 255
000 ó 009
Porcentaje/Configuración
Programa automático 26
Programa automático 27
Programa automático 28
Programa automático 29
Programa automático 30
Programa automático 31
Programa automático 32
Programa automático 33
Programa automático 34
Programa automático 35
Programa automático 36
Programa automático 37
Programa automático 38
Programa automático 39
Programa automático 40
Sin función
0–100% (cuando C. 4 está
entre 015–255)
Sin función
0–30 Hz
Sin función
Programas auto
(lento–rapido)
Activo por sonido
Lente Central
Todas las
Lentes
Montaje Antes de montar este producto, lea las Notas de Seguridad.
Abrazaderas de
Montaje
Soporte de Montaje
Diagrama
de Montaje
del Producto
Mando de Ajuste
del Soporte
12
Cable de
Seguridad
Cubix™ 2.0 MR
FR
À Propos de ce Le Manuel de Référence (MR) du Cubix™ 2.0 reprend des informations de
Manuel base sur cet appareil notamment en matière de montage, d'options de menu
et de valeurs DMX. Téléchargez le manuel d'utilisation
www.chauvetlighting.com pour de plus amples informations.
Clause de NonResponsabilité
Consignes de
Sécurité
sur
Les informations et caractéristiques contenues dans ce manuel sont sujettes à
changement sans préavis.
Ces consignes concernant la sécurité reprennent d'importantes informations
en matière d'installation, d'utilisation et de maintenance.
·
·
·
·
·
·
·
·
·
Cet appareil n'est pas conçu pour être utilisé dans une installation
permanente.
Connectez UNIQUEMENT ce produit à un circuit protégé et relié à la
terre.
Débranchez toujours cet appareil avant de procéder à son nettoyage ou
au remplacement de son fusible.
Ne regardez PAS la source lumineuse lorsque le produit fonctionne.
Assurez-vous que le cordon d'alimentation n'est ni tordu ni endommagé.
Ne débranchez jamais cet appareil en tirant sur le cordon.
Utilisez un câble de sécurité lorsque vous montez ce produit en hauteur.
Veillez à ce qu'AUCUNE source inflammable ne se trouve à proximité
de l'unité lors de son fonctionnement.
Ne touchez PAS cet appareil lors de son fonctionnement car il pourrait
s'avérer brûlant.
13
Cubix™ 2.0 MR
FR
·
·
·
·
·
·
·
·
·
·
·
La tension de la prise à laquelle vous connectez ce cet appareil doit être
comprise dans la plage de tensions reprise sur l'étiquette de l'appareil ou
à l'arrière de ce dernier.
Cet appareil doit être utilisé en intérieur uniquement. (IP20) Afin
d'éviter tout risque d'incendie ou décharge électrique, veillez à n'exposer
cet appareil ni à la pluie ni à l'humidité.
Montez toujours cet appareil dans en endroit bien ventilé, à au moins,
20 pouces (50 cm) des surfaces adjacentes.
Assurez-vous qu'aucune fente de ventilation sur le boîtier ne soit
obstruée.
Ne connectez JAMAIS cet appareil ni à un gradateur ni à un rhéostat.
Remplacez le fusible avec un de même type et même ampérage.
Transportez/Suspendez cet appareil UNIQUEMENT au moyen du
support dont il est doté.
La température ambiante maximale supportée par ce produit est de 104 °F
(40 °C). Ne le faites pas fonctionner à des températures plus élevées.
En cas de sérieux problèmes de fonctionnement, arrêtez le système
immédiatement.
N’ouvrez PAS ce produit. Il ne contient aucun composant susceptible
d’être réparé par l’utilisateur.
Durant les périodes de non-utilisation, pour éviter tout usure inutile et
pour prolonger la durée de vie, déconnectez-entièrement l'appareil en le
débranchant de l'alimentation électrique ou en coupant le disjoncteur.
Contact En dehors des États-Unis, du Royaume-Uni, de l’Irlande, du Mexique et du
Benelux, contactez votre fournisseur si vous avez besoin d'assistance ou de
retourner votre produit. Consultez le site www.chauvetlighting.com pour
trouver nos coordonnées.
· Une Fiche de Garantie
Ce Qui est · Un Cubix™ 2.0
Inclus · Un Cordon d'Alimentation
· Un Manuel de Référence
Débuter Déballez votre Cubix™ 2.0 et assurez-vous d'avoir tout reçu et en bon état.
Description de
l'appareil
Si l'emballage ou le contenu semblait être endommagé, indiquez-le
immédiatement au transporteur et non à Chauvet.
Le Cubix™ 2.0 est un éclairage central combinant deux effets distincts.
Avec ses LED positionnées au centre et son effet derby quadrangulaire les
entourant, le Cubix™ 2.0 vous propose différents pouvant tous être
commandés individuellement.
14
Cubix™ 2.0 MR
FR
Affichage LED
Microphone
Boutons de
Commande
Aperçu du Produit
Molette de
Sensibilité au
Son
Boucle de
Sûreté
Porte-fusible
Entrée/Sortie
DMX
Entrée/Sortie
d'Alimentation
Alimentation CA Ce produit est doté d'une alimentation universelle prenant en charge toute
tension d'entrée comprise entre 100 et 240 VCA, 50/60 Hz.
Durant les périodes de non-utilisation, pour éviter tout usure inutile et
pour prolonger la durée de vie, déconnectez-entièrement l'appareil en le
débranchant de l'alimentation électrique ou en coupant le disjoncteur.
Pour connaître le nombre maximal de Cubix™ 2.0 pouvant être raccordé
Connexion ensemble selon la tension, veuillez vous référer à le manuel d'utilisation ou
Electrique l'étiquette apposée sur l'unité.
Remplacement Pour remplacer le fusible dans le Cubix™ 2.0:
du Fusible 1. Débranchez l'appareil de l'alimentation.
2. Insérez et calez la pointe d'un tournevis à tête plate dans la fente du portefusible.
3. En faisant levier, faites sortir de son emplacement le couvercle du portefusible.
4. Retirez le fusible désuet du clip se trouvant à l'avant du couvercle de
sécurité et remplacez-le par un fusible équivalent.
5. Insérez à nouveau le porte-fusible puis rebranchez l'appareil.
15
Cubix™ 2.0 MR
FR
Description du
Tableau de
Commandes
Bouton
Fonction
<MENU>
Permet la sortie du menu ou de la fonction en cours
Permet de parcourir les listes de menu vers le haut, dans une
fonction permet d'augmenter les valeurs numériques
Permet de parcourir les listes de menu vers le bas, dans une
fonction permet de diminuer les valeurs numériques
Permet l’affichage du menu en cours ou permet de configurer la
valeur en cours
<UP>
<DOWN>
<ENTER>
Options du Menu
Niveau Principal
Adresse DMX
Niveaux de Programmation
512
Programmes
Automatiques
Vitesse du
Programme
Automatique
Mode Musical
d 1–d512
AUTO
S--
Description
Configure l'adresse DMX de départ
Configure le programme automatique
S 1–S100
SNd
Sélectionne la vitesse du programme
automatique (lent à rapide)
Configure le mode musical
Raccordement Le Cubix™ 2.0 peut fonctionner avec un jeu d'orgues DMX quand raccordé
DMX par des connexions DMX en série. Vous trouverez les instructions de
connexion et configuration de cet appareil pour un bon fonctionnement en
DMX dans le manuel d'utilisation. Si vous n'êtes pas familier avec le DMX,
vous
pouvez
télécharger
l'introduction
au
DMX
sur
www.chauvetlighting.com.
Adresse de
Départ
Connexion
Maître/Esclave
Afin d'assurer un accès à tous les canaux dans chaque mode DMX, l'adresse
DMX la plus élevée recommandée est 506.
Le Cubix™ 2.0 utilise une connexion de données DMX pour son mode
maître/esclave. Vous trouverez les instructions de connexion et configuration
de cet appareil pour un bon fonctionnement en maître/esclave dans le manuel
d'utilisation.
16
Cubix™ 2.0 MR
FR
Valeurs DMX
7 Canaux
Canal
1
Fonction
Couleurs
2
Stroboscope
3
Rotation du
Moteur
4
Programmes
Automatiques
Valeur
000 ó 004
005 ó 028
029 ó 056
057 ó 084
085 ó 112
113 ó 140
141 ó 168
169 ó 197
198 ó 224
225 ó 255
000 ó 004
005 ó 255
000 ó 127
128 ó 255
000 ó 014
015 ó 020
021 ó 026
027 ó 032
033 ó 038
039 ó 044
045 ó 050
051 ó 056
057 ó 062
063 ó 068
069 ó 074
075 ó 080
081 ó 086
087 ó 092
093 ó 098
099 ó 104
105 ó 110
111 ó 116
117 ó 122
123 ó 128
129 ó 134
135 ó 140
141 ó 146
147 ó 152
153 ó 158
159 ó 164
17
Pourcentage/Configuration
Pas de fonction
Rouge
Vert
Bleu
Cyan
Violet
Jaune
Blanc
3 couleurs en alternance
7 couleurs en alternance
Pas de fonction
0 à 30 Hz
Rotation avec indexation
Dans les deux sens avec la
distance
Noir général
Programme automatique 1
Programme automatique 2
Programme automatique 3
Programme automatique 4
Programme automatique 5
Programme automatique 6
Programme automatique 7
Programme automatique 8
Programme automatique 9
Programme automatique 10
Programme automatique 11
Programme automatique 12
Programme automatique 13
Programme automatique 14
Programme automatique 15
Programme automatique 16
Programme automatique 17
Programme automatique 18
Programme automatique 19
Programme automatique 20
Programme automatique 21
Programme automatique 22
Programme automatique 23
Programme automatique 24
Programme automatique 25
Lentille de
Côté
Lentille
Centrale
Cubix™ 2.0 MR
7 Canaux
(suite)
FR
Canal
4
(suite)
Fonction
Programmes
Automatiques
(suite)
5
Vitesse du
Programme
Automatique
6
Stroboscope
7
Programmes
Automatiques
(Toutes les
Lentilles)
Valeur
Pourcentage/Configuration
165 ó 170
171 ó 176
177 ó 182
183 ó 188
189 ó 194
195 ó 200
201 ó 206
207 ó 212
213 ó 218
219 ó 224
225 ó 230
231 ó 236
237 ó 242
243 ó 248
249 ó 255
000 ó 015
Programme automatique 26
Programme automatique 27
Programme automatique 28
Programme automatique 29
Programme automatique 30
Programme automatique 31
Programme automatique 32
Programme automatique 33
Programme automatique 34
Programme automatique 35
Programme automatique 36
Programme automatique 37
Programme automatique 38
Programme automatique 39
Programme automatique 40
Pas de fonction
0 à 100% (quand canal 4 est
015 à 255)
Pas de fonction
0 à 30 Hz
Pas de fonction
Programmes Auto (lent–rapide)
016 ó 255
000 ó 015
016 ó 255
000 ó 009
010 ó 250
251 ó 255 Mode musical
Lentille
Centrale
Toutes les
Lentilles
Montage Avant de monter cet appareil, lisez et assimilez les Consignes de Sécurité.
Crampon
Élingue de
Sécurité
Lyre de Suspension
Schéma de
Montage
du Produit
Molette de Réglage de la
Lyre
18
Cubix™ 2.0 SAL
DE
Über diese
Schnellanleitung
In der Schnellanleitung (SAL) des Cubix™ 2.0 finden Sie die wesentlichen
Produktinformationen, wie etwa über die Montage, Menüoptionen und
DMX-Werte des Geräts. Laden Sie für weiterführende Informationen unter
www.chauvetlighting.com das Benutzerhandbuch herunter.
Haftungsausschluss
Sicherheitshinweise
Die Informationen und Spezifikationen dieser Anleitung können ohne
vorherige Ankündigung geändert werden.
Diese Sicherheitshinweise enthalten wichtige Informationen über die
Montage, Verwendung und Wartung des Geräts.
·
·
·
·
·
·
·
·
·
Dieses Produkt eignet sich nicht für eine permanente Installation.
SCHLIESSEN Sie dieses Produkt nur an einen mit der Masse verbundenen
und abgesicherten Stromkreislauf an.
Trennen Sie das Gerät von der Stromquelle, bevor Sie es reinigen oder die
Sicherung auswechseln.
NIEMALS in die Lichtquelle schauen, während das Gerät eingeschaltet ist.
Stellen Sie sicher, dass das Netzkabel nicht gequetscht oder beschädigt ist.
Ziehen Sie beim Trennen des Geräts von der Stromversorgung nie am Kabel.
Bei Montage über Kopf immer ein Sicherungsseil verwenden.
KEINE entflammbaren Materialien während des Betriebs in der Nähe des
Geräts lagern.
NIEMALS während des Betriebs das Gehäuse berühren, da dies sehr heiß
wird.
19
Cubix™ 2.0 SAL
DE
·
·
·
·
·
·
·
·
·
·
·
Die Spannung der Schukosteckdose, an die Sie das Gerät anschließen, muss
sich innerhalb des Spannungsbereiches befinden, der auf dem Hinweisschild
oder dem rückwärtigen Bedienfeld des Geräts angegeben ist.
Dieses Gerät darf nur im Innenbereich verwendet werden. (IP20) Um das
Risiko von Bränden oder elektrischen Schlägen zu vermeiden, dürfen Sie das
Gerät nicht Regen oder Feuchtigkeit aussetzen.
Installieren Sie das Gerät an einem Ort mit ausreichender Belüftung und mit
einem Abstand von 50 cm zu den angrenzenden Flächen.
Stellen Sie sicher, dass die Lüftungsöffnungen im Gehäuse des Geräts nicht
verschlossen sind.
Schließen Sie dieses Gerät niemals an einen Dimmer oder Regelwiderstand
an.
Achten Sie beim Auswechseln der Sicherung darauf, den gleichen Typ mit
den gleichen Werten zu verwenden.
Das Gerät NUR an den Hänge-/Befestigungsbügeln tragen.
Die maximal zulässige Umgebungstemperatur beträgt 40 °C. Nehmen Sie
das Gerät nicht bei höheren Temperaturen in Betrieb.
Bei ernsthaften Betriebsproblemen stoppen Sie umgehend die Verwendung
des Geräts.
Dieses Gerät NICHT öffnen. Die eingebauten Komponenten sind für den
Kunden wartungsfrei.
Um unnötigen Verschleiß zu vermeiden und die Lebensdauer des Geräts
zu verlängern, trennen Sie während längerer Perioden des
Nichtgebrauchs das Gerät vom Stromnetz – entweder per Trennschalter
oder durch Herausziehen des Steckers aus der Steckdose.
Kontakt Kunden außerhalb der USA, GB, Irland, Mexiko oder Benelux wenden sich
an ihren Lieferanten, um den Kundendienst in Anspruch zu nehmen oder ein
Gerät zurückzuschicken. Kontaktinformationen finden Sie unter
www.chauvetlighting.com.
Packungsinhalt · Cubix™ 2.0
Start
· Garantiekarte
· Netzkabel
· Schnellanleitung
Packen Sie Ihren Cubix™ 2.0 aus und überprüfen Sie, ob Sie alle Teile
unbeschädigt erhalten haben. Wenn die Verpackung beschädigt ist,
benachrichtigen Sie umgehend das Transportunternehmen, nicht jedoch
Chauvet.
Produktbe- Der Cubix™ 2.0 ist das mehrfarbige Herzstück einer Beleuchtungsanlage
schreibung und kombiniert zwei verschiedene Effekte. Mit seinen mittig angeordneten
LEDs und dem sie quadratisch umschließenden Derby-Effekt kann der
Cubix™ 2.0 für eine Vielzahl von einzeln ansteuerbaren Effekten eingesetzt
werden.
20
Cubix™ 2.0 SAL
DE
LED-Anzeige
Mikrofon
MusikeempfindlichkeitsKnopf
Steuerungstasten
Sicherheitsschleife
Produktüberblick
Sicherungshalter
DMX-Eingang/Ausgang
Stromeingang/Ausgang
Wechselstrom Dieses Gerät verfügt über ein Vorschaltgerät, das automatisch die anliegende
Spannung erkennt, sobald der Netzstecker in die Schukosteckdose gesteckt
wird, und kann mit einer Eingangsspannung von 100~240 V AC, 50/60 Hz
arbeiten.
Um unnötigen Verschleiß zu vermeiden und die Lebensdauer des Geräts
zu verlängern, trennen Sie während längerer Perioden des
Nichtgebrauchs das Gerät vom Stromnetz – entweder per Trennschalter
oder durch Herausziehen des Steckers aus der Steckdose.
Reihenschaltung Um die maximal mögliche Anzahl der bei jeder Spannung in Serienschaltung
der Geräte zusammen schließbaren Cubix™ 2.0 lesen die Bedienungsanleitung oder Sie
das Typenschild.
21
Cubix™ 2.0 SAL
DE
Auswechseln So wechseln Sie die Sicherung des Cubix™ 2.0 aus:
der Sicherung 1. Trennen Sie das Gerät vom Stromnetz.
2. Klemmen Sie die Spitze eines Flachkopfschraubendrehers in den Schlitz
des Sicherungshalters.
3. Hebeln Sie die Sicherheitsabdeckung vom Gehäuse weg ab.
4. Entfernen Sie die durchgebrannte Sicherung von der Klemme am
Vorderteil der Sicherheitsabdeckung, und ersetzen Sie diese durch eine
Sicherung des gleichen Typs und mit den gleichen Werten.
5. Stecken Sie den Sicherungshalter wieder zurück, und schließen Sie das
Gerät an das Stromnetz an.
Beschreibung
des
Bedienfeldes
Lesen
Taste
Funktion
<MENU>
<UP>
<DOWN>
<ENTER>
Damit verlassen Sie das aktuelle Menü oder die Funktion
Damit navigieren Sie sich durch die Menüpunkte nach oben
und erhöhen den numerischen Wert der entsprechenden
Funktionen
Damit navigieren Sie sich durch die Menüpunkte nach unten
und verringern den numerischen Wert der entsprechenden
Funktionen
Damit wird das aktuelle Menü angezeigt oder der aktuell
ausgewählte Wert eingestellt
Menüoptionen
Hauptebene
DMX-Adresse
Programmierebenen
512
Auto-Programme
Geschwindigkeit
des AutoProgramms
MusiksteuerungsModus
d 1–d512
AUTO
S--
Beschreibung
Stellt die DMX-Startadresse ein
Stellt Auto-Programm ein
S 1–S100
SNd
Wählt Geschwindigkeit des AutoProgramms aus (langsam bis schnell)
Stellt Musiksteuerungs-Modus ein
DMX- Der Cubix™ 2.0 kann mit einem DMX-Controller betrieben werden, wenn
Verbindung eine DMX-Reihenschaltung zum Einsatz kommt. Anweisungen zum
Startadresse
Master/SlaveSchaltung
Zusammenschluss und der Konfiguration dieses Geräts für den Betrieb im
DMX-Modus finden Sie im Benutzerhandbuch. Wenn Sie mit DMX nicht
vertraut sind, laden Sie “DMX – Eine Einführung” unter
www.chauvetlighting.com herunter.
Um einen vollständigen Zugang zu allen Kanälen in jedem DMX-Modus zu
gewährleisten, beträgt die höchste empfohlene DMX-Adresse 506.
Der Cubix™ 2.0 verwendet für seinen Master/Slave-Modus eine DMXDatenverbindung. Anweisungen zum Zusammenschluss und der Konfiguration
dieses Geräts für den Betrieb im Master/Slave-Modus finden Sie im
Benutzerhandbuch.
22
Cubix™ 2.0 SAL
DE
DMX-Werte
7-Kanäle
Kanal
1
Funktion
Farben
2
Stroboskop
3
Motorrotation
4
Auto-Programms
Wert
000 ó 004
005 ó 028
029 ó 056
057 ó 084
085 ó 112
113 ó 140
141 ó 168
169 ó 197
198 ó 224
225 ó 255
000 ó 004
005 ó 255
000 ó 127
128 ó 255
000 ó 014
015 ó 020
021 ó 026
027 ó 032
033 ó 038
039 ó 044
045 ó 050
051 ó 056
057 ó 062
063 ó 068
069 ó 074
075 ó 080
081 ó 086
087 ó 092
093 ó 098
099 ó 104
105 ó 110
111 ó 116
117 ó 122
123 ó 128
129 ó 134
135 ó 140
141 ó 146
147 ó 152
153 ó 158
159 ó 164
165 ó 170
23
Prozent/Einstellung
Keine Funktion
Rot
Grün
Blau
Kobaltblau
Lila
Gelb
Weiß
3-Farben-Umschalten
7-Farben-Umschalten
Keine funktion
0–30 Hz
Rotation mit Indexierung
Hin und her, mit
zunehmender
Geschwindigkeit
Verdunkelung
Auto-Programm 1
Auto-Programm 2
Auto-Programm 3
Auto-Programm 4
Auto-Programm 5
Auto-Programm 6
Auto-Programm 7
Auto-Programm 8
Auto-Programm 9
Auto-Programm 10
Auto-Programm 11
Auto-Programm 12
Auto-Programm 13
Auto-Programm 14
Auto-Programm 15
Auto-Programm 16
Auto-Programm 17
Auto-Programm 18
Auto-Programm 19
Auto-Programm 20
Auto-Programm 21
Auto-Programm 22
Auto-Programm 23
Auto-Programm 24
Auto-Programm 25
Auto-Programm 26
Seitliche Linse
Mittlere Linse
Cubix™ 2.0 SAL
7-Kanäle
(fortsetzen)
DE
Kanal
Funktion
Wert
4
Auto-Programms
(fortsetzen) (fortsetzen)
5
Geschwindigkeit
des AutoProgramms
6
Stroboskop
7
Auto-Programms
(Alle Linsen)
171 ó 176
177 ó 182
183 ó 188
189 ó 194
195 ó 200
201 ó 206
207 ó 212
213 ó 218
219 ó 224
225 ó 230
231 ó 236
237 ó 242
243 ó 248
249 ó 255
000 ó 015
016 ó 255
000 ó 015
016 ó 255
000 ó 009
010 ó 250
Prozent/Einstellung
Auto-Programm 27
Auto-Programm 28
Auto-Programm 29
Auto-Programm 30
Auto-Programm 31
Auto-Programm 32
Auto-Programm 33
Auto-Programm 34
Auto-Programm 35
Auto-Programm 36
Auto-Programm 37
Auto-Programm 38
Auto-Programm 39
Auto-Programm 40
Keine function
0–100% (wenn Kanal 4 ist
015–255)
Keine funktion
0–30 Hz
Keine function
Auto-programms
(langsam–schnell)
Mittlere Linse
Alle Linsen
251 ó 255 Musiksteuerungs-Modus
Montage Lesen Sie vor der Montage dieses Geräts die Sicherheitshinweise durch.
Klammer
Befestigungsbügel
Ansicht
Gerätemontage
Bügeleinstellknopf
24
Sicherheit
Kabel
Cubix™ 2.0 GRR
PT
Sobre este Guia O Guia de Referência Rápida (GRR) do Cubix™ 2.0 contém informações
básicas sobre o produto tais como instalação, opções de menu e valores
DMX. Transfira o Manual de Utilizador de www.chauvetlighting.com para
obter mais informações.
Exclusão de As informações e especificações contidas neste GRR estão sujeitas a
Responsabilidade alteração sem aviso prévio.
Instruções de Estas Instruções de Segurança incluem informações importantes sobre a
Segurança instalação, utilização e manutenção.
·
·
·
·
·
·
·
·
·
Este produto não se destina à instalação permanente.
Ligue este produto APENAS a um circuito protegido e ligado à terra.
Desligue-o sempre da alimentação antes da limpeza ou substituição do
fusível.
NÃO olhe para a fonte de luz quando o produto está ligado.
Certifique-se de que o cabo de alimentação não está desgastado nem
danificado.
Nunca desligue este produto da alimentação ao puxar ou esticar o cabo
de alimentação.
Utilize um cabo de segurança numa instalação suspensa desta produto.
NÃO permita a presença de materiais inflamáveis junto da unidade
durante o seu funcionamento.
NÃO toque neste produto aquando do funcionamento do mesmo, pois
poderá estar quente.
25
Cubix™ 2.0 GRR
PT
·
·
·
·
·
·
·
·
·
·
·
A tensão da tomada à qual irá ligar este produto deve estar no intervalo
indicado no autocolante ou painel posterior do produto.
Este produto destina-se apenas a ser utilizado no interior! (IP20) Para
evitar o risco de incêndio ou choque eléctrico, não exponha este produto
à chuva nem humidade.
Instale sempre este produto num local com ventilação adequada, a pelo
menos 50 cm (20 pol.) das superfícies adjacentes.
Certifique-se de que não estão obstruídas quaisquer ranhuras de
ventilação do corpo da unidade.
Nunca ligue este produto a um regulador da intensidade da luz nem a um
reóstato.
Substitua o fusível por um do mesmo tipo e classificação.
Transporte este produto APENAS com suportes de montagem/suspensão.
A temperatura máxima ambiente é 40 °C (104 °F). Não utilize este
produto em ambientes com temperaturas superiores.
Em caso de um problema de funcionamento grave, pare a utilização
imediatamente.
NÃO abra este produto. Não contém quaisquer peças passíveis de
manutenção.
Para eliminar desgaste desnecessário e aumentar a respectiva vida útil,
durante os períodos de não utilização deve desligar o produto da
alimentação através de um disjuntor ou desconectando-o.
Contacto Fora dos E.U.A., Reino Unido, Irlanda, México ou Benelux, entre em
contacto com o seu distribuidor para solicitar assistência ou devolver um
produto. Aceda a www.chauvetlighting.com para obter informações de
contacto.
Conteúdo · Cubix™ 2.0
Para Começar
Descrição do
Produto
· Cartão de Garantia
· Cabo de Alimentação
· Guia de Referência Rápida
Desembale o Cubix™ 2.0 e certifique-se de que recebeu todas as peças em
boas condições. Se a caixa ou conteúdos aparentarem estar danificados,
notifique imediatamente a transportadora e não a Chauvet.
O Cubix™ 2.0 é uma iluminação central multi-colorida que combina dois
efeitos diferentes. Com LEDs centralmente montados e um efeito derby
lateral circundante, o Cubix™ 2.0 permite vários efeitos, todos
independentemente controláveis.
Microfone
26
Cubix™ 2.0 GRR
PT
Visor LED
Sensibilidade
Sonora
Botões de
Conrolo
Descrição Geral
do Produto
Sup. fusíveis
Anel de
Segurança
Entrada/Saída
DMX
Entrada/Saída
de Alimentação
Alimentação CA Este produto possui uma fonte de alimentação de intervalo automático que
pode funcionar num intervalo de tensão de entrada de 100~240 VCA,
50/60 Hz.
Para eliminar desgaste desnecessário e aumentar a respectiva vida útil,
durante os períodos de não utilização deve desligar o produto da
alimentação através de um disjuntor ou desconectando-o.
Interligação de Para saber qual o número máximo de produtos Cubix™ 2.0 que poderá
Alimentação interligar em cada tensão, consulte o Manual do Utilizador ou o autocolante
no produto.
Substituição do Para substituir um fusível no Cubix™ 2.0:
Fusível 1. Desligue o produto da alimentação.
2. Encaixe a ponta de uma chave de fendas de cabeça chata na ranhura do
suporte de fusíveis.
3. Retire a tampa de segurança do corpo.
4. Retire o fusível queimado do grampo na parte frontal da tampa de
segurança e substitua por um fusível com o mesmo tipo e classificação.
5. Volte a colocar o suporte de fusíveis e volte a ligar a alimentação.
27
Cubix™ 2.0 GRR
PT
Descrição do
Painel de
Controlo
Botão
Função
<MENU>
<UP>
<DOWN>
<ENTER>
Sai da função ou menu actual
Desloca-se para cima na lista de menus e aumenta o valor
numérico numa função
Desloca-se para baixo na lista de menus e diminui o valor
numérico numa função
Activa o menu exibido actualmente ou define o valor
seleccionado actualmente
Opções de Menu
Nível Principal
Endereço DMX
Programas
Automáticos
Velocidade do
Programa
Automático
Modo de
Activação de Som
Níveis De Programação
512
d 1–d512
AUTO
S--
Descrição
Define o endereço de arranque de DMX
Define o programa automático
S 1–S100
SNd
Selecciona a velocidade do programa
automático (lento para rápido)
Define o modo de activação de som
Interligação O Cubix™ 2.0 pode trabalhar com um controlador DMX quando se encontra
DMX ligado a ligações da série DMX. As instruções para a ligação e configuração
Endereço de
Arranque
Ligação
Principal/
Secundária
deste produto para a operação DMX encontram-se no Manual de Utilizador.
Se não estiver familiarizado com o DMX, transfira o DMX Primer a partir de
www.chauvetlighting.com.
Para garantir um acesso total a todos os canais em cada modo DMX, o
endereço DMX mais elevado recomendado é 506.
O Cubix™ 2.0 utiliza a ligação de dados DMX para o seu modo
Principal/Secundário. As instruções para a ligação e configuração deste
produto para a operação Principal/Secundário encontram-se no Manual de
Utilizador.
28
Cubix™ 2.0 GRR
PT
Valores DMX
7-Canais
Canal
1
2
3
4
Função
Valor
000 ó 004
005 ó 028
029 ó 056
057 ó 084
085 ó 112
Cores
113 ó 140
141 ó 168
169 ó 197
198 ó 224
225 ó 255
000 ó 004
Sinal de validação
005 ó 255
000 ó 127
Rotação do Motor
128 ó 255
Programas
Automáticos
000 ó 014
015 ó 020
021 ó 026
027 ó 032
033 ó 038
039 ó 044
045 ó 050
051 ó 056
057 ó 062
063 ó 068
069 ó 074
075 ó 080
081 ó 086
087 ó 092
093 ó 098
099 ó 104
105 ó 110
111 ó 116
117 ó 122
123 ó 128
129 ó 134
135 ó 140
141 ó 146
147 ó 152
153 ó 158
159 ó 164
165 ó 170
29
Percentagem/Definição
Sem função
Vermelho
Verde
Azul
Ciano
Púrpura
Amarelo
Branco
Alternância de 3 cores
Alternância de 7 cores
Sem função
0–30 Hz
Rotação com indexação
Frente e para trás com
velocidade crescente
Escuro
Programa automático 1
Programa automático 2
Programa automático 3
Programa automático 4
Programa automático 5
Programa automático 6
Programa automático 7
Programa automático 8
Programa automático 9
Programa automático 10
Programa automático 11
Programa automático 12
Programa automático 13
Programa automático 14
Programa automático 15
Programa automático 16
Programa automático 17
Programa automático 18
Programa automático 19
Programa automático 20
Programa automático 21
Programa automático 22
Programa automático 23
Programa automático 24
Programa automático 25
Programa automático 26
Lente Lateral
Lente Central
Cubix™ 2.0 GRR
7-Canais
(cont.)
Canal
4
(cont.)
5
6
7
PT
Função
Programas
Automáticos
(cont.)
Velocidade do
Programa
Automático
Valor
171 ó 176
177 ó 182
183 ó 188
189 ó 194
195 ó 200
201 ó 206
207 ó 212
213 ó 218
219 ó 224
225 ó 230
231 ó 236
237 ó 242
243 ó 248
249 ó 255
000 ó 015
016 ó 255
000 ó 015
016 ó 255
000 ó 009
Programas
Automáticos
010 ó 250
(Todas as Lentes) 251 ó 255
Sinal de
Validação
Percentagem/Definição
Programa automático 27
Programa automático 28
Programa automático 29
Programa automático 30
Programa automático 31
Programa automático 32
Programa automático 33
Programa automático 34
Programa automático 35
Lente Central
Programa automático 36
Programa automático 37
Programa automático 38
Programa automático 39
Programa automático 40
Sem função
0–100% (quando o Ch. 4 se
015–255)
Sem função
0–30 Hz
Sem função
Todas as
Programas auto (lento–rápido)
Lentes
Activação de som
Instalação Antes de instalar este produto, leia as Instruções de Segurança.
Braçadeira
Suporte de Montagem
Diagrama de
Instalação do
Produto
Botão de Ajuste do
Suporte
30
Cabo de
Segurança
Cubix™ 2.0 GR
IT
Informazioni La Guida Rapida di Cubix™ 2.0 contiene informazioni di base sul prodotto
sulla Guida quali montaggio, opzioni menù e valori DMX. Per maggiori dettagli, scaricare
il Manuale Utente dal sito www.chauvetlighting.com.
Esclusione di
Responsabilità
Note di
Sicurezza
Le informazioni e le specifiche contenute in questa guida possono essere
modificate senza preavviso.
Le Note di Sicurezza includono informazioni importanti circa il montaggio,
l'uso e la manutenzione.
· Questa apparecchiatura non è progettata per installazione permanente.
· Collegare questa unità SOLTANTO ad un circuito dotato di messa a terra e
protetto.
· Prima di effettuare la pulizia o sostituire il fusibile, scollegare sempre
l'unità dall'alimentazione elettrica.
· NON guardare la sorgente luminosa quando l'unità è in funzione.
· Assicurarsi che il cavo di alimentazione non sia piegato o danneggiato.
· Non scollegare mai questa apparecchiatura dall'alimentazione elettrica
tirando o strattonando il cavo.
· Per il montaggio in alto dell'unità utilizzare SEMPRE un cavo di sicurezza.
· NON collocare materiale infiammabile vicino all'unità mentre è in
funzione.
· NON toccare l'unità durante il funzionamento perché potrebbe essere
molto calda.
· La tensione della presa a muro cui si collega l'apparecchiatura deve trovarsi
entro il campo specificato sull'etichetta o sul pannello posteriore.
· Questa apparecchiatura deve essere utilizzata soltanto in interni (IP20)! Per
evitare il rischio di incendio o di folgorazione non esporre
l'apparecchiatura alla pioggia o all'umidità.
· Montare sempre l'unità in posizione ben ventilata, ad almeno 50 cm. (20")
da qualsiasi superficie.
· Assicurarsi che nessuna apertura di ventilazione dell'unità sia ostruita.
· Non collegare mai ad un dimmer o ad un reostato.
· Sostituire il fusibile con un altro dello stesso tipo e classe.
· Prendere e trasportare l'unità SOLTANTO dalla staffa per il montaggio
sospeso.
· Massima temperatura ambiente ammessa: 40 °C (104 °F). Non utilizzare
l'apparecchiatura a temperature superiori.
· In caso di gravi problemi di funzionamento sospendere immediatamente
l'utilizzo.
· NON aprire l'unità. Non contiene parti riparabili dall'utente.
· Per evitare un consumo inutile ed aumentare la durata, durante i periodi di
non utilizzo disconnettere completamente il prodotto dall'alimentazione
con l'interruttore o scollegando il cavo.
31
Cubix™ 2.0 GR
IT
Contatti Per richiedere assistenza o restituire l'apparecchiatura, al di fuori di Stati
Uniti, Regno Unito, Irlanda, Messico o Benelux, contattare il distributore
locale. Per informazioni sui contatti, visitare il sito Web
www.chauvetlighting.com.
Che Cosa è · Cubix™ 2.0
Incluso · Cavo di alimentazione
· Scheda di garanzia
· Guida Rapida
Per Iniziare Disimballare Cubix™ 2.0 ed accertarsi di aver ricevuto tutti i componenti
Descrizione del
Prodotto
integri. Se l'imballo appare danneggiato, farlo immediatamente presente al
trasportatore e non a Chauvet.
Cubix™ 2.0 è una luce centrale multicolore che combina due diversi effetti.
Con i LED montati centralmente ed un effetto derby avvolgente a quattro
lati, Cubix™ 2.0 consente di ottenere vari effetti, tutti controllabili
indipendentemente.
Microfono
Display a LED
Sensibilità
Sonora
Manopola
Pulsanti di
Controllo
Informazioni
Generali
Portafusibile
Anello di
Sicurezza
Ingresso/Uscita
DMX
Ingresso/Uscita
Alimentazione
Alimentazione Questa apparecchiatura è dotata di alimentatore a commutazione automatica
CA con tensione in ingresso di 100~240 V CA - 50/60 Hz.
Per evitare un consumo inutile ed aumentare la durata, durante i periodi
di
non
utilizzo
disconnettere
completamente
il
prodotto
dall'alimentazione con l'interruttore o scollegando il cavo.
Collegamento Per il numero massimo di apparecchiature che è possibile collegare su
ciascuna presa elettrica fare riferimento alle note riportate al Manuale
Utenete o sull'etichetta apposta sul prodotto.
32
Cubix™ 2.0 GR
IT
Sostituzione Per sostituire il fusibile:
Fusibile 1. Scollegare l'unità dall'alimentazione elettrica.
2. Inserire la punta di un giravite a testa piatta nella fessura
dell'alloggiamento del fusibile.
3. Rimuovere dall'alloggiamento il cappellotto di sicurezza.
4. Rimuovere il fusibile bruciato dalla clip sulla parte anteriore del
cappellotto di sicurezza e sostituirlo con uno identico.
5. Reinserire il portafusibile e ricollegare l'alimentazione elettrica.
Descrizione del
Pannello di
Controllo
Pulsante
Funzione
<MENU>
Consente di uscire dal menù o dalla funzione corrente
Consente di spostarsi verso l'alto nell'elenco menù e di
aumentare il valore numerico all'interno di una funzione
Consente di spostarsi verso il basso nell'elenco menù e di
diminuire il valore numerico all'interno di una funzione
Consente di attivare il menù visualizzato o impostare il
valore selezionato
<UP>
<DOWN>
<ENTER>
Opzioni del Menù
Livello Principale
Indirizzo DMX
Livelli di Programmazione
512
Programmi Auto
Velocità
Programma Auto
Modalità Sound
Active
d 1–d512
AUTO
S--
Descrizione
Imposta l'indirizzo DMX iniziale
Imposta i programmi Auto
S 1–S100
SNd
Seleziona la velocità del programma Auto
(lento-veloce)
Imposta la modalità Sound Active
Collegamento Cubix™ 2.0 può funzionare con un controller DMX quando collegato
DMX tramite connessioni seriali DMX. Le istruzioni per il collegamento e la
Indirizzo Iniziale
Collegamento
Master/Slave
configurazione di questa unità sono contenute nel Manuale Utente. Se non si
ha familiarità con il DMX, scaricare DMX Primer all'indirizzo
www.chauvetlighting.com.
Per assicurare il completo accesso a tutti i canali in ciascuna modalità DMX,
l'indirizzo maggiormente raccomandato è 506.
In modalità Master/Slave, Cubix™ 2.0 utilizza il collegamento dati DMX.
Le istruzioni per il collegamento e la configurazione di questa unità per il
funzionamento Master/Slave sono contenute nel Manuale Utente.
33
Cubix™ 2.0 GR
IT
Valori DMX
7-CH
Canale Funzione
1
Colori
2
Stroboscopio
3
Rotazione
Motorizzata
4
Programmi Auto
Valore
Percentuale/Impostazione
000 ó 004
005 ó 028
029 ó 056
057 ó 084
085 ó 112
113 ó 140
141 ó 168
169 ó 197
198 ó 224
225 ó 255
000 ó 004
005 ó 255
000 ó 127
Nessuna funzione
Rosso
Verde
Blu
Ciano
Viola
Giallo
Bianco
Commutazione a 3 colori
Commutazione a 7 colori
Nessuna funzione
Da 0 a 30 Hz
Rotazione con indicizzazione
Avanti e indietro con
l'aumentare della velocità
Blackout
Programma auto 1
Programma auto 2
Programma auto 3
Programma auto 4
Programma auto 5
Programma auto 6
Programma auto 7
Programma auto 8
Programma auto 9
Programma auto10
Programma auto 11
Programma auto 12
Programma auto 13
Programma auto 14
Programma auto 15
Programma auto 16
Programma auto 17
Programma auto 18
Programma auto 19
Programma auto 20
Programma auto 21
Programma auto 22
Programma auto 23
Programma auto 24
Programma auto 25
Programma auto 26
128 ó 255
000 ó 014
015 ó 020
021 ó 026
027 ó 032
033 ó 038
039 ó 044
045 ó 050
051 ó 056
057 ó 062
063 ó 068
069 ó 074
075 ó 080
081 ó 086
087 ó 092
093 ó 098
099 ó 104
105 ó 110
111 ó 116
117 ó 122
123 ó 128
129 ó 134
135 ó 140
141 ó 146
147 ó 152
153 ó 158
159 ó 164
165 ó 170
34
Lente Laterale
Lente Centrale
Cubix™ 2.0 GR
7-CH
(continua)
IT
Canale
Funzione
Valore
171 ó 176
177 ó 182
183 ó 188
189 ó 194
195 ó 200
201 ó 206
4
Programmi Auto 207 ó 212
(continua) (continua)
213 ó 218
219 ó 224
225 ó 230
231 ó 236
237 ó 242
243 ó 248
249 ó 255
000 ó 015
Velocità
5
Programma
016 ó 255
Auto
6
7
000 ó 015
016 ó 255
000 ó 009
Programma Auto
010 ó 250
(Tutte le Lenti)
251 ó 255
Stroboscopio
Percentuale/Impostazione
Programma auto 27
Programma auto 28
Programma auto 29
Programma auto 30
Programma auto 31
Programma auto 32
Programma auto 33
Programma auto 34
Programma auto 35
Lente Centrale
Programma auto 36
Programma auto 37
Programma auto 38
Programma auto 39
Programma auto 40
Nessuna funzione
Da 0 a 100% (quando il canale 4
015 a 255)
Nessuna funzione
Da 0 a 30 Hz
Nessuna funzione
Programma Auto (lento–veloce) Tutte le Lenti
Modalità sound active
Montaggio Prima di montare l'unità, leggere le Note di Sicurezza.
Morsetto
Cavo di
Sicurezza
Staffa di Montaggio
Schema
di Montaggio
dell'Unità
Manopola Regolazione
Staffa
35
Cubix™ 2.0 QRG
PL
O Przewodniku Cubix™ 2.0 Quick Reference Guide (QRG) zawiera podstawowe
informacje o produkcie takie jak montaż, opcje menu oraz wartości DMX.
Szczegółowe informacje znajdują się w instrukcji obsługi na stronie
www.chauvetlighting.com.
Informacje i specyfikacje zawarte w niniejszym dokumencie (QRG)
Oświdczenie podlegają zmianie bez powiadomienia.
Wskazówki Poniższe wskazówki zawierają ważne informacje dotyczące montażu,
Bezpieczeństwa użycia i konserwacji.
·
·
·
·
·
·
·
·
·
Niniejszy produkt nie jest przeznaczony do stałego montażu.
Produkt należy podłączyć JEDYNIE do uziemionego i
zabezpieczonego obwodu.
Przed czyszczeniem lub wymianą bezpiecznika należy zawsze odłączyć
produkt od zasilania.
NIE należy patrzeć na źródło światła, gdy produkt jest włączony.
Należy upewnić się czy przewód zasilający nie jest zagnieciony lub
uszkodzony.
Nigdy nie należy odłączać produktu od zasilania, ciągnąc lub szarpiąc
za przewód zasilający.
Podczas montażu produktu na górze należy użyć kabla bezpieczeństwa.
NIE należy kłaść materiałów łatwopalnych w pobliżu włączonego
produktu.
NIE należy dotykać produktu, gdy jest włączony, ponieważ może być
nagrzany.
36
Cubix™ 2.0 QRG
PL
·
·
·
·
·
·
·
·
·
·
·
Napięcie wyjścia, do którego podłączony jest produkt powinno być o
wartości podanej na naklejce lub panelu tylnym produktu.
Produkt jest przeznaczony jedynie do obsługi w pomieszczeniach
zamkniętych! (IP20). Aby uniknąć ryzyka pożaru lub porażenia nie
należy wystawiać go na działanie deszczu lub wilgoci.
Należy zawsze montować produkt w miejscu z odpowiednią wentylacją
przynajmniej 20 cali (50 cm) w odległości od przyległych powierzchni.
Należ upewnić się czy żaden z otworów wentylacyjnych na obudowie
produktu nie jest zapchany.
Nigdy nie należy podłączać produktu do ściemniacza lub rezystora.
Należy wymienić bezpiecznik o tej samej wartości i rodzaju.
Przenosząc produkt należy użyć JEDYNIE uchwytów mocujących/do
zawieszania.
Maksymalna temperatura otoczenia to 104 °F (40 °C). Nie należy
używać produktu w wyższych temperaturach.
W przypadku poważnych problemów z obsługą produktu należy
niezwłocznie zaprzestać jego dalszego użytkowania.
NIE należy otwierać produktu. Produkt nie zawiera żadnych części do
serwisowania przez użytkownika.
W celu wyeliminowania niepotrzebnego zużycia oraz wydłużenia
trwałości urządzenia, należy odłączyć je całkowicie od źródła zasilania
poprzez przełączenie bezpiecznika lub wyciągnięcie wtyczki z gniazda
zasilania w czasie, gdy urządzenie nie jest używane.
Kontakt Poza Stanami zjednoczonymi, Zjednoczonym Królestwem, Irlandią,
Meksykiem lub Beneluks w celu uzyskania pomocy lub zwrotu produktu
należy skontaktować się z dystrybutorem na terenie danego kraju. Dalsze
informacje kontaktowe na stronie www.chauvetlighting.com.
· Karta gwarancyjna
Co Wchodzi w · Cubix™ 2.0
· Praktyczny przewodnik
Skład Zestawu · Przewód zasilający
Na Początku Należy rozpakować Cubix™ 2.0 i upewnić się czy otrzymaliście Państwo
wszystkie części w dobrym stanie. Jeżeli opakowanie lub jego zawartość
wydają się być uszkodzone, należy niezwłocznie powiadomić o tym
przewoźnika, a nie firmę Chauvet.
Opis Produktu Cubix™ 2.0 to urządzenie z wielokolorowym źródłem światła ustawionym
w centralnej pozycji, które łączy różne efekty. Z zamontowanymi w
centralnej pozycji diodami LED i z otaczającym efektem świetlnym quad
sided derby Cubix™ 2.0 pozwala na zastosowanie wielu efektów, które
mogą być indywidualnie sterowane.
37
Cubix™ 2.0 QRG
PL
Wyświetlacz
LED
Mikrofon
Przyciski do
Sterowania
Sound sensitivity
pokrętło
Pętla
Bezpieczeństwa
Zacisk
Bezpiecznika
Ogólny opis
Produktu
Wejście/Wyjście
DMX
Wejście/Wyjście
Zasilania
Moc AC Produkt posiada automatyczne przełączanie zakresu zasilania, które pozwala
na działanie produktu przy napięciu wejściowym 100~240 VAC, 50/60 Hz.
W celu wyeliminowania niepotrzebnego zużycia oraz wydłużenia
trwałości urządzenia, należy odłączyć je całkowicie od źródła zasilania
poprzez przełączenie bezpiecznika lub wyciągnięcie wtyczki z gniazda
zasilania w czasie, gdy urządzenie nie jest używane.
Podłączenie Przy podłączaniu maksymalnej liczby urządzeń Cubix™ 2.0, które można ze
Produktów soba połączyć do konkretnego napięcia, należy zapoznać się z instrukcją
obsługi lub treścią nalepki na produkcie.
38
Cubix™ 2.0 QRG
PL
Wymiana Aby wymienić bezpiecznik w należy Cubix™ 2.0:
Bezpiecznika 1. Odłączyć produkt od zasilania.
2. Włożyć końcówkę śrubokręta z płaską główką do otworu zacisku
bezpiecznika.
3. Wyjąć pokrywę bezpieczeństwa z obudowy.
4. Usunąć spalony bezpiecznik z zacisku z przodu pokrywy bezpieczeństwa i
wymienić na nowy o dokładnie tym samym rodzaju i wartości.
5. Włożyć uchwyt bezpiecznika i ponownie włączyć zasilanie.
Opis Panelu
Sterowania
Przycisk
Funkcja
<MENU>
Wychodzi z bieżącej opcji menu lub funkcji
Przechodzi w górę po liście menu oraz zwiększa wartość
numeryczną w funkcji
Przechodzi w dół po liście menu oraz obniża wartość
numeryczną w funkcji
Włącza opcję menu lub wybraną wartość
<UP>
<DOWN>
<ENTER>
Opcje Menu
Główny Poziom
Adres DMX
Poziomy Programowania
512
Auto Programy
Prędkość Auto
Programu
Tryb Reakcji na
Dźwięk
(Sound-Active)
d 1–d512
AUTO
S--
Opis
Ustawia adres początkowy DMX
Ustawia Auto program
S 1–S100
Wybiera prędkość Auto programu
(wolny do szybki)
Ustawia tryb reakcji na dźwięk
(Sound-Active)
SNd
Połączenie DMX Cubix™ 2.0 może współpracować z kontrolerem DMX, gdy jest podłączony
za pomocą połączeń seryjnych DMX. Polecenia odnośnie podłączenia i
konfiguracji produktu w celu obsługi system DMX znajdują się w instrukcji
obsługi. Jeżeli nie znacie Państwo systemu DMX, DMX Primer znajduje się
na stronie www.chauvetlighting.com.
Adres
Początkowy
Połączenie
Master/Slave
W celu zapewnienia pełnego dostępu do wszystkich kanałów w każdym
trybie DMX najbardziej zalecanym adresem DM jest 506.
Cubix™ 2.0 wykorzystuje połączenie danych DMX dla swojego trybu
Master/Slave. Polecenia odnośnie podłączenia i konfiguracji produktu w celu
obsługi Master/Slave znajdują się w instrukcji obsługi.
39
Cubix™ 2.0 QRG
PL
Wartości DMX
7-CH
Kanał
1
Funkcja
Kolory
2
Strobowanie
3
Obracanie
4
Programy
Automatyczny
Wartość Procent/Ustawienia
000 ó 004
005 ó 028
029 ó 056
057 ó 084
085 ó 112
113 ó 140
141 ó 168
169 ó 197
198 ó 224
225 ó 255
000 ó 004
005 ó 255
000 ó 127
128 ó 255
000 ó 014
015 ó 020
021 ó 026
027 ó 032
033 ó 038
039 ó 044
045 ó 050
051 ó 056
057 ó 062
063 ó 068
069 ó 074
075 ó 080
081 ó 086
087 ó 092
093 ó 098
099 ó 104
105 ó 110
111 ó 116
117 ó 122
123 ó 128
129 ó 134
135 ó 140
141 ó 146
147 ó 152
153 ó 158
159 ó 164
165 ó 170
40
Brak funkcji
Czerwony
Zielony
Niebieski
Cyjanowy
Fioletowy
Żółty
Biały
3 przełączenie kolorów
7 przełączenie kolorów
Brak funkcji
0–30 Hz
Obrót z indeksowaniem
Iz powrotem, wraz ze
wzrostem prędkości
Brak funkcji
Program automatyczny 1
Program automatyczny 2
Program automatyczny 3
Program automatyczny 4
Program automatyczny 5
Program automatyczny 6
Program automatyczny 7
Program automatyczny 8
Program automatyczny 9
Program automatyczny 10
Program automatyczny 11
Program automatyczny 12
Program automatyczny 13
Program automatyczny 14
Program automatyczny 15
Program automatyczny 16
Program automatyczny 17
Program automatyczny 18
Program automatyczny 19
Program automatyczny 20
Program automatyczny 21
Program automatyczny 22
Program automatyczny 23
Program automatyczny 24
Program automatyczny 25
Program automatyczny 26
Soczewki
Boczne
Soczewki
Środkowe
Cubix™ 2.0 QRG
7-CH
(kont.)
Kanał
4
(kont.)
PL
Wartość Procent/Ustawienia
Funkcja
Programy
Automatyczny
(kont.)
5
Prędkość Auto
Programu
6
Strobowanie
7
Auto Programy
(Wszystkie
Obiektywy)
171 ó 176
177 ó 182
183 ó 188
189 ó 194
195 ó 200
201 ó 206
207 ó 212
213 ó 218
219 ó 224
225 ó 230
231 ó 236
237 ó 242
243 ó 248
249 ó 255
000 ó 015
016 ó 255
000 ó 015
016 ó 255
000 ó 009
Program automatyczny 27
Program automatyczny 28
Program automatyczny 29
Program automatyczny 30
Program automatyczny 31
Program automatyczny 32
Program automatyczny 33
Program automatyczny 34
Program automatyczny 35
Program automatyczny 36
Program automatyczny 37
Program automatyczny 38
Program automatyczny 39
Program automatyczny 40
Brak funkcji
0–100% (gdy Ch. 4 015–255)
Brak funkcji
0–30 Hz
Brak funkcji
Auto Programy
010 ó 250
(wolny do szybki)
251 ó 255 Reakcji na Dźwięk
Soczewki
Środkowe
Wszystkie
Obiektywy
Montaż Przed zamontowaniem produktu należy przeczytać Wskazówki Bezpieczeństwa.
Zacisk
Bezpieczeństw
o Kabel
Uchwyt mocujący
Rysunek montażu
Produktu
Pokrętło regulacji
uchwytu
41
Cubix™ 2.0 BH
NL
Over Deze De Cubix™ 2.0 Beknopte Handleiding (BH) bevat basisinformatie over het
Handleiding product, zoals montage, menu-opties en DMX-waarden. Download de
Gebruikershandleiding op www.chauvetlighting.com voor details.
Disclaimer De informatie en specificaties in deze BH kunnen zonder voorafgaande
kennisgeving worden gewijzigd.
Veiligheidsinstructies Deze
veiligheidsinstructies bevatten belangrijke informatie over de
installatie, het gebruik en het onderhoud.
· Dit product is niet bedoeld voor permanente installatie.
· Sluit dit product UITSLUITEND op een geaard en beveiligd circuit.
· Haal voor het vervangen van de zekering altijd de stekker van het product uit
het stopcontact.
· KIJK NIET in de lichtbron wanneer het apparaat is ingeschakeld.
· Zorg ervoor dat de stroomkabel niet gesmolten of beschadigd is.
· Maak het product nooit van het stopcontact los door aan het snoer te rukken
of te trekken.
· Gebruik een veiligheidskabel wanneer het product boven lichaamshoogte
wordt gemonteerd.
· GEEN brandbare materialen in de buurt van de unit tijdens gebruik.
· RAAK het product NIET AAN wanneer het in werking omdat het dan heet
zijn.
42
Cubix™ 2.0 BH
NL
·
Contact
De spanning van het stopcontact waarop u dit product aansluit moet binnen
het vermelde bereik op de sticker of achterkant van het product zijn.
· Het product is alleen voor gebruik binnenshuis! (IP20) Om risico op brand
of elektrische schokken te voorkomen, mag dit product niet aan regen of
vocht worden blootgesteld.
· Monteer dit product altijd op een plek met voldoende ventilatie, minstens
20 inch (50 cm) van de aangrenzende oppervlakken.
· Zorg ervoor dat er geen ventilatie-openingen van de behuizing van het
product worden geblokkeerd.
· Sluit dit product nooit aan op een dimmer of een regelweerstand.
· Vervang de zekering met een van hetzelfde type en met dezelfde waarde.
· Gebruik UITSLUITEND de ophang-/montagebeugel om dit product te
dragen.
· De maximale omgevingstemperatuur bedraagt 104 °F (40 °C). Gebruik dit
product niet bij hogere temperaturen.
· Stop in het geval van ernstige operationele problemen onmiddellijk met het
gebruik.
· Open het product NIET. Het bevat geen te onderhouden onderdelen.
· Sluit om onnodige slijtage te verhinderen en de levensduur te verlengen
tijdens periodes van niet-gebruik het product via stroomonderbreker of de
stekker volledig van stroom af.
Van buiten de VS, Verenigd Koninkrijk, Ierland, Ierland, Mexico of Benelux kunt u
contact opnemen met de distributeur of om ondersteuning vragen dan wel
het product retourneren. Ga naar www.chauvetlighting.com voor contactinformatie.
·
Garantiekaart
Wat is · Cubix™ 2.0
·
Beknopte Handleiding
inbegrepen · Stroomkabel
Om te beginnen Pak uw Cubix™ 2.0 uit en zorg ervoor dat u alle onderdelen in goede staat
Product
Beschrijving
hebt ontvangen. Als de doos of inhoud beschadigd lijkt, stel dan de
vervoerder onmiddellijk op de hoogte, niet Chauvet.
De Cubix™ 2.0 is een veelkleurig middenstuk dat twee verschillende
effecten combineert. Met centraal geplaatste LED's en een omringend
vierzijdig derby effect, maakt de Cubix™ 2.0 het mogelijk om verschillende
effecten allemaal onafhankelijk te regelen.
43
Cubix™ 2.0 BH
NL
Microfoon
LED-display
Geluidsgevoeligheidknop
Bedieningsknoppen
Overzicht
Zekeringhouder
Veiligheidslus
DMX
-ingang/-uitgang
Stroomingang/
Vermogensuitgang
AC-stroom Dit product heeft een auto-bereik voeding die kan werken met een
ingangsspanning van 100 tot 240 VAC, 50/60 Hz.
Sluit om onnodige slijtage te verhinderen en de levensduur te verlengen
tijdens periodes van niet-gebruik het product via stroomonderbreker of de
stekker volledig van stroom af.
Power Linking Voor een maximum aantal van Cubix™ 2.0s die kunnen worden elinkt per
vermogen van 120 V of op 240 V, bekijkt u de handleiding of het etiket op het
product.
1.
Ontkoppel het apparaat van de stroom.
Vervangen van
2.
Wig de punt van een platte schroevendraaier in de sleuf van de
de Zekering
zekeringhouder.
3. Druk de veiligheidsafdekking uit de behuizing.
4. Verwijder de doorgebrande zekering vanaf de clip aan de voorkant van de
veiligheidsafdekking en vervang deze door een zekering van exact
hetzelfde type.
5. Plaats de zekeringhouder terug en steek de stekker er weer in.
Ontkoppel het product van de stroom voordat u de zekering vervangt.
Configuratiescherm
Beschrijving
Toets
<MENU>
<UP>
<DOWN>
<ENTER>
Functie
Uitgangen van het huidige menu of functie
Navigeert omhoog via het menu of verhoogt de numerieke
waarde wanneer in een functie
Navigeert omlaag via het menu of verlaagt de numerieke
waarde wanneer in een functie
Activeert het huidige getoonde menu of plaatst de huidige
geselecteerde waarde in de geselecteerde functie
44
Cubix™ 2.0 BH
NL
Menu Opties
Modus
DMX Adres
Programmeerniveaus
512
Auto Programma's
Auto Programma
Snelheid
Geluid-Actieve stand
d 1–d512
AUTO
S--
Beschrijving
Stelt het DMX startadres in
Stelt Auto Programma in
S 1–S100
SNd
Stelt Auto programma snelheid in
(langzaam naar snel)
Stelt Geluid-Actieve stand in
DMX Linking De Cubix™ 2.0 kan met een DMX-controller werken indien gekoppeld door
Startadress
Master-/Slaveverbinding
DMX seriële verbindingen. Instructies voor het aansluiten en configureren
van dit product voor DMX-bediening staan in de Gebruikershandleiding. Als
u niet bekend bent met DMX, download dan hier de DMX Primer
www.chauvetlighting.com.
Om volledige toegang tot alle kanalen in elke DMX modus te garanderen is
het hoogste aanbevolen DMX-adres voor dit product 506.
De Cubix™ 2.0 maakt gebruik van de DMX-dataverbinding voor haar
Master-/Slave-modus. Instructies voor het aansluiten en configureren van dit
product voor DMX-bediening staan in de Gebruikershandleiding.
45
Cubix™ 2.0 BH
NL
DMX-waarden
7-CH
Kanaal Functie
1
Kleuren
2
Stroboscoop
3
Motor Rotatie
4
Auto
Programma's
Waarde
000 ó 004
005 ó 028
029 ó 056
057 ó 084
085 ó 112
113 ó 140
141 ó 168
169 ó 197
198 ó 224
225 ó 255
000 ó 004
005 ó 255
000 ó 127
128 ó 255
000 ó 014
015 ó 020
021 ó 026
027 ó 032
033 ó 038
039 ó 044
045 ó 050
051 ó 056
057 ó 062
063 ó 068
069 ó 074
46
Percentage/Instelling
Geen functie
Rood
Groen
Blauw
Cyaan
Paars
Geel
Wit
3-Kleuren wisselen
7-Kleuren wisselen
Geen functie
0–30 Hz
Rotatie met indexeren
Heen en weer met
toenemende afstand
Blackout
Auto Programma 1
Auto Programma 2
Auto Programma 3
Auto Programma 4
Auto Programma 5
Auto Programma 6
Auto Programma 7
Auto Programma 8
Auto Programma 9
Auto Programma 10
Zij Lenzen
Midden Lens
Cubix™ 2.0 BH
7-CH
NL
Kanaal Functie
4
(vervolgd)
Auto
Programma's
(verbolgd)
Waarde
075 ó 080
081 ó 086
087 ó 092
093 ó 098
099 ó 104
105 ó 110
111 ó 116
117 ó 122
123 ó 128
129 ó 134
135 ó 140
141 ó 146
147 ó 152
153 ó 158
159 ó 164
165 ó 170
171 ó 176
177 ó 182
183 ó 188
189 ó 194
195 ó 200
201 ó 206
207 ó 212
213 ó 218
219 ó 224
225 ó 230
231 ó 236
237 ó 242
243 ó 248
249 ó 255
000 ó 015
5
Auto Programma
Snelheid
016 ó 255
6
Stroboscoop
7
Auto
Programma’s
(Alle Lenzen)
000 ó 015
016 ó 255
000 ó 009
010 ó 250
Percentage/Instelling
Auto Programma 11
Auto Programma 12
Auto Programma 13
Auto Programma 14
Auto Programma 15
Auto Programma 16
Auto Programma 17
Auto Programma 18
Auto Programma 19
Auto Programma 20
Auto Programma 21
Auto Programma 22
Auto Programma 23
Auto Programma 24
Auto Programma 25
Auto Programma 26
Auto Programma 27
Auto Programma 28
Auto Programma 29
Auto Programma 30
Auto Programma 31
Auto Programma 32
Auto Programma 33
Auto Programma 34
Auto Programma 35
Auto Programma 36
Auto Programma 37
Auto Programma 38
Auto Programma 39
Auto Programma 40
Geen functie
0–100%
(als Ch. 4 is 015-255)
Geen functie
0–30 Hz
Geen functie
Auto Programma’s
(langzaam-snel)
251 ó 255 Geluid-Actieve
47
Midden Lens
Alle Lenzen
Cubix™ 2.0 BH
NL
Montage Lees voor montage van dit product de veiligheidsvoorschriften.
Veiligheidskabel
Bevestigingsklem
Bevestigingsbeugel
Montage
Diagram
Beugel Bijstelknop
48
Cubix™ 2.0 QRG
RU
О Данном Краткое руководство (QRG) по Cubix™ 2.0 содержит базовую
руководстве информацию об устройстве, включая вопросы монтажа, настроек меню
и значений DMX. Загрузите Руководство пользователя на сайте
www.chauvetlighting.com.
Отказ от Информация и спецификации, приведенные в этом руководстве, могут
Ответственности меняться без уведомления.
Замечания по Настоящие Замечания по безопасности содержат важную информацию
безопасности о монтаже, эксплуатации и техническом обслуживании.
·
·
·
·
·
·
·
·
·
Это устройство не предназначено для стационарного монтажа.
Подключать это устройство можно ТОЛЬКО к заземленному и
защищенному контуру.
Всегда отключайте устройство от питания перед очисткой или заменой
предохранителя.
НЕ смотрите на источник света, когда устройство включено.
Убедитесь, что провод электропитания не перегнут и не поврежден.
Никогда не отключайте это устройство от питания за шнур питания.
При потолочном монтаже этого устройства пользуйтесь
предохранительным тросом.
НЕ допускайте размещения рядом с устройством воспламеняющихся
материалов.
НЕ прикасайтесь к корпусу устройства во время его работы, поскольку
он нагревается.
49
Cubix™ 2.0 QRG
RU
·
·
·
·
·
·
·
·
·
·
·
Напряжение розетки, к которой подключается это устройство, должно
находиться в диапазоне, указанном на наклейке на задней панели
устройства.
Данное устройство предназначено только для использования в
помещениях! (IP 20) Чтобы уменьшить риск возгорания и поражения
электрическим током, не подвергайте устройство воздействию дождя
или влаги.
Монтаж устройства должен выполняться только при наличии
достаточной вентиляции на расстоянии не менее 20 дюймов (50 см) от
соседних поверхностей.
Убедитесь, что на корпусе устройства нет заблокированных отверстий.
Никогда не подключайте это устройство к регулятору яркости или
реостату.
Заменяйте предохранитель на устройство того же типа и номинала.
Для перемещения этого устройства пользуйтесь ТОЛЬКО
подвесным/монтажным кронштейном.
Максимальная температура окружающей среды составляет 104 °F
(40 °C). Не допускайте работы этого устройства при высокой
температуре.
В случае серьезного нарушения в работе устройства немедленно
прекратите его использование.
НЕ открывайте это устройство. Оно не содержит деталей,
обслуживаемых пользователем.
Во избежание ненужного износа и для продления срока службы
неиспользуемое устройство следует полностью отключить от
питания с помощью выключателя или путем извлечения вилки из
розетки.
Контакт За пределами США, Великобритании, Ирландии, Мексика и Бенилюкспо
вопросам поддержки или возврата устройства обращайтесь к своему
дистрибьютору. Контактная информация приведена на сайте
www.chauvetlighting.com.
Комплект
Поставки
Начало
Работы
· Cubix™ 2.0
· Гарантийная карта
· Шнур питания
· Краткое руководство
Распакуйте устройство Cubix™ 2.0 и проверьте исправное состояние
всех полученных деталей. Если коробка или ее содержимое имеют
признаки повреждения, немедленно сообщите об этом не Chauvet, а
перевозчику.
Описание Cubix™ 2.0 – это многоцветный центральный осветительный элемент,
Устройства сочетающий в себе два спецэффекта. Благодаря устанавливаемым в
центре светодиодам и четырехстороннему эффекту дерби, Cubix™ 2.0
позволяет реализовать самые разные спецэффекты с независимым
управлением каждым из них.
50
Cubix™ 2.0 QRG
RU
Микрофон
Ручка чувствительности
звука
Светодиодный
дисплей
Держатель
предохранителя
Обзор
Устройства Предохранитель
ный контур
Вход/выход
DMX
Вход/выход
питания
Питание Это устройство имеет функцию автоматического выбора диапазона
переменного электропитания и может работать со входным напряжением в диапазоне
100~240 В пер. т, 50/60 Гц.
тока
Во избежание ненужного износа и для продления срока службы
неиспользуемое устройство следует полностью отключить от
питания с помощью выключателя или путем извлечения вилки из
розетки.
Подключение Информацию о максимальном количестве устройств Cubix™ 2.0,
питания которые можно подключить при соответствующем напряжении, см. в
Руководстве пользователя или на стикере на устройстве.
Замена Для замены предохранителя в устройстве Cubix™ 2.0:
предохранителей 1. Отключите устройство от питания.
2. Вставьте кончик отвертки с плоской головкой в отверстие держателя
предохранителя.
3. Извлеките предохранительный колпачок из корпуса.
4. Извлеките перегоревший предохранитель из зажима спереди
предохранительного колпачка и замените его на предохранитель того
же типа и номинала.
5. Повторно вставьте держатель предохранителя и снова подключите
питание.
Описание
Панели
Управления
Кнопка
<MENU>
<UP>
<DOWN>
<ENTER>
Функция
Выход из текущего меню или функции
Перемещение вверх по списку меню и увеличение
числового значения при работе
Перемещение вниз по списку меню и уменьшение
числового значения при работе
Текущее отображаемое меню или настройка текущего
выбранного значения
51
Cubix™ 2.0 QRG
RU
Связь по DMX Устройство Cubix™ 2.0 может работать с контроллером DMX при
Начальный
адрес
Подключение
Master/Slave
подключении с помощью последовательных соединений DMX.
Инструкции по подключению и конфигурированию этого устройства в
режиме DMX приведены в Руководстве пользователя. Если вы не
знакомы с DMX, загрузите вводное руководство DMX Primer на сайте
www.chauvetlighting.com.
Для обеспечения полного доступа ко всем каналам в каждом из режимов
DMX максимальный рекомендуемый адрес DMX – 506.
Устройство Cubix™ 2.0 использует соединение передачи данных DMX
для режима Master/Slave. Инструкции по подключению и
конфигурированию этого устройства в режиме Master/Slave приведены в
Руководстве пользователя.
Настройки Меню
Главный Уровень
DMX-адрес
Уровни Программирования Описание
512
Автопрограммы
Автопрограмма –
скорость
Режим звуковой
активации
d 1–d512
Настройка автопрограмм
AUTO
S--
Настройка начального адреса DMX
S 1–S100
Выбор скорости автопрограммы
c
Настройка режима звуковой активации
SNd
52
Cubix™ 2.0 QRG
Значения DMX
7-CH
Канал
RU
Функция
1
Цвета
2
Стробоскоп
3
Вращение мотора
4
Автопрограммы
Значение Процент/уставка
000 ó 004
005 ó 028
029 ó 056
057 ó 084
085 ó 112
113 ó 140
141 ó 168
169 ó 197
198 ó 224
225 ó 255
000 ó 004
005 ó 255
000 ó 127
128 ó 255
000 ó 014
015 ó 020
021 ó 026
027 ó 032
033 ó 038
039 ó 044
045 ó 050
051 ó 056
057 ó 062
063 ó 068
069 ó 074
075 ó 080
081 ó 086
087 ó 092
093 ó 098
099 ó 104
105 ó 110
111 ó 116
117 ó 122
123 ó 128
129 ó 134
53
Нет действия
Красный
Зеленый
Синий
Циановый
Фиолетовый
Желтый
Боковая линза
Белый
Переключение 3 цветов
Переключение 7 цветов
Нет действия
0–30 Гц
Вращение с индексацией
Туда и обратно с
увеличением скорости
Затемнение
Автопрограмма 1
Автопрограмма 2
Автопрограмма 3
Автопрограмма 4
Автопрограмма 5
Автопрограмма 6
Автопрограмма 7
Автопрограмма 8
Автопрограмма 9
Средняя
Автопрограмма 10
линза
Автопрограмма 11
Автопрограмма 12
Автопрограмма 13
Автопрограмма 14
Автопрограмма 15
Автопрограмма 16
Автопрограмма 17
Автопрограмма 18
Автопрограмма 19
Автопрограмма 20
Cubix™ 2.0 QRG
7-CH
(прод.)
RU
Канал
Функция
Значение Процент/уставка
135 ó 140
141 ó 146
147 ó 152
153 ó 158
159 ó 164
165 ó 170
171 ó 176
177 ó 182
183 ó 188
189 ó 194
4
Автопрограммы
(прод.) (прод.)
195 ó 200
201 ó 206
207 ó 212
213 ó 218
219 ó 224
225 ó 230
231 ó 236
237 ó 242
243 ó 248
249 ó 255
Автопрограмма – 000 ó 015
5
скорость
016 ó 255
000 ó 015
6
Стробоскоп
016 ó 255
000 ó 009
7
Автопрограммы
(Все объективы)
Автопрограмма 21
Автопрограмма 22
Автопрограмма 23
Автопрограмма 24
Автопрограмма 25
Автопрограмма 26
Автопрограмма 27
Автопрограмма 28
Автопрограмма 29
Автопрограмма 30
Автопрограмма 31
Автопрограмма 32
Средняя линза
Автопрограмма 33
Автопрограмма 34
Автопрограмма 35
Автопрограмма 36
Автопрограмма 37
Автопрограмма 38
Автопрограмма 39
Автопрограмма 40
Нет действия
(когда канал 4 – 015–255)
Нет действия
0–30 Гц
Нет действия
Автопрограммы
(низкая-высокая)
Режим звуковой
251 ó 255
активации
010 ó 250
54
Все объективы
Cubix™ 2.0 QRG
RU
Монтаж Перед монтажом этого устройства прочитайте Замечания по
безопасности.
страховочный
трос
зажим
Схема монтажа
Устройства
Монтажный кронштейн
Ручка регулировки
кронштейна
55
Cubix™ 2.0 QRG
Contact WORLD HEADQUARTERS - Chauvet
General Information
Us Address:5200 NW 108th Avenue
Sunrise, FL 33351
Voice: (954) 577-4455
Fax:
(954) 929-5560
Toll free:(800) 762-1084
Multi-Language
Technical Support
Voice:
(954) 577-4455 (Press 4)
Fax:
(954) 756-8015
Email:
[email protected]
World Wide Web
www.chauvetlighting.com
UNITED KINGDOM AND IRELAND - Chauvet Europe Ltd.
General Information
Address:Unit 1C
Brookhill Road Industrial Estate
Pinxton, Nottingham, UK
NG16 6NT
Voice: +44 (0)1773 511115
Fax:
+44 (0)1773 511110
Technical Support
Email: [email protected]
World Wide Web
www.chauvetlighting.co.uk
MEXICO - Chauvet Mexico
General Information
Address:Av. Santa Ana 30
Parque Industrial Lerma
Lerma, Mexico C.P. 52000
Voice: +52 (728) 285-5000
Technical Support
Email: [email protected]
World Wide Web
www.chauvet.com.mx
CHAUVET EUROPE - Chauvet Europe BVBA
General Information
Address: Stokstraat 18
9770 Kruishoutem
Belgium
Voice: +32 9 388 93 97
Technical Support
Email:
[email protected]
World Wide Web
www.chauvetlighting.eu
Outside the U.S., United Kingdom, Ireland, Mexico, or Benelux, contact the dealer
of record. Follow their instructions to request support or to return a product. Visit
our website for contact details.
Cubix™ 2.0 QRG Rev. 9 ML9
© Copyright 2015 Chauvet
All rights reserved.
Printed in the P. R. C.