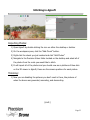
1
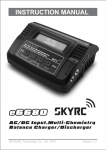
User's Manual Pacesetter Model 2015 Serial Number: Version 1.12 Table of Contents (1) Warnings........................................................................................2 (2) What's in the case?.........................................................................4 (3) Detailed Components......................................................................5 (4) Getting Everything Charged...........................................................10 (5) GPS Recalibration..........................................................................11 (6) Setting Up a Route........................................................................14 (7) Pre-Flight......................................................................................17 (8) Flight............................................................................................18 (9) Post-Flight.....................................................................................21 (10) Stitching In Agisoft.........................................................................22 (11) NDVI Creation using Global Mapper.................................................29 (12)Motor Rotation Diagram..................................................................47 (13)LED Guide......................................................................................48 (14) Technical Specifications..................................................................49 (15)Flight and Service Log.....................................................................50 1 2 Page 1 WARNINGS Obey all federal, state, and local regulations Do not fly in rain or other harsh conditions Do not fly in wind more than 25mph Do not fly faster than 10 m/s (22.5mph) Operating in temperatures below 50° Fahrenheit (10° Celsius) will result in decreased flight times Operating in temperatures below 32° Fahrenheit (0° Celsius) and below the mechanical and electrical components run the chance of seizing, resulting in drone malfunction and ultimately property damage, injury, and/or death Always use the provided battery chargers The drone will return home when it reaches less than 14.5v The drone will land in place when it reaches less than 14.0v Keep away from spinning motors at ALL TIMES. Do not attempt to modify the drone Do not attempt to repair the drone NEVER allow minors to charge battery packs NEVER drop power supply or batteries NEVER attempt to charge damaged or swollen batteries NEVER let batteries fully discharge unless you are disposing of them NEVER attempt to charge a battery pack containing different types of batteries NEVER charge a battery if the cable has been pinched or shorted NEVER allow batteries to come into contact with moisture at any time NEVER charge batteries in extremely hot or cold places or in direct sunlight ALWAYS disconnect the battery after charging ALWAYS end the charging process if the charger or battery becomes too hot 1 3 Page 2 *Failure to exercise caution while using this product and comply with the warnings above could result in product malfunction, electrical issues, excessive heat, fire, and ultimately injury, property damage, or death. Never allow use of this product by anyone without providing them with these instructions. You must read, understand, and follow all instructions and warnings for any product(s) to which this product is used in conjunction with or installed. The operator is choosing to use this product and does so at his or her own risk. Save these instructions with the product for use as a reference in the future 1 4 Page 3 What's in the case? List of Case Components 1x Precision Drone Pacesetter 6x 7600mAh 2S LiPo Battery 1x Command Center Laptop 1x Command Center Charger 1x Live Feed Monitor 1x Live Feed Monitor Charger 1x Precision Vision Camera (NIR) 1x Precision Vision Camera (RGB) 2x Camera Charger Access Cable 1x DX8 Controller 1x Controller Charger 1x Controller Strap 1x Bind Plug 1x Data Link 1x Data Link Cable 2x Battery Charger 2x Balancing Board 2x Gator Clips 2x Charger Wall Plug 2x Charger Battery Plug 2x 16GB microSD card (pre-installed in cameras) OEM Manuals (Located under first layer of foam) 1 5 Page 4 Components DX8 Controller: 1 6 Page 5 Battery Charger: 1 7 Page 6 Live Feed Monitor: 1 8 Page 7 Notes on Live Feed Monitor: 1. All units are in metric as shown in picture above 2. You do not need to plug the live feed cable on the drone into a camera in order to see the telemetry on the live feed screen 3. Flight Modes: • • • • • • • • 1 9 GPS- GPS and Gyroscope correction ATT- Gyroscope correction only M- Manual. No GPS or Gyroscope correction. Never fly when the screen says this GPS FS- Failsafe mode Ghome- Go home mode. Drone will be flying in autopilot WPT- Waypoint mode. Drone will be flying in autopilot Landing- Drone is automatically landing itself in place Pause- Drone is hovering in place after “Pause” button in Ground Station is hit Page 8 Precision Vision Camera: 1 10 Page 9 Battery Voltage Checker Notes on the Battery Checker • To check the charge of a single battery, plug the balancing lead into the battery checker, using the three pins closest to the top as shown above. Make sure the red wire is towards the bottom. • Make sure the checker is set for the correct battery type. As shown above, to the left of the total voltage, it should read “LiPo”. If it does not, press the “Type” button until it does. • Batteries will never read 100%. 99% is the highest reading, and a battery at 99% will have 8.4 total voltage 1 11 Page 10 Getting Everything Charged DX8 Controller: Turn the controller off. Plug one end of the charging cable into the charging port (see p. 5), and the other end into a power outlet. The controller indicator LED will glow blue indicating it is charging and turn off when fully charged. Precision Vision Camera: Turn the camera off. Plug the micro USB cable into the MULTI port on the camera (see p. 9), and the other end into a generic USB port on a laptop or similar device connected to power. The Indicator LED will glow red when charging, and turn off when fully charged. Live Feed Monitor: The monitor can remain powered on while charging. Plug one end of the charging cable into the bottom DC IN port on the monitor (see p. 7), and the other end into a power outlet. The charging indicator LED will glow red. It will turn green when finished. IMPORTANT: DO NOT leave it in prolonged exposure to sunlight while charging! DO NOT plug the adapter into the DC OUT port. This will ruin the battery. Command Center Laptop: The laptop can remain powered on while charging. Simply plug one end into the charging port on the laptop, and the other end into a power outlet. The charging indicator LED will glow red. It will turn green when finished. Laptop battery percentage can also be checked in Windows, in the lower right hand corner of the desktop. Batteries: (see p. 6) Plug the battery charger into a power outlet using the power cable. Attach the red and black leads to their respective positions on the charger. Attach the balancing board to the balancing port on the charger. Now take the red/black leads and connect it to the battery. Connect the white balancing cable to the balancing board. Make sure everything is secure and snug. The charger should now be switched to “CHARGE” mode (it is already on by default). Now hold down the enter button for a few moments, then tap it again to confirm, it will now charge the battery. The charger will beep and flash “FULL” when finished. Hit “STOP”. IMPORTANT: DO NOT disconnect the red/black terminals from the charger at all. Simply unplug the battery from its end. Failure to do so will create an arc in between the leads, this will damage the battery! The Pacesetter comes equipped with 7600 mAh 2s LiPo batteries. It is important that the batteries are charged with these settings. Failure to do so could result in machine under performance or damage to the battery. Note: Refer to the battery charging video for visual instruction. 1 12 Page 11 GPS Recalibration • • • If your drone “toilet bowls” when hovering, or “fish tails” when flying straight Once every 2 or 3 weeks depending on performance When moving from one region to another 1. Make sure your DX8, live feed screen, and one (1) set of batteries are all charged. 2. Turn on DX8 (see page 5 for locations of switches mentioned from here on) and live feed screen (see page 7 for locations mentioned from here on). 3. Place drone in an open outside area and plug batteries in. 4. On the DX8, hit the "select" button. Click on "Servo Setup". Scroll down to "Throttle" and click, then scroll right until you see "Gear". Click again, and scroll down so a % is highlighted. Put the Flight Mode switch in position 2. At this point, the percentage to the left should be highlighted (have a box around it). Click again, and bring it from 105% down to 83-85%. Check on the live feed screen that there is an "M" in the lower left hand corner now when that switch is in position 2. This step allows you to be able to calibrate the GPS. 5. Make sure you have AT LEAST 8 satellites before doing the next step. The more satellites acquired the better the chances of the calibration succeeding. 6. Starting in position 0 on the Flight Mode switch, cycle from 0, to 2, and back to 0. Repeat this “cycle” 11 times. The LED indicator on arm 4 of the drone will immediately turn a solid blue. 7. Grab the drone by arm 5, lift it straight up from the ground and hold above the waist 8. Rotate the drone 360 degrees clockwise around the drone's axis. (Imagine there is a pole running through the middle of the dome) When it is complete the LED will turn solid green. 9. Now turn the drone so the cameras point down, perpendicular to the ground. 10. Rotate the drone another 360 degrees clockwise, maintain its downward posture. Once a full rotation is complete the LED will turn solid purple. If it turns red instead of purple, set the drone down and repeat steps 6-10 (cont.) 1 13 Page 12 11. Take drone up to roughly 20 feet. Take it through typical movements (forward, backward, left, right). If it "toilet bowls", or moves in a constant circular pattern land the drone and repeat steps 6-10. If it locks onto a position and does not wander, land the drone and continue. The GPS calibration was a success. 12. With the drone on the ground, go back to "Servo Setup" on the controller. Put the Flight Mode switch back into position 2, and set the left-hand % under "Gear" back to 105%. Double check what flight mode position 2 is set to by switching to it and looking on the bottom left-hand corner of the live feed monitor. If it says “GPS FS”, you set your fail-safe correctly and can continue with flying. If it still says “M”, repeat step 12. THIS IS EXTREMELY IMPORTANT: FAILURE TO RESET THE LEFT GEAR VALUE TO 105% MEANS THERE WILL BE NO FAIL-SAFE IF THE DRONE LOSES COMMUNICATION WITH THE CONTROLLER! 13. DO NOT FORGET STEP 12 GPS Declination When first set, the drones are programmed for true north in relation to Indiana. If the drone does not fly straight where you are, you will need to adjust the declination. NOTE: It is advised by the manufacturer that you have your authorized dealer perform this calibration. Once declination is set, it will not have to be set again if the drone stays in the same geographic location. 1) Figure out which way it is rotated in relation to forward. Example: Is it pointing forward more with arm 1 or arm 2? 2) Land the drone, remove the dome and batteries. 3) Rotate the GPS puck away from the arm it is “favoring”. Example: If it is flying and points forward more with arm 1, rotate the puck more towards arm 2. The foam under the puck can be rotated roughly 20 degrees without needing to be removed 4) Test the drone and repeat this process until proper flight orientation is achieved 5) The map on the following page will give you a rough idea on how far you will need to rotate it. Each line is 2 degrees, with negative being counter-clockwise (left towards arm 2), and positive being clockwise (right towards arm 1). 1 14 Page 13 1 15 Page 14 Setting up a route Laptop w/ Ground Station open 1) Watch the “Setting Your Scout Route” video on the Youtube channel. 2) Locate the field you wish to fly within Ground Station. ◦ Tip: There is a search box in the upper left-hand corner of Ground Station that you can use to locate your field easily. Simply use it to search for a nearby address or latitude and longitude. 3) Go up to Toolbox, and click “Photogrammetry Tool” 4) Make sure the settings are correct: ◦ ◦ ◦ ◦ ◦ ◦ ◦ ◦ 1 16 Focal Length = 35mm Sensor H = 47mm Sensor W = 82mm Fly Height = 122m H Overlap = 60% W Overlap = 60% H Speed = 10 m/s V Speed = 2 m/s Note: If you are having issues getting photos to align in later steps, increase the overlap and decrease the horinzontal (H) speed. Never fly at less than 60% overlap, and never fly faster than 10m/s. Page 15 5) Click “Click to draw a region in which you want to scan”, a box will appear on the map. The yellow pin is where the route will start and the red pin is where it will end. You can rotate the box by right clicking the center red pin or by clicking on the green arrows in the photogrammetry box. Refer to photos on the next page for visual reference. 6) Make the box inside the borders of the field except for overflying the turns by 30 feet. Refer to photos on the next page for visual reference. 7) Click “Preview” under the Photogrammetry Tool, and the box will preview a route for that current position. You can continue to adjust the box and hit “preview” until you are satisfied with where all of the waypoints are located. 8) Clicking “Generate” will create the route, you can now edit individual waypoints to fit the shape of the field. Maintain the uniform flight pattern. IMPORTANT: Point 0 is the very first waypoint the drone will move to and it is critical to make sure it is in a safe location above the take off spot. The drone will follow a straight line from its home point to point 0, and will hit any obstructions in its path. It is highly recommended you move point 0 to directly above where you will be taking off. Point 1 is the very first point in your actual route and should be a “Stop and Turn” 9) Check each individual waypoint and its height/speed settings to make sure they are consistent with the values above. 10) Save this route for future use, click the “Save” button under the Editor window. Note: For more information, refer to the Youtube video. 1 17 Page 16 1 18 Page 17 Pre-Flight Checklist Drone Controller Live Feed Monitor Batteries 1) Check the drone for any signs of damage or loose cables/straps 2) Make sure all components are fully charged. 3) Check that the propeller direction of rotation is correct. (See page 47) 4) Check that the propellers are tight and won't slip. 5) Make sure motor leads are fastened securely into the ESCs. 6) Make sure all switches on the controller are forward. Flight Mode Switch and Flight Orientation Switch should both be in position 0 (see page 5). Make sure the throttle is all the way down. 7) Turn on the controller. 8) Make sure batteries are strapped in and tight. 9) Power on your live feed monitor and check that voltage is normal, it should be 16.8/16.9v. If voltage is higher, take the drone to your authorized dealer. If voltage is lower, check batteries with the provided battery checker. 10) Make sure the drone and its propellers are free of any and all obstructions before arming. 11) Start the motors and check that individual rotation is correct. To arm them, take both sticks and move them down and towards the center. Refer to the motor rotation diagram on page 47. IMPORTANT: Never take off with less than 8 satellites. 1 19 Page 18 Flight Manual: IMPORTANT: If the drone has difficulty standing still while in hover, it will need a GPS recalibration, refer to pages 11-12 for the instructions 1) Follow all of the steps under the Pre-Flight section first 2) Refer to the FAA guidelines for safe and proper drone operation • To take off, bring the throttle stick up past 50% • To hover in place, leave the throttle at 50% • To descend, bring the throttle a little under 50% • To rotate the camera, turn the Aux 3 knob on the controller GPS Mode • Position 0 (GPS): GPS is ON, Gyro active • Position 1 (Att.): GPS is OFF, Gyro active • Position 2 (FS): Failsafe (For emergency use only!) ◦ NOTE: If you had to recalibrate the GPS as described on pages 11-12, make sure you followed step 12 Flight Mode Orientation • Position 0: The default Flight Mode will make the drone move in relation to its own heading. Basically, its left will always be its left, forward is forward, back is back, etc. • Position 1: The Course Lock mode will save the current heading as the forward orientation whenever. So no matter how you rotate the drone in flight forward/back/left/right always remain the same. A new course can be set with a flick of the switch during flight. (cont.) 1 20 Page 19 • Position 2: The Home Lock mode will lock the homepoint in so that the drone will always move relative to the homepoint. Moving backwards will always be towards the homepoint, forwards would be away from it, etc. Autopilot: IMPORTANT: The drone will move straight to point 0 at the start of its route. Make sure there are no obstructions in between it and point 0, if needed, ascend the drone to a safe height first, then start the route from that altitude. 1) Take the Data Link and plug it into the laptop with the data link cable, and attach to the hook-and-loop adhesive on the lid of the laptop. 2) Open Ground Station and click “Editor” at the top. 3) In the Editor window, click “Open” and load the desired route. 4) At this point you should perform the Pre-Flight checklist and make sure everything is okay with the drone. 4a) Make sure the drone has acquired at least 8 satellites. 5) With the drone powered on now and ready to go, click “Connect” in Ground Station. A red “H” should now appear on the map right where the drone is located. The drone is connected. 6) Move point “0” to directly above the drone. Be aware of 3D view in Google Earth, and locate the pin for point “0” using the red line under it. 7) Under the Editor window, click “Upload”. A box will come up displaying the route information, double check each waypoint altitude/speed. Click OK. 8) To start the autopilot, simply click the red “GO” button in the Editor window. • If at any time you would like the drone to come home, you can click the Go Home button in Ground Station, then click “Click to Go Home” at the bottom left corner of the screen. ◦ IMPORTANT: DO NOT use position 2 on the Flight Mode switch as a regular landing method! 1 21 Page 20 • If at any time you need to take control of the drone, for example to avoid an imminent collision, flip the Flight Mode switch down to position 1 then back up to position 0. In the event that your Pacesetter hits failsafe in the middle of route, the route can be continued once the drone returns home and the batteries have been replaced. To do so, follow the steps below: 1) Remember the last waypoint that had been completed. 2) Clear the route that it had been on, and reload the same field. 3) In the Editor Window, select "Editing Mission". Set the last waypoint completed as the starting waypoint. 4) Go to the last waypoint completed and set its turning mode to "Stop and Turn" 5) Upload the route to the Pacesetter and launch it. 5a) Make sure to take off manually and get it to altitude when doing this. The drone will make a straight line to the continuation point and will hit any obstructions in its way. REMINDER: The drone will hit its Failsafe Return to Home voltage when it reaches <14.5v. It will land in place once <14.0v has been reached. If you are flying manually when this happens, the drone will take control from you. To take back control, flip the Flight Mode Switch to position 1, then back to position 0. When failsafe is hit, the drone will ascend to 40 meters if it is flying lower then this altitude. 1 22 Page 21 Post-Flight Cameras Laptop 1) Remove the batteries from the drone. 2) Remove the cameras from the drone. 3) Using provided micro-USB cables, connect the cameras to the laptop using the MULTI port on the camera (see page 9), and hit the Record button to turn them on. They should say “USB” to indicate a connection. 4) They will come in as “Removable Disk(#:)” under This PC. The photos are located under in the DCIM folder. 5) Now create a place on the laptop to put your photos. Open the “Precision Vision” folder on your desktop, and create a new folder by right-clicking, highlighting “New” and click “Folder”. Name it something you will remember. 6) Within that folder, create two more folders named “IR” and “RGB”. This is so everything stays organized. 6a) Remove the photos where the drone is taking off and landing as they come off the camera. 7) Now simply navigate to the photos that are still each camera (Removable Disk(#:)), and drag and drop or copy those photos to the respective folder, so IR photos from the IR camera will go in the “IR” folder and the RGB photos from the RGB camera will go in the “RGB” folder you just created. 8) Once the transfer is complete it is safe to disconnect the cameras from the laptop and you can now create a map using Agisoft Photoscan Pro. 1 23 Page 22 Stitching in Agisoft Importing Photos: 1) Open Agisoft by double-clicking the icon on either the desktop or taskbar 2) On the workspace pane, click the “Add Chunk” button. 3) Right-click the chunk you just created and click “Add Photos” 4) Navigate to the Precision Vision folder located on the desktop and select all of the photos from the route you would like to stitch. 5) It will import all of the photos and you should now see a plethora of blue dots on the 3D viewer in Agisoft, these are the camera positions for each picture. Trimming: 1) Now you are disabling the pictures you don't need in there, like pictures of when the drone was grounded, ascending, and descending. (cont.) 1 24 Page 23 2) Starting from the first camera (In the “Ground Control” pane to the left of the screen, see page 21), you select each one up until the drone was at altitude and beginning the route. Right-click and disable those cameras. Do the same thing for the end of the route. Since there isn't a way to remote start the cameras, you will always need to trim the ascent/descents from the flight when stitching. Processing: 1) Right-click the chunk you're working on under the “Workspace” pane, highlight “Process”, and click “Align Photos”. A dialog box will open, make sure Accuracy = Low, and Pair Preselection = Ground Control. Click OK and wait for the process to finish 1 25 Page 24 2) Right-click the chunk again, highlight “Process”, and click “Optimize Alignment”. Keep “Fit k4” unselected. 1 26 Page 25 3) Right-click the chunk again, highlight “Process”, and click “Build Dense Cloud”. Set Quality to “Lowest” for faster results, and set Depth Filtering to “Aggressive” for a proper orthophoto. 1 27 Page 26 4) Right-click the chunk again, highlight “Process”, and click “Build Mesh”. Select “Height Field” for the Surface Type, “Sparse Cloud” for the Source Data, and set the Polygon Count to “High”. Keep Interpolation enabled. 1 28 Page 27 5) Right-click the chunk again, highlight “Process”, and click “Build Texture” 6) Once that process is complete you should see a stitched map in the 3D viewer. Tips: -If you can't see any dots when you add photos to a chunk, make sure that chunk is selected (it will be bold, if not double click to select it). Also, make sure the “Show Cameras” button on the top toolbar is highlighted. -If all of the photos don't align in the first process, try selecting the cameras that don't align, right-click them and click “Align Selected Cameras”. -If the above still doesn't bring them in, you most likely trimmed too many or too few cameras from the flight, or there is part of another flight in there and its trying to stitch pictures that don't go together. -You can zoom in/out of the 3D viewer by using pinch to zoom on the laptop trackpad 1 29 Page 28 Exporting: 1) Make sure the chunk you are intending to export is highlighted under the “Workspace” pane 2) Go to “File”, highlight “Export Orthophoto”, and click “Export JPEG/TIFF/PNG” 3) Make sure “Geographic” is selected at the top, and “Write World File” is selected at the bottom. If you will need to email the final photo, or you are concerned about space, select “Max dimension (pix)” and set it to 4096. Click “Export” for the final product. 1 30 Page 29 Using Global Mapper Setting it up 1) Open up Global Mapper by double clicking the icon on the desktop or clicking the taskbar icon. 2) Open your RGB/IR maps you created earlier with Agisoft by clicking on the “Open Your Own Data Files” button. 1 31 Page 30 3) Now open the necessary satellite imagery by going to File and selecting “Download Online Imagery/Topo/Terrain Maps...” 4) You want to select “NAIP Color Imagery for US (1m resolution)”, and click “Connect”. If NAIP is not available, use the “World Imagery” map instead. 1 32 Page 31 5) If the Overlay Control Center isn't already up, click the button to open it called “Open Control Center” located at the top (see page 28). In it, you should see 3 layers (in no particular order) Rectifying The point of the rectification process is to match up the maps created by Agisoft with an actual satellite-made map provided by the professional mapping sources. This process should be as precise as possible so its as accurate an NDVI as can be in the end. 1) Begin by deselecting the IR layer. Click the check-box next to it in the Overlay Control Center so that it is unchecked. Select the NAIP layer and click the down arrow to move it to the bottom of the list, but it will the top layer in the workspace. 2) Right-click the RGB layer and click “RECTIFY - Modify Layer Position” 3) A dialog box will open, click OK. 1 33 Page 32 4) Now the Image Rectifier window will open, displaying the RGB map under “Zoomed View” and the NAIP satellite map under “Reference Images”. An Entire Image view is also displayed. 5) From here you add individual points to both the Reference image (NAIP map) and your map. So, Point 1 on the RGB map should match where Point 1 is on the NAIP map (Point 2 to Point 2, 3 to 3, etc.) Add as many points as possible, the more there are, the more accurate the rectification. • To make a point, you simply left click anywhere on the map • To add the set of points to the list, you click the “Add Point to List “ button • To zoom in on an area, left click and draw a box • To zoom out, simply right click anywhere on the map Tip: its really easy and recommended to establish points on objects that typically don't move over time, like crossroads, trees, driveways, houses, etc. 1 34 Page 33 6) Once you are satisfied with the number of points shared between the maps, click OK and the RGB map is now rectified to the NAIP map. It is recommended that there be 5 or more rectification points. 7) Open your Overlay Control Center again, and de-select the RGB map, and reselect the IR map. Repeat the rectification process for the IR map now, it is done exactly the same way as the RGB map. ◦ Tip: Use the slider tool at the top of the page (see page 30) to see how well the RGB/IR layers line up with the satellite imagery. 8) Once the IR is done, enable both the RGB/IR layers under the Overlay Control Center, and de-select the NAIP map. The viewer should now only display the RGB/IR on top of each other. 9) From here, go up to Analysis and click “Raster Calculator – Apply Formula” 1 35 Page 34 10) A Select Layers box will open, select the RGB/IR layers and click OK. 1 36 Page 35 11) The window “Set up Apply Formula Operation” will open and here you can name what you want your NDVI image to be called in the “Layer Description” textbox. 12) Select “Add Predefined Formula”, and in the drop down menu beside it, select “NDVI” 13) Click “Add Band” and it will appear in the formula box. 14) Click OK at the bottom, the “Set up Bands for Export” window will appear 15) Select the Precision Vision Shader in the shader dropdown. Note: Before continuing, it is important to know the NDVI formula that is used: NDVI = 1 37 B4( IR)−B1(RGB) B4 ( IR)+B1(RGB ) Page 36 16) Click the “Band 1” tab at the top, and make sure the RGB layer is checked, and the IR layer is not. 1 38 Page 37 17) Click the “Band 4” tab at the top, and make sure the IR layer is checked, and the RGB layer is not. Click OK. 18) The NDVI image has been created. At this point you have several options on what to do with it, including area calculations, exporting as a KMZ file to be opened with Google Earth, and exporting as a GeoTIFF for use in farm management software. Other formats are available for export. If you need one that is not mentioned in this manual, please contact your authorized dealer for more information. 1 39 Page 38 Digitizer The digitizer is a very powerful tool in Global Mapper that allows you to accurately calculate area, as well as set custom export bounds. To select it, simply click the Digitizer Tool Button at the top of the window (see page 30). By default it will be in "Edit" mode. To create a new area feature, simply right click an select “Create new area/polygon feature”. There will be multiple options under this, area being the most versatile for field use. To use as an area measurement tool: 1. Create an area. To drop points, left click. When you reach the end of the perimeter you're mapping out, right click. 2. In the window that pops up, name the area feature. If mapping multiple fields, use the field name. If mapping hail damage, it is easier to simply number the areas mapped. 3. Once an area (or multiple) has been created, right click anywhere on the map to bring the digitizer back to edit mode. 4. Left click and drag to select multiple area features at once. 5. Right click on any of the selected areas and find Analysis/Measurement>Measure 6. The pop-up window will give you the information on the various areas, as well as the combined measurements. 7. The button in the lower left of the window allows for export as a .CSV file, which can be opened with Microsoft Excel or similar. 1 40 Page 39 Exporting 1) In the Control Center, make sure any unwanted layers are de-selected. 1a) If an area feature was created using the digitizer, this can be selected for use as the export bounds. Select the area feature desired before going onto step 2. 2) Go up to File, highlight “Export” and click “Export Raster/Image Format...” 1 41 Page 40 3) A “Select Export Format” window will pop up, make sure GeoTIFF is selected 1 42 Page 41 4) A window “GeoTIFF Export Options” will open, make sure you enable the World File by checking the box next to “Generate TFW (World) File” 1 43 Page 42 5) Click the Export Bounds tab, and click the “Draw a box...” button. You can draw a box around the NDVI image to omit unnecessary parts of it you want. 5a) If an area feature was selected in step 1, select “Crop to Selected Area Feature(s)” instead of “Draw a box...” (Recommended) 6) Click OK. Exporting as a .KMZ A .KMZ file is useful as it can be loaded into Google Earth on any device, be it tablet, smartphone, or PC. If it is loaded onto a device with GPS capabilities (Such as a tablet or smartphone), you will be able to use it to navigate to the problem spots in a field. 1) After creating the NDVI, use the digitizer to mark out the perimeter of the field. After selecting Edit with the digitizer select the area feature you just created. 2) After creating a new area feature, go to File>export>export web format. (Cont.) 1 44 Page 43 3) From the dropdown, select KML/KMZ (Any Data as Images) 4) Select PNG as your image format 5) Under the Export Bounds tab, select "Crop to Selected Area Feature(s)" 6) Hit "OK" and name the file. It is suggested you name it after the field name. 1 45 Page 44 Editing the Shader Depending on the shader selected when creating the NDVI image (see page 36), you may have to edit it to give you a better idea of how your crop is doing. 1) To change the shader on the NDVI, highlight it in the Control Center, and hit “Options” at the bottom of the control center 2) Toward the middle of the “Options” pop-up, there will be a “Shader” drop-down. Select a different shader, and hit apply. 3) To edit an existing shader, or to create a new shader, hit the Configuration button at the top of the window (see page 30) 4) In the Configuration popup, towards the bottom, there will be a “Custom Shaders” box. Either select the shader you want to edit and hit “Edit”, or hit “New” to create a new shader. (cont.) 1 46 Page 45 5) When creating a new shader, use the “New Height/Slope Entry” box in the middle of the popup. Enter the desired value, hit “Add”, select the color, and it will be added to the list. To edit an existing value, simply highlight it in the “Elevation/Slop Colors” box and either hit “Change Color” or “Change Value” to edit the variable that is desired. The value can only be between -1 and 1. ◦ Tip: We suggest using the Precision Vision Shader for most crops. If your Pacesetter kit did not come with this shader pre-installed, the values are as follows: ▪ 0.6 Green ▪ 0.4 Yellow ▪ -0.1 Red ◦ Tip: It is easier to write prescriptions off of the NDVI map if you deselect “Blend Colors” towards the bottom of the pop-up. 1 47 Page 46 Blade/Motor Rotation 1 48 Page 47 1 49 Page 48 Technical Specifications Battery Charger Operating Voltage Range Circuit Power DC11.0~180. Volt AC to DC adaptor (DC11.0~18.0V/5A) Max. charge power 80W Max. discharge power 10W Charge current range: 0.1~6.0A Discharge current range: 0.1~2.0A Current drain for balancing Li-po: NiCd/NiMH battery cell count: Li-ion/Polymer cell count: Pb battery voltage: 300mAh/cell 1~15cell 1~6 series 2V~20V Weight: 490g(Net Weight) Dimensions: 135x112x60.9mm Live Feed Monitor Diagonal Resolution Contrast Luminance Display Screen Working Frequency Wireless Receiving AV Port Sensitivity Channel Antenna Port Diversity Receiving TV System Video output level Audio output level RX1 AV OUT RX2 AV OUT DIV AV OUT AV IN HDMI IN(A Type) Built-in Microphone DC IN DC OUT Power Supply Battery Consumption Main Body Battery Main Body Dimensions Weight 1 50 7 inch 1024x600 700:01:00 300 cd/m Band CH 1 CH 2 CH 3 A 5865M 5845M 5825M B 5733M 5752M 5771M E 5705M 5685M 5665M F 5740M 5760M 5780M -90dbm+-1dBm 32 Channel (4 Band x 8 Channel) 2 x SMA, 50 ohm Antenna diversity NTSC/PAL 1.0Vp-p Typ, 75 ohm 1.0Vp-p Typ, 10Kohm Video, Audio output Video, Audio output Diversity receiving, Video, Audio output Video, Stereo Audio input Supports HDMI 1.3 Digital Input, Supports HDMI Audio in 8 Ohm/1W x 2 7 ~ 28V/2A Output Voltage : DC IN or battery voltage Output Current : 1A 11.1V/1000maH(3 series LiPo cells) 12V input:7.8W 183x126x19.5mm(not including sun shadow) 105x87.5x6.7mm(not including prominent part) 350 g ISM 5.8 GHz CH 4 5805M 5790M 5645M 5800M CH 5 5785M 5809M 5885M 5820M CH 6 5765M 5828M 5905M 5840M CH 7 5745M 5847M 5925M 5860M Page 49 CH 8 5725M 5866M 5945M 5880M Flight and Service Log Serial Number: Date: Action: Flight/Service (Circle one) Duration: Name of Pilot/Technician: Starting Voltage: Ending Voltage: Lowest Satellite Count: Highest Satellite Count: Total Flight Time: Weather Conditions: If flown within 5 miles of an airport: Airport: Date and Time of Notification: Notes: Signature: 1 52 Page 51 Date: Action: Flight/Service (Circle one) Duration: Name of Pilot/Technician: Starting Voltage: Ending Voltage: Lowest Satellite Count: Highest Satellite Count: Total Flight Time: Weather Conditions: If flown within 5 miles of an airport: Airport: Date and Time of Notification: Notes: Signature: 1 53 Page 52 Date: Action: Flight/Service (Circle one) Duration: Name of Pilot/Technician: Starting Voltage: Ending Voltage: Lowest Satellite Count: Highest Satellite Count: Total Flight Time: Weather Conditions: If flown within 5 miles of an airport: Airport: Date and Time of Notification: Notes: Signature: 1 54 Page 53 Date: Action: Flight/Service (Circle one) Duration: Name of Pilot/Technician: Starting Voltage: Ending Voltage: Lowest Satellite Count: Highest Satellite Count: Total Flight Time: Weather Conditions: If flown within 5 miles of an airport: Airport: Date and Time of Notification: Notes: Signature: 1 55 Page 54 Date: Action: Flight/Service (Circle one) Duration: Name of Pilot/Technician: Starting Voltage: Ending Voltage: Lowest Satellite Count: Highest Satellite Count: Total Flight Time: Weather Conditions: If flown within 5 miles of an airport: Airport: Date and Time of Notification: Notes: Signature: 1 56 Page 55 Date: Action: Flight/Service (Circle one) Duration: Name of Pilot/Technician: Starting Voltage: Ending Voltage: Lowest Satellite Count: Highest Satellite Count: Total Flight Time: Weather Conditions: If flown within 5 miles of an airport: Airport: Date and Time of Notification: Notes: Signature: 1 57 Page 56 Date: Action: Flight/Service (Circle one) Duration: Name of Pilot/Technician: Starting Voltage: Ending Voltage: Lowest Satellite Count: Highest Satellite Count: Total Flight Time: Weather Conditions: If flown within 5 miles of an airport: Airport: Date and Time of Notification: Notes: Signature: 1 58 Page 57 Date: Action: Flight/Service (Circle one) Duration: Name of Pilot/Technician: Starting Voltage: Ending Voltage: Lowest Satellite Count: Highest Satellite Count: Total Flight Time: Weather Conditions: If flown within 5 miles of an airport: Airport: Date and Time of Notification: Notes: Signature: 1 59 Page 58 Date: Action: Flight/Service (Circle one) Duration: Name of Pilot/Technician: Starting Voltage: Ending Voltage: Lowest Satellite Count: Highest Satellite Count: Total Flight Time: Weather Conditions: If flown within 5 miles of an airport: Airport: Date and Time of Notification: Notes: Signature: 1 60 Page 59