1
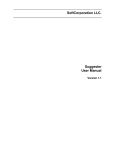
docs.com
http://www.replacement
PSUps2MANUAL.qxd
8/28/06
11:24 AM
Page 2
WARNING: READ BEFORE USING YOUR PLAYSTATION®2 COMPUTER
ENTERTAINMENT SYSTEM.
A very small percentage of individuals may experience epileptic seizures
when exposed to certain light patterns or flashing lights. Exposure to certain
patterns or backgrounds on a television screen or while playing video games,
including games played on the PlayStation 2 console, may induce an
epileptic seizure in these individuals. Certain conditions may induce
previously undetected epileptic symptoms even in persons who have no
history of prior seizures or epilepsy. If you, or anyone in your family, has an
epileptic condition, consult your physician prior to playing. If you experience
any of the following symptoms while playing a video game – dizziness,
altered vision, eye or muscle twitches, loss of awareness, disorientation, any
involuntary movement, or convulsions – IMMEDIATELY discontinue use and
consult your physician before resuming play.
Thank you for purchasing Phantasy Star Universe™. Please note that this software is designed for use with
the PlayStation®2 computer entertainment system. Be sure to read this instruction manual thoroughly
before you start playing.
WARNING TO OWNERS OF PROJECTION TELEVISIONS:
Do not connect your PlayStation 2 console to a projection TV without first
consulting the user manual for your projection TV, unless it is of the LCD type.
Otherwise, it may permanently damage your TV screen.
USE OF UNAUTHORIZED PRODUCT:
The use of software or peripherals not authorized by Sony Computer
Entertainment America may damage your console and/or invalidate your
warranty. Only official or licensed peripherals should be used in the
controller ports or memory card slots.
HANDLING YOUR PLAYSTATION 2 FORMAT DISC:
• This disc is intended for use only with PlayStation 2 consoles
with the NTSC U/C designation.
• Do not bend it, crush it or submerge it in liquids.
• Do not leave it in direct sunlight or near a radiator or other source of heat.
• Be sure to take an occasional rest break during extended play.
• Keep this compact disc clean. Always hold the disc by the edges and
keep it in its protective case when not in use. Clean the disc with a lintfree, soft, dry cloth, wiping in straight lines from center to outer edge.
Never use solvents or abrasive cleaners.
In a far away galaxy, a brilliant sun is orbited by three planets.
The Gurhal System is inhabited by humans and their creations:
CASTs, Newmans and Beasts.
For 500 years, there was war among the races, then finally...
An era of peace and prosperity that has lasted 100 years.
But now, a darkness threatens the universe.
CONTENTS
GETTING STARTED . . . . . . . . . . . . . . . . . . . . . . . 2
CONTROLLER . . . . . . . . . . . . . . . . . . . . . . . . . . . 3
STORY MODE . . . . . . . . . . . . . . . . . . . . . . . . . . . 4
MAIN MENU . . . . . . . . . . . . . . . . . . . . . . . . . . . . 4
GUARDIANS COLONY . . . . . . . . . . . . . . . . . . . . 5
MISSIONS . . . . . . . . . . . . . . . . . . . . . . . . . . . . . . 7
NETWORK MODE. . . . . . . . . . . . . . . . . . . . . . . 11
NETWORK SETUP . . . . . . . . . . . . . . . . . . . . . . . 12
STRUCTURE OF NETWORK MODE . . . . . . . . . 16
NETWORK MODE SCREEN . . . . . . . . . . . . . . . 16
MY ROOM. . . . . . . . . . . . . . . . . . . . . . . . . . . . . 17
NETWORK MODE SPECIFIC MENU ITEMS . . . 18
PARTY. . . . . . . . . . . . . . . . . . . . . . . . . . . . . . . . . 19
MISSIONS . . . . . . . . . . . . . . . . . . . . . . . . . . . . . 20
CHAT & LOBBY ACTIONS . . . . . . . . . . . . . . . . . 20
END USER LICENSE AGREEMENT . . . . . . . . . . 21
1
PSUps2MANUAL.qxd
8/28/06
11:24 AM
Page 2
GETTING STARTED
STARTING UP
open button
disc cover
memory card slot 2
memory card slot 1
®
DUALSHOCK 2 ANALOG CONTROLLER CONFIGURATIONS
on/standby/
reset button
IR receiver
L2 button
R2 button
L1 button
R1 button
USB connectors
controller port 1
controller port 2
Set up your PlayStation®2 computer entertainment system according to the instructions supplied with your
system. Check that the system is turned on (the on/standby indicator is green). Press the OPEN button to open
the disc cover. Place the Phantasy Star Universe™ disc with the label side facing up in the disc holder, and
then close the disc cover. Attach game controllers and other peripherals as appropriate. Follow the on-screen
instructions and refer to this manual for information on using the software.
directional
buttons
Note: For NETWORK MODE setup, please see p.11.
button
Memory Card (8MB)(for PlayStation®2)
To save game settings and progress, insert a memory card (8MB)(for PlayStation®2) into MEMORY CARD slot
1 of your PlayStation®2 system. You can load saved game data from the same memory card or any memory
card (8MB)(for PlayStation®2) containing previously saved games.
left analog stick
(L3 button when pushed down)
SELECT button
ANALOG mode button
START button
right analog stick
(R3 button when pushed down)
button
button
button
The following Save File is created:
PSU GAMEDATA
a minimum of
236KB
Saving is performed manually at the Save Screen which can be accessed at Save
Markers on the field or at the end of each Chapter of the story. There are four slots
available to save your data. Do not remove the Memory Card (8MB) (for
PlayStation®2) while loading or saving is in progress.
Note: In NETWORK MODE (p.11), additional memory spaces (at least 3166KB) are required for PSU SYSTEMFILE. Game progress and character data, however, is saved onto the server. Please refer to the pages on NETWORK MODE for details.
Phantasy Star Universe™ is a one-player game compatible with the DUALSHOCK®2 analog controller.
Connect the controller to controller port 1.
● Controls are all set in ANALOG Mode (mode indicator: ON) and cannot be switched to digital mode
using the ANALOG Mode button. The mode indicator will remain ON (lit red) at all times.
● This game supports the vibration function of the analog controller. This can be activated/deactivated from
the Options menu (p.5).
MAIN CONTROLS
Controls described in bold face are available in the NETWORK MODE only (p.11).
directional buttons . Move cursor, change menu page; (Z/X: hide/show Chat Shortcut)
left analog stick . . . Move character
right analog stick . . Move camera
START button . . . . . . Toggle main menu display, skip movie scene
SELECT button . . . . . . Show/hide Software Keyboard
gS button. . . . . . . . . . . Decide, talk, examine, pick-up item
gA button. . . . . . . . . . . Display Action Palette, display Lock-On Menu
gD button. . . . . . . . . . . Cancel menu, use striking weapon skill, use technic (not used for firing weapons)
gF button. . . . . . . . . . . Attack (striking/firing), bullet (firing), technic (magic), display Lobby Action Menu
tQ button. . . . . . . . . Reset camera, side step (while moving), lock-on enemy, turn page
tE button. . . . . . . . . Switch one-hand weapon, switch technic, turn page
tW button. . . . . . . . . Turn page, short cut for Verification Icon (p.16)
tR button. . . . . . . . . Turn page, switch Chat Log Display
mB button. . . . . . . . . Toggle Character Information Display (p.16)
mN button. . . . . . . . . Toggle camera between third-person and first-person view
Note: When the camera is in first-person view, you cannot move around using the left analog stick. In this
state, the left analog stick has the same function as the right analog stick.
2
3
PSUps2MANUAL.qxd
8/28/06
11:24 AM
Page 4
STORY MODE
MAIN MENU
During the game, press the START button to display the Main Menu.
Player information
Check the current condition and equipment status of the player character.
Status
Character’s abilities are as follows:
Level . . . . . . Current level
Details. . . . . Race and gender
Type. . . . . . . Battle Type
HP. . . . . . . . . Health Points (current/maximum)
ATP . . . . . . . . Attack Power
ATA. . . . . . . . Attack Accuracy
TP . . . . . . . . . Technic Potency
DFP. . . . . . . . Defensive Power
EVP. . . . . . . . Evasion Power
MST . . . . . . . Mental Strength
STA . . . . . . . . Status Abnormality Resistance
Experience . Attained Experience Points
Next level . Experience Points required to
advance to next level
Meseta . . . . Available money
Equipped items
Lists all equipped possessions. For weapons and
items, those on the Action Palette (p.8) are displayed.
Photon Arts list
Lists all special abilities currently available to the
character. See p.9 for details on Photon Arts.
Types list
At a certain stage in the game, you will gain
access to the Type Select Counter on the
GUARDIANS Colony 5th Floor. Here you can
switch the Battle Type of your character as detailed
below:
Hunter. . . . . . . . Strong with striking weapons,
this type is very effective in close
combat. Good balance of skills.
Ideal for beginners.
Ranger . . . . . . . An intermediate level long-range
fighter good at attacking enemies from a distance. Also provides good backup support.
Force . . . . . . . . . An advanced type, technic users
can take on a numerous roles
due to the various types of technics available to them.
Items
Select Possession to display the following three information panels:
Item Count
The number of items in possession. The figure in
brackets shows the number of items in the selected
category, while the figures on the right show the
total and maximum items.
List Window
Each category is displayed separately. The five
categories are Weapons, Armor, Items, Clothing/
Parts, and Synth/Room Items. These can be
switched using the directional buttons Z X. Press
the gF button to change the sort order.
Status Window
Shows the performance or effectiveness of the
selected item. Press the tQ / tE buttons to
switch pages.
Viewing the status window
<Example: Striking Weapon>
• Maker logo/grade/
item name
• Maker name/times
upgraded
• Current PP (Photon Point — p.9)/Maximum PP
• Weapon's Attack Power/Overall Attack Power
• Weapon Accuracy/Overall Accuracy
• Attribute color/attribute bonus value (see below)
• Attack Power (ATP) required to use/current ATP
* During equipment changes, increased values are
marked in red, decreased values are marked in blue.
Switch pages to see details of Photon Arts and Units
set into the weapon/armor.
Red (fire) ↔ Blue (ice) Yellow (lightning) ↔ Orange (ground) Pink (light) ↔ Purple (dark)
Green (no attribute)
Bonus damage awarded for attacking creatures with opposing attributes. No bonus damage for no attribute.
Negative damage for same attribute.
Using Equipment
• Weapon
Set the selected weapon in the Action Palette via
Add to palette for quick access during battle. You
can also select Link photon art to select an art to
attach to the weapon. Refill PP with item allows
you to use any PP Items suited to the selected
weapon.
4
• Armor
Once you select armor, you must equip it. Line Shield
Units may also be attached to the armor.
• Item
Some items can be added to the Tools Palette, some
can be used freely, and some have an effect by simply being held. Actions available to a given item will
be displayed when selected.
• Clothes/Parts
Details of clothing and parts items.
• Synth/room items
Items that can only be used in Ethan's private room.
Map
Displays a map of the area immediately surrounding the character. The player and enemy positions are all
marked. Scroll the map using the directional buttons, and use tQ tE to zoom in and out. No map display is
available at the GUARDIANS Colony or the City.
Party
Choose Form Party and select members from available Partner Cards, or Disband Party to return to individual status.
System
Select Options to change game settings, or Log out to return to the title screen.
Options
Text display speed . . . . . . Set to Instant display or Normal.
Sound . . . . . . . . . . . . . . . . . . . Set to Stereo, Mono, or Dolby Pro Logic II.
Music volume . . . . . . . . . . . . Set the volume of background music.
Sound effect volume . . . . . Set the volume of sound effects.
Vibration . . . . . . . . . . . . . . . . Set the controller vibration function ON/OFF.
Radar map display . . . . . . Set the map display orientation to Based on direction/Based on camera.
Button detail display . . . . . Set display of button controls to Always display/Temporary display/OFF.
Main menu cursor position. . Save/Do not save the cursor position when the main menu is closed.
Camera controls . . . . . . . . . Set the camera controls to Camera follows character/First person camera.
Weapon/TECHNIC swap . Set the method of switching one-handed weapons (between right- and lefthanded) or technics for technic-attack weapons to Hold (switch only while the
tE button is being held)/Click (switch upon each pressing of tE button).
Lock-on. . . . . . . . . . . . . . . . . . Set the controls to lock-on enemies to Hold/Click.
L1 / R1 button settings . . . Default button settings or Change button settings.
Return . . . . . . . . . . . . . . . . . . . Return to the System Menu.
Return to default. . . . . . . . . Return all Options Settings to their default value.
For Dolby Pro Logic II Surround Sound
This game is presented in Dolby® Pro Logic® II surround sound. Connect your game console to a sound system with Dolby Pro Logic, Dolby Pro Logic II, or Dolby Pro Logic IIx decoding to experience the excitement
of surround sound. You may need to enable Dolby Pro Logic II in the Sound options of the game.
Log out
Return to the title screen. Please note that game data is not automatically saved. Game progress will be lost
if you exit without saving.
GUARDIANS COLONY
Your adventures (as Ethan Waber) mostly begin from the GUARDIANS Colony, a base for his activities.
ACTIONS ON GUARDIANS COLONY
You can move freely inside the Colony which consists of five floors, and take various actions. Here are some of
the more common actions:
Talk with Characters
You can talk to various characters in the GUARDIANS
Colony, from small talk to something useful.
Shop/Use Facilities
Buy weapons and items at shops, or use various facilities at the GUARDIANS Colony.
Change Type
As the story progresses, you can change Ethan's type at
the Type Select Counter on 5F of the GUARDIANS HQ.
Go to Cities on other Planet
As the game progresses, you will be able to go to
the cities on other planets from 4F of the colony.
Free Mission
As the story progresses, you will be able to take Free Missions. Go to Mission Counter, verify what the available
Missions are, and choose one. You can also cancel the Mission you have already taken. If you have Partner Cards
(available later in the game — p.18) of other characters, you can take the Free Mission together as Party Members.
My Room
Go to Ethan's room on 1F. You can get various support
options from your Partner Machinery "Pete" (p.6).
Save Game Data
Save your game progress at the Save Marker, located on
4F of the GUARDIANS Colony or inside My Room (p.6).
5
PSUps2MANUAL.qxd
8/28/06
11:24 AM
Page 6
VIEWING THE GAME SCREEN (CITY)
Give Item
By giving Pete consumable items he can level-up. Depending on items fed and the level attained, Pete's
appearance may change, and he may become more proficient at making certain kinds of items. When he
reaches phase 4, he can also join you on your adventures, proving even more useful.
Main Menu
Press START button to
toggle display. The gD
button also cancels the
display.
View Status
Lock-On Cursor
Indicates an item that
can be picked up or
used via the gS button.
Simplified Status
Shows Level, HP, max HP,
and experience required
to level-up. The Level and
HP of allies will also be
shown.
gS button
Shows an gS button command is available, such
as picking up items or
talking to characters.
In addition to the above, a variety of other information is displayed to correspond with the situation.
Speech Bubble
Conversations with other
characters are shown in
speech bubbles. Press the gS
button to proceed.
Movie Scene
Some dialog is played in
movies. You can skip the
movie scenes by pressing the
START button.
Cut In
As certain event scenes
begin, the character’s face
and lines will be displayed.
Shopping
When purchasing items etc.,
a menu window dedicated
for shopping will be displayed.
MY ROOM (GUARDIANS BARRACKS)
Use Storage
When you have too many items and Meseta to carry, you can let Pete put them into storage. He can also be
instructed to retrieve previously stored items. Before going out on the field, check that you have enough space
for items you find along the way.
Partner Machinery Function
Select Talk to hear an explanation of the current story, characters you have met, etc. Menu items that can be
selected will increase as the game progresses.
Synthesize an Item
As the story progresses, you can have Pete synthesize custom items for you. Some items can only be obtained
this way.
Insert Board
6
Synthesize
Display a list of items and the
materials required. Naturally,
only the items that you have
X materials for can be made.
Materials must be placed in
storage, in order to synthesize.
Pete's Parameters
Strike
Proficiency in producing striking weapons.
Range
Proficiency in producing firing weapons.
TECH
Proficiency in producing magic weapons.
Armor
Proficiency in producing defense items.
MISSIONS
The various adventures that Ethan and his allies embark on are called Missions.
MISSION LOCATION
In most cases missions will be requested at the colony or city. You then head for the field where the mission will
be carried out. There are two main types of mission as follows:
Main Mission
Completion is necessary to progress to the next chapter of the story. This mission will normally be outlined at
the beginning of the chapter.
Free Mission
Free Missions appear as the story progresses. These can be chosen from a list and executed in your own time.
Field Actions
Much like the colony and city, you can move freely about the field. The big difference though is the presence
of monsters. The most commonly used field actions are as follows:
Ethan's private room. Here you will find a Save Marker for saving game data, as well as a dressing room for
changing clothes. You can also place up to three items to personalize your room. Most useful to your gameplay though is a Partner Machinery model GHX-005 nicknamed “Pete.” Approach Pete in My Room and press
the gS button to display his option menu.
Before Pete can make anything you need to purchase or
find a board and install it.
Depending on the board, a
variety of items can be created.
Confirm Pete's status. You can see his level and ability parameters at any time, so develop him in a way that
works well with your own skills and playing style.
Take Out Item
Consumable items like
Monomate can be synthesized reliably. With other
X items such as weapons and
armor, success can only be
determined when synthesis is
complete. Even failed items
can still be used for something
else.
Battle
Fight monsters using equipped weapons and armor. Defeating monsters gives you Experience Points (p.10).
Talk with Characters
There are characters in the field too that you can speak with. Approach and press the gS button.
Gather Items/Meseta
By defeating monsters or breaking open containers, you can gain items and Meseta (currency).
Save Game Data
Save Markers can also be found in the field. Use these to record your progress.
VIEWING THE GAME SCREEN (FIELD)
Radar Map
Shows uncovered areas,
monsters, allies, gates
etc. Where a key is
required, the key number
is displayed to the left.
Time
During trials, the elapsed
time is shown here.
Target Information
Lock on an item or monster
to get information.
Lock-on Cursor
A cursor that automatically
locks-on to those within
range. Enemies that can
be attacked will have a
cursor highlighted in red.
Simplified Status
Shows the Level and HP of
Ethan and his allies. Ethan’s
display also shows the current
Experience Points earned.
Damage
Enemy damage is displayed in white
text, and Ethan and his allies in red.
Recovery amount is shown in green.
Action Palette
Shows equipped items,
PP, max PP, and available commands. Put
weapons in the palette
(p.8) for easy access.
7
PSUps2MANUAL.qxd
8/28/06
11:24 AM
Page 8
ACTION PALETTE & TOOLS PALETTE
BATTLES
The Action Palette is a compact system for managing attack methods, PP, weapon changes and use of items.
Master each system effectively for maximum advantage in battle.
Available Commands
Shows commands that
correspond with the gS,
gD and gF buttons.
button commands
Pick up item, press switch,
other non-attack actions.
gS
button commands
Skills (striking weapon)
and technic (magic). Not
used for firing weapons.
gD
Left-hand weapon
Shows when you have a
left-hand weapon
equipped. Background
turns red when in use.
Weapon PP
Shows PP and max PP of
equipped weapon.
button commands
Regular attacks, bullets,
technic attacks.
gF
Equipped Weapon Icon
Shows the weapon type of
equipped weapons.
Action/Tools Palette Settings
Before you can use the Action/Tools Palette, you must prepare the content as detailed below:
● Open the Items menu and choose the item or weapon you wish to set in the palette.
● Choose Add to palette from the menu and press the gS button. When set, press the gD button
to return.
● From the regular game screen, hold down the gA button to bring up the Action and Tools
Palettes. Use the directional buttons or tQ / tW / tE / R buttons to select an item
and release the gA button to set.
PARTY
There's a limit to what Ethan can do all by himself. To attempt more difficult tasks, form a Party with other characters.
Forming a Party
Party Member
If you have Partner Cards (Chapter 3 and beyond), you can have selected characters join your Party. In the
Main Mission, you must form a Party with specific characters. In such cases, you can have them join you simply
by talking to them.
Guest Character
There are cases where a special character needing protection, may join your Party.
Color of Map Cursor
The cursor colors on the radar map match the colors of Party Members on Simplified Status.
Party Member's Actions
Monsters lurk in specific locations on the field, and appear when you approach a given area (displayed as
yellow dots on the Radar Map). Some packs of monsters may either hold weapons or have a leader. In these
cases, they have higher attack and defense abilities, and may even use actions such as healing.
Attack Types and Weapons
There are three types of attacks, depending on weapons and Photon Arts.
Striking Attack
This is a direct attack using sword-type weapons for close combat. Normal attacks do not consume PP (see below),
and up to three attacks in succession can be made. By linking Photon Arts, you can perform powerful attacks.
Shooting Attack
With this type, you attack from a distance, using guns or arrows. Depending on the weapon, you can move while
attacking. Although you can safely make one-sided attacks, you consume PP for each attack.
Technic Attack (Magic)
This type allows you to use "Technics," with different variations, effects, etc. They can be very powerful, if you can
manage them effectively. You will consume PP for each attack.
One-Handed and Two-Handed Weapons
Usually Two-Handed Weapons are stronger, but One-Handed Weapons allow you to hold a second weapon at
the same time (see next).
Left-Handed Weapons
Selected One-Handed Weapons are made for use with the left hand only. Only this type of weapon allows you
to hold one other One-Handed Weapons.
Upgrading Weapons
If you have an item called a "Grinder," you can make upgrades on your weapons at a shop. You can use up
to 10 grinders to a weapon. Note that attempts to upgrade may result in failure at times. In this case, the
weapon will break and disappear from your possession.
Photon Arts and PP (Photon Points)
Photon Arts allow you to power-up a range of powerful attacks using Photon Points across all weapon types.
Obtain a Photon Art Disc, and learn Photon Arts. Select a weapon from the Main Menu, and select Link
Photon Art to link Photon Arts that correspond to the weapon. While that weapon is equipped, the PP will
gradually recover. PP can also be recovered with a PP recover item or a Photon Charger.
Skill
This type is for close combat using striking-type weapons. Variations include powerful strikes against one or multiple enemies.
Bullet
This type is for shooting-type weapons. Many weapons of this type allow placement of an attribute (fire, ice, etc.)
on the bullet.
Technic
This type is for magic-type weapons. This versatile weapon type can be used for both attacks and healing.
There is a level to each Photon Art. By using it more often, it powers up, becoming stronger and more effective.
Battles and Effects
When a monster approaches, the Party Members begin to battle. They will continue to battle even when Ethan
leaves the area. The Party Members also use Photon Arts, and their levels increase with experience.
Lock-ons and Attacks
When an enemy is within your attack range, a red Lock-on cursor will mark the closest enemy. In this state,
press and hold the tQ button (if Lock-on option is set to Hold — p.5) to lock onto that enemy. In this state, you
will side step the enemy (with striking-type weapons, you can continue facing the locked-on enemy). With
shooting-type and magic-type weapons, there are situations where you may still have to adjust the direction to
attack, using the first-person view.
Damages to Party Members
To recover a Party Member's HP, you need to use an item or Technic with corresponding effects. When a Party
Member falls their HP will slowly recover with time and they will eventually rejoin the action.
In dangerous missions, it is very important to equip yourself with proper armor.
Movement
The Party Members follow Ethan.
Other Actions
Your Party Members will not pick up items or Meseta, or open gates.
Armors
Line Shields
Line shields improve your defense ability. They also guard against frontal attacks, nullifying all damages in certain
situations.
Units
Many line shields contain slots where you can attach protective units of different types. Each has various effects
that improve your defense abilities.
8
9
PSUps2MANUAL.qxd
8/28/06
11:24 AM
Page 10
Taking Damage
If an enemy attacks you, your HP will decrease according to the strength of attack. There may be cases where
you may take damages other than physical damage.
Blow Aways and Downs
Attacks from particular monsters may have an effect to blow you away upon taking damage, or make you fall on
the ground. When you are down on the ground, you cannot attack until the character gets up.
Status Abnormalities
If you receive special attacks, in addition to reducing HP, you may have one of various abnormalities in your status. This can be cured with time, recovery items, or recovery technics.
If HP Drops to Zero
If the HP of the character drops to zero, the character will fall to the ground, unable to fight. Some Party
Members may recover with time, but in the case of Ethan, unless some measure of recovery is taken, the game
will be over.
Experience Points
You receive Experience Points for defeating an enemy. By obtaining Experience Points, the character will be
powered up.
If a Party Member Defeats the Enemy
Even if other members in your Party defeat the enemy, if Ethan has inflicted even a fraction of damage to that
particular enemy, you receive a small portion of Experience Points.
Character Level
If Experience Points are accumulated, the character's level increases, raising maximum HP and various other
parameters. Your HP will also recover to full health.
CONTAMINATION
Neutralizing contamination from a mysterious life form called the "SEED" is one of the strange assignments the
GUARDIANS must take. The contaminated land causes changes in the native life forms, making them more violent. As the story progresses, you will be able to equip special items. Though these have no effects on normal
monsters, they are very important. You can add them to the Action Palette.
Goggles
The first equipment against contamination that Ethan obtains. You can also see things you cannot normally distinguish with the naked eye.
Photon Eraser
Equipment used to neutralize fire-type SEED.
Photon Reflector
Equipment used to neutralize ice-type SEED.
BATTLE TYPES
There are three battle types of characters. Each character can change to a Hunter, Ranger or Force. If the battle type is changed, the experiences in your adventure may change.
Type Select Counter
As the story progresses, you will be able to use the facility Type Select Counter. You will be able to change your
battle type here. Though Ethan starts as a Hunter, you can change him to a Ranger who is good at using guns.
Battle Type & Grade of Equipment
Each weapon/armor has a grade (S/A/B/C) and is displayed on the left of the name on the list. Depending on the
battle type, the grade of weapon you can equip varies. You cannot equip a weapon with a grade higher than this.
NETWORK MODE
In NETWORK MODE, you create your original character. And as a member of GUARDIANS, you will explore
the Gurhal System. There you will have your own My Room and Partner Machinery. You can get together and
enjoy adventures in the same world as in STORY MODE with other players. In the adventure, apart from main
Missions, various new missions will be transmitted over the network. You can also enjoy the synthesis of items
using your Partner Machinery which is also available in STORY MODE. Of course, you can also simply chat
with other players.
To play in NETWORK MODE, the following devices and environments are necessary:
• PlayStation®2 computer entertainment system
• PlayStation®2 Network Adaptor compatible with your PlayStation®2
This game is compatible with PlayStation®2 Network Adaptor, sold separately. When using the Network
Adaptor, please also read the instruction manual for it. The SCPH-7000 series PlayStation®2 system has a
built-in Network Adaptor. PlayStation®2 Network Adaptor is not required with this series.
This game is not compatible with a USB Modem.
• Memory card (8MB) (for PlayStation®2)
To play in NETWORK MODE, Your Network Setting file and PSU System File will be created. A minimum of
4191 KB free space is required. Note also that in NETWORK MODE, it is necessary to update the PSU
System File constantly and save it to your Memory Card (8MB) (for PlayStation®2). The file size may
become larger, so please make sure you have extra free space on your Memory Card (8MB) (for
PlayStation®2).
• Broadband Network line
Please verify with the Internet Service Provider (ISP) you are contracted to.
PRECAUTIONS
Upon playing in NETWORK MODE, please be aware of the following. Note that the information printed in
this instruction manual is correct as of October 2006. As it is possible that the specification and condition may
change in the future, make sure to check the Official Site (http://www.sega.com/psu) for the latest information.
• You are required to pay to play the NETWORK MODE. You can use a credit card (VISA, Mastercard) for
your payments.
• For 30 days from your first registration, you may connect online free of charge. After the free service period, you must access the official site to take the necessary procedure in order to continue your network play.
• The network service may end, with notification in advance. Please consent that you may not be able to play
the network play after the end of service.
• The charge for your GUARDIANS License does not include fees for connecting to the internet (ISP fee).
• To play the NETWORK MODE, you must agree to the terms of the End User License Agreement (see p.21).
The End User License Agreement may be subject to change. Please also check the official site for the latest
End User License Agreement.
• The ESRB Rating is based on the content of this product alone, and does not include additional content that
may come from online play.
• In NETWORK MODE, you will play with original character that has no relations with the STORY MODE.
• The game progress and character data will be saved onto the server which is managed by SEGA
Corporation.
SEGA ID AND PASSWORD
To play in NETWORK MODE, you must first register at the official site to have your SEGA ID and Password
issued. The SEGA ID and Password are required to log in to the server (see p.14). You are must have a valid email address, and you will be issued only one SEGA ID/Password per e-mail address.
TRIAL ACCOMPLISHMENT AND REWARD
Within a mission, there are a number of "trials" on which your actions will be evaluated at the end. Note that
there is only one trial per Free Mission.
Reward
In Results Screen, you may be given Meseta and items, according to the evaluation.
Mission Points
Mission Points are given according to the rank the player achieves at the end of the Mission.
About Evaluation
The trial evaluation is based on various points. How many enemies have you defeated? How long did you take
to clear? Have any of your members fallen in the battle? Keep yourself alert for anything, and aim for a higher
evaluation.
10
11
PSUps2MANUAL.qxd
8/28/06
11:24 AM
Page 12
NETWORK SETUP
From the Title Menu, select NETWORK MODE. The NETWORK MODE Menu with the following menu items
will be displayed: CONNECT TO NETWORK, NETWORK SETTING, and RETURN TO TITLE SCREEN. Either
select Return to Title or press the gA button to return to the Title Screen.
Software Keyboard
Select the box for entering ID/Password, press the gS button, and the Software
Keyboard will be displayed (SELECT button during the game to show/hide). Note
that "Keyboard Cursor" is an orange cursor on the Software Keyboard, and "Input
Cursor" is the white cursor on the box you are entering letters.
Controls with the Controller
Directional buttons. Move Keyboard Cursor
button. . . . . . . . . . . Enter letter/command selected by Keyboard Cursor
gD button. . . . . . . . . . . Delete the previous letter on
Input Cursor
gF button. . . . . . . . . . . Enter text and exit
gS
tQ/tE button . . . . Select a letter type
t
R
button. . . . . . . . . Hold and enter text
to display
chat in cut-in.
button. . . . . . . . . Hold and enter text to display
chat in exclamation balloon.
mB button . . . . . . . . . Hold and enter text to display
chat in cloud-shaped balloon.
W
Controls on the Software Keyboard
ESC . . . . . . . . . . . . . . . . Cancel
↑ . . . . . . . . . . . . . . . . . . Bring Input Cursor to the top
of the line
↓ . . . . . . . . . . . . . . . . . . Bring Input Cursor to the end
of the line
←/→ . . . . . . . . . . . . . . Move Input Cursor
forward/back by one
DEL . . . . . . . . . . . . . . . . Delete the letter immediately
after the Input Cursor
BS . . . . . . . . . . . . . . . . . Delete the previous letter on
Input Cursor
SPACE . . . . . . . . . . . . . Enter a single space
OK . . . . . . . . . . . . . . . . Enter text and exit
NETWORK SETTINGS
Next, select Network Setting from the NETWORK MODE Menu. Here you configure network settings for the
broadband environment, and test for connection. When confirmed, select Yes to display Network Settings
Menu, with the following menu items: Add Setting, Edit Setting, Delete Setting, and Test Connection.
Add Setting
If you are configuring for the first time, select Add Setting. Follow the steps A to I to configure network connection.
A. Save Location
First you will select the location to save the network settings. You can save your settings only to the Memory
Card (8MB) (for PlayStation®2) inserted into Memory Card slot 1. Press the gS button.
B. Setting Guide Mode
Follow the on-screen instructions to configure, and press the directional button X to advance to the next
screen.
C. Hardware Settings
Check the device you are using to connect your PlayStation®2 System to the network, and press the directional button X to advance "D. Use of PPPoE." For directions on connecting your device, please refer to the
instruction manual of the network device or the PlayStation®2 System.
Software Keyboard (Network Settings Screens Only)
While in the Network Settings Screens, select a box using the directional button, and
press the gS button to display Software Keyboard dedicated to Network Settings.
Note that "Keyboard Cursor" is a blue cursor on the Software Keyboard, and "Input
Cursor" is the white cursor on the box you are entering letters.
12
←/→ . . . . . . . . . . . . . . Move Input Cursor left/right
Z . . . . . . . . . . . . . . . . . Delete the letter immediately
before the Input Cursor
c (Shift) . . . . . . . . . . . Use uppercase for next one
letter (press again to cancel)
CapsLock . . . . . . . . . . Toggles uppercase/lower
case letters (remains after
each input of a letter)
Space bar . . . . . . . . . Enter a single space
0 . . . . . . . . . . . . . . . . Enter text and exit
? . . . . . . . . . . . . . . . . . . Display Help Screen
D. Use of PPPoE
When confirmed, press the gS button for the settings to connect to your ISP.
Upon connecting to your ISP, if you need to transmit the ID/password for the connection (use PPPoE), select
Required and press the directional button X to advance to the next screen.
If you are using either a broadband router or a mode with a built-in router, with PPPoE settings already configured, select Not Required and press the directional button X to advance.
• If Required is selected, enter ID and password to connect to your ISP. When done, press the directional button X to advance to F. DNS Server Address Setup.
• If Not Required is selected, press the directional button X to advance to E. IP Address Setup.
E. IP Address Setup
If you need to manually enter IP Addresses, select Manual. Otherwise, select Auto.
Also, if you wish to set up DHCP Host Name, press the gD button while selecting Auto, then enter Host Name
in the Details Screen.
• If Auto is selected, press the directional button X to advance to F. DNS Server Address Setup.
• If Manual is selected, based on your broadband environment and the configuration information from your
ISP, enter IP Address/Netmask/Default Router. Use the directional buttons CV to change numerical value,
ZX to change location, and gS button to enter. When all entries have been made, press the directional
button X to advance to "If Manual is selected" of F. DNS Server Address Setup.
F. DNS Server Address Setup
Normally you will select Auto. If you need to manually enter DNS Server Address, select Manual. If the information has not been provided by your ISP, you do not need to specify DNS Server Address.
• If Auto is selected, press the directional button X to advance to G. Name the Setting.
• If Manual is selected, based on information provided by your ISP, enter Primary DNS/Secondary DNS.
Use the directional buttons CV to change numerical value, ZX to change location, and gS button to enter.
When all entries have been made, press the directional button X to advance to G. Name the Setting.
G. Name the Setting
Make a name for the configuration you just created. You can enter any name, but it's a good idea to use
something easily recognizable such as the name of your ISP. When done, press the directional button X to
advance to H. Confirm and Save the Setting.
H. Confirm and Save the Setting
Verify your settings. If everything is in order, press the gS button. The settings will be saved onto the Memory
Card (8MB) (for PlayStation®2). When done, press the gS button to advance to I. End Setting Guide Mode.
I. End Setting Guide Mode
If you wish to test for connection, select Yes. If No is selected, you will return to Network Setting Menu.
Edit Setting
Select a network setting and verify/change setting. The flow after the selection of the Network Setting is the
same as in "Add Setting (p.12)."
Delete Setting
Select a network setting and delete. Follow the on-screen directions to delete.
Test Connection
Select a network setting and press the gS button. You can test to see if the setting is correct and the broadband
connection is done properly.
After the creation/saving of network configuration and Test Connection are complete,
press the gD button. After the confirmation, the game returns to the Title Screen.
Controls with the Controller
Directional buttons. Move Keyboard Cursor
gS button. . . . . . . . . . . Enter letter/command selected on Keyboard Cursor
gF button. . . . . . . . . . . Delete the previous letter on
Input Cursor
gD button. . . . . . . . . . . Enter a single space
Controls on the Software Keyboard
gA button. . . . . . . . . . . Back (exit without change)
tE button. . . . . . . . . Shift key (use upper case)
tW/tR button . . . . Move Input Cursor left/right
SELECT button . . . . . . Change keyboard layout
START button . . . . . . Enter text and exit
13
PSUps2MANUAL.qxd
8/28/06
11:24 AM
Page 14
CONNECT TO NETWORK
CREATE CHARACTER/BEGIN PLAY
From the Network Menu Screen, select CONNECT TO NETWORK.
Here you will create a character that you will use in NETWORK MODE. You can create up to four characters,
and the items can be shared between your characters through the Community Box (p.17).
Select Network Setting
Select a network setting. The name of currently selected setting will be displayed at the top of the screen, and
the setting at the bottom. To confirm, press the gS button.
Downloading PSU System File
After the DNAS certification, the current version will be checked. If necessary, the updated PSU System File will
be downloaded to your Memory Card (8MB) (for PlayStaion®2). Please be aware that downloading may
take time. If a new PSU System File is downloaded, this software will restart the system and return to the Title
Screen. Keep the Memory Card (8MB) (for PlayStation®2) inserted, and reselect NETWORK MODE to
advance to CONNECT TO NETWORK.
Note that at the bottom right of the screen, the version number of PSU System File will be displayed to verify
the update condition.
Loading PSU System File
PSU System File will be loaded automatically when you start this game up. After downloading, start the game up
with the Memory Card (8MB) (for PlayStation®2) containing PSU System File inserted into Memory Card Slot 1.
Create a Character
You have four selectable character spaces, one for each character. In the beginning,
all spaces are blank, so select any space. The next time you connect and play, select
a character to use from this screen. You can also delete a character and recreate
anew.
Please be cautious, as once a character is deleted, all data relating to the deleted character will be lost completely.
How to Create
You can select a race, sex, face, body, clothes, voice, and name for your character. Use the directional button
CV to select a category, and ZX to change type. When done, select Next setting to advance to the next
screen. Where it is applicable, select Return to return to the previous screen. Also, during the character creation, use the right analog stick CV to zoom the character in/out, and ZX to rotate left/right.
Race and Sex
You can select from four races and two sexes. Please see information below for notes on races.
Entering ID/Password
Face and Body
You can select each part of your face, body suit, skin color, and proportions. Depending on the part, you
can make adjustments on shape or color, using the left analog stick.
You will be asked to enter your Game ID and Password. Use the directional buttons
to select the box to enter, and press the gS button. Enter your Game ID and
Password. When done, select Log in, and press the gS button.
Clothes and Voice
You can select clothes and voice, voice type, and voice pitch. You can listen to the voice by pressing the gF
button.
Character Name
Enter a name for your character. You can use up to 16 letters.
End User License Agreement
End User License Agreement will be displayed. Use the directional buttons CV to change pages, and read
thoroughly. If you agree, press the gS button. If you don't agree with the terms, press the gA button to return to
the Title Screen.
Verify Settings
Verify settings for your character. If the settings are correct, select Done and press the gS button to end
Character Create.
Check for Service Connection Period
About Races
The game checks for the Free Trial Period or service period after the Connection Procedure. If the Service
Period is over, a message will be displayed to notify you. If you wish to play the NETWORK MODE, please
visit the official site to purchase a GUARDIANS License. If you are within the service period, you will log in to
the Universe (server), and advance to the Character Select Screen.
Note: The Universe you are logged in to will be assigned automatically. You may move to another Universe
freely during the game (p.16).
Purchasing GUARDIANS License
In order to play Phantasy Star Universe online, you must purchase a GUARDIANS License. Use your PC to
access this website in order to purchase a GUADIANS License.
http://www.sega.com/psu
You must be 18 years old or have a parent sign up for you in order to purchase a GUARDIANS License.
Note: If you do not purchase a new GUARDIANS License and perform the connection procedure within
three months of the expiration of your previous GUARDIANS License, your character data may be deleted
from the server.
14
Humans
Humans have a greater ability to adapt to the environment and have balanced overall abilities.
Newmans
Newmans are created with faster reflexes and
minds, but they lack in physique compared to humans.
CASTs
CASTs are artificial life forms of mechanical origin.
They think logically and move with precision.
Beasts
Beasts have stronger physical abilities and can
transform themselves through "Nano blast."
Begin a Game
When you are finished with your first-ever character creation, you will go to "My Room." Here you can receive
a simple tutorial of the game.
NETWORK MANNERS
•
•
•
•
Avoid a user name or a Party name that may be offensive to other users.
Do NOT make remarks that may be hurtful to other users.
Keep your personal information confidential.
Do NOT reset a game or disconnect a line in the middle of gameplay.
15
PSUps2MANUAL.qxd
8/28/06
11:24 AM
Page 16
STRUCTURE OF NETWORK MODE
The world and structure of NETWORK MODE is basically the same as in STORY MODE. My Room becomes
your base in the game, and you can move freely between the GUARDIANS Colony and three planets. Also,
although you are automatically assigned a Universe at log in, you can move from Universe to Universe freely
in the game.
BEGIN NETWORK MODE
Immediately after the beginning of the NETWORK MODE, you will start from "My Room." After the second
time around, you will either restart from "My Room" or the Lobby where you started the last time.
Moving Between the GUARDIANS Colony and the Planets
From "My Room," you can go to the "Central Table," located on 1F of the GUARDIANS
Colony. As in STORY MODE, you can move between the GUARDIANS Colony and
the planets. If a planet has already been visited, you can go directly from "My
Room," through PPT Spaceport.
Moving Between the Universes
By examining the Universe Transporter located near the center of the map, you can
select "My Room" or the Universe to transport yourself. Please be cautious, as transporting to "My Room" or another Universe has the following effects:
• Exit from a Party you currently belong to.
• Give up current Mission.
• The setting for Set invite block (p.18) becomes Receive invitation.
• Reset Party Setting.
• All Partner Cards, invitation to Party, and exchanged Items which have arrived but
have not yet been received will be lost (simple messages can be received after
the transportation).
NETWORK MODE SCREEN
Except for a few NETWORK MODE-specific displays, it is basically the same as in STORY MODE.
Target Display
When another player's
name is displayed, press the
gS button to open Lock-On
Menu (p.19).
Character Info. Display
Various information, such as
character name will be displayed above the character's head (see below).
Simplified Status
Your Information (character
name, level, Experience
Points Bar, Nano Blast
Gauge and SUV Weapon
Gauge) will be displayed at
the bottom, and your Party
Member information (character name, level, HP) will
be displayed above it. Also,
the small square icon under
the Simplified Status Display
indicates the status of
changeover between Menu
Shortcut and Chat Shortcut.
Universe Number
Display
The Universe Number you
are currently in (except
while in My Room or on the
field).
Verification Icon
This will be displayed whenever you have incoming simple mail/Partner Card/Party invitation/
request for item exchange, or to confirm the
quest board. Press the tW button to enter Icon
Select Mode, select an icon using the directional
button and press the gS button to display shortcut relating to the selected icon.
Character Info. Display
In NETWORK MODE, Character Information will be displayed above each character. By pressing mB button, the displayed content changes: Character Name,
Character Name & Level, Account Number, and no display.
Also, a Photon Fortune Icon will be displayed next to the text. It is said that there will
be a divine protection of some sort, depending on the way it shines, and as it shines
more brightly, higher effects can be expected.
16
MY ROOM
In My Room of the NETWORK MODE, a shop function where you can sell items you either found or synthesized is added. You can also visit other players' rooms and purchase items at their shops.
PARTNER MACHINERY
When you talk to your Partner Machinery for the first time, you can give it a name.
As in STORY MODE, you can deposit items with it, synthesize items, give items, or
have it along with you in your adventure. In NETWORK MODE, however, you can
put prices on deposited items and have it open a shop.
Use storage
You can deposit items and Meseta.
Partner Machinery Function
You can use various functions of Partner Machinery:
Talk, Give item, Synthesize an item, View status, and
Change Name.
Redecorate
By using a "Remodeling Ticket," you can remodel
your My Room. You can purchase a Remodeling
Ticket at the shop for Room Decorations, located on
2F of the GUARDIANS Colony.
Cancel
Return to normal screen.
SHOP
You can open a shop in your My Room, and sell your items to other players. Use the "Remodeling Ticket" to
first remodel your My Room.
Shop Preparation
Give items to your Partner Machinery, and put a price on each item. Whenever another player visits My
Room, the Partner Machinery will function as a shop. When an item is sold, the Meseta obtained will be transferred to your storage.
Visiting Other Player's My Room
To visit another player's My Room, select a destination from Vision Phone functions (see below). Once there,
you can talk to the Partner Machinery to buy items, or view Partner Machinery's status or goods in the Room.
COMMON BOX
Store your items and Meseta in this box, and let your other character(s) use them.
VISION PHONE
The Vision Phone in "My Room" has the following functions:
View information
View latest information on events and system.
Go to room
Using Partner Card, visit other player's My Room.
Search for a shop
Search for a shop, using character name or advertising content.
Recently visited shops
Display a list of shops you have visited recently, and
select to visit again.
View visitor log
View a list of players who visited your My Room.
Help
View Play Guide or glossary.
Return
Return to normal screen.
DRESSING ROOM
Here you can change clothes or parts.
17
PSUps2MANUAL.qxd
8/28/06
11:24 AM
Page 18
NETWORK MODE SPECIFIC MENU ITEMS
NETWORK MODE allows you to play as a race other than human. There are various functions used only in
the NETWORK MODE, such as creating a Party or communicating with others using mail or chat, are added
to the Menu.
Shortcuts
Prepare short text messages and assign them to be able to be displayed quickly using the directional button X.
MAIN MENU: System
Options
MAIN MENU: Player information
If the race of your character is either Beast or CAST, special attacks become possible by reaching a certain
level. Higher-level Beasts can transform using "Nano Blast" and CASTs can utilize special SUV Weapons.
Status
When either Nano Blast or SUV Weapon becomes available, its name will appear on Status Display.
MAIN MENU: Community
This is a menu item related to communication with other players.
Party
Set up Party conditions and rules. Please refer to p.19 for details.
Form Party
You can select this either when you do not belong to any Party or when you are a leader of one. A list of
Partner Cards (see below) will be displayed, so select and invite him/her into your Party. You may not,
however, invite him/her, if he/she already belongs to another Party, if they are not currently connected to
the network, or if they are refusing invitations.
Set Invite Block
You can set this to block invitations from other players.
The option Function key setting becomes available, if you have the USB Keyboard, allowing you to choose
Menu or Chat Shortcut.
Blacklist
You can establish a blockage against a particular person's attempt to communicate with you. Select a
name from Partner Card or Simple Mail to add them to the list. If established, all Party invitations, Partner
Card transmissions, and simple mail from players on the list will be blocked, and no chat messages will be
visible from them. You can also remove a name from the list to lift the blockage (against that player).
Log out
Quit NETWORK MODE and return to the Title Screen. Your game progress and character data in the NETWORK MODE will be saved onto the server from time to time, but your data may be lost if you do not quit
the game properly. Make sure to select Log out when quitting NETWORK MODE.
LOCK-ON MENU
While locking onto other players, press the gS button to display his/her status. This can also be used to make
direct communication.
Invite to Party
If the target player does not belong to any Party, you can form a Party with him/her, or invite him/her to
your Party.
Leave Party
You will exit from the Party you currently belong to.
Send Simple Mail
Send him/her a simple mail.
Leader rights
You can select this either when you do not belong to any Party or when you are a leader of one. You can
perform Abandon Mission, Edit Party Name, Edit comment (displayed on other player's screen when
searched), Party Password (to join your Party), Switch leader, and Remove member.
Send card
Send him/her your Partner Card.
Member Location
You can verify the whereabouts of your Party Members.
Send card / View stats/equip. / Add to blacklist
These are controls related to your Party Members. Please refer to p.19, under Lock-On Menu, for details.
Simple Mail
Trade items
You can trade items or Meseta. Select items to give, and verify contents you are receiving. After confirmation, the items will be traded.
View stats/equip.
View his/her information, such as status, weapons, armor & units equipped, clothes/parts, and Photon Arts.
Add to blacklist
You can add him/her to the list of players you wish to block.
You can exchange a short text with other players.
PARTY
Mail inbox
A list of received mail will be displayed. Select one from the list, and you can either reply or delete it. Upon
replying, you also have an option to quote from the received mail. Note that when there is an incoming
message, a letter-shaped icon will be displayed at the bottom of the screen.
In NETWORK MODE, you form a Party with other players in the city or field to take on various Missions.
Compose mail
You can write a new message and send it. Write text and select recipient(s) to receive it. You can send one
message to multiple players.
A Party can consist of up to six players. There must be a leader in a Party to guide and administer other members. Also, the leader accepts or declines Missions. In the beginning, the player who created the Party
becomes the leader, but the leader can also be changed.
Partner Card
This card records your profile and comments, and also appears in STORY MODE. By exchanging these
cards with other players, it becomes easier to communicate, such as inviting them to your Party or sending
a simple message.
Partner Card list
View a list of cards you received from other players. From the list, you can verify if each player currently
belongs to a Party or if they are currently connected to the network. When you select a card, you have
options to Add Comments (write comments on the card you received), Sort priority (allocate priority number for list display), and Delete card.
Edit your card
You can add comments to your card.
LEADER AND MEMBERS
FORMING A PARTY
You can form a Party in the following ways. Note that you cannot form a Party when you're inside your barracks.
Form a Party from Main Menu
You become a leader and select players to invite from the Partner Cards.
Invite to Party from Lock-on Menu
Lock-on to the player nearby and invite him/her to your Party.
Join other Party at Mission Counter
Go to Mission Counter and join a Party whose mission is already in progress.
LEAVING/REMOVAL OF PARTY MEMBER
The Party Member (and its leader) can exit a Party freely. Also, the leader has the authority to remove a
Party Member whose actions are becoming an annoyance to other members. Note that once a member
moves to one of the other servers, he will automatically exit the Party.
18
19
PSUps2MANUAL.qxd
8/28/06
11:24 AM
Page 20
MISSIONS
CREDITS
As in STORY MODE, there are two types of Missions: Main Mission and Free Mission. In general, Main
Missions start from the GUARDIANS Branch, and Free Missions from the Flyer Base Mission Counter.
The following credits list the staff responsible for the localization and marketing for the North American release
of Phantasy Star Universe. See in-game credits for the complete list of the development staff.
STARTING YOUR MISSION
At Mission Counter, the Party Leader selects, changes, and decides the Mission, and changes Party Settings.
Depending on the Mission, there are cases where new members can join a Party whose Mission is already in
progress, while other Missions require that all members be present in order to start.
Sega of America
NEW FEATURES IN THE NETWORK MODE
Check Point
There are Check Points throughout the Missions which will light up upon contact. Once touched, you can transport to other Check Points that your Party Members have already touched.
Interval Lobbies
Some Missions have Interval Lobbies where you can rest. No monsters appear here, so your Party Members
can safely have conversations or check their Equipment.
CHAT & LOBBY ACTIONS
Chatting is a useful method of communication with other players. During the battle, using Chat Shortcut will
simplify the controls. Also, there are special character action commands called Lobby Actions.
Press the SELECT button to bring up the Software Keyboard. Enter message, and select OK to display the message.
Upon finalizing your input, select OK while holding down tR button to display a list of cut-ins. Use the directional buttons ZX to select expression, CV to select camera position, and press the gS button to display your
chat message as a cut-in. Likewise, hold down tW or mB button (instead of tR button) to display your chat
message in an exclamation balloon or cloud-shaped balloon.
Also, press the directional button X to display Chat Shortcut. Use the directional buttons CV to select a shortcut, then X to display the chat message you set up in Shortcut Setting (p.19). Press the directional button Z to
cancel Chat Shortcut.
CHAT TYPES
There are two types of chat: Public Chat (chat in the City and will be heard by all nearby players) and Party
Chat (chat in the field, and can be heard only by the Party Members). You can view the log for each.
CEO
Naoya Tsurumi
President
Simon Jeffery
VP of Product Development
Dave Cobb
Associate Producer
Jason Kuo
VP of Marketing
Scott Steinberg
Director of Marketing
Don Mesa
Product Manager
Ben Harrison
Public Relations Manager
Jennie Sue
Creative Services Manager
Jen Groeling
Senior Content Writer
Bridget Oates
Tester(s)
Anthony Banks
Orville Bongat
John Bonyhard
Mike Castillo
Tristan Corbett
Trent Dieke
Tim Erbil
Matt Girard
Alice Grunstra
Jamil Hale
Jake Holub
Nick Makovkin
Ken Nacua
Chris Peterson
Seneca Roux
Mike Silva
Kyle Uberman
Omar Woodly
Compliancy QA
Stephen Akana (Lead)
Steve Flemming
Joe Floyd
Jason Mahar
Lawrence Mann (Assistant Lead)
Special Thanks
Beejey Enriquez
Rey Buzon
Andrew Byrne
Rhianna Kellom
Production Specialist
Heather Lucchetti
LOBBY ACTIONS
Anywhere in the lobby you can make your character perform special actions. Press the gF button to open the
Lobby Action Menu. Use the directional button to select an action, and press the gS button to execute. The
Lobby Action Menu can be cancelled with gA button.
Web Development
Julian Mehlfeld
Chris Olson
Network Engineers
David Fung
Masahiro Sato
QA Manager
Deni Skeens
QA Supervisor
Josh Morton
QA Lead
Demetrius Griffin
QA Assistant Lead
Mabel Chung
20
21
PSUps2MANUAL.qxd
8/28/06
11:24 AM
NOTES
22
Page 22
NOTES
23
PSUps2MANUAL.qxd
8/28/06
11:24 AM
Page 24
LIMITED WARRANTY:
NOTES
SEGA of America, Inc. warrants to the original consumer purchaser that the game disc or cartridge shall be free from defects
in material and workmanship for a period of 90-days from the original date of purchase. If a defect covered by this limited
warranty occurs during this 90-day warranty period, the defective game disc or cartridge will be replaced free of charge.
This limited warranty does not apply if the defects have been caused by negligence, accident, unreasonable use, modification,
tampering, or any other causes not related to defective materials or manufacturing workmanship. This limited warranty does
not apply to used software or to software acquired through private transactions between individuals or purchased from online
auction sites. Please retain the original, or a photocopy, of your dated sales receipt to establish the date of purchase for
in-warranty replacement. For replacement, return the product, with its original packaging and receipt, to the retailer from which
the software was originally purchased. In the event that you cannot obtain a replacement from the retailer, please contact Sega
to obtain support.
Obtaining technical support/service
To receive additional support, including troubleshooting assistance, please contact Sega at:
• Website: www.sega.com/support
• E-mail: [email protected]
• Telephone: 1-800-USA-SEGA
LIMITATIONS ON WARRANTY
ANY APPLICABLE IMPLIED WARRANTIES, INCLUDING WARRANTIES OF MERCHANTABILITY AND FITNESS FOR A
PARTICULAR PURPOSE, ARE HEREBY LIMITED TO 90 DAYS FROM THE DATE OF PURCHASE AND ARE SUBJECT TO THE
CONDITIONS SET FORTH HEREIN. IN NO EVENT SHALL SEGA OF AMERICA, INC., BE LIABLE FOR CONSEQUENTIAL OR
INCIDENTAL DAMAGES RESULTING FROM THE BREACH OF ANY EXPRESS OR IMPLIED WARRANTIES. THE PROVISIONS OF
THIS LIMITED WARRANTY ARE VALID IN THE UNITED STATES AND CANADA ONLY. SOME STATES DO NOT ALLOW
LIMITATIONS ON HOW LONG AN IMPLIED WARRANTY LASTS, OR EXCLUSION OF CONSEQUENTIAL OR INCIDENTAL
DAMAGES, SO THE ABOVE LIMITATION OR EXCLUSION MAY NOT APPLY TO YOU. THIS WARRANTY PROVIDES YOU WITH
SPECIFIC LEGAL RIGHTS. YOU MAY HAVE OTHER RIGHTS THAT VARY FROM STATE TO STATE.
To register this product, please go to www.sega.com
RSA BSAFE® SSL-C and Crypto-C software from RSA Security Inc. have been installed. RSA is a registered
trademark of RSA Security Inc. BSAFE is a registered trademark of RSA Security Inc. in the United States and
other countries. RSA Security Inc. All rights reserved.
This software uses "DNAS" (Dynamic Network Authentification System), a proprietary authentification system
created by Sony Computer Entertainment Inc. to provide security and to help protect copyrighted content. The
unauthorized transfer, exhibition, export, import or transmission of programs and devices circumventing its
authentification scheme may be prohibited by law. For additional information, see
www.us.playstation.com/DNAS.
Contains MatrixSSL™ security software licensed from PeerSec Networks Inc. http://www.peersec.com
SEGA is registered in the U.S. Patent and Trademark Office. SEGA, the SEGA logo and Phantasy Star Universe
are registered trademarks or trademarks of SEGA Corporation. © SEGA. All Rights Reserved. This game is
licensed for use with PlayStation®2 only. Copying and/or transmission of this game is strictly prohibited. The
typefaces included herein are solely developed by DynaComware.
24