1
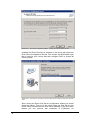
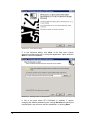
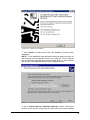
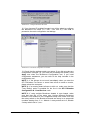
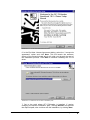
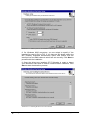
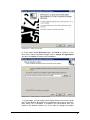
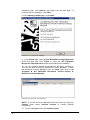
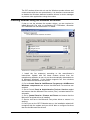
GFI FAXmaker 14 for Exchange/Lotus/SMTP Fax device installation manual By GFI Software Ltd http://www.gfi.com E-mail: [email protected] Information in this document is subject to change without notice. Companies, names, and data used in examples herein are fictitious unless otherwise noted. No part of this document may be reproduced or transmitted in any form or by any means, electronic or mechanical, for any purpose, without the express written permission of GFI Software Ltd. GFI FAXmaker is copyright of GFI SOFTWARE LTD 1995-2009 GFI Software. All rights reserved. GFI FAXmaker is a registered trademark and GFI Software Ltd. and the GFI logo are trademarks of GFI Software Ltd. in the Europe, the United States and other countries. Version 14.0 - Last updated: 1 March 2010 Document Version – FAX-DI-EN-1.00.003 Contents Installing fax devices 3 Which fax devices to use with GFI FAXmaker? ............................................................. 3 Installing an Eicon Diva Server ISDN Adapter ............................................................... 3 Installing a Brooktrout Fax Board ................................................................................... 5 Brooktrout TR1034 or Trufax ISDN cards ......................................................... 5 If using a Brooktrout TR114 or Trufax analog card: ........................................ 10 Troubleshooting Brooktrout cards ................................................................... 13 Installing the Brooktrout SR140 (FoIP) ........................................................................ 13 Installing a Brooktrout SR140 card ................................................................. 13 Installing XCAPI ........................................................................................................... 21 Installing fax modems or multi port fax boards ............................................................ 22 Installing modems using the GFI modem drivers......................................................... 22 Installing modems using the windows fax drivers ........................................................ 23 Troubleshooting 25 Introduction................................................................................................................... 25 Knowledge Base .......................................................................................................... 25 Web Forum .................................................................................................................. 25 Request technical support ............................................................................................ 25 Build notifications ......................................................................................................... 26 Index GFI FAXmaker 14 for Exchange/Lotus/SMTP 27 Contents i Installing fax devices Which fax devices to use with GFI FAXmaker? GFI FAXmaker can use many fax devices, including modems. GFI however highly recommends investing in a professional fax server device such as a Brooktrout TR 114, TR 1034 or Trufax fax board, an EICON DIVA PRO/SERVER ISDN fax card or an AVM B1 ISDN fax card. These devices are far superior to a modem or multi-port modem in terms of reliability and transmission speed. Modems can be unreliable, requiring regular resets, and are frequently not compatible with all fax machines; this often results in failed faxes. The chipset used is an important factor; however, since modem manufacturers constantly change chipsets it is difficult to recommend a particular model or brand. In terms of cost, a Brooktrout Trufax, EICON or AVM card is relatively inexpensive: only marginally more expensive than using 2 modems. Depending on what card you choose, you also get more fax features for example, inbound routing or faster 33.6 faxing. The slight increase in cost is easily justified in terms of reliability and reduced administration! For the most up to date list of supported fax devices, refer to: http://kbase.gfi.com/showarticle.asp?id=KBID001220. Installing an Eicon Diva Server ISDN Adapter The Eicon Diva Server Adapter should be installed into the server as per the installation instructions provided with the card. The list of currently supported EICON cards is available online at http://kbase.gfi.com/showarticle.asp?id=KBID001220UTH. The latest drivers, installation guides and support for the Eicon product range is available from the Eicon website at http://www.eicon.com. NOTE: Current Eicon adapters are Universal PCI (3.3/5 volts), however always check the technical details of the adapter to make sure the adapter is suitable for the server hardware. GFI FAXmaker uses CAPI (Common ISDN Application Programming Interface – www.capi.org) to interface with supported EICON (&AVM) ISDN cards. CAPI support is provided by installing the Eicon Diva Server software and drivers. GFI FAXmaker 14 for Exchange/Lotus/SMTP Installing fax devices 3 Screenshot 1 - Diva Server Configuration Wizard: - Configuring CAPI to answer all calls. Installing the Eicon Diva Server software on the server will launch the Diva Server Configuration Wizard. First choose the ISDN switch type that is used by your country and then configure CAPI to „Accept all incoming calls‟. Screenshot 2 - Diva Server Line Check: Test the ISDN service using this utility from the start menu. After running the Eicon Diva Server Configuration wizard you should restart the server. Then run a line check using the Diva Server Line Check utility included with the Diva Server software. If the line check passes you can continue with installation of FAXmaker. An 4 Installing fax devices GFI FAXmaker 14 for Exchange/Lotus/SMTP unsuccessful line check will return an error code which can be referenced on the Eicon technical support website for the cause and a list of possible solutions. NOTE: You can use the Eicon Diva Server Configuration Manager utility to setup advanced configurations such as sharing the Eicon Adapter between FAXmaker and Routing and Remote Access for dialup access. For further information on this consult the Eicon documentation. Installing a Brooktrout Fax Board The list of currently supported Brooktrout cards is available from http://kbase.gfi.com/showarticle.asp?id=KBID001227. Installation guides, product documentation and support are available from the Dialogic Technology website at http://www.dialogic.com/default.htm. NOTE 1: The current Brooktrout boards are Universal PCI (3.3/5 volts); however always check the technical details of the adapter to make sure it is suitable for the server hardware. Old TR114 Boards can only be installed in 5v slots. NOTE 2: You must always install GFI FAXmaker software before installing Brooktrout or Trufax drivers. For more information refer to the „Installing GFI FAXmaker‟ chapter in the user manual. NOTE 3: Ensure that the correct Brooktrout card driver is installed. For more information on Brooktrout drivers refer to http://kbase.gfi.com/showarticle.asp?id=KBID001228. Brooktrout TR1034 or Trufax ISDN cards The Brooktrout TR1034 cards are the latest fax cards from Dialogic Technology. To install the card: 1. Switch off the computer where you want to install the Brooktrout Fax card. Plug in the card following the instructions supplied with the hardware. 2. Restart the computer. Ignore any „Add New Hardware‟ wizard dialog by pressing Cancel. 3. Navigate to <GFI installation folder>\brooktrout\ 4. Double click the executable file brooktrout_tr1034.exe. GFI FAXmaker 14 for Exchange/Lotus/SMTP Installing fax devices 5 Screenshot 3 – Setup welcome-dialog 5. In the Welcome dialog, click Next. In the End User License Agreement dialog select the “I accept the agreement” option and click Next to continue installation. Screenshot 4 - Selecting location of TR1034 drivers 6. Set to the path where GFI FAXmaker is installed. If require changing the default installation path, clicking Browse and specify the required path; else continue with the installation, by clicking Next. 6 Installing fax devices GFI FAXmaker 14 for Exchange/Lotus/SMTP Screenshot 5 - Finalize driver installation 7. Click Install to install drivers and click Finish to finalize driver installation. NOTE: If the installation has detected existing Brooktrout drivers on the computer, you are asked to reboot your computer. This is required just in case the mentioned drivers where being used (i.e. were locked) and could not be replaced with the newly installed drivers. Screenshot 6 - Add New Hardware wizard: Search and install options dialog 8. Go to Control Panel ► Add New Hardware. Select „Include this location in the search’ and provide the path where you have installed GFI FAXmaker 14 for Exchange/Lotus/SMTP Installing fax devices 7 the Brooktrout TR1034 drivers. If you have opted to install the drivers in the default path, you should find these drivers in the same path where GFI FAXmaker is installed; else you should specify the same location that you have used in step 6 of this installation. Screenshot 7 - Confirm installation of unsigned drivers 9. Confirm the installation of uncertified drivers. Click Yes to proceed and install the new hardware. 10. Go to Start ► All Programs ► GFI FAXmaker Brooktrout TR1034 Drivers ► Brooktrout Configuration Tool. Screenshot 8 - Configuration tool preferences dialog 11. Click Next and confirm the file paths. Click OK to proceed with setup. 8 Installing fax devices GFI FAXmaker 14 for Exchange/Lotus/SMTP Screenshot 9 – Configure Brooktrout SIP stack 12. If you have an IP enabled fax card, you will be asked to configure the Brooktrout SIP stack (i.e. FOIP - Fax over IP). Click Yes to proceed to the main configuration tool dialogs. Screenshot 10 - Brooktrout configuration tool window 13. Check that the settings match your setup. If you did not make any configuration changes (i.e. you have left all settings as default), click Apply and close the Brooktrout Configuration tool. If you need configuration assistance, you can refer to the help included in the configuration tool. NOTE 1: If the drivers do not work immediately when you start the GFI FAXmaker Fax Server or some lines refuse to send or receive, please reboot the computer. NOTE 2: If an analog board refuses to dial out, make sure that the 'Tone Dialing' option is enabled for the line in the GFI FAXmaker Configuration ► Lines/Devices node. NOTE 3: If using multiple Brooktrout boards in one chassis, make sure that they are of the same type. Having different Brooktrout boards in one chassis is not a supported setup. Also make sure that the rotary switch on the Brooktrout boards are setup in as sequential numbers starting from 2. I.e.: Module 1 rotary switch set to 2, Module 2 rotary switch set to 3, etc... GFI FAXmaker 14 for Exchange/Lotus/SMTP Installing fax devices 9 If using a Brooktrout TR114 or Trufax analog card: 1. Switch off the computer where you want to install the Brooktrout Fax card. Plug in the card following the instructions supplied with this hardware. 2. Restart computer. Ignore any „Add New Hardware’ wizard dialogs by pressing Cancel. 3. Navigate to <GFI installation folder>\brooktrout\ 4. Double click the executable file brooktrout_tr114.exe. Screenshot 11- Brooktrout driver setup: Welcome dialog 5. The Brooktrout driver setup will start by displaying the welcome dialog. Click Next to proceed with installation. 10 Installing fax devices GFI FAXmaker 14 for Exchange/Lotus/SMTP Screenshot 12 - The second wizard welcome screen 6. In the End User License Agreement dialog, select the “I accept the agreement” option and click Next. This will launch the welcome screen of the second wizard which will guide you through the rest of the installation process. Click Next to continue installing the TR114 driver. Screenshot 13 - Define the TR114 driver's installation path 7. Set to the path where GFI FAXmaker is installed. If require changing the default installation path, clicking Browse and provide the required path; else continue with the installation, by clicking Next. GFI FAXmaker 14 for Exchange/Lotus/SMTP Installing fax devices 11 Screenshot 14 – Define if your Fax card interface is PCI or ISA 8. On Windows 2000 computers, you are asked to specify if the installed fax card is ISA or PCI. If you have an ISA board, select the ISA (Industry Standard Architecture) option and ensure that the Interrupt line and DMA channel values are set correctly. Click Next to proceed with the installation. 9. Once the drivers are installed, GFI FAXmaker is ready to detect your Brooktrout card and its relative communication channels. Click Start to start the detection process. Screenshot 15 - Detecting Brooktrout card and channels 12 Installing fax devices GFI FAXmaker 14 for Exchange/Lotus/SMTP NOTE: If an error occurs or no channels are detected, click Back to retry and launch again the detection process. If the problem persists, refer to the „Troubleshooting Brooktrout Cards‟ section. 10. On completing the card detection process, click Next and Finish to finalize the Brooktrout driver installation. Troubleshooting Brooktrout cards To troubleshoot any hardware installation issues, download the Brooktrout diagnostics software from Dialogic Technology and ensure the card is installed properly. If the card is not recognized or not running, contact Dialogic Technology technical support. Screenshot 16 - Brooktrout diagnostics software NOTE: Dialogic Technology technical support might inquire about the SDK/API version that the GFI FAXmaker TR 114 drivers use. This is BFV 4.3 SDK/API. Installing the Brooktrout SR140 (FoIP) The list of currently supported Brooktrout cards is available from http://kbase.gfi.com/showarticle.asp?id=KBID001227. Installation guides, product documentation and support are available from the Dialogic Technology website at http://www.dialogic.com/default.htm NOTE: The current Brooktrout boards are Universal PCI (3.3/5 volts); however always check the technical details of the adapter to make sure it is suitable for the server hardware. Old TR114 Boards can only be installed in 5v slots. Installing a Brooktrout SR140 card The Brooktrout SR140 is a software-only Fax over IP (FoIP) solution from Dialogic Technology. To install the Brooktrout SR140 follow these steps: GFI FAXmaker 14 for Exchange/Lotus/SMTP Installing fax devices 13 1. Click on Start ► FAXmaker 14 ► FAXmaker Configuration Wizard. 2. In the Welcome page, click Next to continue. The wizard will stop the GFI FAXmaker Fax Server Service and the GFI FAXmaker Message Transfer Agent Service. Click Next to continue once the services are both stopped. Screenshot 17 - Selecting the Brooktrout SR140 driver 3. Click on Brooktrout by Dialogic and select Brooktrout SR140 Software Fax over IP. Click Next to continue. Screenshot 18 - Click Yes to launch the FAXmaker Brooktrout driver setup 4. The wizard will ask you whether you want to run the FAXmaker Brooktrout TR1034 (Boston) / SR140 driver setup. Click YES to start the driver setup wizard. NOTE: The Brooktrout TR1034 (Boston) / SR140 driver setup contains drivers that are made by Dialogic Technology, however Dialogic Technology relies on vendors to distribute them. 5. Setup will start by checking if there is any Brooktrout software already installed on the machine. Should it be the case, uninstall any existing Brooktrout software using the Add/remove programs from the Control Panel. After all Brooktrout software has been uninstalled, restart the Brooktrout setup again. 14 Installing fax devices GFI FAXmaker 14 for Exchange/Lotus/SMTP Screenshot 19 – Setup welcome page 6. In the setup wizard Welcome page, click Next to continue. In the End User License Agreement page, click I accept the agreement and then click Next to continue the installation. Screenshot 20 - Selecting location of TR1034 drivers 7. At this stage, you can specify the location where you want to install the TR1034 drivers. By default, the installation path is set to the same path where GFI FAXmaker is installed. We recommend that you install to this default location, but if you want to change the default GFI FAXmaker 14 for Exchange/Lotus/SMTP Installing fax devices 15 installation path, click Browse and specify the required path. To continue with the installation, click Next. 8. In the Ready to Install page, click Install. Screenshot 21 - Finalize driver installation 9. In the Finish page, clear the Run Brooktrout configuration tool check box and then click Finish to close the GFI FAXmaker Brooktrout TR1034 Drivers wizard and complete the installation. 10. You now need to activate the Brooktrout SR140 by licensing it. This can be done through the Brooktrout License Manager. To start the Brooktrout License Manager, from the Start menu click on All Programs ► GFI FAXmaker Brooktrout TR1034 Drivers ► Brooktrout License Manager. Screenshot 22 - Brooktrout License Manager NOTE: If you do not have a Brooktrout SR140 license yet, from the License menu select Activate License to contact Dialogic Technology. 11. From the License menu click Install License. 16 Installing fax devices GFI FAXmaker 14 for Exchange/Lotus/SMTP Screenshot 23 - Selecting the license file 12. From the Specify License File dialog box, select the *.lic file provided by Dialogic Technology and click Open. 13. The Brooktrout License Manager will display the details of the license key you provided. To close the Brooktrout License Manager click Exit from the License menu. NOTE: To use the Brooktrout SR140 (FoIP) software, you must have both a license from Dialogic Technology, activated as outlined in steps 10 to 13 above, as well as a GFI FAXmaker license key that is enabled for Brooktrout SR140 usage from GFI. To obtain an SR140 usage license from GFI, please contact GFI sales at [email protected]. 14. To determine whether you have a valid SR140 usage license both from Dialogic Technology and GFI, from the Start menu click on All Programs ► GFI FAXmaker Brooktrout TR1034 Drivers ► FAXmaker Brooktrout Configuration GUI. Screenshot 24 – Brooktrout SR140 licensed from Dialogic Technology but not from GFI Screenshot 25 – No Dialogic Technology license is available for the Brooktrout SR140 GFI FAXmaker 14 for Exchange/Lotus/SMTP Installing fax devices 17 Screenshot 26 – SR140 licensing status: Dialogic Technology and GFI license activated 15. You now need to configure the Brooktrout SR140 settings from the Brooktrout Configuration Tool. To start the Brooktrout configuration tool, from the Start menu click on All Programs ► GFI FAXmaker Brooktrout TR1034 Drivers ► Brooktrout Configuration Tool. 18 Installing fax devices GFI FAXmaker 14 for Exchange/Lotus/SMTP Screenshot 27 - Brooktrout configuration tool 16. From the Brooktrout Configuration Tool check that the settings match your setup. If you need configuration assistance, you can refer to the help included in the configuration tool. Click on the Apply icon in the toolbar and then close the Brooktrout Configuration Tool. Screenshot 28 - Configure lines from the FAXmaker Configuration Wizard 17. Now that you have installed the GFI FAXmaker Brooktrout TR1034 Drivers, specified your license file and configured the Brooktrout SR140 from the Brooktrout Configuration Tool, you need to configure the GFI FAXmaker lines that will be associated with the Brooktrout SR140 (FoIP). To do so, from the FAXmaker Configuration Wizard click Configure lines. For more information GFI FAXmaker 14 for Exchange/Lotus/SMTP Installing fax devices 19 on how to configure GFI FAXmaker lines, refer to the „Setting up fax lines for the Brooktrout SR140‟ in the „Configuring Fax lines‟ chapter. 18. Continue the FAXmaker Configuration Wizard to start the GFI FAXmaker Fax Server Service and the GFI FAXmaker Message Transfer Agent Service. On the Finish page, click Finish to close and complete the FAXmaker Configuration Wizard. NOTE: If the drivers do not work immediately when you start the GFI FAXmaker Fax Server or some lines refuse to send or receive, please reboot the machine. 20 Installing fax devices GFI FAXmaker 14 for Exchange/Lotus/SMTP Installing XCAPI XCAPI is a software-only Fax over IP (FoIP) solution from TESYSTEMS. This section information explains how to install XCAPI on your GFI FAXmaker server XCAPI needs to be purchased and downloaded directly from TESYSTEMS. More information can be found on the TE-SYSTEMS website http://www.te-systems.de/. The XCAPI software should be installed into the server as per the installation instructions provided with the card. Installation instructions are provided once XCAPI is downloaded. Screenshot 29 – XCAPI configuration 1. Open the XCAPI Configuration and click on Click here to add a controller link under the Controller section. 2. From the Controller Wizard select Add Voice-over-IP controller (VoIP) and click Next. Screenshot 30 - Add a new controller 3. Select the appropriate Network Interface Card on which GFI FAXmaker can to communicate with your VoIP Gateway. 4. Select your appropriate VoIP gateway which will be used to send and receive faxes. If the list included in XCAPI does not contain your PBX, you should select a compatible or one of the generic environments such as „H.323 Gateway‟ or „SIP‟ GFI FAXmaker 14 for Exchange/Lotus/SMTP Installing fax devices 21 Screenshot 31 - Define VoIP gateway properties 5. Depending on the VoIP gateway selected, define the properties of the VoIP gateway. Typically this consists of the IP address of the VoIP gateway and any authentication settings required by your VoIP gateway. Click Next to continue setup. 6. Key in a meaningful description of the newly created controller and decide how many channels should be available for GFI FAXmaker. 7. Click Next and Finish to finalize settings. Installing fax modems or multi port fax boards If you are planning to use a fax modem for faxing, you can choose to use either the GFI fax modem drivers or the fax modem drivers included in Windows 2000/2003. It mainly depends on the modem that you are using and which driver will work best. For some modems, the Windows 2000/2003 modem drivers might work better since GFI cannot offer you such a wide range of modem support as Microsoft can. If you require DTMF routing and plan to use modems (not recommended) then you must use the GFI modem drivers. In general, GFI recommends trying both drivers with your modem and choosing the driver that works best. NOTE 1: The Microsoft Fax modem drivers have wider modem support and 2D faxing, which can give faster fax transmission to some fax machines. You can have a maximum of 2 fax lines using Windows 2000 fax drivers and a maximum of 4 fax lines using Windows 2003 fax drivers! Windows XP only supports 1 fax line. NOTE 2: For reliability ensure that you implement a high quality modem solution. Installing modems using the GFI modem drivers Installing a modem using GFI drivers implies just plugging in the modem. No further modem configuration is required since all configuration is done from within the GFI FAXmaker configuration. 22 Installing fax devices GFI FAXmaker 14 for Exchange/Lotus/SMTP The GFI modem drivers do not use the Windows modem drivers and communicate with the com ports directly. It is therefore recommended to disable the Windows detected modems drivers in device manager to prevent other applications using the modem. Installing modems using the windows fax drivers If plan to use the windows fax modem drivers, you are required to install Microsoft Fax prior to configuring GFI FAXmaker, otherwise GFI FAXmaker will not detect them. To install: Screenshot 32 - Installing Fax Services 1. Install the fax modem(s) according to the manufacturer‟s instructions. Update with the latest modem drivers from the manufacturer website; do not rely on the automatically detected driver of Microsoft Windows! If the modem supports fax, then windows should install the Microsoft fax service. 2. Go to Control Panel ► Add/Remove Programs ► Add/Remove Windows components and ensure that Microsoft Fax services are enabled. 3. Go to Control Panel ► Administrative Tools ► Services applet and ensure that the Microsoft Fax service („Fax‟) is started and set to automatic. 4. Go to Control Panel ► Printers and Faxes and ensure that the Microsoft Fax printer driver is installed. 5. Send a test fax to the Microsoft Fax printer driver to ensure it is working. 6. Once you run the GFI FAXmaker set-up, the installation wizard will recognize this fax modem and you will be able to configure fax lines that use the Microsoft fax drivers. GFI FAXmaker 14 for Exchange/Lotus/SMTP Installing fax devices 23 Troubleshooting Introduction The troubleshooting chapter explains how you should go about resolving any software issues that you might encounter. The main sources of information available to users are: The manual – most issues can be solved by reading this manual. GFI Knowledge Base articles Web forum Contacting GFI Technical Support Knowledge Base GFI maintains a Knowledge Base, which includes answers to the most common problems. If you have a problem, please consult the Knowledge Base first. The Knowledge Base always has the most upto-date listing of technical support questions and patches. To access the Knowledge Base, visit http://kbase.gfi.com/. Web Forum User to user technical support is available via the web forum. The forum can be found at: http://forums.gfi.com/. Request technical support If you have referred to this manual and our Knowledge Base articles, and you still cannot solve issues with the software, contact the GFI Technical Support team by filling in an online support request form or by phone. Online: Fill out the support request form on: http://support.gfi.com/supportrequestform.asp. Follow the instructions on this page closely to submit your support request. Phone: To obtain the correct technical support phone number for your region please visit: http://www.gfi.com/company/contact.htm. NOTE: Before you contact our Technical Support team, please have your Customer ID available. Your Customer ID is the online account number that is assigned to you when you first register your license keys in our Customer Area at: http://customers.gfi.com. We will answer your query within 24 hours or less, depending on your time zone. GFI FAXmaker 14 for Exchange/Lotus/SMTP Troubleshooting 25 Build notifications We strongly suggest that you subscribe to our build notifications list. This way, you will be immediately notified about new product builds. To subscribe to our build notifications, visit: http://www.gfi.com/pages/productmailing.htm. 26 Troubleshooting GFI FAXmaker 14 for Exchange/Lotus/SMTP Index B Brooktrout diagnostics 13 Brooktrout SR140 13 Brooktrout TR1034 5 Brooktrout TR114 10 E Eicon 3 F fax modems 22 FoIP 13 M multi port fax boards 22 T Troubleshooting 25 Trufax analog 10 Trufax ISDN 5 W windows fax drivers See, See X XCAPI 21 GFI FAXmaker 14 for Exchange/Lotus/SMTP Index 27