1
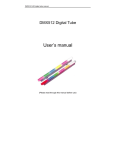
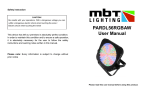
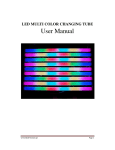
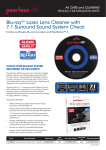
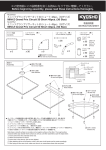
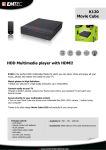
Color V-Tube Controller
TABLE OF CONTENTS
1. Safety Instructions
2. Technical Specifications
3. Overview
3.1 Front View
3.2 Rear View
4. How to Set the Unit
4.1 Main Function
5. DMX512 Configuration
6. Installation
7. Fixture Cleaning
User Manual
Please read these instructions carefully before use
1-
1. Safety Introductions
3. Overview
Please read the instructions carefully which includes important
3.1 Front View
information about the installation, operation and maintenance.
WARNING
Please keep this user manual for future consultation.
Unpack and check carefully there is no transportation damage before using the fixture.
Ensure the voltage and frequency of power supply match the power requirements.
It’s important to ground the yellow/green conductor to earth in order to avoid electric
shock.
Disconnect main power before service and maintenance.
Maximum ambient temperature is Ta : 40℃. Don’t operate it where the temperature is
higher than this.
Stop using the fixture immediately when malfunction. Never try to repair the fixture by
yourself. Please contact the nearest authorized technical assistance center.
Do not touch any wire during operation and there might be a hazard of electric shock.
There are no user serviceable parts inside the fixture.
2. Technical Specifications
1. ON/OFF
Turn on/off the power
2. MENU
Select the programming functions
3. DOWN
Go backward in the selected functions
4. UP
Go forward in the selected functions
5. ENTER
Confirm the selected functions
¥ Power supply
AC: 120V 60Hz or 230V/240V/250V 50/60Hz
3.2 Rear View
Power consumption:15 Watts
¥ LED
Total 144pcs, (Red 48pcs, Green 48pcs, Blue 48pcs)
¥ Dimension:153 × 95 × 52 mm
¥ Weight:3 kg
2-
1. DC INPUT
DC 9V-12V, 300mA min.
2. SINGLE OUTPUT
Output DC 24V 300W max.
3. DMX IN
Set DMX value to the fixture.
4. DMX OUT
Set DMX value to the fixture.
3-
4.How to control the unit
4.1 Main Function
Press the ENTER button and turn jog wheel until the required function is shown on the
monitor. Use the jog wheel to change the mode. Once the required mode has been selected,
press the ENTER button to setup or it will automatically return to the main functions without
any change after idling 10 seconds. To go back to the previous functions without any change
press the ESC button. The main functions are shown below:
DMX 512 System Setting
Press the ENTER button until
System setting
is shown on the display. Use DOWN
and UP button to select (Tube Amount) or (DMX512 address) or (Already DMX) mode. Once
the mode has been selected, press the ENTER button to setup or automatically return to the
main functions without any change after 8 seconds. To go back to the functions without any
change press MENU button again.
4-
5-
Auto Mode
Reset Mode
Press the ENTER button until
UP button to select
chase) /
Auto Mode
Auto Random /
ST chase
in one way chase)/
Auto Fade /
SO chase
(Single color in two way chase) or
MT chase
strobe )/ WL strobe
is shown on the display. Use DOWN and
(Single color in one way
MO chase
(Multicolor in two way chase)/
(Multicolor
MC strobe
Press ENTER button until
Reset Mode
is shown on the display. Pressing ENTER
button and the unit will run Reset automatically. To go back to the functions press MENU
button again.
(Multicolor
Standby Mode
(Strobe in white light)mode. Once the mode has been selected, press
Press ENTER button until Standby Mode is shown on the display. Select (Yes) option
ENTER button to setup or automatically return to the main functions without any change
and all channels of unit will return to their original setting. To go back to the functions press
after 8 seconds. To go back to the functions without any change press MENU button again.
MENU button again.
Sound Mode
5.DMX512 Configuration
Press the ENTER button until
UP button to select
SO chase
or
/
Sound Mode
Sound Random /
is shown on the display. Use DOWN and
TC chase
(Single color in one way chase) /
MO chase
ST chase
(Multicolor in one way chase)/
Color change
/
Color strobe
(Two color in chase)/
(Single color in two way chase)
MT chase
(Multicolor in two way chase)
mode. Once the mode has been selected, press the
ENTER button to setup or automatically return to the main functions without any change
after 8 seconds. To go back to the functions without any change press MENU button again.
dB Mode
Press ENTER button until
button to select
dB Random
chase in green base) or
in black base)/
dB Mode
dB_Red
dB_Blue
dB_RYG
chase in different base)/
/
is shown on the display. Use DOWN and UP
(dB chase in red base)/ dB_Green
(dB chase in blue base)
dB_Black
(db chase in red/yellow/green base )/
dB_Same
(dB
(dB chase
dB_Different
(dB
(dB chase in same base)mode. Once the mode has
been selected, press ENTER button to setup or automatically return to the main functions
without any change after 8 seconds. To go back to the functions without any change press
MENU button again.
Hold Mode
Press ENTER button until
button to select
/ Cyan
/
White
White
/
Hold
Red
Mode
/
is shown on the display. Use DOWN and UP
Green
/
Yellow
or
Blue /
Purple
mode. Once the Mode has been selected, press ENTER button to
setup or automatically return to the main functions without any change after 8 seconds.
To go back to the functions without any change press MENU button again.
6-
7-
6. Installation
7. Fixture Cleaning
LED-VC could be link as below schema.
Cleaning frequency depends on the environment in which the fixture operates: damp, smoky
or particularly dirty surrounding can cause greater accumulation of dirt on the fixture’s
optics.
pic 1
Clean with soft cloth using normal glass cleaning fluid.
Always dry the parts carefully.
EC Declaration of Conformity
We declare that our products (lighting equipments) comply with the
following specification and bears CE mark in accordance with the provision
of the Electromagnetic Compatibility (EMC) Directive 89/336/EEC.
pic 2
EN55014-2: 1997 A1:2001, EN61000-4-2: 1995; EN61000-4-3:2002;
EN61000-4-4: 1995; EN61000-4-5: 1995, EN61000-4-6:1996,
EN61000-4-11: 1994.
&
Harmonized Standard
EN60598-1: 2000+ALL:2000+A12:2002
Safety of household and similar electrical appliances
Part 1 : General requirements
Innovation, Quality, Performance
8-
9-