1
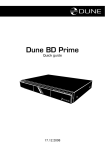
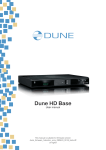
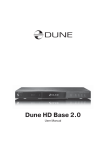
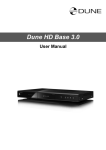
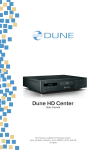
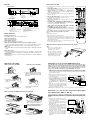
Remote Control (RC)
Exterior
1) Command indicator (i.e. indicator of remote control response to but1
ton pressing)
Front view
2) EJECT, MUTE, POWER – opening/closing of disk tray, sound on/off 2
and standby mode on/off, respectively
3) A(Red) - INFO, B(Green) - ZOOM, C(Yelow) - MODE, D(Blue) - 3
SETUP – control menu buttons for setting of internal functions, as
well as some playback modes.
1
4
2 3
5
6
1. Standby Indicator
2. Display
3. STOP Button
7
4. PLAY Button
5. OPEN/CLOSE
6. Blu-Ray tray
4) 0 - 9 – numeric buttons. Allow controlling of player in playback mode, 4
as well as text entry.
8
7. Mobile rack
8. USB 2.0
5) INFO, ZOOM, MODE, SETUP – control menu buttons, allow setting
of internal functions, as well as some playback modes.
BLU-RAY DISC PLAYER
MODEL: HD Center
DTS is a registered trademark & the DTS
logos and Symbol are trademarks of DTS,
lnc. 1996-2008 DTS, lnc. All Rights Reserved.
Manufactured under license from Dolby Laboratories. Dolby
and the double-D symbol are trademarks of Dolby Laboratories.
USB
AC~100-240V
50/60Hz, 27W min.
Do not remove covers hazard - life parts
5
1
5
6) Vol+ / Vol- – volume adjusting
Rear view
C
2
Made in Israel
ETHERNET
3
1. AC Power Jack
2. On/Off Button
3. 7.1 Channel Audio Output Jacks
4. LAN
5. HDMI 1.3 Jack
6. Video Output (CVBS) Jack
4
HDMI
5 6 7 8
9
10 11 12
7. S-Video Output Jack
8. Component Video (Y, PB, PR) Output Jacks
9. COAXIAL Output Jack
10. OPTICAL Output Jack
11. Stereo Audio Left/Right Output Jacks
12. USB 2.0
7) Page Up / Page Down – for scrolling up and down to see and
6
change settings.
8) SUBTITLE, AUDIO, RETURN, POP UP/MENU, ENTER and con- 7
trol menu buttons UP, DOWN, RIGHT, LEFT – to control main player
modes and cursor motions through file browser.
8
9) PLAY, PAUSE, STOP, REW, FWD, PREV, NEXT, SLOW REW,
SLOW FWD – media file playback control buttons.
10) TOP MENU/URL, ANGLE/ROTATE, SEARCH – control menu buttons, allow setting of internal functions, as well as some playback
modes.
10
*Some buttons may have several functions, depending on mode.
For more details visit: http://www.HDI.co.il/manuals.
Note:
Player features:
● Use alkaline AA batteries.
Blu-Ray discs playback
● BD-ROM (Profile 1.1/2.0), as well as DVD and CD.
● Observe polarity when inserting batteries.
Media content playback
● Video, Music and Pictures.
● Direct the remote control to the player. There must be no obstacles 9
between the RC and the player. If the player is installed inside a desk
with tinted glass, the manufacturer may not guarantee an undisturbed functioning of RC.
Network drive operation
● NFS, SMB and some other HTTP clients.
● If RC functions only at short distances or stopped functioning, make
sure to replace batteries to new ones.
Mobile rack with SATA Direct Link for fast and easy HDD exchange
● Supports any audio and video collection on any number of hard discs w/o need to
create expensive multi-disc NAS solutions. Any 3.5" SATA HDDs can be used.
Effective distance of the remote control transmitter
HDMI v1.3
● Up-to-date HDMI v1.3 interface ensures peerless quality of digital video and audio
signal.
Three USB 2.0 ports
● Three high-speed USB 2.0 ports ensure an easy-to-use playback of media content
from such external data storage devices, as USB-HDD, flash drives, cardreaders, etc.
Upgradeability
● availability of connection of optional modules: Wi-Fi 802.11n, Ethernet 1000 Mb/s
and 2 x eSATA
Operations with HDD
How to tаke out the HDD.
1. Shift the clamp upwards.
● When there is an obstacle between
the player and the transmitter, the
transmitter may not operate.
● When direct sunlight, an incandescent lamp, fluorescent lamp or any
other strong light shines on the REMOTE SENSOR of the Player, the remote operation may be unstable.
3
Connection to a TV set with HDMI/DVI output:
How to insert the HDD
1. Having convinced that the container
handle is slightly opened, insert the
internal container and push it inside
all the way.
Since Dune HD Center is designed first of all for playback of high definition (HD) video (up to
1080p), the best way of signal transmission from player to a TV set or projector is the HDMI
interface. In this case, video and audio streams are transmitted in digital form, without
losses, allowing enjoying excellent picture and sound. It is recommended to connect the
player to any compatible equipment using original DUNE HDMI cable (option).
If your TV set has no HDMI socket, but it is equipped with DVI one, you can use an original DUNE
HDMI-DVI adapter (to be connected to HDMI-HDMI cable) or Dune HDMI-DVI cable (no adapter
needed). In this case, transmission of audio stream is only available separately, from an analog
audio or digital optical output.
1) Make sure that the player and the TV set are
switched off. Do not switch on until the end of
connection procedure.
2) Connect the HDMI output of the player with
appropriate HDMI/DVI input of the TV set using
a HDMI-HDMI cable for HDMI input of your TV
set, or HDMI-DVI cable or HDMI-HDMI cable
with HDMI-DVI adapter, for DVI input of your
TV set.
2. Keeping the
clamp, turn the handle
outside
3. Pull out the internal container from
a player
Note:
2. Turn the handle inside till the
clamp clicks.
How to change the HDD in the internal container
HDMI IN
3) Using RC of TV or projector (depending on
what you use), select required input and display
mode. For more instructions please refer to the
manual of your displaying equipment.
4) Wait until you see a picture on screen of your TV (or projection) set received from the player.
Connection to a TV set with component video signal
input (Component Video, Y, Cb, Cr)
For this connection you should use a 3RCA-3RCA video cable and (optionally) a 2RCA2RCA audio cable for sound transmission to your TV set. Please note that video cable
shall have an impedance of 75 Ohm, i.e. specially fitted for transmission of analog video
signal.
1. Shift the top cover of the internal
container in an arrows direction.
3. Be convinced that the HDD is densely pressed to a rear side of the container and fixed to an emphasis.
Only such placing provides correct functioning of the device.
2. Insert the HDD into the internal
container.
4. Close the top cover
of the internal container.
1) Make sure that the player and TV set are
switched off. Do not switch on until the end
of connection procedure.
2) Connect the component video output of
media player with relevant TV input using a
3RCA-3RCA cable.
3) Optionally connect audio output AUDIO L
R of the player with relevant input of TV set
using a 2RCA-2 RCA cable (note: you can
use optical cable to transmit digital audio
to your A/V receiver; this way better audio
quality result may be expected).
4) Using RC of TV or projector (depending
on what you use), select required input
and display mode. For more instructions
please refer to the manual of your displaying
equipment.
AUDIO IN
R
L
COMPONENT
VIDEO IN
То get the full version of the instruction please visit:
http://www.HDI.co.il/manuals
www.HDI.co.il
Quick guide
Dune HD Center
DUNE HD Center specifications
3 x USB Host
USB 2.0 ports
Digital: optical Toslink and Сoaxial, analog: 7.1 output and stereo 2RCA
Audio output
Component (Y, Pb, Pr), S-Video, composite (CVBS)
Analog video output
● 480i, 480p (60 Гц) ● 576i, 576p (50 Гц) ● 720p (50 Гц, 60 Гц)
●1080i (50 Гц, 60 Гц) ●1080p (24 Гц, 25 Гц, 30 Гц, 50 Гц, 60 Гц)
●1024х768, 1280х1024, 1280х768, 1280х960, 1360х768, 1366х768,
1400х1050, 1440х900, 1600х1200, 1680х1050, 1920х1200 (60 Гц)
Available picture
modes through HDMI
v1.3
RAM: 384 Mb
ROM: 64 Mb (for control microprogramm)
1GB NAND flash
System memory
Sigma Designs 8634 SoC
Processor
Plain text, SSA/AAS (MKV containers), SRT (with any supported video
file format), VOB
Subtitle formats
JPG, PNG, BMP
Digital images
DD: AC3 (DD), EAC3 (DD+), Dolby True HD [lossless]; DTS: DTS HD
High Resolution Audio (HRA), DTS HD Master Audio (MA) [lossless],
decoding in PCM/analog, Bitstream on HDMI1.3.
Audio formats
MPEG2, MPEG4, DivX, XVID, WMV9, VC1, H.264
Video compression
algorithms
MKV, MPEG-TS, MPEG-PS, M2TS, VOB, AVI, MOV, MP4, QT, ASF, WMV,
DVD-ISO, VIDEO_TS
Video file formats
BD-ROM, BD-R (RE), DVD-ROM, DVD-R (RW), CD, CD-R (RW)
Optical discs
430mm (width) x 270mm (depth) x 50mm (height)
Size, mm
LAN Ethernet 100 Mbit/sec Wi-Fi
LAN connection
DUNE HD Center dimensions
301,5mm
Package contents:
1
5
4
2
3
1. Dune HD Center media player
2. Remote control (batteries not included)
3. Power supply cord
4. AV cable
5. Quick start guide
Safety measures
To avoid troubles, before to start using this device, please read this manual carefully and
keep it for future reference.
Warning: This Blu-ray player uses a laser beam sightless with human eye.
If directed to human eye retina, it may cause hazardous radiation exposure
and loss of sight. Please make sure that you use the player in conformity with
the user’s manual. Please make sure that the device is out of reach of small
children as far as possible.
Caution: This product employs a laser system. Performing adjustments,
or carrying out procedures other than those specified herein may result in
hazardous radiation exposure. Do not open the safety enclosure: this product
does not contain any parts that can be repaired by the user.
1) Do not try to repair the device. Only authorized after-sales centers are entitled to carry out
repair and preventive maintenance.
2) To avoid electric shock, do not touch the plugged in device with wet hands and do not allow
moisture within the case. If it happened, immediately unplug the device and contact an
authorized Dune service center.
3) Clean the device only with a dry soft cotton, or alike, cloth preventing accumulation of static
discharges. Do not use any liquid detergent or scouring powder. In case of hard dirt, use
special wipes suitable for PC care. Make sure that the wipe is dry enough (otherwise fluid
drops may get inside).
81,1mm
4) The device is for indoor use only. Do not expose it to direct sunlight, do not leave it near a
heater or radiator.
435,5mm
5) DO NOT use the device in rooms with high humidity.
* Note: Files with specific coding features or specific combinations of containers/codecs may not be
played, or played with limitations or improperly. Follow release of firmware updates (control microprograms). Firmware update may resolve problems of playback of some files. This procedure may
be made by the user or by a technician of post-sales service center.
** Note: basic modes of music files playback are currently supported (single file playback, M3U
and PLS play lists are supported). More advanced mechanisms will be available in future firmware
releases.
*** Note: only very basic mode of picture viewing is currently supported (single picture view only).
More advanced mechanisms, including slide shows, will be available in future firmware releases.
6) DO NOT plug in the player immediately after moving it from a cold into a warm place. If you
move the device from an extremely cold place, unpack it and leave for 1.5 to 2 hours in order
to allow evaporation of condensate on internal parts, afterwards you may start using it.
7) Please make sure to switch off all relevant AV equipment before connection to the Blu-ray
media player.
8) Use EU-standard screened cables and sockets.