1
TABLE OF CONTENTS
CHAPTER 1. BEFORE USING YOUR PHONE
PACKAGE INCLUDES ................................................................................................................................8
HANDSET DESCRIPTION...........................................................................................................................9
BATTERY USAGE ....................................................................................................................................15
POWER CONNECTION.........................................................................................................................17
BATTERY HANDLING INFORMATION......................................................................................................18
DO’s ....................................................................................................................................................18
DON’Ts................................................................................................................................................18
CHAPTER 2. BASIC OPERATION
TURNING THE PHONE ON / OFF .............................................................................................................20
TURNING THE PHONE ON ...................................................................................................................20
TURNING THE PHONE OFF ..................................................................................................................20
ACCESSING THE MENU ..........................................................................................................................21
MENU SUMMARY ..................................................................................................................................22
BASIC FUNCTIONS .................................................................................................................................25
MAKING A CALL .................................................................................................................................25
ANSWERING CALLS.............................................................................................................................25
WAIT/PAUSE FEATURE.........................................................................................................................26
3-WAY CALLING ..................................................................................................................................26
CALLER ID FUNCTION .........................................................................................................................27
CALL WAITING FUNCTION ..................................................................................................................27
ADJUSTING VOLUME...........................................................................................................................28
SPEAKERPHONE..................................................................................................................................28
VIBRATE ON/OFF MODE ......................................................................................................................29
090115_7076PP_EN_M_size.indd 1
1
2009.1.29 11:59:24 AM
TABLE OF CONTENTS
DURING A CALL .....................................................................................................................................30
MUTE (UNMUTE) ................................................................................................................................30
SEND TXT MSG ...................................................................................................................................30
CONTACTS ..........................................................................................................................................30
RECENT CALLS ....................................................................................................................................30
NOTEPAD ............................................................................................................................................31
LOCATION ...........................................................................................................................................31
MAKING AN EMERGENCY CALL ............................................................................................................32
911 IN LOCK MODE ............................................................................................................................32
911 USING ANY AVAILABLE SYSTEM ..................................................................................................32
CHAPTER 3. MEMORY FUNCTION
STORING A PHONE NUMBER .................................................................................................................34
ENTERING LETTERS, NUMBERS & SYMBOLS ..........................................................................................42
STANDARD INPUT MODE ....................................................................................................................43
T9WORD INPUT MODE........................................................................................................................44
NUMERIC MODE .................................................................................................................................45
SYMBOL MODE ...................................................................................................................................45
MAKING A CALL THROUGH THE CONTACT LIST.....................................................................................46
ONE-TOUCH/TWO-TOUCH DIALING ....................................................................................................46
CHAPTER 4. MENU FUNCTION
CONTACTS .............................................................................................................................................50
NEW CONTACT ...................................................................................................................................50
CONTACT LIST .....................................................................................................................................50
GROUPS ..............................................................................................................................................51
2
090115_7076PP_EN_M_size.indd 2-3
TABLE OF CONTENTS
SPEED DIALS .......................................................................................................................................55
IN CASE OF EMERGENCY....................................................................................................................55
RECENT CALLS .......................................................................................................................................59
RECENT CALLS ....................................................................................................................................59
MISSED ...............................................................................................................................................59
RECEIVED ............................................................................................................................................60
DIALED ................................................................................................................................................61
ALL ......................................................................................................................................................63
VIEW TIMERS ......................................................................................................................................64
SETTINGS ...............................................................................................................................................65
SOUND SETTINGS ...............................................................................................................................65
DISPLAY SETTINGS ..............................................................................................................................70
PHONE SETTINGS................................................................................................................................75
CALL SETTINGS ...................................................................................................................................85
MEMORY ............................................................................................................................................89
PHONE INFO .......................................................................................................................................91
MY VERIZON ..........................................................................................................................................93
MY VERIZON .......................................................................................................................................93
CHAPTER 5. TOOLS
TOOLS ....................................................................................................................................................96
VOICE COMMAND ..............................................................................................................................96
CALCULATOR ......................................................................................................................................98
CALENDAR ..........................................................................................................................................99
ALARM CLOCK ..................................................................................................................................102
3
2009.1.29 11:59:26 AM
TABLE OF CONTENTS
STOPWATCH .....................................................................................................................................104
WORLD CLOCK ..................................................................................................................................105
NOTEPAD ..........................................................................................................................................106
CHAPTER 6. MEDIA CENTER
MEDIA CENTER ....................................................................................................................................110
TUNES & TONES ................................................................................................................................110
PICTURES ..........................................................................................................................................114
GAMES..............................................................................................................................................117
MOBILE WEB .....................................................................................................................................118
BROWSE & DOWNLOAD ...................................................................................................................118
EXTRAS .............................................................................................................................................119
CHAPTER 7. MESSAGING
MESSAGING .........................................................................................................................................122
NEW MESSAGE .................................................................................................................................122
INBOX ...............................................................................................................................................124
SENT .................................................................................................................................................125
DRAFTS .............................................................................................................................................126
VOICEMAIL........................................................................................................................................127
MOBILE IM ........................................................................................................................................128
EMAIL ...............................................................................................................................................128
CHAT .................................................................................................................................................128
SETTINGS ..........................................................................................................................................129
4
090115_7076PP_EN_M_size.indd 4-5
TABLE OF CONTENTS
CHAPTER 8. MOBILE WEB
MOBILE WEB ........................................................................................................................................136
LAUNCHING MOBILE WEB ................................................................................................................136
BROWSER MENU ..............................................................................................................................136
CHAPTER 9 SAFETY AND WARRANTY
SAFETY.................................................................................................................................................142
SAFETY INFORMATION FOR WIRELESS HANDHELD PHONES ............................................................142
SAFETY INFORMATION FOR FCC EXPOSURE ...................................................................................146
SAR INFORMATION...........................................................................................................................147
FDA CONSUMER UPDATE .................................................................................................................149
EMERGENCY CALLS ..........................................................................................................................159
COMPLIANCE WITH OTHER FCC REGULATIONS................................................................................162
GENERAL SAFETY .............................................................................................................................163
ANTENNA..........................................................................................................................................164
BATTERY............................................................................................................................................164
CHARGER ..........................................................................................................................................166
FCC HEARING-AID COMPATIBILITY (HAC) REGULATIONS FOR WIRELESS DEVICES ..........................167
GAMES..............................................................................................................................................170
CAMERA ...........................................................................................................................................171
RECYCLE YOUR CELL PHONE! ...........................................................................................................171
RESPONSIBLE DRIVING .....................................................................................................................173
RF EMISSIONS ...................................................................................................................................174
AVOID POTENTIAL HEARING LOSS.......................................................................................................181
CAUTION:..........................................................................................................................................181
5
2009.1.29 11:59:26 AM
TABLE OF CONTENTS
FCC COMPLIANCE INFORMATION .......................................................................................................184
INFORMATION TO USER ....................................................................................................................184
WARRANTY..........................................................................................................................................186
MANUFACTURER’S WARRANTY........................................................................................................186
CHAPTER 1
BEFORE USING YOUR PHONE
CHAPTER 1
BEFORE
USING
YOUR PHONE
This chapter provides important information about
using your phone including:
Package Includes
Handset Description
Battery Usage
Battery Handling Information
6
090115_7076PP_EN_M_size.indd 6-7
7
2009.1.29 11:59:26 AM
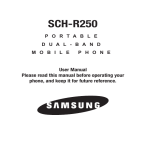
PACKAGE INCLUDES
HANDSET DESCRIPTION
This package should include all items pictured below.
If any are missing or different, immediately contact the retailer where you
purchased the phone.
Camera Lens
Speaker
OK Key
Left Soft Key
Camera Key
SEND Key
Directional Key
Right Soft Key
Speakerphone Key
END/POWER Key
CLR Key
Handset
Standard Battery
Microphone
Charging/
Date Port
Volume Keys
Headset Jack
Side Camera
Key
Voice Commands
Key
User Manual
8
090115_7076PP_EN_M_size.indd 8-9
Quick Referance
Guide
Wall Charger
9
2009.1.29 11:59:26 AM
HANDSET DESCRIPTION
(THE FUNCTION KEYS)
HANDSET DESCRIPTION
(DISPLAY INDICATORS)
Directional Key
Allows you to scroll through phone menu options and provides a shortcut to phone
functions from idle mode.
Space Key
SEND Key
Side Camera Key
Enters the pound [#] character for calling features. In text entry mode, press to accept the word and add
a space. Press and hold to enable/disable Vibrate Mode.
Press to make or receive a call. In Idle Mode, press to access the All Calls list.
Press to access the Pictures Menu. Press and hold to access to access the built-in camera.
END/POWER Key
Voice Commands Key
Press and hold to turn the phone on/off, or press to end a call or browser session. Within a menu, press
to return to idle mode.
Volume Keys
Left Soft Key
With the filp open, press to access the Voice Commands menu.
Press to adjust the master volume in idle mode or adjust the voice volume during a call.
Press to access the Message menu or function displayed above the key.
Right Soft Key
Press to access the Contacts menu or access the function displayed above the key.
CLR Key
Press to clear a digit from the display or to return to the previous page.
Press and hold to clear all digits.
Speakerphone Key
Press to turn speakerphone On/Off.
Camera Key
With the flip open, press to access the Pictures menu or press and hold to access the built-in camera.
Shift Key
Enters the asterisk [*] character for calling features. In text entry mode, press to change the character
input type. Press and hold to display a plus sign (+) for international dialing.
10
090115_7076PP_EN_M_size.indd 10-11
11
2009.1.29 11:59:27 AM
HANDSET DESCRIPTION
(DISPLAY INDICATORS)
HANDSET DESCRIPTION
(DISPLAY INDICATORS)
Airplane Mode
All Sounds Off
Wireless connectivity is turned off, but non-network functions can still be accessed.
Indicates all sounds and alerts are set to off.
Roaming
Alarm Only
The phone is outside of the home service area.
Phone will alert you with an alarm tone when a call is received.
SSL (Secured Socket Layer)
Vibrate Only
Indicates that secure communication between client and server has been established during data
communication using encryption.
Phone will vibrate when call is received.
Voice Privacy
Speakerphone mode is active.
Indicates Voice Privacy mode is active.
Data Call
Data Session is in progress.
No Service
Phone cannot receive a signal from the system.
TTY
Speakerphone
Missed Calls
Indicates you have missed calls.
New Message
Indicates you have new TXT or PIX message.
Calendar Appointment
Event Alarm is active.
TTY mode is active.
Voice Call
A call is in progress.
* No icon indicates the phone is in idle mode.
Location On
Voicemail
Indicates you have voicemail messages.
Alarm On
Appears when an alarm is set.
Indicates the Location Service of your phone is disabled/enabled.
Antennae
Battery Level
Phone Lock
Battery charging level — the more blocks, the stronger the charge.
12
090115_7076PP_EN_M_size.indd 12-13
Indicates your phone is locked.
13
2009.1.29 11:59:28 AM
HANDSET DESCRIPTION
(DISPLAY INDICATORS)
D Signal Strength
Digital service is available.
BATTERY USAGE
(BATTERY INSTALLATION)
1. Slide the battery into the slot by aligning the contacts located at the top of the
unit and press down until you hear the “click”.
1X Signal Strength
1X service is available.
2. Align the cover tabs with the slot at the bottom of the device and slide the
battery cover back onto the unit.
14
090115_7076PP_EN_M_size.indd 14-15
15
2009.1.29 11:59:29 AM
BATTERY USAGE
(BATTERY REMOVAL)
1. Remove the battery cover from the unit.
BATTERY USAGE
(BATTERY CHARGING)
POWER CONNECTION
1. To charge the phone, open the Charging/Data Port cover at the top of the
phone and connect the Wall Charger. Plug the other end into a standard
outlet.
2. To remove the battery, push down on the top of the battery while inserting
your finger into the slot and pulling up from the back of the battery and slide
it out.
2. To remove the Wall Charger, squeeze the adapter’s sides and pull away from
the device.
3. Remove the Wall charger from the outlet.
3. Align the cover tabs with the slot at the bottom of the device and slide the
battery cover back onto the unit.
Note
• If the battery is not correctly placed in the compartment, the handset will not
turn on and/or the battery may detach during use.
16
090115_7076PP_EN_M_size.indd 16-17
Hot Key • When you charge the battery with the phone power off, you will see a
charging status screen. You cannot operate the phone until it is powered on.
• The battery is not fully charged at the time of purchase.
• Fully charge the battery before use.
• It is more efficient to charge the battery with the handset powered off.
• The battery must be connected to the phone in order to charge it.
• Battery operating time gradually decreases over time.
• If the battery fails to perform normally, you may need to replace the battery.
17
2009.1.29 11:59:30 AM
CHAPTER 2
BASIC OPERATION
BATTERY HANDLING INFORMATION
DO’s
Only use the battery approved for use with your phone.
Only use the battery for its original purpose.
l Try to keep batteries in a temperature between 41ºF (5ºC ) and 95ºF (35ºC).
l If the battery is stored in temperatures above or below the recommended range, give it
time to warm up or cool down before using.
l Completely drain the battery before recharging.
l Store the discharged battery in a cool, dark, and dry place.
l Purchase a new battery when operating time gradually decreases after fully charging.
l
l
l
Properly dispose of the battery according to local laws.
DON’Ts
Don’t attempt to disassemble the battery – it is a sealed unit with no serviceable parts.
Don’t accidentally short circuit the battery by carrying it in your pocket or purse with other
metallic objects such as coins, clips and pens. This may critically damage the battery.
l Don’t leave the battery in hot or cold temps. Otherwise, it could significantly reduce the
capacity and lifetime of the battery.
l Don’t dispose of the battery into a fire.
l
l
18
090115_7076PP_EN_M_size.indd 18-19
CHAPTER 2
BASIC
OPERATION
This chapter addresses and explains the basic
features of your phone including:
Turning The Phone ON / OFF
Accessing The Menu
Menu Summary
Basic Functions
During a Call
Making An Emergency Call
19
2009.1.29 11:59:30 AM
TURNING THE PHONE ON / OFF
TURNING THE PHONE ON
1. Press and hold the END Key until the display turns on and the tone sounds.
Note
• If ”Phone Locked” appears on the display, press the Right Soft Key
[Unlocked] then enter your 4-digit lock code.
• The default lock code is the last 4 digits of your phone number.
ACCESSING THE MENU
Your phone can be customized via the menu. Each function can be accessed by
scrolling with the Directional Key or by pressing the number that corresponds with
the menu item.
1. To access the menu from Idle Mode, press the OK Key [MENU].
2. To scroll through the menu, press the Directional Key up, down, left or right
.
TURNING THE PHONE OFF
1. Press and hold the END Key until the display turns off.
Note
• Immediately change or recharge the battery when ”LOW BATTERY!!
PHONE IS TURNING OFF!” appears on the display. Memory may possibly be
damaged if the phone turns off due to the battery completely draining.
• Turn the phone off before removing or replacing the battery. If the phone is
on, unsaved data may be lost.
20
090115_7076PP_EN_M_size.indd 20-21
3. To return to the previous screen, press the Clear Key
menu and return to the idle mode, press the END Key
. To exit the current
.
4. To access the Messaging menu, press the Left Soft Key [Message].
5. To access the Contact List press the Right Soft Key [Contacts].
Note
• All directions in this manual are based on the Grid Menu Layout and Urban
Display Themes. If you have changed either of these settings, the directions
may vary.
• Please see page 75 for directions on how to change the function of the Set
Shortcut.
21
2009.1.29 11:59:30 AM
MENU SUMMARY
CONTACTS
1. New Contact
2. Contact List
3. Groups
4. Speed Dials
5. In Case of Emergency
MESSAGING
1. New Message
1.1. TXT Message
1.2. Picture Message
1.3. Voice Message
2. Inbox
3. Sent
4. Drafts
5. Voicemail
6. Mobile IM
7. Email
8. Chat
RECENT CALLS
1. Missed
2. Received
3. Dialed
4. All
5. View Timers
22
090115_7076PP_EN_M_size.indd 22-23
MENU SUMMARY
MY RINGTONES
1. Get New Applications
MEDIA CENTER
1. Tunes & Tones
1.1. Get New Ringtones
1.2. My Ringtones
1.3. My Sounds
2. Pictures
2.1. Get New Pictures
2.2. My Pictures
2.3. Take Picture
2.4. Online Album
3. Games
4. Mobile Web
5. Browse & Download
6. Extras
MY PICTURES
GAMES
1. Get New Applications
TOOLS
1. Voice Commands
2. Calculator
3. Calendar
4. Alarm Clock
5. Stop Watch
6. World Clock
7. Notepad
SETTINGS
1. My Verizon
2. Sounds Settings
2.1. Call Sounds
2.1.1. Call Ringtone
2.1.2. Call Vibrate
2.2. Alert Sounds
2.2.1. TXT Message
2.2.2. Pic/Voice Message
2.2.3. Voicemail
2.2.4. Emergency Tone
2.3. Keypad Volume
2.4. Service Alerts
2.4.1. ERI
2.4.2. Minute Beep
2.4.3. Call Connect
2.5. Power On/Off
2.5.1. Power On
2.5.2. Power Off
3. Display Settings
3.1. Banner
3.1.1. Personal Banner
3.1.2. ERI Banner
3.2. Backlight
3.2.1. Display
3.2.2. Keypad
3.3. Contrast
3.4. Wallpaper
3.5. Display Themes
3.6. Main Menu Layout
3.7. Dial Fonts
3.8. Clock Format
4. Phone Settings
4.1. Airplane Mode
4.2. Set Shortcuts
4.2.1. Set My Shortcuts
4.2.2. Set Directional Keys
4.3. Voice Commands
4.3.1. Prompts
4.3.2. Call Alert
4.4. Language
4.5. Location
4.6. Security
4.6.1. Edit Codes
4.6.1.1. Phone only
4.6.1.2. Call & Services
4.6.2. Restrictions
23
2009.1.29 11:59:31 AM
MENU SUMMARY
4.6.2.1. Location Setting
4.6.2.2. Calls
4.6.2.3. Messages
4.6.3. Phone Lock Setting
4.6.4. Lock Phone Now
4.6.5. Restore Phone
4.7. System Select
5. Call Settings
5.1. Answer Options
5.2. Auto Retry
5.3. TTY Mode
5.4. One Touch Dial
5.5. Voice Privacy
5.6. Assisted Dialing
5.7. DTMF Tones
6. Memory
6.1. Phone Memory Usage
6.2. My Pictures
6.3. My Ringtones
6.4. My Sounds
7. Phone Info
7.1. My Number
7.2. SW/HW Version
7.3. Icon Glossary
24
090115_7076PP_EN_M_size.indd 24-25
BASIC FUNCTIONS
MAKING A CALL
1. Enter a phone number including the area code if needed and press the SEND
Key.
Note
To modify the phone number you have entered :
• To erase one digit at a time press the Clear Key
.
• To erase the entire number, press and hold the Clear Key
.
2. To end a call, press the END Key.
ANSWERING CALLS
1. When your phone rings or vibrates, press the SEND Key to answer the
incoming call. (Depending on your phone’s settings, you may also answer
incoming calls by opening the phone or by pressing any key. See page 85.)
To ignore incoming calls, press Right Soft Key [Ignore].
2. To end the call, press the END Key.
Note
In Auto Answer Mode a call is automatically answered after five seconds of
ring tones.
25
2009.1.29 11:59:31 AM
BASIC FUNCTIONS
BASIC FUNCTIONS
WAIT/PAUSE FEATURE
Pauses are used for automated systems (i.e. voice mail, calling cards). Insert a
pause after a phone number then enter another group of numbers. The second set
of numbers is dialed automatically after the pause. This feature is useful for dialing
into systems that require a code.
1. To insert a wait/pause, enter a phone number then press the Right Soft Key
[Options]. Select either 2-Sec Pause (”P” appears) or Wait (”W” appears)
and press the OK Key. Enter additional number(s) (pin number or credit card
number).
2. Press the SEND Key
to dial or press the Left Soft Key [Save] to save phone
number.
3-WAY CALLING
With 3-Way Calling, you can talk to two people at the same time. When using this
feature, the normal airtime rates will be applied for each of the two calls.
1. Enter the phone number to call then press the SEND Key.
2. Once you have established the connection, enter the second number you wish
3. When you’re connected to the second party, press the SEND Key again to
begin your 3-Way call.
Note
If one of the people you called hangs up during your call, you and the
remaining caller stay connected. If you initiated the call and are the first to
hang up, all three callers are disconnected.
CALLER ID FUNCTION
Caller ID displays the number of the person calling when your phone rings. If the
caller’s identity is stored in Contacts, the name appears on the screen.This is a
system dependent feature.
Please contact your service provider for details.
CALL WAITING FUNCTION
If you are on a call and you receive another incoming call, you will hear two beeps
and the caller’s phone number will appear on the display. With Call Waiting, you
may put the active call on hold while you answer the other incoming call.
1. To answer another call while on the phone, press the SEND Key. This places the
first call on hold. To switch back to the first caller, press the SEND Key again.
to call then press the SEND Key.
26
090115_7076PP_EN_M_size.indd 26-27
27
2009.1.29 11:59:31 AM
BASIC FUNCTIONS
Note
BASIC FUNCTIONS
Call Waiting is a system dependent feature. Please contact your service
provider for details.
VIBRATE ON/OFF MODE
Vibrate Mode mutes the tones and activates an alert for an incoming call or
message.
1. To activate, press and hold .
2. To deactivate, press and hold again.
ADJUSTING VOLUME
To adjust the volume:
1. Adjust the volume by pressing the Volume Keys up or down then press the
OK Key [SET] to save the setting.
SPEAKERPHONE
The speakerphone feature lets you hear audio through the speaker and talk
without holding the phone.
1. To activate the speakerphone, with the filp open, press the Speakerphone Key
. To deactivate, press the Speakerphone Key
Note
again.
The phone returns to normal (Speakerphone Off) after ending a call or when
the phone is turned off.
28
090115_7076PP_EN_M_size.indd 28-29
29
2009.1.29 11:59:31 AM
DURING A CALL
DURING A CALL
MUTE (UNMUTE)
NOTEPAD
The caller cannot hear you or any sounds from your side but you can still hear
them.
To access the notepad during a call:
1. Press the Left Soft Key [Mute].
1. Press the Right Soft Key [Options], then press
Voice Privacy.
LOCATION
• To deactivate, press the Left Soft Key [Unmute].
To access location during a call:
1. Press the Right Soft Key [Options], then press
SEND TXT MSG
Location.
To send a TXT message during a call:
1. Press the Right Soft Key [Options], then press
Send TXT Msg.
CONTACTS
To select the phone number in your internal Contact List:
1. Press the Right Soft Key [Options], then press
Contact List.
RECENT CALLS
To select a phone number in your Recent Calls List:
1. Press the Right Soft Key [Options], then press
30
090115_7076PP_EN_M_size.indd 30-31
Recent Calls.
31
2009.1.29 11:59:32 AM
CHAPTER 3
MEMORY FUNCTION
MAKING AN EMERGENCY CALL
The 911 feature puts the phone in Emergency Call Mode when you dial the
preprogrammed emergency number, 911.
It also operates in Lock Mode and out of the service area.
911 IN LOCK MODE
To make an emergency call in Lock Mode:
1. Enter ”911”, then press the SEND Key.
2. The call connects.
3. When the call ends, the phone returns to the Lock Mode.
911 USING ANY AVAILABLE SYSTEM
To make an Emergency Call using any available system:
1. Enter ”911”, then press the SEND Key.
2. The call connects.
3. The phone maintains Emergency Mode and the phone can receive an
CHAPTER 3
MEMORY
FUNCTION
This chapter addresses memory functions including:
Storing a Phone Number
Entering Letters, Numbers & Symbols
Making a Call Through The Contact List
incoming call from any available system. However, it can’t make a call.
Note
The 911 call does not appear in the Recent Calls list.
32
090115_7076PP_EN_M_size.indd 32-33
33
2009.1.29 11:59:32 AM
STORING A PHONE NUMBER
The phone book stores up to 500 entries.
1. Enter phone number then press the Left Soft Key [Save].
2. Press for Add New Contact or
for Update Existing. If Add New
Contact is selected, the phone number will appear above a list. Press the
Directional Key up / down to choose the type of number you are adding.
Press the OK Key to select. If Update Existing is selected, your contact list is
displayed. Choose the entry to add the number to, then press the OK Key. You
will then see the phone number listed above the number type list. Select the
type then press the OK Key.
3. Enter a name. To change the input mode, press the Left Soft Key [Abc]. Press
the Directional Key down to enter information in other fields for the contact.
Fields include Name, Mobile 1, Home, Work, Email 1, Group, Picture, Ringtone,
Mobile 2, Fax, Email 2. When a phone number field is filled and selected, press
the Right Soft Key [Options] to select one of the following:
Set Speed Dial: Select to set the phone number as a speed dial.
Select the location number and press the OK Key [SET]. ”Add Contact to Speed Dial?” will
appear. Select Yes and press the OK Key.
Set As Default: Select to set the phone number as the primary phone number for the
contact. ”Set as Default?” will appear. Select Yes and press the OK Key.
Add Pause: Select to add a pause after the number.
34
090115_7076PP_EN_M_size.indd 34-35
STORING A PHONE NUMBER
4. To store the entry in your contact list, press the OK Key [SAVE]. ”CONTACT
SAVED” will be displayed.
ADDING OR CHANGING GROUPS
To organize your Contacts into groups:
1. Press the Right Soft Key [Contacts], then select the Contact you want to add to
a group.
2.
3.
4.
5.
Press the Left Soft Key [Edit].
Scroll to the Group Field then press the Left Soft Key [Set].
Select the desired group and press the OK Key.
To create new group, press the Left Soft Key [New].
Enter the group name then press the OK Key [SAVE].
6. Press the OK Key [SAVE] to save.
CHANGING THE CALL RINGTONE
To identify who is calling by setting different ringtones for different phone numbers
in your Contacts:
1. Press the Right Soft Key [Contacts], then select the Contact you want to edit.
35
2009.1.29 11:59:32 AM
STORING A PHONE NUMBER
2. Press the Left Soft Key [Edit].
3. Scroll to Ringtone then press the Left Soft Key [Set].
4. Scroll and select a Ringtone. To listen the selected ringtone, press the Left Soft
Key [Play]. To stop press the Left Soft Key [Stop]. Press the OK Key to set the
ringtone.
5. Press the OK Key [SAVE] to save.
ADDING OR CHANGING THE PICTURE ID
To select a picture or graphic to assign to a Caller ID:
1.
2.
3.
4.
Press the Right Soft Key [Contacts], then select the Contact you want to edit.
Press the Left Soft Key [Edit].
Scroll to the Picture Field and press the Left Soft Key [Set].
Scroll and select the picture to set. To view the selected picture press the Left
Soft Key [View]. Press the OK Key to select the image.
5. Press the OK Key [SAVE] to save.
STORING A PHONE NUMBER
ADDING OR CHANGING AN EMAIL ADDRESS
To add or change an email address:
1.
2.
3.
4.
Press the Right Soft Key [Contacts], then select the Contact you want to edit.
Press the Left Soft Key [Edit].
Scroll to E-mail1 or E-mail 2 to edit.
Enter the email address then press the OK Key [SAVE] to save.
ADDING A SPEED DIAL ENTRY
To add an entry to Speed Dial:
1. Press the Right Soft Key [Contacts], then select the Contact you want to add to
Speed Dial.
2. Press the Left Soft Key [Edit].
3. Select the phone number to add to speed dial then press the Right Soft Key
[Options].
4. Select Set Speed Dial and press the OK Key, choose a Speed Dial location, then
press the OK Key [SET].
5. To save the entry select Yes then press the OK Key.
36
090115_7076PP_EN_M_size.indd 36-37
37
2009.1.29 11:59:33 AM
STORING A PHONE NUMBER
STORING A PHONE NUMBER
6. Press the OK Key [SAVE] to save.
4. Press the OK Key [SAVE].
EDITING CONTACTS ENTRIES
ADDING A PHONE NUMBER FROM IDLE MODE
DEFAULT NUMBER
1.
2.
3.
4.
5.
6.
Enter the phone number you want to save (up to 32 digits).
Press the Left Soft Key [Save].
Scroll to Update Existing then press the OK Key.
Scroll and select the contact to update then press the OK Key.
The phone number saved when a Contact is created is the Default Number. If more
than one number is saved in a Contact entry, another number can be set as the
Default Number.
The Default Number cannot be deleted. The entire Contact entry can be deleted or
another number can be assigned as the Default Number allowing you to delete the
original number and keep the Contact entry.
Select Mobile 1, Mobile 2, Home, Work or Fax then press the OK Key.
CHANGING THE DEFAULT NUMBER
If a phone number is already assigned to the category you selected, select Yes
or No to overwrite the entry, then press the OK Key. Press the OK Key [Save] to
exit.
1. Press the Right Soft Key [Contacts]. Your Contacts display alphabetically.
2. Scroll to the contact to update then press the Left Soft Key [Edit].
3. Scroll to the number to assign as the default number then press the Right Soft
ADDING A PHONE NUMBER FROM THE CONTACT LIST SCREEN
1. Press the Right Soft Key [Contacts]. Your Contacts display alphabetically.
2. Scroll to the contact to update then press the Left Soft Key [Edit].
3. Select the appropriate category field, then enter the phone number.
38
090115_7076PP_EN_M_size.indd 38-39
Key [Options].
4. Select Set As Default then press the OK Key.
5. Select Yes then press the OK Key set as default number.
6. Press the OK Key [SAVE] to save.
39
2009.1.29 11:59:33 AM
STORING A PHONE NUMBER
STORING A PHONE NUMBER
EDITING STORED PHONE NUMBERS
3. Select Yes and then press the OK Key to erase.
1. Press the Right Soft Key [Contacts]. Your Contacts display alphabetically.
2. Scroll to highlight the Contact entry you want to edit then press the Left Soft
DELETING A SPEED DIAL
Key [Edit].
3. Scroll to highlight the phone number.
4. Edit the phone number as necessary then press the OK Key [SAVE].
DELETING A PHONE NUMBER FROM A CONTACT
1.
2.
3.
4.
5.
1. Press the Right Soft Key [Contacts] then select the Contact you want to edit.
2. Press the Left Soft Key [Edit].
3. Scroll to the phone number stored in Speed Dial then press the Right Soft Key
[Options].
4. Select Remove Speed Dial and press the OK Key.
Press the Right Soft Key [Contacts]. Your Contacts display alphabetically.
Scroll to the contact to update and press the Left Soft Key [Edit].
Scroll to the number you want to delete.
Press and hold the Clear Key to delete.
Press the OK Key [SAVE] to save.
DELETING A CONTACT ENTRY
1. Press the Right Soft Key [Contacts] then select the Contact you want to delete.
2. Press the Right Soft Key [Options] then scroll to Erase and press the OK Key.
40
090115_7076PP_EN_M_size.indd 40-41
41
2009.1.29 11:59:33 AM
ENTERING LETTERS, NUMBERS & SYMBOLS
The text entering mode (Alpha editor) allows to input text, numbers and symbols.
The default mode is [Abc] mode.
ENTERING LETTERS, NUMBERS & SYMBOLS
STANDARD INPUT MODE
Use the alphanumeric keys to enter letters, numbers and characters.
1. From the text entry screen, enter letters using the keypad. To change the input
KEY
Press to change
mode. [T9Word]
[Abc] [ABC][123]
[Symbols]
Press to view the next
Press to accept a word
matching word in T9Word and add a space in
mode if the highlighted
T9Word mode.
word is not the word you
intended.
KEY
Press to delete a
character to the
left of the cursor.
Press and hold to
delete an entire
word.
Press to select a letter case of the standard text input
or T9Word mode. [Abc], [ABC] and [abc] indicate
the standard text input. [T9Word], [T9WORD] and
[T9word] indicate the predictive text input.
42
090115_7076PP_EN_M_size.indd 42-43
mode, press the Left Soft Key.
2. To enter a space, press
. The cursor will automatically move to the next
column.
3. To delete one digit, press the Clear Key
and hold the Clear Key
. To delete the entire entry, press
.
4. To change from lowercase to uppercase, press
E.G.
.
Select Abc mode by pressing the Left Soft Key [Abc].
When you select this mode, the Abc icon appears as a visual confirmation.
- Find the key that corresponds to the letter you want to enter.
- Press it as many times as needed for the letter to appear on the screen.
- To enter the name ”John”:
]
J
Press [
,
,
]
o
Press [
,
]
h
Press [
,
]
n
Press [
43
2009.1.29 11:59:33 AM
ENTERING LETTERS, NUMBERS & SYMBOLS
ENTERING LETTERS, NUMBERS & SYMBOLS
T9WORD INPUT MODE
T9 mode incorporates a built-in-dictionary to determine a word based on the
entered characters. A word can be entered more quickly by pressing each key once
per character.
1. From the text entry screen, press the Left Soft Key [Abc], then select T9Word
and press the OK Key.
2. Press the number keys to input the sequential characters.
3. To view the next matching word, press
.
4. To accept the matching word then enter a space, press .
Note
E.G.
To enter a compound word :
• Enter the first part of the word then press the Directional Key right to accept
it without adding a space after it.
• Enter the last part of the word then press
to accept the word.
To enter ”Funfare” in T9Word mode :
- Press the Left Soft Key [Abc] select T9Word and press the OK Key.
,
,
and you will see ”Fun”highlighted.
- Press
- Press the Directional Key right to select ”Fun”.
- Press
,
,
,
and you will see ”ease” highlighted.
44
090115_7076PP_EN_M_size.indd 44-45
Press
Press
until you see ”fare” highlighted.
to select and add a space.
NUMERIC MODE
Allows you to enter numbers.
1. Press the Left Soft Key [Abc], select 123 (Numeric Mode) and press the OK Key.
2. To enter a number, press the corresponding key.
SYMBOL MODE
Allows you to enter symbols.
1. Press the Left Soft Key [Abc], select Symbols (Symbol Mode) and press the OK
Key.
2. Select the symbol you want to enter with the Directional Key, then press the
OK Key.
Note
Use the Directional Key to scroll through the different symbols available.
45
2009.1.29 11:59:34 AM
MAKING A CALL THROUGH THE CONTACT LIST
ONE-TOUCH/TWO-TOUCH DIALING
Ideal for frequently dialed numbers, this feature allows entries in your contact list
to be dialed via the keypad with only one or two key presses.
Note
One Touch Dial needs to be set to On. (Please see page 87.)
ONE-TOUCH DIALING
2-9: Press and hold the number you wish to connect to for more than 1 second.
MAKING A CALL THROUGH THE CONTACT LIST
To assign a speed dial location, please see page 55.
#DATA: #DATA is a VZW Customer Service VRU number (Free call) that
provides customers information about their Verizon Wireless billing balance.
#BAL/Balance: #BAL is a VZW Customer Service VRU number (Free call) that
provides customers information on their Verizon Wireless billing balance.
#MIN/Minutes Usage: #MIN is a VZW Customer Service VRU number (Free
call) that provides customers information on their Verizon Wireless usage.
#PMT/Payment: #PMT is a VZW Customer Service VRU number (Free call)
that allows user to make a bill payment, either with a payment option they
have already set up, or using a new, one time payment option.
TWO-TOUCH DIALING
10-95: Press the first digit then press and hold the second digit of the number to
dial.
Note
• If no phone number is stored in the location entered,”Unassigned location”
will appear on the screen.
• If One Touch Dial is set to Off: Enter the speed dial location number then
press the SEND Key [SEND].
• Location 1 is reserved for voicemail.
Location 96 is reserved for #DATA.
Location 97 is reserved for #BAL.
Location 98 is reserved for #MIN
Location 99 is reserved for #PMT.
46
090115_7076PP_EN_M_size.indd 46-47
47
2009.1.29 11:59:35 AM
CHAPTER 4
MENU FUNCTION
MEMO
CHAPTER 4
MENU
FUNCTION
This chapter addresses accessing the menu and usingits
functions and features to customize your phone.
Contacts
Recent Calls
Settings
My Verizon
48
090115_7076PP_EN_M_size.indd 48-49
49
2009.1.29 11:59:35 AM
CONTACTS
CONTACTS
Stores up to 500 entries, each of which can be assigned to a group. Entries can be
retrieved by name or group.
NEW CONTACT
Note
GROUPS
CONTACT LIST
You can review all the entries stored in your Contact List or quickly find an entry by
entering a name or its character.
The contacts are listed in Alphabetical Order.
Contacts, and then press
List. In idle mode, press the Right Soft Key [Contacts].
Contact
2. The list of names in your contact list is displayed alphabetically.
3. Enter a name in the Go To field or scroll to the contact to find.
4. To edit the contact, press the Left Soft Key [Edit]. For more options, press the
Right Soft Key [Options] to choose from 1. New Contact, 2. Erase, 3. New
TXT Message, 4. New Picture Message, 5. New Voice Message, 6. Set As ICE
Contact, 7. Call and 8. Erase All Contacts.
50
090115_7076PP_EN_M_size.indd 50-51
Contact screen, press the Left Soft Key [Erase] to erase the contact. Press the
Right Soft Key [Options] for 1. New TXT Message, 2. New Picture Message, 3.
New Voice Message or 4. Call.
6. To call the selected number, press the SEND Key.
For details on adding a new contact, see page 34.
1. Press the OK Key [MENU], press
5. Press the OK Key [VIEW] to view the details of the contact. From the View
Allows you to classify phone entries into groups. Existing groups include No Group,
Company, Family, Friends, and V.I.P. A maximum of 30 groups is allowed. You can
add, change, and erase a Group.
ADD NEW GROUP
1. Press the OK Key [MENU], select Contacts and press the OK Key, scroll to
Groups and press the OK Key.
2. Press the Left Soft Key [New] to add a new group name.
3. Input a new group name.
4. To save it, press the OK Key [SAVE].
51
2009.1.29 11:59:35 AM
CONTACTS
CONTACTS
ASSIGN PHONE NUMBER TO GROUP
ERASE GROUP
1. Press the OK Key [MENU], select Contacts and press the OK Key, scroll to
1. Press the OK Key [MENU], select Contacts and press the OK Key, scroll to
Groups and press the OK Key.
2. Scroll to the Group to add the contact to then press the OK Key [VIEW].
3. To add a contact, press the OK Key [ADD]. Scroll to the contact to add and
press the OK Key [MARK] then press the Left Soft Key [Done] to add.
Note
Each group can contain up to 10 phone numbers or email addresses.
CHANGE GROUP NAME
1. Press the OK Key [MENU], select Contacts and press the OK Key, scroll to
Groups and press the OK Key.
2. Scroll to the Group to rename then press the Right Soft Key [Options] and
select Rename, then press the OK Key.
3. Enter the new group name and press the OK Key [SAVE].
Groups and press the OK Key.
2. Scroll to the Group to erase then press the Right Soft Key [Options].
3. Scroll to Erase and press the OK Key.
4. Select Yes and press the OK Key to erase the group.
TO SEND A TXT MESSAGE TO A GROUP
1. Press the OK Key [MENU], select Contacts and press the OK Key, scroll to
Groups and press the OK Key.
2. Select the group you want to send a message to and press the Right Soft Key
[Options].
3. Scroll to New TXT Message and press the OK Key, then write the message.
4. To send, press the OK Key [SEND] or press the SEND Key.
SEND PIX MSG. GROUP
1. Press the OK Key [MENU], select Contacts and press the OK Key, scroll to
Groups then press the OK Key.
52
090115_7076PP_EN_M_size.indd 52-53
53
2009.1.29 11:59:36 AM
CONTACTS
2. Select the group you want to send a message to and press the Right Soft Key
[Options].
3. Scroll to New Picture Message and press the OK Key.
4. Scroll to Picture and press the Left Soft Key [My Pics]. Scroll to the picture and
press the OK Key to select.
5. Enter the remaining message information and press the OK Key [SEND] or
press the SEND Key.
Press the Directional Key up again to edit the phone numbers for sending the
message. Press the OK Key when you are done editing the numbers and return to the
New Picture Message screen.
CONTACTS
5. Enter any additional message information. To send, press the OK Key [SEND]
or press the SEND Key.
SPEED DIALS
In Idle Mode, calls can be placed to numbers stored in speed dial by pressing &
holding the location number on the key pad.
For a 2-digit location number, press the first number, then press and hold the second
number. To add an entry to Speed Dial:
Note
One Touch Dial must be set to On. For details on adding a new contact, see
page 37.
TO SEND A VOICE MESSAGE TO A GROUP
IN CASE OF EMERGENCY
1. Press the OK Key [MENU], select Contacts and press the OK Key, scroll to
Your phone has a special menu to organize your emergency contacts and personal
information.
Groups then press the OK Key.
2. Scroll to the group to send a voice message to and press the Right Soft Key
[Options].
3. Scroll to New Voice Message and press the OK Key.
4. Press the OK Key to being recording. Press the OK Key [STOP] to end recording.
54
090115_7076PP_EN_M_size.indd 54-55
TO ASSIGN EMERGENCY CONTACTS
Follow the procedures below to register a Contact to be contacted in case of
emergency, or to register a medical record number or other personal info. To
register up to three different Contacts to ICE:
55
2009.1.29 11:59:36 AM
CONTACTS
1. Press the OK Key [MENU], select Contacts and press the OK Key, scroll to In
Case of Emergency and press the OK Key.
2. Scroll to select Contact1, Contact 2 or Contact 3 and press the OK Key [ADD].
3. Select From Contacts and press the OK Key, then scroll to the contact to assign
and press the OK Key. Or, select New Contact and press the OK Key, then enter
the fields and press the OK Key [SAVE].
CONTACTS
TO ERASE ASSIGNED EMERGENCY CONTACTS
1. Press the OK Key [MENU], select Contacts and press the OK Key, scroll to In
Case of Emergency and press the OK Key.
2. Scroll to the contact you want to erase, press the Right Soft Key [Options] and
select Unassign.
3. Press the OK Key.
4. The contact name will display instead of Contact 1, Contact 2 and Contact 3.
TO CALL AN ASSIGNED EMERGENCY CONTACT
TO RE-ASSIGN EMERGENCY CONTACTS
1. Press the OK Key [MENU], select Contacts and press the OK Key, scroll to In
1. Press the OK Key [MENU], select Contacts and press the OK Key, scroll to In
Case of Emergency and press the OK Key.
2. Scroll to the contact you want to re-assign, press the Right Soft Key [Options],
then select Re-assign and press the OK Key.
3. Select From Contacts and press the OK Key, then scroll to the contact to assign
and press the OK Key. Or, select New Contact and press the OK Key, then enter
the contact information in the appropriate fields and press the OK Key [SAVE].
Case of Emergency and press the OK Key.
2. Scroll to the contact you want to call then press the Left Soft Key [Call] or
press the SEND Key.
TO ADD PERSONAL INFO
To store a Medical Record Number or other information that may be useful in case
of an emergency:
1. Press the OK Key [MENU], select Contacts and press the OK Key, scroll to In
Case of Emergency and press the OK Key.
2. Scroll to Personal Info then press the OK Key [VIEW].
56
090115_7076PP_EN_M_size.indd 56-57
57
2009.1.29 11:59:36 AM
CONTACTS
3. Select Note 1, Note 2 or Note 3 then press the OK Key [ADD].
4. Enter the information then press the OK Key [SAVE].
TO EDIT SAVED PERSONAL INFO
1. Press the OK Key [MENU], select Contacts and press the OK Key, scroll to In
RECENT CALLS
RECENT CALL
The Recent Calls menu is a list of the last phone numbers or Contact entries for
calls you placed, accepted or missed. It is continually updated as new numbers
are added to the beginning of the list and the oldest entries are removed from the
bottom of the list.
Case of Emergency and press the OK Key.
2. Scroll to Personal Info then press the OK Key [VIEW].
3. Select the Note you want to edit then press the OK Key [VIEW].
4. Press the OK Key [EDIT]. Edit the Note then press the OK Key [SAVE].
TO ERASE SAVED PERSONAL INFO
1. Press the OK Key [MENU], select Contacts and press the OK Key, scroll to In
Case of Emergency and press the OK Key.
2. Scroll to Personal Info then press the OK Key [VIEW].
3. Select the Note you want to erase then press the Right Soft Key [Erase].
4. To erase, scroll to Yes, then press the OK Key.
58
090115_7076PP_EN_M_size.indd 58-59
MISSED
Displays information about the 90 most recently missed calls. Place a call to a
missed call number by simply pressing the SEND Key.
1. Press the OK Key [MENU], select Recent Calls and press the OK Key, scroll to
Missed and press the OK Key.
If the number is already stored in your contact list, only the name appears. If
the number is not stored, the phone number appears.
2. To view missed call details, press the OK Key [OPEN].
Note
Call details include date, time and phone number.
3. Press the Right Soft Key [Options] for the following:
59
2009.1.29 11:59:36 AM
RECENT CALLS
Note
Note
• Save to contacts: To store the phone number in your contact list. (This only
appears if the number is not already saved in your contact list.)
• Erase: To erase a missed call from the list.
• Lock: To lock or unlock a missed call from the list
• Erase All: To erase all missed calls in the list.
• View Timers: To display your phone’s call timers.
RECENT CALLS
Note
3. Press the Right Soft Key [Options] for the following:
Note
• Save to contacts: To store the phone number in your contact list. (This only
appears if the number is not already saved in your contact list.)
• Erase: To erase a received call from the list.
• Lock: To lock or unlock a received call from the list.
• Erase All: To erase all received calls in the list.
• View Timers: To display your phone’s call timers.
Note
• After 90 received calls, the oldest call will automatically be erased from the
history.
• Press the Left Soft Key [Message], to send a TXT, Picture or Voice Message to
the selected number.
• After 90 missed calls, the oldest call will automatically be erased from the
history.
• Press the Left Soft Key [Message], to send a TXT, Picture or Voice Message to
the selected number.
RECEIVED
Displays information about the 90 most recently answered calls. Place a call to a
received call by simply pressing the SEND Key.
1. Press the OK Key [MENU], select Recent Calls and press the OK Key, scroll to
Received and press the OK Key. If the number is already stored in your contact
list, only the name appears. If the number is not stored, the number appears.
2. To view incoming call details, press the OK Key [OPEN].
Call details include date, time and phone number.
DIALED
Displays information about the 30 most recently dialed numbers. Place a call to a
dialed call by simply pressing the SEND Key.
1. Press the OK Key [MENU], select Recent Calls and press the OK Key, scroll to
Dialed and press the OK Key.
60
090115_7076PP_EN_M_size.indd 60-61
61
2009.1.29 11:59:36 AM
RECENT CALLS
If the number is already stored in your contact list, only the name appears. If
the number is not stored, the number appears.
2. To view dialed call details, press the OK Key [OPEN].
Note
Call details include date, time and phone number.
3. Press the Right Soft Key [Options] for the following:
Note
Note
• Save to contacts: To store the phone number in your contact list. (This only
appears if the number is not already saved in your contact list.)
• Erase: To erase a dialed call from the list.
• Lock: To lock or unlock a dialed call from the list.
• Erase All: To erase all dialed calls in the list.
• View Timers: To display your phone’s call timers.
RECENT CALLS
ALL
Displays information about the most recent received, dialed and missed calls.
1. Press the OK Key [MENU], select Recent Calls and press the OK Key, scroll to
All and press the OK Key. If the number is already stored in your contact list,
only the name appears. If the number is not stored, the number appears.
2. To view details, press the OK Key [OPEN].
Note
3. Press the Right Soft Key [options] for the following:
Note
• Save to contacts: To store the phone number in your contact list. (This only
appears if the number is not already saved in your contact list.)
• Erase: To erase an entry from the list.
• Lock: To lock or unlock a call from the list.
• Erase All: To erase all calls in the list.
• View Timers: To display your phone’s call timers.
Note
• After 210 received, dialed or missed calls, the oldest call will automatically
be erased from the history.
• Press the Left Soft Key [Message], to send a TXT, Picture or Voice Message to
the selected number.
• After 30 dialed calls, the oldest call will automatically be erased from the
history.
• Press the Left Soft Key [Message], to send a TXT, Picture or Voice Message to
the selected number.
62
090115_7076PP_EN_M_size.indd 62-63
Call details include date, time and phone number.
63
2009.1.29 11:59:36 AM
RECENT CALLS
SETTINGS
VIEW TIMERS
Customizes your phone and optimizes performance through a variety of settings.
Checks the usage time and manages your calls within the limit you set.
SOUNDS SETTINGS
1. Press the OK Key [MENU], select Recent Calls and press the OK Key, scroll to
View Timers and press the OK Key.
2. Scroll to view the information about Last Call, All Calls, Received Calls, Dialed
Calls, Roaming Calls, Transmit Data, Received Data, Total Data, Last Reset,
Lifetime Calls and Lifetime Data Counter. To reset the selected timer, press the
Left Soft Key [Reset]. ”Reset timer?” will be displayed. Select Yes and press
the OK Key. To reset all timers, press the Right Soft Key [Reset All]. ”Reset all
timers?” will be displayed. Select Yes and press the OK Key.
3. To return to the previous page, press the OK Key.
Note
This is not for billing purposes.
CALL SOUNDS
To set ringtones for types of incoming calls:
1. Press the OK Key [MENU], select Settings and press the OK Key, scroll to
Sounds Settings and press the OK Key, select Call Sounds and press the OK
Key.
Call Ringtone
1. Press the OK Key [MENU], select Settings and press the OK Key, scroll to
Sounds Settings and press the OK Key, select Call Sounds and press the OK
Key, select Call Ringtone and press the OK Key.
2. Scroll to select a ringtone and press the OK Key to save.
• Press the Left Soft Key to Play/Stop the ringer.
• Get New Ringtone takes you to Get New Applications in the Get New
Ringtones menu. Follow directions for downloading a ringtone on page
110.
64
090115_7076PP_EN_M_size.indd 64-65
65
2009.1.29 11:59:37 AM
SETTINGS
SETTINGS
Call Vibrate
1. Press the OK Key [MENU], select Settings and press the OK Key, scroll to
Sounds Settings and press the OK Key, select Call Sounds, press the OK Key,
select Call Vibrate and press the OK Key.
2. Select On or Off then press the OK Key to save it.
• Short cut: Press and hold the
to access Vibrate Mode.
ALERT SOUNDS
When selected, this setting allows you to select the alert type for TXT and
voicemail messages.
TXT Message
1. Press the OK Key [MENU], select Settings and press the OK Key, scroll to
Sounds Settings and press the OK Key, select Alert Sounds, press the OK Key,
select TXT Message and press the OK Key.
2. Select Tone, Vibrate or Reminder then select one of the following options:
66
090115_7076PP_EN_M_size.indd 66-67
• Tone: Select Get New Rightone or select your desired ringer type.
• Vibrate: Select On or Off.
• Reminder: Select Once, Every 2 Minutes, Every 15 Minutes or Off.
3. Press the OK Key to save the setting for that selection.
Pic/Voice Message
1. Press the OK Key [MENU], select Settings and press the OK Key, scroll to
Sounds Settings and press the OK Key, select Alert Sounds, press the OK Key,
select Pic/Voice Message and press the OK Key.
2. Select Tone, Vibrate or Reminder then select one of the following options:
• Tone: Select Get New Rightone or select your desired ringer type.
• Vibrate: Select On or Off.
• Reminder: Select Once, Every 2 Minutes, Every 15 Minutes or Off.
3. Press the OK Key to save the setting for that selection.
67
2009.1.29 11:59:37 AM
SETTINGS
SETTINGS
Voicemail
KEYPAD VOLUME
1. Press the OK Key [MENU], select Settings and press the OK Key, scroll to
To adjust keypad tone:
Sounds Settings and press the OK Key, select Alert Sounds and press the OK
Key, select Voicemail and press the OK Key.
2. Select Tone, Vibrate or Reminder then select one of the following options:
1. Press the OK Key [MENU], select Settings and press the OK Key, scroll to
• Tone: Select Get New Rightone or select your desired ringer type.
• Vibrate: Select On or Off.
• Reminder: Select Once, Every 2 Minutes, Every 15 Minutes or Off.
Sounds Settings and press the OK Key, select Keypad Volume and press the OK
Key.
2. Adjust the volume by pressing the Directional Key up or down / and press the
OK Key to save.
3. Press the OK Key to save the setting for that selection.
SERVICE ALERTS
Emergency Tone
1. Press the OK Key [MENU], select Settings and press the OK Key, scroll to
To set the alert for emergency dialing:
1. Press the OK Key [MENU], select Settings and press the OK Key, scroll to
Sounds Settings and press the OK Key, select Alert Sounds and press the OK
Key.
2. Scroll to select Emergency Tone and press the OK Key.
3. Scroll to select Alert, Vibrate or Off and press the OK Key.
68
090115_7076PP_EN_M_size.indd 68-69
To set any of the three Alert options to either On or Off:
Sounds Settings and press the OK Key, select Service Alerts and press the OK
Key.
2. Scroll to select one of the following options and press the OK Key.
• ERI: The Enhanced Roaming Indicator (ERI) feature displays a text banner on the
display screen informing the handset user of which systems the wireless
device is using as compared to the service plan they purchased. The ERI
Banner text changes to tell a customer if they are using the: Verizon Wireless
Network, Extended Network or Roaming.
69
2009.1.29 11:59:37 AM
SETTINGS
• Minute Beep: Alerts you every minute during a call.
• Call Connect: Alerts you when the call is connected.
3. Scroll to select On or Off and press the OK Key.
POWER ON/OFF
To set the phone to sound a tone when the phone is powered on/off:
1. Press the OK Key [MENU], select Settings and press the OK Key, scroll to
Sounds Settings and press the OK Key, select Power On/Off and press the OK
Key.
2. Select Power On or Power Off and press the OK Key.
3. Scroll to select On or Off and press the OK Key.
DISPLAY SETTINGS
SETTINGS
Personal Banner
The Personal Banner can be up to 20 characters and is displayed on your phone’s
screen in standby mode.
1. Press the OK Key [MENU], select Settings and press the OK Key, scroll to
Display Settings and press the OK Key, select Banner, press the OK Key, select
Personal Banner and press the OK Key.
2. Enter your banner text (up to 20 characters) and press the OK Key.
ERI Banner
If you use ERI Service, ERI Text is shown on the sub banner.
1. Press the OK Key [MENU], select Settings and press the OK Key, scroll to
Display Settings and press the OK Key, select Banner, press the OK Key, select
ERI Banner and press the OK Key.
Allows you to customize the display.
2. Scroll to select On or Off and press the OK Key.
BANNER
BACKLIGHT
To input a personal/ERI banner greeting:
To set the duration for backlight illumination for the Main Screen and Keypad:
1. Press the OK Key [MENU], select Settings and press the OK Key, scroll to
Display Settings and press the OK Key, select Backlight and press the OK Key.
70
090115_7076PP_EN_M_size.indd 70-71
71
2009.1.29 11:59:37 AM
SETTINGS
2. Select Display or Keypad and press the OK Key.
3. Scroll to select 7 Seconds, 15 Seconds, 30 Seconds, Always On or Always Off
and press the OK Key.
Even if Always On is selected for the Backlight setting, the backlight will turn
off when the phone is closed.
CONTRAST
To adjust the display contrast:
1. Press the OK Key [MENU], select Settings and press the OK Key, scroll to
SETTINGS
DISPLAY THEMES
1. Press the OK Key [MENU], select Settings and press the OK Key, scroll to
Display Settings and press the OK Key, select Display Themes and press the OK
Key.
2. Scroll to select Urban or Blue Water.
3. Press the OK Key [SET] to save the theme.
• To preview the selected the Display Themes, press the Left Soft Key [Preview].
• To display descriptions of the Display Themes, press the Right Soft Key [Help].
Display Settings and press the OK Key, select Contrast and press the OK Key.
2. Press the OK Key to save the setting.
Note
The default setting is Urban.
WALLPAPER
MAIN MENU LAYOUT
To set the wallpaper:
1. Press the OK Key [MENU], select Settings and press the OK Key, scroll to
1. Press the OK Key [MENU], select Settings and press the OK Key, scroll to
Display Settings and press the OK Key, select Wallpaper and press the OK Key.
2. Scroll through the image thumbnails and press the Left Soft Key [View] to
view the selected image full screen.
3. Press the OK Key to save the image as your wallpaper.
72
090115_7076PP_EN_M_size.indd 72-73
Display Settings and press the OK Key, select Main Menu Layout and press the
OK Key.
2. Select Tab, List or Grid.
3. Press the OK Key to save the setting.
73
2009.1.29 11:59:37 AM
SETTINGS
Note
SETTINGS
The default setting is Grid.
DIAL FONTS
To set the font size:
1. Press the OK Key [MENU], select Settings and press the OK Key, scroll to
Display Settings and press the OK Key,select Dial Fonts and press the OK Key.
2. Scroll to select Normal or Large Only and press the OK Key.
CLOCK FORMAT
PHONE SETTINGS
AIRPLANE MODE
In Airplane Mode, all menu functions can be accessed except making calls,
receiving calls and data connection. Activating Airplane Mode will disable all
wireless communications. In Airplane Mode, services that support Location On
functions like Chaperone are temporarily disabled.
1. Press the OK Key [MENU], select Settings and press the OK Key, scroll to Phone
Settings and press the OK Key. Select Airplane Mode and press the OK Key.
To change the clock’s appearance in Idle Mode:
2. Select On or Off and press the OK Key.
1. Press the OK Key [MENU], select Settings and press the OK Key, scroll to
SET SHORTCUTS
Display Settings and press the OK Key, select Clock Format and press the OK
Key.
2. Select one of the following options:
Analog, Large Analog, Digital 12, Large Digital 12, Digital 24,
Large Digital 24, Off
3. Press the OK Key to save the setting.
Note
The default setting is Digital 12.
74
090115_7076PP_EN_M_size.indd 74-75
Your phone offers you the option of assigning one touch access when you press
the Directional Key right to a favorite or often-used function. To assign a function
to the key:
Set My Shortcuts
1. Press the OK Key [MENU], select Settings and press the OK Key, scroll to Phone
Settings and press the OK Key. Select Set Shortcuts and press the OK Key,
select Set My Shortcuts and press the OK Key.
75
2009.1.29 11:59:37 AM
SETTINGS
2. Select Shortcut 1, Shortcut 2, Shortcut 3 or Shortcut 4 and press the OK Key
[SET].
3. Select your desired function menu option then press the OK Key.
Alarm Clock, Calculator, Calendar, Call Settings, Chat, Display Settings,
Email, Email Inbox, Extras, Games, Media Center, Get New Extra, Get New
Game, Get New Pictures, Get New Ringtones, Get New Browse & Download,
Messaging Inbox, Mobile IM, My Verizon, My Pictures, My Ringtones, My
Sounds, New Contact, New TXT Message, New Picture Message, Mobile Web,
Phone Settings, Online Album, Settings, Sounds Settings, Tools, Browse &
Download, Tunes & Tones
4. In Idle Mode, the selected function can now be accessed by pressing the
Directional Key right.
Resetting My Shortcuts
To restore My Shortcuts to their original defaults:
1. Press the OK Key [MENU], select Settings and press the OK Key, scroll to Phone
Settings and press the OK Key. Select Set Shortcuts and press the OK Key,
select Set My Shortcuts and press the OK Key.
SETTINGS
3. Select Reset Shortcut (1, 2, 3 or 4) or Reset My Shortcuts and press the OK Key.
4. Select Yes and press the OK Key.
Set Directional Keys
1. Press the OK Key [MENU], select Settings and press the OK Key, scroll to Phone
Settings and press the OK Key. Select Set Shortcuts and press the OK Key,
select Set Directional Keys and press the OK Key.
2. Select Up Directional Key, Left Directional Key or Down Directional Key and
press the OK Key [SET].
3. Select your desired function menu option then press the OK Key.
Alarm Clock, Calculator, Calendar, Call Settings, Chat, Display Settings,
Email, Email Inbox, Extras, Games, Media Center, Get New Extra, Get New
Game, Get New Pictures, Get New Ringtones, Get New Browse & Download,
Messaging Inbox, Mobile IM, My Verizon, My Pictures, My Ringtones, My
Sounds, New Contact, New TXT Message, New Picture Message, Mobile Web,
Phone Settings, Online Album, Settings, Sounds Settings, Tools, Browse &
Download, Tunes & Tones
2. Select Shortcut 1, Shortcut 2, Shortcut 3 or Shortcut 4 and press the Right Soft
Key [Options].
76
090115_7076PP_EN_M_size.indd 76-77
77
2009.1.29 11:59:38 AM
SETTINGS
RESETTING THE DIRECTIONAL KEY SETTINGS
Use the following procedure to specify the default directional key settings.
1. Press the OK Key [MENU], select Settings and press the OK Key, scroll to Phone
Settings and press the OK Key. Select Set Shortcuts and press the OK Key,
select Set Directional Keys and press the OK Key.
2. Scroll to select UP Directional Key, LEFT Directional Key or DOWN Directional
Key and press the Right Soft Key [Options].
3. Select Reset (UP, LEFT or DOWN) Key or Reset Directional Keys and press the
OK Key.
4. Select Yes and press the OK Key.
VOICE COMMANDS
You can use voice commands to control your device.
1. Press the OK Key [MENU], select Settings and press the OK Key, scroll to Phone
Settings and press the OK Key. Select Voice Commands and press the OK Key.
2. Select Prompts or Call Alert and press the OK Key.
3. Select your desired function menu option then press the OK Key.
78
090115_7076PP_EN_M_size.indd 78-79
SETTINGS
• Prompts:
- Mode: Select Prompts or Tones Only.
- Timeout: Select 5 Seconds or 10 Seconds.
• Call Alert: Select Ring Only, Caller ID+Ring or Name Repeat.
LANGUAGE
Selects the language in which letters are displayed on the screen.
1. Press the OK Key [MENU], select Settings and press the OK Key, scroll to Phone
Settings and press the OK Key. Select Language and press the OK Key.
2. Select English or Español and press the OK Key.
LOCATION
To select whether your location will always appear in the network or during
emergency use:
1. Press the OK Key [MENU], select Settings and press the OK Key, scroll to Phone
Settings and press the OK Key. Select Location and press the OK Key.
2. Select one of the following settings:
• Location On: Your location is now available to the network.
• E911 Only: Your location will be hidden from the network and applications, except
for 911.
79
2009.1.29 11:59:38 AM
SETTINGS
SETTINGS
3. Press the OK Key to save the setting.
Note
If you have set Lock Mode for Location, you will need to enter your location
lock code before you can enter this menu. The default code is the last 4-digits
number of your phone number.
SECURITY
Prevents unauthorized use of your phone. The following settings can be restricted:
Edit Codes
To set a new Lock Code:
1. Press the OK Key [MENU], select Settings and press the OK Key, scroll to Phone
Settings and press the OK Key. Select Security and press the OK Key.
The default lock code is the last 4 digits of your phone number.
2. Enter the four-digit lock code and press the OK Key.
3. Select Edit Codes and press the OK Key.
4. Select one of the following settings and press the OK Key:
• Phone Only: Allows you to edit the Lock Code for Security. (The default Lock Code
is the last 4 digits of your Mobile Telephone Number.)
• Calls & Services: Allows you to edit the Lock Code for Restrictions. (The default
Lock Code is the last 4 digits of your Mobile Telephone Number.)
5. If Phone Only is selected, enter the new four-digit code in the Enter New Code
field. Enter the new four-digit code again in the Re-enter New Code field and
press the OK Key.
6. If Calls & Services is selected, enter the current lock code in the Enter Current
Code field. Enter the new four-digit code in the Enter New Code field. Enter
the new four-digit code again in the Re-enter New Code field.
7. Press the OK Key.
Restrictions
Use the following procedure to configure Location Setting, Calls and Messages
restrictions.
1. Press the OK Key [MENU], select Settings and press the OK Key, scroll to Phone
Settings and press the OK Key. Select Security and press the OK Key.
2. Enter the four-digit lock code and press the OK Key.
80
090115_7076PP_EN_M_size.indd 80-81
81
2009.1.29 11:59:38 AM
SETTINGS
The default lock code is the last 4 digits of your phone number.
3. Select Restrictions and press the OK Key then enter the four-digit lock code
and press the OK Key.
4. Select Location Setting, Calls or Messages.
• Location Setting: Select Unlock Setting or Lock Setting.
• Calls:
- Incoming Calls: Select Allow All, Contacts Only or Block All.
- Outgoing Calls: Select Allow All, Contacts Only or Block All.
• Messages:
- Incoming Messages: Select Allow All or Block All.
- Outgoing Messages: Select Allow All or Block All.
Phone Lock Setting
This setting specifies whether the phone should be locked whenever it is turned
on. Lock Mode prevents the unauthorized use of your phone. Once the phone is
locked, it is in restricted mode until the Lock Code is entered.
1. Press the OK Key [MENU], select Settings and press the OK Key, scroll to Phone
Settings and press the OK Key. Select Security and press the OK Key.
2. Enter the four-digit lock code and press the OK Key.
82
090115_7076PP_EN_M_size.indd 82-83
SETTINGS
The default lock code is the last 4 digits of your phone number.
3. Select Phone Lock Setting and press the OK Key.
4. Select one of the following settings and press the OK Key:
• Unlocked: Phone is unlocked.
• On Power Up: Phone will lock when it is turned on.
Lock Phone Now
To immediately lock your phone:
1. Press the OK Key [MENU], select Settings and press the OK Key, scroll to Phone
Settings and press the OK Key. Select Security and press the OK Key.
2. Enter the four-digit lock code and press the OK Key.
The default lock code is the last 4 digits of your phone number.
3. Select Lock Phone Now and press the OK Key.
4. To unlock the phone, from idle mode, press the Right Soft
Key [Unlock] and enter the four-digit Lock Code,
then press the OK Key.
83
2009.1.29 11:59:38 AM
SETTINGS
Restore Phone
To delete all User Data and restore all settings to their initial defaults:
1. Press the OK Key [MENU], select Settings and press the OK Key, scroll to Phone
Settings and press the OK Key. Select Security and press the OK Key.
2. Enter the four-digit lock code and press the OK Key.
The default lock code is the last 4 digits of your phone number.
3. Select Restore Phone and press the OK Key.
4. After reading the warning message that appears, select Yes and press the OK
Key.
5. After reading the message that appears, press the OK Key.
6. Follow the on-screen prompt and press the OK Key.
The phone will turn off and back on again automatically.
SYSTEM SELECT
You can set your phone to search or roam on another network when you are not in
your home area. Leave this setting as default unless you want to alter the system
selection as instructed by your service provider.
84
090115_7076PP_EN_M_size.indd 84-85
SETTINGS
1. Press the OK Key [MENU], select Settings and press the OK Key, scroll to Phone
Settings and press the OK Key. Select System Select and press the OK Key.
2. Select one of the following options:
• Home Only: Only within your home area or home affiliated area.
• Automatic A: Scan radio channels based on the Automatic A setting.
• Automatic B: Scan radio channels based on the Automatic B setting.
3. Press the OK Key to save the setting.
CALL SETTINGS
ANSWER OPTIONS
To determine how to handle an answered call:
1. Press the OK Key [MENU], select Settings and press the OK Key, scroll to Call
Settings and press the OK Key. Select Answer Options and press the OK Key.
2. Select one of the following options:
• Flip Open: Answer an incoming call by simply opening the phone.
• Any Key: Answers an incoming call by pressing any key except the END Key, the Clear
Key, or the Right Soft Key.
• Auto w/ Handsfree: Automatically answers an incoming call after 5 seconds.
85
2009.1.29 11:59:38 AM
SETTINGS
Note
SETTINGS
The default setting is Flip Open.
3. Press the OK Key [MARK], and then press the Left Soft Key [Done].
AUTO RETRY
To set the length of time the phone waits before automatically redialing a number
when the attempted call fails:
1. Press the OK Key [MENU], select Settings and press the OK Key, scroll to Call
Settings and press the OK Key. Select Auto Retry and press the OK Key.
2. Scroll to select 10 Seconds, 30 Seconds, 60 Seconds or Off and press the OK
Key.
TTY MODE
You can attach a TTY device to your phone enabling you to communicate with
parties also using a TTY device. A phone with TTY support is able to translate typed
characters to voice. Voice can also be translated into characters and displayed on
the TTY.
1. Press the OK Key [MENU], select Settings and press the OK Key, scroll to Call
Settings and press the OK Key. Select TTY Mode and press the OK Key.
• TTY Full
• TTY + Talk
• TTY + Hear
• TTY Off
3. Press the OK Key to save the setting.
ONE TOUCH DIAL
To initiate a speed dial call by holding down the speed dial digit:
1. Press the OK Key [MENU], select Settings and press the OK Key, scroll to Call
Settings and press the OK Key. Select One Touch Dial and press the OK Key.
2. Scroll to select On or Off and press the OK Key.
Note
If One Touch Dial is disabled, Speed Dial numbers designated in your Contacts
will not function.
VOICE PRIVACY
To enhance voice privacy during a call:
1. Press the OK Key [MENU], select Settings and press the OK Key, scroll to Call
Settings and press the OK Key. Select Voice Privacy and press the OK Key.
2. Select one of the following options:
86
090115_7076PP_EN_M_size.indd 86-87
87
2009.1.29 11:59:38 AM
SETTINGS
SETTINGS
2. Select On or Off and press the OK Key.
MEMORY
ASSISTED DIALING
PHONE MEMORY USAGE
To ensure that the proper IDDD Prefix is in place for international dialing:
To check the available Phone Memory capacity, used capacity and total capacity:
1. Press the OK Key [MENU], select Settings and press the OK Key, scroll to Call
1. Press the OK Key [MENU], select Settings and press the OK Key, scroll to
Settings and press the OK Key. Select Assisted Dialing and press the OK Key.
2. Select On or Off and press the OK Key.
Memory and press the OK Key.
Select Phone Memory Usage and press the OK Key.
To set the key tone length and touch tone playback speed:
2. Select Phone Memory Usage and press the OK Key to view.
3. Press the OK Key to return to the previous screen.
1. Press the OK Key [MENU], select Settings and press the OK Key, scroll to Call
MY PICTURES
DTMF TONES
Settings and press the OK Key. Select DTMF Tones and press the OK Key.
2. Select one of the following settings and press the OK Key:
• Normal: Sends out a tone for a fixed period of time even if you continue to press
the key.
• Long: Sends out a continuous tone for the duration the key is pressed and held.
88
090115_7076PP_EN_M_size.indd 88-89
To display My Pictures memory usage:
1. Press the OK Key [MENU], select Settings and press the OK Key, scroll to
Memory and press the OK Key.
Select My Pictures and press the OK Key.
2. The My Pictures total used and available memory will be displayed.
3. To return to the previous page, press the OK Key.
89
2009.1.29 11:59:39 AM
SETTINGS
MY RINGTONES
To display My Ringtones memory usage:
1. Press the OK Key [MENU], select Settings and press the OK Key, scroll to
Memory and press the OK Key.
Select My Ringtones and press the OK Key.
2. The My Ringtones total used and available memory will be displayed.
3. To return to the previous page, press the OK Key.
MY SOUNDS
To display My Sounds memory usage:
1. Press the OK Key [MENU], select Settings and press the OK Key, scroll to
Memory and press the OK Key. Select My Sounds and press the OK Key.
2. The My Sounds total used and available memory will be displayed.
3. To return to the previous page, press the OK Key.
SETTINGS
PHONE INFO
To display the information about your phone:
MY NUMBER
To view your phone number:
1. Press the OK Key [MENU], select Settings and press the OK Key, scroll to Phone
Info and press the OK Key. Select My Number and press the OK Key.
2. The MDN and MIN will be displayed along with your service provider's name.
3. To return to the previous page, press the OK Key.
SW/HW VERSION
To display the Software/PRL/ERI/Browser/Media Center version:
1. Press the OK Key [MENU], select Settings and press the OK Key, scroll to Phone
Info and press the OK Key. Select SW/HW Version and press the OK Key.
2. The Software, PRL, ERI, Browser, Media Center, MSUI, HW version and MEID
information is displayed.
3. Press the OK Key to return to the previous screen.
90
090115_7076PP_EN_M_size.indd 90-91
91
2009.1.29 11:59:39 AM
SETTINGS
MY VERIZON
ICON GLOSSARY
To display the Indicator icons used in your phone:
1. Press the OK Key [MENU], select Settings and press the OK Key, scroll to Phone
Info and press the OK Key. Select Icon Glossary and press the OK Key.
2. The Indicator icons are displayed.
3. Press the OK Key to return to the previous screen.
Note
MY VERIZON
1. Press the OK Key [MENU], select Settings and press the OK Key, then select My
Verizon and press the OK Key.
2. You will connect to the browser. The My Verizon page will appear.
Note
• Short cut: In idle mode, press the Directional Key left to access My Verizon.
• Airtime is free for accessing My Verizon through your phone.
Please refer to page 12 for more a detailed list.
92
090115_7076PP_EN_M_size.indd 92-93
93
2009.1.29 11:59:39 AM
CHAPTER 5
TOOLS
MEMO
CHAPTER 5
TOOLS
This section shows you how to use these features to
turn your phone into a time management planner that
helps you keep up with your contacts, schedules, and commitments.
94
090115_7076PP_EN_M_size.indd 94-95
95
2009.1.29 11:59:39 AM
TOOLS
TOOLS
VOICE COMMANDS
3. To set a voice command, press the Right Soft Key [Set].
Your phone is equipped with an AVR (Advanced Voice Recognition) feature. This
feature allows you to make calls or use the phone’s functions by simply using your
voice. All you have to do is talk into the phone and the phone will recognize your
voice and complete tasks by itself.
CALLING USING VOICE ACTIVATED DIALING
1. In Idle Mode, with the flip open, press the Voice Commands Key to access
the Voice Commands menu. You will hear ”Please say a command”.
Note
You can also access this menu by pressing the OK Key [MENU], selecting Tools
and pressing the OK Key and then selecting Voice Commands and pressing the
OK Key.
2. After the phone beeps, say the name of the command that you want to
perform.
The commands listed in the following table are available.
1. Call: Lets you dial a phone number by saying a name saved in your contact list.
2. Digit Dial: Lets you dial a phone number by saying the digits in the phone
number.
3. Redial: Lets you dial a phone number by last dial phone number.
4. Voice Answer: Lets you activate voice answer mode.
5. Recent Calls: Lets you view recent calls list.
6. Voicemail: Lets you access Voice Mail.
7. Battery: Lets you view your phone’s current battery level.
96
090115_7076PP_EN_M_size.indd 96-97
Use the Call command to voice dial a name from your Contact List.
1. To call a number saved in your Contact List, with the flip open, press the Voice
Commands Key
2.
3.
4.
5.
. You will hear and see ”Please Say a Command”.
After the beep, say ”Call”.
You will hear and see ”Please say a name”.
After the beep, say the name of contact.
You will hear ”Did you say [name] [phone number]” and the contact will be
displayed on screen. More than one contact may be displayed. If the first
contact is not correct, say ”No”. Repeat until the correct contact is indicated.
Say ”Yes” if the name and phone number are correct.
Note
If more than one phone number exists for the contact you are calling, the
primary number will be the one chosen for voice activated dialing.
6. The phone will dial the number.
97
2009.1.29 11:59:39 AM
TOOLS
TOOLS
INFORMATION
1. In idle mode, with the flip open, press the Voice Commands Key . After
a brief pause, ”Please Say a Command” appears in the display and is
pronounced through the speaker.
2. Scroll to a menu item then press the Left Soft Key [Info].
3. Your phone displays the information to help you use that menu item and plays
it through your speaker.
The Calculator allows you to perform simple mathematical calculations. To access
the calculator:
1. Press the OK Key [MENU], select Tools and press the OK Key then select
Calculator and press the OK Key.
2. Enter the number using your keypad to perform one of the following functions:
98
090115_7076PP_EN_M_size.indd 98-99
3. Enter the numerical formula and press the OK Key for Equals (=).
4. To reset, press the Right Soft Key [Erase].
CALENDAR
CALCULATOR
• Press the Directional Key
• Press the Directional Key
• Press the Directional Key
• Press the Directional Key
• Press
for a decimal point.
for change the displayed number from positive (+) to negative (-) and
• Press
vice versa.
• Press the Right Soft Key to erase all numbers.
• Press the Left Soft Key to select left parenthesis or right parenthesis or power.
right for Multiplication (x).
left for Division (÷).
down for Subtraction (-).
up for Addition (+).
The Calendar tool provides easy and convenient access to your schedule. Simply
store your appointments and your phone will alert you to them.
ADD NEW CALENDAR
1. Press the OK Key [MENU], select Tools and press the OK Key then select
Calendar and press the OK Key.
Note
In Idle Mode, press the Directional Key down.
2. Press the Directional Key up, down, left or right to highlight the scheduled day.
3. Press the Left Soft Key [Add].
99
2009.1.29 11:59:39 AM
TOOLS
4. The New Event screen will be displayed. Enter the event name. Press the
Directional Key down to move to the next fields.
• Start Time: Use the keypad to set a start time and press the Left Soft Key for am/
pm.
• End Time: Use the keypad to set a end time and press the Left Soft Key for am/pm.
• Start Date: Use the keypad to change or enter the start date.
• End Date: Use the keypad to change or enter the end date.
• Time Zone: If the Time Zone needs to be adjusted, press the Left Soft Key [Set].
Press the Directional Key up or down / to select a new time zone then press the OK
Key.
• Recurrence: Press the Directional Key left or right to set the recurrence of the
event (Daily, Weekly, Monthly, Yearly).
• Tone: Press the OK [Set] to select a new ringtone. Press the Directional Key up or
down to highlight a ringtone then press the OK Key. Press the Left Soft Key [Play/
Stop] to preview a ringtone.
• Vibrate: Press the OK Key [Set] then select either On or Off and press the OK Key.
• Reminder: Press the OK Key [Set] to select an alert time interval option: 0, 5, 10,
or 15 Minutes.
5. Press the OK Key [SAVE] to save it. The date of the event will be marked on
your calendar.
TOOLS
VIEW CALENDAR EVENTS
1. Press the OK Key [MENU], select Tools and press the OK Key then select
Calendar and press the OK Key.
2. Scroll to a date in the calendar and press the OK Key [VIEW] to view the event
for that day.
3. Press the OK Key [VIEW] for more detailed information about the event.
ERASE SAVED EVENT
1. Press the OK Key [MENU], select Tools and press the OK Key then select
Calendar and press the OK Key.
2. Scroll to date in the calendar and press the OK Key [VIEW] to view the event
for that day.
3. Press the Right Soft Key [Options], select Erase and press the OK Key, then
select Yes and press the OK Key.
ERASE ALL PASSED EVENTS
1. Press the OK Key [MENU], select Tools and press the OK Key then select
Calendar and press the OK Key.
100
090115_7076PP_EN_M_size.indd 100-101
101
2009.1.29 11:59:40 AM
TOOLS
2. Scroll to date in the calendar and press the OK Key [VIEW] to view the event
for that day.
3. Press the Right Soft Key [Options], select Erase All and press the OK Key, then
select Yes and press the OK Key.
ALARM CLOCK
The Alarm Clock tool allows you to set up to three alarms. When you set an alarm,
the current time is displayed at the top of the screen. When the alarm goes off,
Alarm 1 (or 2 or 3, as applicable) will be displayed on the LCD screen and the
alarm will sound.
1. Press the OK Key [MENU], select Tools and press the OK Key then select Alarm
Clock and press the OK Key.
2. Select Alarm 1, 2 or 3 to set a new alarm, then press the OK Key.
3. The Alarm field will be highlighted. Press the Directional Key down to select
alarm options:
• Alarm: Press the Directional Key right or left to select Alarm On or Off.
• Time: Use the keypad to set a time for the alarm and the Left Soft Key to select
AM or PM.
102
090115_7076PP_EN_M_size.indd 102-103
TOOLS
• Frequency: Press the Directional Key right or left to select Once/Daily/Mon ~ Fri/
Weekends.
• Ringer ID: Press the Left Soft Key [Set] to select 1. Get New Ringtone or to select
a ringtone for the alarm sound from the list by pressing the OK Key. Press the Left
Soft Key [Play/Stop] to preview the ringtone.
• Reminder: Press the Directional Key right or left to select Reminder 0Min/Reminder
5Min/Reminder 10Min/Reminder 15Min.
4. To save an alarm setting press the OK Key [SAVE].
TURN ON/OFF THE ALARM SETTING
1. Press the OK Key [MENU], select Tools and press the OK Key then select Alarm
Clock and press the OK Key.
2. Select an Alarm (1, 2 or 3) and press the Right Soft Key [Options].
3. Select Turn On/Turn Off then press the OK Key.
RESET THE ALARM SETTING
1. Press the OK Key [MENU], select Tools and press the OK Key then select Alarm
Clock and press the OK Key.
2. Select an Alarm (1, 2 or 3) and press the Right Soft Key [Options].
103
2009.1.29 11:59:40 AM
TOOLS
3. Select Reset Alarm and press the OK Key, select Yes, and press the OK Key.
RESET ALL ALARM SETTINGS
TOOLS
• To stop press the Left Soft Key [Stop/Continue].
• To review the results, press the Directional Key up / down.
• To reset the stop watch, press the Right Soft Key [Reset].
1. Press the OK Key [MENU], select Tools and press the OK Key then select Alarm
Clock and press the OK Key.
WORLD CLOCK
2. Select an Alarm (1, 2 or 3) and press the Right Soft Key [Options].
3. Select Reset All and press the OK Key, select Yes, and press the OK Key.
To display the time and date in pre-programmed cities:
STOPWATCH
2. Select a city by pressing the Right Soft Key [City].
3. The world map appears with the city, its date and time. Use the Directional Key
Simultaneously times up to ten different events. To operate the stop watch:
1. Press the OK Key [MENU], select Tools and press the OK Key then select
Stopwatch and press the OK Key.
2. To measure a time period:
• To start, press the Left Soft Key [Start].
• To stop a time period and continue measuring another one,press the Right Soft Key
[Lap].
• To stop the second and continue measuring a third one, press the Right Soft Key
[Lap].
• To measure up to ten time periods, repeat the above steps.
104
090115_7076PP_EN_M_size.indd 104-105
1. Press the OK Key [MENU], select Tools and press the OK Key then select World
Clock and press the OK Key.
to select another city.
Note
If you press the Left Soft Key [Dst], then all Daylight Savings supporting cities
Dst turn on/off.
4. To return to the previous page and view a city’s time information, press the OK
Key.
105
2009.1.29 11:59:40 AM
TOOLS
TOOLS
NOTEPAD
EDIT SAVED MEMO
Your phone includes an internal notepad that can be used to compose and store
reminders and notes.
1. Press the OK Key [MENU], select Tools and press the OK Key then select
ADD NEW MEMO
To edit a saved memo:
Notepad and press the OK Key.
To compose a memo (there is an 80-letter limit):
2. Press the OK Key [VIEW] to view a selected Note.
1. Press the OK Key [MENU], select Tools and press the OK Key then select
3. Press the OK Key [EDIT]. Edit the Note then press the OK Key [SAVE].
Notepad and press the OK Key.
2. To add a new memo, press the Left Soft Key [Add].
Input a new text memo.
3. To save the memo, press the OK Key [SAVE].
VIEW MEMO
To view a saved memo:
1. Press the OK Key [MENU], select Tools and press the OK Key then select
Notepad and press the OK Key.
2. The list of all memos, in saved order, is displayed. Select a memo then press
the OK Key [VIEW].
106
090115_7076PP_EN_M_size.indd 106-107
ERASE SAVED MEMO
To erase a saved memo:
1. Press the OK Key [MENU], select Tools and press the OK Key then select
Notepad and press the OK Key.
2. Press the Right Soft Key [Options] and select Erase and press the OK Key.
3. Press the OK Key to select Yes.
ERASE ALL SAVED MEMOS
To erase all saved memos:
1. Press the OK Key [MENU], select Tools and press the OK Key then select
Notepad and press the OK Key.
107
2009.1.29 11:59:41 AM
CHAPTER 6
MEDIA CENTER
TOOLS
2. Press the Right Soft Key [Options] and select Erase All and press the OK Key.
3. Press the OK Key to select Yes.
CHAPTER 6
MEDIA
CENTER
Your phone provides a unique feature
- Media Center - that enables you to download ringtones,
games, and more from your network to your phone.
Please contact your service provider about these services.
This chapter also covers using your phone's built-in camera.
108
090115_7076PP_EN_M_size.indd 108-109
109
2009.1.29 11:59:41 AM
MEDIA CENTER
TUNES & TONES
GET NEW RINGTONES
To connect to MEDIA CENTER and download various ringtones:
1. Press the OK Key [MENU], select Media Center and press the OK Key, scroll to
Tunes & Tones and press the OK Key. Select Get New Ringtones and press the
OK Key.
2. If you have not previously downloaded any ringtones or ringtone applications,
select Get New Applications and press the OK Key. The browser will launch.
Follow the on-screen prompts.
To play download Tunes or Tones
1. Press the OK Key [MENU], select Media Center and press the OK Key, scroll to
Tunes & Tones and press the OK Key. Select My Ringtones and press the OK
Key.
Shortcut: Press the OK Key [MENU], select My Ringtones and press the OK Key.
2. Select the ringtone you want to play and press the OK Key [PLAY].
3. To stop, press the OK Key [STOP].
110
090115_7076PP_EN_M_size.indd 110-111
MEDIA CENTER
To erase download Tunes & Tones
1. Press the OK Key [MENU], select Media Center and press the OK Key, scroll to
Tunes & Tones and press the OK Key. Select My Ringtones and press the OK
Key.
2. Select the ringtone you want to erase and press the Right Soft Key [Options].
3. Select Erase and press the OK Key and then select Yes and press the OK Key to
erase.
TO ASSIGN DOWNLOADED TUNES & TONES
To select a desired ringtone or download a new ringtone:
1. Press the OK Key [MENU], select Media Center and press the OK Key, scroll to
Tunes & Tones and press the OK Key. Select My Ringtones and press the OK
Key.
2. Select a ringtone and press the Left Soft Key [Set As].
1. Ringtone: A confirmation message appears.
2. Contact ID: The SET AS CONTACT ID screen appears. Select the Contact you want
to assign the ringtone to and press the OK Key.
3. Alert Sounds: Press the corresponding number key to set the ringtone for one of
the following: All Messages/TXT Message/Pic/Voice Message/Voicemail. Press the
OK Key to set the desired ringtone.
111
2009.1.29 11:59:41 AM
MEDIA CENTER
3. Press the Right Soft Key [Options] to access the following options:
• Erase: Erase the current ringtone from your phone.
• Rename: To edit the ringtone’s title. (This option only appears for a downloaded
ringtone)
• Lock/Unlock: Lock or unlock the current ringtone in your phone. (This option only
appears for a downloaded ringtone.)
• Erase All: To erase all the ringtones in your phone.
• File Info: Displays information on the selected ringtone.
MY SOUNDS
To select a desired sound:
1. Press the OK Key [MENU], select Media Center and press the OK Key, scroll to
Tunes & Tones and press the OK Key. Select My Sounds and press the OK Key.
2. To play downloaded sounds, select the sound you want to play then press the
OK Key [PLAY].
By pressing the Right Soft Key [Options], you can choose from the following:
1. Send: To send a sound message.
2. To Online Album
3. Rename: To edit the sound title.
4. Lock/Unlocked: To select Lock or Unlocked.
112
090115_7076PP_EN_M_size.indd 112-113
MEDIA CENTER
5. Erase: To erase the sounds in your phone.
6. Erase All: To erase all the sounds in your phone.
7. File Info: Displays information on the selected sound, such as File Name, File Size,
File Type.
Record New
1. Press the OK Key [MENU], select Media Center and press the OK Key, scroll to
Tunes & Tones and press the OK Key. Select My Sounds and press the OK Key.
2. To record a sound or voice memo, select Record New and press the OK Key.
”Press OK to start Recording” will be displayed. Press the OK Key and you will
hear a beep sound. Start recording your sound/voice memo.
3. To stop recording, press the OK Key [STOP].
Erase Sounds
1. Press the OK Key [MENU], select Media Center and press the OK Key, scroll to
Tunes & Tones and press the OK Key. Select My Sounds and press the OK Key.
2. Scroll to select the sound you want to erase and press the Right Soft Key
[Options].
3. Scroll to Erase and press the OK Key.
113
2009.1.29 11:59:41 AM
MEDIA CENTER
MEDIA CENTER
4. Select Yes and press the OK Key.
MY PICTURES
PICTURES
You can view all the pictures you have taken, store selected images in your phone,
send pictures to the Online Album, delete images and access additional picture
options.
GET NEW PICTURES
1. Press the OK Key [MENU], select Media Center and press the OK Key, scroll to
To connect to MEDIA CENTER and download a variety of Pictures:
1. Press the OK Key [MENU], select Media Center and press the OK Key, scroll to
Pictures and press the OK Key. Select Get New Pictures and press the OK Key.
2. If you have not previously downloaded any images or applications, select Get
New Applications and press the OK Key. The browser will launch. Follow the
on-screen prompts.
3. Downloaded images are saved to the My Pictures menu.
By pressing the Right Soft Key [Options], you can choose from the following:
• View Properties
• Lock/Unlock
• Cancel Subscr.
• Upgrade Check
114
090115_7076PP_EN_M_size.indd 114-115
Pictures and press the OK Key. Select My Pictures and press the OK Key.
Shortcut: Press the OK Key [MENU], select My Pictures then press the OK Key.
2. You can view all the pictures you have stored in your phone.
3. Select the picture and then press the OK Key [VIEW].
• By pressing the Right Soft Key [Options], you can choose from the following:
1. Send: To send a picture message.
2. Set As: Assigns the selected PIX to display for specific tasks.
(Wallpaper/Picture ID)
3. To Online Album
4. Take Picture: To Camera mode to take a picture.
5. Get New Pictures: To download picure.
6. Rename: To edit the picture’s title.
7. Lock/Unlock: To select Lock or Unlock.
8. Erase All: To erase all the pictures in your phone.
115
2009.1.29 11:59:41 AM
MEDIA CENTER
9. File Info: Displays information on the selected picture, such as File Name, Date,
Time, Resolution, Size.
TAKE PICTURE
To take a picture:
1. With the flip open, press and hold the Camera Key .
2. Point the camera lens at your subject. You can check the picture framing
through the main display screen.
3. Press the OK Key [TAKE] to take the picture.
• To view captured images, press the Left Soft Key [My Pics].
• By pressing the Right Soft Key [Options], you can choose from the following:
1. Resolution: To select a resolution for a picture. (640x480/320x240/160x120)
2. Self Timer: To activate the camera’s timer function. (Off/3sec./5sec./10sec.)
3. Brightness: To select brightness control. (-2 ~ +2)
4. White Balance: To select a white tone balance.
(Auto/Sunny/Cloudy/Tungsten/Flourescent/Darkness)
5. Shutter Sound: To select a shutter sound. (Shutter/Silent/Say ”Cheez”/Ready!
1 2 3)
6. Color Effects: To select color effect among the following:
(Normal/Antique/Black & white/Negative)
7. Capture Mode: To select a capture mode. (Landscape/Portrait)
116
090115_7076PP_EN_M_size.indd 116-117
MEDIA CENTER
• Press the Directional Key right / left: Zoom up/down
(only if resolution is set to 160 x 120 or 320 x 240).
4. Press the Left Soft Key [Save] to save the picture to My Pictures. Press the
Right Soft Key [Erase] to delete the picture and take a new one. Press the OK
Key [SEND] to save the picture and send it to a mobile phone or email address.
ONLINE ALBUM
1. Press the OK Key [MENU], select Media Center and press the OK Key, scroll to
Pictures and press the OK Key. Select Online Album and press the OK Key.
2. Follow the on-screen prompts.
GAMES
DOWNLOADING GAMES
1. Press the OK Key [MENU], select Games and then press the OK Key.
2. If you have not previously downloaded any fun and games or applications,
select Get New Applications and press the OK Key. The browser will launch.
From the Download menu, select a game type and press the OK Key. Then
select the application and press the OK Key to download it.
117
2009.1.29 11:59:41 AM
MEDIA CENTER
3. Once the application has launched, follow the directions to download your
games. Downloaded games are saved to the Games folder.
PLAYING DOWNLOADED GAMES
1. Press the OK Key [MENU], select Games and then press the OK Key.
2. To play the game you downloaded, select the game and press the OK Key.
Follow the on-screen prompts.
MOBILE WEB
CONNECTING MOBILE WEB
1. Press the OK Key [MENU], select Media Center and press the OK Key, select
Mobile Web and then press the OK Key.
2. Mobile Web launches.
MEDIA CENTER
1. Press the OK Key [MENU], select Media Center and press the OK Key, select
Browse & Download and then press the OK Key.
2. Select Get New Applications and press the OK Key. The browser will launch.
From the Download menu, select an application type and press the OK Key.
Select the application and press the OK Key to download it.
EXTRAS
CONNECTING TO EXTRAS
1. Press the OK Key [MENU], select Media Center and press the OK Key, select
Extras and then press the OK Key.
2. If you have not previously downloaded any applications, select Get New
Applications and press the OK Key. The browser will launch. From the
Download menu, select an application type and press the OK Key. Select the
application and press the OK Key to download it.
BROWSE & DOWNLOAD
CONNECTING BROWSE & DOWNLOAD
To download Tools that can help you navigate to entertainment spots, restaurants
and provide you with up-to-date weather information:
118
090115_7076PP_EN_M_size.indd 118-119
119
2009.1.29 11:59:42 AM
CHAPTER 7
MESSAGING
MEMO
CHAPTER 7
MESSAGING
This chapter address Voicemail, TXT and Picture message.
120
090115_7076PP_EN_M_size.indd 120-121
121
2009.1.29 11:59:42 AM
MESSAGING
NEW MESSAGE
TXT MESSAGE
To send a new TXT message:
1. Press the Left Soft Key [Message], scroll to New Message and press the OK
Key, select TXT Message and press the OK Key.
2. Under ”To”, input the phone number, then press the OK Key.
By pressing the Right Soft Key [Add], you can choose from the following:
• From Contacts: Search for a phone number which is stored in the contacts list.
• Recent Calls: Search for a phone number which is stored in the recent calls list.
• Groups: Search the groups stored in the contacts list.
• To Contacts: Save the number or email you’ve entered to the contacts list, after
you enter the number.
3. Input your message. To change the input mode, press the Left Soft Key [Abc].
Press the Right Soft Key [Options] for the following:
• Insert Quick Text: Inserts already written sentences in TXT message.
• Save As Draft: To save the TXT message.
• Add: Inserts simple graphic images or EMS sounds in TXT message.
• Priority Level: Select High or Normal.
• Cancel Message: To cancel message.
MESSAGING
PICTURE MESSAGE
To send a new picture message:
1. Press the Left Soft Key [Message], scroll to New Message and press the OK
Key, select Picture Message and press the OK Key.
2. Under ”To”, input the phone number, then press the OK Key.
By pressing the Right Soft Key [Add], you can choose from the following:
• From Contacts: Search for a phone number which is stored in the contacts list.
• Recent Calls: Search for a phone number which is stored in the recent calls list.
• Groups: Search the groups stored in the contacts list.
• To Online Album: To send Picture message by using online Address.
• To Contacts: Save the number or email you’ve entered to the contacts list, when
you enter the number.
3. Input your message.
4. Scroll to the Picture field and press the Left Soft Key [My Pics]. Select the
picture and press the OK Key. You can only send one picture file.
5. Scroll to the Sound field and press the Left Soft Key [Sounds]. Select the sound
and press the OK Key. You can only send one sound file.
6. Scroll to the Subject field, enter your subject text.
4. To send the TXT Message, press the OK Key [SEND].
122
090115_7076PP_EN_M_size.indd 122-123
123
2009.1.29 11:59:42 AM
MESSAGING
Press the Right Soft Key [Options] for the following:
• Preview: To preview a written Picture Message.
• Save As Draft: To save the Picture Message.
• Quick Text: Inserts already written sentences in Picture Message.
• Add Slide: To add another message.
• Remove Picture: To remove inserted picture in Picture field.
• Remove Slide: To remove inserted Slide Message.
• Remove Sound: To remove inserted sound in Sound field.
• Priority Level: Select High or Normal.
• Cancel Message: To cancel message.
7. To send the message, press the OK Key [SEND].
INBOX
The Inbox manages received TXT/PIX/Web Alert messages. To access:
1. Press the Left Soft Key [Message], scroll to Inbox and press the OK Key.
2. Select a message, then press the OK Key [OPEN]. The message is displayed.
To delete a message, press the Left Soft Key [Erase], then select Yes or No and
press the OK Key.
By pressing the Right Soft Key [Options], you can choose from the following:
• Forward: To forward the message.
• Reply with Copy: To reply to a received message and include the received
message into the message.
124
090115_7076PP_EN_M_size.indd 124-125
MESSAGING
• Erase: To delete the message.
• Save Quick Text: Select to save received text msg.
• Add to Contacts: Select to save number to contacts.
• Save PIX: To save the picture in the message.
• Lock/Unlock: To lock or unlock the message.
• Message Info: To show received message information.
SENT
Manages all sent messages.
1. Press the Left Soft Key [Message], scroll to Sent and press the OK Key.
2. Select a message, and press the OK Key [OPEN].
The message is displayed. To delete a message, press the Left Soft Key [Erase],
then select Yes or No and press the OK Key. To resend a message, press the OK
Key [SEND].
By pressing the Right Soft Key [Options], you can choose from the following:
• Forward: To forward the message.
• Lock/Unlock: To lock or unlock the message.
• Save Quick Text: Select to save received text from the message.
• Add to Contacts: Select to save number to contacts.
• Save Graphics: To save a picture.
125
2009.1.29 11:59:42 AM
MESSAGING
• Save Sound: To save a sound.
• Message Info: To show received message information.
MESSAGING
VOICEMAIL
To access your voicemail:
1. Press the Left Soft Key [Message], scroll to Voicemail and press the OK Key.
DRAFTS
FIRST TIME USER
Draft Folder contains any draft messages or saved messages. If message
composition is interrupted by a voice call or other interrupting event, the text of
the current composition is automatically saved in the drafts folder.
1. Dial *86 then press the SEND Key.
2. At the recording, press .
3. To set up your account follow the voice tutorial.
1. Press the Left Soft Key [Message], scroll to Drafts and press the OK Key.
2. Scroll to a message to edit and press the OK Key [EDIT]. Edit the message.
3. To delete a message, press the Left Soft Key [Erase] and select Yes and then
press the OK Key.
By pressing the Right Soft Key [Options], you can choose from the following:
• Send: To send a selected message.
• Lock/Unlock: To lock or unlock the message.
• Add To Contacts: Select to save number to contacts.
• Erase Drafts: To erase all drafts messages.
126
090115_7076PP_EN_M_size.indd 126-127
EXISTING USER
1. Dial *86 then press the SEND Key.
2. At the recording, enter your 4 digit password, then press
3. To listen to new messages, press .
.
127
2009.1.29 11:59:42 AM
MESSAGING
MOBILE IM
DOWNLOAD NEW IM APPLICATIONS
1. Press the Left Soft Key [Message], scroll to Mobile IM and press the OK Key
then select Get New Applications and press the OK Key.
2. Press the Left Soft Key [Accept]. Select your browser and press the OK Key.
Follow the on-screen prompts.
EMAIL
Allows you to send an Email.
1. Press the Left Soft Key [Message], scroll to Email and press the OK Key.
2. Mobile Web launches.
3. Choose your email service and press the Left Soft Key [Select]. Follow the
on-screen prompts.
CHAT
Allows you to chat with Internet Messenger users.
1. Press the Left Soft Key [Message], scroll to Chat and press the OK Key.
128
090115_7076PP_EN_M_size.indd 128-129
MESSAGING
2. Mobile Web launches.
3. Choose your perferred social networking service and press the Left Soft Key
[Select]. Follow the on-screen prompts.
SETTINGS
Manages messaging features through various features.
ENTRY MODE
Sets an Entry Mode as a default. For example, if T9 Mode is the default, its icon
will appear.
1. Press the Left Soft Key [Message], then press the Left Soft Key [Settings] and
select Entry Mode and press the OK Key.
2. Select T9Word, Abc, ABC or 123.
3. Press the OK Key to save it.
AUTO SAVE SENT
1. Press the Left Soft Key [Message], then press the Left Soft Key [Settings] and
select Auto Save Sent and press the OK Key.
2. Select On, Off or Prompt.
129
2009.1.29 11:59:43 AM
MESSAGING
• On: All sent messages saved in the Sent box.
• Off: All sent messages not saved in the Sent box.
• Prompt: You will be asked if you want to save the message
3. Press the OK Key to save it.
AUTO ERASE INBOX
MESSAGING
2. Select On or Off.
• On: Text message displayed automatically.
• Off: Text message displayed by going to the Inbox or responding to interactive
notification.
3. Press the OK Key to save it.
Automatically erases Inbox messages when new messages arrive.
MULTIMEDIA AUTO RECEIVE
1. Press the Left Soft Key [Message], then press the Left Soft Key [Settings] and
1. Press the Left Soft Key [Message], then press the Left Soft Key [Settings] and
select Auto Erase Inbox and press the OK Key.
2. Select On or Off.
• On: Oldest message erased from Inbox automatically when message is full.
• Off: Oldest message not erased from Inbox automatically when message is full.
select Multimedia Auto Receive and press the OK Key.
2. Select On or Off.
• On: Multimedia message downloaded automatically.
• Off: Multimedia message must be retrieved from the Inbox or at
new TXT message prompt.
3. Press the OK Key to save it.
3. Press the OK Key to save it.
TXT AUTO VIEW
QUICK TEXT
If TXT Auto View is set to on, the user will be able to view the message. If TXT Auto
View is set to off, the user can view the message by entering SMS Menu-> Inbox.
1. Press the Left Soft Key [Message], then press the Left Soft Key [Settings] and
select TXT Auto View and press the OK Key.
130
090115_7076PP_EN_M_size.indd 130-131
To edit the Quick Text messages you have saved:
1. Press the Left Soft Key [Message], then press the Left Soft Key [Settings] and
select Quick Text and press the OK Key.
131
2009.1.29 11:59:43 AM
MESSAGING
2. Select a message from the list. To add a new Quick Text message, press the
Right Soft Key [Options], then select New and press the OK Key. Enter the new
message and press the OK Key [SAVE]. To edit the Quick Text message you
have selected, press the OK Key [EDIT] and then enter text and press the OK
Key [SAVE].
3. To erase a saved Quick Text message, press the Left Soft Key [Erase]. Select Yes
and press the OK Key.
Quick Text messages include:
What’s up? / Wanna meet up? / Check this out! / Whatcha doin? /Want to get
together later? / On my way / You’re the best! / Call me / I love you! / Miss you! /
Where are you? / Good morning! / Good night / How are you? / Thanks
VOICEMAIL #
To view or edit your Voicemail number:
1. Press the Left Soft Key [Message], then press the Left Soft Key [Settings] and
select Voicemail # and press the OK Key.
2. Input a new voice mail number.
3. Press the OK Key to save it.
132
090115_7076PP_EN_M_size.indd 132-133
MESSAGING
CALLBACK #
Edits a default callback number so that the recipient can call back or reply.
1. Press the Left Soft Key [Message], then press the Left Soft Key [Settings] and
select Callback # and press the OK Key.
2. Select On and input a new call back number.
3. Press the OK Key to save it.
SIGNATURE
Create a signature that can be automatically inserted at the end of a message.
1. Press the Left Soft Key [Message], then press the Left Soft Key [Settings] and
select Signature and press the OK Key.
2. To activate the Signature function, select Custom and press the OK Key. To
deactivate the Signature function, select None and press the OK Key.
3. To input a Signature, select Custom and press the OK Key, then enter the
Signature and press the OK Key to save it.
133
2009.1.29 11:59:43 AM
CHAPTER 8
MOBILE WEB
MEMO
CHAPTER 8
MOBILE WEB
This chapter addresses Internet services and web browsing.
For more detailed information contact your service provider.
134
090115_7076PP_EN_M_size.indd 134-135
135
2009.1.29 11:59:43 AM
MOBILE WEB
MOBILE WEB
LAUNCHING MOBILE WEB
ADD FAVORITE
Now you can access news, sports, weather, and e-mail from your phone. Mobile
Web keeps you updated by providing access to up-to-date information such as
news, sports, weather and stock quotes when you subscribe to Internet service
with your service provider. Please contact your service provider for a list of
available websites and service details.
Takes user to the VZW Add Favorite page.
1. To start your Internet browser and access websites through your wireless
1. To select ”Search”, press
handset press the Directional Key up.
1. To select ”Add Favorite”, press
SEARCH
Takes user to the VZW Search page.
The Browser Menu lists the actions necessary to operate the Browser. Press the
Directional Key left to launch Mobile Web and then press the Right Soft Key
[MENU] for the following options:
Takes user to the VZW Search > Go to Site page.
1. To select ”Go To URL”, press
Displays the current URL.
Returns the user to the home page.
1. To select ”Show URL”, press
090115_7076PP_EN_M_size.indd 136-137
.
SHOW URL
VZW HOME
136
.
GO TO URL
BROWSER MENU
1. To display the homepage, press
.
.
.
137
2009.1.29 11:59:43 AM
MOBILE WEB
MOBILE WEB
BACK
Returns to the previously viewed page.
1. To select ”Back”, press
.
MANAGE MEMORY
Displays the following list of options:
1. To select ”Manage Memory”, press
.
• Clear Cache: Clears the cache.
• Clear History: Clears the list of recently visited URLs.
• Clear Cookies: Clears saved cookies.
• Autofill: Automatically fills in character for browser recognized words.
SETTINGS
1. To select ”Settings”, press
.
1. Downloads: Selecting the ”Downloads” item allows the user to enable/disable
downloading images, background sounds, and object downloads when a URL is
accessed.
2. Restart Browser: Selecting ”Restart Browser” causes the history and cache to be
cleared and returns the user to the homepage.
138
090115_7076PP_EN_M_size.indd 138-139
3. Scroll Mode: Selecting ”Scroll Mode” from the Settings menu allows the user to
select the way text scrolls and the scroll speed.
4. Send Referrer: When the ”Send Referrer” item is selected from the Settings
menu, the browser allows the user to turn on or off sending the referrer URL.
5. Key Press Timeout: When the ”Key Press Timeout” item is selected from the
Settings menu, the browser allows the user to set the key press timeout as fast,
medium or slow. Medium is 1.5 seconds, slow 2 seconds and fast is 1 second. The
key press timeout is the period of time after which the cursor auto-advances to the
next entry position. In most cases, a single key can be used to enter more than one
character. Each time the key is pressed the last character of the line is replaced by
the next choice for that key. As long as the same key is re-pressed within key press
timeout, the last character cycles between all the choices for the key.
6. Connection Timeout: When the Connection Timeout item is selected from the
Settings menu, the browser allows the user to set the connection timeout. The
connection timeout determines how long the browser will wait for a response
from the network for a network request.
ADVANCED
Selecting the ”Advanced” item in the Browser Menu displays the advanced menu
items.
1. To select ”Advanced”, press
.
139
2009.1.29 11:59:44 AM
MOBILE WEB
• About...: Displays the name of the supplier of the Browser and the Browser SW
version.
• Refresh: Allows the user to reload the current URL.
• History: Displays the previous 20 websites you visited, where X=20.
• Encryption: Displays the following list of options.
1. Authentication: Gives the option to turn Authentication Caching ON or OFF.
2. Root Certificate: Shows the root security keys for TLS.
3. Current Certificate: Shows the current site security key for TLS (if applicable).
CHAPTER 9
SAFETY AND WARRANTY
CHAPTER 9
SAFETY AND
WARRANTY
This manual addresses the safety guidelines and precautions
to follow when operating your phone. Before operating your phone,
please be aware of all the safety details. This manual contains
the terms and conditions of services and the warranty for your phone.
Please review them thoroughly.
Safety
Avoid pote
Fcc compliance information
Warranty
140
090115_7076PP_EN_M_size.indd 140-141
141
2009.1.29 11:59:44 AM
SAFETY
SAFETY
SAFETY INFORMATION FOR WIRELESS HANDHELD
PHONES
WARNING!: Failure to follow these instructions could lead to serious personal
injury and possible property damage.
Read This Information Before Using Your Handheld
Portable Cellular Telephone
ELECTRONIC DEVICES
DRIVING SAFETY
Most modern electronic equipment is shielded from RF energy. However,
certain electronic equipment may not be shielded against the RF signals from
your wireless phone. Therefore, use of your phone must be restricted in certain
situations.
Talking on the phone while driving is extremely dangerous and is illegal in some
states. Remember, safety comes first. Check the laws and regulations on the use of
phones in the areas where you drive. Always obey them.
If you must use your phone while driving, please:
• Give full attention to driving. Driving safely is your first responsibility.
• Use hands-free operation and/or one-touch, speed dialing, and auto answer
modes.
• Pull off the road and park before making or answering a call.
An air bag inflates with great force. DO NOT place objects, including either
installed or portable wireless equipment, in the area over the air bag or in the air
bag deployment area. If in-vehicle wireless equipment is improperly installed and
the air bag inflates, serious injury could result.
142
090115_7076PP_EN_M_size.indd 142-143
Your wireless handheld portable telephone is a low power radio transmitter and
receiver. When it is ON, it receives and also sends out radio frequency (RF) signals.
PACEMAKERS
The Health Industry Manufacturers Association recommends that a minimum
separation of six (6”) inches be maintained between a handheld wireless
phone and a pacemaker to avoid potential interference with the pacemaker.
These recommendations are consistent with the independent research by and
recommendations of Wireless Technology Research.
Never come closer than six (6) inches to a person with a heart pacemaker implant
when using your phone. Doing so could result in interference with the function of
the pacemaker.
143
2009.1.29 11:59:44 AM
SAFETY
SAFETY
Persons with pacemakers :
VEHICLES
• ALWAYS keep the phone more than six inches from your pacemaker when the
phone is turned on.
• Do not carry the phone in a breast pocket.
• Use the ear opposite the pacemaker to minimize the potential for interference.
• If you have any reason to suspect that interference is taking place, turn your
phone OFF immediately.
RF signals may affect improperly installed or inadequately shielded electronic
systems in motor vehicles. Check with the manufacturer or its representative
regarding your vehicle. You should also consult the manufacturer of any equipment
that has been added to your vehicle.
HEARING AIDS
AIRCRAFT
Some digital wireless phones may interfere with some hearing aids. In the event
of such interference, you may want to consult your service provider (or call the
customer service line to discuss alternatives).
FCC regulations prohibit using your phone while in the air. Turn your phone OFF
before boarding an aircraft. Always request and obtain prior consent and approval
of an authorized airline representative before using your phone aboard an aircraft.
Always follow the instructions of the airline representative whenever using your
phone aboard an aircraft, to prevent any possible interference with airborne
electronic equipment.
OTHER MEDICAL DEVICES
If you use any other personal medical device, consult the manufacturer of your
device to determine if they are adequately shielded from external RF energy. Your
physician may be able to assist you in obtaining this information.
HOSPITALS AND HEALTH CARE FACILITIES
Turn your phone OFF in health care facilities when any regulations posted in
these areas instruct you to do so. Hospitals or healthcare facilities may be using
equipment that could be sensitive to external RF energy.
144
090115_7076PP_EN_M_size.indd 144-145
POSTED FACILITIES
Turn your phone OFF where posted notices so require.
BLASTING AREAS
To avoid interfering with blasting operations, turn your phone OFF when in a
”blasting area” or in areas posted ”Turn off two-way radio”. Obey all signs and
instructions.
145
2009.1.29 11:59:44 AM
SAFETY
SAFETY
POTENTIALLY EXPLOSIVE ATMOSPHERES
BODY-WORN OPERATION
Turn your phone OFF when in any area with a potentially explosive atmosphere
and obey all signs and instructions. Sparks in such areas could cause an explosion
or fire resulting in bodily injury or even death.
This device was tested for typical body-worn operations with the back of
the phone kept 2.5 cm from the body with a beltclip that contains metallic
components.To maintain compliance with FCC RF exposurer equirements, use only
belt-clips, holsters or similar accessories with which this device was tested. The use
of accessories that do not satisfy these requirements may not comply with FCC RF
exposure requirement,and should be avoided.
For more information about RF exposure, please visit the FCC website at www.fcc.
gov.
Areas with a potentially explosive atmosphere are often, but not always, clearly
marked. They include fueling areas such as gas stations; below deck on boats; fuel
or chemical transfer or storage facilities; vehicles using liquefied petroleum gas
(such as propane or butane); areas where the air contains chemicals or particles,
such as grain, dust, or metal powders; and any other area where you would
normally be advised to turn off your vehicle’s engine.
SAFETY INFORMATION FOR FCC RF EXPOSURE
Warning! Read this information before using your
phone.
In August 1996 the Federal Communications Commission (FCC) of the United
States with its action in Report and Order FCC 96-326 adopted an updated safety
standard for human exposure to radio frequency electromagnetic energy emitted
by FCC regulated transmitters. Those guidelines are consistent with the safety
standard previously set by both U.S. and international standards bodies. The design
of this phone complies with the FCC guidelines and these international standards.
146
090115_7076PP_EN_M_size.indd 146-147
SAR INFORMATION
THIS MODEL PHONE MEETS THE GOVERNMENT’S REQUIREMENTS FOR
EXPOSURE TO RADIO WAVES.
Your wireless phone is a radio transmitter and receiver. It is designed and
manufactured not to exceed the emission limits for exposure to radiofrequency
(RF) energy set by the Federal Communications Commission of the U.S.
Government. These limits are part of comprehensive guidelines and establish
permitted levels of RF energy for the general population. The guidelines are based
on standards that were developed by independent scientific organizations through
periodic and thorough evaluation of scientific studies.
147
2009.1.29 11:59:45 AM
SAFETY
The standards include a substantial safety margin designed to assure the safety of
all persons, regardless of age and health.
The exposure standard for wireless mobile phones employs a unit of measurement
known as the Specific Absorption Rate, or SAR. The SAR limit set by the FCC is 1.6
W/kg. * Tests for SAR are conducted with the phone transmitting at its highest
certified power level in all tested frequency bands. Although the SAR is determined
at the highest certified power level, the actual SAR level of the phone while
operating can be well below the maximum value. This is because the phone is
designed to operate at multiple power levels so as to use only the power required
to reach the network. In general, the closer you are to a wireless base station
antenna, the lower the power output. Before a phone model is available for sale
to the public, it must be tested and certified to the FCC that it does not exceed the
limit established by the government adopted requirement for safe exposure. The
tests are performed in positions and locations (e.g., at the ear and worn on the
body) as required by the FCC for each model.
The highest SAR value for this model phone when tested for use at the ear is
1.03W/Kg and when worn on the body, as described in this user guide, is 0.989W/
Kg. (Body-worn measurements differ among phone models, depending upon
available accessories and FCC requirements). While there may be differences
between the SAR levels of various phones and at various positions, they all meet
the government requirement for safe exposure.
148
090115_7076PP_EN_M_size.indd 148-149
SAFETY
The FCC has granted an Equipment Authorization for this model phone with
all reported SAR levels evaluated as in compliance with the FCC RF exposure
guidelines. SAR information on this model phone is on file with the FCC and can
be found under the Display Grant section of http://www.fcc.gov/oet/fccid after
searching on O6Y-CDM7076.
Additional information on Specific Absorption Rates (SAR) can be found on the
Cellular Telecommunications & Internet Association (CTIA) web-site at http://www.
phonefacts.net.
* In the United States and Canada, the SAR limit for mobile phones used by the
public is 1.6 watts/kg (W/kg) averaged over one gram of tissue. The standard
incorporates a substantial margin of safety to give additional protection for the
public and to account for any variations in measurements.
FDA CONSUMER UPDATE
U.S. Food and Drug Administration Cell Phone Facts
Consumer Information on Wireless Phones
1. What kinds of phones are the subject of this update?
The term ”wireless phone” refers here to handheld wireless phones with built-in
antennas, often called ”cell”, ”mobile”, or ”PCS” phones. These types of wireless
phones can expose the user to measurable radiofrequency energy (RF) because
149
2009.1.29 11:59:45 AM
SAFETY
SAFETY
of the short distance between the phone and the user’s head. These RF exposures
are limited by Federal Communications Commission safety guidelines that were
developed with the advice of FDA and other federal health and safety agencies.
When the phone is located at greater distances from the user, the exposure to RF is
drastically lower because a person's RF exposure decreases rapidly with increasing
distance from the source. The so-called ”cordless phones”, which have a base unit
connected to the telephone wiring in a house, typically operate at far lower power
levels, and thus produce RF exposures well within the FCC's compliance limits.
3. What is FDA's role concerning the safety of wireless phones?
Under the law, FDA does not review the safety of radiation-emitting consumer
products such as wireless phones before they can be sold, as it does with new
drugs or medical devices. However, the agency has authority to take action if
wireless phones are shown to emit radiofrequency energy (RF) at a level that is
hazardous to the user. In such a case, FDA could require the manufacturers of
wireless phones to notify users of the health hazard and to repair, replace or recall
the phones so that the hazard no longer exists.
2. Do wireless phones pose a health hazard?
The available scientific evidence does not show that any health problems are
associated with using wireless phones. There is no proof, however, that wireless
phones are absolutely safe. Wireless phones emit low levels of radiofrequency
energy (RF) in the microwave range while being used. They also emit very low
levels of RF when in the standby mode. Whereas high levels of RF can produce
health effects (by heating tissue), exposure to low level RF that does not produce
heating effects causes no known adverse health effects. Many studies of low level
RF exposures have not found any biological effects. Some studies have suggested
that some biological effects may occur, but such findings have not been confirmed
by additional research. In some cases, other researchers have had difficulty in
reproducing those studies, or in determining the reasons for inconsistent results.
Although the existing scientific data do not justify FDA regulatory actions, FDA
has urged the wireless phone industry to take a number of steps, including the
following:
150
090115_7076PP_EN_M_size.indd 150-151
• Support needed research into possible biological effects of RF of thetype emitted
by wireless phones;
• Design wireless phones in a way that minimizes any RF exposure to the user that
is not necessary for device function; and
• Cooperate in providing users of wireless phones with the best possible
information on possible effects of wireless phone use on human health
FDA belongs to an interagency working group of the federal agencies that have
responsibility for different aspects of RF safety to ensure coordinated efforts at the
federal level. The following agencies belong to this working group:
151
2009.1.29 11:59:45 AM
SAFETY
• National Institute for Occupational Safety and Health
• Environmental Protection Agency
• Federal Communications Commission
• Occupational Safety and Health Administration
• National Telecommunications and Information Administration
The National Institutes of Health participates in some interagency working group
activities, as well.
FDA shares regulatory responsibilities for wireless phones with the Federal
Communications Commission (FCC).
All phones that are sold in the United States must comply with FCC safety
guidelines that limit RF exposure. FCC relies on FDA and other health agencies for
safety questions about wireless phones.
FCC also regulates the base stations that the wireless phone networks rely upon.
While these base stations operate at higher power than do the wireless phones
themselves, the RF exposures that people get from these base stations are typically
thousands of times lower than those they can get from wireless phones. Base
stations are thus not the primary subject of the safety questions discussed in this
document.
152
090115_7076PP_EN_M_size.indd 152-153
SAFETY
4. What are the results of the research done already?
The research done thus far has produced conflicting results, and many studies have
suffered from flaws in their research methods. Animal experiments investigating
the effects of radiofrequency energy (RF) exposures characteristic of wireless
phones have yielded conflicting results that often cannot be repeated in other
laboratories. A few animal studies, however, have suggested that low levels of RF
could accelerate the development of cancer in laboratory animals. However, many
of the studies that showed increased tumor development used animals that had
been genetically engineered or treated with cancer-causing chemicals so as to
be pre-disposed to develop cancer in the absence of RF exposure. Other studies
exposed the animals to RF for up to 22 hours per day. These conditions are not
similar to the conditions under which people use wireless phones, so we don’t
know with certainty what the results of such studies mean for human health.
Three large epidemiology studies have been published since December 2000.
Between them, the studies investigated any possible association between the use
of wireless phones and primary brain cancer, glioma, meningioma, or acoustic
neuroma, tumors of the brain or salivary gland, leukemia, or other cancers. None of
the studies demonstrated the existence of any harmful health effects from wireless
phone RF exposures. However, none of the studies can answer questions about
long-term exposures, since the average period of phone use in these studies was
around three years.
153
2009.1.29 11:59:45 AM
SAFETY
5. What research is needed to decide whether RF exposure from wireless
phones poses a health risk?
A combination of laboratory studies and epidemiological studies of people
actually using wireless phones would provide some of the data that are needed.
Lifetime animal exposure studies could be completed in a few years. However, very
large numbers of animals would be needed to provide reliable proof of a cancer
promoting effect if one exists. Epidemiological studies can provide data that is
directly applicable to human populations, but 10 or more years’ follow-up may
be needed to provide answers about some health effects, such as cancer. This is
because the interval between the time of exposure to a cancer-causing agent and
the time tumors develop - if they do - may be many, many years.
The interpretation of epidemiological studies is hampered by difficulties in
measuring actual RF exposure during day-to-day use of wireless phones. Many
factors affect this measurement, such as the angle at which the phone is held, or
which model of phone is used.
6. What is FDA doing to find out more about the possible health effects of
wireless phone RF?
FDA is working with the U.S. National Toxicology Program and with groups of
investigators around the world to ensure that high priority animal studies are
conducted to address important questions about the effects of exposure to
radiofrequency energy (RF).
154
090115_7076PP_EN_M_size.indd 154-155
SAFETY
FDA has been a leading participant in the World Health Organization International
Electromagnetic Fields (EMF) Project since its inception in 1996. An influential
result of this work has been the development of a detailed agenda of research
needs that has driven the establishment of new research programs around
the world. The Project has also helped develop a series of public information
documents on EMF issues.
FDA and the Cellular Telecommunications & Internet Association (CTIA) have a
formal Cooperative Research and Development Agreement (CRADA) to do research
on wireless phone safety. FDA provides the scientific oversight, obtaining input
from experts in government, industry, and academic organizations. CTIA-funded
research is conducted through contracts to independent investigators. The initial
research will include both laboratory studies and studies of wireless phone users.
The CRADA will also include a broad assessment of additional research needs in
the context of the latest research developments around the world.
7. What steps can I take to reduce my exposure to radiofrequency energy
from my wireless phone?
If there is a risk from these products--and at this point we do not know that there
is--it is probably very small. But if you are concerned about avoiding even potential
risks, you can take a few simple steps to minimize your exposure to radiofrequency
energy (RF). Since time is a key factor in how much exposure a person receives,
155
2009.1.29 11:59:45 AM
SAFETY
reducing the amount of time spent using a wireless phone will reduce RF exposure.
• If you must conduct extended conversations by wireless phone every day, you
could place more distance between your body and the source of the RF, since the
exposure level drops off dramatically with distance. For example, you could use
a headset and carry the wireless phone away from your body or use a wireless
phone connected to a remote antenna
Again, the scientific data do not demonstrate that wireless phones are harmful.
But if you are concerned about the RF exposure from these products, you can use
measures like those described above to reduce your RF exposure from wireless
phone use.
8. What about children using wireless phones?
The scientific evidence does not show a danger to users of wireless phones,
including children and teenagers. If you want to take steps to lower exposure to
radiofrequency energy (RF), the measures described above would apply to children
and teenagers using wireless phones. Reducing the time of wireless phone use
and increasing the distance between the user and the RF source will reduce RF
exposure.
Some groups sponsored by other national governments have advised that children
be discouraged from using wireless phones at all. For example, the government
in the United Kingdom distributed leaflets containing such a recommendation in
156
090115_7076PP_EN_M_size.indd 156-157
SAFETY
December 2000. They noted that no evidence exists that using a wireless phone
causes brain tumors or other ill effects. Their recommendation to limit wireless
phone use by children was strictly precautionary; it was not based on scientific
evidence that any health hazard exists.
9. Do hands-free kits for wireless phones reduce risks from exposure to RF
emissions?
Since there are no known risks from exposure to RF emissions from wireless
phones, there is no reason to believe that hands-free kits reduce risks. Hands-free
kits can be used with wireless phones for convenience and comfort. These systems
reduce the absorption of RF energy in the head because the phone, which is the
source of the RF emissions, will not be placed against the head. On the other hand,
if the phone is mounted against the waist or other part of the body during use,
then that part of the body will absorb more RF energy. Wireless phones marketed
in the U.S. are required to meet safety requirements regardless of whether they are
used against the head or against the body. Either configuration should result in
compliance with the safety limit.
10. Do wireless phone accessories that claim to shield the head from RF
radiation work?
Since there are no known risks from exposure to RF emissions from wireless
phones, there is no reason to believe that accessories that claim to shield the
157
2009.1.29 11:59:45 AM
SAFETY
head from those emissions reduce risks. Some products that claim to shield the
user from RF absorption use special phone cases, while others involve nothing
more than a metallic accessory attached to the phone. Studies have shown that
these products generally do not work as advertised. Unlike ”hand-free” kits, these
so-called ”shields” may interfere with proper operation of the phone. The phone
may be forced to boost its power to compensate, leading to an increase in RF
absorption. In February 2002, the Federal trade Commission (FTC) charged two
companies that sold devices that claimed to protect wireless phone users from
radiation with making false and unsubstantiated claims. According to FTC, these
defendants lacked a reasonable basis to substantiate their claim.
11. What about wireless phone interference with medical equipment?
Radiofrequency energy (RF) from wireless phones can interact with some
electronic devices. For this reason, FDA helped develop a detailed test method to
measure electromagnetic interference (EMI) of implanted cardiac pacemakers and
defibrillators from wireless telephones. This test method is now part of a standard
sponsored by the Association for the Advancement of Medical instrumentation
(AAMI). The final draft, a joint effort by FDA, medical device manufacturers,
and many other groups, was completed in late 2000. This standard will allow
manufacturers to ensure that cardiac pacemakers and defibrillators are safe from
wireless phone EMI.
158
090115_7076PP_EN_M_size.indd 158-159
SAFETY
FDA has tested hearing aids for interference from handheld wireless phones and
helped develop a voluntary standard sponsored by the Institute of Electrical and
Electronic Engineers (IEEE). This standard specifies test methods and performance
requirements for hearing aids and wireless phones so that no interference occurs
when a person uses a ”compatible” phone and a ”compatible” hearing aid at the
same time. This standard was approved by the IEEE in 2000.
FDA continues to monitor the use of wireless phones for possible interactions with
other medical devices. Should harmful interference be found to occur, FDA will
conduct testing to assess the interference and work to resolve the problem.
Updated July 29, 2003
For more information, please visit the FDA website at http://www.fda.gov/
cellphones.
EMERGENCY CALLS
Never rely solely upon your wireless phone for essential communications (e.g.,
medical emergencies), if it can be avoided, since a wireless phone requires a
complex combination of radio signals, relay stations and landline networks for
its operation. Consequently, emergency calls may not always be possible under
all conditions on all wireless phone systems. Your wireless phone, however, may
159
2009.1.29 11:59:45 AM
SAFETY
SAFETY
sometimes be the only available means of communication at the scene of an
accident. When making an emergency call, always give the recipient all necessary
information as accurately as possible. Never terminate an emergency call until you
have received clearance to do so.
able to reach the handset (such transmissions do not always work indoors, for
example) ; and (c) handset signals reaching wireless ”base stations” (atmospheric
and environmental conditions may cause variations in handset receiving signal
strength).
FCC ENHANCED 911 (E911) RULES
Also the transmission of the ALI information is subject, in part, to system
constraints within the wireless network to which the E911 signal is transmitted
and over which UT Starcom has no control.
Background
The Federal Communications Commission (FCC) requires wireless carriers to
transmit specific latitude and longitude location (Automatic Location Identification
= ALI) information as well as ”911” calls to Public Safety Answering Points (PSAPs)
to identify the location of the caller in case of emergency.
Generally, the rules require that carriers identify an E911 caller’s location within 50
meters of the actual location for 67 percent of calls and within 150 meters of the
actual location for 95 percent of calls.
CDM7076’s ALI Capability
The CDM7076 is an ALI-capable phone equipped with a GPS (Global Positioning
System) receiver supporting a satellite-based GPS ALI-capable network to comply
with the FCC’s ALI requirements.
The network compliance with the above FCC requirements is dependent on: (a) the
use of digital technology by the wireless network; (b) GPS satellite signals being
160
090115_7076PP_EN_M_size.indd 160-161
Finally, customers are advised that the CDM7076’s ALI capability is to be used for
E911 purposes only.
This feature allows you to place an emergency call even if your phone is in
”Phone Lock” or ”Restrict” mode when you dial the preprogrammed emergency
number, 911, #911, or *911. It also operates in out-of-service areas. The phone
maintains the emergency mode until you press the END Key after disconnecting an
emergency call. In emergency call mode, the phone can receive an incoming call
from any available system.
To call ”911” in ”Phone Lock” or ”Restrict” mode.
1. Enter
,
,
.
2. Press the SEND Key
. ”911” and ”Emergency” will appear on the screen.
161
2009.1.29 11:59:46 AM
SAFETY
SAFETY
COMPLIANCE WITH OTHER FCC REGULATIONS
GENERAL SAFETY
OPERATING PROCEDURES
PRECAUTIONS
Never violate any of the following Rules and Regulations of the FCC when using
your Cellular Phone. Such violations are punishable by fine, imprisonment or both.
Your Handheld Portable Telephone is a high quality piece of equipment. Before
operating, read all instructions and cautionary markings on the product, battery
and adapter/charger.
• Never use obscene, indecent, or profane language.
• Never use your Cellular Phone to send false distress calls.
• Never wiretap or otherwise intercept a phone call, unless you have first obtained
the consent of the parties participating in the call.
• Never make any anonymous calls to annoy, harass, or molest other people.
• Never charge another account without authorization, to avoid
payment for service.
• Never willfully or maliciously interfere with any other radio
communications.
• Never refuse to yield the line when informed that it is needed for an Emergency
Call. Also, never take over a line by stating falsely that it is needed for an
emergency.
162
090115_7076PP_EN_M_size.indd 162-163
Failure to follow the directions below could result in serious bodily injury and/or
property damage due to battery liquid leakage, fire or rupture.
• DO NOT use or store this equipment in a place where it will be exposed to high
temperatures, such as near an open flame or heat-emitting equipment.
• DO NOT drop your device or subject it to severe shock.
When not using, lay down the unit to avoid possible damage due to instability.
• DO NOT expose this equipment to rain or spilled beverages.
• DO NOT use unauthorized accessories.
• DO NOT disassemble the phone or its accessories. If service or repair is required,
return unit to an authorized Personal Communications Devices cellular service
center. If unit is disassembled, the risk of electric shock or fire may result.
163
2009.1.29 11:59:46 AM
SAFETY
ANTENNA
ANTENNA SAFETY
Use only the supplied or an approved replacement antenna. Unauthorized
antennas, modifications, or attachments could impair call quality, damage the
phone, or result in violation of FCC regulations. Please contact your local dealer for
replacement antenna.
Do not use the phone with a damaged antenna. If a damaged antenna comes into
contact with the skin, a minor burn may result. Please contact your local dealer for
replacement antenna.
BATTERY
BATTERY SAFETY
Your device uses a removable and rechargeable lithium ion battery. Please contact
customer service for assistance should you need a replacement battery.
DOs
• Only use the battery and charger approved by the manufacturer.
SAFETY
• If the battery is stored in temperatures above or below the recommended range,
give it time to warm up or cool down before using.
• Completely drain the battery before recharging. It may take one to four days to
completely drain.
• Store the discharged battery in a cool, dark, and dry place.
• Purchase a new battery when its operating time gradually decreases after fully
charging.
• Properly dispose of the battery according to local regulations.
DON’Ts
• Don’t attempt to disassemble the battery – it is a sealed unit with no serviceable
parts.
• Don’t expose the battery terminals to any other metal object (e.g., by carrying it
in your pocket or purse with other metallic objects such as coins, clips and pens).
This can short circuit and critically damage the battery.
• Only use the battery for its original purpose.
• Don’t leave the battery in hot or cold temps. Otherwise, it could significantly
reduce the capacity and lifetime of the battery.
• Try to keep batteries in a temperature between 41°F (5°C) and 95°F (35°C).
• Don’t dispose of the battery into a fire.
164
090115_7076PP_EN_M_size.indd 164-165
165
2009.1.29 11:59:46 AM
SAFETY
Lithium ion batteries are recyclable. When you replace your built-in battery, please
request the repair center to recycle the battery in accordance with RBRC standards.
When disposing of the battery by yourself, please call RBRC at (800) 822-8837 for
proper disposal tips.
Never touch any fluid that might leak from the built-in battery. Such liquid when
in contact with the eyes or skin, could cause injury to the skin or eyes. Should the
liquid come into contact with the eyes, irrigate the eyes thoroughly with clean
water and immediately seek medical attention. In the event the liquid comes into
contact with the skin or clothing, wash it away immediately with clean water.
CHARGER
CHARGER SAFETY
The charger designed by Personal Communications Devices for this unit requires
the use of a standard 120 V AC power source for its operation.
• Never attempt to disassemble or repair a charger.
• Never use a charger if it has a damaged or worn power cord or plug. Always
contact a Personal Communications Devices authorized service center, if repair or
replacement is required.
166
090115_7076PP_EN_M_size.indd 166-167
SAFETY
• Never alter the AC cord or plug on your charger. If the plug
will not fit into the available outlet, have a proper outlet installed by a qualified
electrician.
• Never allow any liquids or water to spill on the charger when it is connected
to an AC power source. Always use the authorized charger to avoid any risk of
bodily injury or damage to your cellular phone or battery.
• Never attempt to connect or disconnect the charger with wet hands. Always
unplug the charger from the power source before attempting any cleaning.
Always use a soft cloth dampened with water to clean the equipment, after it
has been unplugged.
Handling the cord on this product or cords associated with accessories sold with
this product, will expose you to lead, a chemical known to the State of California
to cause birth defects or other reproductive harm. Wash hands after handling.
Always disconnect the charger from the power source when it is not in use.
FCC HEARING-AID COMPATIBILITY (HAC)
REGULATIONS FOR WIRELESS DEVICES
On July 10, 2003, the U.S. Federal Communications Commission (FCC) Report and
Order in WT Docket 01-309 modified the exception of wireless phones under the
167
2009.1.29 11:59:46 AM
SAFETY
Hearing Aid Compatibility Act of 1988 (HAC Act) to require digital wireless phones
be compatible with hearing-aids. The intent of the HAC Act is to ensure reasonable
access to telecommunications services for persons with hearing disabilities.
While some wireless phones are used near some hearing devices (hearing aids
and cochlear implants), users may detect a buzzing, humming, or whining noise.
Some hearing devices are more immune than others to this interference noise, and
phones also vary in the amount of interference they generate.
The wireless telephone industry has developed a rating system for wireless phones,
to assist hearing device users find phones that may be compatible with their
hearing devices.
Not all phones have been rated. Phones that are rated have the rating on their
box or a label located on the box. The ratings are not guarantees. Results will vary
depending on the user’s hearing device and hearing loss. If your hearing device
happens to be vulnerable to interference, you may not be able to use a rated
phone successfully. Trying out the phone with your hearing device is the best way
to evaluate it for your personal needs.
M-Ratings: Phones rated M3 or M4 meet FCC requirements and are likely to
generate less interference to hearing devices than phones that are not labeled.
M4 is the better/higher of the two ratings.Hearing devices may also be rated. Your
hearing device manufacturer or hearing health professional may help you find
this rating. Higher ratings mean that the hearing device is relatively immune to
168
090115_7076PP_EN_M_size.indd 168-169
SAFETY
interference noise. The hearing aid and wireless phone rating
values are then added together. A sum of 5 is considered
acceptable for normal use. A sum of 6 is considered for best
use. In the above example, if a hearing aid meets the M2 level
rating and the wireless phone meets the M3 level rating, the
sum of the two values equal M5. This should provide the hearing aid user with
”normal usage” while using their hearing aid with the particular wireless phone.
”Normal usage” in this context is defined as a signal quality that is acceptable for
normal operation. The M mark is intended to be synonymous with the U mark. The
T mark is intended to be synonymous with the UT mark.
The M and T marks are recommended by the Alliance for Telecommunications
Industries Solutions (ATIS). The U and UT marks are referenced in Section 20.19 of
the FCC Rules. The HAC rating and measurement procedure are described in the
American National Standards Institute (ANSI) C63.19 standard.
For information about hearing aids and digital wireless phone:
• FCC Hearing Aid Compatibility and Volume Control
http://www.fcc.gov/cgb/dro/hearing.html
• GallaudetUniversity,RERC
http://tap.gallaudet.edu/DigWireless.KS/DigWireless.htm
169
2009.1.29 11:59:46 AM
SAFETY
• Self Help for Hard of Hearing People Inc. [SHHH]
www.hearingloss.org/hat/TipsWirelessPhones.htm
• The Hearing Aid Compatibility FCC Order
http://hraunfoss.fcc.gov/edocs_public/attachmatch/ FCC-03-168A1.pdf
SAFETY
Repetitive Motion Injuries
When you play games on your phone, you may experience occasional discomfort
in your hands, arms, shoulders, neck, or other parts of your body. Follow these
instructions to avoid problems such as tendonitis, carpal tunnel syndrome, or other
musculoskeletal disorders:
GAMES
• Take a minimum 15-minute break every hour of game playing.
SEIZURES/BLACKOUTS
• If your hands, wrists, or arms become tired or sore while playing, stop and rest
for several hours before playing again.
Warning
A very small percentage of individuals may experience epileptic seizures when
exposed to certain light patterns or flashing lights. Exposure to certain patterns
or backgrounds on a computer screen, or while playing video games, may induce
an epileptic seizure in these individuals. Certain conditions may induce previously
undetected epileptic symptoms even in persons who have no history of prior
seizures or epilepsy.
If you, or anyone in your family, have an epileptic condition, consult your physician
prior to playing. If you experience any of the following symptoms while playing
a video or computer game -- dizziness, altered vision, eye or muscle twitches,
loss of awareness, disorientation, any involuntary movement, or convulsions -IMMEDIATELY discontinue use and consult your physician before resuming play.
170
090115_7076PP_EN_M_size.indd 170-171
• If you continue to have sore hands, wrists, or arms during or after play, stop
playing and see a doctor.
CAMERA
Do not aim your camera at the sun. The sunlight passing through the camera lens
may cause damage to the camera.
RECYCLE YOUR CELL PHONE!
Carriers marketing this cell phone have an in-store phone take-back program.
Consumers can drop off their used wireless devices to specified carrier retail
171
2009.1.29 11:59:47 AM
SAFETY
SAFETY
outlets for recycling purposes. For a list of carrier members and collection sites,
visit the cellular industry’s recycling website www.recyclewirelessphones.com.
to remove it).
To mail in your old wireless device to Personal Communications Devices for
recycling purposes, simply package your old wireless device and any accessories
(including discharged batteries) in appropriate shipping materials and mail to: For
Recycling Personal Communications Devices LLC 555 Wireless Blvd. Hauppauge,
NY 11788
(from verzonwireless.com):
When behind the wheel, safe driving is your responsibility and it should always be
your first priority.
Scientific research on the subject of wireless phone use and driving has been
conducted worldwide for several years. According to the National Highway Traffic
Safety Administration (NHTSA), the available research indicates that using a
wireless phone while driving degrades a driver’s performance, whether it is a
hands-free or hand-held wireless phone. NHTSA advises that the “safest course of
action is to refrain from using a cell phone while driving.” NHTSA’s policy on “Cell
Phone Use While Driving,” as well as Frequently Asked Questions on the subject,
are available at www.nhtsa.gov (click on “Traffic Safety” then on “Drowsy and
Distracted Driving”). For your well being and the well being of those around you,
you should consider turning your phone off and allowing calls to go to Voice Mail
while you are driving.
If you choose to use your wireless phone while driving, several jurisdictions have
adopted “hands-free” and other restrictions on the use of wireless devices while
driving. It is your responsibility to know and to comply with the law in your area.
Wireless phones also can be donated to the Wireless Foundation’s DONATE A
PHONE® CALL TO PROTECT® campaign. This charitable cause collects wireless
phones to benefit victims of domestic violence. All donated phones are tax
deductible. You may mail the phone to:CALL TO PROTECT2555 Bishop Circle
WestDexter, MI 48130
-ORDrop the phone off at a local collection center. For a list of collectioncenters,visit
www.wirelessfoundation.org/CalltoProtect/dropoff.cfm
Before returning any wireless device for recycling purposes, please remember to
terminate your service on the device, clear the device of any stored information
and remove the device’s SIM card, if it has one (please contact your wireless
provider to find out if your device contains a SIM card and for assistance on how
172
090115_7076PP_EN_M_size.indd 172-173
RESPONSIBLE DRIVING
173
2009.1.29 11:59:47 AM
SAFETY
RF EMISSIONS
(from verzonwireless.com):
CONSUMER INFORMATION ABOUT RADIO FREQUENCY EMISSIONS
Your wireless phone, which contains a radio transmitter and receiver, emits radio
frequency energy during use. The following consumer information addresses
commonly asked questions about the health effects of wireless phones.
ARE WIRELESS PHONES SAFE?
Scientific research on the subject of wireless phones and radio frequency ("RF")
energy has been conducted worldwide for many years, and continues. In the
United States, the Food and Drug Administration ("FDA") and the Federal
Communications Commission ("FCC") set policies and procedures for wireless
phones. The FDA issued a website publication on health issues related to cell
phone usage where it states, “The scientific community at large … believes that
the weight of scientific evidence does not show an association between exposure
to radiofrequency (RF) from cell phones and adverse health outcomes. Still the
scientific community does recommend conducting additional research to address
gaps in knowledge. That research is being conducted around the world and FDA
continues to monitor developments in this field.” You can access the FDA website
at http://www.fda.gov/cellphones. You can also contact the FDA toll-free at (888)
174
090115_7076PP_EN_M_size.indd 174-175
SAFETY
463-6332 or (888) INFO-FDA. The FCC issued its own website publication stating
that "[t]here is no scientific evidence that proves that wireless telephone usage
can lead to cancer or other problems, including headaches, dizziness or memory
loss." This publication is available at http://www.fcc.gov/cgb/consumerfacts/
mobilephone.html or through the FCC at (888) 225-5322 or (888) CALL-FCC. The
National Cancer Institute (“NCI”) states that concerns about the potential health
effects of using cellular phones ? “and specifically the suggestion that using a cell
phone may increase a person's risk of developing brain cancer ? are not supported
by a growing body of research on the subject.” You can access NCI’s review of the
research at http://www.cancer.gov/ncicancerbulletin/NCI_Cancer_Bulletin_092308/
page7.
WHAT DOES "SAR" MEAN?
In 1996, the FCC, working with the FDA, the U.S. Environmental Protection Agency,
and other agencies, established RF exposure safety guidelines for wireless phones
in the United States. Before a wireless phone model is available for sale to the
public, it must be tested by the manufacturer and certified to the FCC that it does
not exceed limits established by the FCC. One of these limits is expressed as a
Specific Absorption Rate, or "SAR". SAR is a measure of the rate of absorption of
RF energy in the body. Tests for SAR are conducted with the phone transmitting
at its highest power level in all tested frequency bands. Since 1996, the FCC has
175
2009.1.29 11:59:47 AM
SAFETY
required that the SAR of handheld wireless phones not exceed 1.6 watts per
kilogram, averaged over one gram of tissue. Although the SAR is determined at the
highest power level, the actual SAR value of a wireless phone while operating can
be less than the reported SAR value. This is because the SAR value may vary from
call to call, depending on factors such as proximity to a cell site, the proximity of
the phone to the body while in use, and the use of hands-free devices. For more
information about SARs, see the FCC’s OET Bulletins 56 and 65 at http://www.fcc.
gov/Bureaus/Engineering_Technology/Documents/bulletins and http://www.fcc.
gov/oet/ea/, or visit the Cellular Telecommunications Industry Association website
at http://www.ctia.org/consumer_info/index.cfm/AID/10371. You may also wish to
contact the manufacturer of your phone.
CAN I MINIMIZE MY RF EXPOSURE?
If you are concerned about RF, there are several simple steps you can take to
minimize your RF exposure. You can, of course, reduce your talk time. You can
place more distance between your body and the source of the RF, as the exposure
level drops off dramatically with distance. The FDA/FCC website states that "[h]
ands-free kits can be used with wireless phones for convenience and comfort.
These systems reduce the absorption of RF energy in the head because the phone,
which is the source of the RF emissions, will not be placed against the head. On
the other hand, if the phone is mounted against the waist or other part of the
176
090115_7076PP_EN_M_size.indd 176-177
SAFETY
body during use, then that part of the body will absorb more RF energy. Wireless
phones marketed in the U.S. are required to meet safety requirements regardless of
whether they are used against the head or against the body. Either configuration
should result in compliance with the safety limit." Also, if you use your wireless
phone while in a car, you can use a phone with an antenna on the outside of
the vehicle. You should also read and follow your wireless phone manufacturer’s
instructions for the safe operation of your phone.
DO WIRELESS PHONES POSE ANY SPECIAL RISKS TO CHILDREN?
The FDA website states that "[t]he scientific evidence does not show a danger
to any users of cell phones from RF exposure, including children and teenagers."
The FDA website further states that "[s]ome groups sponsored by other national
governments have advised that children be discouraged from using cell phones
at all. For example, the Stewart Report from the United Kingdom [“UK”] made
such a recommendation in December 2000. In this report a group of independent
experts noted that no evidence exists that using a cell phone causes brain tumors
or other ill effects. [The UK’s] recommendation to limit cell phone use by children
was strictly precautionary; it was not based on scientific evidence that any health
hazard exists." A copy of the UK’s leaflet is available at http://www.dh.gov.uk
(search "mobile"), or you can write to: NRPB, Chilton, Didcot, Oxon OX11 0RQ,
United Kingdom. Copies of UK’s annual reports on mobile phones and RF are
177
2009.1.29 11:59:47 AM
SAFETY
available online at http://www.iegmp.org.uk and http://www.hpa.org.uk/radiation/
(search "mobile"). Parents who wish to reduce their children’s RF exposure may
choose to restrict their children’s wireless phone use.
WHERE CAN I OBTAIN FURTHER INFORMATION?
For further information, see the following additional resources:
U.S. FOOD AND DRUG ADMINISTRATION
FDA Consumer magazine
November-December 2000
Telephone: (888) INFO-FDA
http://www.fda.gov/fdac/features/2000/600_phone.html
U.S. FEDERAL COMMUNICATIONS COMMISSION
445 12th St. S.W.
Washington, D.C. 20554
Telephone: (888) 225-5322
http://www.fcc.gov/oet/rfsafety
INDEPENDENT EXPERT GROUP ON MOBILE PHONES
http://www.iegmp.org.uk
178
090115_7076PP_EN_M_size.indd 178-179
SAFETY
ROYAL SOCIETY OF CANADA
EXPERT PANEL ON POTENTIAL HEALTH RISKS
OF RADIOFREQUENCY FIELDS FROM WIRELESS
TELECOMMUNICATIONS DEVICES
283 Sparks Street
Ottawa, Ontario K1R 7X9
Canada
Telephone: (613) 991-6990
http://www.rsc.ca/index.php?page=expert_panels_rf&lang_id=1&page_id=120
WORLD HEALTH ORGANIZATION
Avenue Appia 20
1211 Geneva 27
Switzerland
Telephone: 011 41 22 791 21 11
http://www.who.int/mediacentre/factsheets/fs193/en/
International Commission on Non-Ionizing Radiation Protection
c/o Bundesamt fur Strahlenschutz
Ingolstaedter Landstr.1
85764 Oberschleissheim
179
2009.1.29 11:59:47 AM
SAFETY
Germany
Telephone: 011 49 1888 333 2156
http://www.icnirp.de
American National Standards Institute
1819 L Street, N.W., 6th Floor
Washington, D.C. 20036
(202) 293-8020
http://www.ansi.org
National Council on Radiation Protection and Measurements
7910 Woodmont Avenue, Suite 800
Bethesda, MD 20814-3095
Telephone: (301) 657-2652
http://www.ncrponline.org
Engineering in Medicine and Biology Society, Committee on Man and Radiation
(COMAR), of the Institute of Electrical and Electronics Engineers
http://http://ewh.ieee.org/soc/embs/comar/
SAFETY AVOID POTENTIAL HEARING LOSS
CAUTION:
Avoid potential hearing loss.
Prolonged exposure to loud sounds (including music) is the most common cause
of preventable hearing loss. Some scientific research suggests that using portable
audio devices, such as portable music players and cellular telephones, at high
volume settings for long durations may lead to permanent noise-induced hearing
loss. This includes the use of headphones (including headsets, earbuds and
Bluetooth® or other wireless devices). Exposure to very loud sound has also been
associated in some studies with tinnitus (a ringing in the ear), hypersensitivity to
sound and distorted hearing. Individual susceptibility to
noise-induced hearing loss and other potential hearing problems varies.
The amount of sound produced by a portable audio device varies depending on
the nature of the sound, the device, the device settings and the headphones. You
should follow some commonsense recommendations when using any portable
audio device:
• Set the volume in a quiet environment and select the lowest volume at which
you can hear adequately.
• When using headphones, turn the volume down if you cannot hear the people
speaking near you or if the person sitting next to you can hear what you are
180
090115_7076PP_EN_M_size.indd 180-181
181
2009.1.29 11:59:47 AM
AVOID POTEATIAL HEARING LOSS
listening to.
• Do not turn the volume up to block out noisy surroundings. If you choose to
listen to your portable device in a noisy environment, use noise-cancelling
headphones to block out background environmental noise.
• Limit the amount of time you listen. As the volume increases, less time is
required before your hearing could be affected.
• Avoid using headphones after exposure to extremely loud noises, such as rock
concerts, that might cause temporary hearing loss. Temporary hearing loss might
cause unsafe volumes to sound normal.
• Do not listen at any volume that causes you discomfort. If you experience ringing
in your ears, hear muffled speech or experience any temporary hearing difficulty
after listening to your portable audio device, discontinue use and consult your
doctor.
YOU CAN OBTAIN ADDITIONAL INFORMATION ON THIS SUBJECT
FROM THE FOLLOWING SOURCES:
American Academy of Audiology
11730 Plaza American Drive, Suite 300 Reston, VA 20190
Voice: (800) 222-2336
182
090115_7076PP_EN_M_size.indd 182-183
AVOID POTEATIAL HEARING LOSS
Email: [email protected]
Internet: www.audiology.org
National Institute on Deafness and Other Communication Disorders
National Institutes of Health
31 Center Drive, MSC 2320
Bethesda, MD USA 20892-2320
Voice: (301) 496-7243
Email: [email protected]
Internet: http://www.nidcd.nih.gov/health/hearing
National Institute for Occupational Safety and Health
Hubert H. Humphrey Bldg.
200 Independence Ave., SW
Washington, DC 20201
Voice: 1-800-35-NIOSH (1-800-356-4674)
Internet: http://www.cdc.gov/niosh/topics/noise/default.html
©2008 Verizon Wireless. All Rights Reserved.
183
2009.1.29 11:59:48 AM
FCC COMPLIANCE INFORMATION
This device complies with Part 15 of FCC Rules.Operation is subject to the
following two conditions:
(1) This device may not cause harmful interference, and
(2) This device must accept any interference received.
Including interference that may cause undesired operation.
INFORMATION TO USER
This equipment has been tested and found to comply with the limits for a Class
B digital device, pursuant to part 15 of the FCC Rules. These limits are designed
to provide reasonable protection against harmful interference in a residential
installation. This equipment generates, uses and can radiate radio frequency energy
and, if not installed and used in accordance with the instructions, may cause
harmful interference to radio communications. However, there is no guarantee that
interference will not occur in a particular installation.
FCC COMPLIANCE INFORMATION
- Increase the separation between the equipment and receiver.
- Connect the equipment into an outlet on a circuit different from that to which the
receiver is connected.
- Consult the dealer or an experienced radio/ tv technician for help.
CAUTION: The user who makes changes or modifications to the unit without
the express approval by the manufacturer will void user authority to
operate the equipment.
If this equipment does cause harmful interference to radio or television reception,
which can be determined by turning the equipment off and on, the user is
encouraged to try to correct the interference by one or more of the following
measures:
- Reorient or relocate the receiving antenna.
184
090115_7076PP_EN_M_size.indd 184-185
185
2009.1.29 11:59:48 AM
WARRANTY
MANUFACTURER’S WARRANTY
12 MONTH LIMITED WARRANTY
Personal Communications Devices, LLC (the Company) warrants to the original
retail purchaser of this Personal Communications Devices handheld portable
cellular telephone, that should this product or any part thereof during normal
consumer usage and conditions, be proven defective in material or workmanship
that results in product failure within the first twelve (12) month period from the
date of purchase, such defect(s) will be repaired or replaced (with new or rebuilt
parts) at the Company’s option, without charge for parts or labor directly related to
the defect(s).
The antenna, keypad, display, rechargeable battery and battery charger, if included,
are similarly warranted for twelve (12) months from date of purchase.
This Warranty extends only to consumers who purchase the product in the United
States or Canada and it is not transferable or assignable.
This Warranty does not apply to:
(a) Product subjected to abnormal use or conditions, accident, mishandling,
neglect, unauthorized alteration, misuse, improper installation or repair or
improper storage;
186
090115_7076PP_EN_M_size.indd 186-187
WARRANTY
(b) Product whose mechanical serial number or electronic serial number has been
removed, altered or defaced.
(c) Damage from exposure to moisture, humidity, excessive temperatures or
extreme environmental conditions;
(d) Damage resulting from connection to, or use of any accessory or other product
not approved or authorized by the Company;
(e) Defects in appearance, cosmetic, decorative or structural items such as framing
and non-operative parts;
(f) Product damaged from external causes such as fire, flooding, dirt, sand, weather
conditions, battery leakage, blown fuse, theft or improper usage of any electrical
source.
The Company disclaims liability for removal or reinstallation of the product,
for geographic coverage, for inadequate signal reception by the antenna or for
communications range or operation of the cellular system as a whole.
When sending your wireless device to Personal Communications Devices, LLC for
repair or service, please note that any personal data or software stored on the
device may be inadvertently erased or altered. Therefore, we strongly recommend
you make a back up copy of all data and software contained on your device before
submitting it for repair or service. This includes all contact lists, downloads (i.e.
third-party software applications, ringtones, games and graphics) and any other
187
2009.1.29 11:59:48 AM
WARRANTY
data added to your device. In addition, if your wireless device utilizes a SIM or
Multimedia card, please remove the card before submitting the device and store
for later use when your device is returned, Personal Communications Devices,
LLC is not responsible for and does not guarantee restoration of any third-party
software, personal information or memory data contained in, stored on, or
integrated with any wireless device, whether under warranty or not, returned to
Personal Communications Devices for repair or service.
To obtain repairs or replacement within the terms of this Warranty, the product
should be delivered with proof of Warranty coverage (e.g. dated bill of sale),
the consumer’s return address, daytime phone number and/or fax number and
complete description of the problem, transportation prepaid, to the Company at
the address shown below or to the place of purchase for repair or replacement
processing.
In addition, for reference to an authorized Warranty station in your area, you may
telephone in the United States (800) 229-1235, and in Canada (800) 465-9672 (in
Ontario call 416-695-3060).
THE EXTENT OF THE COMPANY’S LIABILITY UNDER THIS WARRANTY IS LIMITED
TO THE REPAIR OR REPLACEMENT PROVIDED ABOVE AND, IN NO EVENT, SHALL
THE COMPANY’S LAIBILITY EXCEED THE PURCHASE PRICE PAID BY PURCHASER
FOR THE PRODUCT.
188
090115_7076PP_EN_M_size.indd 188-189
WARRANTY
ANY IMPLIED WARRANTIES, INCLUDING ANY IMPLIED WARRANTY OF
MERCHANTABILITY OR FITNESS FOR A PARTICULAR PURPOSE, SHALL BE LIMITED
TO THE DURATION OF THIS WRITTEN WARRANTY. ANY ACTION FOR BREACH OF
ANY WARRANTY MUST BE BROUGHT WITHIN A PERIOD OF 18 MONTHS FROM
DATE OF ORIGINAL PURCHASE.
IN NO CASE SHALL THE COMPANY BE LIABLE FOR AN SPECIAL CONSEQUENTIAL
OR INCIDENTAL DAMAGES FOR BREACH OF THIS OR ANY OTHER WARRANTY,
EXPRESS OR IMPLIED, WHATSOEVER. THE COMPANY SHALL NOT BE LIABLE FOR
THE DELAY IN RENDERING SERVICE UNDER THIS WARRANTY OR LOSS OF USE
DURING THE TIME THE PRODUCT IS BEING REPAIRED OR REPLACED.
No person or representative is authorized to assume for the Company any liability
other than expressed herein in connection with the sale of this product.
Some states or provinces do not allow limitations on how long an implied
warranty lasts or the exclusion or limitation of incidental or consequential damage
so the above limitation or exclusions may not apply to you. This Warranty gives you
specific legal rights, and you may also have other rights, which vary from state to
state or province to province.
189
2009.1.29 11:59:48 AM
WARRANTY
IN USA:
IN CANADA:
190
MEMO
Personal Communications Devices
555 Wireless Blvd. Hauppauge, NY 11788
(800) 229-1235
PCD Canada Company
5535 Eglinton Avenue West
Suite# 234
Toronto, ON M9C 5K5
(800) 465-9675
191
TABLA DE CONTENIDOS
CAPITULO 1. ANTES DE USAR SU TELEFONO
CONTENIDO DEL PAQUETE .....................................................................................................................8
DESCRIPCION DEL TELEFONO .................................................................................................................9
USO DE LA BATERIA..............................................................................................................................15
CONEXIÓN ELECTRICA.......................................................................................................................17
INFORMACION DEL MANEJO DE LA BATERIA......................................................................................19
QUE HACER........................................................................................................................................19
QUE NO HACER .................................................................................................................................19
CAPITULO 2. OPERACIÓN BASICA
ENCENDIENDO Y APAGANDO EL TELEFONO........................................................................................22
ENCENDIENDO EL TELEFONO ............................................................................................................22
APAGANDO EL TELEFONO..................................................................................................................22
ACCESANDO EL MENU .........................................................................................................................23
RESUMEN DEL MENU ...........................................................................................................................24
FUNCIONES BASICAS ............................................................................................................................27
HACIENDO UNA LLAMADA................................................................................................................27
CONTESTANDO LLAMADAS ...............................................................................................................27
FUNCION DE PAUSA/ESPERA .............................................................................................................28
LLAMADA TRIPARTITA........................................................................................................................28
FUNCION DE INDENTIFICADOR DE LLAMADA ...................................................................................29
FUNCION DE LLAMADA EN ESPERA ..................................................................................................29
AJUSTE DE VOLUMEN ........................................................................................................................30
ALTAVOZ.............................................................................................................................................30
MODO VIBRADOR ENCENDIDO/APAGADO ........................................................................................31
090115_7076PP_SP_M_size.indd 1
1
2009.1.29 12:8:18 PM
TABLA DE CONTENIDOS
DURANTE UNA LLAMADA ....................................................................................................................32
MUTE (UNMUTE) ...............................................................................................................................32
ENVAR MENSAJE DE TEXTO ...............................................................................................................32
CONTACTOS .......................................................................................................................................32
LLAMADAS RECIENTES ......................................................................................................................33
CUADERNO DE ANOTACIONES...........................................................................................................33
UBICACION ........................................................................................................................................33
HACIENDO UNA LLAMADA DE EMERGENCIA ......................................................................................34
911 CON EL TELEFONO BLOQUEADO ................................................................................................34
911 USANDO CUALQUIER SISTEMA DISPONIBLE ..............................................................................34
CAPITULO 3. FUNCIONES DE MEMORIA
GUARDANDO UN NUMERO TELEFONICO .............................................................................................38
INGRESANDO LETRAS, NUMEROS Y SIMBOLOS...................................................................................47
TIPO DE ENTRADA ESTANDAR ...........................................................................................................48
MODO DE ENTRADA T9 .....................................................................................................................49
MODO NUMERICO.............................................................................................................................50
MODO DE SIMBOLOS.........................................................................................................................51
LLAMANDO DESDE LISTA DE CONTACTOS...........................................................................................52
MARCACION DE UNO Y DOS TOQUES ...............................................................................................52
CAPITULO 4. MENU DE FUNCIONES
CONTACTOS ..........................................................................................................................................56
CONTACTO NUEVO ............................................................................................................................56
LISTA DE CONTACTOS ........................................................................................................................56
GRUPOS .............................................................................................................................................57
2
090115_7076PP_SP_M_size.indd 2-3
TABLA DE CONTENIDOS
MARCACION RAPIDA.........................................................................................................................61
EN CASO DE EMERGENCIA ................................................................................................................62
LLAMADAS RECIENTES .........................................................................................................................66
LLAMADAS RECIENTES ......................................................................................................................66
PERDIDAS...........................................................................................................................................66
RECIBIDAS .........................................................................................................................................67
MARCADAS........................................................................................................................................68
TODAS ................................................................................................................................................70
VER CRONOMETROS ..........................................................................................................................71
PROGRAMACION ..................................................................................................................................72
AJUSTES DE SONIDO ..........................................................................................................................72
PROGRAMACION DE PANTALLA ........................................................................................................77
PROGRAMACION DE TELEFONO ........................................................................................................83
PROGRAMACIÓN DE LLAMADAS.......................................................................................................94
MEMORIA ..........................................................................................................................................98
INFORMACION DE TELEFONO..........................................................................................................100
MI VERIZON ........................................................................................................................................103
MI VERIZON .....................................................................................................................................103
CAPITULO 5. HERRAMIENTAS
HERRAMIENTAS ..................................................................................................................................106
COMANDOS DE VOZ ........................................................................................................................106
CALCULADORA ................................................................................................................................108
CALENDARIO ...................................................................................................................................109
RELOJ DESPERTADOR.......................................................................................................................112
3
2009.1.29 12:8:19 PM
TABLA DE CONTENIDOS
CRONOMETRO .................................................................................................................................115
RELOJ MUNDIAL ..............................................................................................................................116
CUADERNO DE ANOTACIONES.........................................................................................................116
CAPITULO 6. CENTRO DE MEDIOS
CENTRO DE MEDIOS ...........................................................................................................................120
MUSICA Y TONOS.............................................................................................................................120
IMAGENES .......................................................................................................................................124
JUEGOS ............................................................................................................................................128
INTERNET MOVIL .............................................................................................................................129
NAVEGAR Y DESCARGAR.................................................................................................................129
EXTRAS ............................................................................................................................................130
CAPITULO 7. MENSAJERIA
MENSAJERIA .......................................................................................................................................132
MENSAJE NUEVO.............................................................................................................................132
BUZON DE ENTRADA .......................................................................................................................135
ENVIADOS........................................................................................................................................136
BORRADORES ..................................................................................................................................136
CORREO DE VOZ ..............................................................................................................................137
IM MOVIL.........................................................................................................................................138
CORREO ELECTRONICO ...................................................................................................................139
CHAT ................................................................................................................................................139
AJUSTES ...........................................................................................................................................139
4
090115_7076PP_SP_M_size.indd 4-5
TABLA DE CONTENIDOS
CAPITULO 8. INTERNET MOVIL
INTERNET MOVIL ................................................................................................................................146
ACCESANDO INTERNET MOVIL ........................................................................................................146
MENU NAVEGADOR ........................................................................................................................146
CAPITULO 9 SEGURIDAD Y GARANTIA
SEGURIDAD ........................................................................................................................................152
INFORMACION DE SEGURIDAD PARA TELEFONOS INHALAMBRICOS .............................................152
INFORMACION DE SEGURIDAD DE LA FCC SOBRE LA EXPOSICION A RF ........................................157
INFORMACION DE SAR ....................................................................................................................158
INFORMACION DE LA FDA PARA EL CONSUMIDOR ........................................................................160
LLAMADAS DE EMERGENCIA ..........................................................................................................171
CUMPLIMIENTO CON OTRAS REGULACIONES DE LA FCC ...............................................................174
SEGURIDAD GENERAL .....................................................................................................................175
ANTENA ...........................................................................................................................................176
BATERIA ...........................................................................................................................................176
CARGADOR ......................................................................................................................................178
REGULACIONES DE LA FCC PARA LA COMPATIBILIDAD DE DISPOSITIVOS
DE AYUDA AUDITIVA (HAC) CON EQUIPOS INALAMBRICOS ............................................................180
JUEGOS ............................................................................................................................................183
CAMARA ..........................................................................................................................................184
RECICLAR SU TELEFONO CELULAR! .................................................................................................184
CONDUCIR RESPOSABLEMENTE ......................................................................................................186
RF EMISIONS....................................................................................................................................187
EVITE LA PERDIDA POTENCIAL DEL OIDO ...........................................................................................195
5
2009.1.29 12:8:19 PM
TABLA DE CONTENIDOS
PRECUACION: ..................................................................................................................................195
INFORMACION DE CUMPLIMENTO DE LA FCC ...................................................................................199
INFORMACION PARA EL USUARIO ..................................................................................................199
GARANTIA ..........................................................................................................................................201
GARANTIA DEL FABRICANTE ...........................................................................................................201
CAPITULO 1
ANTES DE USAR SU TELEFONO
CAPITULO 1
ANTES DE
USAR SU
TELEFONO
Este capítulo contiene información importante acerca
de su teléfono incluyendo:
Contenido del Paquete
Descripción del Teléfono
Uso de la Batería
Información del el Manejo de la Batería
6
090115_7076PP_SP_M_size.indd 6-7
7
2009.1.29 12:8:19 PM
CONTENIDO DEL PAQUETE
DESCRIPCION DEL TELEFONO
Este paquete incluye todos los artículos mostrados abajo. Si alguno falta o luce
diferente, contacte inmediatamente a la tienda donde compró su teléfono.
Lente de Cámara
Altavoz
Tecla OK
Tecla de Función
Izquierda
Tecla de Cámara
Tecla ENVIAR
Tecla de Navegación
Tecla de Función
Derecha
Tecla Altavoz
Tecla ENCENDIDO/
APAGADO
Tecla Borrar
Teléfono
Batería Estándar
Micrófono
Conector
de Cargador/
Datos
Manual de Usuario
8
090115_7076PP_SP_M_size.indd 8-9
Guía de Referencia
Rápida
Teclas de
Volumen
Conector
Audífono
Tecla Lateral
de Cámara
Tecla Comandos
de Voz
Cargador de Pared
9
2009.1.29 12:8:20 PM
DESCRIPCION DEL TELEFONO
(TECLAS DE FUNCIONES)
Tecla de NAVEGACION
Permite navegar a través de las opciones del menú del teléfono y brinda atajos a las
funciones del teléfono desde el modo en reposo.
Tecla SEND
Presione ésta tecla para hacer o recibir una llamada.
Si es presionada en modo de reposo, permite accesar la lista de Todas las Llamadas.
Tecla ENCENDIDO/APAGADO
Presiónela para terminar una llamada o regresar al modo de reposo. Si se deja presionada, apaga/
enciende el teléfono.
Tecla de Función Izquierda
Presiónela para mostrar el Menú de Mensajería o la función mostrada en la línea inferior.
Tecla de Función Derecha
Presiónela para accesar a la Lista de Contactos o la función mostrada en la línea inferior.
DESCRIPCION DEL TELEFONO
(TECLAS DE FUNCIONES)
Tecla Shift
Esta tecla ingresa el símbolo asterisco [*] para funciones de llamadas. En modo de texto, presiónela
para cambiar el modo de escritura. Presione y sostenga para mostrar el símbolo (+) para marcado
internacional.
Tecla Espacio
Ingresa el símbolo [#] para funciones de llamada. En modo texto, presiónela para aceptar la palabra y
adicionar un espacio. Presione y sostenga para habilitar o deshabilitar el modo Vibrador.
Tecla lateral de cámara:
Presione para acceder el menú de Fotos. Presione y sostenga para acceder a la cámara incluida.
Tecla Comandos de Voz
Con el teléfono abierto presione para acceder al menú de Comandos de Voz.
Teclas de Volumen
Presione para ajustar el volumen en el modo de reposo o ajustar el volumen durante una llamada.
Tecla CLR
Presiónela para borrar un dígito en la pantalla o volver a la página anterior. Si se deja sostenida, borra
todos los dígitos en la pantalla.
Tecla de Altavoz
Presione para encender/apagar el altavoz.
Tecla Cámara
Con el teléfono abierto, presione para accede el menú de fotos o presione y sostenga para acceder a
la cámara.
10
090115_7076PP_SP_M_size.indd 10-11
11
2009.1.29 12:8:20 PM
DESCRIPCION DEL TELEFONO
(INDICADORES DE PANTALLA)
DESCRIPCION DEL TELEFONO
(INDICADORES DE PANTALLA)
Modo de Avión
Todos los sonidos Apagados
La transmisión y recepción de información está restringida. Las funciones que no requieran red pueden
ser accedidas.
Indica que todos los sonidos y alertas están apagados.
Roaming
El teléfono le avisará con un tono de alerta cuando una llamada es recibida.
El teléfono está fuera del área de cobertura.
Alarma solamente
Vibrador solamente
Capa de Conexión Segura
El teléfono vibrará cuando una llamada es recibida.
Indica que se ha establecido una comunicación segura entre el cliente y el servidor durante una
comunicación de datos usando encriptación.
Altavoz
Voz Privada
La opción de voz privada está encendida.
Llamada de datos
Una descarga está en progreso.
Sin Servicio
Indica que el teléfono no puede recibir señal de la red.
TTY
Modo TTY está activo
Llamada de Voz
El modo de altavoz está activado.
Llamadas Pérdidas
Indica que tiene llamadas perdidas.
Mensaje Nuevo
Indica que tiene un nuevo mensaje de TXT o PIX.
Cita en Calendario
Una alarma de evento esta activa.
Mensaje de Voz
Indica que tiene mensajes de voz.
Una llamada está en progreso.
*Ningún icono indica que el teléfono está en modo de reposo.
Alarma encendida
Localización Encendida
Antena
Aparece cuando hay una alarma configurada.
Indica que el servicio de localización del teléfono está activado o desactivado.
Nivel de Batería
Nivel de Carga de la Batería — Entre más barras aparezcan, más carga tiene.
12
090115_7076PP_SP_M_size.indd 12-13
Teléfono Bloqueado
Indica que el teléfono está bloqueado.
13
2009.1.29 12:8:22 PM
DESCRIPCION DEL TELEFONO
(INDICADORES DE PANTALLA)
Fuerza de la Señal D
Servicio Digital está disponible.
USO DE LA BATERIA
(INSTALACION DELA BATERIA)
1. Deslice la batería dentro de la ranura alineando los contactos situados en la
parte superior de la unidad y presione hasta que usted oiga el “click”.
Fuerza de la señal 1X
Servicio 1x está disponible.
2. Alinee las lengüetas de la cubierta con las ranuras en la tapa del teléfono y
deslice la cubierta de la batería sobre la unidad.
14
090115_7076PP_SP_M_size.indd 14-15
15
2009.1.29 12:8:24 PM
USO DE LA BATERIA
(REMOVER LA BATERIA)
1. Remueva la batería de la unidad.
USO DE LA BATERIA
(CARGANDO LA BATERIA)
CONEXIÓN ELECTRICA
1. Para cargar el teléfono, abra el la cubierta del puerto de Datos/Carga en la
parte inferior del teléfono y conecte el adaptador del cargador. Conecte el otro
extremo a un tomacorriente estándar.
2. Para remover la batería, empuje hacia abajo la parte superior de la batería
mientras inserta su dedo en la ranura, luego levántela desde la parte posterior
y deslícela hacia fuera.
2. Para remover el adaptador, apriete los botones laterales del adaptador y hale.
3. Retire el cargador de pared del toma corriente.
3. Alinee las lengüetas de la cubierta con las ranuras en la parte superior del
teléfono y deslice la cubierta de la batería sobre la unidad.
Nota
• Si la batería no está puesta correctamente en el compartimiento, el teléfono
no encenderá y/o la batería podría caerse durante el uso.
16
090115_7076PP_SP_M_size.indd 16-17
Consideraciones:
• Cuando la batería esté siendo cargada con el teléfono apagado, la pantalla
mostrará estatus de carga. El teléfono no podrá ser usado hasta no ser
encendido.
• La batería no está cargada al momento de la compra.
• Cargue la batería completamente antes de usarla.
• Es más eficiente cargar la batería con el teléfono apagado.
17
2009.1.29 12:8:24 PM
USO DE LA BATERIA
(CARGANDO LA BATERIA)
• La batería debe estar conectada al teléfono para poder ser cargada.
• El tiempo de operación de la batería disminuye con el tiempo.
• Si la batería no opera normalmente, debe ser reemplazada.
INFORMACION DEL MANEJO DE LA BATERIA
QUE HACER
l
Use solamente la batería y el cargador aprobados por el fabricante
l
Use la batería solamente para su propósito original.
l
Intente conservar la batería a una temperatura entre 41°F (5°C) y 95°F (35°C).
l
Si la batería es expuesta a temperaturas superiores o inferiores a las recomendadas,
espere a que se enfríe o caliente antes de usarla.
l
Descargue completamente la batería antes de recargarla.
Esto puede tomar entre uno y cuatro días.
l
Guarde la batería descargada en un lugar fresco, oscuro y seco.
l
Compre una batería nueva cuando su tiempo de operación disminuya gradualmente
después de estar cargada completamente.
l
Recicle apropiadamente la batería de acuerdo a las leyes locales.
QUE NO HACER
18
090115_7076PP_SP_M_size.indd 18-19
l
No intente destapar la batería. Esta es una unidad sellada cuyas partes no son útiles para
otros servicios.
l
No ocasione accidentalmente un corto circuito con la batería al llevarla en su bolsillo o
cartera junto con otros objetos metálicos tales como: monedas, lapiceros, etc. Esto puede
ocasionar daños críticos a la batería.
19
2009.1.29 12:8:25 PM
CAPITULO 2
OPERACIÓN BASICA
INFORMACION DEL MANEJO DE LA BATERIA
l
No deje la batería expuesta a temperaturas frías o calientes. De lo contrario su capacidad
de vida útil podría reducir notoriamente.
l
No destruya la batería usando fuego.
CAPITULO 2
OPERACIÓN
BASICA
Este capítulo señala y explica las funciones básicas de su teléfono,
las cuales incluye:
Encendiendo y Apagando el Teléfono
Accesando el Menú
Resumen del Menú
Funciones Básicas
Durante una Llamada
Haciendo una Llamada de Emergencia
20
090115_7076PP_SP_M_size.indd 20-21
21
2009.1.29 12:8:25 PM
ENCENDIENDO Y APAGANDO EL TELEFONO
ENCENDIENDO EL TELEFONO
1. Presione y sostenga la tecla END hasta que la pantalla encienda y el teléfono
Nota
suene.
• Si “Teléfono Bloqueado” aparece en la pantalla, presione la Tecla de Función
Derecha [Desbloquear] luego ingrese los cuatro dígitos de su contraseña.
• La contraseña por defecto son los últimos cuatro dígitos de su número
telefónico.
APAGANDO EL TELEFONO
1. Presione y sostenga la tecla END hasta que la pantalla se apague.
Nota
• Cargue o recargue inmediatamente la batería cuando la señal “BATERIA
BAJA. EL TELEFONO SE ESTA APAGANDO!” aparezca en la pantalla. La
memoria del teléfono se puede dañar si el teléfono se apaga debido a que
la batería se agotó completamente.
• Apague el teléfono antes de remover o reemplazar la batería. Si el teléfono
está encendido, la información que no ha sido guardada se puede perder.
22
090115_7076PP_SP_M_size.indd 22-23
ACCESANDO EL MENU
Su teléfono puede ser personalizado usando el menú. Cada función puede ser
accedida usando la Tecla de Navegación o presionando el número que corresponde
a dicho menú.
1. Para accesar el menú en modo de reposo, presione la Tecla OK [MENU].
2. Presione la Tecla de Navegación izquierda, derecha, arriba o abajo para
navegar a través del menú.
3. Para retornar a la página previa, presione la tecla CLR
. Para salir del
menú actual y regresar al modo de reposo presione la tecla END
.
4. Para acceder al menú de Mensajería, presione la Tecla de Función Izquierda
[Mensajes].
5. Para acceder a la lista de Contactos presione la Tecla de Función Derecha
[Contactos].
Nota
• Todas las indicaciones en este manual están basadas en la distribución
del menú y los temas en la pantalla. Si ha cambiado alguna de estas
configuraciones, las indicaciones pueden variar.
• Vea la página 83 para ver como cambiar los atajos a las funciones.
23
2009.1.29 12:8:25 PM
RESUMEN DEL MENU
RESUMEN DEL MENU
CONTACTOS
MIS TIMBRES
1. Nuevo Contacto
2. Lista de Contactos
3. Grupos
4. Marcados Rápidos
5. En Caso de Emergencia
1. Obtener nuevos timbres
MENSAJERIA
1. Nuevo Mensaje
1.1. Mensaje de TXT
1.2. Mensaje de Foto
1.3. Mensaje de Voz
2. Buzón de entrada
3. Enviado
4. Borradores
5. Mensajes de Voz
6. IM Móvil
7. Correo Electrónico
8. Chatear
CENTRO DE MEDIOS
1. Música y Tonos
1.1. Obtener Nuevos Timbres
1.2. Mis Timbres
1.3. Mis Sonidos
2. Fotos
2.1. Obtener Nuevas Fotos
2.2. Mis Fotos
2.3. Tomar Foto
2.4. Album en Línea
3. Juegos
4. Internet Móvil
5. Navegar y Descargar
6. Extras
MIS FOTOS
LLAMADAS RECIENTES
JUEGOS
1. Perdidas
2. Recibidas
3. Marcadas
4. Todas
5. Ver Cronómetros
1. Obtener Nueva Aplicación
24
090115_7076PP_SP_M_size.indd 24-25
HERRAMIENTAS
1. Comandos de Voz
2. Calculadora
3. Calendario
4. Reloj Despertador
5. Cronómetro
6. Reloj Mundial
7. Cuaderno de Anotaciones
PROGRAMACION
1. Mi Verizon
2. Programación de Sonido
2.1. Sonidos de Llamadas
2.1.1. Timbre
2.1.2. Vibrador
2.2. Sonidos de Alerta
2.2.1. Mensaje de TXT
2.2.2. Mensaje de Voz/Foto
2.2.3. Correo de Voz
2.2.4. Tono de Emergencia
2.3. Volumen de Teclas
2.4. Alertas de Servicio
2.4.1. ERI
2.4.2. Alerta de Minuto
2.4.3. Llamada Conectada
2.5. Apagado/Encendido
2.5.1. Encendido
2.5.2. Apagado
3. Programación de Pantalla
3.1. Aviso
3.1.1. Aviso Personal
3.1.2. Aviso ERI
3.2. Luz de Fondo
3.2.1. Pantalla
3.2.2. Teclado
3.3. Contraste
3.4. Fondo de Pantalla
3.5. Mostrar Temas
3.6. Programación del Menú Principal
3.7. Fuentes de Marcado
3.8. Formato de Reloj
4. Programación de Teléfono
4.1. Modo de Aeroplano
4.2. Establecer Accesos Directos
4.2.1. Establecer Accesos Directos
4.2.2. Establecer Teclas de
Navegación
4.3. Comandos de Voz
4.3.1. Indicaciones
4.3.2. Llamada de Alerta
4.4. Idioma
4.5. Ubicación
4.6. Seguridad
4.6.1. Editar Códigos
4.6.1.1. Teléfono solamente
4.6.1.2. Llamadas y Servicios
4.6.2. Restricciones
4.6.2.1. Programación de
25
2009.1.29 12:8:26 PM
RESUMEN DEL MENU
Localización
4.6.2.2. Llamadas
4.6.2.3. Mensajes
4.6.3. Programar Bloqueo de
Teléfono
4.6.4. Bloquear Teléfono Ahora
4.6.5. Restaurar Teléfono
4.7. Selección de Sistema
5. Programación de Llamada
5.1. Opciones de Respuesta
5.2. Reintentar Automáticamente
5.3. Modo TTY
5.4. Marcado oprimiendo un botón
5.5. Privacidad de Voz
5.6. Marcación Asistida
5.7. Tonos DTMF
6. Memoria
6.1. Uso de Memoria de Teléfono
6.2. Mis Fotos
6.3. Mis Timbres
6.4. Mis Sonidos
7. Información del Teléfono
7.1. Mi Número
7.2. Versión SW/HW
7.3. Glosario de Icono
26
090115_7076PP_SP_M_size.indd 26-27
FUNCIONES BASICAS
HACIENDO UNA LLAMADA
1. Ingrese el número telefónico incluyendo el código de área y presione la Tecla
SEND.
Nota
Para modificar el número telefónico que ha sido ingresado:
• Para borrar un dígito a la vez, presione la tecla CLR
.
• Para borrar todos los números, deje presionada la tecla CLR
.
2. Para finalizar una llamada presione la tecla END.
CONTESTANDO LLAMADAS
1. Cuando su teléfono suene o vibre, presione la tecla SEND para responder la
llamada entrante. (Dependiendo de la configuración que sea seleccionada,
la llamada también puede ser contestada abriendo el flip o presionando
cualquier dígito del teclado. Ver página 94 para detalles).
Para ignorar llamadas entrantes, presione la Tecla de Función Derecha [Ignorar].
2. Para finalizar una llamada, presione la tecla END.
Nota
En el modo de Respuesta Automática, una llamada es contestada
automáticamente luego de repicar por cinco segundos.
27
2009.1.29 12:8:26 PM
FUNCIONES BASICAS
FUNCION DE PAUSA/ESPERA
Las pausas son usadas para sistemas automáticos. (Por ejemplo, buzón de voz,
tarjetas de llamadas). Inserte una pausa seguida de un número telefónico.
Posteriormente ingrese otro grupo de números. El segundo grupo de números
es discado automáticamente luego de la pausa. Esta función es útil al llamar a
sistemas que requieran un código.
1. Para insertar una pausa/espera, ingrese un número telefónico. Luego presione
la Tecla de Función Derecha [Opciones]. Seleccione bien sea una pausa de
2-seg. (aparecerá una “P”) o una pausa (aparecerá una “T”) y presione la
Tecla Ok. Ingrese el número adicional (número pin o número de tarjeta de
crédito).
2. Presione la tecla SEND
para discar o presione la Tecla de función
Izquierda [Guardar] para guardar el número.
LLAMADA TRIPARTITA
Con la llamada tripartita, se puede establecer una conversación simultánea con
dos personas. Cuando esta función es usada, los cargos por tiempo al aire se
aplican por las dos llamadas.
1. Ingrese el número al que desea llamar. Luego presione la tecla SEND.
28
090115_7076PP_SP_M_size.indd 28-29
FUNCIONES BASICAS
2. Una vez se haya establecido la conexión, ingrese el segundo número al cual
desea marcar presionando la tecla SEND.
3. Cuando la segunda llamada haya sido conectada, presionar de nuevo la tecla
SEND otra vez y así dar inicio a la llamada tripartita.
Nota
Si alguna de las personas a las que usted ha llamado cuelga, usted y la
persona restante continúan conectados. Si usted inició la llamada y es el
primero en terminar la llamada, los tres son desconectados.
FUNCION DE INDENTIFICADOR DE LLAMADA
Identifica a quien llama mostrando su número telefónico. Si el nombre de quien
llama está almacenado en la lista de contactos, su nombre será indicado. Esta
función es dependiente del sistema. Por favor contactar al proveedor de servicio
para detalles.
FUNCION DE LLAMADA EN ESPERA
Si usted está en una llamada y recibe otra llamada entrante, escuchará dos tonos
de alerta y el número telefónico de la persona será mostrado en la pantalla. Con la
llamada en espera, puede poner la llamada activa en espera mientras contesta la
llamada entrante.
29
2009.1.29 12:8:26 PM
FUNCIONES BASICAS
FUNCIONES BASICAS
1. Para responder otra llamada mientras está en el teléfono, presione la tecla
MODO VIBRADOR ENCENDIDO/APAGADO
SEND. Así la primera llamada es puesta en espera. Para retomar la primera
llamada presione la tecla SEND nuevamente.
Nota
El Modo Vibrador silencia los tonos y activa una alerta para llamadas entrantes o
mensajes.
1. Para activar, presione y sostenga la tecla .
2. Para desactivar, presione y sostenga de nuevo la tecla
La Llamada en Espera es una función dependiente del sistema. Por favor
contactar al proveedor de servicio para detalles.
.
AJUSTE DE VOLUMEN
Para ajustar el volumen:
1. Presione las Teclas de Volumen arriba o abajo luego presione la Tecla OK
[AJUSTAR] para guardar la configuración.
ALTAVOZ
La función de altavoz le permite al usuario escuchar el audio a través del parlante
y hablar sin sostener el teléfono.
1. Para activar el altavoz, con el teléfono abierto, presione la Tecla Altavoz
Para desactivar, presione la Tecla Altavoz
Nota
.
otra vez.
El teléfono retorna a su estado inicial (Altavoz Apagado) al terminar la
llamada o cuando el teléfono es apagado y luego encendido nuevamente.
30
090115_7076PP_SP_M_size.indd 30-31
31
2009.1.29 12:8:26 PM
DURANTE UNA LLAMADA
DURANTE UNA LLAMADA
MUTE (UNMUTE)
LLAMADAS RECIENTES
La persona son la que usted está hablando no podrá escucharlo o cualquier otro
tipo de sonido proveniente de su lado de la conversación. Usted si podrá escuchar
lo que pasa al otro lado de la línea.
Muestra el historial de llamadas durante una llamada:
1. Presione la Tecla Función Izquierda [Silencio].
Para acceder al cuaderno de anotaciones durante una llamada:
1. Presione la Tecla de Función Derecha [Opciones], luego presione
ENVAR MENSAJE DE TEXTO
CONTACTOS
Permite seleccionar un nombre de su lista de contactos interna:
Voz
Privada.
Para enviar un mensaje de texto durante una llamada:
Mensaje de Texto.
Llamadas.
CUADERNO DE ANOTACIONES
• Para desactivar presione la Tecla Función Izquierda [No Silencio].
1. Presione la Tecla de Función Derecha [Opciones], luego presione
1. Presione la Tecla de Función Derecha [Opciones], luego presione
Enviar
UBICACION
Para acceder a la ubicación durante una llamada:
1. Presione la Tecla de Función Derecha [Opciones], luego presione
Ubicación.
1. Presione la Tecla de Función Derecha [Opciones], luego presione
Contactos.
32
090115_7076PP_SP_M_size.indd 32-33
33
2009.1.29 12:8:27 PM
HACIENDO UNA LLAMADA DE EMERGENCIA
La función 911 pone el teléfono en el Modo de Llamada de Emergencia cuando
se disca el número pre programado de emergencia, 911. El Modo de Llamada de
Emergencia también se activa así el teléfono esté bloqueado o fuera del área de
cobertura.
HACIENDO UNA LLAMADA DE EMERGENCIA
3. El teléfono se mantiene en el Modo de Emergencia y el teléfono puede recibir
una llamada entrante desde cualquier sistema disponible, aunque no podrá
hacer otro tipo de llamada que no sea al número de emergencia.
Nota
El 911 no aparece en la lista de llamadas recientes.
911 CON EL TELEFONO BLOQUEADO
El servicio de llamada al 911 está disponible así el teléfono se encuentre
bloqueado:
1. Digite “911”, luego presione la tecla SEND.
2. La llamada se conecta.
3. Cuando la llamada termine, el teléfono volverá a bloquearse.
911 USANDO CUALQUIER SISTEMA DISPONIBLE
Hacer una llamada de emergencia usando cualquier sistema disponible.
1. Digite “911”, luego presione la tecla SEND.
2. La llamada se conecta.
34
090115_7076PP_SP_M_size.indd 34-35
35
2009.1.29 12:8:27 PM
MEMO
CAPITULO 3
FUNCIONES DE MEMORIA
CAPITULO 3
FUNCIONES DE
MEMORIA
Este capítulo explica las funciones de memoria incluyendo:
Guardando un Número Telefónico
Ingresando Letras, Números y Símbolos
Llamando desde la Lista de Contactos
36
090115_7076PP_SP_M_size.indd 36-37
37
2009.1.29 12:8:27 PM
STORING A PHONE NUMBER
El teléfono guarda hasta 500 contactos.
1. Ingrese el número telefónico y presione la Tecla de Función Izquierda
[Guardar].
2. Presione
para un nuevo contacto o
para actualizar uno existente.
Si “Nuevo Contacto” el número telefónico aparecerá arriba en una lista.
Presione La Tecla de Navegación arriba o abajo para escoger el tipo de
número que esta adicionando. Presione la Tecla OK para seleccionar. Si está
actualizando un contacto existente su lista de contactos aparecerá en la
pantalla. Seleccione el contacto para adicionar el número telefónico, luego
presione la Tecla OK. Verá el número en la parte superior de la lista de tipos de
número. Seleccione el tipo de número y presione la Tecla OK.
3. Ingrese un nombre. Para cambiar el modo de entrada, presione la Tecla de
Función Izquierda [Abc]. Presione la Tecla de Navegación abajo para ingresar
la información en los otros campos del contacto. Los campos incluyen Nombre,
Móvil 1, Casa, Trabajo, Correo Electrónico 1, Grupo, Foto, Timbre, Móvil 2, Fax,
Correo Electrónico 2. Cuando un campo de número telefónico es seleccionado,
presione la Tecla de Función Derecha [Opciones] para seleccionar entre lo
siguiente:
38
090115_7076PP_SP_M_size.indd 38-39
STORING A PHONE NUMBER
Configurar Marcación Rápida: Seleccione para configurar el número telefónico como
marcación rápida. Seleccione la ubicación del número y presione la Tecla OK [Configurar].
“Agregar contacto a marcación rápida?” aparecerá. Seleccione Si y presione la Tecla OK.
Configurar por defecto: Seleccione para configurar el número telefónico como número
primario para el contacto. “Configurar por defecto?” aparecerá. Seleccione Si y presione
la Tecla OK.
Agregar Pausa: Seleccione para agregar una pausa después del número.
4. Para guardar la entrada en su lista de contactos, presione la Tecla OK
[GUARDAR]. “CONTACTO GUARDAO” aparecerá.
AGREGAR O CAMBIAR GRUPOS
Para organizar los contactos en grupos:
1. Presione la Tecla de Función Derecha [Contactos], luego seleccione el contacto
que desea adicionar a un grupo.
2. Presione la Tecla de Función Izquierda [Editar].
3. Vaya al campo de grupo luego presione la Tecla de Función Izquierda
[Configurar].
4. Seleccione el grupo deseado y presione la Tecla OK.
39
2009.1.29 12:8:28 PM
STORING A PHONE NUMBER
5. Para crear un grupo nuevo, presione la Tecla de Función Izquierda [Nuevo].
Ingrese el nombre del grupo y presione la Tecla OK [GUARDAR].
6. Presione la Tecla OK [GUARDAR] para guardar.
CAMBIAR EL TONO DE TIMBRE DE LA LLAMADA
Para identificar que persona llama configurando diferentes tonos de timbre para
diferentes números telefónicos en sus contactos:
1. Presione la Tecla de Función Derecha [Contactos], luego seleccione el contacto que
desea editar.
2. Presione la Tecla de Función Izquierda [Editar].
3. Vaya a Tonos Fijos luego presione la Tecla de Función Izquierda [Configurar].
4. Navegue y seleccione un tono de timbre. Para escuchar el timbre seleccionado,
presione la Tecla de Función Izquierda [Tocar]. Para parar presione la tecla
de Función Izquierda [Alto]. Presione la Tecla OK para configurar el tono de
timbre.
5. Presione la Tecla OK [GUARDAR] para guardar.
40
090115_7076PP_SP_M_size.indd 40-41
STORING A PHONE NUMBER
ADICIONAR O CAMBIAR LA FOTO DE IDENTIFICACION
Para seleccionar un foto o gráfico para asignar a una identificación de llamada:
1. Presione la Tecla de Función Derecha [Contactos], luego seleccione el contacto
que desea editar.
2. Presione la Tecla de Función Izquierda [Editar].
3. Vaya al campo de foto y presione la Tecla de Función Izquierda [Configurar].
4. Navegue y seleccione la foto a configurar. Para ver la foto seleccionada
presione la Tecla de Función Izquierda [Ver]. Presione la Tecla OK para
seleccionar la imagen.
5. Presione la Tecla OK [GUARDAR] para guardar.
AGREGAR O CAMBIAR UNA DIRECCION DE CORREO ELECTRONICO
Agregar o cambiar una dirección de correo electrónico:
1. Presione la Tecla de Función Derecha [Contactos], luego seleccione el contacto
que desea editar.
2. Presione la Tecla de Función Izquierda [Editar].
3. Vaya a Correo Electrónico 1 o Correo Electrónico 2 para editar.
41
2009.1.29 12:8:28 PM
STORING A PHONE NUMBER
4. Ingrese la dirección de correo electrónico luego presione la Tecla OK
[GUARDAR] para guardar.
AGREGAR UNA ENTRADA DE MARCACION RAPIDA
Para adicionar una entrada a marcación rápida:
1. Presione la Tecla de Función Derecha [Contactos], luego seleccione el contacto
que desea editar.
2. Presione la Tecla de Función Izquierda [Editar].
3. Seleccione el número que desea agregar como marcado rápido luego presione
la Tecla de Función Derecha [Opciones].
4. Seleccione Programar Marcado Rápido, escoja una asignación de marcación
rápida luego presione la Tecla OK [CONFIGURAR].
5. Para guardar una entrada seleccione SI luego presione la Tecla OK.
6. Presione la Tecla OK [GUARDAR] para guardar.
EDITAR ENTRADA DE CONTACTOS ADICIONAR UN NUMERO
TELEFONICO DESDE EL MODO DE REPOSO
1. Ingrese el número telefónico que desea guardar (hasta 32 dígitos).
42
090115_7076PP_SP_M_size.indd 42-43
STORING A PHONE NUMBER
2.
3.
4.
5.
6.
Presione la Tecla de Función Izquierda [Guardar].
Vaya a Actualizar Existente luego presione la Tecla OK.
Navegue y seleccione el contacto a actualizar luego presione la Tecla OK.
Seleccione Móvil 1, Móvil 2, Casa, Trabajo o Fax luego presione la Tecla OK.
Si hay un número que ya está asignado a la categoría deseada, seleccione SI
o NO para sobrescribir la entrada, luego presione la Tecla OK. Presione le Tecla
OK [Guardar] para salir.
ADICIONAR UN NUMERO TELEFONICO DESDE LA PANTALLA DE LISTA
DE CONTACTOS
1. Presione la Tecla de Función Derecha [Contactos]. Sus Contactos serán
mostrados alfabéticamente.
2. Vaya hasta el contacto que desea actualizar luego presione la Tecla de Función
Izquierda [Editar].
3. Seleccione el campo de la categoría apropiada, luego ingrese el número
telefónico.
4. Presione la Tecla OK [GUARDAR].
43
2009.1.29 12:8:28 PM
STORING A PHONE NUMBER
STORING A PHONE NUMBER
NUMERO POR DEFECTO
EDITAR NUMEROS TELEFONICOS GUARDADOS
El número telefónico guardado cuando un contacto es creado es el número por
defecto. Si un Contacto tiene varios números telefónicos, otro número puede ser
configurado como Número por Defecto. El Número por Defecto no puede ser
borrado. La entrada entera del contacto puede ser borrada u otro número puede
ser asignado como número por defecto permitiéndole borrar el número original y
mantener la entrada del contacto.
1. Presione la Tecla de Función Derecha [Contactos]. Sus Contactos serán
mostrados alfabéticamente.
2. Vaya hasta el Contacto que desea actualizar luego presione la Tecla de Función
Izquierda [Editar].
CAMBIAR EL NUMERO POR DEFECTO
3. Vaya hasta el número telefónico.
4. Edite el número telefónico luego presione la Tecla OK [GUARDAR].
1. Presione la Tecla de Función Derecha [Contactos]. Los contactos serán
BORRAR UN NUMERO TELEFONICO DE UN CONTACTO
mostrados alfabéticamente.
2. Vaya hasta el contacto que desea actualizar luego presione la Tecla de Función
Izquierda [Editar].
3. Vaya al número a asignar como número por defecto luego presione la Tecla de
Función Derecha [Opciones].
4. Seleccione Fijar Predeterminado luego presione la Tecla OK.
5. Seleccione SI luego presione la Tecla OK configurar como número por defecto.
6. Presione la Tecla OK [GUARDAR] para guardar.
44
090115_7076PP_SP_M_size.indd 44-45
1. Presione la Tecla de Función Derecha [Contactos]. Sus Contactos serán
mostrados alfabéticamente.
2. Vaya hasta el Contacto que desea actualizar luego presione la Tecla de Función
Izquierda [Editar].
3. Vaya al número que desea borrar.
4. Presione y sostenga la Tecla CLR para borrar.
5. Presione la Tecla OK [GUARDAR] para guardar.
45
2009.1.29 12:8:28 PM
STORING A PHONE NUMBER
BORRAR UN CONTACTO
1. Presione la Tecla de Función Derecha [Contactos] luego seleccione el Contacto
que desea borrar.
INGRESANDO LETRAS, NUMEROS Y SIMBOLOS
El modo de ingreso de texto (Editor Alpha) permite ingresar texto, números y
símbolos. El modo por defecto es modo [Abc].
TECLA
2. Presione la Tecla de Función Derecha [Opciones] luego vaya hasta Borrar y
presione la Tecla OK.
3. Seleccione SI y luego presione la Tecla OK para borrar.
Presione para
cambiar el modo.
[T9] [ABC] [123]
[Símbolos]
Presione para ver la
siguiente opción de
palabra que concuerda si la
palabra resaltada no es la
palabra deseada.
Presione para
borrar una letra
a la izquierda del
cursor. Presione
y sostenga para
borrar una palabra
entera.
Presione para seleccionar un tipo de letra del modo de
entrada estándar o modo palabra T9. [Abc], [ABC] y
[abc] indican el modo de entrada estándar, [PALABRAT)]
y [palabraT9] indican el modo predictivo.
BORRAR UNA MARCACION RAPIDA
1. Presione la Tecla de Función Derecha [Contactos] luego seleccione el Contacto
que desea editar.
2. Presione la Tecla de Función Izquierda [Editar].
3. Vaya hasta el número telefónico guardado en marcación rápida luego presione
la Tecla de Función Derecha [Opciones].
4. Seleccione Quitar Marcado Rápido y presione la Tecla OK.
46
090115_7076PP_SP_M_size.indd 46-47
Presione para aceptar
una palabra y agregar
un espacio en modo
PalabraT9.
TECLA
47
2009.1.29 12:8:28 PM
INGRESANDO LETRAS, NUMEROS Y SIMBOLOS
INGRESANDO LETRAS, NUMEROS Y SIMBOLOS
TIPO DE ENTRADA ESTANDAR
- Para ingresar el nombre ”John”:
]
Presione [
,
,
]
Presione [
Presione [
,
]
,
]
Presione [
Use el teclado para ingresar las letras, números y caracteres.
1. Desde la pantalla de ingreso de texto, ingrese las letras usando el teclado. Para
cambiar el modo de entrada, presione la Tecla de Función Izquierda.
2. Para ingresar un espacio, presione
.El cursor automáticamente se moverá
a la siguiente columna.
3. Para borrar una letra presione la tecla CLR
totalmente, presione y sostenga la tecla CLR
. Para borrar la entrada
.
4. Para cambiar de minúsculas a mayúsculas, presione
EJEMPLO
J
o
h
n
.
Seleccione Abc presionando la Tecla de Función Izquierda [Abc]. Cuando
este modo haya sido seleccionado, el icono Abc aparece como una
confirmación visual.
- Encuentre la tecla que corresponde a la letra que desea ingresar.
- Presiónela cuantas veces sea necesario para que la letra aparezca en la
pantalla.
MODO DE ENTRADA T9
El Modo T9 es un diccionario incorporado para determinar una palabra basados
en los caracteres ingresados. Una palabra puede ser ingresada más rápidamente
presionando una tecla por cada carácter.
1. Desde la pantalla de entrada de texto presione la Tecla de Función Izquierda
[Abc], luego seleccione Palabra T9 y presione la Tecla OK.
2. Presione las teclas de números para ingresar la secuencia de caracteres.
3. Para ver la siguiente palabra que concuerda, presione
.
4. Para aceptar la palabra que concuerda luego ingresar un espacio, presione
.
48
090115_7076PP_SP_M_size.indd 48-49
49
2009.1.29 12:8:29 PM
INGRESANDO LETRAS, NUMEROS Y SIMBOLOS
Nota
EJEMPLO
Para ingresar una palabra compuesta:
• Ingrese la primera parte de la palabra, luego presione la Tecla de
Navegación derecha para aceptarla sin adicionar un espacio al final.
para aceptarla.
• Ingrese la última parte de la palabra, luego presione
Para ingresar la palabra “Funfare” en modo T9:
- Presione la Tecla de Función Izquierda [Abc] seleccione palabra T9 y
presione la Tecla OK.
- Presione
,
,
y verá “Fun” resaltado.
- Presione la Tecla de Navegación derecha para seleccionar “Fun”.
- Presione
,
,
,
y verá “ease” resaltado.
hasta que vea “fare” resaltado.
Presione
Presione
para seleccionar y agregar un espacio.
INGRESANDO LETRAS, NUMEROS Y SIMBOLOS
MODO DE SIMBOLOS
Permite ingresar símbolos.
1. Presione la Tecla de Función Izquierda [Abc], luego seleccione Símbolos (Modo
Símbolos) y presione la Tecla OK.
2. Seleccione el símbolo deseado con la Tecla de Navegación, luego presione la
Tecla OK.
Nota
Use la Tecla de Navegación para navegar los diferentes símbolos disponibles.
MODO NUMERICO
Permite ingresar números.
1. Presione la Tecla de Función Izquierda [Abc], luego seleccione 123 (Modo
Numérico) y presione la Tecla OK.
2. Para ingresar un número presione la tecla de su dígito correspondiente.
50
090115_7076PP_SP_M_size.indd 50-51
51
2009.1.29 12:8:30 PM
LLAMANDO DESDE LISTA DE CONTACTOS
MARCACION DE UNO Y DOS TOQUES
Ideal para números marcados frecuentemente, esta función permite que los
contactos de su lista sean marcados vía teclado solamente con presionar una o
dos teclas.
Nota
Para que la Marcación de Uno y Dos Dígitos funcione apropiadamente, ésta
debe ser habilitada (Por favor vea la página 96).
MARCACION DE UN TOQUE
2-9: Presione y sostenga el número que desea por más de un segundo.
MARCACION DE DOS TOQUES
10-95: Presione el primer dígito de una manera corta y el segundo sosténgalo por
más de un segundo.
Nota
LLAMANDO DESDE LISTA DE CONTACTOS
La posición 98 está reservada para #MIN.
La posición 99 está reservada para #PMT.
Para asignar una posición de marcación abreviada, por favor vea la página 61.
#DATA: #DATA es un número VRU (Llamada gratis) de servicio al cliente de
Verizon que brinda la información a los clientes acerca del balance de la
factura.
#BAL/Balance: #BAL es un número VRU (Llamada gratis) de servicio al cliente
de Verizon que brinda la información a los clientes acerca del balance de la
factura.
#MIN/Minutes Usage: # es un número VRU (Llamada gratis) de servicio al
cliente de Verizon que brinda la información a los clientes acerca del uso de
su Verizon.
#PMT/Payment: #PMT es un número VRU (Llamada gratis) de servicio al
cliente de Verizon que permite al usuario pagar una factura, con una opción
de pago configurada previamente, o usar una nueva, una opción de pago
único.
• Si no hay un número guardado en la posición ingresada, “Marcación rápida
vacía” aparecerá en la pantalla.
• Si la Marcación de Un Dígito está desactivada: Ingrese la posición del
número de marcación abreviada y luego presione la Tecla SEND [SEND].
• La posición 1 está reservada para el correo de voz.
La posición 96 está reservada para #DATA.
La posición 97 está reservada para #BAL.
52
090115_7076PP_SP_M_size.indd 52-53
53
2009.1.29 12:8:31 PM
CAPITULO 4
MENU DEFUNCIONES
MEMO
CAPITULO 4
MENU
DEFUNCIONES
Este capítulo explica como accesar el menú y usar las diferentes opciones
para configurar su teléfono.
Contactos
Llamadas recientes
Programación
Mi Verizon
54
090115_7076PP_SP_M_size.indd 54-55
55
2009.1.29 12:8:31 PM
CONTACTOS
Almacena hasta 500 entradas, cada una de ellas puede ser asignada a un grupo.
Las entradas pueden ser buscadas por nombre o grupo.
CONTACTO NUEVO
Nota
Para detalles sobre adicionar un contacto nuevo vea la página 42.
CONTACTOS
4. Nuevo Mensaje de Foto, 5. Nuevo Mensaje de Voz, 6. Configurar como
Contacto ICE, 7. Llamar y 8. Borrar Todos los Contactos.
5. Presione la Tecla OK [VER] para ver los detalles del contacto. Desde la pantalla
de visualización de contactos, presione la Tecla de Función Izquierda [Borrar]
para borrar un contacto. Presione la Tecla de Función Derecha [Opciones] para
1. Nuevo Mensaje de Texto, 2. Nuevo Mensaje de Foto, 3. Nuevo Mensaje de
Voz o 4. Llamar.
LISTA DE CONTACTOS
6. Para llamar al número seleccionado presione la Tecla SEND.
Las entradas guardadas pueden ser revisadas en la lista de contactos o es posible
encontrar rápidamente una entrada ingresando un número o su secuencia de
caracteres. Los contactos están ordenados en orden alfabético.
GRUPOS
1. Presione la Tecla OK [MENU], presione
Contactos, y luego presione
Lista de Contactos. En el modo en reposo, presione la Tecla de Función Derecha
[Contactos].
2. La lista de nombres en contactos es mostrada alfabéticamente.
3. Ingrese el nombre en el campo Ir a, o búsquelo en la lista.
4. Para editar la información del contacto, presione la Tecla de Función Izquierda
[Editar]. Para más opciones presione la Tecla de Función Derecha [Opciones]
para escoger entre 1. Contacto Nuevo, 2. Borrar, 3. Nuevo Mensaje de Texto,
56
090115_7076PP_SP_M_size.indd 56-57
Permite clasificar entradas de teléfono en grupos. Los grupos existentes incluyen
– Sin Grupo, Compañía, Familia, Amigos y V.I.P. Un máximo de 30 grupos es
permitido. Usted puede agregar, cambiar y borrar un grupo.
ADICIONAR UN NUEVO GRUPO
1. Presione la Tecla OK [MENU], seleccione Contactos y presione la Tecla OK,
navegue los grupos y presione la Tecla OK.
2. Presione la Tecla de Función Izquierda [Nuevo] para adicionar el nombre de un
grupo nuevo.
57
2009.1.29 12:8:31 PM
CONTACTOS
3. Ingrese el nuevo nombre del grupo.
4. Para guardar presione la Tecla OK [GUARDAR].
ASIGNAR UN NUMERO DE TELEFONO A UN GRUPO
1. Presione la Tecla OK [MENU] seleccione Contactos y presione la Tecla OK, vaya
a Grupos y presione la Tecla OK.
2. Vaya al grupo al que desea añadir el contacto luego presione la Tecla OK
[VER].
3. Para adicionar un contacto, presione la Tecla OK [Añadir]. Vaya al contacto
a agregar y presione la Tecla OK [SUBRY] luego presione la Tecla de Función
Izquierda [Hecho] para agregar.
Nota
Cada grupo contiene hasta 10 números telefónicos o direcciones de correo
electrónico.
CONTACTOS
2. Vaya al grupo a renombrar luego presione la Tecla de Función Derecha
[Opciones] y seleccione Cambiar Nombre, luego presione la Tecla OK.
3. Ingrese el nombre nuevo del grupo y presione la Tecla OK [GUARDAR].
BORRAR GRUPO
1. Presione la Tecla OK [MENU] seleccione Contactos y presione la Tecla OK, vaya
a la Grupos y presione la Tecla OK.
2. Vaya al grupo a borrar y presione la Tecla de Función Derecha [Opciones].
3. Vaya a Borrar y presione la Tecla OK.
4. Seleccione SI y presione la Tecla OK para borrar el grupo.
ENVIAR UN MENSAJE DE TEXTO A UN GRUPO
1. Presione la Tecla OK [MENU] seleccione Contactos y presione la Tecla OK, vaya
a Grupos y presione la Tecla OK.
CAMBIAR EL NOMBRE DEL GRUPO
1. Presione la Tecla OK [MENU] seleccione Contactos y presione la Tecla OK, vaya
a la Grupos y presione la Tecla OK.
2. Seleccione el grupo al que desea enviar el mensaje y presione la Tecla de
Función Derecha [Opciones].
3. Vaya a Nuevo Mensaje de TXT, presione la Tecla OK, y luego escriba el
mensaje.
58
090115_7076PP_SP_M_size.indd 58-59
59
2009.1.29 12:8:31 PM
CONTACTOS
4. Para enviar, presione la Tecla OK [ENVIAR] o presione la Tecla SEND.
ENVIAR UN MENSAJE DE FOTO A UN GRUPO
1. Presione la Tecla OK [MENU] seleccione Contactos y presione la Tecla OK, vaya
a la Grupos y presione la Tecla OK.
2. Seleccione el grupo al que desea enviar el mensaje y presione la Tecla de
Función Derecha [Opciones].
3. Vaya a Nuevo Mensaje de Foto, presione la Tecla OK.
4. Vaya al campo de Foto y presione la Tecla de Función Izquierda [Mis Fotos].
Navegue y presione la Tecla OK para seleccionar.
5. Ingrese la información restante del mensaje y presione la Tecla OK [ENVIAR] o
presione la Tecla SEND.
Presione la Tecla de Navegación arriba para editar los números telefónicos para el
envió de mensaje. Presione la Tecla OK cuando haya terminado de editar los números
y vuelva a la pantalla de Nuevo Mensaje de Foto.
CONTACTOS
2. Vaya al grupo al que desea enviar el mensaje de voz y presione la Tecla de
Función Derecha [Opciones].
3. Vaya a Nuevo Mensaje de Voz y presione la Tecla OK.
4. Presione la Tecla OK para iniciar la grabación. Presione la Tecla OK [PARAR]
para finalizar la grabación.
5. Ingrese la información del mensaje restante. Para enviar presione la Tecla OK
[ENVIAR] o presione la Tecla SEND.
MARCACION RAPIDA
En el modo de reposo, se pueden realizar llamadas a números guardados en
marcados rápidos al presionar y sostener la ubicación del número en el teclado. Para
una ubicación de dos números, presione el primer número, luego presione y sostenga
el segundo número. Para adicionar una entrada de marcación rápida:
Nota
Marcación de un toque debe estar activada. Para detalles en la adición de un
contacto nuevo, vea la página 42.
ENVIAR UN MENSAJE DE VOZ A UN GRUPO
1. Presione la Tecla OK [MENU] seleccione Contactos y presione la Tecla OK, vaya
a la Grupos y presione la Tecla OK.
60
090115_7076PP_SP_M_size.indd 60-61
61
2009.1.29 12:8:32 PM
CONTACTOS
EN CASO DE EMERGENCIA
Su teléfono tiene un menú especial para organizar sus contactos de emergencia y
la información personal.
ASIGNAR CONTACTOS DE EMERGENCIA
Siga las indicaciones abajo para registrar un contacto para ser contactado en
caso de emergencia, o registres un número de registro médico u otra información
personal. Para registrar hasta tres diferentes contactos ICE:
1. Presione la Tecla OK [MENU], seleccione Contactos y presione la Tecla OK,
vaya hasta En Caso de Emergencia y presione la Tecla OK.
2. Seleccione Contacto 1, Contacto 2 o Contacto 3 y presione la Tecla OK
[AÑADIR].
3. Seleccione De Contactos y presione la Tecla OK, luego vaya al contacto que
desea asignar y presione la Tecla OK.
O seleccione Nuevo Contacto y presione la Tecla OK, luego ingrese la
información en los campos y presione la Tecla OK [GUARDAR].
CONTACTOS
REASIGNAR CONTACTOS DE EMERGENCIA
1. Presione la Tecla OK [MENU], seleccione Contactos y presione la Tecla OK,
vaya hasta En Caso de Emergencia y presione la Tecla OK.
2. Seleccione el contacto que desea reasignar, presione la Tecla de Función
Derecha [Opciones], luego seleccione Re-asignar y presione la Tecla OK.
3. Seleccione De Contactos y presione la Tecla OK, luego vaya al contacto que
desea asignar y presione la Tecla OK.
O seleccione Nuevo Contacto y presione la Tecla OK, luego ingrese la
información en los campos y presione la Tecla OK [GUARDAR].
BORRAR CONTACTOS DE EMERGENCIA ASIGNADOS
1. Presione la Tecla OK [MENU], seleccione Contactos y presione la Tecla OK,
vaya hasta En Caso de Emergencia y presione la Tecla OK.
2. Seleccione el contacto que desea borrar, presione la Tecla de Función Derecha
[Opciones], luego seleccione No asignar.
3. Presione la Tecla OK.
4. El nombre del contacto aparecerá en lugar de Contacto1, Contacto 2 y
Contacto 3.
62
090115_7076PP_SP_M_size.indd 62-63
63
2009.1.29 12:8:32 PM
CONTACTOS
CONTACTOS
LLAMAR A UN CONTACTO DE EMERGENCIA ASIGNADO
PARA EDITAR INFORMACION PERSONAL GUARDADA
1. Presione la Tecla OK [MENU], seleccione Contactos y presione la Tecla OK, vaya
1. Presione la Tecla OK [MENU], seleccione Contactos y presione la Tecla OK,
hasta En Caso de Emergencia y presione la Tecla OK.
2. Seleccione el contacto que desea llamar luego presione la Tecla de Función
Derecha [Llamada] o presione la Tecla SEND.
AÑADIR INFORMACION PERSONAL
Para guardar un número de Historial Médico u otra información que pueda ser útil
en caso de emergencia:
1. Presione la Tecla OK [MENU], seleccione Contactos y presione la Tecla OK, vaya
hasta En Caso de Emergencia y presione la Tecla OK.
2.
3.
4.
5.
Vaya a Información Personal luego presione la Tecla OK [VER].
Seleccione Nota 1, Nota 2 o Nota3 luego presione la Tecla OK [AÑADIR].
Ingrese la información luego presione la Tecla OK [GUARDAR].
La información que ingrese será mostrada en lugar de Nota 1, Nota 2 y Nota 3.
64
090115_7076PP_SP_M_size.indd 64-65
Vaya hasta En Caso de Emergencia y presione la Tecla OK.
2. Vaya a Información Personal luego presione la Tecla OK [VER].
3. Seleccione la Nota que desea editar y luego presione la Tecla OK [VER].
4. Presione la Tecla OK [Editar], edite la Nota luego presione la Tecla OK
[GUARDAR].
PARA BORRAR INFORMACION PERSONAL GUARDADA
1. Presione la Tecla OK [MENU], seleccione Contactos y presione la Tecla OK,
vaya hasta En Caso de Emergencia y presione la Tecla OK.
2. Vaya a Información Personal luego presione la Tecla OK [VER].
3. Seleccione la Nota que desea borrar y luego presione la Tecla de Función
Derecha [Borrar].
4. Para borrar, seleccione SI luego presione la Tecla OK.
65
2009.1.29 12:8:32 PM
LLAMADAS RECIENTES
LLAMADAS RECIENTES
LLAMADAS RECIENTES
Nota
• Guardar a Contactos: Guarda el número telefónico en sus Contactos.
(Esto solamente aparece si el número no está guardado ya en la lista de
contactos.)
• Borrar: Borrar una llamada perdida de la lista.
• Bloquear: Para bloquear o desbloquear una llamada de la lista.
• Borrar todo: Borrar todas las llamadas perdidas en la lista.
• Ver Cronometro: Muestra el tiempo de llamada.
Nota
• Después de 90 llamadas, la llamada más antigua será borrada
automáticamente de la historia.
• Presione la Tecla de Función Izquierda [Mensaje], para enviar un mensaje de
TXT, Foto o Voz al número seleccionado.
El menú de Llamadas Recientes en una lista de los últimos números telefónicos
o llamadas realizadas a contactos, aceptadas, perdidas. Esta es continuamente
actualizada a medida que números nuevos son añadidos al principio de las lista y
las últimas entradas son movidas a la parte inferior de la lista.
PERDIDAS
Muestra información acerca de las 90 llamadas perdidas más recientes. Haga una
llamada a una llamada perdida presionando simplemente la Tecla SEND.
1. Presione la Tecla OK [MENU], seleccione Llamadas Recientes y presione
la Tecla OK, vaya a Perdidas y presione la Tecla OK. Si el número ya está
guardado en la lista de contactos, solo el nombre aparecerá. Si el número no
está guardado, el número telefónico aparecerá.
2. Para ver los detalles de una llamada perdida presione la Tecla OK [ABRIR].
Nota
Los detalles de la llamada incluyen fecha, hora y número telefónico.
3. Presione la Tecla de Función Derecha [Opciones] para seleccionar:
66
090115_7076PP_SP_M_size.indd 66-67
RECIBIDAS
Muestra información acerca de las 90 llamadas recibidas más recientes. Haga una
llamada a una llamada recibida presionando simplemente la Tecla SEND.
1. Presione la Tecla OK [MENU], seleccione Llamadas Recientes y presione
la Tecla OK, vaya a Recibidas y presione la Tecla OK. Si el número ya está
guardado en la lista de contactos, solo el nombre aparecerá. Si el número no
está guardado, el número telefónico aparecerá.
67
2009.1.29 12:8:32 PM
LLAMADAS RECIENTES
2. Para ver los detalles de una llamada recibida presione la Tecla OK [ABRIR].
Nota
Los detalles de la llamada incluyen fecha, hora y número telefónico.
3. Press the Right Soft Key [Options] for the following:
Nota
Nota
• Guardar a Contactos: Guarda el número telefónico en sus Contactos.
(Esto solamente aparece si el número no está guardado ya en la lista de
contactos.)
• Borrar: Borrar una llamada recibida de la lista.
• Bloquear: Para bloquear o desbloquear una llamada de la lista.
• Borrar todo: Borrar todas las llamadas recibidas de la lista.
• Ver Cronometro: Muestra el tiempo de llamada.
LLAMADAS RECIENTES
1. Presione la Tecla OK [MENU], seleccione Llamadas Recientes y presione
la Tecla OK, vaya a Marcadas y presione la Tecla OK. Si el número ya está
guardado en la lista de contactos, solo el nombre aparecerá. Si el número no
está guardado, el número telefónico aparecerá.
2. Para ver los detalles de una llamada marcada, presione la Tecla OK [ABRIR].
Nota
3. Presione la Tecla de Función Derecha [Opciones] para seleccionar:
Nota
• Guardar a Contactos: Guarda el número telefónico en sus Contactos.
(Esto solamente aparece si el número no está guardado ya en la lista de
contactos.)
• Borrar: Borrar una llamada perdida de la lista.
• Bloquear: Para bloquear o desbloquear una llamada de la lista.
• Borrar todo: Borrar todas las llamadas marcadas en la lista.
• Ver Cronometro: Muestra el tiempo de llamada.
Nota
• Después de 30 llamadas, la llamada más antigua será borrada
automáticamente de la historia.
• Presione la Tecla de Función Izquierda [Mensaje], para enviar un mensaje de
TXT, Foto o Voz al número seleccionado.
• Después de 90 llamadas, la llamada más antigua será borrada
automáticamente de la historia.
• Presione la Tecla de Función Izquierda [Mensaje], para enviar un mensaje de
TXT, Foto o Voz al número seleccionado.
MARCADAS
Muestra información acerca de las 30 llamadas marcadas más recientes. Haga una
llamada a una llamada marcada presionando simplemente la Tecla SEND.
68
090115_7076PP_SP_M_size.indd 68-69
Los detalles de la llamada incluyen fecha, hora y número telefónico.
69
2009.1.29 12:8:32 PM
LLAMADAS RECIENTES
TODAS
LLAMADAS RECIENTES
Nota
Muestra la información acerca de las llamadas recibidas, marcadas y perdidas más
recientes.
• Después de 210 llamadas, la llamada más antigua será borrada
automáticamente de la historia.
• Presione la Tecla de Función Izquierda [Mensaje], para enviar un mensaje de
TXT, Foto o Voz al número seleccionado.
1. Presione la Tecla OK [MENU], seleccione Llamadas Recientes y presione la
Tecla OK, vaya a Todas y presione la Tecla OK. Si el número ya está guardado
en la lista de contactos, solo el nombre aparecerá. Si el número no está
guardado, el número telefónico aparecerá.
2. Para ver los detalles de una llamada marcada, presione la Tecla OK [ABRIR].
Nota
Los detalles de la llamada incluyen fecha, hora y número telefónico.
3. Presione la Tecla de Función Derecha [Opciones] para seleccionar:
Nota
• Guardar a Contactos: Guarda el número telefónico en sus Contactos.
(Esto solamente aparece si el número no está guardado ya en la lista de
contactos.)
• Borrar: Borrar una llamada de la lista.
• Bloquear: Para bloquear o desbloquear una llamada de la lista.
• Borrar todo: Borrar todas las llamadas en la lista.
• Ver Cronometro: Muestra el tiempo de llamada.
VER CRONOMETROS
Revisa el tiempo de uso y administra sus llamadas dentro del límite configurado.
1. Presione la Tecla OK [MENU], seleccione Llamadas Recientes y presione la
Tecla OK, vaya a Ver Cronómetros y presione la Tecla OK.
2. Navegue para ver la información sobre Ultima llamada, Todas las Llamadas,
Llamadas Recibidas, Llamadas Marcadas, Llamadas Roaming, Datos
Transmitidos, Datos Recibidos, Datos Total, Ultimo Reajuste, Total de Llamadas
y Tiempo de Vida del Contador de Datos. Para restaurar el cronometro de
tiempo seleccionado, presione la Tecla de Función Izquierda [Restaurar].
“Restaurar tiempo?” aparecerá. Seleccione Si y presione la Tecla OK. Para
restaurar todos los tiempos, presione la Tecla de Función Derecha [Restaurar
todos]. “Restaurar todos?” aparecerá. Seleccione Si y presione la Tecla OK.
3. Para volver a la página anterior, presione la Tecla OK.
Nota
70
090115_7076PP_SP_M_size.indd 70-71
Esto no es para propósitos de facturación.
71
2009.1.29 12:8:33 PM
PROGRAMACION
PROGRAMACION
Programe su teléfono y optimice su funcionamiento a través de una variedad de
ajustes.
Vibrador de Llamada
AJUSTES DE SONIDO
vaya a Programación Sonido y presione la Tecla OK, seleccione Sonidos de
Llamada y presione la Tecla OK, seleccione Vibrador de Llamada y presione la
Tecla OK.
2. Seleccione Encendido o Apagado y presione la Tecla OK para guardar.
SONIDOS DE LLAMADA
Para configurar los tipos de timbre para llamadas entrantes:
1. Presione la Tecla OK [MENU], seleccione Programación y presione la Tecla OK,
vaya a Programación Sonido y presione la Tecla OK, seleccione Sonidos de
Llamada y presione la Tecla OK.
Timbre de Llamada
1. Presione la Tecla OK [MENU], seleccione Programación y presione la Tecla OK,
vaya a Programación Sonido y presione la Tecla OK, seleccione Sonidos de
Llamada y presione la Tecla OK, seleccione Timbre de Llamada y presione la
Tecla OK .
2. Seleccione el timbre y presione la Tecla OK para guardar.
• Presione la Tecla de Función Izquierda para Tocar/Parar el timbre.
• Obtener Nuevos Timbres lo conduce a Obtener Nuevas Aplicaciones. Siga
las instrucciones en la página 120.
72
090115_7076PP_SP_M_size.indd 72-73
1. Presione la Tecla OK [MENU], seleccione Programación y presione la Tecla OK,
• Acceso Directo: Presione y sostenga
para acceder al modo Vibrador.
SONIDOS DE ALERTA
Cuando se seleccionar, este ajuste permite seleccionar el tipo de alerta para los
mensajes de TXT y Voz.
Mensajes de TXT
1. Presione la Tecla OK [MENU], seleccione Programación y presione la Tecla OK,
vaya a Programación Sonido y presione la Tecla OK, seleccione Sonidos de
Alerta y presione la Tecla OK, seleccione Mensajes de TXT y presione la Tecla
OK.
2. Seleccione Tono, Vibrar o Recordatorio luego seleccione una de las siguientes
opciones:
73
2009.1.29 12:8:33 PM
PROGRAMACION
• Tono: Seleccione Obtener Nuevo Timbre o seleccione el tipo de timbre deseado.
• Vibrar: Seleccione Activado o Desactivado.
• Recordatorio: Seleccione Una Vez, Cada 2 Minutos, Cada 15 Minutos o Apagado.
3. Presione la Tecla OK para guardar la configuración para esa selección.
Mensajes de Voz/Foto
1. Presione la Tecla OK [MENU], seleccione Programación y presione la Tecla OK,
vaya a Programación Sonido y presione la Tecla OK, seleccione Sonidos de
Alerta y presione la Tecla OK, seleccione Mensajes de Voz/Foto y presione la
Tecla OK.
2. Seleccione Tono, Vibrar o Recordatorio luego seleccione una de las siguientes
opciones:
• Tono: Seleccione Obtener Nuevo Timbre o seleccione el tipo de timbre deseado.
• Vibrar: Seleccione Activado o Desactivado.
• Recordatorio: Seleccione Una Vez, Cada 2 Minutos, Cada 15 Minutos o Apagado.
3. Presione la Tecla OK para guardar la configuración para esa selección.
PROGRAMACION
Correo de Voz
1. Presione la Tecla OK [MENU], seleccione Programación y presione la Tecla OK,
vaya a Programación Sonido y presione la Tecla OK, seleccione Sonidos de
Alerta y presione la Tecla OK, seleccione Correo de Voz y presione la Tecla OK.
2. Seleccione Tono, Vibrar o Recordatorio luego seleccione una de las siguientes
opciones:
• Tono: Seleccione Obtener Nuevo Timbre o seleccione el tipo de timbre deseado.
• Vibrar: Seleccione Activado o Desactivado.
• Recordatorio: Seleccione Una Vez, Cada 2 Minutos, Cada 15 Minutos o Apagado.
3. Presione la Tecla OK para guardar la configuración para esa selección.
Tono de Emergencia
Para configurar la alerta para la marcación de emergencia:
1. Presione la Tecla OK [MENU], seleccione Programación y presione la Tecla OK,
vaya a Programación Sonido y presione la Tecla OK, seleccione Sonidos de
Alerta y presione la Tecla OK.
2. Navegue para seleccionar Tono de Emergencia y presione la Tecla OK.
3. Seleccione Tono, Vibrar o Apagado y presione la Tecla OK.
74
090115_7076PP_SP_M_size.indd 74-75
75
2009.1.29 12:8:33 PM
PROGRAMACION
VOLUMEN DEL TECLADO
Para configurar el volumen del teclado:
1. Presione la Tecla OK [MENU], seleccione Programación y presione la Tecla OK,
vaya a Programación Sonido y presione la Tecla OK, seleccione Volumen del
Teclado y presione la Tecla OK.
2. Ajuste el volumen al presionar la Tecla de Navegación Arriba o Abajo y
presione la Tecla OK para guardar.
ALERTAS DE SERVICIO
Para configurar cualquiera de los tres tipos de Alerta Encendido o Apagado:
1. Presione la Tecla OK [MENU], seleccione Programación y presione la Tecla
OK, vaya a Programación Sonido y presione la Tecla OK, seleccione Alertas de
Servicio y presione la Tecla OK.
2. Seleccione una de las siguientes opciones y presione la Tecla OK.
• ERI: La función de Indicador de Roaming (ERI) muestra un texto en la pantalla
informando al usuario que sistema de red está usando el dispositivo en
comparación con el plan que se ha comprado. El texto de ERI cambia para informar
al usuario si está usando: Verizon Wireless Network, Extended Network o Roaming.
76
090115_7076PP_SP_M_size.indd 76-77
PROGRAMACION
• Sonido de Minutos: Alerta sobre cada minuto transcurrido durante una llamada.
• Conectar Llamada: Alerta cuando la llamada es conectada.
3. Seleccione Encendido o Apagado y presione la Tecla OK.
APAGADO/ENCENDIDO
Para configurar un sonido cuando el teléfono es encendido o apagado:
1. Presione la Tecla OK [MENU], seleccione Programación y presione la Tecla OK,
vaya a Programación Sonido y presione la Tecla OK, seleccione Encendido/
Apagado y presione la Tecla OK.
2. Seleccione Encendido Sonido o Apagado Sonido y presione la Tecla OK.
3. Navegue para seleccionar Encendido o Apagado y presione la Tecla OK.
PROGRAMACION DE PANTALLA
Permite modificar la presentación de pantalla.
AVISO
Para configurar el aviso personal/ERI:
77
2009.1.29 12:8:33 PM
PROGRAMACION
Aviso Personal
El Aviso Personal puede tener hasta 16 caracteres y se muestra en la pantalla del
teléfono en modo de reposo.
1. Presione la tecla OK [MENU], seleccione Programación y presione la tecla OK,
vaya a Programación de Pantalla y presione la tecla OK, seleccione Aviso y
presione la tecla OK, seleccione Aviso Personal y presione la tecla OK.
2. Ingrese el aviso (hasta 16 caracteres) y presione la Tecla OK.
Aviso ERI
Si usted usa servicio de ERI, un texto indicándole esta opción será mostrado como
un sub anuncio.
1. Presione la tecla OK [MENU], seleccione Programación y presione la tecla OK,
vaya a Programación de Pantalla y presione la tecla OK, seleccione Aviso y
presione la tecla OK, seleccione Aviso ERI y presione la tecla OK.
2. Seleccione Apagado o Encendido y presione la tecla OK.
PROGRAMACION
1. Presione la tecla OK [MENU], seleccione Programación y presione la tecla OK,
vaya a Programación de Pantalla y presione la tecla OK, seleccione Luz de
Fondo y presione la tecla OK.
2. Seleccione Pantalla o Teclado y presione la tecla OK.
3. Seleccione 7 segundos, 15 segundos, 30 segundo, Siempre Encendido o
Siempre Apagado y presione la tecla OK.
Incluso si Siempre Encendido es seleccionado, la luz de fondo se apagará
cuando el teléfono sea cerrado.
CONTRASTE
Para ajustar el contraste de la pantalla:
1. Presione la tecla OK [MENU], seleccione Programación y presione la tecla OK,
vaya a Programación de Pantalla y presione la tecla OK, seleccione Contraste y
presione la tecla OK.
2. Presione la tecla OK para guardar la configuración.
LUZ DE FONDO
Para ajustar la duración de la iluminación de la pantalla principal y teclado:
78
090115_7076PP_SP_M_size.indd 78-79
79
2009.1.29 12:8:34 PM
PROGRAMACION
FONDO DE PANTALLA
Para configurar el fondo de pantalla:
1. Presione la tecla OK [MENU], seleccione Programación y presione la tecla OK,
vaya a Programación de Pantalla y presione la tecla OK, seleccione Fondo de
pantalla y presione la tecla OK.
2. Navegue las imágenes y presione la Tecla de Función Izquierda [Ver] para ver
la imagen seleccionada en pantalla completa.
3. Presione la Tecla OK para guardar la imagen como fondo de pantalla.
MOSTRAR TEMAS
1. Presione la tecla OK [MENU], seleccione Programación y presione la tecla OK,
vaya a Programación de Pantalla y presione la tecla OK, seleccione Mostrar
Temas y presione la tecla OK.
2. Navegue para seleccionar Urbano o Agua Azul.
3. Presione la Tecla OK [AJUSTAR] para guardar el tema.
• Para una vista previa los Temas, presione la Tecla de Función Izquierda [Avance].
• Para una descripción de los Temas, presione la Tecla de Función Derecha [Ayuda].
80
090115_7076PP_SP_M_size.indd 80-81
PROGRAMACION
Nota
El valor por defecto es Urbano.
CONFIGURACION DEL MENU PRINCIPAL
1. Presione la tecla OK [MENU], seleccione Programación y presione la tecla
OK, vaya a Programación de Pantalla y presione la tecla OK, seleccione
Configuración Menú Principal y presione la tecla OK.
2. Seleccione Lengüeta, Lista o Cuadricula.
3. Presione la Tecla OK para guardar la configuración..
Nota
La configuración por defecto es cuadricula.
FUENTES DE MARCADO
Para ajustar el tamaño de letra:
1. Presione la tecla OK [MENU], seleccione Programación y presione la tecla OK,
vaya a Programación de Pantalla y presione la tecla OK, seleccione Fuentes de
Marcado y presione la tecla OK.
2. Seleccione Normal o Sólo Grande y presione la tecla OK.
81
2009.1.29 12:8:34 PM
PROGRAMACION
FORMATO DEL RELOJ
Para cambiar la apariencia del reloj en el modo de reposo:
1. Presione la tecla OK [MENU], seleccione Programación y presione la tecla OK,
vaya a Programación de Pantalla y presione la tecla OK, seleccione Formato de
Reloj y presione la tecla OK.
2. Seleccione una de las siguientes opciones:
Análogo, Análogo grande, Digital 12, Digital 12 Grande, Digital24,
Digital 24 Grande, Apagado.
3. Presione la Tecla OK para guardar la configuración.
Nota
La opción por defecto es Digital 12.
PROGRAMACION
PROGRAMACION DE TELEFONO
MODO AEROPLANO
En Modo Aeroplano, todas las opciones del menú pueden ser accedidas excepto
hacer llamadas, recibir llamadas y conexión de datos. La activación del Modo
Aeroplano deshabilita todas las comunicaciones inalámbricas. Igualmente todos
los servicios que soporten funciones de Ubicación (GPS) quedarán temporalmente
deshabilitadas.
1. Presione la tecla OK [MENU], seleccione Programación y presione la tecla OK,
vaya a Programación del Teléfono y presione la tecla OK. Seleccione Modo
Aeroplano y presione la tecla OK.
2. Seleccione Apagado/Encendido y presione la tecla OK.
ESTABLECER ACCESOS DIRECTOS
Su teléfono ofrece la opción de asignar acceso directo al presionar la tecla de
función derecha una función favorita o muy usada. Para asignar una función a la
tecla:
82
090115_7076PP_SP_M_size.indd 82-83
83
2009.1.29 12:8:34 PM
PROGRAMACION
PROGRAMACION
Establecer Mis Accesos Directos
Restaurando Mis Accesos Directos
1. Presione la tecla OK [MENU], seleccione Programación y presione la tecla OK,
Para restaurar Mis Accesos Directos a sus valores originales:
vaya a Programación Teléfono y presione la tecla OK, seleccione Ajuste de
Accesos Directos y presione la tecla OK. Seleccione Establecer Mis Accesos
Directos y presione la tecla OK.
2. Seleccione Acceso Directo 1, Acceso Directo2, Acceso Directo3 o Acceso
Directo 4 y presione la tecla OK [CONFIGURAR].
3. Seleccione la función deseada y presione la tecla OK.
Alarma, Calculadora, Calendario, Ajustes de Llamadas, Chat, Ajustes de
Pantalla, Correo Electrónico, Buzón de entrada de correo electrónico,
Extras, Juegos, Centro Multimedia, Obtener Nuevo Extra, Obtener Nuevo
Juego, Obtener Nueva Imagen, Obtener Nuevo Tono, Obtener navegador y
Descargar, Buzón de entrada Mensajes, MI Móvil, Mi Verizon, Mis Fotos, Mis
Tonos de Timbre, Mis Sonidos, Nuevo Contacto, Nuevo Mensaje de Texto,
Nuevo Foto Mensaje, Web Móvil, Configuración Teléfono, Álbum En Línea,
Ajustes de Sonido, Herramientas, Navegar y Descargar, Melodías y Tonos.
4. En modo de reposo, la función seleccionada puede ser accedida presionando
la tecla de navegación derecha.
84
090115_7076PP_SP_M_size.indd 84-85
1. Presione la tecla OK [MENU], seleccione Programación y presione la tecla OK,
vaya a Programación Teléfono y presione la tecla OK, seleccione Ajuste de
Accesos Directos y presione la tecla OK. Seleccione Restaurando Mis Accesos
Directos y presione la tecla OK.
2. Seleccione Acceso Directo 1, Acceso Directo2, Acceso Directo3 o Acceso
Directo 4 y presione la Tecla de Función Derecha [Opciones].
3. Seleccione restaurar Acceso Directo (1, 2, 3 ó 4) o Restaurar Mis Accesos
Directos y presione la tecla OK.
4. Seleccione Si y presione la tecla OK.
Ajustar Teclas de Navegación
1. Presione la tecla OK [MENU], seleccione Programación y presione la tecla
OK, vaya a Programación de Teléfono y presione la tecla OK, seleccione
Ajustar Accesos Directos y presione la tecla OK, seleccione Ajustar Teclas De
Navegación y presione la tecla OK.
85
2009.1.29 12:8:34 PM
PROGRAMACION
2. Seleccione la tecla De Navegación Arriba, Izquierda o Abajo y presione la tecla
OK [AJUSTAR].
3. Seleccione una de las siguientes funciones y presione la tecla OK.
Alarma, Calculadora, Calendario, Ajustes de Llamadas, Chat, Ajustes de
Pantalla, Correo Electrónico, Buzón de entrada de correo electrónico,
Extras, Juegos, Centro Multimedia, Obtener Nuevo Extra, Obtener Nuevo
Juego, Obtener Nueva Imagen, Obtener Nuevo Tono, Obtener navegador y
Descargar, Buzón de entrada Mensajes, MI Móvil, Mi Verizon, Mis Fotos, Mis
Tonos de Timbre, Mis Sonidos, Nuevo Contacto, Nuevo Mensaje de Texto,
Nuevo Foto Mensaje, Web Móvil, Configuración Teléfono, Álbum En Línea,
Ajustes de Sonido, Herramientas, Navegar y Descargar, Melodías y Tonos
Restaurando la Configuración de las Teclas de Navegación
Use el siguiente procedimiento para especificar los ajustes por defecto de las
teclas de Navegación.
1. Presione la tecla OK [MENU], seleccione Programación y presione la tecla OK,
vaya a Programación de Teléfono y presione la tecla OK, Seleccione Ajuste
de Accesos Directos y presione la tecla OK, seleccione Ajustar Teclas De
Navegación y presione la tecla OK.
86
090115_7076PP_SP_M_size.indd 86-87
PROGRAMACION
2. Seleccione Tecla De Navegación Arriba, Izquierda o Abajo y presione la Tecla
de Función Derecha [Opciones].
3. Seleccione Restaurar Tecla (Arriba, Izquierda o Abajo) o Restaurar Teclas De
Navegación y presione la tecla OK.
4. Seleccione SI y presione la tecla OK.
COMANDOS DE VOZ
Usted puede usar comandos de voz para controlar su celular.
1. Presione la tecla OK [MENU], seleccione Programación y presione la tecla OK,
vaya a Programación de Teléfono y presione la tecla OK, seleccione Comandos
de Voz y Presione la tecla OK.
2. Seleccione Anuncios o Alerta de Llamada y presione la tecla OK.
3. Seleccione la opción del menú de función deseada y presione la tecla OK.
• Anuncios:
- Modo: Seleccione Anuncios o Tonos Solamente.
- Tiempo Fuera: Seleccione 5 Segundos o 10 Segundos.
• Alerta de Llamada: Seleccione Timbre solamente, Identificador + Timbre o Repetir
Nombre.
87
2009.1.29 12:8:34 PM
PROGRAMACION
IDIOMA
Ajuste el idioma en el cual las letras serán mostradas en la pantalla.
1. Presione la tecla OK [MENU], seleccione Programación y presione la tecla OK,
vaya a Programación de Teléfono y presione la tecla OK, seleccione Idioma y
presione la tecla OK.
2. Seleccione Inglés o Español y presione la tecla OK.
PROGRAMACION
Nota
Cuando la Programación de Bloqueo sea seleccionada para Ajustes de
Programación en las Restricciones del Menú de Seguridad, será necesario
ingresar un código de desbloqueo. El código por defecto son los últimos 4
dígitos de su número telefónico.
SEGURIDAD
Previene el uso no autorizado del teléfono. Las siguientes características pueden
ser restringidas:
UBICACION
Para seleccionar si su ubicación siempre aparecerá en la red o durante uso de
emergencia:
Editar Códigos
1. Presione la tecla OK [MENU], seleccione Programación y presione la tecla OK,
1. Presione la tecla OK [MENU], seleccione Programación y presione la tecla OK,
vaya a Programación de Teléfono y presione la tecla OK, seleccione Ubicación
y presione la tecla OK.
2. Seleccione una de las siguientes funciones:
• Ubicación Encendida: Su posición estará disponible para la red.
• Solamente E911: Su posición estará oculta para la red y demás aplicaciones
excepto para 911.
3. Presione la tecla OK para guardar la configuración.
88
090115_7076PP_SP_M_size.indd 88-89
Para establecer un Nuevo código:
vaya a Programación de Teléfono y presione la tecla OK, seleccione Seguridad
y Presione la tecla OK.
El código por defecto son los últimos 4 dígitos de su número.
2. Ingrese el código de 4 dígitos y presione la tecla OK.
3. Seleccione Editar Códigos y presione la tecla OK.
4. Seleccione una de las siguientes opciones y presione la tecla OK:
89
2009.1.29 12:8:35 PM
PROGRAMACION
• Teléfono Solamente: Permite editar el Código para Seguridad. (El código por
defecto son los últimos 4 dígitos de su número)
• Llamadas & Servicios: Permite editar el Código para Restricciones. (El código por
defecto son los últimos 4 dígitos de su número)
5. If Phone Only is selected, enter the new four-digit code in the Enter New Code
field. Enter the new four-digit code again in the Re-enter New Code field and
press the OK Key.
6. Si llamadas & Servicios es seleccionado, ingrese el código de bloqueo actual
en el campo Ingrese Código de Bloqueo actual. Ingrese el nuevo código de
cuatro dígitos en el campo Ingrese Nuevo Código. Ingrese el nuevo código de
cuatro dígitos nuevamente en el campo Re-ingrese el nuevo Código.
7. Presione la tecla OK.
PROGRAMACION
2. Ingrese el código de seguridad de 4 dígitos y presione la tecla OK.
Por defecto son los últimos cuatro dígitos de su teléfono.
3. Seleccione Restricciones y presione la tecla OK, después ingrese el código de 4
dígitos y presione la tecla OK.
4. Seleccione Ajustes de Ubicación, Llamadas o Mensajes.
• Ajustes de Ubicación: Bloquear/Desbloquear ajustes.
• Llamadas:
- Llamadas Entrantes: Seleccione Permitir, Contactos Solamente o Bloquear Todas.
- Llamadas Salientes: Seleccione Permitir, Contactos Solamente o Bloquear Todas.
• Mensajes:
- Mensajes Entrantes: Selecciones Permitir Todos o Bloquear Todos.
- Mensajes Salientes: Selecciones Permitir Todos o Bloquear Todos.
Restricciones
Ajuste de Bloqueo de Teléfono
Use el siguiente procedimiento para configurar los ajustes de Ubicación, Llamadas
y restricciones de Mensajes.
1. Presione la tecla OK [MENU], seleccione Programación y presione la tecla OK,
vaya a Programación de Teléfono y presione la tecla OK, seleccione Seguridad
y presione la tecla OK.
Esta opción especifica si el teléfono será bloqueado al encender. El modo de
bloqueo previene el uso no autorizado del teléfono. El Modo de Bloqueo previene
el uso no autorizado del teléfono. Una vez bloqueado permanecerá en este estado
hasta que el código de bloqueo sea ingresado.
90
090115_7076PP_SP_M_size.indd 90-91
91
2009.1.29 12:8:35 PM
PROGRAMACION
1. Presione la tecla OK [MENU], seleccione Programación y presione la tecla OK,
vaya a Programación de Teléfono y presione la tecla OK, seleccione Seguridad
y presione la tecla OK.
2. Ingrese el código de bloqueo de 4 dígitos y presione la tecla OK.
El código por defecto son los últimos 4 dígitos del número telefónico.
3. Seleccione Bloqueo de Teléfono y presione la tecla OK.
4. Seleccione una de las siguientes opciones y presione la tecla OK:
• Desbloqueado: El teléfono es desbloqueado.
• Bloqueado al encender: El teléfono será bloqueado al encender.
PROGRAMACION
4. Para desbloquear, desde el modo de reposo, presione la Tecla de Función
Derecha [DESBLOQUEAR] e ingrese el código de desbloqueo, luego presione
la tecla OK.
Restaurar el Teléfono
Para borrar todos los Datos del Usuario y restaurar todos los valores iníciales:
1. Presione la tecla OK [MENU], seleccione Programación y presione la tecla OK,
vaya a Programación de Teléfono y presione la tecla OK, seleccione Seguridad
y presione la tecla OK .
2. Ingrese el código de bloqueo de 4 dígitos y presione la tecla OK.
El código por defecto son los últimos 4 dígitos del número telefónico.
Bloquear Teléfono Ahora
Para bloquear el teléfono inmediatamente:
1. Presione la tecla OK [MENU], seleccione Programación y presione la tecla OK,
vaya a Programación de Teléfono y presione la tecla OK, seleccione Seguridad
y presione la tecla OK.
2. Ingrese el código de bloqueo de 4 dígitos y presione la tecla OK.
El código por defecto son los últimos 4 dígitos del número telefónico.
3. Seleccione Restaurar Teléfono y presione la tecla OK.
4. Luego de leer el mensaje de precaución que aparece en pantalla, seleccione Si
y presione la tecla OK.
5. Luego de leer el mensaje que aparece en pantalla, presione la tecla OK.
6. Siga las instrucciones en la pantalla y presione la tecla OK. El teléfono se
apagará automáticamente y encenderá de nuevo.
3. Seleccione Bloquear Ahora y presione la tecla OK.
92
090115_7076PP_SP_M_size.indd 92-93
93
2009.1.29 12:8:35 PM
PROGRAMACION
SELECCIÓN DE SISTEMA
Usted puede programar su teléfono para que busque otra red o haga Roaming
fuera de su zona local de cobertura. Deje este parámetro en su valor pro defecto a
menos que desee alterar la selección del sistema con es instruido por su proveedor
de servicios.
1. Presione la tecla OK [MENU], seleccione Programación y presione la tecla OK,
vaya a Programación de Teléfono y presione la tecla OK, seleccione Selección
del Sistema y presione la tecla OK.
2. Seleccione uno de las siguientes opciones:
• Solo Casa: Obtiene servicio solo de su zona de cobertura local.
• Automático A: Escanea canales de radio de la banda A.
• Automático B: Escanea canales de radio de la banda B.
3. Presione la tecla OK para guardar la configuración.
PROGRAMACIÓN DE LLAMADAS
PROGRAMACION
1. Presione la Tecla OK [MENU], seleccione Programación y presione la Tecla OK,
vaya a Programación de Llamada y presione la Tecla OK, seleccione Opciones
de Respuesta y presione la Tecla OK.
2. Seleccione una de las siguientes opciones:
• Tapa Abierta: Contestar una llamada solo abriendo el teléfono.
• Cualquier Tecla: Contestar una llamada presionando cualquier tecla excepto la tecla
END, la tecla Borrar o la Tecla de Función Derecha.
• Automático con Manos Libres: Contesta automáticamente y una llamada después
de 5 segundos.
Nota
El valor por defecto es Tapa Abierta.
3. Presione la Tecla OK [SUBRAYAR], y después presione la Tecla de Función
Izquierda [Hecho].
REINTENTAR AUTOMATICAMENTE
OPCIONES DE RESPUESTA
Para configurar la duración del tiempo que debe esperar el teléfono para remarcar
un número cuando la llamada inicial falla:
Para determinar cómo contestar una llamada:
1. Presione la Tecla OK [MENU], seleccione Programación y presione la Tecla OK,
vaya a Programación de Llamada y presione la Tecla OK seleccione Reintentar
Automáticamente y presione la Tecla OK.
94
090115_7076PP_SP_M_size.indd 94-95
95
2009.1.29 12:8:35 PM
PROGRAMACION
2. Seleccione 10 Segundos, 30 Segundos, 60 Segundos o Apagado y presione la
Tecla OK.
MODO TTY
Puede añadir un dispositivo TTY al teléfono permitiendo la comunicación con otras
personas usando también un dispositivo TTY. Un teléfono que soporta TTY es capaz
de traducir texto ingresado a voz. La voz también puede ser traducida a caracteres
y mostrada en la pantalla del TTY.
1. Presione la Tecla OK [MENU], seleccione Programación y presione la Tecla OK,
vaya a Programación de Llamada y presione la Tecla OK, seleccione Modo TTY
y presione la Tecla OK.
2. Seleccione una de las siguientes opciones:
• TTY Lleno
• TTY + Voz
• TTY + Escucha
• TTY Apagado
PROGRAMACION
1. Presione la Tecla OK [MENU], seleccione Programación y presione la Tecla OK,
vaya a Programación de Llamada y presione la Tecla OK, seleccione Marcación
Oprimiendo un Botón y presione la Tecla OK.
2. Seleccione Encendido o Apagado y presione la Tecla OK.
Nota
Si Marcación Oprimiendo un Botón es desactivado, los números de marcación
rápida asignados en Contactos no funcionarán.
PRIVACIDAD DE VOZ
Para Encender/Apagar la función de Privacidad de Voz.
1. Presione la Tecla OK [MENU], seleccione Programación y presione la Tecla OK,
vaya a Programación de Llamada y presione la Tecla OK, seleccione Privacidad
de Voz y presione la Tecla OK.
2. Seleccione Encendido o Apagado y presione la Tecla OK.
MARCACION ASISTIDA
3. Presione la Tecla OK para guardar la configuración.
Para asegurarse de que el prefijo IDDD apropiado es usado para una llamada
internacional:
MARCACION DE UN TOQUE
1. Presione la tecla OK [MENU], seleccione Programación y presione la tecla OK,
Para iniciar marcación rápida sosteniendo una tecla de marcación rápida:
96
090115_7076PP_SP_M_size.indd 96-97
vaya a Programación llamadas y presione la tecla OK. Seleccione Marcación
Asistida y presione la tecla OK.
97
2009.1.29 12:8:36 PM
PROGRAMACION
2. Seleccione Encendido o Apagado y presione la Tecla OK.
TONOS DTMF
Para configurar la duración de los tonos de tecla velocidad de respuesta de los
tonos sensible al tacto:
1. Presione la Tecla OK [MENU], seleccione Programación y presione la Tecla
OK, vaya a Programación de Llamada y presione la Tecla OK, seleccione Tonos
DTMF y presione la Tecla OK.
2. Seleccione una de las siguientes opciones y presione la Tecla OK.
• Normal: Envía un tono por un periodo fijo de tiempo incluso si continúa
presionando la tecla.
• Largo: Envía un tono continuo durante el tiempo que la tecla esté presionada y
sostenida.
MEMORIA
USO DE MEMORIA DE TELEFONO
Para revisar la capacidad disponible, capacidad usada y capacidad total de
memoria de teléfono:
98
090115_7076PP_SP_M_size.indd 98-99
PROGRAMACION
1. Presione la Tecla OK [MENU], seleccione Programación y presione la Tecla
OK, vaya a Memoria y presione OK. Seleccione Uso de Memoria de Teléfono y
presione la Tecla OK.
2. Seleccione Uso de Memoria de Teléfono y presione la Tecla OK para ver.
3. Presione la Tecla OK para volver a la pantalla anterior.
MIS IMAGENES
Para ver el uso de memoria en Mis Imágenes:
1. Presione la Tecla OK [MENU], seleccione Programación y presione la Tecla OK,
vaya a Memoria y presione OK. Seleccione Mis imágenes y presione la Tecla
OK.
2. La memoria usada y la disponible en Mis imágenes será mostrada.
3. Presione la Tecla OK para volver a la pantalla anterior.
MIS TONOS DE TIMBRE
Para ver el uso de memoria en Mis Tonos de Timbre:
1. Presione la Tecla OK [MENU], seleccione Programación y presione la Tecla OK,
vaya a Memoria y presione OK. Seleccione Mis Tonos de Timbre y presione la
Tecla OK.
99
2009.1.29 12:8:36 PM
PROGRAMACION
2. La memoria usada y la disponible en Mis Tonos de Timbre será mostrada.
3. Presione la Tecla OK para volver a la pantalla anterior.
MIS SONIDOS
PROGRAMACION
2. El Número Dispositivo Móvil (MDN) y El Número de Identificación Móvil (MIN)
serán mostrados.
3. Para regresar a la pantalla anterior, presione la tecla OK.
Para ver el uso de memoria en Mis Sonidos:
SW/HW VERSION
1. Presione la Tecla OK [MENU], seleccione Programación y presione la Tecla OK,
Para mostrar la versión del SW/PRL/ERI/Browser/Centro de Medios:
vaya a Memoria y presione OK. Seleccione Mis Sonidos y presione la Tecla OK.
2. La memoria usada y la disponible en Mis Sonidos será mostrada.
3. Presione la Tecla OK para volver a la pantalla anterior.
INFORMACION DE TELEFONO
Para mostrar la información acerca del teléfono:
1. Presione la Tecla OK [MENU], seleccione Programación y presione la Tecla OK,
vaya a Información del teléfono y presione la Tecla OK, seleccione Versión SW/
HW y presione la Tecla OK.
2. Muestra la Versión de Software, Versión PRL, Versión ERI, Versión Navegador,
Versión Centro de Medios, Versión de MSUI, Versión de HW, MEID.
3. Presione la Tecla OK para volver a la pantalla anterior.
MI NÚMERO
Para ver su número de teléfono:
1. Presione la Tecla OK [MENU], seleccione Programación y presione la Tecla
OK, vaya a Información de Teléfono y presione OK, seleccione Mi Número y
presione la Tecla OK.
100
090115_7076PP_SP_M_size.indd 100-101
101
2009.1.29 12:8:36 PM
PROGRAMACION
GLOSARIO DE ICONO
Para ver todos los iconos y su significado:
1. Presione la Tecla OK [MENU], seleccione Programación y presione la Tecla OK,
vaya a Información del teléfono y presione la Tecla OK, seleccione Glosario de
Iconos y presione la Tecla OK.
2. Los iconos indicadores serán mostrados.
3. Presione la Tecla OK para volver a la pantalla anterior.
Nota
MI VERIZON
MI VERIZON
1. Presione la Tecla OK [MENU], seleccione Programación y presione la Tecla OK,
después seleccione Mi Verizon y presione la Tecla OK.
2. Usted se conectará al navegador y la página de Mi Verizon aparecerá.
Nota
• Acceso Directo: En modo de reposo, presione la tecla de navegación
izquierda para accede a Mi Verizon.
• Tiempo de Aire es gratis para acceso al Mi Verizon a través del Teléfono.
Por favor refiérase a la página 12 para más detalles de los indicadores de
pantalla.
102
090115_7076PP_SP_M_size.indd 102-103
103
2009.1.29 12:8:36 PM
CHAPTER 5
HERRAMIENTAS
MEMO
CAPITULO 5
HERRAMIENTAS
Esta sección le muestra para cómo utilizar estas
características para utilizar su teléfono como un
planeador de gestión de tiempo que ayuda le a mantener sus contactos,
cronogramas y compromisos.
104
090115_7076PP_SP_M_size.indd 104-105
105
2009.1.29 12:8:37 PM
HERRAMIENTAS
COMANDOS DE VOZ
Su teléfono está equipado con una función AVR (reconocimiento vocal avanzado).
Esta función permite que usted haga llamadas o que utilice las funciones del
teléfono simplemente usando su voz. Todo lo que usted tiene que hacer es hablar
en el teléfono y el teléfono reconocerá su voz y completará las tareas por sí mismo.
1. En modo de reposo, con la tapa abierta, presione la Tecla de Comandos de Voz
para acceder a Comandos de Voz. Usted escuchará ”Por favor diga un
comando”.
Nota
Usted también puede acceder a este menú presionando la Tecla OK
[MENU], seleccionando Herramientas y presionando la Tecla OK, y después
seleccionando Comandos de Voz y presionando la Tecla OK.
2. Después de escuchar una señal sonora, diga el nombre del comando.
Los comandos listados en la siguiente tabla están disponibles.
1. Llamar: Permite llamar a un número de teléfono diciendo un nombre grabado en
la lista de contactos.
2. Marcación por dígitos: Permite macar un numero diciendo los dígitos.
3. Repetir Llamada: Llamar al último número marcado.
4. Contestar con voz: Activar el modo de contestar por voz.
5. Llamadas recientes: Ver la lista de llamadas recientes.
6. Buzón de Voz: Accede al buzón de voz.
7. Batería: Ver el nivel de batería actual.
106
090115_7076PP_SP_M_size.indd 106-107
HERRAMIENTAS
3. Para Ajustar el Comando de Voz , presione la tecla de función derecha
[Configurar].
LLAMAR USANDO MARCACION POR VOZ ACTIVADA
Use el comando de voz para llamar un nombre de la lista de contactos.
1. Para llamar un número guardado en la lista de contactos, con la tapa abierta,
presione la tecla de Comandos de Voz
un comando”.
2.
3.
4.
5.
. Usted escuchara ”Por favor Diga
Después de la señal Sonora, diga “Llamar”.
Usted escuchará y verá “Por Favor Diga un Nombre”.
Después de la señal sonora, diga el nombre del contacto.
Usted escuchara “Dijo [Nombre] [Numero]” y el contacto será mostrado en la
pantalla. Más de un contacto puede ser mostrado. Si el primer contacto no es
correcto, diga “No”. Repita hasta que el contacto correcto sea indicado. Diga
“Si” si el nombre y número son correctos.
Nota
SI el contacto tiene más de un número de teléfono, el número principal será
escogido para la marcación por voz.
6. El teléfono marcará el numero.
107
2009.1.29 12:8:37 PM
HERRAMIENTAS
INFORMACION
1. En el modo de reposo, con la tapa abierta, presione la tecla de Comandos de
Voz . Después de una pequeña pausa ”Por favor Diga un Comando”
aparece en la pantalla y es pronunciado a través del altavoz.
2. Vaya a un elemento del menú y presione la Tecla de Función Izquierda [Info].
3. El teléfono muestra la información para ayudar a usar ese elemento del menú
y lo reproduce a través del altavoz.
CALCULADORA
La Calculadora permite realizar simple cálculos matemáticos. Para acceder a
Calculadora:
1. Presione la Tecla OK [MENU], seleccione Herramientas y presione la Tecla OK,
seleccione Calculadora y presione la Tecla OK.
2. Ingrese el numero usando el teclado para utilizar una de las siguientes
funciones:
• Presione la Tecla de Navegación Derecha
para Multiplicación (x).
• Presione la Tecla de Navegación Izquierda
para División (÷).
para Restar (-).
• Presione la Tecla de Navegación Abajo
108
090115_7076PP_SP_M_size.indd 108-109
HERRAMIENTAS
• Presione la Tecla de Navegación Arriba
para Sumar (+).
para un punto decimal.
• Presione
• Presione
para cambiar el numero mostrado de positive (+) a negativo (-) y
viceversa.
• Presione la Tecla de Función Derecha para borrar todos los números.
• Presione la Tecla de Función Izquierda para seleccionar paréntesis derecho o
paréntesis izquierdo o Exponente.
3. Ingrese la formula numérica y presione la tecla OK para ver el resultado (=).
4. Para restaurar presione la Tecla de Función Derecha [Borrar].
CALENDARIO
La herramienta Calendario provee acceso fácil y conveniente a su horario.
Simplemente guarde sus citas y el teléfono le alertará sobre ellas.
AGREGAR NUEVO CALENDARIO
1. Presione la Tecla OK [MENU], seleccione Herramientas y presione la Tecla OK,
seleccione Calendario y presione la Tecla OK.
Nota
En modo de reposo presione la Tecla de Navegación Abajo.
109
2009.1.29 12:8:37 PM
HERRAMIENTAS
2. Presione la Tecla de Navegación Arriba, abajo, derecha o izquierda para
resaltar el día deseado.
3. Presione la Tecla de Función Izquierda [Añadir].
4. La pantalla del Nuevo evento será mostrada. Ingrese el nombre del evento.
Presione la Tecla de Navegación abajo para llenar los otros campos del evento.
• Hora de comienzo: Use el teclado para configurar una hora de comienzo y
presione la Tecla de Función Izquierda para am/pm.
• Hora de término: Use el teclado para configurar una hora de término y presione
la Tecla de Función Izquierda para am/pm.
• Fecha de comienzo: Use el teclado para cambiar o ingresar la fecha de comienzo.
• Fecha de término: Use el teclado para cambiar o ingresar la fecha de término.
• Zona de tiempo: Si la zona de tiempo necesita ser ajustada, presione la Tecla de
Función Izquierda [Configurar]. Presione la Tecla de Navegación arriba o abajo para
seleccionar una zona de tiempo nueva luego presione la Tecla OK.
• Repetición: Presione la Tecla de Navegación izquierda o derecha para configurar
la repetición del evento (Diario, Semanal, Mensual, Anual).
• Tono: Presione la Tecla OK [Configurar] para seleccionar un Nuevo tono de timbre.
Presione la Tecla de Navegación arriba o abajo para resaltar el timbre luego
presione la Tecla OK. Presione la Tecla de Función Izquierda [Tocar/parar] para
escuchar el timbre.
• Vibrar: Presione la Tecla OK [Configurar] para configurar Apagado o Encendido y
presione la tecla OK.
110
090115_7076PP_SP_M_size.indd 110-111
HERRAMIENTAS
• Recordatorio: Presione la Tecla OK para seleccionar una opción de intervalo de
tiempo: 0, 5, 10 o 15 Minutos.
5. Presione la Tecla OK [GUARDAR] para guardarlo. La fecha del evento será
marcada en su calendario.
VER LISTA DE EVENTOS
1. Presione la Tecla OK [MENU], seleccione Herramientas y presione la Tecla OK,
seleccione Calendario y presione la Tecla OK.
2. Vaya a la fecha en el calendario y presione la tecla OK [VER] para ver el evento
de ese día.
3. Presione la tecla OK [VER] para información más detallada acerca de ese
evento.
BORRAR UN EVENTO GUARDADO
1. Presione la Tecla OK [MENU], seleccione Herramientas y presione la Tecla OK,
seleccione Calendario y presione la Tecla OK.
2. Vaya a la fecha en el calendario y presione la tecla OK [VER] para ver el evento
de ese día.
111
2009.1.29 12:8:38 PM
HERRAMIENTAS
3. Presione la Tecla de Función Derecha [Opciones], seleccione Borrar y presione
la Tecla OK, después seleccione Si y presione la Tecla OK.
BORRAR TODOS LOS EVENTOS PASADOS
1. Presione la Tecla OK [MENU], seleccione Herramientas y presione la Tecla OK,
seleccione Calendario y presione la Tecla OK.
2. Vaya a la fecha en el calendario y presione la tecla OK [VER] para ver el evento
de ese día.
3. Presione la Tecla de Función Derecha [Opciones], seleccione Borrar Todo y
presione la Tecla OK, después seleccione Si y presione la Tecla OK.
RELOJ DESPERTADOR
HERRAMIENTAS
2. Seleccionar Alarma 1, 2, o 3 para configurar una nueva alarma y presione la
Tecla OK.
3. El campo de configuración será resaltado. Presione la Tecla de Navegación
Abajo para seleccionar las opciones de alarma:
• Alarma: Presione la Tecla de Navegación Izquierda o Derecha / para seleccionar
Encendido o Apagado.
• Tiempo: Use el teclado para configurar la hora de alarma y presione la Tecla de
Función Izquierda para am/pm.
• Frecuencia: Presione la Tecla de Navegación Derecha o Izquierda / para
seleccionar Una Vez, Diario, Lunes – Viernes, Fines de Semana).
• ID timbre: Presione la Tecla de Función Izquierda [Configurar] para seleccionar
1. Obtener Un Nuevo Timbre o seleccionar un tono de timbre para el sonido de la
alarma de la lista presionando la tecla OK. Presione la Tecla de Función Izquierda
[Tocar/Parar] para escuchar el tono de timbre.
• Recordatorio: Presione la Tecla de Navegación Izquierda o Derecha / para
seleccionar Recordar 0 Min, Recordar 5 Min, Recordar 10 Min, Recordar 15 Min.
La herramienta del despertador permite que configure hasta tres alarmas. Cuando
usted fija una alarma, el tiempo actual se exhibe en la parte superior de la
pantalla. Cuando se activa la alarma, el elemento 1 (o 2 o 3, como se aplica) será
exhibido en la pantalla y la alarma sonará.
4. Para guardar una Programación de alarma presione la Tecla OK [GUARDAR].
1. Presione la Tecla OK [MENU], seleccione Herramientas y presione la Tecla OK,
APAGAR/ENCENDER LA CONFIGURACION DE ALARMA
seleccione Reloj Despertador y presione la Tecla OK.
1. Presione la Tecla OK [MENU], Herramientas y presione la Tecla OK, seleccione
Reloj Despertador y presione la Tecla OK.
112
090115_7076PP_SP_M_size.indd 112-113
113
2009.1.29 12:8:38 PM
HERRAMIENTAS
2. Seleccione una alarma 1, 2, o 3 y presione la Tecla de Función Derecha
[Opciones].
3. Seleccione Encendido/Apagado y luego presione la Tecla OK.
REAJUSTAR LA CONFIGURACION DE ALARMA
1. Presione la Tecla OK [MENU], seleccione Herramientas y presione la Tecla OK,
seleccione Reloj Despertador y presione la Tecla OK.
2. Seleccione una alarma 1, 2, o 3 y presione la Tecla De Función Derecha
[Opciones].
3. Seleccione Reajustar Alarma y luego presione la Tecla OK, seleccione Si, y
presione la Tecla OK.
RESTAURAR TODAS LAS CONFIGURACIONES DE ALARMA
1. Presione la Tecla OK [MENU], seleccione Herramientas y presione la Tecla OK,
seleccione Reloj Despertador y presione la Tecla OK.
2. Seleccione una alarma 1, 2, o 3 y presione la Tecla De Función Derecha
[Opciones].
114
090115_7076PP_SP_M_size.indd 114-115
HERRAMIENTAS
3. Seleccione Reajustar Todo y luego presione la Tecla OK, seleccione Si, y
presione la Tecla OK.
CRONOMETRO
Toma el tiempo simultaneo de hasta ocho eventos diferentes. Para utilizar el
cronometro:
1. Presione la Tecla OK [MENU], seleccione Herramientas y presione la Tecla OK,
seleccione Cronometro y presione la Tecla OK.
2. Para medir un periodo de tiempo:
• Para iniciar el cronometro, presione la Tecla de Función Izquierda [Comenzar].
• Para detener un periodo de tiempo y continuar midiendo otro presione la Tecla de
Función Derecha [Cont].
• Para detener un segundo periodo de tiempo y continuar midiendo otro presione la
Tecla de Función Derecha [Cont].
• Para medir hasta Diez eventos, repita los pasos arriba.
• Para detener el cronometro, presione la Tecla de Función Izquierda [Alto/Continuar].
• Para revisar los resultados, presione la Tecla de Navegación Arriba/Abajo.
• Para restaurar el cronometro, presione la Tecla de Función Derecha [Reajustar].
115
2009.1.29 12:8:38 PM
HERRAMIENTAS
RELOJ MUNDIAL
Para mostrar la fecha y hora en ciudades pre programadas:
1. Presione la Tecla OK [MENU], seleccione Herramientas y presione la Tecla OK,
seleccione Reloj Mundial y presione la Tecla OK.
2. Seleccione una ciudad presionando la Tecla de Función Derecha [Ciudad].
3. El mapa del mundo aparece con la ciudad, fecha y hora. Utilice la tecla de
navegación para seleccionar otra ciudad.
Nota
Si presiona la Tecla de Función Izquierda [Dst], entonces todas las ciudades
que soportan Luz de Día Dst se encenderán/apagaran.
4. Para regresar a la pantalla anterior y ver la información de una ciudad,
presione la Tecla OK.
HERRAMIENTAS
1. Presione la Tecla OK [MENU], seleccione Herramientas y presione la Tecla OK,
seleccione Cuaderno de Anotaciones y presione la Tecla OK.
2. Para agregar una nueva NOTA, presione la Tecla de Función Izquierda
[Agregar].Ingrese un nuevo texto.
3. Para guardar la NOTA, presione la Tecla OK [GUARDAR].
VER MEMO
Para ver un memo guardado:
1. Presione la Tecla OK [MENU], seleccione Herramientas y presione la Tecla OK,
seleccione Cuaderno de Anotaciones y presione la Tecla OK.
2. La lista de todas las notas, en orden de guardado, es mostrada. Seleccione una
NOTA y presione la Tecla OK [VER].
CUADERNO DE ANOTACIONES
EDITAR UN MEMO GUARDADO
Su teléfono tiene incluido un cuaderno de anotaciones interno que le permite
componer y guardar recordatorios y notas.
Para editar un memo guardado:
AGREGAR NUEVA NOTA
Para componer un memo (Tiene un límite de 80 letras):
116
090115_7076PP_SP_M_size.indd 116-117
1. Presione la Tecla OK [MENU], seleccione Herramientas y presione la Tecla OK,
seleccione Cuaderno de Anotaciones y presione la Tecla OK.
2. Presione la Tecla OK [VER] para ver la NOTA seleccionada.
117
2009.1.29 12:8:38 PM
CAPITULO 6
CENTRO DE MEDIOS
HERRAMIENTAS
3. Presione la Tecla OK [EDITAR]. Edite la NOTA y presione la Tecla OK
[GUARDAR].
BORRAR UN MEMO GUARDADO
Para borrar un memo guardado:
1. Presione la Tecla OK [MENU], seleccione Herramientas y presione la Tecla OK,
CAPITULO 6
CENTRO DE
MEDIOS
seleccione Cuaderno de Anotaciones y presione la Tecla OK.
2. Presione la Tecla de Función Derecha [Opciones] y seleccione borrar y presione
la Tecla OK.
3. Presione la Tecla OK para seleccionar Si.
BORRAR TODOS LOS MEMOS GUARDADOS
Para borrar todos los memos guardados:
1. Presione la Tecla OK [MENU], seleccione Herramientas y presione la Tecla OK,
seleccione Cuaderno de Anotaciones y presione la Tecla OK.
El teléfono proporciona una característica única
-Centro de Medios- que permite descargar Tonos de Timbre,
fondos de pantalla, juegos y mucho más de la red al teléfono.
Póngase en contacto con el proveedor de servicio
para la habilitación de estos servicios.
Este capítulo también cubre el uso de la cámara incorporada de teléfono
2. Presione la Tecla de Función Derecha [Opciones] y seleccione Borrar Todo y
presione la Tecla OK.
3. Presione la Tecla OK para seleccionar Si.
118
090115_7076PP_SP_M_size.indd 118-119
119
2009.1.29 12:8:39 PM
CENTRO DE MEDIOS
CENTRO DE MEDIOS
MUSICA Y TONOS
3. Para parar, presione la Tecla OK [ALTO].
OBTENER NUEVOS TONOS DE TIMBRE
Para borrar Melodias y Tonos descargados
Para conectarse al CENTRO DE MEDIOS y descargar varios tonos de timbre:
1. Presione la Tecla OK [MENU], seleccione Centro de Medios y presione la Tecla
OK, desplace hasta Música y Tonos y presione la Tecla OK, seleccione Obtener
Nuevos Timbres y presione la Tecla OK.
2. Si no ha descargado previamente ningún tono de timbre o aplicación de tonos
de timbre, presione Obtener Nuevas Aplicaciones y presione la Tecla OK. El
navegador de Centro de Medios aparecerá. Siga los avisos en las pantallas.
1. Presione la Tecla OK [MENU], seleccione Centro de Medios y presione la Tecla
OK, desplace hasta Música y Tonos t presione la Tecla OK, seleccione Mis
Timbres y presione la Tecla OK.
2. Seleccione la tono de timbre que desea borrar y después presione la Tecla de
Función Derecha [Opciones].
3. Seleccione Borrar y presione la Tecla OK y después seleccione Si presionando
la Tecla OK para borrar.
Para reproducir la Musica o Tonos descargados
ASIGNAR UNA MELODIA Y TONO DESCARGADO
1. Presione la Tecla OK [MENU], seleccione Centro de Medios y presione la Tecla
Para seleccionar un tono de timbre deseado o descargar un nuevo tono de timbre:
OK, desplace hasta Música y Tonos y presione la Tecla OK, seleccione Mis
Timbres y presione la Tecla OK.
Atajo:
Press the OK Key [MENU], select My Ringtones and press the OK Key.
2. Seleccione la tono de timbre que desea reproducir y presione la Tecla OK
1. Presione la Tecla OK [MENU], seleccione Centro de Medios y presione la Tecla
OK, desplace hasta Música y Tonos y presione la Tecla OK, seleccione Mis
Timbres y presione la Tecla OK.
2. Seleccione un Tono de Timbre y presione la Tecla de Función Izquierda [Ajustar
como].
[TOCAR].
120
090115_7076PP_SP_M_size.indd 120-121
121
2009.1.29 12:8:39 PM
CENTRO DE MEDIOS
1. Tonos de Timbre: Un mensaje de confirmación aparece.
2. ID para Contactar: La pantalla AJUSTAR ID CONTACTO aparece. Seleccione el
contacto al que desea asignar el tono de timbre y presione la Tecla OK.
3. Sonidos de Alerta: Presione la tecla número correspondiente para ajustar el tono
de timbre a lo siguiente: Todos Mensajería/Mensajes de TXT/Mensaje de Fotos/
Mensajes de Voz. Presione la Tecla OK para ajustar el tono de timbre deseado.
3. Presione la Tecla de Función Derecha [Opciones] para acceder a las siguientes
opciones:
• Borrar: Borrar el tono de timbre actual del teléfono.
• Renombrar: Para editar el titulo del tono de timbre. (Esta opción solo aparece para
un tono de timbre descargado.)
• Bloquear/Desbloquear: Bloquear/Desbloquear el tono de timbre actual de su
teléfono. (Esta opción solo aparece para un tono de timbre descargado.)
• Borrar Todo: Para borrar todos los tonos de timbre de su teléfono.
• Información Archivo: Muestra la información del Tono de Timbre seleccionado.
MIS SONIDOS
Para seleccionar un sonido deseado:
1. Presione la Tecla OK [MENU], seleccione Centro de Medios y presione la Tecla
OK, desplace hasta Música y Tonos y presione la Tecla OK, seleccione Mis
Sonidos y presione la Tecla OK.
122
090115_7076PP_SP_M_size.indd 122-123
CENTRO DE MEDIOS
2. Para reproducir un sonido descargado, seleccione el sonido que desea
reproducir y presione la Tecla OK [REPRODUCIR].
Presione la Tecla de Función Derecha [Opciones] puede acceder a las siguientes
opciones:
1. Enviar: Para enviar el sonido.
2. A Álbum en Línea
3. Renombrar: Para editar el titulo del sonido.
4. Bloquear/Desbloquear: Bloquear o desbloquear el sonido seleccionado en el
teléfono.
5. Borrar: Para borrar un sonido seleccionado en el teléfono.
6. Borrar Todo: Para borrar todos los sonidos en el teléfono.
7. Info Archivo: Muestra la información del sonido seleccionado.
Grabar Nuevo
1. Presione la Tecla OK [MENU], seleccione Centro de Medios y presione la Tecla
OK, desplace hasta Música y Tonos y presione la Tecla OK, seleccione Mis
Sonidos y presione la Tecla OK.
2. Para Grabar un sonido o memo de voz, seleccione Grabar Nuevo y presione
la Tecla OK. “Presione OK para empezar a grabar” será mostrado. Presione la
Tecla OK y escuchará un sonido de alerta. Empiece a grabar su sonido o memo
de voz.
123
2009.1.29 12:8:39 PM
CENTRO DE MEDIOS
3. Para detener la grabación, presione la Tecla OK [DETENER].
Borrar Sonidos
1. Presione la Tecla OK [MENU], seleccione Centro de Medios y Presione la Tecla
OK, desplace hasta Música y Tonos y Presione la Tecla OK, seleccione Mis
Sonidos y Presione la Tecla OK.
2. Desplace para seleccionar el sonido que desea borrar y presione la Tecla de
Función Derecha [Opciones].
3. Desplace hasta Borrar y presione la Tecla OK.
4. Presione la Tecla OK para seleccionar Sí.
CENTRO DE MEDIOS
2. Si no tiene ninguna imagen o aplicación previamente descargada, seleccione
Obtener Nueva Aplicación y presione la Tecla OK. El navegador se conectará.
Siga los avisos en las pantallas.
3. Las imágenes descargadas son guardadas en el menú Mis Imágenes.
Presionando la Tecla de Función Derecha [Opciones], puede escoger una de las
siguientes opciones:
• Ver Propiedades
• Bloquear /Desbloquear
• Cancelar Subscripció
• Actualizar
MIS IMAGENES
IMAGENES
OBTENER NUEVAS IMAGENES
Conecte al CENTRO DE MEDIOS y descargue una variedad de fotos (imágenes):
1. Presione la Tecla OK [MENU], seleccione Centro de Medios y Presione la Tecla
OK, desplace hasta Fotos y Presione la Tecla OK, seleccione Obtener Nuevas
Fotos y presione la Tecla OK.
En Mis Fotos se puede ver todas las fotos que ha tomado, imágenes seleccionadas
guardadas en el teléfono, enviar fotos al álbum en línea, borrar imágenes y
acceder a opciones adicionales de fotos.
1. Presione la Tecla OK [MENU], seleccione Centro de Medios y Presione la Tecla
OK, desplace hasta Foto y presione la Tecla OK, seleccione Mis Fotos y presione
la Tecla OK.
Atajo:
124
090115_7076PP_SP_M_size.indd 124-125
Presione la Tecla OK [MENU], seleccione Mis Fotos luego presione Tecla OK.
125
2009.1.29 12:8:39 PM
CENTRO DE MEDIOS
2. Usted podrá ver todas las imágenes guardadas en el teléfono.
3. Seleccione la foto deseada y presione la Tecla OK [VER].
• Presionando la Tecla de Función Derecha [Opciones], puede escoger una de las
siguientes opciones:
1. Enviar: Para enviar un mensaje de foto.
2. Ajustar como: Asignar la foto seleccionada para mostrar tarea específica. (Fondo
de Pantalla/Foto ID)
3. A Álbum en Línea
4. Tomar Foto: To Tomar una nueva foto.
5. Obtener nuevas Fotos: Para descargar foto.
6. Renombrar: Renombrar la foto seleccionada.
7. Bloquear/Desbloquear: Para seleccionar bloquear o Desbloquear.
8. Borrar Todo: Para borrar todas las fotos en su teléfono.
9. Info Archivo: Muestra información acerca de la foto seleccionada (Nombre de
Archivo/Fecha/Hora/ Resolución/ Tamaño).
TOMAR UNA FOTO
Para Tomar una Foto:
1. Con el teléfono abierto presione y sostenga la Tecla Cámara .
2. Apunte el lente de la cámara a su objetivo. Puede revisar el marco de la foto
en la pantalla principal.
126
090115_7076PP_SP_M_size.indd 126-127
CENTRO DE MEDIOS
3. Presione la Tecla OK [CAPTURAR] para tomar la foto.
• Para ver las imágenes capturadas, Presione la Tecla de Función Izquierda [Mis
Fotos].
• Presionando la Tecla de Función Derecha [Opciones], se puede escoger de las
siguientes opciones:
1. Resolución: Para seleccionar la resolución para una foto,
(640x480/320x240/160x120).
2. Temporizador Automático: Para activar la función de contador de la cámara.
(Apagado/3 Segundos/5 Segundos/10 Segundos).
3. Brillo: Para ajustar el brillo Aumentar/Disminuir (-2 ~ +2).
4. Equilibrio Blanco: Para seleccionar el balance de Blancos. (Auto/Soleado/
Nublado/Tungsteno/Fluorescente/Oscuro).
5. Sonido del Obturador: Para seleccionar el sonido del obturador. (Disparo/
Silencio/Decir “Cheez”/Listo! 123)
6. Efectos de Color: Para seleccionar el efecto de color entre los
siguientes:(Normal/Antiguo/Blanco & Negro/Negativo).
7. Modo de Captura: Para seleccionar el modo de captura (Paisaje o Retrato).
• Presione la Tecla de Navegación Izquierda o Derecha: Zoom (Solo so la resolución
es ajustad a 160 X 120 o 320 X 240).
4. Presione la Tecla de Función Izquierda [Guardar] para guardar a foto en
Mis Fotos. Presione la Tecla de Función derecha [Borrar] para borra una foto
tomada. Presione la Tecla OK [Send] para guardar la foto y enviarla a un
teléfono móvil o un correo electrónico.
127
2009.1.29 12:8:39 PM
CENTRO DE MEDIOS
ALBUM EN LINEA
1. Presione la Tecla OK [MENU], seleccione Centro de Medios y presione la Tecla
OK, desplace hasta Foto y presione la Tecla OK, seleccione Álbum en línea y
presione la Tecla OK.
2. Siga los avisos en las pantallas.
JUEGOS
CENTRO DE MEDIOS
2. Para jugar el juego descargado y seleccione el juego y presione la Tecla OK.
Siga los avisos en las pantallas.
INTERNET MOVIL
CONECTANDO A INTERNET MOVIL
1. Presione la Tecla OK [MENU], seleccione Centro de Medios y presione la Tecla
OK y seleccione Internet Móvil y presione la Tecla OK
DESCARGAR JUEGOS
2. Internet Móvil iniciara.
1. Presione la Tecla OK [MENU], seleccione Juegos y presione la Tecla OK.
2. Si no ha descargado previamente ningún juego o aplicación de tonos de
NAVEGAR Y DESCARGAR
timbre, seleccione Obtener Nuevas Aplicaciones. El navegador aparecerá.
Desde el menú de Descarga, seleccione un tipo de juego y presione la Tecla
OK. Después seleccione la aplicación y presione la Tecla OK para descargarlo.
3. Una vez la aplicación ha iniciado, siga las instrucciones para descargar sus
juegos. Los juegos descargados son guardados en la carpeta de juegos.
JUGANDO LOS JUEGOS DESCARGADOS
1. Presione la Tecla OK [MENU], seleccione Juegos y presione la Tecla OK.
128
090115_7076PP_SP_M_size.indd 128-129
CONECTANDO AL NAVEGADOR Y DESCARGANDO
Para descargar Instrumentos que pueden ayudar a navegar en lugares de
entretenimiento, restaurantes y proporcionarle información reciente del tiempo:
1. Presione la Tecla OK [MENU], seleccione Centro de Medios y presione la Tecla
OK y seleccione Internet Móvil y presione la Tecla OK
2. Seleccione Obtener Nuevas Aplicaciones y presione la Tecla OK. El navegador
aparecerá. Desde el menú de Descarga, seleccione un tipo de aplicación tipo
de juego y presione la Tecla OK. Seleccione la aplicación y presione la Tecla OK
para descargarla.
129
2009.1.29 12:8:40 PM
CAPITULO 7
MENSAJERIA
CENTRO DE MEDIOS
EXTRAS
CONECTANDO A EXTRAS
1. Presione la Tecla OK [MENU], seleccione Centro de Medios y presione la Tecla
CAPITULO 7
OK, seleccione Extras y presione la Tecla OK.
2. Si no tiene ninguna aplicación previamente descargada, seleccione Obtener
MENSAJERIA
Nueva Aplicación y presione la Tecla OK. El Navegador se iniciara. Del menú de
descarga seleccione un tipo de aplicación y presione la Tecla OK. Seleccione la
aplicación y presione la Tecla OK para descargarla.
Este capítulo explica Correo de Voz, mensajes de TXT y Foto.
130
090115_7076PP_SP_M_size.indd 130-131
131
2009.1.29 12:8:40 PM
MENSAJERIA
MENSAJE NUEVO
MENSAJE DE TEXTO
MENSAJERIA
• Nivel de Prioridad: Seleccione Alto o Normal.
• Cancelar Mensaje: Para cancelar el mensaje.
Para enviar un mensaje de TXT nuevo:
4. Para enviar el mensaje de TXT presione la Tecla OK [SEND].
1. Presione la Tecla de Función Izquierda [Mensaje], desplace hasta Nuevo
MENSAJE DE FOTO
Mensaje y presione la Tecla OK, seleccione Mensaje TXT y presione la Tecla OK.
2. En “Para” ingrese el número telefónico, luego presione la Tecla OK.
Al presionar la Tecla de Función Derecha [Agregar], se puede escoger de lo siguiente:
• De Contactos: Buscar por números de teléfono o direcciones de email los cuales
son guardados en la lista de contactos.
• Llamadas Recientes: Buscar por los número de teléfono guardados en la lista
llamadas recientes.
• Grupos: Buscar los grupos guardados en la lista de contactos.
• A Contactos: Guarda el numero no guardado o dirección de email a la lista de
contacto antes de enviar el mensaje.
3. Ingrese el mensaje. Para cambiar el modo de entrada, presione la Tecla de
Función Izquierda [Abc].
Presione la Tecla de Función Derecha [Opciones] para acceder a lo siguiente:
• Texto Rápido: Inserte oraciones ya escritas en el Mensaje de Texto.
• Guardar Como Borrador: Para Guardar el mensaje de texto.
• Añadir: Para adicionar Grafico o Sonidos EMS en los mensajes de TXT.
132
090115_7076PP_SP_M_size.indd 132-133
Para enviar un Nuevo mensaje de foto.
1. Presione la Tecla de Función Izquierda [Mensaje], desplace hasta Nuevo
Mensaje y presione la Tecla OK, seleccione Mensaje de Foto y presione la Tecla
OK.
2. En “Para” ingrese el número telefónico, luego presione la Tecla OK.
Al presionar la Tecla de Función Derecha [Agregar], se puede escoger de lo siguiente:
• De Contactos: Buscar por números de teléfono o direcciones de email los cuales
son guardados en la lista de contactos.
• Llamadas Recientes: Buscar por los número de teléfono guardados en la lista
llamadas recientes.
• Grupos: Buscar los grupos guardados en la lista de contactos.
• A Álbum en línea: Enviar el Mensaje de Foto usando una dirección en línea.
• A Contactos: Guarda el numero no guardado o dirección de email a la lista de
contactos, cuando ingresa el número.
3. Ingrese el mensaje.
133
2009.1.29 12:8:40 PM
MENSAJERIA
4. Desplace hasta el campo de la foto y presione la Tecla de Función Izquierda
[Mis Fotos]. Desplace y seleccione la foto y presione la Tecla OK. Solo puede
enviar un archivo de foto.
5. Desplace hasta el campo de Sonido y presione la Tecla de Función Izquierda
[Sonidos]. Desplace y seleccione el sonido y presione la Tecla OK. Solo puede
enviar un archivo de sonido.
6. Desplace hasta el campo Asunto y escriba el asunto.
Presione la Tecla de Función Derecha [Opciones],para escoger entre lo siguiente:
• Vista Previa: Vista previa del mensaje.
• Guardar Como Borrador: Guardar el mensaje.
• Añadir Texto Rápido: Inserte oraciones ya escritas en el Mensaje.
• Agregar Pantalla: Agregar otro mensaje.
• Remover Foto: Remover la foto insertada.
• Remover Pantalla: Remover la pantalla actual.
• Remover Sonido: Remover sonido insertado.
• Nivel de Prioridad: Seleccione Alto o Normal.
• Cancelar Mensaje: Cancela el mensaje.
MENSAJERIA
BUZON DE ENTRADA
La bandeja de entrada administra mensajes recibidos Texto, Foto y Alerta WEB.
Para acceder:
1. Presione la Tecla de Función Izquierda [Mensaje], desplace hasta Buzón de
entrada y presione la Tecla OK.
2. Seleccione un mensaje y presione la Tecla OK [ABRIR]. Para borrar un mensaje,
presione la Tecla de Función Izquierda [Borrar] y presione la Tecla OK para
seleccionar Sí.
Presione la Tecla de Función Derecha [Opciones] para acceder a lo siguiente:
• Reenviar: Reenviar el mensaje.
• Responder con Copia: Responder al emisor con el mensaje original incluido.
• Borrar: Para borrar el mensaje.
• Guardar Texto Rápido: Guardar un mensaje de texto recibido como texto rápido.
• Agregar a Contactos: Guardar un número a contactos.
• Guardar Foto: Guardar la foto en el mensaje.
• Bloquear/Desbloquear: Bloquear o Desbloquear un mensaje.
• Info Mensaje:Muestra la información del mensaje recibido.
7. Para enviar el mensaje presione la Tecla OK [SEND].
134
090115_7076PP_SP_M_size.indd 134-135
135
2009.1.29 12:8:40 PM
MENSAJERIA
ENVIADOS
Maneja todos los mensajes enviados.
1. Presione la Tecla de Función Izquierda [Mensaje], desplace hasta Enviados y
presione la Tecla OK.
2. Seleccione un mensaje y presione la Tecla OK [ABRIR]. Para borrar un mensaje,
presione la Tecla de Función Izquierda [Borrar], luego seleccione Si o No y
presione la Tecla OK. Para reenviar el mensaje, presione la Tecla OK [SEND].
Presione la Tecla de Función Derecha [Opciones] para acceder a lo siguiente:
• Reenviar: Reenviar el mensaje.
• Bloquear/Desbloquear: Bloquear o Desbloquear el mensaje.
• Guardar Texto Rápido: Guardar un mensaje de texto enviado como texto rápido.
• Agregar a Contactos: Guardar un número a contactos.
• Guardar Gráficos: To save a picture.
• Save Sound: Para guardar la Foto.
• Info Mensaje: Muestra la información del mensaje recibido.
MENSAJERIA
1. Presione la Tecla de Función Izquierda [Mensaje], desplace hasta Borradores y
presione la Tecla OK.
2. Desplace hasta un mensaje para editar y presione la Tecla OK [EDITAR]. Edite
el mensaje.
3. Para borra un mensaje, presione la Tecla de Función Izquierda [Borrar] y
seleccione Si luego presione la Tecla OK.
Presione la Tecla de Función Derecha [Opciones] para acceder a lo siguiente:
• Enviar: Enviar el mensaje seleccionado.
• Bloquear/Desbloquear: Bloquear o Desbloquear un mensaje.
• Agregar a Contactos: Guarda un número a contactos.
• Borrar Borradores: Borra todos los mensajes en borradores.
CORREO DE VOZ
Para acceder a su correo de voz:
1. Presione la Tecla de Función Izquierda [Mensaje], desplace hasta Correo de
BORRADORES
La carpeta borradores contiene cualquier mensaje borrador o mensajes guardados.
SI la composición del mensaje es interrumpida por una llamada u otro evento, el
mensaje que se está componiendo es guardado en borradores.
136
090115_7076PP_SP_M_size.indd 136-137
Voz y presione la Tecla OK.
USUARIO POR PRIMERA VEZ
1. Marque *86 luego presione la Tecla SEND.
137
2009.1.29 12:8:41 PM
MENSAJERIA
MENSAJERIA
2. Durante la grabación, presione .
3. Para configurar su cuenta siga las instrucciones de la voz.
USUARIO EXISTENTE
1. Marque *86 luego presione la Tecla SEND.
2. Durante la grabación, ingrese los 4 dígitos de su contraseña, luego presione
.
3. Para escuchar el mensaje presione
CORREO ELECTRONICO
Le permite enviar un correo electrónico.
1. Presione la Tecla de Función Izquierda [Mensaje], desplace hasta Correo
Electrónico y Presione la Tecla OK.
2. Navegador inicia.
3. Escoja su servicio de sala de chat preferido y presione la Tecla de Función
Izquierda [Seleccionar]. Siga las instrucciones en la pantalla.
.
CHAT
IM MOVIL
Le permite chatear usuarios de Internet Messenger.
DESCARGAR NUEVAS APLICACIONES IM
1. Presione la Tecla de Función Izquierda [Mensaje], desplace hasta Chat y
1. Presione la Tecla de Función Izquierda [Mensaje], desplace hasta IM Móvil, y
presione la Tecla OK, luego seleccione Obtener Nuevas Aplicaciones y presione
la Tecla OK.
2. Presione la Tecla de Función Izquierda [Aceptar]. Seleccione su navegador y
presione la Tecla OK. Siga las indicaciones en pantalla.
Presione la Tecla OK.
2. Navegador inicia.
3. Escoja su servicio de sala de chat preferido y presione la Tecla de Función
Izquierda [Seleccionar]. Siga las instrucciones en la pantalla.
AJUSTES
Para manejar la configuración de mensajería.
138
090115_7076PP_SP_M_size.indd 138-139
139
2009.1.29 12:8:41 PM
MENSAJERIA
MENSAJERIA
MODO DE ENTRADA
BORRAR BANDEJA DE ENTRADA AUTOMATICO
Ajusta el modo de entrada por defecto. Por ejemplo, si Modo T9 está por defecto,
su icono debe aparecer.
Automáticamente borrar mensajes entrantes cuando un nuevo mensaje llegue
1. Presione la Tecla de Función Izquierda [Mensaje], luego presione la Tecla de
Función Izquierda [Ajustes] y seleccione el modo de entrada, luego presione la
Tecla OK.
2. Seleccione Palabra T9, Abc, ABC o 123.
3. Presione la Tecla Ok para guardar.
GUARDAR ENVIADO AUTOMATICO
1. Presione la Tecla de Función Izquierda [Mensaje], luego presione la Tecla de
Función Izquierda [Ajustes] y seleccione Guardar Enviado Automático, luego
presione la Tecla OK.
2. Seleccione Encendido, Apagado o Aviso.
• Encendido: Todos los mensajes enviados son guardados.
• Apagado: Todos los mensajes enviados no son guardados.
• Aviso: Se le preguntará si desea guardar el mensaje.
3. Presione la Tecla OK para guardar.
140
090115_7076PP_SP_M_size.indd 140-141
1. Presione la Tecla de Función Izquierda [Mensaje], luego presione la Tecla de
Función Izquierda [Ajustes] y seleccione Borrar Automático, luego presione la
Tecla OK.
2. Seleccione Encendido o Apagado.
• Encendido: Los mensaje más antiguos son borrados automáticamente cuando el
buzón este lleno.
• Apagado: Los mensaje más antiguos no son borrados automáticamente cuando el
buzón este lleno.
3. Presione la Tecla OK para guardar.
VISTA AUTOMATICA TEXTO
Si la vista automática de TXT está encendida, el usuario podrá ver el mensaje. Si la
vista automática de TXT está apagada, el usuario puede ver el mensaje ingresando
SMS Menú-> Buzón de entrada.
1. Presione la Tecla de Función Izquierda [Mensaje], luego presione la Tecla
de Función Izquierda [Ajustes] y seleccione Vista Automática de TXT, luego
presione la Tecla OK.
141
2009.1.29 12:8:41 PM
MENSAJERIA
2. Seleccione Encendido o Apagado.
• Encendido: El Mensaje de texto mostrado automáticamente.
• Apagado: El Mensaje de texto mostrado al ir a la bandeja de entrada o
respondiendo a una notificación interactiva.
3. Presione la Tecla OK para guardar.
RECIBIR AUTOMATICAMENTE MULTIMEDIA
1. Presione la Tecla de Función Izquierda [Mensaje], luego presione la Tecla de
Función Izquierda [Ajustes] y seleccione Recibir Multimedia Automático, luego
presione la Tecla OK.
2. Seleccione Encendido o Apagado.
• Encendido: Los mensajes multimedia serán descargados automáticamente.
• Apagado: Los mensajes multimedia deben ser recuperados de la bandeja de
entrada o por aviso de nuevo mensaje.
3. Presione la Tecla OK para guardar.
TEXTO RAPIDO
Para crear un nuevo Texto Rápido o editar uno guardado:
1. Presione la Tecla de Función Izquierda [Mensaje], luego presione la Tecla de
Función Izquierda [Ajustes] y seleccione Recibir Multimedia Automático, luego
142
090115_7076PP_SP_M_size.indd 142-143
MENSAJERIA
presione la Tecla OK.
2. Seleccione un mensaje de la lista. Para agregar un mensaje de texto rápido,
presione la Tecla de Función Derecha [Opciones], luego seleccione Nuevo. Para
editar un mensaje de texto rápido seleccionado, presione la Tecla OK [EDITAR]
y luego entre el texto, presione la Tecla OK [GUARDAR].
3. Para borrar un mensaje de texto rápido, presione la Tecla de Función Izquierda
[Borrar]. Seleccione Si y presione la tecla OK.
Mensajes de Texto Rápido incluyen:
Qué pasa?, / Quieres que nos encontremos? / Revisa esto! / Qué estás haciendo? /
Quieres que nos veamos más tarde? / En camino / Eres el mejor! /Llámame / Te amo!
/ Te extraño! / Donde estas? / Buenos días! / Buenas noches / Como estas? / Gracias
NUMERO DE CORREO DE VOZ
Para ver o editar el número de correo de voz.
1. Presione la Tecla de Función Izquierda [Mensaje], luego presione la Tecla de
Función Izquierda [Ajustes] y seleccione # Correo de Voz, luego presione la
Tecla OK.
2. Ingrese el nuevo número de correo de voz.
3. Presione la Tecla OK para guardar.
143
2009.1.29 12:8:41 PM
CAPITULO 8
INTERNET MOVIL
MENSAJERIA
NUMERO DE RESPUESTA
Edite un numero de respuesta por defecto para que la persona que recibe el
mensaje pueda devolver la llamada o contestar.
CAPITULO 8
1. Presione la Tecla de Función Izquierda [Mensaje], luego presione la Tecla de
Función Izquierda [Ajustes] y seleccione Número de Respuesta, luego presione
la Tecla OK.
INTERNET MOVIL
2. Seleccione Encendido e ingres un Nuevo número de respuesta.
3. Presione la Tecla OK para guardar.
FIRMA
Para crear una firma que puede ser insertada automáticamente el final de los
mensajes.
Este capítulo explica los servicios de internet y navegación.
Para información más detallada contacte su proveedor de servicios.
1. Presione la Tecla de Función Izquierda [Mensaje], luego presione la Tecla de
Función Izquierda [Ajustes] y seleccione Firma, luego presione la Tecla OK.
2. Para activar la función de firma, seleccione Personalizar y presione la Tecla OK.
Para desactivar la función de Firma, seleccione Ninguno y presione la Tecla OK.
3. Para ingresar una firma, seleccione personalizar y presione la Tecla OK, luego
ingrese la Firma y presione la Tecla OK para guardar.
144
090115_7076PP_SP_M_size.indd 144-145
145
2009.1.29 12:8:42 PM
INTERNET MOVIL
INTERNET MOVIL
ACCESANDO INTERNET MOVIL
ADICIONAR A FAVORITOS
Ahora puede acceder a noticias, deportes, clima y correo electrónico desde el
teléfono. Internet Móvil lo mantiene actualizado ya que permite acceder a
información actualizada como noticias, deportes, clima y abono a cuotas cuando
se subscribe al servicio de internet con su proveedor de servicio. Por favor contacto
a si proveedor de servicio para una lista de los sitios disponibles y detalles del
servicio.
Lleva al usuario a la página Adicionar Favorito VZW.
1. Para iniciar el navegador de internet y acceder a sitios web a través de su
teléfono inalámbrico presione la Tecla de Navegación Izquierda.
El menú del navegador lista las acciones necesarias para operarlo. Para acceder
presione la Tecla de Navegación izquierda y luego presione la Tecla de Función
Derecha [MENU] para las siguientes opciones:
BUSCAR
Lleva al usuario a la página Buscar de VZW.
1. Para seleccionar “Buscar”, presione
Retornar el usuario a la página de inicio.
IR A URL
1. Para seleccionar “Ir a sitio Web”, presione
.
MOSTRAR URL
Muestra el URL actual.
.
ATRÁS
.
Retorna a la página previamente vista.
1. Para seleccionar “Atrás”, presione
090115_7076PP_SP_M_size.indd 146-147
.
1. Para seleccionar “Mostrar URL”, presione
INICIO VZW
146
.
Lleva al usuario a la página de VZW Buscar > Ir a sitio Web.
MENU NAVEGADOR
1. Para mostrar la página de inicio, presione
1. Para seleccionar “Agregar a Favoritos” presion
.
147
2009.1.29 12:8:42 PM
INTERNET MOVIL
INTERNET MOVIL
MANEJO DE MEMORIA
Muestra la siguiente lista de opciones:
1. Para seleccionar “Manejo de Memoria”, presione
.
• Limpiar Cache: Limpia el cache.
• Borrar Historial: Borra la lista de los URLs recientes.
• Borrar Cookies: Borra las cookies guardados.
• Auto completar: Automáticamente completa las palabras que reconoce en el
navegador.
CONFIGURACION
1. Para seleccionar “Configuración”, presione
.
1. Descargas: Seleccionando el elemento Descargas permite al usuario habilitar/
deshabilitar la descarga de imágenes, sonidos de fondo y objetos de descarga
cuando un URL es accedido.
2. Reiniciar Navegador: Seleccionando Reiniciar Navegador provoca que el
historial y el cache sean borrados y retorne el usuario a la página de inicio.
3. Modo Desplazar: Seleccionando Modo Deslazar del menú de ajustes permite al
usuario seleccionar la forma y velocidad del desplazamiento en los textos.
148
090115_7076PP_SP_M_size.indd 148-149
4. Enviar Referido: Cuando el elemento Enviar Referido es seleccionado del menú
de ajustes, el navegador permite al usuario apagar o encender el envío de URL
referido.
5. Tiempo de Tecla Presionada: El navegador permite al usuario ajustar el tiempo
de tecla presionada como rápido, medio o lento. Medio es 1.5 segundos, lento
2 segundos y rápido 1 segundo. El tiempo de tecla presionada es el periodo de
tiempo después del cual el cursor auto-avanza a la siguiente posición de entrada.
En la mayoría de los casos, una simple tecla puede ser usada para ingresar más
de un carácter. Cuando la tecla es presionada el ultimo carácter de la línea es
reemplazado por el siguiente escogió por esa tecla. Siempre que la misma tecla es
presionada de nuevo con tiempo de tecla presionada, los ciclos del último carácter
entre todas las escogidas por la tecla.
6. Tiempo de Conexión: El navegador permite al usuario ajustar el tiempo de
conexión.
AVANZADO
Seleccionando “Avanzado” en el Menú del Navegador muestra las opciones
avanzadas de menú.
1. Para seleccionar “Avanzado”, presione
.
149
2009.1.29 12:8:42 PM
INTERNET MOVIL
• Acerca de: Muestra el nombre del proveedor del navegador y la versión de SW del
navegador.
• Refrescar: Permite cargar de nuevo el URL actual.
• Historial: Muestra los anteriores 20 URLs visitados, donde X=20.
• Encriptación: Muestra la siguiente lista de opciones.
1. Autenticación: Da la opción de encender o apagar la Autenticación.
2. Certificado Raíz: Muestra la llave de seguridad raíz para TLS.
3. Certificado Actual: Muestra la llave de seguridad actual para TLS (si aplica).
CAPITULO 9
SEGURIDAD Y GARANTIA
CAPITULO 9
SEGURIDAD Y
GARANTIA
Este capítulo contiene las pautas y precauciones a seguir
cuando use el teléfono. Antes de usar su teléfono, por favor
tenga conocimiento de todos los detalles de seguridad.
Este manual contiene las condiciones de servicios y garantía para su teléfono.
Revíselos a fondo por favor.
Seguridad
Evite perdida potencial del oído
Información de conformidad de la FCC
Garantía
150
090115_7076PP_SP_M_size.indd 150-151
151
2009.1.29 12:8:43 PM
SEGURIDAD
SEGURIDAD
INFORMACION DE SEGURIDAD PARA TELEFONOS
INHALAMBRICOS
PRECAUCION!: El incumplimiento de estas instrucciones podrían causar serias
lesiones y posiblemente daños materiales.
Lea esta información antes de usar su Teléfono Celular.
DISPOSITIVOS ELECTRONICOS
SEGURIDAD AL CONDUCIR
Su teléfono móvil celular es un receptor y transmisor de radio de baja potencia.
Cuando está encendido, envía y recibe señales de radio frecuencia (RF).
Hablar por teléfono celular al conducir es extremadamente peligroso e ilegal en
algunos estados de cada país. Recuerde que siempre la seguridad está primero.
Revise las leyes y las regulaciones del uso de teléfonos en las áreas donde planea
conducir. Obedézcalas siempre.
Si debe usar su teléfono mientras maneja, por favor:
La mayoría de los equipos electrónicos modernos tienen protección de aislamiento
de la energía RF. Sin embargo algunos equipos podrían no aislar las señales
provenientes de su teléfono celular. Por lo tanto, el uso de su teléfono debe ser
restringido en ciertas situaciones.
• Preste total atención al conducir. Manejar de manera segura es su principal
responsabilidad.
• Use los modos: Manos libres, marcación de un toque, marcación rápida y auto
respuesta.
• Detenga su vehículo y estacione antes de hacer o recibir una llamada.
Las bolsas de aire de los automóviles se inflan con gran fuerza. NO ponga objetos,
incluyendo equipos inalámbricos instalados, sobre el área de la bolsa de aire o su
zona de protección. Si algún equipo inalámbrico es instalado inadecuadamente y
las bolsas de aire se inflan, lesiones graves podrían ocurrir.
152
090115_7076PP_SP_M_size.indd 152-153
MARCA PASOS
La Asociación de Fabricantes para la Industria de la Salud recomienda que una
separación mínima de 6 pulgadas sea mantenida entre el teléfono celular y
el marca pasos para evitar posible interferencia. Estas recomendaciones son
consistentes con la investigación independiente efectuada por el grupo de
Investigación de Tecnología Inalámbrica.
Cuando esté usando su teléfono celular, nunca se acerque a menos de 6 pulgadas
a una persona que lleve un marca pasos implantado en su corazón. Hacerlo podría
resultar en la interferencia con la función del marca pasos.
153
2009.1.29 12:8:43 PM
SEGURIDAD
SEGURIDAD
Personas con marca pasos:
HOSPITALES Y ESTABLECIMINETOS MEDICOS
• SIEMPRE mantengan el teléfono, si está encendido, a más de 6 pulgadas de su
marcapasos.
• No lleve el teléfono en un bolsillo en el pecho.
Apague su teléfono en establecimientos médicos cuando haya anuncios
indicándolo. Hospitales y centros de salud pueden estar usando equipos que
pudieran ser sensitivos a energía RF externa.
• Use el oído opuesto al lado donde el marcapasos está implantado para
minimizar el potencial de interferencia.
• Si tiene alguna razón para sospechar que se está presentando alguna
interferencia, apague el teléfono inmediatamente.
VEHICULOS
AUDIFONOS
Algunos teléfonos inalámbricos pueden interferir con el funcionamiento de
algunos audífonos. En caso de tal interferencia, ponerse en contacto con el
proveedor de servicio (o llamar a la línea de servicio al cliente para discutir
alternativas).
OTROS DISPOSITIVOS MEDICOS
Si usted usa algún dispositivo médico personal, consulte con el fabricante del
equipo para determinar si tiene un aislamiento adecuado de energía de RF
externa. Su médico puede asistirle con esta información.
154
090115_7076PP_SP_M_size.indd 154-155
Señales de RF podrían afectar sistemas electrónicos mal instalados o aislados
inapropiadamente en vehículos motores. Consulte con el fabricante o su
representante acerca de su vehículo. Debe también consultar con el fabricante
sobre equipos adicionales que hayan sido agregados a su vehículo.
ESTABLECIMIENTOS CON ANUNCIOS
Apague su teléfono cuando haya anuncios que así lo indiquen.
AVION
Las regulaciones de la FCC prohíben el uso de su teléfono mientras esta en el
aire. Apague su teléfono antes de abordar el avión. Siempre pregunte y obtenga
consentimiento de un representante autorizado de la aerolínea antes de usar su
teléfono dentro del avión. Siempre siga las instrucciones del representante de la
aerolínea cuando esté usando su teléfono en el avión, para prevenir cualquier tipo
de interferencia con los equipos electrónicos a bordo.
155
2009.1.29 12:8:43 PM
SEGURIDAD
AREAS DE FUNDICION
Para evitar la interferencia con operaciones de fundición, apague su teléfono
cuando haya un anuncio indicando “Area de Fundición” o en zonas con anuncios
“Apague Radios de dos vías”. Obedezca todas las señales e instrucciones.
ATMOSFERAS POTENCIALMENTE EXPLOSIVAS
Apague su teléfono cuando se encuentre en un área con atmosfera potencialmente
explosiva y siga todas las señales e instrucciones. Chispas en dichas áreas podrían
causar una explosión o fuego resultando en lesiones personales o incluso la
muerte.
Áreas con atmosferas potencialmente explosivas están frecuentemente, pero no
siempre, claramente marcadas.
Ellas incluyen áreas de estacionamiento de combustible tales como estaciones
de gasolina; debajo de terrazas o botes; transferencia de gasolina o químicos o
establecimientos de almacenamiento; vehículos usando gas liquido (propano o
butano); áreas
donde el aire contiene químicos o partículas tales como grano, polvo, o polvo de
metal, o alguna otra área donde normalmente le será pedido que apague el motor
de su vehículo.
156
090115_7076PP_SP_M_size.indd 156-157
SEGURIDAD
INFORMACION DE SEGURIDAD DE LA FCC SOBRE
LA EXPOSICION A RF
Advertencia! Lea esta información antes de usar el teléfono celular.
En Agosto de 1996 la Comisión Federal de Comunicaciones (FCC) de los Estados
Unidos con su acción en reporte y orden FCC 96-326 adoptó y actualizó los
estándares de seguridad para la exposición humana a energía electromagnética
de radiofrecuencia emitidos por transmisores regulados por la FCC. Estos
lineamientos son consistentes con los estándares de seguridad previamente
establecidos por entidades internacionales de estándares y de los Estados
Unidos. El diseño de este teléfono cumple con los lineamientos de la FCC y estos
estándares internacionales.
FUNCIONAMIENTO EN PRENDAS DE VESTIR
Este dispositivo fue probado para su utilización en prendas de vestir comunes, con
la parte posterior del teléfono mantenida a 2.5 centímetros del cuerpo, con una
hebilla de cinturón que contiene componentes metálicos. El uso de accesorios que
no satisfacen estos requerimientos puede no cumplir con los requerimientos de
exposición RF de la FCC, y deberían ser evitados.
Para mayor información acerca de exposición RF, por favor visite el sitio de la FCC:
http://www. fcc.gov
157
2009.1.29 12:8:43 PM
SEGURIDAD
INFORMACION DE SAR
ESTE MODELO CUMPLE CON LOS REQUERIMIENTOS
GUBERNAMENTALES ACERCA DE LA EXPOSICION A RADIO ONDAS.
Su teléfono celular es un receptor y transmisor de radio. Está diseñado para no
exceder los límites de emisión de energía de radio frecuencia (RF) establecidos
por la Comisión Federal de Comunicaciones de los Estados Unidos (FCC). Estos
límites forman parte de lineamientos de niveles de energía de RF permitidos
y establecidos para el mundo en general. Tales lineamientos están basados
en estándares desarrollados por organizaciones científicas independientes
fundamentados en estudios científicos periódicos y completamente evaluados. Los
estándares incluyen un margen sustancial de precaución diseñado para garantizar
la seguridad de cualquier persona independiente de su edad o condición de salud.
La exposición estándar para teléfonos móviles emplea una unidad de medida
conocida como la Tasa de Absorción Específica, o SAR. El límite de SAR establecido
por la FCC es 1.6 w/kg. * Las pruebas de SAR son efectuadas con el teléfono
transmitiendo a su máximo nivel de potencia certificado en todas las bandas
soportadas. Aunque el SAR es determinado usando el máximo nivel de potencia
certificado, el nivel real de SAR del teléfono mientras está operando puede estar
por debajo del máximo valor. Esto es debido a que está diseñado para operar a
múltiples niveles de potencia de tal suerte que logre conexión a la red solamente
158
090115_7076PP_SP_M_size.indd 158-159
SEGURIDAD
con la potencia requerida. En general, entre más cercano esté el teléfono a la
antena de la estación base, más baja será la potencia de salida. Antes de que un
modelo de teléfono esté disponible para la venta al público, este debe ser probado
y certificado por la FCC de que no excede los límites establecidos por el gobierno
para ser usado de manera segura. Las pruebas son efectuadas en diferentes
posiciones y ubicaciones tal como es requerido por la FCC para cada modelo.
El valor más alto de la Tasa de Absorción Especifica (SAR) para este modelo es
1.03W/Kg al usarlo al oído. Al cargarlo en el cuerpo, como se describe en esta guía
de usuario, es 0.989W/Kg. (Los valores medidos en un teléfono al ser llevado en el
cuerpo varían entre sí dependiendo de los accesorios y de los requerimientos de la
FCC). Aunque existen diferencias entre los valores SAR de distintos terminales en
posiciones diferentes, todos ellos cumplen con las regulaciones gubernamentales
para su uso seguro.
La FCC ha emitido una Autorización de Equipo para este modelo con todos los
valores de SAR evaluados en cumplimiento con los lineamientos de la FCC para
exposición a RF. La información de SAR para este modelo está registrada en
los archivos de la FCC y puede ser encontrado en: http://www.fcc.gov/oet/fccid
buscando el número de autorización O6Y-CDM7076.
Información adicional referente a la Tasa de Absorción Específica (SAR) puede
ser encontrada en el sitio web de la Asociación de Internet y Telecomunicaciones
159
2009.1.29 12:8:43 PM
SEGURIDAD
SEGURIDAD
Celulares (CTIA) http://www.phonefacts.net.
* En los Estados Unidos y Canadá, el límite de SAR para teléfonos móviles usados
por el público es 1.6 vatios por kilogramo (W/Kg) promediados por cada gramo
de tejido. El estándar incorpora un margen sustancial de seguridad para brindar
protección adicional al público considerando alguna posible variación en la
medición.
INFORMACION DE LA FDA PARA EL
CONSUMIDOR
Información para consumidor de la Administración de Drogas y
Alimentos (FDA) de los Estados unidos acerca de Teléfonos Celulares.
1. Qué tipo de teléfonos son el tema de esta información?
El término “Teléfono Celular” se refiere a teléfonos móviles portátiles con antenas
incorporadas, usualmente llamado teléfono “Celular”, “móvil” o “PCS”. Estos
tipos de teléfonos pueden exponer al usuario a una posible energía de radio
frecuencia (RF) debido a la corta distancia entre el teléfono y la cabeza del
usuario. Estas exposiciones a energía de RF están limitadas por los lineamientos
de seguridad de la FCC los cuales fueron desarrollados con las recomendaciones
de la FDA y otras agencias federales de salud y seguridad. Cuando el teléfono
está localizado a una gran distancia del usuario, la exposición a energía de RF es
160
090115_7076PP_SP_M_size.indd 160-161
drásticamente menor debido a que tal exposición disminuye rápidamente a mayor
distancia. Los teléfonos inalámbricos de uso doméstico, los cuales tienen una base
conectada a la línea telefónica mediante un cable, operan típicamente a niveles
de potencia mucho menores, emitiendo así niveles de RF dentro de los límites
aprobados por la FCC.
2. Ponen en peligro la salud los teléfonos celulares?
Las evidencias científicas disponibles no indican que ningún problema de salud
sea asociado con el uso de teléfonos celulares. Sin embargo, tampoco existen
pruebas que los teléfonos celulares sean absolutamente seguros. Los teléfonos
celulares cuando son usados emiten niveles de energía de radio frecuencia en el
rango micro ondas. También emiten niveles muy bajos de RF en estado de reposo.
Aunque altos niveles de energía de RF pueden afectar la salud (calentando el
tejido), el estar expuesto a niveles bajos de RF que no producen calentamiento, no
producen efectos adversos. Muchos estudios sobre exposición a bajos niveles de
RF no han determinado ningún efecto biológico. Algunos estudios han indicado
que posibles efectos biológicos pueden ocurrir, sin embargo tales resultados
no han sido ratificados por investigaciones posteriores. En algunos casos, otras
investigaciones han tenido dificultades para reproducir estos estudios, o para
determinar las razones de resultados inconsistentes.
161
2009.1.29 12:8:44 PM
SEGURIDAD
3. Cual es rol de la FDA respecto a la seguridad de teléfonos celulares?
Según la legislación, la FDA no revisa la emisión de radiación de productos del
consumidor tales como teléfonos celulares antes de que estos sean vendidos al
público, como si lo hace con medicamentos o insumos médicos. Sin embargo, la
agencia tiene autoridad para tomar medidas si los teléfonos celulares demuestran
emitir energía de RF a un nivel peligroso para el usuario. En tal caso la FDA podría
pedirle al fabricante tomar acción e informar al usuario acerca de esta amenaza
así como reparar, reemplazar o retirar del mercado el producto hasta que el riesgo
sea eliminado.
Aunque los datos científicos existentes no justifican las acciones regulatorias de la
FDA, la agencia invita a la industria de teléfonos celulares a tomar un número de
pasos incluyendo los siguientes:
• Apoyar investigaciones que sean necesarias referentes a posibles efectos
biológicos de RF o del tipo de energía emitida por teléfonos celulares.
• Diseñar teléfonos celulares de tal manera que disminuyan cualquier exposición
del usuario a energía RF que no sea necesaria para la funcionalidad del terminal;
y
• Cooperar brindándole al usuario de teléfonos celulares la mejor información
sobre los posibles efectos del teléfono celular en la salud humana.
La FDA pertenece a un grupo de trabajo integrado por agencias federales que
162
090115_7076PP_SP_M_size.indd 162-163
SEGURIDAD
tienen responsabilidad sobre diferentes aspectos de seguridad de emisiones de RF
con el fin de asegurar esfuerzos conjuntos a nivel federal. Las siguientes agencias
pertenecen a este grupo de trabajo:
• Instituto Nacional de la Salud y Seguridad Ocupacional
• Agencia de Protección Ambiental
• Comisión Federal de Comunicaciones
• Administración de Seguridad y Salud Ocupacional
• Administración Nacional de Telecomunicaciones e Información
Los Institutos Nacionales de Salud participan también en algún tipo de trabajo con
las agencias indicadas.
La FDA comparte responsabilidades de regulación de teléfonos celulares con la
Comisión Federal de Comunicaciones (FCC).
Cualquier teléfono que sea vendido en los Estados Unidos debe cumplir con los
lineamientos de seguridad de la FCC para emisión de energía RF. La FCC depende
de la FDA y otras agencias de salud para temas de seguridad en teléfonos
celulares.
La FCC también regula las estaciones base que usan las redes de teléfonos
celulares para su operación. A pesar de que las estaciones base operan a
frecuencias más altas que los teléfonos celulares, la exposición a energía de RF
163
2009.1.29 12:8:44 PM
SEGURIDAD
que la gente recibe es mucho más inferior que la recibida de los mismos teléfonos.
Por ende, las estaciones base no son el objeto primario de discusión de este
documento.
4. Cuáles son los resultados de las investigaciones ya hechas?
Las investigaciones ya hechas han arrojado resultados conflictivos, y en muchos
estudios han variado de acuerdo con los métodos usados en la investigación.
Experimentos en animales que investigan los efectos de exposición a energía de
radio frecuencia (RF) característica de teléfonos celulares han producido resultados
conflictivos que usualmente no han podido ser reproducidos en otros laboratorios.
Estudios en algunos animales, sin embargo, han indicado que niveles bajos de RF
pueden acelerar el desarrollo de cáncer en animales de laboratorio. No obstante,
muchos de los estudios han mostrado un incremento en el desarrollo de tumores
en los animales expuestos a químicos cancerosos aún sin la presencia de energía
de RF. Otros estudios han expuesto animales a energía de RF hasta 22 horas
por día. Estas condiciones no son similares a las de la gente que usa teléfonos
celulares, razón por la cual no se tiene certeza del significado de tales estudios
para la salud humana.
Tres grandes estudios de epidemiología han sido publicados desde Diciembre del
2000. Tales estudios investigaron alguna posible relación entre el uso de teléfonos
celulares y el cáncer primario de cerebro, glioma, meningioma, neuroma acústico,
164
090115_7076PP_SP_M_size.indd 164-165
SEGURIDAD
tumor cerebral, leucemia y otros tipos de cáncer. Ninguno de los estudios demostró
la existencia de efectos perjudiciales para la salud producto de la exposición a
energía de RF proveniente de teléfonos celulares. Sin embargo, ninguno de los
estudios puede responder preguntas acerca de exposiciones a largo plazo, ya que
el periodo promedio de uso de un teléfono según los estudios es alrededor de tres
años.
5. Qué investigación es requerida para determinar si la exposición a
energía de RF emitida por un teléfono celular implica un riesgo para la
salud?
Una combinación de estudios de laboratorio y estudios epidemiológicos de
personas usando realmente teléfonos celulares podría arrojar algunos de los datos
necesarios. Estudios de exposición de por vida en animales podría ser efectuada
en algunos años. Sin embargo, una gran cantidad de animales sería requerida
para arrojar pruebas confiables en caso de que el riesgo de cáncer exista. Estudios
epidemiológicos pueden proporcionar información que es directamente aplicable
a la población humana, pero 10 o más años de seguimiento serían necesarios para
responder a algunos de los efectos en la salud, tales como cáncer. Esto es debido a
que el intervalo de tiempo entre la exposición a agentes cancerosos y el desarrollo
de tumores, si existen, tomaría muchos años.
La interpretación de estudios epidemiológicos ha tenido algunos contratiempos
en la interpretación de la medición de exposición a energía de RF de teléfonos
165
2009.1.29 12:8:44 PM
SEGURIDAD
celulares en el uso diario. Muchos factores afectan esta medida, tales como el
ángulo al cual el teléfono es sostenido, o que modelo es usado.
6. Que hace la FDA para encontrar más información acerca de los posibles
efectos en la salud producto de la energía de RF proveniente de los
teléfonos celulares?
La FDA trabaja con el Programa Nacional de Toxicología de los Estados Unidos al
igual que con grupos de investigadores alrededor del mundo para asegurar que se
llevan a cabo estudios de alta prioridad con animales y que tratan las preguntas
importantes al respecto de la exposición a energía de radio frecuencia (RF).
La FDA ha sido un participante líder en el Proyecto Internacional de Campos
Electromagnéticos (EMF) para La Organización Mundial de la Salud desde su
inserción en 1996. Como resultado influyente de este trabajo ha sido desarrollada
una agenda detallada de necesidades de investigación la cual ha ayudado al
establecimiento de nuevos programas de investigación alrededor del mundo.
El proyecto ha ayudado igualmente a desarrollar una serie de documentos de
información pública sobre temas relacionados con la EMF.
La FDA y la CTIA tienen un Acuerdo de Desarrollo y Cooperación de Investigación
(CRADA) para realizar estudios en seguridad de teléfonos celulares. La FDA
brinda información científica, tras obtener datos de expertos en organizaciones
del gobierno, la industria y académicas. Investigaciones de CTIA son conducidas
166
090115_7076PP_SP_M_size.indd 166-167
SEGURIDAD
a través de contratos con investigadores independientes. La investigación inicial
incluye estudios tanto de laboratorio como de usuarios de teléfonos celulares.
CRADA también incluye estudios adicionales en el contexto de los últimos avances
alrededor del mundo.
7. Qué pasos puedo tomar para reducir mi exposición a la energía de
radiofrecuencia emitida por mi teléfono celular?
Si existe un riego de estos productos, en este momento no sabemos si existe, sería
probablemente muy pequeño; pero si su preocupación es evitar incluso riesgos
potenciales, se pueden tomar unos pasos sencillos para esto. Debido a que el
tiempo es un factor principal en cuanto al nivel de exposición de las personas,
minimizar la cantidad de tiempo de uso de un teléfono celular reducirá la
exposición a energía de RF.
• Si usted debe conducir conversaciones extendidas en su teléfono celular cada
día podría procurar aumentar la distancia entre su cuerpo y su teléfono, ya que
el nivel de exposición disminuye dramáticamente con la distancia. Por ejemplo,
podría usar un audífono y llevar el teléfono alejado de su cuerpo o usar su
celular conectado a una antena remota.
De nuevo, la información científica no demuestra que los teléfonos celulares sean
perjudiciales. Si usted está preocupado al respecto de la exposición de energía RF
emitida por estos productos, puede usar medidas como las descritas anteriormente
167
2009.1.29 12:8:44 PM
SEGURIDAD
para reducir tal exposición.
8. Qué hay de los niños usando teléfonos celulares?
La evidencia científica no muestra ningún un peligro a usuarios de teléfonos
celulares incluyendo adolescentes y niños. Si se desean tomar medidas para
disminuir la exposición a energía RF, las medidas descritas anteriormente son
recomendadas igualmente para adolescentes y niños. Reducir el tiempo de
conversación por el teléfono e incrementar la distancia entre el terminal y el
cuerpo ayudan a reducir está exposición.
Algunos grupos patrocinados por otros gobiernos nacionales han recomendado
que los niños no hagan uso de teléfonos celulares. Por ejemplo el gobierno del
Reino Unido distribuyó anuncios que contenían tal recomendación en Diciembre
del 2000. Indicaban que no existía evidencia de que el uso del teléfono celular
causará tumores cerebrales o alguna otra enfermedad. Su recomendación de
limitar el uso de teléfonos en los niños fue estrictamente a modo preventivo; no se
basó en evidencia científica de que existiera algún riesgo para la salud.
9. Los equipos de manos libres para teléfonos celulares reducen el riesgo
de exposición a emisiones de energía RF?
Ya que no hay riesgos conocidos de exposición a emisiones de energía RF
provenientes de teléfonos celulares, no hay razón para creer que los equipos
manos libres reduzcan los riesgos. Los equipos manos libres pueden ser usados
168
090115_7076PP_SP_M_size.indd 168-169
SEGURIDAD
con teléfonos celulares por conveniencia y seguridad. Estos sistemas reducen la
absorción de energía RF en la cabeza ya que el teléfono, el cual emite energía de
RF, no está puesto directamente contra esta. De otro lado, si el teléfono es llevado
en la cintura o en otra parte del cuerpo durante su uso, entonces esa parte del
cuerpo absorberá más energía RF. Los teléfonos celulares vendidos en los Estados
Unidos deben cumplir con requerimientos de seguridad independiente de si son
usados en la cabeza o en otra parte del cuerpo. Cualquiera que sea su uso debe
cumplir con los límites de seguridad.
10. Realmente trabajan los accesorios para teléfonos celulares que
argumentan aislar la cabeza de emisión de energía de RF?
Desde que no hay riesgos conocidos a exposición de emisiones RF de los teléfonos
celulares, no hay razón para creer que los accesorios que aseguran aislar la
cabeza de estas emisiones reducen los riesgos. Algunos productos que indican
aislar al usuario de absorción de RF usan estuches especiales, mientras que otros
incluyen nada más que un accesorio metálico conectado al teléfono. Los estudios
han demostrado que estos productos generalmente no trabajan tal como son
anunciados. A diferencia de los equipos manos libres, los equipos “Aislantes”
pueden interferir con la correcta operación del teléfono. El teléfono se puede ver
forzado a aumentar su potencia para compensar, lo cual conlleva a un incremento
en la absorción de RF. En Febrero del 2002 la comisión de Negocios Federales
“FTC” multó a dos compañías que vendían equipos para teléfonos celulares que
169
2009.1.29 12:8:44 PM
SEGURIDAD
argumentaban proteger a los usuarios de la radiación, lo cual resultó ser falso y
sin argumentos. De acuerdo con la FTC sus defensores carecieron de argumentos
razonables para sustentar sus anuncios.
11. Que hay acerca de la interferencia de teléfonos celulares con equipos
médicos?
La emisión de energía RF de teléfonos celulares puede interferir con algunos
equipos electrónicos. Por esta razón, la FDA ayudó a desarrollar un método de
prueba detallado para medir interferencia electromagnética (EMI) que provocan
los teléfonos celulares en marca pasos cardiacos implantados y desfibriladores.
Este método de prueba es ahora parte de un estándar patrocinado por la
Asociación para el Avance de la Instrumentación Médica (AAMI). El documento
final en esfuerzo conjunto con la FDA, fabricantes de equipos médicos y muchos
otros grupos, fue terminado a finales del 2000. El estándar permite a los
fabricantes asegurar que los marcapasos cardiacos y desfibriladores están libres de
interferencia EMI provenientes de teléfonos celulares.
La FDA ha realizado pruebas en audífonos para comprobar si existe interferencia
por parte de los teléfonos celulares y ayudó a desarrollar un estándar voluntario
patrocinado por el Instituto de Ingenieros Eléctricos y Electrónicos (IEEE). Este
estándar específica métodos de prueba y rendimientos requeridos para audífonos
y teléfonos celulares de tal suerte que no ocurra ninguna interferencia cuando una
170
090115_7076PP_SP_M_size.indd 170-171
SEGURIDAD
persona usa un teléfono “compatible” con un audífono “compatible” al mismo
tiempo. Este estándar fue aprobado por la IEEE en el 2000.
La FDA continua monitoreando el uso de teléfonos celulares para posible
interacciones con otros equipos médicos. Si se encontrara alguna interferencia
perjudicial, la FDA conduciría pruebas para evaluar tal interferencia y trabajar para
resolver el problema.
Actualizado 29 de Julio del 2003
Para mayor información http://www.fda.gov/cellphones.
LLAMADAS DE EMERGENCIA
Nunca confíe únicamente en su teléfono celular para llamadas esenciales de
comunicación, por ejemplo emergencias médicas, si estas pueden ser evitadas,
ya que un teléfono celular requiere una compleja combinación de señales de
radio, estaciones y redes de líneas fijas para su operación. Consecuentemente, las
llamadas de emergencia no siempre serán posibles bajo todas las condiciones en
todos los sistemas celulares. Su teléfono sin embargo, podría algunas veces ser el
único medio de comunicación disponible en el momento de un accidente. Cuando
se haga una llamada de emergencia, siempre de a quien responde la llamada la
información más precisa posible. Nunca termine una llamada de emergencia hasta
171
2009.1.29 12:8:44 PM
SEGURIDAD
SEGURIDAD
que no se le indique que puede hacerlo.
en la fuerza de la señal).
REGLAS MEJORADAS POR LA FCC PARA LLAMADAS 911(E911)
También la transmisión de información ALI está sujeta, en parte, a los
contratiempos de sistema entre la red a la que la señal E911 es transmitida y
sobre la cual PCD no tiene control.
Historia
La FCC requiere que los operadores de telefonía celular transmitan información
de ubicación especifica de latitud y longitud (Identificación de Ubicación
Automática = ALI) al igual que llamadas “911” a Puntos de Respuesta para la
Seguridad Pública (PSAPs) para identificar la ubicación de quien llama en caso de
emergencia.
Generalmente las reglas requieren que los operadores identifiquen una llamada
E911 a una posición no superior a 50 metros para el 67% de las llamadas, y no
superior a 150 metros de la ubicación actual para el 95% de las llamadas.
El CDM7076 es un terminal que soporta ALI, equipado con receptor GPS (Sistema
de Posicionamiento Global) que soporta sistemas de red GPS ALI, Satelitales para
cumplir con todos los requerimientos ALI de la FCC.
El cumplimiento de la red con los requerimientos de la FCC depende de: (a) el uso
de tecnología celular por la red inalámbrica; (b) Señales de satélite GPS capaces
de alcanzar el teléfono (como transmisiones que no siempre funcionan adentro
de un lugar, por ejemplo); y (c) señales del teléfono alcanzando “estaciones”
inalámbricas (Condiciones del ambiente y atmosféricas pueden causar variaciones
172
090115_7076PP_SP_M_size.indd 172-173
Finalmente, los consumidores están advertidos que la capacidad ALI del
CDM7176M es para ser usada con propósitos E911 solamente.
Esta función permite hacer una llamada de emergencia incluso si su teléfono
está en “Modo Bloqueado” o “Restringido” cuando se marque el número de
emergencia pre programado, 911, #911, o *911. También funciona en áreas fuera
de servicio. El teléfono mantiene el modo de emergencia hasta que presione la
Tecla Terminar después de terminar una llamada de emergencia. En modo de
emergencia el teléfono puede recibir una llamada entrante de cualquier sistema
disponible.
Para llamar “911” in “Modo Bloqueado” o “Restringido”.
1. Digite
,
,
.
2. Presione la Tecla ENVIAR
pantalla.
. “911” y “Emergencia” aparecerá en la
173
2009.1.29 12:8:45 PM
SEGURIDAD
CUMPLIMIENTO CON OTRAS REGULACIONES DE
LA FCC
PROCEDIMIENTOS DE OPERACIÓN
Nunca viole ninguna de las siguientes reglas y regulaciones de la FCC cuando esté
usando su teléfono celular. Estas violaciones son castigadas con una multa, cárcel
o ambas.
• Nunca use lenguaje obsceno, indecente o profano.
• Nunca use su teléfono celular para hacer llamadas falsas de distracción.
• Nunca interfiera una llamada telefónica, a menos que tenga el consentimiento
de las personas participantes de la llamada.
• Nunca haga llamadas telefónicas anónimas o para molestar o acosar a otras
personas.
• Nunca haga cargos a otra cuenta sin autorización, para evitar pagar por el
servicio.
• Nunca interfiera deliberadamente o maliciosamente con otra radio
comunicación.
174
090115_7076PP_SP_M_size.indd 174-175
SEGURIDAD
• Nunca se niegue a desocupar la línea cuando se le informe que se necesita para
una Llamada de Emergencia. También, nunca ocupe una línea mintiendo acerca
de que se necesita para una llamada de emergencia.
SEGURIDAD GENERAL
PRECAUCIONES
Su teléfono celular es un equipo de alta cualidad. Antes de usarlo, lea todas las
instrucciones y precauciones a tomar en cuenta señaladas en el producto, la
batería y el cargador.
El no seguir las instrucciones mencionadas abajo puede resultar en heridas
corporales y/o daños en el teléfono debido al derrame del líquido de la batería,
fuego o ruptura.
• No almacene este equipo en lugares donde pueda ser expuesto a altas
temperaturas, como lugares cercanos al fuego o equipos emisores de calor.
• No deje caer su equipo bruscamente. Cuando no esté en uso póngalo en un
lugar seguro para evitar caídas.
• No exponga el equipo a la lluvia o bebidas derramadas.
• No use accesorios no autorizados.
175
2009.1.29 12:8:45 PM
SEGURIDAD
SEGURIDAD
• No desarme el teléfono o sus accesorios. Si requiere servicio de reparación,
devuelva la unidad a un centro de servicio autorizado PCD. Desarmar la unidad
puede resultar en una descarga eléctrica o fuego.
QUE HACER
• Use solamente la batería y el cargador aprobados por la fábrica.
ANTENA
• Trate de mantener las baterías a una temperatura entre 41°F (5°C) y 95°F (35°C).
SEGURIDAD DE LA ANTENA
• Si la batería es guardada en lugares con temperaturas por encima o por debajo
del nivel recomendado, déjela enfriar o calentar antes de usar.
Usar solamente la antena o repuestos suministrados. Antenas no autorizadas,
modificaciones o añadiduras podrían afectar la calidad de la llamada, dañar el
teléfono o resultar en violaciones a las regulaciones de la FCC. Por favor contacte
su distribuidor local para reemplazar la antena.
No use su teléfono con una antena dañada. Si una antena dañada tiene contacto
con la piel podría generar una quemadura menor. Por favor contacte su distribuidor
local para reemplazar la antena.
BATERIA
SEGURIDAD DE LA BATERIA
Su teléfono usa una batería de ion litio removible y recargable. Por favor contacte
Servicio al Cliente cuando necesite reemplazar la batería.
176
090115_7076PP_SP_M_size.indd 176-177
• Use solamente la batería para su propósito original.
• Deje descargar la batería completamente antes de recargarla. Puede tomar
entre uno y cuatro días para descargarse completamente.
• Guarde la batería descargada en un lugar fresco, oscuro y seco.
• Compre una batería nueva cuando el tiempo de operación se reduzca
gradualmente después de una carga completa.
• Recicle la batería apropiadamente de acuerdo a las regulaciones locales.
QUE NO HACER
• No intente destapar la batería. Esta es una unidad sellada cuyas partes no son
útiles para otros servicios.
• No ocasione accidentalmente un corto circuito con la batería al llevarla en
su bolsillo o cartera junto con otros objetos metálicos tales como: monedas,
177
2009.1.29 12:8:45 PM
SEGURIDAD
lapiceros, etc. Esto puede ocasionar daños críticos a la batería.
• No deje la batería expuesta a temperaturas frías o calientes. De lo contrario su
capacidad de vida útil podría reducir notoriamente.
• No destruya la batería usando fuego.
Baterías de Ion Litio son reciclables. Cuando reemplace su batería, por favor pida al
centro de servicios que recicle la batería de acuerdo a los estándares de la RBRC.
Cuando recicle la batería por su cuenta, por favor llame a la RBRC (800)822.8837
para obtener la instrucciones apropiadas.
Nunca toque algún liquido que pueda proveer de la batería. Este líquido puede ser
perjudicial si entra en contacto con la piel o los ojos. Si el líquido entra en contacto
con los ojos, lávelos inmediatamente con suficiente agua limpia y busque atención
médica inmediata. En caso de que el líquido entre en contacto con la piel o la ropa,
lávela inmediatamente con agua limpia.
CARGADOR
SEGURIDAD DEL CARGADOR
El cargador diseñado por PCD requiere el uso de un adaptador de 120 V AC para
su funcionamiento.
178
090115_7076PP_SP_M_size.indd 178-179
SEGURIDAD
• Nunca intente desarmar o reparar el cargador.
• Nunca use un cargador si está dañado o se ha desgastado el cable de corriente.
Contacte su centro de servicio autorizado PCD si es necesario reemplazar o
reparar su cargador.
• Nunca altere el cable o conector de su cargador. Si el conector no encaja en el
toma corriente disponible haga instalar una toma apropiada por un electricista
calificado.
• No permita que ningún líquido o agua se derrame en el cargador cuando esté
conectado al toma corriente. Siempre use el cargador PCD autorizado para evitar
cualquier riesgo de lesión personal o daño a su teléfono o batería.
• Nunca conecte o desconecte el cargador con las manos mojadas. Siempre
desconecte el cargador del tomacorriente antes de intentar limpiarlo.
Siempre use un paño húmedo para limpiar el equipo después que haya sido
desconectado.
La manipulación del cable y los accesorios que vienen con el teléfono lo expondrán
a plomo, un químico que en el Estado de California es conocido por causar
defectos de nacimiento u otros daños al sistema reproductivo. Lávese las manos
después de manipular estos accesorios. Siempre desconecte el cargador del
tomacorriente cuando no lo esté usando.
179
2009.1.29 12:8:45 PM
SEGURIDAD
REGULACIONES DE LA FCC PARA LA
COMPATIBILIDAD DE DISPOSITIVOS DE AYUDA
AUDITIVA (HAC) CON EQUIPOS INALAMBRICOS
En Julio 10, 2003, el reporte y orden de la FCC, decreto WT 01-309, modificó la
excepción de teléfonos celulares bajo el acto de compatibilidad de dispositivos de
ayuda auditiva de 1998 (Acto HAC) el cual requiere que teléfonos celulares sean
compatibles con dispositivos de ayuda auditiva. La intención del acto HAC es la
asegurar acceso razonable a servicios de telecomunicaciones para personas con
limitaciones auditivas.
Mientras algunos teléfonos celulares son usados cerca de equipos auditivos
(Dispositivos de ayuda e implantes cocleares), los usuarios pueden detectar un
zumbido o ruido blanco.
Algunos equipos auditivos son más inmunes que otros a esta interferencia
de ruido, y los teléfonos también varían la cantidad de interferencia que
ellos generan. La industria de telefonía celular ha desarrollado un sistema de
calificación para terminales, para ayudar a los usuarios de dispositivos auditivos a
encontrar teléfonos que sean compatibles con sus dispositivos.
No todos los teléfonos has sido evaluados, los teléfonos que lo han sido tienen
una etiqueta de calificación anexa en su caja. Las calificaciones no son garantías.
Los resultados pueden variar dependiendo del dispositivo auditivo del usuario
180
090115_7076PP_SP_M_size.indd 180-181
SEGURIDAD
y el grado de disminución de la audición. Si su dispositivo auditivo resulta ser
vulnerable a la interferencia, el teléfono no tendrá una calificación exitosa. La
mejor manera de evaluar su dispositivo auditivo para sus necesidades personales,
es probando con el teléfono a ser usado.
Calificación M: Teléfonos con calificación M3 o M4 cumplen con
los requerimientos de la FCC y son propensos a generar menos
interferencia a dispositivos auditivos que los teléfonos sin
etiquetas. M4 es la mejor y más alta de las dos calificaciones.
Los dispositivos también pueden ser calificados. El fabricante
o personal médico pueden ayudarle a conocer esta calificación.
Entre más alta sea más inmune es el quipo a la interferencia de ruido. Las
calificaciones del dispositivo auditivo y el teléfono celular son sumadas. Una suma
de 5 es considerada aceptable para un uso normal.
Una suma de 6 es considerada para un uso óptimo. En el ejemplo si un dispositivo
auditivo alcanza un nivel de calificación M2 y el teléfono celular un nivel de
calificación M3, la suma de los dos valores es igual a M5. Esto debe proveer al
usuario con un “uso normal” cuando esté utilizando el dispositivo auditivo con
este teléfono celular en particular. En este contexto “Uso Normal” es definido
como una señal de calidad para operación normal. Se pretende que la calificación
M sea equivalente a la calificación U. Se pretende que la calificación T sea
equivalente a la calificación UT.
181
2009.1.29 12:8:46 PM
SEGURIDAD
The M and T marks are recommended by the Alliance for Telecommunications
Industries Solutions (ATIS). The U and UT marks are referenced in Section 20.19 of
the FCC Rules. The HAC rating and measurement procedure are described in the
American National Standards Institute (ANSI) C63.19 standard.
Para información acerca de dispositivos de ayuda auditiva y teléfonos
celulares digitales:
• FCC HAC y control de volumen
http://www.fcc.gov/cgb/dro/hearing.html
• Universidad Gallaudet, RERC
http://tap.gallaudet.edu/DigWireless.KS/DigWireless.htm
• Auto ayuda para personas con dificultad auditiva [SHHH]
www.hearingloss.org/hat/TipsWirelessPhones.htm
• Orden de Compatibilidad para dispositivos auditivos de la FCC
http://hraunfoss.fcc.gov/edocs_public/attachmatch/ FCC-03-168A1.pdf
SEGURIDAD
JUEGOS
ATAQUES/DESMAYOS
Advertencia
Un porcentaje reducido de personas pueden presentar ataques epilépticos cuando
están expuestas a ciertas patentes de luz o luces intermitentes. La exposición
a ciertas patentes o fondos de pantalla de computador, o mientras se juegan
juegos de video, pueden producir ataque epilépticos en estas personas. Ciertas
condiciones pueden inducir síntomas epilépticos previamente no detectados
incluso en personas que no tienen historia de ataques anteriores o epilepsia.
Si usted o algún familiar tiene una condición epiléptica consulte a su doctor
antes de jugar. Si mientras juega juegos de video o de computador experimenta
uno de los siguientes síntomas descontinúe INMEDIATAMENTE el uso y consulte
a su doctor antes de reiniciar el juego: mareo, visión alterada, contracciones
musculares u oculares, pérdida del conocimiento, desorientación, algún
movimiento involuntario o convulsiones.
Lesión repetitiva de movimiento
Cuando juega juegos en su teléfono, puede experimentar incomodidad en sus
manos, brazos, hombros, cuello u otras partes del cuerpo. Siga estas instrucciones
para evitar problemas como tendinitis, síndrome de túnel carpal, u otros
182
090115_7076PP_SP_M_size.indd 182-183
183
2009.1.29 12:8:46 PM
SEGURIDAD
desordenes musculo esqueléticos:
• Tome 15 minutos de descanso por cada hora jugada.
• Si sus manos, muñecas, o brazos están cansados o adoloridos mientras está
jugando, pare y descanse por varias horas antes de volver a jugar.
• Si sus manos, muñecas o brazos continúan adoloridos durante o después de un
juego, pare de jugar y consulte a un doctor.
CAMARA
No exponga su cámara al sol. La luz del sol que pasa a través del lente de la
cámara y causar daño a la cámara.
RECICLAR SU TELEFONO CELULAR!
Los operadores que venden este terminal celular tienen en sus tiendas un
programa de devolución de teléfonos. Los clientes pueden entregar su teléfono
usado la tienda especificada por el operador para propósitos de reciclaje. Para
una lista de operadores y sitios de recolección visite la página web de la industria
celular de reciclaje www.recyclewirelessphones.com.
SEGURIDAD
simplemente empaque su teléfono celular viejo y cualquier accesorio (Incluyendo
baterías descargadas) y envíelo a: PCD Personal Communications LLC 555 Wireless
Blvd. Hauppauge, NY 1788.
Los teléfonos celulares también pueden ser donados a la campaña de la fundación
inalámbrica DONE UN TELEFONO®, LLAME PARA PROTEGER®. Esta causa
caritativa conecta teléfonos celulares en beneficio de las víctimas de violencia
domestica. Todos los teléfonos donados son deducibles de impuestos. Puede
enviar su teléfono a: LLAME PARA PROTEGER, 2555 Bishop Circle, West Dexter, MI
48130.
-ODeje su teléfono en un centro de colección local. Para una lista de los centros de
colección, visite www.wirelessfoundation.org/CalltoProtect/dropoff.cfm
Antes de devolver cualquier teléfono para propósitos de reciclaje, por favor
recuerde desactivar el servicio en este teléfono, borrar cualquier información
guardada y remover la tarjeta SIM, si tiene alguna (por favor contacte su
proveedor de servicios para averiguar si su teléfono contiene una tarjeta SIM y
para asistencia en como removerla).
Para enviar por correo su teléfono celular viejo a PCD para propósitos de reciclaje,
184
090115_7076PP_SP_M_size.indd 184-185
185
2009.1.29 12:8:46 PM
SEGURIDAD
SEGURIDAD
CONDUCIR RESPOSABLEMENTE
RF EMISIONS
(f verzonwireless.com):
Cuando estás al volante, el manejo seguro es tu responsabilidad y siempre debería
ser una prioridad.
Durante muchos años se han llevado a cabo investigaciones en todo el mundo
sobre el uso del teléfono móvil y el manejo. Según la Administración Nacional de
Seguridad del Tráfico en las Carreteras (NHTSA, por sus siglas en inglés), el último
informe indica que el uso del teléfono móvil mientras se conduce disminuye el
desempeño del conductor, ya sea que se trate de un teléfono móvil con manos
libres o un teléfono de mano. La NHTSA recomienda que “lo más seguro es evitar
el uso del teléfono móvil mientras se conduce”. La política de la NHTSA sobre el
“Uso del teléfono móvil mientras se conduce”, así como también las Preguntas
frecuentes sobre el tema, se encuentran disponibles en www.nhtsa.gov (haz clic en
“Traffic Safety” y luego en “Drowsy and Distracted Driving”). Para tu seguridad y
la de los demás, deberías considerar apagar tu teléfono y dejar que tus llamadas
vayan al correo de voz mientras estés conduciendo.
Si optas por usar tu teléfono móvil mientras conduces, varias jurisdicciones han
adoptado el uso de "manos libres" y otras restricciones sobre el uso de aparatos
móviles mientras se conduce un automóvil. Es tu responsabilidad conocer y
cumplir las leyes de tu área.
(from verzonwireless.com):
INFORMACIÓN PARA EL CONSUMIDOR ACERCA DE LAS EMISIONES DE
RADIOFRECUENCIA
Tu teléfono móvil, que contiene un radiotransmisor y un radiorreceptor, emite
energía de radiofrecuencia mientras se lo utiliza. La información para el
consumidor que se detalla a continuación, trata las preguntas más frecuentes
acerca de los efectos que provocan los teléfonos móviles en la salud.
186
090115_7076PP_SP_M_size.indd 186-187
¿ES SEGURO UTILIZAR TELÉFONOS MÓVILES?
Se han realizado, y se siguen realizando en todo el mundo, investigaciones
científicas acerca del tema de los teléfonos móviles y la energía de radiofrecuencia
("RF"). En EE. UU, la Administración de Drogas y Alimentos ("FDA", por sus siglas
en inglés) y la Comisión Federal de Comunicaciones ("FCC", por sus siglas en
inglés) establecen políticas y procedimientos para los teléfonos móviles. La FDA
emitió una publicación en el sitio web sobre temas de salud relacionados con el
uso de teléfonos móviles, donde expresa: "La comunidad científica en general
... cree que el peso de la evidencia científica no demuestra una relación entre la
exposición a las radiofrecuencias (RF) de los teléfonos móviles y consecuencias
adversas para la salud. Aún así, la comunidad científica recomienda que se sigan
187
2009.1.29 12:8:46 PM
SEGURIDAD
realizando investigaciones para abordar los vacíos que todavía existen con
respecto a este tema. Estas investigaciones se están llevando a cabo en todo el
mundo y la FDA sigue controlando los progresos en este campo." Puedes ingresar
al sitio web de la FDA en http://www.fda.gov/cellphones. También te puedes
contactar con la FDA llamando sin cargo al (888) 463-6332 o al (888) INFO-FDA.
La FCC presentó su propia publicación en el sitio web en la cual manifestó que
"no existe evidencia científica que compruebe que el uso de teléfonos móviles
pueda ocasionar cáncer u otros problemas, incluyendo dolores de cabeza, mareo
o pérdida de la memoria". Esta publicación está disponible en http://www.fcc.
gov/cgb/consumerfacts/mobilephone.html o a través de la FCC al (888) 225-5322
o al (888) CALL-FCC. El Instituto Nacional del Cáncer (“NCI”) plantea que las
inquietudes sobre los potenciales efectos en la salud del uso de teléfonos móviles
– "y específicamente la idea de que el uso de un teléfono móvil puede incrementar
el riesgo de que una persona desarrolle cáncer de cerebro – no tienen sustento
en el creciente conjunto de conocimientos en la materia." Puedes acceder a la
reseña de la investigación del NCI en http://www.cancer.gov/ncicancerbulletin/
NCI_Cancer_Bulletin_092308/page7.
¿QUÉ SIGNIFICA "SAR"?
En el 1996, la FCC junto con la FDA, la Agencia de Protección Ambiental de los
EE.UU. y otras agencias, establecieron las pautas para la exposición segura a la
188
090115_7076PP_SP_M_size.indd 188-189
SEGURIDAD
RF para teléfonos móviles de EE. UU. Antes de que un modelo de teléfono móvil
esté disponible para la venta al público, el fabricante debe probar el teléfono y la
FCC debe certificar que el aparato no supera los límites establecidos por la FCC.
Uno de estos límites se expresa como un Índice de Absorción Específica (o "SAR",
por sus siglas en inglés). El SAR es una medida del índice de absorción de energía
de RF en el cuerpo. Las pruebas para determinar el nivel de SAR se realizan
cuando el teléfono está transmitiendo a su máximo nivel de potencia en todas
las bandas de frecuencia que se prueban. Desde 1996, la FCC exige que el nivel
SAR de teléfonos móviles no supere los 1.6 vatios por kilogramo, promediados
sobre un gramo de tejido. A pesar de que el valor SAR se determina en el nivel
de potencia más alto, el valor SAR real que un teléfono móvil tiene, mientras está
funcionando, puede ser menor que el valor SAR informado. Esto se debe a que el
valor SAR puede variar de llamada a llamada, dependiendo de factores tales como
proximidad a la torre celular, la proximidad del teléfono al cuerpo mientras se lo
está utilizando y el uso de aparatos de manos libres. Para obtener más información
acerca del SAR, consulta los boletines 56 y 65 de la Oficina de Ingeniería y
Tecnología (OET, por sus siglas en inglés) de la FCC en http://www.fcc.gov/Bureaus/
Engineering_Technology/Documents/bulletins y http://www.fcc.gov/oet/ea/o visita
el sitio Web de la Asociación de la Industria de Telefonía Móvil en http://www.
ctia.org/consumer_info/index.cfm/AID/10371. También puedes comunicarte con el
fabricante de tu teléfono.
189
2009.1.29 12:8:46 PM
SEGURIDAD
¿PUEDO MINIMIZAR MI EXPOSICIÓN A RF?
Si estás preocupado acerca de la RF, existen algunos pasos simples que puedes
realizar para minimizar tu exposición a la RF. Puedes, por supuesto, reducir tu
tiempo de uso. Puedes dejar más distancia entre tu cuerpo y la fuente de RF,
ya que el nivel de exposición se reduce mucho con la distancia. El sitio Web de
la FDA y la FCC afirma que "el paquete de manos libres se puede utilizar con
teléfonos móviles por conveniencia y comodidad. Estos sistemas reducen la
absorción de energía de RF en la cabeza, ya que el teléfono, que es la fuente de
emisiones de RF, no estará apoyado contra la cabeza. Por otro lado, si el teléfono
se coloca en la cintura o en otra parte del cuerpo mientras se lo utiliza, entonces,
esa parte del cuerpo absorberá más energía de RF. Se requiere que los teléfonos
móviles que se comercializan en EE. UU cumplan con los requisitos de seguridad,
independientemente de si se utilizan contra la cabeza o el cuerpo. Cualquiera de
las configuraciones debe cumplir con el límite de seguridad". Además, si utilizas
tu teléfono móvil mientras conduces, puedes usar un teléfono con una antena
ubicada en la parte exterior del vehículo. También deberías leer y seguir las
instrucciones del fabricante de tu teléfono móvil para un uso seguro del mismo.
SEGURIDAD
ningún efecto perjudicial para los usuarios de teléfonos móviles por la exposición
a RF, incluidos niños y adolescentes." El sitio web de la FDA también afirma
"algunos grupos con el apoyo de otros gobiernos nacionales aconsejan que
los niños no usen teléfonos móviles, Por ejemplo, el Informe Stewart, del Reino
Unido [“UK”], emitió tal recomendación en diciembre de 2000. En este informe,
un grupo de expertos independientes señaló que no existe evidencia de que el
uso de un teléfono móvil cause tumores cerebrales u otros efectos adversos. La
recomendación [del UK] de limitar el uso de teléfonos móviles por parte de los
niños fue estrictamente preventiva; no fue basada en evidencia científica de que
exista algún tipo de riesgo para la salud." Se encuentra disponible una copia
del folleto del RU en http://www.dh.gov.uk (busca "mobile") o puedes escribir
a: NRPB, Chilton, Didcot, Oxon OX11 0RQ, United Kingdom. Las copias de los
informes anuales del RU sobre teléfonos móviles y RF están disponibles por
Internet en http://www.iegmp.org.uk y http://www.hpa.org.uk/radiation/ (busca
"mobile"). Los padres que deseen reducir la exposición de sus hijos a la RF pueden
optar por restringir el uso de teléfonos móviles por parte de sus hijos.
¿DÓNDE PUEDO OBTENER MÁS INFORMACIÓN?
LOS TELÉFONOS MÓVILES ¿REPRESENTAN ALGÚN TIPO DE
PELIGRO ESPECIAL PARA LOS NIÑOS?
Para obtener más información, consulta los siguientes recursos adicionales:
El sitio web de la FDA afirma que "la evidencia científica no ha demostrado
Revista FDA Consumer
190
090115_7076PP_SP_M_size.indd 190-191
ADMINISTRACIÓN DE DROGAS Y ALIMENTOS DE EE. UU
191
2009.1.29 12:8:46 PM
SEGURIDAD
SEGURIDAD
Noviembre-diciembre 2000
Teléfono: (888) INFO-FDA
http://www.fda.gov/fdac/features/2000/600_phone.html
ORGANIZACIÓN MUNDIAL DE LA SALUD
COMISIÓN FEDERAL DE COMUNICACIONES DE EE. UU
Suiza
Teléfono: 011 41 22 791 21 11
http://www.who.int/mediacentre/factsheets/fs193/en/
International Commission on Non-Ionizing Radiation Protection (Comisión
internacional de protección contra la radiación no ionizante) c/o Bundesamt fur
Strahlenschutz
Ingolstaedter Landstr.1
85764 Oberschleissheim
445 12th St. S.W.
Washington, D.C. 20554
Teléfono: (888) 225-5322
http://www.fcc.gov/oet/rfsafety
INDEPENDENT EXPERT GROUP ON MOBILE PHONES (GRUPO
INDEPENDIENTE DE EXPERTOS EN TELÉFONOS MÓVILES)
http://www.iegmp.org.uk
SOCIEDAD REAL DE CANADÁ PANEL DE EXPERTOS EN POSIBLES
RIESGOS DE SALUD DEL CAMPO DE LA RADIOFRECUENCIA DE
APARATOS DE TELECOMUNICACIÓN MÓVIL
283 Sparks Street
Ottawa, Ontario K1R 7X9
Canadá
Teléfono: (613) 991-6990
http://www.rsc.ca/index.php?page=expert_panels_rf&lang_id=1&page_id=120
192
090115_7076PP_SP_M_size.indd 192-193
Avenue Appia 20
1211 Geneva 27
Alemania
Teléfono: 011 49 1888 333 2156
http://www.icnirp.de
American National Standards Institute (Instituto Nacional de Estándares de los
EE.UU.)
1819 L Street, N.W., 6th Floor
Washington, D.C. 20036
(202) 293-8020
http://www.ansi.org
193
2009.1.29 12:8:47 PM
SEGURIDAD
National Council on Radiation Protection and Measurements (Consejo Nacional de
Protección y Medidas Radiológicas) 7910 Woodmont Avenue, Suite 800
Bethesda, MD 20814-3095
Teléfono: (301) 657-2652
http://www.ncrponline.org
Engineering in Medicine and Biology Society, Committee on Man and Radiation
(COMAR), of Institute of Electrical and Electronics Engineers (Sociedad de
Ingeniería Biomédica Comité sobre el Hombre y la Radiación del Instituto de
Ingenieros Eléctricos y Electrónicos)
http://http://ewh.ieee.org/soc/embs/comar/
EVITE LA PERDIDA POTENCIAL DEL OIDO
PRECUACION:
Evite la pérdida potencial de oído.
La exposición prolongada a los sonidos ruidosos (incluyendo música) es la causa
más común de la pérdida de oído prevenible. Ciertas investigaciones científicas
sugieren que usar dispositivos de audios portátiles, tales como reproductores de
músicas portátiles y teléfonos celulares en un volumen muy alto durante un largo
periodo de tiempo puede conducir a la pérdida permanente del oído inducidapor ruido. Esto incluye el uso de audífonos (incluyendo audífonos, earbuds y
Bluetooth® u otros dispositivos inalámbricos). La exposición al sonido muy
ruidoso también se ha asociado en algunos estudios al zumbido (un sonido en el
oído), hipersensibilidad al sonido y a la distorsión de audición. La susceptibilidad
individual a la pérdida de oído inducida por el ruido y a otros problemas
potenciales de la audición varía.
La cantidad de sonido producida por un dispositivo de audio portátil varía
dependiendo de la naturaleza del sonido, del dispositivo, de los ajustes del
dispositivo y de los audífonos. Debe seguir las recomendaciones del sentido común
cuando use un dispositivo de audio portátil:
• Fijar el volumen en un ambiente callado y seleccionar el volumen más bajo en el
cual pueda oír adecuadamente.
194
090115_7076PP_SP_M_size.indd 194-195
195
2009.1.29 12:8:47 PM
EVITE LA PERDIDA POTENCIAL DEL OIDO
• Al usar los audífonos, baje el volumen si no puede oír a la gente hablando
cerca a usted o si la persona que se sienta a su lado puede oír lo que usted está
escuchando.
• No subir el volumen para bloquear alrededores ruidosos. Si usted elige
escuchar su dispositivo portátil en un ambiente ruidoso, utilice los audífonos de
cancelación de ruido para bloquear ruido ambiental de fondo.
• Limitar la cantidad de tiempo que usted escucha. Mientras que el volumen
aumenta, se requiere menos tiempo antes de que su audición pudiera ser
afectada.
• Evitar usar los audífonos después de exposición a ruidos extremadamente
fuertes, tales como conciertos de rock, que pudieron causar pérdida de oído
temporal. La pérdida de oído temporal pudo hacer volúmenes inseguros sonar
normales.
• No escuchar en cualquier volumen que pueda causar inconformidad. Si usted
experimenta ruido en sus odios, oye discurso amortiguado o experimenta
cualquier dificultad temporal de la audición después de escuchar su dispositivo
de audio portátil, descontinúe el uso y consulte a su doctor.
196
090115_7076PP_SP_M_size.indd 196-197
EVITE LA PERDIDA POTENCIAL DEL OIDO
PUEDE OBTENER MAS IFORMACION ACERCA DE ESTE TEMA EN
LAS SIGUIENTES FUENTES:
American Academy of Audiology
11730 Plaza American Drive, Suite 300
Reston, VA 20190
Voice: (800) 222-2336
Email: [email protected]
Internet: www.audiology.org
National Institute on Deafness and Other Communication Disorders
National Institutes of Health
31 Center Drive, MSC 2320
Bethesda, MD USA 20892-2320
Voice: (301) 496-7243
Email: [email protected]
Internet: http://www.nidcd.nih.gov/health/hearing
National Institute for Occupational Safety and Health
Hubert H. Humphrey Bldg.
200 Independence Ave., SW
Washington, DC 20201
197
2009.1.29 12:8:47 PM
EVITE LA PERDIDA POTENCIAL DEL OIDO
Voice: 1-800-35-NIOSH (1-800-356-4674)
Internet: http://www.cdc.gov/niosh/topics/noise/default.html
INFORMACION DE CUMPLIMENTO DE LA FCC
Este equipo cumple con la Parte 15 del reglamento de la FCC. La operación está
sujeta a las siguientes dos condiciones:
(1) Este equipo no causa interferencia perjudicial, y
(2) Este equipo debe aceptar cualquier interferencia recibida. Incluyendo
interferencia que pueda causar funcionamiento no deseado.
INFORMACION PARA EL USUARIO
Este equipo ha sido probado y cumple con los límites para una clase B de acuerdo
con la parte 15 del reglamento de la FCC. Estos límites están diseñados para
proveer protección razonable contra las interferencias perjudiciales en una
instalación residencial. Este equipo genera, usa y puede emitir energía de radio
frecuencia y, si no es instalado y usado acorde con las instrucciones puede causar
interferencia perjudicial a comunicaciones de radio. De todas maneras, no hay
garantía de que no ocurra interferencia en una instalación en particular.
Si el equipo causa interferencia perjudicial a la recepción de radio o televisión, la
cual puede ser determinada al prender y apagar el equipo, el usuario puede tratar
de corregir la interferencia usando una de las siguientes medidas:
- Reorientar o cambiar de lugar la antena de recepción.
©2008 Verizon Wireless. Todos los derechos reservados.
198
090115_7076PP_SP_M_size.indd 198-199
- Incrementar la distancia entre el equipo y el receptor.
199
2009.1.29 12:8:47 PM
INFORMACION DE CUMPLIMENTO DE LA FCC
- Conectar el equipo a un toma corriente diferente al que el receptor se encuentra
conectado.
- Consultar al vendedor o a personal experto en asistencia técnica para Radio/TV.
ADVERTENCIA: El hacer cambios o modificaciones a la unidad sin estricta
aprobación de la fábrica anulara la autoridad del usuario para
manejar el equipo.
GARANTIA
GARANTIA DEL FABRICANTE
GARANTIA LIMITADA DE 12 MESES
PCD Personal Communications (la empresa) garantiza al comprador minorista
original de este teléfono celular portátil PCD que en caso de que este producto
o cualquiera de sus piezas, bajo condiciones de uso normal del consumidor,
tuviera algún defecto que resultada en la falla del producto, tanto en el material
como en la mano de obra, dentro de un plazo de 12 meses a partir de la compra
original, dichos defectos serán reparados o reemplazados (con piezas nuevas o
reacondicionadas) a criterio de la empresa, sin cargo alguno por las piezas o la
mano de obra relacionada directamente con los defectos.
La antena, el teclado, la pantalla, la batería recargable y el cargador de la batería,
si está incluido, también tienen una garantía de 12 meses a partir de la fecha de
compra.
Esta garantía se extiende solamente a los consumidores que hayan comprado este
producto en los Estados unidos o en Canadá y no es transferible ni puede cederse.
Esta Garantía no es válida si:
(a) El producto se somete a uso o condiciones anormales, accidente, maltrato,
descuido, alteración no autorizada, uso incorrecto, instalación o reparación
inadecuada o almacenamiento inadecuado.
200
090115_7076PP_SP_M_size.indd 200-201
201
2009.1.29 12:8:48 PM
GARANTIA
(b) El número de serie mecánico o número de serie del producto ha sido removido,
alterado o desfigurado.
(c) Los daños han sido originados por la exposición a la condensación, humedad,
temperaturas excesivas, o condiciones ambientales extremas.
(d) Los daños resultan de la conexión a, o el uso de cualquier accesorio u otro
producto no aprobado o autorizado por la empresa.
(e) Se trata de defectos de apariencia, cosmética, elementos decorativos o
estructurales como el armazón o piezas no operativas.
(f) El producto fue dañado por causas externas, como incendio, inundación, polvo,
arena, condiciones climáticas, filtración de la batería, fusible fundido, robo o uso
inadecuado de cualquier fuente eléctrica.
La empresa no se hace responsable por el retiro o la reinstalación del producto,
la cobertura geográfica, la recepción inadecuada de la señal, el alcance de las
comunicaciones o el funcionamiento del sistema celular en conjunto.
Cuando envíe su teléfono celular a PCD Personal Communications para reparación
o servicio, tenga en cuenta que datos personales o aplicaciones almacenadas
en el terminal pueden ser borrados o alterados inadvertidamente. Por lo tanto le
recomendamos hacer una copia de seguridad de todos los datos y aplicaciones
incluidas en el terminal antes de enviarlo a servicio o reparación. Esto incluye
toda la lista de contactos, descargas (por ejemplo aplicaciones de software de
202
090115_7076PP_SP_M_size.indd 202-203
GARANTIA
terceros, tonos de timbre, juegos y gráficos) y cualquier otro tipo de datos que
haya agregado a su teléfono celular. Adicionalmente, si su teléfono utiliza una
tarjeta SIM o multimedia, debe retirarla antes de enviarlo su equipo para usarla
nuevamente cuando le sea devuelto.
PCD Personal Communications no se hace responsable y no garantiza la
restauración de software de terceros, información personal, o datos de memoria
contenidos, almacenados o integrados en ningún dispositivo inalámbrico, estando
o no cubierto por garantía, que se envíe a PCD Personal Communications para
reparación o servicio.
Para obtener reparaciones o el reemplazo dentro de los términos de esta Garantía,
el producto debe entregarse, previo pago de los gastos de transporte, con la
dirección remitente del consumidor, el número de teléfono y/o el número de fax
y la descripción completa del problema, junto con una prueba de la cobertura de
Garantía (por ejemplo, factura de compra con fecha) a la dirección de la Empresa
que se indica a continuación o al lugar de compra para su procesamiento de
reparación o reemplazo. Además, para conocer cuál es el centro autorizado de
Garantía en su área de residencia, puede llamar al (800) 229-1235 en los Estados
Unidos y al (800) 465-9672 en Canadá (en Ontario, llame al 416-695-3060).
203
2009.1.29 12:8:48 PM
GARANTIA
EL GRADO DE RESPONSABILIDAD DE LA EMPRESA EN VIRTUD DE ESTA GARANTÍA
SE LIMITA A LA REPARACIÓN O REEMPLAZO ANTES DISPUESTOS Y, EN NINGÚN
CASO, LA OBLIGACIÓN DE LA EMPRESA SUPERARÁ EL PRECIO DE COMPRA QUE
PAGÓ EL COMPRADOR POR EL PRODUCTO.
TODAS LAS GARANTÍAS IMPLÍCITAS, INCLUIDAS LAS GARANTÍAS IMPLÍCITAS
DE COMERCIABILIDAD O CAPACIDAD DE CUMPLIR CON UN PROPÓSITO EN
PARTICULAR, SE LIMITARÁN A LA DURACIÓN DE ESTA GARANTÍA ESCRITA.
TODA ACCIÓN POR INCUMPLIMIENTO DE ALGUNA GARANTÍA SE DEBERÁ
PRESENTAR DENTRO DE UN PERIODO DE 18 MESES A PARTIR DE LA FECHA
DE COMPRA ORIGINAL. EN NINGÚN CASO LA EMPRESA SERÁ RESPONSABLE
POR CUALQUIER DAÑO ESPECIAL, INCIDENTAL O INDIRECTO DEBIDO AL
INCUMPLIMIENTO DE ÉSTA O DE CUALQUIER OTRA GARANTÍA, EXPRESA O
IMPLÍCITA. LA EMPRESA NO SERÁ RESPONSABLE POR EL RETRASO EN LA
PRESTACIÓN DEL SERVICIO EN VIRTUD DE ESTA GARANTÍA O POR LA PÉRDIDA DE
USO DURANTE EL TIEMPO DE REPARACIÓN O REEMPLAZO DEL PRODUCTO.
Ninguna persona o representante está autorizado a asumir responsabilidad alguna
en nombre de la Empresa más allá de la expresada en este documento en relación
con la venta de este producto.
Algunos estados o provincias no permiten limitaciones sobre la duración de
una garantía implícita ni la exclusión o limitación de los daños incidentales o
204
090115_7076PP_SP_M_size.indd 204-205
GARANTIA
indirectos, de modo que es posible que la limitación o exclusión antes indicada no
le corresponda. Esta Garantía le otorga derechos legales específicos y también es
posible que tenga otros derechos que varían según el estado o la provincia.
EN LOS ESTADOS UNIDOS: Personal Communications
Devices 555 Wireless Blvd.
Hauppauge, NY 11788
(800) 229-1235
EN CANADÁ:
PCD Canada Company
5535 Eglinton Avenue West
Suite# 234
Toronto, ON M9C 5K5
(800) 465-9675
205
2009.1.29 12:8:48 PM