1
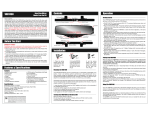
KIO positioning solution
User manual
Thank you for purchasing Eliko’s precise positioning solution KIO. The evaluation kit
includes at least 3 anchors, 1 tag and 2D evaluation software and is designed to work
both in- and outdoors.
Getting started
1. Connect standard micro USB B to anchors and connect to 5V chargers (charger min
output 500 mA).
2. Connect standard micro USB B to tags. If you are using battery-powered tags please
check the next paragraph.
3. Connect the anchor (except A, last letter of serial number on the reverse side indicates
A, B, C or D type of anchors) to your computer USB port (directly or via the UART
connector) to export data from the anchor.
4. Now it is possible to read data from the serial port using any terminal service (Using
UART the baud rate is 230400).
5. Start java based evaluation software.
a. Locate the ranging menu in the Java app, choose correct COM port and press
start.
b. Fill in the correct anchor positions (for example 3.25 m)
c. This app can be used to quickly evaluate the performance of a system. The app
currently supports a minimum of 3 anchors and 1 tag.
6. Happy positioning!
Battery Powered tag setup
1. To turn the battery powered tag on push the upper button of a tag until the upper red led
turns on and then release the button.
a. If the green lower led is blinking, the tag is working and the ranging/polling functionality
is activated.
b. After you have made sure that the system is working you can connect KIO anchor to a
computer and start reading distance data from the port.
2. If nothing happens after pushing the upper button then the battery is empty.
a. Use a standard USB charger to connect the KIO tag to your computer or power socket
(cable not included in the kit).
b. The lower led should turn to red and the green led inside it does not blink. This means
that the tag battery is charging and the ranging/polling functionality is not activated. c. To activate the ranging/polling functionality while charging, push the upper button of the
tag until the upper red led turns on and then release the button.
1
d. The lower red led should be on and the green led
blinking inside it. This means that the tag battery is
charging and the ranging/polling functionality is
activated.
e. You can now connect KIO to a computer and start
reading the distance data (Using UART the baud
rate is 230400).
3. To turn off the battery powered tag, push the upper
button of tag until the upper red led turns on and then
release the button.
a. All lights off means that tag is switched off and the
ranging/polling functionality is not activated.
Figure 1: KIO Evaluation Kit
2
This device complies with Part 15 of the FCC Rules. Operation is subject to the following two
conditions: (1) this device may not cause harmful interference, and (2) this device must accept any
interference received, including interference that may cause undesired operation.
NOTE: This equipment has been tested and found to comply with the limits for a Class B digital device,
pursuant to Part 15 of the FCC Rules. These limits are designed to provide reasonable protection against
harmful interference in a residential installation. This equipment generates, uses and can radiate radio
frequency energy and, if not installed and used in accordance with the instructions, may cause harmful
interference to radio communications. However, there is no guarantee that interference will not occur in a
particular installation. If this equipment does cause harmful interference to radio or television reception,
which can be determined by turning the equipment off and on, the user is encouraged to try to correct
the interference by one or more of the following measures:
Increase the separation between the equipment and receiver.
Connect the equipment into an outlet on a circuit different from that to which the receiver is connected.
Consult the dealer or an experienced radio/TV technician for help.
NOTICE:
This device complies with Part 15 of the FCC Rules.
(1) Operation is subject to the following two conditions:
(2) this device may not cause harmful interference, and (3) this device must accept any interference received, including interference that may
cause undesired operation.
NOTICE:
Changes or modifications made to this equipment not expressly approved by (manufacturer
name) may void the FCC authorization to operate this equipment.
Radiofrequency radiation exposure Information:
The radiated output power of the device is far below the FCC radio frequency exposure limits.
Nevertheless, the device shall be used in such a manner that the potential for human contact
during normal operation is minimized.
3