1
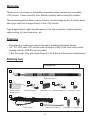
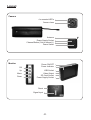
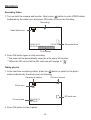
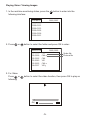
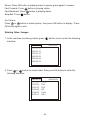
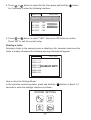
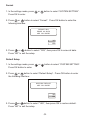
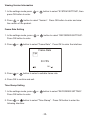
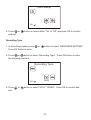
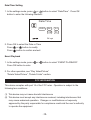
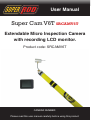
User Manual
Super Cam V6T SRCAMV6T
Extendable Micro Inspection Camera
with recording LCD monitor.
Product code: SRCAMV6T
CAMERA NUMBER:
Please read this user manual carefully before using this product.
CONTENTS
Welcome .................................................................................................. 1
Features ................................................................................................... 1
Packing List .............................................................................................. 1
Layout ....................................................................................................... 2
Installation ................................................................................................ 3
Operation .................................................................................................. 4
Recording Video .......................................................................... 4
Taking Photos .............................................................................. 4
Playing Video/Viewing Images .................................................... 5
Deleting Video/Images ................................................................ 6
Deleting a Folder .......................................................................... 7
Language Setting ........................................................................ 8
Video System Setting .................................................................. 8
Format ......................................................................................... 9
Default Setup ............................................................................... 9
Viewing Version Information ........................................................ 10
Frame Rate Setting ..................................................................... 10
Time Stamp Setting ..................................................................... 10
Recording Type ............................................................................ 11
Date/Time Setting ....................................................................... 12
Event Playback ........................................................................... 12
Specifications ........................................................................................... 13
Welcome
Thank you for choosing our extendable inspection video camera and recordable
LCD monitor. Please read the User Manual carefully before using this product.
This remote inspection device can be used to record footage up to 5.6 metres away
and relays real-time footage directly to the LCD monitor.
Typical applications might include heating & fire alarm systems, busbar systems,
cable routing, loft area inspection, etc.
Features
• Discrete micro inspection camera housed in branded alluminium casing.
• 3.5” TFT-LCD palm LCD monitor with resolution of 960 x 240 (can record video
footage onto the 2GB SD card included).
• 5.6m Telescopic Pole with Super Magnet, Flat Bullet and Gooseneck attachments
Packing List
Checked By:
Bullet Camera
W/ Housing x 1
Camera Adapter x 1
Carry Case x 1
Telescopic Pole x 1
LCD Monitor x 1
Monitor Adapter x 1
100mm Gooseneck x 1
-1-
Micro SD Card x 1
Flat Bullet x 1
Magnet x 1
Layout
Camera
4 x mounted LED’s
Camera Lens
Antenna
Power Supply Socket
Channel Button (Set to channel 1)
Power Switch
Monitor
OK
Up
Menu
Down
Power ON/OFF
Power Indicator
USB Socket
Video Output
SD Card Socket
Power Supply Socket
Reset
Signal Input
-2-
Installation
Telescopic Pole & Camera
Screw your bullet camera and aluminium housing into the Gooseneck material
located on the Telescopic Pole platform. From here, slide out the first section of
the Telescopic Pole containing the multi-functional platform.
Next, extend each section fully and lock into position. This is done by twisting
each section using a small amount of tensile force. Please ensure each section is
fully locked before you proceed to pull out further sections. To stop the pole from
opening when not in use, please make sure the rubber section of the platform is
securely fitted into the housing of the main body.
External Monitor
Make sure the camera and monitor are fully charged before use, using the
mains adapters supplied. Connect the adapter to the monitor, whereby the
power indicator will illuminate red, or similarly the battery capacity icon on the
LCD monitor will flash. This indicates that the unit is on charge, and will turn off
automatically once fully charged.
Insert SD Card
Insert the SD card into the monitor as
After
SD card
wasAfter
inserted
per the
the image
(right).
the SD card
successfully
into SD
card socket,
has been inserted
successfully
into the
card socket,
the following
symbol will
theSD
screen
of monitor
will appear
be shown
on;the
monitor screen
“ ”,
icon
otherwise,
it will
otherwise “ ” will
appear.
appear
icon.
Connect USB Cable
Use the USB cable to connect the
monitor to a PC. The USB online
-3-
SD card
Operation
2. Press Video
OK button to record as following:
Recording
Recording
1. Turn on both the camera and monitor. Next, press
button to enter VIDEO status
(indicated by the video icon) and press OK button toCH4
record as following:
2. Press OK button to record as following:
Recording
Recording
CH4
Video Mode Icon
2009/02/11
[00:05:43]
14:50:40 2009/02/11 14:50:40
Time Stamp
2009/02/11
[00:05:43]
14:50:40
3. Press OK button again
to stop
recording.
2009/02/11
14:50:40
Recorded Time
Recordedtime
Time
Recorded
Time
TimeStamp
stamp
Notice!
2. 3.
Press
OKOK
button
againagain
to stop
Press
button
torecording.
stop recording.
* The Video will be automatically saved as a file every 30 minutes.
* The video will be automatically saved as a file every 30 minutes.
* SD card
is full when the SD card icon change to
.
** When
Notice!the SD card is full the SD card icon will change to “ F ”.
* The
Video will be automatically saved as a file every 30 minutes.
Taking
photos
Take photo
* SD card is full when the SD card icon change to
.
1. In the real-time monitoring status, press the
button to switch to the photo
1. In the realtime monitoring status, press
button to switch to photo
status (indicated by the photo icon) as following:
taking status as following:
Capacity of battery
Current channel
Take photo
Capacity Of Battery
Current Channel
1. In the realtime monitoring status, press
Photo as following:
taking
status
Photo
icon
Icon
Capacity Of Battery
button to switch to photo
CH4
Current Channel
CH4
Photo
Icon
Current
Current
date
Date
SD
icon
SDcard
Card
Icon
2009/02/11
14:50:40
2. Press OK button to take a photo.
Current
2. Press OK
button to 2009/02/11
take photo.
Date
14:50:40
Notice!
when the SD card icon change
to
-4-
card
is full.
2. Press OK
button
to take photo.
SD Card Icon
which means SD
Playing Video / Viewing Images
Play Video/Picture
Play Video/Picture
In
realtime
monitoring
status,
press button
button
to enter
into the
1.1.
thethe
real-time
monitoring
status,
press the
to enter
into the
1.InIn
the
realtime
monitoring
status,
press
button
to enter
into the
following
interface:
following
interface:
following
interface:
PLAYBACK
PLAYBACK
2009-01-10
2009-01-10
2009-01-11
2009-01-11
2009-01-12
2009-01-12
2009-02-05
2009-02-05
2009-02-09
2009-02-09
2009-02-11
2009-02-11
2. Press
or
2.2.Press
Press
into it: oror
into it:
0001/0007
0001/0007
button to select folder, then press OK button to enter
button
to to
select
the folder
press
OK to
button
select
folder,and
then
press
OKenter:
button to enter
2009-01-10
2009-01-10
05:53:00
05:53:00
05:53:00
05:53:00
05:53:03
05:53:03
05:56:40
05:56:40
05:59:03
05:59:03
06:05:17
06:05:17
CH4
CH4
CH4
CH4
CH4
CH4
VID
VID
CH4
CH4
VID
VID
0002/0005
0002/0005
mean
Video
filevideo file
video file
mean file
picture
file
Picture
mean picture file
3. For Video:
3. For Video:
oror button
to select
the video
then press
OK to play
as as
For
3.Press
PressVideo:
button
to select
video,function,
then press
OK button
to play
Press
or
button to select video, then press OK button to play as
following:
following
interface:
following interface:
OK
OK
2009/01/10
2009/01/10
2009/01/10
-5-9-9-
05:53:00
05:53:00
05:53:00
:
:
Pause:Pause:
Press OK
button
playing in
status
to pause,
press
again to resume.
press
OKinbutton
playing
status
to pause;
press again
toinresume;
Fast Forward: Press
button
playing status.
Fast Forward:
button
playing status;
Fast Backward:
Press press
button in
playinginstatus.
Fast Backward: press
button in playing status;
Stop/Exit: Press
button.
Stop/Exit: press
button.
For Picture:
For Picture:
Press
or
button to select picture, then press OK button to display. Press
Press
or
button to select picture, then press OK button to
OK button
again press
to exit.OK button again to exit.
display,
Deleting Video / Images
Delete Video/Picture
1. In1.
theInreal-time
monitoring
status, press
button once
to enter
theto
following
the realtime
monitoring
status, press
button
once
enter into
interface:
the following interface :
PLAYBACK
0001/0007
2009-01-10
2009-01-11
2009-01-12
2009-02-05
2009-02-09
2009-02-11
2. Pressor orbutton
button
to select
folder,
then
button
2. Press
to select
folder, then
press
OKpress
buttonOK
to enter
theto enter
into interface:
the following interface:
following
2009-01-10
05:53:00
05:53:00
05:53:03
05:56:40
05:59:03
06:05:17
0002/0005
CH4
CH4
CH4
VID
CH4
VID
-6-10-
3.Press
Press oror button
button
select
press
andand
hold
onthe button
for 2
3.
to to
select
the file,
file,
then
press
hold
button
3. 3.
Press
Press or or button
button
to
to
select
select
file,
file,
press
press
and
and
hold
hold
onon button
button
forfor
2 2
seconds
willtoenter
the
following
interface:
for
2seconds
seconds
enter
thethe
following
interface:
seconds
willwill
enter
enter
the
following
following
interface:
interface:
2009-01-10
0002/0005
2009-01-10
2009-01-10
0002/0005
0002/0005
05:53:00 CH5
DELETE
FILE?
05:53:00
05:53:00CURRENT
CH5
CH5
05:53:00
CH5
DELETE
DELETE
CURRENT
CURRENT
FILE?
FILE?
05:53:00
05:53:00 CH5
CH5
05:53:03 CH5
NO
05:53:03
05:53:03 CH5
CH5
NO NO
05:56:40 CH5
YES
05:56:40
05:56:40 CH5
CH5
05:59:03 CH5
YESYES
05:59:03
05:59:03 CH5
CH5
06:05:17 CH5
06:05:17
06:05:17 CH5
CH5
4. Press
or
button to select YES , then press OK button will be
4.
to to
select
“YES”,
then
OK
button
tobutton
confirm.
4.Press
4.
Press
Press oror or button
button
button
to
select
select
YES
YES,press
then
, then
press
press
OKOK
button
willwill
bebe
deleted has been selected by the file; NO will be exit.
deleted
deleted
been
been
selected
byby
thethe
file;
file;NONO willwill
bebe
exit.
exit.
Press
“NO”has
tohas
exit
theselected
current
setup.
Delete Folder
Deleting
a
folder
Delete
Delete
Folder
Folder
Delete
folder
same
as
delete
,but make
sure the
folder
is the
empty,
Deleting
a folder
is is
theis
same
process
asfile
deleting
a file,
however
make
sure
Delete
Delete
folder
folder
is
same
same
as
as
delete
delete
file
file
,but
,but
make
make
sure
sure
the
the
folder
folder
is is
empty,
empty,
otherwise not delete it and appear a warning interface:
folder
is
empty, not
otherwise
the
warning
will
appear:
otherwise
otherwise
not
delete
delete
it following
and
it and
appear
appear
a warning
ainterface
warning
interface:
interface:
PLAYBACK
0001/0007
PLAYBACK
PLAYBACK
0001/0007
0001/0007
2009-01-10
2009-01-10
2009-01-10
2009-01-11
2009-01-11
2009-01-11
2009-01-12
2009-01-12
2009-01-12
FOLDER NOT EMPTY
2009-02-05
FOLDER
FOLDER
NOT
NOT
EMPTY
EMPTY
2009-02-05
2009-02-05
2009-02-09
2009-02-09
2009-02-09
2009-02-11
2009-02-11
2009-02-11
to the
enter
the Mode:
Setting Mode
HowHow
toHow
enter
Settings
How
toto
enter
enter
the
the
Setting
Setting
Mode
Mode
In the
real-time
monitoring
status, press
andpress
hold the
button
about 1-2
In the realtime monitoring
status,
and hold
on for button
for
In In
thethe
realtime
realtime
monitoring
monitoring
status,
status,
press
press
and
and
hold
hold
onon button
button
forfor
about
to enter
into
setting interface as follows:
seconds
to 1~2
enterseconds
the settings
interface
as the
follows:
about
about
1~2
1~2
seconds
seconds
to to
enter
enter
into
into
thethe
setting
setting
interface
interface
asas
follows:
follows:
SYSTEM SETTING
SYSTEM
SYSTEMSETTING
SETTING
-11-7-11-11-
Language Setting
1. Language
In the settings
mode, press
or
button to select “SYSTEM SETTING”.
Setting
Press OK to enter.
1. In the setting
mode press
or
button to select SYSTEM
Language
Setting
SETTING
press OK button to enter
2. 2.
Press
to select
“Language”,
press the
OK button
to enter
the to
1.
In the or
setting
mode
press
orLanguage
button
to press
select
SYSTEM
Press
or button
button
to
select
the
OK
button
following
interface:
SETTING
OK button
to enter
enter
into thepress
following
interface
2. Press
or
button to select Language
press the OK button to
enter into the following interface
OK:
English
English
Press or or button
button
to select
a suitablelanguage.
language
3. 3.
Press
to OK:
select
the appropriate
4. Press OK button to confirm and exit.
3. Press
or
button to select a suitable language
4. Press OK button to confirm and exit.
4. Press OK button to confirm and exit.
Video
System
Setting
Video
System
Setting
1.
In the
settingSetting
mode press
or
button to select SYSTEM
Video
System
1. In the
settings mode,
press
or to
button
SETTING
press
OK button
enterto select “SYSTEM SETTING”.
Press
OK button
enter. to
1.
In the
setting
press
button
to select
SYSTEM
2.
Press
or tomode
button
select orVideo
System
press
OK button to
SETTING
OK button
to enter
enter
into thepress
following
interface:
Press or or button
button
to select
System
button to
2. 2.
Press
to select
“VideoVideo
System”.
Press OKpress
buttonOK
to enter
enter into the following interface:
Video system
the following interface:
NTSC
Video system
NTSC
3. Press
or
NTSC
PAL
OK
NTSC
NTSC
PAL
OK
NTSC
button to select right type press OK button to
confirm
exit. to select the right type. Press OK to confirm and exit.
3. Press
or andbutton
3. Press
or
button to select right type press OK button to
confirm and exit.
-8-
Format
Format
1. In the settings mode, press
or
button to select “SYSTEM SETTING”.
Format
Press
to enter.
1. In
theOK
setting
mode press
or
button to select SYSTEM
SETTING
button to
1. In
the settingpress
modeOKpress
orenter
button to select SYSTEM
2.
or
button
tobutton
select“Format”.
OK button
enter
SETTING
OKto
to Format
enter Presspress
2. Press
Press
or press
button
select
OK button
to entertothe
into
the
following
interface
2. Press
or
button to select Format
press OK button to enter
following interface.
into the following interface
FORMAT WILL
ERASE ALL DATA
FORMAT
WILL
ARE
YOU SURE?
ERASE ALL DATA
ARE YOU SURE?
NO
YES
NO
YES
3. Press
Press
or button
button to
to select
press
OK toOK
erase
all data.
3.
or
select“YES”,
YES then
, then
press
button
will
Press “NO”
to exit
the
erase
all or
data;
NOsetup.
be exit.
3. Press
button
towill
select
YES , then press OK button will
erase all data; NO will be exit.
Default Setup
Default Setup
Default
Setup mode, press
1. In
In the
to select
“SYSTEM
SETTING”.
1.
thesettings
setting mode press or or button
button
to select
SYSTEM
Press
button
to enter.
SETTING
press
OKpress
button to
1. In
theOK
setting
mode
orenter
button to select SYSTEM
2. Press
button
selectto enter
Default Setup
press OK button to
SETTINGor press
OKtobutton
enter
following
interface:
2.
or
select
Default
Setup
press
OKtobutton
2. Press
Press into
orthe button
button totoselect
“Default
Setup”.
Press OK
button
enter to
enter
into the
following interface:
the following
interface:
RESTORE DEFAULT
ARE YOU SURE?
RESTORE DEFAULT
ARE YOU SURE?
NO
YES
NO
YES
3.
or
button
select
YESthen
, then
button
will
3. Press
Press
or
button totoselect
“YES”,
presspress
OK to OK
restore
default.
restore
default;
be exit.
3. Press
orto exit
button
to will
select
YES , then press OK button will
Press “NO”
theNO
setup.
restore default; NO will be exit.
-9-
Viewing Version Information
View Version Information
1. In the settings mode press
or
button to select “SYSTEM SETTING”, then
press
OK button
enter. ,press
1.
In the
settingtomode
or
button to select SYSTEM
SETTING , then press OK button to enter;
Press oror button
button
select
Version
press
OKtobutton
to enter
2.2.
Press
to to
select
“Version”.
Press, OK
button
enter and
view
and view the version of product.
the version of the product.
Frame Rate Setting
Frame Rate Setting
1. In the settings mode, press
or
button to select “RECORDER SETTING”.
1. In the setting mode press
or
button to select RECORDER
Press OK button to enter.
SETTING
press OK button to enter
2. Press
or
button to select Frame Rate
press OK button to
2. Press
or interface:
button to select “Frame Rate”. Press OK to enter the interface:
enter into
Frame Rate
Fps
30 FPS
OK:
3. Press
or
button to select a suitable frame rate.
3. Press
or
button to select suitable frame rate;
4. Press OK button to confirm and exit.
4. Press OK to confirm and exit.
Time Stamp Setting
Time Stamp Setting
1.1.
In In
thethe
settings
mode,
press press
or
to select
SETTING”.
setting
mode
orbutton
button
to “RECORDER
select RECORDER
SETTING
OK button to enter
Press
OK button press
to enter.
2. Press
or
button to select Time Stamp
press OK button to
enter into the following interface:
2. Press
or
button to select “Time Stamp”. Press OK button to enter the
following interface:
-10-
Time Stamp
OK:
off
off
3. Press
or
button to
“Off” and
press
OKbutton
to confirm
or
button
toselect
selecteither
Off“On” orOn
press
OK
to
3. Press
and
exit. and exit.
confirm
Recording Type
Recording Type
1. In the settings mode, press
or
button to select “RECORDER SETTING”.
or
button to select RECORDER
Press
buttonmode
to enter.press
1. In
theOK
setting
SETTING
press OK button to enter
2.
or
button
select
Recording
Type
press
OK to
button
2. Press
Press
or
button totoselect
“Recording
Type”.
Press OK
button
enter
to enter into the following interface:
the following interface:
Recording Type
OK:
VIDEO
VIDEO
3. Press
or
button to select “STILL” “VIDEO”. Press OK to confirm and
3. Press
or
button to select STILL
VIDEO
press OK button
exit.
to confirm and exit.
-11-15-
Date/Time Setting
Date/Time Setting
In the
setting
mode
or
to“Date/Time”.
select Date/Time
1. 1.
In the
settings
mode,
press press
or
buttonbutton
to select
Press OK
press
OK button
to enter
into the following interface:
button
to enter
the following
interface:
Date/Time
2009 / 02 / 13
09 : 51
OK:
2. Press OK to select the Date or Time
2. Press OK button to select Date or Time;
Press
or
button to modify
press
or
button to modify;
Press
button
to confirm
and exit
press
button
to confirm
and exit.
Event Playback
EVENT PLAYBACK
1. In the settings mode, press
or
button to select “EVENT PLAYBACK”.
Press
OKthe
button
to enter.
1. In
setting
mode press
or
button to select EVENT
PLAYBACK
press OK button to enter;
Other
operation
Play Video/Picture
2. For2.other
operation,
see see
“Play Video/Picture”
Delete Video/Picture
Delete Folder section.
“Delete Video/Picture”, “Delete Folder” section.
FCC INFORMATION
This device complies with part 15 of the FCC rules. Operation is subject to the
following two conditions:
(1) This device may not cause harmful interference
(2) This device must accept any interference received, including interference that
may cause undesired operation. Changes or modifications not expressly
approved by the party responsible for compliance could void the user’s authority
to operate the equipment.
-12-16-
Monitor
Camera
Specifications
Model No.
JK8810
Imaging Sensor
CMOS
Total Pixels
410,000
Viewing Angle
360o
Transmission Frequency
2.4GHz (detailed channels 2.414GHz, 2.432GHz,
2.450GHz, 2.468GHz are adjustable)
Minimum Illumination
0.05Lux
Modulation Type
FM
Bandwidth
18MHz
Recording Distance
5.6m
Power Supply
DC 5V Power Adapter
Unobstructed Effective Range
10m
Dimensions (W x D x H)
57 x 19 x 18.5 mm (length not including antenna)
Weight
24.5g
Model No.
GB7307
LCD Screen Type
LCD 3.5” TFT-LCD
Effective Pixels
320 (RGB) x 240
Video System
PAL / NTSC
Transmission Frequency
2414MHz, 2432MHz, 2450MHz, 2468MHz
Exterior Supply Voltage
5VDC
Consumption Current (Max.)
500 mA
Charge Time
3 hours
Work Time
2 hours
Picture/Video Pixels
640 x 480
Video Size
27M byte /minute
Frame Rate
30 frame/second
Video Output Level
0.9 1.3VP-P @ 75ohm
Receiving Sensitivity
≤ -85dBm
Dimensions (W x D x H)
100 x 70 x 25 mm
Weight (about)
140g
Operating Temperature
-10 °c ~ +50°c / 14°F ~ 122° F
15% ~ 85%RH
Operating Humidity
* Actual transmission range may vary according to the weather, location, interference
and building construction.
* All the specifications are subject to minor change without prior notice.
-13-
!
•
•
•
•
•
CAUTIONS
FCC INFORMATION
This device complies with part 15 of the FCC Rules. Operation is subject
to the following two conditions:
(1) this device may not cause harmful interference,
(2) this device must accept any interference received, including
interference that may cause undesired operation. Changes or
The apparatus shall
not be exposed to dripping or splashing. No objects
modifications not expressly approved by the party responsible for
compliance
could
void the
user be
s authority
to on
operate
equipment.
filled with liquids,
such as
vases,
shall
placed
the the
apparatus.
Turn off the Camera/Monitor if the system is not in use.
! CAUTIONS
The Camera/Monitor can only be completely disconnected from the mains
The
apparatus shall not be exposed to dripping or splashing and that
by unplugging the adapter.
no objects filled with liquids, such as vases, shall be placed on the
Do not cut the DCapparatus.
power cable of the apparatus to fit with another power
Turn off the Camera/Monitor if the system is not in use.
The Camera/Monitor can only be completely disconnected from the
source.
mains by unplug the adapter.
Do drawn
not cut the
power
cable of the apparatus
to fit
anotherdisposal.
Attention should be
toDC
the
environment
aspects
ofwith
battery
power source.
Attention should be drawn to the environment aspects of battery
disposal.
Remove the batteries when cleaning the unit.
Remove the batteries before storing the unit for a long time.
When necessary, REPLACE ALL FOUR BATTERIES in this unit with new
ones.
Use only the size and type of battery specified.
Be sure to install the battery with the correct polarity as indicated in
the battery compartment.
EU Environmental Protection
Waste electrical
products should
not be
EU Environmental
Protection
disposed ofWaste
withelectrical
household
waste.
products
should not be
disposed of with household waste.
Please recycle
facilities
exist.
Pleasewhere
recycle where
facilities
exist.
yourAuthority
Local Authority
Check withCheck
yourwith
Local
or or
retailer for recycling advice.
retailer for recycling advice.
• Tel: +44 (0) 1495 792000
• Email: [email protected]
• Web: www.super-rod.co.uk
22