1
Meyer Sound
© Meyer Sound Laboratories, 1993.
MSPN 05.102.217.01 A
SIM System II
Reference Manual
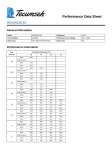
Source
Level
Input
(A)
Overload
0
1
Pulse
Noise
1 kHz Sine
Var. Sine
Output
(B)
Overload
Mic
(C)
Phones
System
Level
Overload
0 dB
0 dB
0 dB
-2 dB
-2 dB
-2 dB
-5 dB
-5 dB
-5 dB
-9 dB
-9 dB
-9 dB
-15 dB
-15 dB
-15 dB
-21 dB
-21 dB
-21 dB
-27 dB
-27 dB
-27 dB
-33 dB
-33 dB
-33 dB
-39 dB
-39 dB
-39 dB
-42 dB
-42 dB
-42 dB
0
1
Input (A)
Output (B)
+ 48 VDC
Sine Freq.
Mic (C)
Source
Input (A)
Output (B)
Mic (C)
Phones
System
Reset
Power
Disk
®
SOURCE INDEPENDENT MEASUREMENT
SIM - 2201 SOUND ANALYZER
Power
Keyboard
®
Source Independent Measurement
91
SIM® System II
Reference Manual
This manual reflects Release 5.1 of the system software.
93
Copyright © 1993 by Meyer Sound. All rights reserved. No part of this work
covered by the copyrights hereon may be reproduced or copied in any form
or by any means — graphic, electronic, or mechanical, including photocopying, recording, taping, or information retrieval systems — without prior
written permission of the publisher:
Meyer Sound
2832 San Pablo Avenue
Berkeley, CA 94702
Phone (510) 486-1166
Fax (510) 486-8356
First Printing: April 1993
SIM® is a registered trademark of Meyer Sound.
94
Contents
Introduction ........................................................................................ 3
About This Reference Manual ........................................................ 3
Physical Model ............................................................................... 3
Section 1 — Hardware ....................................................................... 4
1.1 Front Panel Audio Hardware .......................................................... 4
1.2 Front Panel System Hardware ....................................................... 5
1.3 Rear Panel Audio Hardware .......................................................... 6
1.4 Rear Panel System Hardware ....................................................... 7
Section 2 — Software ........................................................................ 8
2.0 Boot-up of the SIM System II Software .......................................... 8
2.1 Status Panels ............................................................................... 12
2.1.1 Data Status Area .................................................................... 12
2.1.2 Cursor status area .................................................................. 13
2.1.3 System status area ................................................................. 14
2.1.4 Input status area ..................................................................... 15
2.1.5 Overall status area ................................................................. 16
2.2 Measure Menu ............................................................................. 16
2.2.1 Spectrum ................................................................................ 16
2.2.2 Delay finder ............................................................................ 19
Internal Delay Time ...................................................................... 20
Delay finder axes .......................................................................... 20
Delay finder Amplitude threshold .................................................. 20
Time/Bandwidth Selection ............................................................ 20
Setting the Internal Delay Time .................................................... 20
Notes regarding the Delay finder and measuring loudspeakers ... 20
Pre-Eq External Delays ................................................................ 23
Characterizing Reflections ............................................................ 23
Polarity Checking .......................................................................... 23
2.2.3 Frequency response ............................................................... 24
Frequency response Cursor ......................................................... 25
2.2.4 fEedback finder ...................................................................... 27
2.3 Data Menu ................................................................................... 30
2.3.1 Store ....................................................................................... 30
2.3.2 Recall ..................................................................................... 31
2.3.3 saVe ....................................................................................... 31
2.3.4 Load ....................................................................................... 31
Shortcut Keys ............................................................................... 31
2.3.5 Disk menu .............................................................................. 32
Notes on naming data files ........................................................... 32
2.3.6 dElete ..................................................................................... 32
2.3.7 Save All .................................................................................. 32
2.3.8 Load All .................................................................................. 32
2.3.9 save Ascii ............................................................................... 32
2.3.10 Panel .................................................................................... 32
2.3.11 Notepad ................................................................................ 33
2.3.12 Viewing Memory Data .......................................................... 34
2.3.13 Memory Tracking .................................................................. 34
Room/Eq ....................................................................................... 34
Branch Compare .......................................................................... 34
Additional notes for v. 2.3 Stereo and Multi-channel .................... 34
2.3.14 Related Commands and Shortcut Keys ............................... 34
F5 (Freeze) ................................................................................... 34
F6 (Clear) ..................................................................................... 34
F10 (Live/Memory Display Toggle) ............................................... 34
2.4 Setup Menu .................................................................................. 35
2.4.1 Reference channel ................................................................. 36
2.4.2 Measurement channel ............................................................ 36
2.4.3 Names .................................................................................... 37
2.4.4 Speakers ................................................................................ 38
2.4.5 Microphones ........................................................................... 38
2.4.6 Branches ................................................................................ 38
Branch Naming ............................................................................. 38
Editing Addresses and Channels ................................................. 39
Exiting the Branch Setup Panel .................................................... 39
2.4.7 Delay ...................................................................................... 39
2.4.8 trace Offset ............................................................................. 39
2.4.9 saVe ....................................................................................... 40
2.4.10 Load ..................................................................................... 40
2.4.11 dElete ................................................................................... 41
2.4.12 New ...................................................................................... 41
2.4.13 Default Setup ........................................................................ 41
2.5 Util Menu ...................................................................................... 42
2.5.1 Vertical Scale ......................................................................... 42
2.5.2 Smoothing .............................................................................. 43
2.5.3 Master Gain ............................................................................ 43
Setting Master Gain ...................................................................... 44
Shortcut Keys ............................................................................... 44
2.5.4 Gain: A, B, or C (v. 2.0 Lab only) ........................................... 44
2.5.5 Position (Mic Gain — v. 2.3 Stereo and Multi-channel only) .. 44
2.5.6 Autoset Delay (F3) ................................................................. 44
2.5.7 Amplitude threshold (v. 2.0 Lab only) ..................................... 44
2.5.8 Coherence threshold (v. 2.0 Lab only) .................................. 45
2.5.9 Zoom ...................................................................................... 46
2.6 Averages ...................................................................................... 47
2.6.1 The Averaging Menu .............................................................. 47
2.6.2 Average Menu Selections ...................................................... 48
2.7 Cursor .......................................................................................... 49
2.8 Generator ..................................................................................... 50
2.8.1 Off (F1) ................................................................................... 50
2.8.2 Noise ...................................................................................... 50
2.8.3 Pulse ...................................................................................... 50
2.8.4 1 kHz Sine .............................................................................. 50
1
2.8.5 Variable sine ........................................................................... 50
2.9 Help .............................................................................................. 51
2.9.1 Setup ...................................................................................... 51
2.9.2 Keys ....................................................................................... 51
2.9.3 Names .................................................................................... 51
2.9.4 Info ......................................................................................... 51
2.9.5 Procedure ............................................................................... 51
Section 3 — Stereo and Multi-channel Menus .............................. 52
3.1 View Menu ................................................................................... 52
3.1.1 Single Channel Spectrum and Feedback Find ....................... 52
3.1.2 Dual Channel Delay Finder and Frequency response ........... 52
3.2 Branch Menu ................................................................................ 53
Shortcut keys ................................................................................ 54
3.3 Procedure Menu .......................................................................... 55
3.3.1 Pretest .................................................................................... 56
3.3.2 Single System ........................................................................ 56
3.3.3 External Delay ........................................................................ 57
Definitions ..................................................................................... 57
Post-Eq Delay Lines ..................................................................... 57
Pre-Eq Delay Lines ....................................................................... 60
3.3.4 Lobe Study ............................................................................. 64
3.3.5 Combined Systems ................................................................ 64
3.3.6 Mic Eq .................................................................................... 64
Foot (Mouse) Mics ........................................................................ 65
3.3.7 mIc Compare (v. 2.3 Multi-channel only) ................................ 67
Microphone evaluation ................................................................. 68
Acoustic response measurements without speakers ................... 68
3.3.8 Show ...................................................................................... 68
3.3.9 pOst process .......................................................................... 69
3.3.10 Quit ....................................................................................... 69
3.3.11 Speaker Menu ...................................................................... 69
Select ............................................................................................ 70
Enable .......................................................................................... 70
Select and Enable ........................................................................ 71
Summary ...................................................................................... 71
Section 4: Service ............................................................................ 73
4.1 Non-fatal failures .......................................................................... 73
4.2 SIM 2201 BIOS Setup .................................................................. 74
Accessing BIOS Setup Program .................................................. 74
Navigating and Selecting Values .................................................. 74
Standard CMOS Setup Values ..................................................... 74
Advanced CMOS Setup Values ................................................... 74
Advanced Chipset Setup Values .................................................. 75
Auto Configuration with BIOS Defaults ......................................... 75
Auto Configuration with Power-On Defaults ................................. 75
4.3 User-Serviceable ......................................................................... 76
4.3.1 SVGA ..................................................................................... 76
2
4.3.2 IDE Disk controller .................................................................. 76
4.3.3 I/O Card .................................................................................. 77
4.3.4 DSP Card ............................................................................... 77
4.3.5 Motherboard ........................................................................... 77
4.3.6 SIMMs (Single In-line Memory Modules.) .............................. 77
4.3.7 Power Supply ......................................................................... 77
4.3.8 DC Converter PCB ................................................................. 78
4.3.9 Floppy drive ............................................................................ 78
4.3.10 Hard Drive Receptacle ......................................................... 78
4.3.11 Hard drive Cartridge ............................................................. 78
4.4 Rear panel service ....................................................................... 78
4.5 Front panel service ...................................................................... 78
4.6 Factory service required .............................................................. 78
Section 5 — Appendices ................................................................. 79
A. Connection Diagrams .................................................................... 79
B. Cable Pinout Charts ...................................................................... 83
C. ISO™ Input (Channels A and B) ................................................... 85
D. ASCII Data File Example ............................................................... 86
E. Shortcut Keys ................................................................................ 88
v. 2.0 Lab ...................................................................................... 88
v. 2.3 Stereo, v. 2.3 Multi-channel ................................................ 89
Introduction
About This Reference Manual
The SIM Reference Manual is intended to serve as a reference document for the users of SIM System II. The manual
is divided into five sections. The main body of the manual is devoted to the v. 2.0 Lab configuration. Wherever differences occur between this and the v. 2.3 Stereo and v. 2.3 Multi-channel versions, the version-related aspects are
specified.
Section 1: Hardware — This section describes the front and rear panel connectors, knobs and switches.
Section 2: Software — This section describes the system software, beginning with the boot-up. The remainder of
Section 2 is devoted to a discussion of each of the Main menus and their sub parts. The order of the Main Menu
choices in this manual follows the menu bar from left to right for the v. 2.0 Lab configuration. There are three Main
Menus that appear exclusively in v. 2.3 Stereo and v. 2.3 Multi-channel, and these are covered in Section 3. The order of the Sub-Menu choices typically follows their position in the pull-down menu, from top to bottom.
Section 3: Stereo and Multi-channel Menus — This section describes the main menu items that are specific to
v. 2.3 Stereo and v. 2.3 Multi-channel.
Section 4: Service — This section describes service of the SIM-2201 Sound Analyzer.
Appendix — Connection information, connector pinouts and Ascii data file sample.
Physical Model
SIM System II is designed for not only characterizing, but also electronically correcting, acoustical systems. Its architecture and nomenclature follow a physical model consisting of a loudspeaker in a room (object of measurement) with
a measurement microphone, and a parametric equalizer (correction network) connected in series with the input signal.
The excitation is assumed to be neither totally random nor predictable, though known test signals such as noise or
stepped sine waves may be used.
The instrument’s three input ports are connected respectively to the correction network input (A), the network output
(B), and the measurement microphone (C). Three different transfer functions may be computed: Room + Speaker (the
unequalized response of the speaker in the room); Eq (the equalizer response); and Result (the equalized speaker
system response).
Excitation
Correction
Object of Measurement
Music
Input
Signal
CP-10
Parametric
Equalizer
(A)
Input
Loudspeaker in Room
with Measurement
Microphone
(B)
Output
EQ
(C)
Mic
Room + Speaker
Result
Figure 1 — SIM System II Physical Model
3
Section 1 — Hardware
Input Level
dBFS Meters
Headphone
Level Control
Headphone Source
Switches & Indicators
(Input, Output, Mic)
Source Level Control
Source Type
Indicators
(Pulse, Noise,
1 kHz Sine,
Var. Sine)
3.5" Floppy
Drive
Source
Level
Input
(A)
Output
(B)
Overload
0
1
Pulse
Noise
Overload
Mic
(C)
Phones
Removable
Hard Drive
System
Level
Overload
0 dB
0 dB
0 dB
-2 dB
-2 dB
-2 dB
-5 dB
-5 dB
-5 dB
-9 dB
-9 dB
-9 dB
-15 dB
-15 dB
-15 dB
-21 dB
-21 dB
-21 dB
-27 dB
-27 dB
-27 dB
1 kHz Sine
-33 dB
-33 dB
-33 dB
-39 dB
-39 dB
-39 dB
Var. Sine
-42 dB
-42 dB
-42 dB
0
1
Input (A)
System Reset
Switch
Power & Drive
LED Indicators
Output (B)
+ 48 VDC
Sine Freq.
Mic (C)
Source
Input (A)
Output (B)
Mic (C)
Phones
System
Reset
Power
®
Disk
SOURCE INDEPENDENT MEASUREMENT
Var. Sine
Freq. Control
SIM - 2201 SOUND ANALYZER
Power
Keyboard
Keyboard
Connector
Source Output
Connector & Indicator
Headphone
Output Connector
Input (A)
Connector & Indicator
Output (B)
Connector & Indicator
Power Switch
Phantom Power
Select Switch
& Indicator
Mic (C)
Connector & Indicator
Figure 2 — SIM-2201 Front Panel Controls and Indicators
1.1 Front Panel Audio Hardware
1.1.1 Source Level — A rotary level control for the source output.
1.1.2 Source Type — The source signal type is selected from the Generator Menu, and the selected source is indicated by a green LED.
Noise — Pink random noise
Pulse — A pink filtered Pulse at an average rate of 1.1 Hz. The interval ranges from .9 to 1.3 Hz
1 kHz Sine — Sine wave for distortion measurement and setting gains
Variable Sine — For manually operated sine wave sweeps
1.1.3 Sine Freq. — A rotary control for variable sine frequency. The ranges are:
Low
High
16 Hz - 1 kHz
500 Hz - 22 kHz
Range is selected from the Generator Menu.
4
1.1.4 Source Output — The source output is a male XLR-type (A3) with 300 ohm balanced source impedance. A
green LED located next to the connector is illuminated whenever the source output is active.
1.1.5 Headphone Level — A rotary level control for the headphone output.
1.1.6 Headphone Source Switches — Three membrane switches select the measurement bus channel to be monitored: Eq Input (A), Eq Output (B) or Microphone (C).
1.1.7 Headphone Output — A three-circuit 1/4" phone jack for connecting headphones to monitor the three measurement signal buses. Connect only to headphones equipped with a three-circuit (stereo) jack. Minimum impedance is 32
ohms, and monitoring is monophonic only.
1.1.8 Level Meters — Three LED bar meters indicate the signal headroom below full-scale digital. The meters indicate the peak level as a ratio (in dB) to the maximum allowed by the A/D converters. The meters are post gain control,
and therefore always indicate the headroom of the converters. Their decay time is 500 ms.
The meters show the level at the Channels A, B and C respectively. The signal path is version dependent:
Version
Ch. A meter
Ch. B meter
Ch. C meter
v. 2.0 Lab
v. 2.3 Stereo
v. 2.3 Multi-channel
Input (A)
Eq In Bus
Eq In Bus
Output (B)
Eq Out Bus
Eq Out Bus
Mic (C)
Mic (C)
Mic Bus
1.1.9 Signal Inputs — Three female XLR-type (A3) connectors located on the front panel provide direct access to the
three measurement points. Each channel has an LED that illuminates when the channel is active.
Input (A) and Output (B) are both signal inputs; the nomenclature refers to the input and output, respectively, of the
device under test. The maximum signal level for these inputs is 28 volts peak. They are wired pin 3 hot, and incorporate Meyer Sound’s ISO™ Input circuitry (see Appendix D), providing full transformer isolation and accommodating
any connection configuration with no change in gain.
The Mic (C) input is wired pin 2 hot to conform with the accepted standard for measurement microphones, and can be
supplied with Phantom power (48 VDC) via a front-panel membrane switch.
v. 2.0 Lab — Input (A), Output (B) and Mic (C) are selectable.
v. 2.3 Stereo — Mic (C) is active. Input (A) and Output (B) are patched through the Stereo Snake.
v. 2.3 Multi-channel — No front-panel input connections are active except in the special case of Procedure: Mic Compare, where the front panel Mic Input is used. Otherwise, all connections are made
through the SIM-2403 Interface Network.
1.1.10 Phantom Power (+48 Volt) Select Switch — A membrane switch that toggles the phantom power to the Mic
(C) input connector. A red LED located next to the switch is illuminated when the phantom power is enabled.
1.2 Front Panel System Hardware
1.2.1 Power Switch — A pushbutton to switch power to the system.
1.2.2 Reset Switch — A membrane switch that resets the system.
1.2.3 Power LED — This green LED lights when the system is powered.
1.2.4 Drive LED — This LED lights when the hard drive is reading or writing.
5
1.2.5 Floppy Drive — The drive accepts standard 3.5" 1.44 Mbyte floppy disks.
1.2.6 Removable Hard Drive — This removable cartridge contains a 120 Mbyte IDE auto-parking hard drive. The
cartridge may be removed when the system is to be shipped. The cartridge should not be removed or inserted
while the system is powered up.
Switched Auxiliary AC
Power Outlet
Mains Voltage
Selector Switch
Source
Output
Source
®
SIM® 2403
Control or
Mate™ ETI
SOURCE INDEPENDENT MEASUREMENT
SIM - 2201 SOUND ANALYZER
Mouse
Serial
Printer
Bus
Input
SVGA
Buss Input
110V
Power Supply
Cooling Fan
AC Power
Inlet
Control
Port
(v. 2.3 only)
SVGA
Video Port
Printer
Port
Mouse
Port
Serial
Port
Figure 3 — SIM-2201 Rear Panel Controls and Connectors
1.3 Rear Panel Audio Hardware
1.3.1 Bus Input — A 39 pin Multi-connector which carries audio signals to the SIM-2201 Sound Analyzer.
v. 2.0 Lab: Not used
v. 2.3 Stereo: The Stereo Snake is connected here.
v. 2.3 Multi-channel: The Bus Output Cable from the SIM-2403 Interface Network is connected here.
1.3.2 Source Output — A male XLR with 300 ohm balanced source impedance. A green LED located next to the
Source Output front panel connector is illuminated whenever the source output is active. The front and rear connectors are hard-wired in parallel.
6
1.4 Rear Panel System Hardware
1.4.1 Power Inlet — Takes universal IEC power cable.
1.4.1 Mains Voltage Selector — The power supply is designed to run over a wide range of line voltages. The chart
below shows the specified range for the two selectable settings.
AC Line Voltage
90-125 VAC 50/60 Hz
200-250 VAC 50/60 Hz
Switch Setting
115
230
1.4.2 Power Outlet — Switching courtesy outlet for video monitor.
1.4.3 SVGA — 15 pin D-shell connector carrying video output to monitor.
Caution: The video cable must be plugged so that the 15 pin end is connected to the SIM 2201. Attempting to connect a 9-pin VGA cable at the SVGA output may cause pins to bend.
Note: For a detailed description of the SVGA Video Card, please refer to the SVGA Video Card
user’s manual.
1.4.4 Serial — RS 232 Serial port (Com 2).
1.4.5 Printer — Parallel port for interface with printers (see Section 2.5.10 Util: Print).
1.4.6 Mouse — Serial PC Mouse port (Com 1).
Note: For a detailed description of the Serial, Printer and Mouse ports please refer to the PTI-217
Multi I/O Card user’s manual.
v. 2.3 Multi-channel
1.4.7 Control — D25 connector to control SIM-2403 Interface Network.
Note: For a detailed description of the I/O Driver PCB please refer to the Keithley Metrabyte P10-24
user’s manual.
7
Section 2 — Software
2.0 Boot-up of the SIM System II Software
2.0.1 Installing and Updating SIM Software On the Hard Drive
The hard drive is pre-formatted with the original SIM System II Software installed. Subsequent updates will arrive on
floppy disk with installation instructions. The new version is installed onto the hard disk using the Utilities function. The
floppies should be saved as a backup.
2.0.2 Boot-up from the Hard Drive
1)
2)
3)
4)
Insert the removable hard drive cartridge. Do not slam!
Remove any floppy disk from the floppy drive.
Turn the SIM-2201 Sound Analyzer on. After checking the A: floppy drive, the SIM-2201 Sound Analyzer will
look to the C: drive to boot the program.
The SIM System II Program will automatically load and run.
2.0.3 Boot-up from Floppy Disk
1)
Choose one of the three program disks available:
v. 2.0 Lab
v. 2.3 Stereo
v. 2.3 Multi-channel
2)
3)
Insert the SIM System II Program disk for that version into the floppy drive.
If it is desired to save data on the hard disk, then insert the hard drive cartridge.
The floppy drive is configured as the A: drive and therefore the system will attempt to boot from this drive first. The
hard drive is configured as the C: drive. (If the program has already been installed on the hard drive, there is no need
to boot from floppy disk.)
4)
5)
Turn the SIM-2201 Sound Analyzer on.
The SIM System II Software will automatically load and run.
Note:
The boot-up time from floppy is dependent upon whether or not the hard drive is installed:
Boot-up from floppy with hard disk installed — 1 minute
Boot-up from floppy w/o hard disk installed — 2 minutes.
Note: The Video monitor must be connected before the system is powered up. If not, the display will
display black and white only. To correct this, the system must be reset.
2.0.4 Boot-up of Software other than SIM
1)
2)
8
Insert a bootable disk into the floppy drive, or insert a separate portable hard drive with the desired program.
Turn the SIM-2201 Sound Analyzer on.
Caution: Bootable floppies other than the SIM Software may corrupt the SIM Software on the hard
disk. If other programs are used, it is advised that the SIM Software hard disk not be inserted.
When you wish to return to the SIM System II Program, power down and follow the boot-up Procedure as outlined in
Section 2.0.2.
2.0.5 Beginning the Program
The function keys select the various SIM Software versions and Utilities.
F1 2.0 Lab — For single or dual channel measurements of individual components or networks. All input connections
are made on the analyzer front panel. This program is used for stand-alone measurements and research.
F2 2.3 Stereo — This program is used for analysis and alignment of recording studios or stereo sound reinforcement
systems. It uses the Stereo Snake connected to the rear panel of the SIM-2201 Sound Analyzer for access to the Input (A) and Output (B) channels. A single microphone is patched into the front panel Microphone input (C).
F3 2.3 Multi-channel — This program is used for analysis and alignment of complex sound reinforcement systems. It
uses the SIM-2403 Interface Network plugged into the rear panel of the SIM-2201 Sound Analyzer to access eight
equalizer input and output channels and eight microphones. The system can expanded to include up to eight SIM2403 Interface Networks for a maximum of sixty-four equalizer channels and microphones.
v. 2.3 Stereo and v. 2.3 Multi-channel utilize three DSP engines for parallel processing to achieve a three-fold improvement in data acquisition speed over v. 2.0 Lab.
F9 Utilities — This program is used for computer-related utility functions. A sub-menu will appear with the following
selections:
F1 Install — This is used for installing new releases of the SIM Software from floppy disks onto the hard disk. Follow the instructions to install each of the programs.
F2 Format disk — Follow the instructions to format blank 1.44 Mbyte high density 3.5 inch floppies.
F3 Select a SIM Printer — This utility contains a library of 128 printer drivers, including both color and black and
white printers. Follow the instructions to install the printer driver for your printer. The selected printer will appear
as the “Other” printer in the Util: Print menu. Many of the drivers have not been tested, and Meyer Sound cannot
guarantee compatibility with all printer models.
2.0.6 Signing In
When the program is finished loading, you will be prompted to update the system time and date. Press <Enter> to accept the present settings, or enter new settings and press <Enter>.
The screen will then display a series of sign-in prompts. Here, you will enter labels that will be saved with the data
Notepad and will be stored along with data that you save to disk in v. 2.3.
9
2.0.7 The SIM System II Menus
The SIM Software user interface is both logical and intuitive. At the top of the display is the Menu Bar, comprising the
main system menus. These are selected by typing the first letter (highlighted in red) of each menu. When the letter is
typed, the menu will open to display the available sub-menu choices.
Throughout this manual, menu choices are shown in bold face type. The highlighted red character in the program is
denoted with an underline. The main menu choice always appears first followed by a colon, followed by the sub-menu
choices.
Example — Measure: Delay finder refers to the Main menu item “Measure” which is selected by the letter “M”. Its
sub-menu item “Delay finder” is selected by the letter “D” and selected with <Enter>. The command consists of:
M D <Enter>
Once a Main menu is open, adjacent menus may be selected with the left/right arrow keys. The sub-menus can be
selected by using either the highlighted letters or the up/down arrow keys.
The presently selected sub-menu is always shown with a dark gray background. To select the current sub-menu, simply press the <Enter> key. You may also cancel without changing any settings by pressing <Esc> at any time. For
more information, use the Help Menu Keys selection.
Procedure
Measure
View
Branch
Data
Setup
Util
Averages
Generator
Help
Branch
Data
Setup
Util
Averages
Generator
Help
Util
Averages
Generator
Help
No menus have been selected
Procedure
Measure
View
Spectrum
Delay finder
Frequency response
fEedback finder
The Measure menu has been selected using the “M” key.
The current selection, Frequency response, is highlighted.
Procedure
Measure
View
Branch
Data
Setup
Spectrum
Delay finder
Time:
± 70 ms
BW:
10k
Frequency response
fEedback finder
± 140 ms
± 280 ms
± 560 ms
5k
2k5
1k2
The Delay finder menu has been selected using the “D” key.
Pressing <Enter> to accept the selection has caused the Delay Time sub-menu to appear.
The current selection, ±70 ms, is highlighted.
Figure 4 — Pull-Down Menus
10
System Time
and Date
Menu Bar
Measurement
Type
Software
Version
Average
Number and
Type
Generator
Status
Amplitude
Threshold
Upper Display
Measurement
Type
Vertical
Scale
Horizontal
Scale
Lower Display
Measurement
Type
Reference and
Measurement
Channel
Names
Vertical
Scale
Data
Status
Area
(Fig. 7)
Overall
Status
Area
(Fig. 18)
Cursor
Status
Area
(Fig. 9)
System
Status
Area
(Fig. 12)
Input
Status
Area
(Fig. 15)
Figure 5 — v. 2.0 Lab Main Screen
Procedure
Type
Upper Display
Measurement
Type
View
Type
Branch
Number
Average
Number and
Type
Generator
Status
Measure
Type
Vertical
Scale
Horizontal
Scale
Lower Display
Measurement
Type
Eq, Speaker
and Microphone
Names, Addresses
and Channels
Vertical
Scale
Data
Status
Area
(Fig. 8)
Overall
Status
Area
(Fig. 18)
Cursor
Status
Area
(Fig. 11)
System
Status
Area
(Fig. 14)
Input
Status
Area
(Fig. 17)
Figure 6 — v. 2.3 Multi-Channel Main Screen
11
2.1 Status Panels
2.1.1 Data Status Area
The lower left area of the screen displays information about the traces, in two columns. The left column refers to the
primary traces (bright colors) and the right column refers to the secondary traces (muted colors).
Data
Traces
Data
Group
Notes
Offset
Live
Memory
2 Lab Data
On Axis
1 Lab Data
+15 vert
+4.00 dB
+4.00 dB
Figure 7 — v. 2.0 Lab Data Status Area
Traces
Group
Note
Offset
Live = Incoming measurement data
Memory = Data from Recall Buffer
Left column = Data Store Group number and data type
Right column = Data Recall Group number and data type
Left column = 1st 10 characters of Notepad for primary traces
Right column = 1st 10 characters of Notepad for secondary traces
Frequency response Amplitude offset in dB
Data
Live
Traces
1 Left
Branch
Group 2 Comb Sys
Notes After Re-EQ
Spkrs 12________
0.00 dB
Offset
Memory
1 Left
1 Single Sys
Initial EQ
1________
0.00 dB
Figure 8 — v. 2.3 Multi-Channel Data Status Area
Traces
Group
Note
Spkr
Offset
12
Live = Incoming measurement data
Memory = Data from Recall Buffer
Memory A = Data from Recall A Buffer ( Post-Process only)
Memory B= Data from Recall B Buffer ( Post-Process only)
Left column = Data Store Group number and data type (Procedure)
Right column = Data Recall Group number and data type (Procedure)
Left column = 1st 10 characters of Notepad for primary traces
Right column = 1st 10 characters of Notepad for secondary traces
Left column = Number of speakers on for primary data
Right column = Number of speakers on for secondary data
Left Column = Frequency response Amplitude offset in dB for primary data
Right Column = Frequency response Amplitude offset in dB for secondary data
2.1.2 Cursor status area
The lower left center box refers to the Cursor trace.
Data
Type
live
Meas
THD
.002
Cursor
3610
-8.7
Hz
dBV
Figure 9 — Measure Spectrum Cursor Status Area
Data
Type
THD
Hz
dBV
Live = Incoming measurement data (only)
v. 2.0 Lab: Ref (Generator or Input A), Meas (Output B or Mic C)
v. 2.3 Stereo and v. 2.3 Multi-channel: Eq in, Eq out, Mic
v. 2.3 Multi-channel: Ref mic, MeasMic (Mic Compare only)
Total harmonic distortion in percent at the Cursor position
Frequency of Cursor location (X axis)
Amplitude in dBV at the Cursor
Data
Type
Live
Result
Delay
73.70
Cursor
44.60
-0.7
ms
Ampl
Figure 10 — Measure Delay Finder Cursor Status Area
Data
Type
Delay
ms
Ampl
Live = Incoming measurement data (only)
v. 2.0 Lab: IFT (Inverse Fourier Transform)
v. 2.3 Stereo and v. 2.3 Multi-channel: Room+speaker, Eq or Result
Delay offset between Reference channel and present Cursor position (in ms)
Delay offset between Internal Delay Time and present Cursor position (in ms)
Amplitude ratio at the Cursor
Data
Type
Mean
S/N
Live
Result
Cursor
15200
-6.3
Hz
dB
4.0 dB
Figure 11 — Measure Frequency response Cursor Status Area
Data
Type
Mean S/N
Hz
dB
Live = Incoming measurement data
Memory = Data from recall Buffer
v. 2.0 Lab: Ampl (amplitude), Phase, S/N (signal-to noise + distortion) or Coher (Coherence)
v. 2.3 Stereo and v. 2.3 Multi-channel: Room+speaker, Result, Eq, 1/Eq
Mean Signal-to-Noise (or Coherence) over entire bandwidth
Frequency at the Cursor
Amplitude in dB at the Cursor
13
2.1.3 System status area
The lower right center box displays global instrument parameters.
Delay
Thresh
BW
Window
76.06 ms
-60 dB
1/6 oct
Flattop
Figure 12 — Measure Spectrum System Status Area
Delay
Thresh
B/W
Window
Internal Delay Time in ms
Amplitude threshold referenced to full scale in dB
Effective bandwidth of passband filter
Window function applied to time record
Delay
Thresh
BW
Window
76.06 ms
-40 dB
10 kHz
Half Hann
Figure 13 — Measure Delay Finder Status Area
Delay
Thresh
B/W
Window
Internal Delay Time in ms
Amplitude threshold value referenced to full scale in dB
Effective frequency bandwidth (-3dB point)
Window function. The Half Hann Window is applied to the Frequency response data prior to the IFT.
Delay
Thresh
BW
Window
76.06 ms
60% Coh
1/24 oct
Hann
Figure 14 — Measure Frequency response Status Area
Delay
Thresh
B/W
Window
14
Internal Delay Time in ms
Coherence threshold in percent
Effective bandwidth of passband filter
Window function applied to time record
2.1.4 Input status area
The input status area at the lower right displays information about incoming signal levels, gains and channel names.
Reference
Generator
Measurement
Out, B
Gain
in +20
out +10
mic +30
dB FS
-3.2
-6.7
-----
A
B
C
Figure 15 — v. 2.0 Lab Input Status Area
Reference
Measurement
Gain A, B, C
dB FS
Reference channel name (Generator or A)
Measurement channel name (B or C)
Gain (-20 to + 50 dB) of each channel
Signal levels of each channel referenced to full scale in dB
EQ
chn
1
SPEAKER
Name
HD-2
Gain
in +20
out +20
mic +30
dB FS
-3.2
-3.6
-6.7
Figure 16 — v. 2.3 Stereo Input Status Area
Speaker
Gain In, Out, Mic
dB FS
Channel number and name for speaker
Gain (-20 to + 50 dB) of each channel
Signal levels of each channel referenced to full scale in dB
adr
0
EQ
chn
1
SPEAKER
Name
MSL-10
adr
0
MICROPHONE
chn
Name
Balc 1
7
Gain
in +20
out +20
mic +30
dB FS
-3.2
-3.6
-6.7
Figure 17 — v. 2.3 Multi-Channel Input Status Area
Eq
Speaker
Microphone
Gain In, Out, Mic
dB FS
Address and Channel number of Eq
Name for speaker
Address, channel number and name for microphone
Gain (-20 to + 50 dB) of each channel
Signal levels of each channel referenced to full scale in dB
15
2.1.5 Overall status area
The Overall Status Area at the lower center displays information about the overall system status.
Acquiring Data
Figure 18 — Overall Status Area
Acquiring Data
Pause
Input disabled
Data rejected
Data <threshold
Writing
Reading
Searching
Printing
Averaging Complete
Processing incoming data
A menu is open, suspending processing
Space bar has disabled the input — press it again to continue
Overload of the measurement inputs — data are rejected
All signals are under the Amplitude threshold
Writing to disk
Reading from disk
Searching for data files on disk
Printing screen
999 averages have been accumulated
2.2 Measure Menu
The Measure menu selects the type of measurement to be made.
2.2.1 Spectrum
Spectrum measurements display the single-channel amplitude response of each of the measured input channels as
absolute amplitude in dB vs. frequency in Hz.
Reference
Channel
Measurement
Channel
Figure 19 — v. 2.0 Lab Measure Spectrum Screen Display
16
Spectrum Axes
The top of the amplitude axis represents full scale digital at each frequency. The vertical scale is adjustable in dB/div.
The frequency axis is a logarithmic display with 24 points/octave typical. The equivalent percentage bandwidth is fixed
at 1/6th octave due to the width of the flattop window. Below 20 Hz, the axis is linear.
Spectrum Cursor
The Cursor value is read out in frequency and dBV rms. Note that the Y axis is read in dB FS (full-scale) while the
Cursor value is in dBV (referenced to 1V rms). The Cursor follows the frequency of highest amplitude when peak
tracking is enabled.
Spectrum Amplitude threshold
The Amplitude threshold is shown as a white trace. Only data at frequencies that exceed the Amplitude threshold will
be allowed into the averager during Frequency response measurements.
Note: While the Amplitude threshold line is shown in Spectrum measurements, it has no effect upon
them. It only affects measurements displayed in Measure: Frequency response.
MEASURE – V 2.0 LAB
Spectrum
Delay Finder
Time:
BW:
+/– 70 ms
+/– 140 ms
+/– 280 ms
+/– 560 ms
10k
5k
2k5
1k2
Frequency Response (SIM)
Quit
MEASURE – V 2.3 STEREO & MULTI
Spectrum
Delay Finder
Time:
BW:
+/– 70 ms
+/– 140 ms
+/– 280 ms
+/– 560 ms
10k
5k
2k5
1k2
Frequency Response (SIM)
Feedback Find
Figure 20 — Measure Menu Structure
17
THD
Total Harmonic Distortion (THD) is calculated at the Cursor frequency and displayed in the Cursor Status Area. To
make an accurate distortion measurement, you must use a sine wave and optimize the signal-to-noise ratio of the
system. The distortion measurements are computed by analyzing the signal strength of the first nine (9) harmonics
above the fundamental (the Cursor position), within the 22 kHz bandwidth. THD is calculated when the fundamental
frequency is below 10 kHz.
THD Example
1)
Set the Generator to 1 kHz Sine or Var Sine. If the Cursor does not move to the amplitude peak, set it to
peak-track mode by typing <Alt+P>.
2)
Adjust the Source Level Control (Front Panel) so that the amplitude peak approaches the top of the screen.
The signal input meter (lower right) should read close to 0 dB. The gain should be adjusted internally with
Util: Master gain to optimize the dynamic range of the instrument and maintain a desirable drive level. If the
drive level of the fundamental is low, the readings will contain the noise products of the analyzer itself and the
environment, giving an inaccurately high distortion reading.
3)
The distortion reading is displayed in the Cursor status area. If the THD exceeds 99%, >99 will be displayed.
Window
The flattop window is chosen, as it yields the best accuracy for sine waves.
Overload Status
Data are rejected if the measurement inputs are overloaded.
Measure: Spectrum screen configuration:
v. 2.0 Lab
Screen
Type
Color
Signal Channel
Upper
Reference
White
Generator or Input (Ch A)
—————————————————————————————————
Lower
Measurement
Yellow
Output (Ch B)
Lower
Measurement
Orange
Mic (Ch C)
The signal channel is selected in the Setup menu
v. 2.3 Stereo and v. 2.3 Multi-channel
Screen
Color
Signal Channel
Upper
White
Eq Input
Upper
Yellow
Eq Output
Upper
Orange
Microphone
—————————————————————————————————
Lower
Not used
The signal channel is selected in the View menu
18
2.2.2 Delay finder
The Delay finder computes and displays the amplitude response of the measured system in the time domain. Two
large FFT’s are performed in transfer function mode (Reference vs Measurement channel). A half Hann window is applied to the frequency data, and an inverse Fourier Transform (IFT) is then taken. This yields a calculation of the impulse response, which resembles the response that would be seen if an ideal pulse were applied to the system input
and the system output were viewed on an oscilloscope. SIM System II utilizes an advanced implementation of the IFT
that prevents the “phantom echoes” or “wrap-around” artifacts of conventional sampling algorithms.
The Delay finder is useful for identifying:
•
•
•
•
time offset between the reference and measurement channels
timing and relative level of echo structures
time domain characteristics of filters and circuits
polarity
Because sine waves cannot be used for time-domain measurements, the generator waveform will automatically be
set to noise. The upper screen displays the relative amplitude versus time at the selected Time/Bandwidth. The lower
screen displays the same data with a 10x magnified time axis.
Upper
Screen
Lower
Screen
(Upper screen
magnified
x10)
Figure 21 — Measure Delay Finder Screen Display
Note: The display in the upper screen may contain an amplitude response error, due to sampling,
that varies dependent upon the data spectral density and type. This may cause the amplitude to appear lower than its actual value. The margin of error is proportional to the time offset from the center
of the screen. The lower screen contains the area of the highest amplitude accuracy, ± .5 dB. Therefore if accurate amplitude measurements are required, make sure that Cursor is on the trace in the
lower screen.
19
Internal Delay Time
Before accurate Frequency response measurements can be made, you must compensate for any time delay between
the Reference and Measurement channels. This is accomplished with an internal digital delay line. Delay times are
selectable in increments of 20 µs, to a maximum of 983.04 ms.
Delay finder axes
The center of the horizontal axis is the present Internal Delay Time. This delay is applied to the Reference channel so
that it can be made synchronous with the Measurement channel. The horizontal values to the left and right of the center represent time relative to the Internal Delay Time. When the Internal Delay Time is set such that the time delay between the channels has been compensated, the amplitude peak will be at the center of the horizontal axis.
The relative amplitude of the impulse response at a given time offset may be found by moving the Cursor to that time
point and reading the value. A ratio of 2:1 between two points on the time axis indicates a difference of 6 dB.
Delay finder Amplitude threshold
The Amplitude threshold defaults to -40 dB. If the Reference channel signal level does not exceed -40 dB relative to
full scale, the Delay finder will pause. The overall status window will indicate that data is below the threshold.
Time/Bandwidth Selection
The Delay finder can be configured so that any of four different time intervals can be measured. The choice of time interval is based upon the span of time you wish to view. The default setting is ± 70 ms.
Each of the Time settings has an associated Bandwidth:
Time
±70 ms
±140 ms
±280 ms
±560 ms
Bandwidth (-3 dB)
10 kHz
5 kHz
2.5 kHz
1.2 kHz
Increment
20 µs
40 µs
80 µs
160 µs
Setting the Internal Delay Time
Once the Delay finder is running, the Cursor will move to the largest amplitude on its measurement trace as shown in
Figure 22a. The center of the screen will read the Internal Delay Time. Once the Cursor has stabilized, select Util:
Autoset delay (or F3). This sets the Internal Delay Time to the value corresponding to the Cursor position. The new
value will become the center of the screen, and the amplitude peak will move to the center of both the upper and
lower screens as shown in Figure 22b.
Notes regarding the Delay finder and measuring loudspeakers
The leftmost peak in the impulse response corresponds to the arrival of the direct sound from the loudspeaker at the
microphone. Echoes will appear to the right of it, because they arrive after the direct sound. If the echoes are stronger
than, or equal to, the direct sound, the Cursor may lock onto the echo. In such instances, selecting select Util: Autoset delay (or F3) will result in an incorrect setting of the Internal Delay Time. At any rate, it is inadvisable to attempt to
align the system from such a microphone position, since the loudspeaker system may be driven into instability.
With speaker systems that lack optimum phase alignment, it may be necessary to set the Internal Delay Time to values other than the time offset of the peak with greatest amplitude. The Internal Delay Time should be set to align to
20
SIM-2201 Sound Analyzer
Cursor on
Direct sound
Source
Internal Delay
Echo
EQ In (A)
0.00 ms
Upper
Screen
IFT
Speaker
System
Measurement
Microphone
-70
Mic (C)
0.00
+70 ms
Internal Delay Time
30 ms
Propagation Delay
Data
Type
Live
Result
Delay
30.00
Cursor
30.00
0.4
Cursor position relative to
center of
ms
screen
Ampl
Propagation Delay
(Internal Delay Time + Cursor Position)
Figure 22a — Before Setting the Internal Delay: Propagation Delay Produces 30 ms Time Offset Between Reference (A) and␣ Measurement (C) Channels
SIM-2201 Sound Analyzer
Direct sound
Source
Echo
Internal Delay
EQ In (A)
30.00 ms
Upper
Screen
IFT
Speaker
System
Measurement
Microphone
Mic (C)
-70
30.00
+70 ms
Internal Delay Time
Cursor
30 ms
Propagation Delay
Data
Type
Live
Result
Delay
30.00
0.00
0.4
Cursor position relative to
center of
ms
screen
Ampl
Propagation Delay
(Internal Delay Time + Cursor Position)
Figure 22b — After Setting the Internal Delay: Pressing F3 Sets Internal Delay to Compensate for Propagation
Delay and␣ Synchronize Channels
21
SIM-2201 Sound Analyzer
Source
Direct sound
External Delay
100 ms
Echo
Internal Delay
EQ In (A)
30.00 ms
Eq
Upper
Screen
IFT
Speaker
System
Measurement
Microphone
-70
Mic (C)
30.00
+70 ms
Internal Delay Time
Cursor position relative to
center of
ms
screen
Ampl
Cursor
30 ms
Propagation Delay
Data
Type
Live
Result
Delay
30.00
0.00
0.4
Internal Delay Time + Cursor Position
Figure 22c — Pre-Eq Delays: External Delay Does Not Affect Propagation Time Measurement
SIM-2201 Sound Analyzer
Direct sound
Source
Cursor on
Echo
Internal Delay
EQ In (A)
30.00 ms
Upper
Screen
IFT
Speaker
System
Measurement
Microphone
Mic (C)
-70
30.00
+70 ms
Internal Delay Time
30 ms
Propagation Delay
Data
Type
Live
Result
Delay
65.00
Cursor
35.00
0.2
Cursor position relative to
center of
ms
screen
Ampl
(t 1 )
Internal Delay Time + Cursor Position
Figure 22d — Characterizing Reflections: Placing the Cursor on the Echo Provides Direct Measurement of Initial Time-Delay Gap
22
the highest frequency components. Always fine-tune the Internal Delay setting using the smallest Delay finder time
window (10 kHz bandwidth); even small time offsets between the Reference and Measurement channels will degrade
the quality of Frequency response data at high frequencies.
The Internal Delay Time does not affect signals in the system under test — only the time synchronization between the
measurement channels.
Pre-Eq External Delays
As shown in Figure 22c, an external delay line that is patched before the equalizer affects both the Reference and the
Measurement channel equally, as it is treated as part of the source. External delays therefore will not affect the measurement of propagation delay when the system is configured as shown in this Figure. Special Procedures are used
to align delay fill systems using external delay lines (see Section 3.3.3 External delay).
Characterizing Reflections
The Delay finder may also be used to obtain direct measurement of the “Initial Time Delay Gap” (t1). Recognized as a
primary determinant of concert hall acoustic quality, t1 is defined as the time delay between the arrival of the direct
sound and that of the first reflection at a given location. As Figure 22d shows, simply placing the Cursor on the amplitude peak of the first reflection (after setting the Internal Delay to compensate for propagation) causes t1 to read in the
Cursor Status Area. Later arrivals (t2 , t3 etc.) may similarly be measured against the direct sound arrival.
Polarity Checking
The Delay finder displays the system impulse response and thus preserves polarity information. A positive-going impulse (the highest point) indicates a net non-inverting system, whereas a negative peak indicates inversion. To check
polarity:
1)
View the Delay finder response in the lower screen, which contains the full resolution needed.
2)
Measure in the near field on axis of the speaker system whenever possible.
3)
Verify any questionable responses by viewing the phase response (refer to Section 2.2.3 Frequency response).
Multiway loudspeaker systems can exhibit complex interactions in their crossover regions. It can be misleading to try
to ascertain polarity information based on single drivers, since those that appear to be reversed in polarity may actually be optimized in their crossover range. Therefore, the most accurate method for measuring polarity is to view the
phase response in Frequency response measurements.
23
Measure: Delay finder screen configuration
v. 2.0 Lab
Screen
Type
Color
Signal Channels
Upper
Time
Blue
Reference Vs Measurement
—————————————————————————————————
Lower
Time/10
Blue
Reference Vs Measurement
v. 2.3 Stereo and v. 2.3 Multi-channel
Screen
Type
Color
Signal Channels
Upper
Time
Blue
Result (Eq Input Vs Mic)
—————————————————————————————————
Lower
Time/10
Blue
Result (Eq Input Vs Mic)
The Result impulse response is the default. Room+spkr or Eq may be selected under the View Menu.
Colors are as follows:
Color
Type
Signal Channels
Blue
White
Orange
Result
Room+speaker
Eq
Eq Input Vs Mic
Eq Output Vs Mic
Eq Input Vs Eq Output
Note: The 1/Eq Type is not available in Delay finder.
2.2.3 Frequency response
Frequency response measurements display the difference (transfer function) between the Reference and Measurement channels in the frequency domain. The Hann Window of the time record has been chosen since it is optimized
for random noise. Data are suppressed on overload of either of the two channels.
Frequency response Axes
The Frequency axis is a logarithmic display with 24 points/octave typical, and linear below 20 Hz. It can be displayed
as full bandwidth or in three frequency spans (see Section 2.5.9 Util: Zoom).
Amplitude — Amplitude in dB, vs. frequency
Phase — Phase in degrees, vs. frequency
Coherence — Coherence in percent, vs. frequency
dB S/N — Signal-to-noise ratio in dB, vs. frequency
24
S/N (dB) or
Coherence
(%)
Vertical
Scale
S/N + D Trace
Amplitude Trace
Phase Trace
Figure 23 — Measure Frequency response Screen Display
Frequency response Cursor
The amplitude and phase Cursor values are affected by interpolation and smoothing when used. The S/N and Coherence traces are never interpolated or smoothed.
The amplitude Cursor values do not track with the Setup: trace Offset. The Cursor retains the actual value. Therefore when the Trace Offset function is used, the Cursor values will appear to differ from the vertical axis values by the
amount of offset applied.
Frequency response Amplitude threshold
The default Amplitude threshold is -60 dB. The Frequency response display consists only of data at frequencies
whose Reference channel amplitude exceeds the Amplitude threshold. If no data exceed the threshold, the system
will not use any data from that time record and a prompt will appear in the main status window:
Data <threshold
25
Measure: Frequency response screen configuration
v. 2.0 Lab
Screen
Type
Color
Signal Channels
Upper
Amplitude (Avg.)
Blue
Reference Vs Measurement
Upper
Amplitude (Inst.)
Yellow
Reference Vs Measurement
Upper
S/N or Coherence
Red
Reference Vs Measurement
—————————————————————————————————
Lower
Phase (Avg.)
Blue
Reference Vs Measurement
Lower
Phase (Inst.)
Yellow
Reference Vs Measurement
v. 2.3 Stereo and v. 2.3 Multi-channel
Colors for the different Frequency response types
Color
Type
Ref. Vs Meas. ch.
Blue
White
Orange
Green
Result
Room+speaker
Eq
1/Eq
Eq In Vs Mic
Eq Out Vs Mic
Eq In Vs Eq Out
Eq In Vs Eq Out (Inverse)
v. 2.3 Stereo and v. 2.3 Multi-channel Basic View (Room+speaker, Eq or reSult)
Screen
Type
Color
Signal Channels
Upper
Amplitude(Avg.)
See Above
Room, Eq, 1/Eq or reSult
Upper
Amplitude (Inst.)
Yellow
Room, Eq, 1/Eq or reSult
Upper
S/N or Coherence
Red
Room, Eq, 1/Eq or reSult
—————————————————————————————————
Lower
Phase(Avg.)
See Above
Room, Eq, 1/Eq or reSult
Lower
Phase (Inst.)
Yellow
Room, Eq, 1/Eq or reSult
v. 2.3 Stereo and v. 2.3 Multi-channel Group View
Screen
Type
Color
Signal Channels
Upper
Amplitude (Avg.)
Blue
Result
Upper
Amplitude (Inst.)
Yellow
Result
Upper
S/N or Coherence
Red
Result
—————————————————————————————————
Lower
Amplitude (Avg.)
White
Room
Lower
Amplitude (Inst.)
Yellow
Room
Lower
S/N or Coherence
Red
Room
Lower
Amplitude (Avg.)
Orange
Eq
Lower
Amplitude (Avg.)
Green
1/Eq
Lower
Amplitude (Inst.)
Yellow
Eq or 1/Eq
Lower
S/N or Coherence
Red
Eq or 1/Eq
Bright colors are used for all primary (Live) traces
Muted colors are used for all secondary (Memory) traces
26
2.2.4 fEedback finder
v. 2.0 Lab — Not used
v. 2.3 Stereo, and v. 2.3 Multi-channel — Feedback finder is similar to Spectrum with the addition of
a peak hold function. It is used to identify feedback frequencies when equalizing sound systems. The
highest amplitude value at each frequency is held until the Average: Restart command is given.
In , Out or Mic
Not Used
Figure 24 — Measure Feedback Find Screen Display
27
2.2.5 Default Measure: settings
Measure: Spectrum
Vertical Scale
Horizontal Scale
Amplitude threshold
Window
Cursor
Master Gain
Averages
15 dB/Div. (0 to -90 dB)
7.6 Hz- 22,634 Hz
-60 dB
Flattop
Peak tracking
0 dB
1 rms (No averaging)
Measure: Delay finder
Vertical Scale
Horizontal Scale
Internal Delay Time
Amplitude threshold
Window
Cursor
Master Gain
Averages
.5 Div. (± 1.5)
±70 msec (10 kHz)
0 ms
-40 dB
Half Hann
Peak tracking
0 dB
Accumulate vector
Measure: Frequency response
Vertical Scale
Horizontal Scale
Amplitude threshold
Window
Cursor
Master Gain
Averages
10 dB/Div. (± 30 dB)
7.6 Hz- 22,634 Hz
-60 dB
Hann
Peak tracking
0 dB
4 vector
2.2.5.4 Measure: fEedback finder
Vertical Scale
Horizontal Scale
Amplitude threshold
Window
Cursor
Master Gain
Averages
28
15 dB/Div. (0 to -90 dB)
7.6 Hz- 22,634 Hz
-60 dB
Flattop
Peak tracking
0 dB
Peak hold
2.2.6 Measure Menu Reference Guide
Measure
View
Averages
Generator
Smoothing
Data
Trace Offset
————————————————————————————————————————————————————
Spectrum
Eq In*
1†
Off
No
No
No
Eq Out
1 k Sine
Mic
Var Sine
Noise
Pulse
————————————————————————————————————————————————————
Delay Find
Room
Accum*
Off
No
No
No
Eq
2
Noise
Result*
4
Pulse
8
16
————————————————————————————————————————————————————
Freq. Resp
Room*
1/Eq
Result
Eq
Group
Accum
2
4*
8
16
Off
1K Sine
Var Sine
Noise
Pulse
Off (24th)
6th
3rd
Store (1-8)
Yes
Recall (1-8)
Memory Track
Save Branch
Save All
Load Branch
Load All
Delete Branch
Clear
————————————————————————————————————————————————————
Feedback
Eq In
Eq Out
Mic*
Peak Hold
Off*
1 kHz Sine
Var Sine
Noise
Pulse
No
No
No
* Default (Original Setting)
† Only available setting or not adjustable.
29
2.3 Data Menu
The Data Menu allows Frequency response data to be stored in memory and saved to disk. Data remain in memory
as long as the SIM-2201 Sound Analyzer is powered up. Unless data are also saved to disk, they will be lost when the
system is reset or power is interrupted.
The main data functions are:
Store — Stores live data in memory
Save — Saves memory data to disk.
Load — Loads data from disk to memory
Recall — Recalls data from memory to screen
The data stored include averaged amplitude and phase measurements (unsmoothed), and the Coherence (or S/N)
data. When saving data to disk, the Setup must first be saved, as the Setup file also serves as a subdirectory for storing data files. Each Setup has its own data files.
2.3.1 Store
To store data, press Data Store. The Group menu (1-8) appears. Data may be stored to any of the eight Groups.
In v. 2.3 Stereo and Multi-channel versions, each Branch has eight memory Groups.
When storing data, a Notepad pops up allowing you to enter up to three lines of text to annotate the stored data. To
exit the Notepad, press <Ctrl+Enter>.
If data have been stored at this Group already, a prompt “Overwrite Y/N?” appears. Press ‘Y’ to overwrite data, or any
other key to select a different Group.
Figure 25 — Data Store Screen Display
30
DATA – V 2.3 STEREO & MULTI
DATA – V 2.0 LAB
Store
Store
Recall
Group:
1– 8
Recall
Memory Tracking
Group:
1– 8
Off
Room / EQ
Load
Save
Save ASCII
Delete
Branch Compare
Disk Drive:
Floppy
Hard
Load Branch
Load All
Save Branch
Panel
Clear F6
Compare to:
Branch #
Save All
Disk Drive:
Floppy
Hard
Save Branch ASCII
Delete Branch
Panel
Clear F6
Figure 26 — Data Menu Structure
2.3.2 Recall
To recall data from memory to the screen, press Data Recall. The Group menu (1-8) appears. Select a Group to recall and press <Enter>. The Notepad then appears, allowing you to view and edit the text. To exit the Notepad, press
<Ctrl+Enter>.
2.3.3 saVe
To save the data (all eight Groups) in memory to disk, press Data saVe. If the Setup has not been saved, you will be
prompted for a Setup name and the Setup will be saved. Next, a prompt appears asking for the name to save the data
as. Type a name and press <Enter>. The data is now saved to disk under the current Setup.
2.3.4 Load
Data loaded from disk always comes from the current Setup. To load data, press Data Load. A menu appears listing
all the data files in the current Setup directory. Select a file and press <Enter>.
Shortcut Keys
For faster storage and recall of data without viewing the Notepad, press <Ctrl+Enter> instead of <Enter> after selecting one of the eight Groups.
31
2.3.5 Disk menu
Select either the removable hard drive or the floppy disk to save or load data.
Notes on naming data files
When saving data, filenames must contain only the letters A-Z, digits 0-9, and the following characters:
_^$~!#%&-{}()@’‘“;
Filenames cannot contain spaces; spaces typed into filenames are replaced by underbars (_). The filename is
searched for disallowed characters. If any are found, the message “Bad characters in filename” appears, the offending characters are removed, and the filename prompt re-appears.
Before data files are saved to disk, the Setup directory is searched for a file with the same name. If there is already a
file with the same name, the message “File Exists. Overwrite Y/N?” appears. Press ‘Y’ to overwrite data, or any other
key to return to the filename prompt.
If a file cannot be saved because of disk problems, the message “No such file or directory” appears. Some of the reasons for this include:
•
•
•
•
•
•
Disk not present or not installed in drive completely.
Unformatted disk.
Disk is full.
Disk is write-protected (sliding tab on floppy disk shell)
Disk is not proper type (High density 1.44M diskettes must be used)
Bad Sector(s) on disk.
2.3.6 dElete
Data files on disk which are no longer be needed may be deleted. Press dElete from the Disk menu, select a file to
delete, and press <Enter>. Once a data file has been deleted, it cannot be recovered.
2.3.7 Save All
In v. 2.3 Stereo and Multi-channel, the Save All command provides a convenient means of saving to disk data from
all Branches. The Branch names are used as the filenames. This command backs up your data so that an inadvertent
system reset will not cause a loss of data.
2.3.8 Load All
In v. 2.3 Stereo and Multi-channel, the Load All command searches the Setup directory for any files matching the
present Branch names. Each file that matches a Branch name is loaded into that Branch.
2.3.9 save Ascii
Frequency response data may be saved as an ASCII file for post-processing and analysis in math programs or other
applications. The resulting ASCII data table is tab-delimited and includes real and imaginary parts, coherence and
data validity flags for each frequency bin. A sample ASCII data file may be found in the Appendix.
2.3.10 Panel
Pressing Data Panel displays a table of all the stored data in all the Branches, labeled with name, Group number, and
the first 10 characters of the Notepad. In v. 2.3 Stereo and Multi-channel, each Group’s Procedure name also appears.
32
Figure 27 — v. 2.3 Multi-channel Data Panel Screen Display
2.3.11 Notepad
Whenever data are stored or recalled, a Notepad appears, allowing three lines of text to be entered, annotating the
data.
In addition, the Notepad displays the following:
Branch number
Group number
Procedure in which data was stored
Microphone name
Speaker status (which speakers were on)
Averaging type and number
Amplitude threshold
Coherence threshold
Time and date that the data was stored
Internal Delay Time
Venue
Artist
Engineer’s name
All of these Notepad items stay with the data when it is saved to and loaded from disk. The Notepad may be skipped
when storing and recalling data; see <Ctrl+Enter> shortcut key, above.
33
v. 2.3 Stereo and Multi-channel
2.3.12 Viewing Memory Data
Data recalled from memory will normally match the type being viewed. For example, if you are viewing a Room response, selecting Data Recall brings up Room memory traces. In Group view, Room, Eq, and Result memory traces
are displayed.
However, these defaults may be easily overridden. Any recalled memory trace may be viewed by using the View
Memory menu. For example, a Room memory trace may viewed along with a live Eq trace. See “Memory Tracking”.
2.3.13 Memory Tracking
In v. 2.3 Stereo and Multi-channel, Memory Tracking conveniently automates commonly used memory views. There
are two types of Memory Tracking, Room/Eq and Branch Compare.
Room/Eq
Room/Eq Memory Tracking works as follows: In Eq view, the Room memory traces are recalled, and in Room view,
the Eq memory traces are recalled (Result view recalls Result traces). This feature is useful during system equalization. In Room/Eq memory tracking, all data are recalled from the present Branch.
Branch Compare
During Branch Compare Memory Tracking, traces are automatically recalled from a “Compare” Branch. Each Branch
can be assigned a Compare Branch; this is done in the Branch Setup Panel. Example: If Branch 1 and 2 are being
compared to Branches 5 and 6 respectively, then Branch 5’s memory traces are displayed while Branch 1 is being
measured, and changing to Branch 2 brings up Branch 6’s memory.
Memory Tracking is initially off, and is selected from the Data menu. When selecting Branch Compare Memory Tracking, you must also select which Branch you wish to compare the present Branch to.
Additional notes for v. 2.3 Stereo and Multi-channel
When storing and recalling data, the data are tagged with the name of the Procedure. These Procedure names appear on the Group 1-8 menu, the Notepad, and the data panel. This helps to organize the large amount of data that
may be gathered when using multiple Branches, Groups, and Procedures.
2.3.14 Related Commands and Shortcut Keys
F5 (Freeze)
Pressing F5 stores live Frequency response traces to memory, replacing any memory traces already on screen. F5 is
useful for quick A/B comparisons and other occasions when it is not necessary to keep the data in long-term memory.
F6 (Clear)
Pressing F6 clears memory traces.
F10 (Live/Memory Display Toggle)
This key is useful when you wish to quickly toggle between live and memory traces. Pressing F10 hides the memory
traces. Pressing it again brings back the memory traces and hides the live traces; a third keypress restores both live
and memory traces.
None of these three commands affect data stored using the Data Store command.
34
2.4 Setup Menu
SETUP – V 2.0 LAB
Reference Channel
SETUP – V 2.3 STEREO & MULTI
Generator
Input (A)
Speakers
Microphones
Measurement Channel
Output (B)
Mic (C)
*
Branches
Trace Offsets
Trace Offsets
Branch Delay
Delay
Names
Load
Load
Save
Disk Drive:
Floppy
Hard
Save
Disk Drive:
Floppy
Hard
Delete
Delete
New
New
*
Not Used in Stereo Version
Figure 28 — Setup Menu Structure
The Setup menu customizes the SIM-2201 Sound Analyzer to conform to the system under test. All Setup data can
be saved to disk and reloaded, allowing speedy restoration of the instrument state.
Within the Setup Panels, the keyboard functions are as follows:
Right/Left arrow .....................................
Up/Down arrow .....................................
Ctrl+L/R Arrow. ......................................
Backspace .............................................
DEL .......................................................
Home .....................................................
END .......................................................
INS ........................................................
TAB .......................................................
ESC .......................................................
ENTER ..................................................
CTRL+ENTER .......................................
Move within field
Move to field above and below
Move to beginning of next/previous word
Delete previous character
Delete current character
Move to first character in field
Move to last character in field
Toggle insert mode
Move to next field
Restore field to last value before edit
Accept entry and move to next field
Exit from panel
35
v. 2.0 Lab
2.4.1 Reference channel
The Reference channel can be set to Input (A) or Generator.
2.4.2 Measurement channel
The Measurement Channel can be set to Output (B) or Mic (C). Selecting Output (B) sets the system to measure a
line-level electronic device. Instrumentation microphones that are preamplified may also be patched to Channel B.
Selecting Mic (C) sets the system to measure with a microphone or mic level device.
Channel A (Input) refers to the “device under test” input.
Channel B (Output) refers to the “device under test” output.
Channel C (Mic) is for microphones.
SIM-2201 Front Panel
Source
Input (A) Output (B)
In
Mic (C)
Electronic
Device Under Test
Out
Figure 29 — v. 2.0 Lab Electronic Measurement with Generator as Reference Channel
SIM-2201 Front Panel
Source
Input (A) Output (B)
Mic (C)
Figure 30 — v. 2.0 Lab Acoustic Measurement with Generator as Reference Channel
Select the Generator as the Reference when there is no need to use an unknown source. The system should be
patched as shown in Figure 29 or 30.
36
SIM-2201 Front Panel
Source
Input (A) Output (B)
External
Source
In
Mic (C)
Electronic
Device Under Test
Out
Figure 31 — v. 2.0 Lab Electronic Measurement with Input (A) as the Reference Channel
SIM-2201 Front Panel
Source
Input (A) Output (B)
Mic (C)
External
Source
Figure 32 — v. 2.0 Lab Acoustic Measurement with Input (A) as the Reference Channel
Selecting Input (A) allows Source Independent Measurements (using program material instead of the Generator). The
system should be patched as shown in Figure 31 or 32.
2.4.3 Names
Selects names for A, B and C Channels. Type the names you wish into the appropriate boxes.
Figure 33 — Setup Names Screen Display
37
v. 2.3 Stereo, v. 2.3 Multi-channel
2.4.4 Speakers
The Speaker Setup Panel must be configured to reflect the patching of the speaker system and measurement system.
Type the Name of the speaker system corresponding to each of the Eq channels. This Name will be used in the
Branch panel. Text areas annotate the speaker system type and location.
Speaker information is entered into the above fields so that the Speaker Panel is fully defined. The Speaker Name entered here will be used in the Branch Setup Panel. Each time the Speaker menu (See Procedure menu) is used, the
Eq channel and Speaker Names will be displayed. The Speaker Name, Type and Location fields are saved in the
Setup file.
Figure 34 — Setup Speakers Screen Display
Multiple SIM-2403 access — Each Speaker Panel contains labeling for the eight channels of one SIM-2403 Interface
Network. When addressing multiple Interface Networks, it is necessary to input the speaker and microphone Names
on the panel for that address. Use Page Up/Down keys to see the Panel for the next/previous address.
2.4.5 Microphones
Type the Name of the microphone corresponding to each of the measurement microphone inputs to the SIM-2403 Interface Network. This Name will be used in the Branch Setup Panel. The Microphone Name, Type and Location fields
are saved in the Setup file.
2.4.6 Branches
Branch Naming
Type the name of each Branch into the Branch Name field. This Name will also serve as the Branch’s filename for the
data storage. (See also Section 3.2 Branch Menu.)
Important note: You must name each Branch for which you wish to save Frequency response data.
38
Editing Addresses and Channels
For each named Branch in the system, the measurement points must be defined. Each Eq and Microphone must
have its Address (0-7) and Channel (1-8) defined. The Cursor may be moved to the Eq and Mic channel fields for
each Branch and the appropriate number entered. The labels for speaker and microphone will be updated as new
channel numbers are entered.
Exiting the Branch Setup Panel
Pressing <Control+Enter> will return you to the main menu bar display.
Figure 35 — Setup Branches Screen Display
2.4.7 Delay
The Delay Setup Panel allows you to enter the Internal Delay Time for a Branch. This might be done when estimating
delay times before measurements are made.
2.4.8 trace Offset
The Trace Offset function repositions the amplitude response traces for convenient viewing and comparison. Trace
Offset is entirely a video function, and does not change the values of the Frequency response measurements. Nor
does it affect the input range (as do the Util: Gain controls). All data are stored and recalled with their actual amplitude values, but can be displayed with an offset. The offset range is ±12 dB. If the trace is more than 10 dB off from
the desired position, it is best to use Util: Gain so as to preserve dynamic range. (In v. 2.3, the Trace Offset is applied
to Room and Result amplitude traces.)
Shortcut keys
+ or = increases offset 1 dB. - decreases offset 1 dB.
Note: The amplitude shown by the Cursor is its measured value, not inclusive of the offset.
39
2.4.9 saVe
This command saves the Setup file to disk. The Setup file includes:
•
•
•
•
•
Data for each Branch, including the Branch Name, Speaker and microphone addresses and channels,
Internal Delay Time, Trace Offset, Compare Branch and Notepad;
Speaker and Microphone Names, Types and Locations;
Venue, Artist and Engineer’s name;
Average number and type;
Master Gain, Mic Gain, all vertical scales, Smoothing and Coherence threshold.
Setups can be saved to either the floppy or the hard drive. You will be prompted for a filename. The Setup filename
will serve as the subdirectory name under which your present data files can be stored, so it is always necessary to
save a Setup before saving data files. Type in the name and press <Enter>. The directory of Setup files on the disk
will be searched. If the name is unique, the Setup will be saved. If there is a file with the same name, a prompt will appear:
Overwrite Yes or No?
If the Y key is selected, the new Setup will overwrite the old one. Any other key will return you to the filename prompt.
If the file cannot be saved, you will be alerted by a prompt stating:
No such file or directory
The reasons that a file cannot be saved include:
•
•
•
•
•
•
Disk not present
Unformatted floppy disks
Disk full
Write protected disk
Not a High density floppy disk
Bad sector(s) on disk
Setup file size
The Setup file size ranges from 1.9 to 9.8 kbyte, depending upon the number of Branches used.
2.4.10 Load
Select the disk having the desired Setup file. You will be prompted with a list of the Setup files on the disk. The Up/
Down arrow keys will select the desired file. Page Up/Down keys select additional pages of files if required. Press
<Enter> to Load the desired data file.
The Setup will load from disk, and the Branch Setup Panel will show the new Setup. You may change any entries if
you desire. In addition, the other parameters listed above will be recalled.
If the selected disk is not present, a prompt will appear as described above in the section on Setup: saVe.
After the Setup has been loaded a prompt will appear regarding the data array. You may choose to load the data array that corresponds to the newly loaded Setup as well, to clear the array, or to continue with the old data still present.
40
Load: Clear old data — Clears the Frequency response data array in memory so that the next cycle of measurements may begin with a clear array. This has no effect upon data that have been saved previously to disk.
Load: Load all data — Loads the Frequency response data from disk for all Branches using the present Branch
names as filenames.
Load: cOntinue — Allows the Setup to be reset without clearing the Frequency response data array. Note that if the
old data remain in memory they are no longer labeled with their original Branch names.
2.4.11 dElete
Deletes the Setup file from the directory. If there are data files present a prompt will appear asking:
Delete X Branches in Setup <Setup filename>
Yes No
(X is the number of data files to be deleted.) If Yes is selected, the Setup file and its data will be deleted. If No is selected, the Setup file will not be deleted.
2.4.12 New
This command resets the Setup Panel to the default setting.
•
•
•
•
Names are cleared.
Internal Delay Time(s) set to 0 ms.
Trace Offset(s) set to 0 dB
Compare Branch numbers reset to default settings
Utility and Average parameters such as Gain and Smoothing are not affected by this command.
After the Setup has been cleared, a prompt will appear regarding the data array. You may choose to clear out the
data array as well, or to continue with the old data still present.
2.4.12.1 New: Clear old data
Clears the Frequency response data in memory so that the next cycle of measurements may begin with a clear array.
This has no effect upon data that have been saved to disk.
2.4.12.2 New: cOntinue
Allows the Setup to be reset without clearing the Frequency response data array. Note that if the old data remains in
memory, it is no longer labeled with its original Branch names.
2.4.13 Default Setup
The system boots up with its own default Setup. This Setup is intended to provide a logical starting place so that the
minimum amount of time need be spent filling out the Setup Panel. There are different default Setups for the Lab, Stereo and Multi-channel programs.
41
2.5 Util Menu
The Utilities menu contains sub-menus that control the global parameters of the instrument.
2.5.1 Vertical Scale
Sets the vertical scale for the displays.
2.5.1.1 Spectrum Vertical Scale
Amplitude in dB/div — The amplitude scale is always referred to dB full scale. 0 dB is at the top of the screen.
2.5.1.2 Delay finder Vertical Scale
Amplitude in units/div — 0 is always at center; a value of 1 implies unity gain.
UTIL – V 2.0 LAB
Vertical Scale
Amplitude
1
2
6
10
12
15
20
dB/div
dB/div
dB/div
dB/div
dB/div
dB/div
dB/div
Delay Finder:
.1
.2
.3
.5
1.0
2.0
or
S/N per Hz
10 deg/div
30 deg/div
60 deg/div
-------------0
deg/ctr
180 deg/ctr
Master Gain
90%
80%
70%
60%
50%
40%
30%
20%
10%
0%
+ 20 dB x 10
+ 10 dB
– 10 dB
– 20 dB x .1
–3
–6
– 10
– 20
– 30
– 40
– 50
– 60
– 70
– 80
– 90
dB*
dB*
dB
dB
dB
dB
dB
dB
dB
dB
dB
* Delay finder only
Smoothing
Master Gain
Position (Mic Gain)
Gain
In (A)
Out (B)
Mic (C)
50 dB
40 dB
30 dB
20 dB
10 dB
0 dB
– 10 dB
– 20 dB
+
+
+
+
+
Zoom
Print
Apple Laserwriter Series
HP DeskJet 500c
HP LaserJet Series II
Other
Full
Low
Mid
High
BW
Color
Zoom
Figure 36 — Util Menu Structure
42
Full
1/2
1/3
S/N per Hz
Full
1/2
1/3
Delay Finder:
or
10 deg/div
30 deg/div
60 deg/div
-------------0 deg/ctr
180 deg/ctr
Narrow (Off)
1/6 Octave
1/3 Octave
+ 50 dB
+ 40 dB
+ 30 dB
+ 20 dB
+ 10 dB
0 dB
– 10 dB
– 20 dB
Autoset Delay F3
Autoset Delay F3
Print
Spectrum &
Freq Resp:
Coherence
Phase
Amplitude Threshold
Narrow (Off)
1/6 Octave
1/3 Octave
Amplitude
2 dB/div
6 dB/div
10 dB/div
12 dB/div
15 dB/div
Full
1/2
1/3
Coherence Threshold
Smoothing
Vertical Scale
div
div
div
div
div
div
Full
1/2
1/3
Coherence
Phase
UTIL – V 2.3 STEREO & MULTI
Spectrum &
Freq Resp:
Apple Laserwriter Series
HP DeskJet 500c
HP LaserJet Series II
Other
Full
Low
Mid
High
BW
Color
.1 div
.2 div
.3 div
.5 div
1.0 div
2.0 div
2.5.1.3 Frequency response Vertical Scale
Amplitude in dB/div — The amplitude traces are typically centered with unity gain at the screen center.
v. 2.0 Lab — The vertical scale is offset when the gains of the Reference and Measurement channels
are different.
Coherence — The Coherence scale shows 100% at the top of the screen, and may be adjusted for full, 1⁄2 or 1⁄3
screen.
S/N per Hz — The signal-to-noise scale shows +100 dB at the top of the screen, and may be adjusted for full, 1⁄2 or 1⁄3
screen. Signal-to-noise is calculated at maximum frequency resolution, regardless of the smoothing setting.
Phase in degrees/div — The phase scale typically shows 0 degrees at the center, but can be changed to 180 degrees
at the center. This option is available only with vector averaging.
Util: Vertical scale: Phase: 0 degrees center
Util: Vertical scale: Phase: 180 degrees center
The vertical scales are independently adjustable, and are stored as part of the Setup file. You may choose either Coherence or S/N.
2.5.2 Smoothing
Smoothing can be applied to the Frequency response data.
•
•
•
•
Only amplitude and phase responses are smoothed.
All amplitude and phase traces are formatted the same (smoothed or not)
All data are stored at full resolution, regardless of smoothing.
Smoothing is never applied to Coherence or S/N traces.
Smoothing of the amplitude and phase traces is achieved by averaging above and below each of the frequency bins.
Narrow (1/24th Octave) — No smoothing or interpolation
1/6 Octave — Sixth octave smoothing and interpolation
1/3 Octave — Third octave smoothing and interpolation
2.5.3 Master Gain
The Master Gain menu sets the gain of the Eq In (A), Out (B) and Mic (C) in 10 dB increments. Setting the Master
gain optimizes the measurement system’s gain structure to deal with different source levels. Changes in the Master
gain will not cause any of the Frequency response traces to move up or down, since the Frequency response is sensitive only to the relative gain between channels. It will move the Spectrum response up or down, since the spectrum
vertical display is referred to full scale input level. The default Master Gain is 0 dB for all channels.
v. 2.0 Lab
The Master Gain Menu selections refer to the gain relative to the present settings. For example, selecting +10 dB will
increase the gains of channels A, B, and C by 10 dB.
v. 2.3 Stereo, v. 2.3 Multi-channel
The Master Gain Menu selections refer to the actual gain settings of the Eq and Mic channels. They are listed in
separate columns. For example, selecting +10 dB on the Eq channels will set the gain of the Eq channels to +10 dB.
The gain of the Mic channel will maintain its relationship with the Eq channel.
43
Setting Master Gain
The gain for each channel can be set by first viewing the levels of the incoming data, as displayed in the Input Status
Area on the screen (or the front panel meters), and adjusted so that the input level is within 10 dB of full scale input
drive. If the gain is too high, an overload will be indicated and the data will be rejected. If the gain is too low, the input
level will read consistently lower than -10 dB FS (full-scale), and the effect of the Amplitude threshold will cause data
acquisition to be slowed. For signals with wide dynamic range, bear in mind that an occasional overload is tolerable,
as data are rejected.
Shortcut Keys
v. 2.0 Lab — No shortcut key for master gain. <Shift> F1-F6 may be used to set individual gains.
v. 2.3 Stereo, v. 2.3 Multi-channel — <Shift> F1/F2 move master gain up/down 10 dB.
2.5.4 Gain: A, B, or C (v. 2.0 Lab only)
Controls the gain of the selected channel only, in 10 dB increments. Changes in gain of any one of these channels will
cause the Frequency response traces to move up or down. The vertical scale will be redrawn to reflect the offset in
gain. The gain for each channel can be set by first viewing the levels of the incoming data, as displayed in the Input
Status Area on the screen (or the front panel meters), and adjusted so that the input level is within 10 dB of full scale.
Precise control of the trace position is effected using Setup: trace Offset in the Setup Panel.
2.5.5 Position (Mic Gain — v. 2.3 Stereo and Multi-channel only)
The Position menu controls the gain of the mic channel only. It is used during Setup as a coarse vertical positioning
control to compensate for the acoustical gain of the loudspeaker system at each microphone point. Fine control of the
trace position is effected using the Setup: trace Offset.
By setting the Mic channel gain separately from the Eq In and Out gain, one can compensate for the relative gain of
the Speaker/Mic system. Changes in the mic gain will cause the amplitude response traces of the Room+speaker and
the Result Types to move up or down. Since a change in mic gain causes a change in the position of the trace on the
screen, it is advisable to find a single setting that best suits the average gain level of the different Branches. Otherwise, it can become difficult to keep track of the actual gain relationships between sub-systems. The Position can be
set by viewing the input levels of the incoming data, and adjusting so that the Mic input level most closely matches the
Eq In and Out levels. The relationship between the Eq Input and Eq Output gain and the Mic Gain is changed only
when the Mic Gain is changed — not the Master gain.
Shortcut Keys
<Shift> F5/F6 move position (Mic Gain) up/down 10 dB.
2.5.6 Autoset Delay (F3)
This function is available only in the Delay finder. The Internal Delay Time is set to the Cursor position.
2.5.7 Amplitude threshold
The Amplitude threshold is designed to improve the signal-to-noise ratio of Frequency response measurements by
pre-screening the incoming data. The level at each frequency bin in the Reference channel is checked against the
threshold, and only data at those frequencies that clear the threshold are used for computation. This is particularly
useful for sources such as music, where the density and frequency content of the incoming signal is variable. The Amplitude threshold is adjustable for Frequency response and Delay finder measurements in v. 2.0 Lab.
44
2.5.8 Coherence threshold
Coherence thresholding blanks Frequency response data at frequencies where there is a low signal-to-noise ratio.
The Coherence threshold ranges from 90% to 20%, depending upon the number of averages selected. This threshold
can also be expressed as Signal-to-noise ratio in dB. Its relationship to the averaging number is as follows:
Avg. #
Coh Thresh
dB/SN
2
4
8
16
90%
60%
40%
20%
+20 dB
+3.5 dB
-3.5 dB
-20 dB
In v. 2.0 Lab, the Coherence threshold is adjustable for Frequency response measurements in 10% increments.
Note: The setting for the Coherence threshold is valid only for the current number of averages. Each
time the Average number is changed, the Coherence threshold value automatically resets to the default value.
Vertical Scale
is set to 1⁄2
Low Coherence
Amplitude Trace
Blanked
Figure 37 — Coherence Blanking
45
2.5.9 Zoom
This is a video display function designed to allow easier viewing of Frequency response data within a specific range.
Zoom is not available in Spectrum or Delay finder measurements.
There are four range selections:
•
•
•
•
Full — Full range (7.6 Hz-22.634 kHz)
Low — 7.6 Hz -200 Hz
Mid — 125 Hz-2 kHz
High — 1 kHz -22.634 kHz
Shortcut Keys
<Control+Page Up/Down> keys serve as shortcut keys for Zoom as a four-position toggle.
Command Sequence:
Util: Zoom: Range select (Full, Low, Mid, High)
v. 2.0 Lab
The Zoom function doubles the number of lines of resolution in Frequency response measurements. This increases
the effective bandwidth of the measurements to greater than 1/30th octave.
v. 2.3 Stereo and v. 2.3 Multi-channel
The Zoom function is a display function only and has no effect upon the number of lines of resolution in Frequency response measurements.
2.5.10 Print
The Print utility is used to make hard copy for publication or presentation. Printouts occupy approximately half a standard 8 1⁄2" by 11" page.
The printer must be connected to the parallel port on the rear panel marked “Printer.” A standard D25 fully-wired pinto-pin cable will make the proper connection.
Printer model selection
The system will prompt you to select a printer. The following printers are permanently installed:
Apple LaserWriter Series
HP DeskJet 500c
HP LaserJet Series II
Other:
Press <Enter> to confirm your selection.
The Other printer is user-installable. Installation of a user-selected printer is described in Section 2.0.5.
Print format selection
Once a printer is selected, a sub-menu will prompt you to select color or black and white mode.
B/W — Black and white (no grey scale)
Color — Prints color on the HP DeskJet 500c or other color printers, and grey scale on monochrome printers.
46
2.6 Averages
AVERAGES – V 2.0 & V 2.3
Restart
1
2
4
8
16
Accum
Type
Vector
RMS
Figure 38 — Averages Menu Structure
SIM System II utilizes a unique form of averaging implementing Amplitude thresholding. The threshold function serves
to avoid some of the common inaccuracies of FFT analyzers when an unknown excitation is used.
The instantaneous amplitude and phase values are shown as yellow dots. The averaged values will not appear until
each frequency bin contains at least the number of averages selected.
2.6.1 The Averaging Menu
The Averages menu selects the number of averages and the average type.
The numerical selections are:
•
•
2,4,8,16 (First in first out)
Accumulator
FIFO (First In First Out) averaging uses the last N (2,4,8 or 16) samples and divides them by N. When more than N
samples have been obtained, then the oldest of the samples is deleted and the new one is added in. This provides a
continuously updated averager. No weighting function distinguishes among the data; all data are treated equally. Until
the averager has N samples for a frequency bin, only the incoming instantaneous Frequency response data for that
bin (yellow dots) will be shown. After N samples are obtained for a bin, the averaged data will be displayed as a trace.
The principal advantages to this type of averaging are that:
•
•
each frequency bin has the same number of samples, and
no restart is required when system adjustments are made.
Fewer averages will yield faster display of the measured data at the expense of greater stability and accuracy. Measurements substantially contaminated with noise should use more averages. (Systems in reverberant halls, for example, will require more averages than near-field measurements in quiet environments.)
47
In the Accumulator type of averaging, all data samples are averaged until a Restart command flushes out the
averager. As each new sample comes in, it is added to the others, the sum of which is divided by the accumulated
number of samples.
Accumulator averaging yields very quick display and increased stability with more samples. It has three distinct disadvantages from FIFO averaging:
•
•
•
Each frequency bin contains an unknown number of samples.
Later averages have very little effect on the total. This means that if the system under test changes, the
change will be barely detectable.
A Restart is required any time the system under test changes.
The Accumulator averaging option is available in Measure: Delay finder for all system software versions. In
v. 2.0 Lab, the Accumulator is also available for Frequency response measurements.
Regardless of which averaging type is chosen, an automatic Restart will occur whenever:
•
•
•
•
•
The Branch is changed
The Internal Delay Time is changed
The Position (Mic Gain) is changed
The Speaker Selector is changed
The Branch, Eq or Microphone Setup Panels are edited
This prevents the averager from containing data of different sources or types.
2.6.2 Average Menu Selections
Restart — Restarts averager and clears out all previous samples from the averager (Shortcut key “R”).
Numerical Selections — Select the number of averages.
Accum — Accumulating average, limited to 999 samples (available in v. 2.0 Lab Frequency response, and in all versions for Delay finder).
Type — Selects averaging type.
•
Vector — Selects Vector Averaging, which affords the best rejection of contaminated data. It requires an absolutely stable time relationship between channels, and works well for indoor applications
•
Rms — Selects RMS (Power) Averaging, which affords less rejection of contaminated data. RMS averaging
is more tolerant of time variance between channels. It is preferable for outdoor applications, or when speakers
or mics are moving slightly. Coherence blanking is disabled.
Default Average settings
•
•
•
•
•
Average: num./type — Measure: Spectrum
Average: num./type — Measure: Delay finder
Average: num./type — Measure: Frequency response.
Average: num./type — Measure: fEedback finder
Average: num./type — Procedure: External Delay
1 RMS
Accum Vector
4 Vector
Peak hold
2 Vector
Note: In v. 2.3 Stereo and Multi-channel, you may have a different number of averages for Room and
Result types than for Eq and 1/Eq types. This allows more averages for acoustical measurements in
reverberant environments (better noise rejection), and fewer for equalizer measurements (greater
speed).
48
2.7 Cursor
CURSOR – V 2.0 LAB
On
Peak Track Alt P
Figure 39 — Cursor Menu Structure
The Cursor appears as an “X” on the display, and can be placed on any of the traces. The description of that trace will
then be found in the Cursor Status Area:
•
•
•
•
Type
Measurement Trace
X-axis position
Y-axis value
Room+speaker, Eq, Result, Eq In, Out, Mic
Amplitude, Phase, Coherence
Frequency, Time
dB, dBV, Degrees, % Coherence
The default status of the Cursor is Peak Tracking, in which the Cursor finds the highest value of the amplitude trace.
(Peak tracking is not used on Phase traces.) The peak track function is updated with each new measurement cycle.
Left and Right arrow keys move the Cursor on the horizontal axis.
Control+Left and Right arrow keys move the Cursor on the horizontal axis by 24 bins (approximately one octave). If
the L/R arrow keys are used, the automatic peak tracking function will be halted. To restore the peak tracking function, type <Alt+P>. The peak track function will be restored automatically any time the Measurement is changed.
The Up/Down arrow keys move the Cursor to the next/previous trace.
When a menu is open, the arrow keys are used for navigating among selections.
v. 2.0 Lab
On Turns Cursor on
Peak Track Enables peak tracking mode
49
2.8 Generator
GENERATOR – V 2.0 & V 2.3
Off F1
Var Sine
Low 16 – 1k
High 500 – 22k
1 kHz
Noise
Pulse
Figure 40 — Generator Menu Structure
The Generator serves as a convenient excitation signal when Source Independent Measurements are not required. Its
output is capable of a maximum voltage swing of +26 dBV, and its source impedance is 300 Ω.
2.8.1 Off (F1)
Shortcut key F1 turns off the Generator. Once the Generator has been turned off, you must select one of the Generator functions below to reactivate it.
2.8.2 Noise
Pressing Noise selects pink random noise with equal energy per octave. It is primarily used for Frequency response
and Delay finder measurements.
2.8.3 Pulse
Pressing Pulse selects a pink filtered pulse at an average rate of 1.1 Hz. The interval ranges randomly from 0.9
to 1.3 Hz.
2.8.4 1 kHz Sine
Pressing Sine selects a 1 kHz sine wave for distortion and gain structure testing.
2.8.5 Variable sine
Variable sine is used for selectable sine frequencies and sweeps. Two frequency ranges are available: High and
Low. The Sine Freq control is located on the front panel.
50
2.9 Help
2.9.1 Setup
Describes keyboard functions for the Setup panels.
2.9.2 Keys
Furnishes a complete list of the Shortcut keys.
2.9.3 Names
Shows the acceptable characters for filenames.
2.9.4 Info
Gives version numbers of the software in use.
v. 2.3 Stereo, v. 2.3 Multi-channel
2.9.5 Procedure
Provides a brief guide to the Procedures menu.
Note: The Help menu text is maintained on the system disk as a separate file. If the program has
booted from a SIM Software bootable floppy, that floppy must remain in the drive to access the help
files.
HELP – V 2.0 LAB
Setup
Keys
Names
Info
HELP – V 2.3 STEREO & MULTI
Procedures
Setup
Keys
Names
Info
Figure 41 — Help Menu Structure
51
Section 3 — Stereo and Multi-channel Menus
3.1 View Menu
VIEW – V 2.3 STEREO & MULTI
EQ In
(A)
EQ Out (B)
Mic
(C)
Room + Spkr
!/EQ
Result
EQ
Group
Memory
Clear F6
-----------------Room + Spkr
1/EQ
Result
EQ
Group
Figure 42 — View Menu Structure
The View menu selects the display format for the traces. Live traces and memory traces may be individually selected,
or viewed together.
3.1.1 View Menu for Single Channel Spectrum and Feedback Find
Eq Input — Single channel amplitude spectrum of Eq Input.
Eq Output — Single channel amplitude spectrum of Eq Output.
Microphone — Single channel amplitude spectrum of Microphone.
3.1.2 View Menu for Dual Channel Delay Finder and Frequency response
Room+speaker (White) — Measurement of the unequalized loudspeaker/room system response.
Eq (Orange) — Measurement of the equalizer response. Measurements of this type may be made with the loudspeaker system muted, if desired.
1/Eq (Green) — Measurement of the inverse of the equalizer response. Measurements of this type may be made with
the loudspeaker system muted. View: 1/Eq is not available in Delay finder.
52
Note: Only one of the Eq view selections (Eq or 1/Eq) is available at a time.
reSult (Blue) — Measurement of the equalized loudspeaker/room system response.
Group — This is an amplitude and S/N (or Coherence) display of the Room, Eq and Result measurement types.
Memory —Selects which memory traces appear on the screen.
Command Sequence:
View: Memory: Select Type (Room+speaker, 1/Eq, reSult, Eq)
Default View settings:
Spectrum
Delay finder
Frequency response
fEedback finder
Eq Input
reSult
reSult
Eq Input
3.2 Branch Menu
SIM System II allows selection and measurement of up to 64 equalizers, speakers and microphones. To facilitate efficient system management, the equalizers, speakers and microphones may be linked together by defining Branches.
The Stereo version of the SIM software accommodates two Branches, and the Multi-channel version accommodates
sixteen.
The Branch menu selects a Branch for measurement. When a Branch is selected, the SIM-2201 and SIM-2403 automatically select the appropriate equalizer, speaker and microphone.
Each Branch has three measurement points:
•
•
•
Eq Input
Eq Output
Microphone
From these, three transfer functions are calculated: Room+speaker, Eq and Result.
From
Source
Equalizer
Loudspeaker in Room
Eq In
Eq Out
EQ
Mic
Room + Speaker
Result
Figure 43 — A sound system Branch
Each Branch also has an associated delay time corresponding to the propagation delay between speaker and microphone. When a Branch is selected, the Internal Delay Time is set to the appropriate value.
53
Each Branch has a user-selectable Name. When data are stored and saved to disk, this Name serves as the
filename.
To be fully defined, a Branch must have:
Example
•
•
•
•
•
•
Left
0 1 Mains Left
0 1 Mix Pos
30.00 ms
+4.00 dB
Branch 2
Name
Eq and speaker address, channel number and name
Microphone address, channel number and name
Delay time
Trace Offset
Compare Branch
These parameters may all be entered from the Setup Menu.
Each Branch also has eight memory Groups where Frequency response data may be stored. When a Branch’s data
are saved to disk, the eight data Groups are saved.
Shortcut keys
<Alt> + <Alt> N selects the next Branch
<Alt> selects the previous Branch
BRANCH – V 2.3 STEREO & MULTI
1
*
2
*
3
4
5
6
7
8
9
10
! 11
@ 12
# 13
$ 14
% 15
^ 16
* Only Branches 1 and 2 Are Used in Stereo Version
Figure 44 — Branch Menu Structure
54
3.3 The Procedure Menu
PROCEDURE – V 2.3 STEREO & MULTI
Pretest
Single System
External Delay
Speakers:
All Off
Enable
Pre Eq
Post Eq
Speakers:
All Off
Select
Enable
Lobe Study
Combined Systems
Speaker:
All Off
Select
Enable
Speaker:
All Off
Select
Enable
Speakers:
All Off
Select
Enable
All On
Speakers:
All Off
Select
Enable
All On
Mic EQ
*
Mic Compare
Show
Speakers:
All Off
Select
Enable
All On
Post Process
Quit
* Procedure Not Available in Stereo Version
Figure 45 — Procedure Menu Structure
The Procedure menu guides the user through the major steps that constitute a complete analysis and adjustment
cycle for a sound system, and the selections resemble a typical system alignment chronology. These Procedures are:
•
•
•
•
•
•
•
•
•
•
Pretest — Setup, patching, verification of hookup
Single System — Console output calibration, distortion analysis, polarity checking, initial equalization and
gain adjustments of individual speaker subsystems.
External Delay — Alignment of delay lines to synchronize speaker subsystems.
Lobe Study — Examination of the relative isolation between speaker subsystems.
Combined Systems — Gain adjustment and equalization of combinations of speaker subsystems.
Mic Eq — equalization of individual microphones to be used in performance.
mIc Compare — Analysis of individual microphones versus a known reference mic.
Show — Measurement and adjustment of the system during performance.
pOst-process — Examination and printing of previously collected data.
Quit — Unmutes speakers, saves Setup, and exits program.
55
The Procedure menu sets global parameters to help guide the process. It does not, however, enforce a rigid protocol.
Parameters are set primarily to alleviate the burden of having to design each set of measurements from scratch. An
orderly categorization of data is effected so that tedious note taking is not required.
The Speaker menu (available from the Procedure menu) controls and keeps track of what speaker(s) are on.
The Procedure menu affects:
•
•
•
•
•
•
Speaker control (muting)
Internal Delay Time
Measure menu
Setup-trace Offset
Generator (Source)
Data-Store and Data-Recall
Note: It is impossible to fully describe the Procedure menu outside of the context of some specific applications. The scope of this text will be to give an overview of the Procedure menu. The SIM Applications Guide will serve as a reference for the specific techniques and system design criteria developed
by Meyer Sound.
3.3.1 Pretest
The Pretest Procedure is used to establish that proper connections, signal flow and linearity are maintained in both
the measurement system and the system under test.
Speakers — All On (speakers may not be muted)
Measure — Spectrum only
During Pretest Procedure, the engineer is able to unobtrusively “come on line” (hence no muting). Typical tasks include loading a Setup file (See Section 2.4 Setup Menu) or creating a new one for the day’s job. After this is completed, signal is passed through the sound system to determine whether the system patch is correct.
3.3.2 Single System
The Single System Procedure incorporates speaker muting. Measurements performed in Single System will turn on
only one speaker system at a time.
Applications include:
•
•
•
•
•
•
Console drive level calibration
System distortion measurements
Setting the Internal Delay Time for each Branch, compensating for the propagation delay between the
speaker and microphone
Polarity verification
Speaker system level setting
Initial equalization
To make and store Single System measurements, follow these steps:
1)
56
Select the Single System Procedure and enable the speaker (Procedure: Single System — Speaker: Enable).
2)
3)
4)
Measure: Delay Finder — Set the Internal Delay Time.
Measure: Frequency response.
When the measurement is complete, you may store it in memory using the Data: Store (Single System) command.
3.3.3 External Delay
The External Delay Procedure is used to set an external delay line for the Branch being measured. The external delay
line may be connected before or after the equalizer; the alignment sequence is different in each case. Delay finder is
automatically selected during this Procedure.
Definitions
Delay Branch — The Branch that owns the Delay speaker and equalizer into which the External Delay Line is
patched.
Reference Speaker — The speaker to which the Delay speaker is to be synchronized.
Post-Eq Delay Lines
If the external delay line is patched after the system equalizer, follow these steps:
1)
2)
3)
Select the Delay Branch.
Set the external delay line to 0.0 ms (bypassed).
Select Procedure: External Delay, select Post-Eq, and select a Reference speaker. Press <Enter>. The
Delay finder display should appear as shown in Figure 46a.
SIM-2201 Sound Analyzer
Source
Reference Speaker
Impulse Response
Red
Internal Delay
Red
SIM-2403
Interface Network
Blk
Blu
Wht
Wht
EQ In
Bus Output Cable
Blu
Blk
0.00 ms
Upper
Screen
IFT
EQ
-70
0.00 ms
EQ
0.00
External
Delay
+70 ms
Internal Delay Time
Measurement
Microphone
Mic (C)
Data
Type
Live
Result
Delay
65.00
Cursor
65.00
0.4
Cursor position relative to
center of
ms
screen
Ampl
Delayed
Speaker
System
Internal Delay Time + Cursor Position
Reference
Speaker
System
Delayed Speaker
Delay
30 ms
65 ms
Reference Speaker
Delay
Figure 46a — Before Setting the External Delay. The Reference Speaker is Selected (Step 3).
57
4)
Press F3. The Internal Delay Time will be set to compensate for the Reference speaker propagation delay,
then the SIM-2201 will select the Delayed speaker and restart the Delay finder. The Delay finder display
should appear as shown in Figure 46b.
SIM-2201 Sound Analyzer
Source
Delayed Speaker
Impulse Response
Red
Internal Delay
Red
SIM-2403
Interface Network
Blk
Blu
Wht
Wht
EQ In
Bus Output Cable
Blu
Blk
65.00 ms
Upper
Screen
IFT
EQ
-70
0.00 ms
EQ
65.00
External
Delay
+70 ms
Internal Delay Time
Measurement
Microphone
Mic (C)
Data
Type
Live
Result
Delay
30.00
Cursor
-35.00
0.4
Cursor position relative to
center of
ms
screen
Ampl
Delayed
Speaker
System
Internal Delay Time + Cursor Position
Reference
Speaker
System
Delayed Speaker
Delay
30 ms
65 ms
Reference Speaker
Delay
Figure 46b — Before Setting the External Delay. F3 has been Pressed. The Delay Speaker is Selected.
5)
58
Adjust the external delay line time to the same number as Delay finder readout, highlighted in green in the
cursor area (cursor position relative to screen center, labeled “ms”). The Delay finder trace will move as you
adjust the external delay. (F3 is disabled after step 4.)
6)
When the external delay time is properly set, the Delay speaker impulse response peak will be at the center
of the screen, as shown in Figure 46c.
SIM-2201 Sound Analyzer
Source
Delayed Speaker
Impulse Response
Red
Internal Delay
Red
SIM-2403
Interface Network
Blk
Blu
Wht
Wht
EQ In
Bus Output Cable
Blu
Blk
65.00 ms
Upper
Screen
IFT
EQ
-70
35.00 ms
EQ
65.00
+70 ms
External
Delay
Internal Delay Time
Measurement
Microphone
Mic (C)
Cursor
Data
Type
Live
Result
Delay
65.00
0.00
0.4
Cursor position relative to
center of
ms
screen
Ampl
Delayed
Speaker
System
Internal Delay Time + Cursor Position
Reference
Speaker
System
Delayed Speaker
Delay
30 ms
65 ms
Reference Speaker
Delay
Figure 46c — After Setting the External Delay. The Delay Speaker Impulse Response Peak is Centered.
The external delay line has now been adjusted so that its speaker’s sound will arrive coincident with the sound from
the Reference speaker, at the measurement microphone position.
59
Pre-Eq Delay Lines
If the external delay line is patched before the system equalizer, follow these steps:
1)
2)
3)
Select the Delay Branch.
Set the external delay line to 0.0 ms (bypassed).
Select Procedure: Single System and Measure: Delay finder. The display should appear as shown in Figure 47a.
SIM-2201 Sound Analyzer
Delayed Speaker
Impulse Response
Internal Delay
EQ In
Source
0.00 ms
Red
External
Delay
Blk
Blu
Wht
Wht
Upper
Screen
IFT
Red
SIM-2403
Interface Network
0.00 ms
Bus Output Cable
Blu
Blk
-70
0.00
EQ
EQ
Internal Delay Time
Measurement
Microphone
Mic (C)
Reference
Speaker
System
+70 ms
Data
Type
Live
Result
Delay
30.00
Cursor
30.00
0.4
Cursor position relative to
center of
ms
screen
Ampl
Delayed
Speaker
System
Internal Delay Time + Cursor Position
Delayed Speaker
Delay
30 ms
65 ms
Reference Speaker
Delay
Figure 47a — Before Setting External Delay. In Single System Delay finder, Select Delayed Speaker Branch.
60
4)
Set the Internal Delay Time for the Delay Branch to compensate for the propagation delay between the Delay
speaker and the microphone by using F3. The display should appear as shown in Figure 47b.
SIM-2201 Sound Analyzer
Delayed Speaker
Impulse Response
Internal Delay
EQ In
Source
0.00 ms
Red
External
Delay
Blk
Blu
Wht
Wht
Upper
Screen
IFT
Red
SIM-2403
Interface Network
30.00 ms
Bus Output Cable
Blu
Blk
-70
30.00
+70 ms
EQ
EQ
Internal Delay Time
Measurement
Microphone
Mic (C)
Reference
Speaker
System
Cursor
Data
Type
Live
Result
Delay
30.00
0.00
0.4
Cursor position relative to
center of
ms
screen
Ampl
Delayed
Speaker
System
Internal Delay Time + Cursor Position
Delayed Speaker
Delay
30 ms
65 ms
Reference Speaker
Delay
Figure 47b — Before Setting External Delay. Press F3 to Autoset Internal Delay Time.
61
5)
Select Procedure: External Delay, select Pre-Eq, and select the Reference speaker from the Speaker
menu. The display should appear as shown in Figure 47c.
SIM-2201 Sound Analyzer
Reference Speaker
Impulse Response
Internal Delay
EQ In
Source
0.00 ms
Red
External
Delay
Blk
Blu
Wht
Wht
Upper
Screen
IFT
Red
SIM-2403
Interface Network
30.00 ms
Bus Output Cable
Blu
Blk
-70
30.00
EQ
EQ
+70 ms
Internal Delay Time
Measurement
Microphone
Mic (C)
Data
Type
Live
Result
Delay
65.00
Cursor
35.00
0.4
Cursor position relative to
center of
ms
screen
Ampl
Delayed
Speaker
System
Internal Delay Time + Cursor Position
Reference
Speaker
System
Delayed Speaker
Delay
30 ms
65 ms
Reference Speaker
Delay
Figure 47c — Setting the External Delay. In External Delay Procedure, Select Reference Speaker.
62
6)
While observing the Delay finder trace, adjust the external delay time until the peak is at center. The display
should appear as shown in Figure 47d. The external delay line has now been adjusted so that its speaker’s
sound will arrive coincident with the sound from the Reference speaker, at the measurement microphone position.
SIM-2201 Sound Analyzer
Reference Speaker
Impulse Response
Internal Delay
EQ In
Source
35.00 ms
Red
External
Delay
Blk
Blu
Wht
Wht
Upper
Screen
IFT
Red
SIM-2403
Interface Network
30.00 ms
Bus Output Cable
Blu
Blk
-70
30.00
+70 ms
EQ
EQ
Internal Delay Time
Measurement
Microphone
Mic (C)
Cursor
Data
Type
Live
Result
Delay
30.00
0.00
0.4
Cursor position relative to
center of
ms
screen
Ampl
Delayed
Speaker
System
Internal Delay Time + Cursor Position
Reference
Speaker
System
Delayed Speaker
Delay
30 ms
65 ms
Reference Speaker
Delay
Figure 47d — Setting the External Delay. Adjust External Delay Until Cursor Peak is Centered.
Note: When using Procedure: External Delay: Pre-Eq, you will not be able to adjust the Internal Delay Time. This would cause errors in the computation of the external delay line time. The Internal Delay Time is always set to compensate for the propagation delay from the delay speaker to the measurement microphone.
63
3.3.4 Lobe Study
The Lobe Study Procedure is used is to view the interaction from other speaker systems into the coverage area of the
Branch being measured.
To make and store Lobe Study measurements, follow these steps:
1)
2)
3)
4)
Select the Lobe Study Procedure and select or enable the speakers (Procedure: Lobe Study: Speaker: Enable or Select).
Measure: Delay Finder — Set Internal Delay Time if necessary.
Measure: Frequency response (Trace Offsets are defeated).
When the measurement is complete, you may store it using the Data: Store (Lobe Study) command.
3.3.5 Combined Systems
The Combined Systems Procedure is used to add other sub-systems (such as delayed fill speakers) to the present
Branch’s coverage area and set their respective levels.
To make and store Combined Systems measurements, follow these steps:
1)
2)
3)
4)
5)
Select the Combined Systems Procedure and select or enable speakers (Procedure: Combined Systems Speaker: Enable or Select).
Measure: Delay Finder — Set Internal Delay Time if necessary.
Measure: Frequency response (Trace Offsets are defeated).
When the measurement is complete, you may store it using the Data: Store (Combined Systems) command.
You may also recall other data (i.e. Single System or Lobe Study) while viewing Combined Systems data.
(Data: Recall — recall Single System or Lobe).
3.3.6 Mic Eq
The Mic Eq Procedure provides a way to measure and correct microphone responses similar to the Procedures for
speaker systems, above. For those who want to measure the response of a microphone in its actual environs SIM
System II provides an elegant solution. A typical application for this is a lavaliere mic attached to a person. The SIM
reference mic is placed at a conversational distance and becomes the “known” reference point in the measurements.
The signal from the lavalier mic is fed through an outboard equalizer. The Eq Input and Output are monitored as
usual. The switching is handled in software, and speakers are normally muted.
Lavalier
Mic
Reference
Mic
Figure 48 — Reference Mic Position for Body Mic equalization
64
In order to perform these measurements in actual practice they must be carefully executed. Because it is not possible
to make these measurements while someone is walking around a stage, the person must remain at a fixed distance
and angle to the reference microphone and to their own body mic. After the gains have been set proceed to Measure:
Delay finder and set the Internal Delay Time. Move to Measure: Frequency response. Since the human voice is the
generator, it is necessary to coax the person into speaking for long enough for you to obtain 4 to 8 samples at each
frequency in the pass band of the human voice. This can take a while, so be patient and bear in mind that the averaging algorithm will hold the last valid samples received. It may seem silly, but by far the fastest method is to have the
person either sing or simulate pink noise in various ranges. While it is possible to equalize the mic as the person
speaks, it is usually more practical to store the Room+speaker Frequency response and equalize against the memory
trace. After the Room+speaker data has been stored, enable the generator so that it flows through the equalizer for
the mic channel. This will expedite the equalization process.
Figure 49 — Procedure: Mic Eq Signal Flow
Foot (Mouse) Mics
A popular technique in theatrical sound design is to use ground plane microphones to unobtrusively mic large stage
areas where close proximity miking is not possible. The mics are placed low to floor to minimize the effect of floor reflections. It is possible to equalize these mics by comparing them against a reference mic in the near field. Any sound
source can be used, human or a loudspeaker (a speaker is easier). The sound source is placed at a reference position and the reference mic is placed the desired distance from it. It is important that the two mics be placed so that
they are both in the same axial plane of the loudspeaker to prevent the measurements from including the differences
in axial response of the speaker.
HD-1
High
Definition
Audio
Monitor
Reference
Mic
Foot (Mouse)
Mic
Figure 50 — Mic Placement for Foot Mic equalization
65
Connections should be made as shown in Figure 51. The procedure for equalizing the microphone is the same for
both v. 2.3 Stereo and v. 2.3 Multi-channel, and is as follows:
1)
2)
3)
4)
5)
6)
7)
8)
9)
10)
11)
12)
13)
In Procedure: Pretest, have the subject speak. If the sound source is loudspeaker, run noise through it. Adjust the console gain for optimum drive from the channel insert send output.
Using the Branch Setup Panel, establish a Branch with equalizer and Mic assignments that correspond to
your connections. Measure this Branch.
Select mIc Eq Procedure.
Adjust the Master gain and Mic gain so that signal levels are within 10 dB of full scale.
Select Delay finder under the Measure menu. Autoset (F3) the Internal Delay Time to compensate for the
propagation delay between the microphones.
Select Frequency response under the Measure Menu, and select four or eight averages with the Average
Menu.
Have the subject speak until a usable Frequency response is obtained.
Select Store mic Eq from the Data Menu.
Recall the stored data from memory.
Connect the Generator output to the console input in place of the lavalier or foot microphone, select Noise
under the Generator Menu and adjust the level on the SIM-2201 front panel.
Select Memory tracking: Room/Eq from the Data Menu.
Select 1/Eq from the View Menu.
Adjust the system equalizer to match the stored Frequency response.
Equalization of the microphone is now complete. Unplug the generator from the console input and re-patch the microphone.
SIM Reference Mic (connect to
SIM-2201 front-panel Mic input)
SIM Reference Mic
Lavalier or
Foot Mic
SIM-2201 Sound Analyzer
Mic
In
Console
Ch. 1 (Red)
Ch. Insert
Send
Equalizer
Mix Console
EQ in 1
(Blk)
Mic
Snake
Lavalier or
Foot Mic
Stereo
Snake
Amp
Ch. 1 (Wht)
Ch. Insert
Rec.
SIM-2403 Interface Network
Mic
In
Ch. Insert
Send
Ch. Insert
Rec.
EQ out 1
(Blu)
System
Snake
EQ In/Out
Snake
Console
Ch. 1 (Red)
Amp
Ch. 1 (Wht)
Mix Console
EQ in 1
(Blk)
Equalizer
Figure 51 — Mic Eq Connections for v. 2.3 Stereo (Left) and v. 2.3 Multi-Channel (Right)
66
EQ out 1
(Blu)
3.3.7 mIc Compare (v. 2.3 Multi-channel only)
The Mic Compare Procedure allows for comparing different measurement microphones with a single reference microphone. The Reference microphone is plugged into the mic input on the front panel and routed internally to Channel A
(ordinarily the Eq Input). The Measurement microphone is selected from the SIM-2403 Interface Network. All Frequency response data are of the Result type. The Measurement microphone should not be placed closer to the sound
source than the Reference microphone, because you will not be able to set the Internal Delay Time if the Measurement mic signal arrives before the Reference mic signal.
Applications:
•
•
•
Perform a fast diagnostic test of measurement microphones.
Perform measurements without the use of loudspeakers or other electrical devices. An example of this is
measuring the Frequency response between the stage and the audience areas of a symphonic concert hall.
Analyze the response of different microphones compared to a reference microphone.
SIM-2201 Sound Analyzer
Result
SIM Reference
Mic
EQ In Bus (A)
(internally switched)
Mic Bus (C)
Mic In
(front panel)
Bus In
SIM-2403
Compare
Mic(s)
Mic Snake
Bus Output
Cable
Figure 52 — Procedure: Mic Compare Block Diagram
67
Microphone evaluation
This type of Mic Compare measurement is dependent upon the quality of the Reference microphone (the one plugged
into the front panel). Therefore, it is important that only the highest quality mics be used, such as the B & K 4007 SIM
Reference Microphone, which is selected and matched by Brüel and Kjaer for Meyer Sound. The ideal Frequency response between the mics would occur if the mics were capable of occupying the same position. Because this is obviously not possible, it is also important that care be exercised to prevent the mics from reflecting into each other or
from being so far apart as to be in different acoustic environments.
Acoustic response measurements without speakers
This type of Mic Compare measurement is dependent upon the placement of the reference microphone (the one
plugged into the front panel). Therefore, it is important that the Reference mic be placed in a position that is known to
have particular type of response. The Frequency response between the mics shows the difference between the two
positions. The microphones should be of the same type with a matched response, so that the Frequency response is
limited to the difference in the acoustic responses at the different positions.
Use the Microphone Setup Panel to label the microphones’ types and positions. Use the Branch Setup Panel to define
the Branch names and assign one mic to each of them. The Eq Input and Eq Output channels are not used in the Mic
Compare Procedure, and their settings are irrelevant.
To make and store Mic Compare measurements, follow these steps:
1)
2)
3)
4)
5)
Select the mIc Compare Procedure.
Measure: Delay finder — Set the Internal Delay Time to compensate for the propagation delay between microphones.
Select a Branch which owns the desired Microphone channel.
Measure: Frequency response.
When the measurement is complete, you may store it using the Data: Store (mIc Compare) command.
3.3.8 Show
SIM System II is designed to measure sound systems with an audience present, so certain functions that could disrupt a performance are disabled in Show Procedure.
During show Procedure:
•
•
•
The Generator is disabled.
All speakers must be on, so speaker muting is disabled.
Only the Post Process and Quit Procedures can be selected during the show.
Because of these assumptions, it is necessary to make absolutely sure that you are ready to move into the Show Procedure. All steps that precede the Show Procedure should be performed before moving into the Show Procedure.
Note for v. 2.3 Stereo users: The Eq out signal passes through an internal relay that is capable of
muting the speaker sends. Once you have entered Procedure: Show, there are no commands in the
software that can mute the speakers. If the SIM-2201 Sound Analyzer loses power the relays will not
mute and signal will continue to flow as before. However, it is possible that an inadvertent hardware
error could cause the mute relay to close. For a true hardwire parallel connection as implemented in
the SIM-2403 Interface Network, you should insert a “Y” cable in the path at the “Eq Output” cable in
place of the “To Amps” cable.
68
Note for v. 2.3 Multi-channel users: When measuring during a concert it is strongly advised that the
system be set into its “Safe” configuration. The “System Muting” configuration of the SIM-2403 Interface Network, which is used during the alignment phase to mute and adjust levels carries a risk if
used during a show. To prevent the possibility of inadvertent speaker muting from a loss of power or
software control, move the System Snake on the rear of the SIM-2403 Interface Network to the “System Safe” position. When re-patching the System snake, it is recommended that all amplifiers be temporarily turned off.
If the speaker level controls of the SIM-2403 Interface Network have been moved from the unity gain position, they
must be re-adjusted as follows before patching to the “Safe” position:
1)
2)
Select Procedure: Single System and Measure: Frequency response.
For each speaker system that is not already at unity:
• Data: Store and Data: Recall (or F5).
• Readjust speaker level on SIM-2403 Interface Network to unity (fully CW).
• Adjust speaker system level at some point post-Eq output controllers or amplifiers) until the live trace overlays the stored trace.
When this task has been completed for all systems, patch the System Snake to the System “Safe” position.
When this patch has been made, the green “Safe” LED on the front panel of the SIM-2403 Interface Network will be illuminated. The SIM-2201 could now be powered down without risk to the path of the sound reinforcement signal. It is
also recommended that the Source Output be unpatched from the system console. Select Procedure: Show.
3.3.9 pOst process
The Post Process Procedure enables displaying multiple memory traces. As the name connotes, no new data are
taken. All data are of the Frequency response type, and are obtained from the memory array.
The color designation closely resembles those of the Frequency response screen.
3.3.10 Quit
Select Procedure Quit to exit the program. Before exiting, you will be prompted to save the Setup and any data to
disk. The Generator is turned off and all speakers are unmuted.
3.3.11 Speaker Menu
The Speaker Menu enables remote switching of speaker systems from the keyboard. This has several advantages
over manual control:
•
No additional personnel are needed at the amplifier racks to control speaker muting. This saves time and
greatly reduces the risk of error.
•
The control is ahead of the amp racks and crossovers, allowing speaker systems to be muted from a single
point. This is particularly advantageous with systems having multiple speakers and amplifiers fed from a
single equalizer, as such systems can otherwise require entire banks of amplifiers be switched off and on.
•
The SIM-2201 Sound Analyzer tracks the speaker system status. This allows the speaker control function to
work in conjunction with the Procedure Menu to assure measurement of the proper speaker combinations.
Additionally, information about which speakers are on is attached to measurement data which is stored and
saved to disk, and is displayed on the screen for both live and memory data.
69
•
Because muting occurs after the Eq outputs, speakers may be muted after storing the Room+speaker Frequency responses, and equalizers may be adjusted while being viewed against the stored Room+speaker
data. This is very advantageous in situations requiring an absolute minimum amount of disturbance.
Speaker switching is closely tied to the present Procedure. Each Procedure has a different strategy for selecting
speakers:
•
Pretest — All speakers are turned on, and may not be muted.
•
Single System — Only the present Branch’s speaker is selected. All others are muted.
•
Lobe Study — Any combination of speakers may be selected except the present Branch’s.
•
External Delay — Any single speaker may be selected except the present Branch’s.
•
Combined Systems — Any combination of speakers may be selected; however, the present Branch’s
speaker is always on, and cannot be muted.
•
Mic Eq, Mic Compare — Any combination of speakers may be selected.
•
Show, Quit — All speakers are turned on, and may not be muted.
Speakers switching also follows Branch changes, making it unnecessary to do speaker switching when a different
Branch is selected.
The speaker Menu allows individual manual switching of speakers, and provides four options:
•
all Off — Mutes all speaker systems. Allows system equalization when when it is important to minimize the
use of test signals in a venue.
•
Select — A Button Menu providing individual speaker on/off switching.
•
Enable — Enables default switching for speakers.
•
All on — Turns on all speakers.
Select
The Select button Menu provides switching for up to eight speakers controlled by one SIM-2403 Interface Network.
Speakers which are on are represented by green buttons, those off by red. The eight buttons are also labeled with the
speaker Names entered on the Speaker Setup Panel.
Press number number keys 1-8 or F1-F8 to toggle individual speakers on/off. To select speakers at a different SIM2403 address, press PgUp/PgDn. Since SIM System II addresses up to eight SIM-2403’s, up to sixty-four speaker
systems may be switched.
During certain Procedures, some speakers may be unavaliable for switching, in which case the button and speaker
Name will be greyed out and the button will not toggle the speaker. For example, in Lobe Study, the present Branch’s
speaker is disabled.
Enable
Enable provides a quick way to pick a default (“usual”) set of speakers to turn on, depending on the present Procedure and Branch.
Selecting Enable in Single System Procedure will turn on the present Branch’s speaker and mute all others. As you
step through the Branches, each Branch’s speaker will turn on as the rest are muted.
70
Selecting Enable in Combined Systems Procedure will automatically turn on the present Branch’s speaker, and any
other speakers that were previously selected in combined systems or Lobe Study.
Selecting Enable in Lobe Study Procedure will automatically turn off the present Branch’s speaker, and turn on any
other speakers that were previously selected in Combined Systems or Lobe Study.
Select and Enable
The Speaker Select menu remembers which speakers were on when the Procedure changes. When multiple speakers are selected during Combined Systems and Lobe Study, the selection is maintained in memory. If you select
Single System (one speaker only) and then return to Combined Systems or Lobe Study, the same speaker selection
will return. This is best explained by an example.
In this example, we will assume that Branch 1 controls Speaker 1, Branch 2 controls Speaker 2, etc. (the default
Setup).
1)
2)
3)
4)
5)
6)
Select Branch 1.
In Combined Systems Procedure, select Speakers 1-4. All others should be off.
Select Single System Procedure, Speaker: Enable. Speaker 1 will be on; all others will be muted. As you
step through the Branches, each Branch’s Speaker will turn on as the rest are muted.
Now return to Branch 1, and select Combined Systems, Speaker: Enable. Notice that Speakers 1-4 are
now selected, as they were before you entered the Single System Procedure.
Select Lobe Study Procedure, Speaker: Enable. Notice that Branch 1’s speaker is now off, while Speakers
2-4 are still on. As you step through the Branches, each Branch’s speaker will muted, and the remaining three
will be on.
If you then select Single System Procedure and return to Lobe Study, the same three speakers will still be
selected.
Summary
The selection of multiple speakers made in Lobe Study, Combined Systems (and Mic Eq) is remembered by the system when the Procedure is changed. Once a set of speakers has been selected from the Speaker: Select Menu,
Speaker: Enable will turn on the appropriate speakers based on the current Procedure and Branch.
71
3.3.13 Procedure Menu Reference Guide
Procedure
Measure
Speaker
Trace Offset
Generator
————————————————————————————————————————————————————
Pretest*
Spectrum†
Off*
1 kHz Sine
Var Sine
Noise
Pulse
————————————————————————————————————————————————————
Single Sys
Spectrum*
All Off
Yes†
Off*
Delay finder
Enable*
1 kHz Sine
Freq. Response
Var Sine
Feedback find
Noise
Pulse
————————————————————————————————————————————————————
External Delay
Spectrum
All Off
No†
Off*
Delay finder*
Select Ref*
Noise
Enable
Pulse
————————————————————————————————————————————————————
Lobe Study
Spectrum*
All Off
No†
Off*
Delay finder
Select
1 kHz Sine
Freq. Response
Enable*
Var Sine
Feedback find
Noise
Pulse
————————————————————————————————————————————————————
Comb Systems
Spectrum*
All Off
No†
Off*
Delay finder
Select*
1 kHz Sine
Freq. Response
Enable
Var Sine
Feedback find
All On
Noise
Pulse
————————————————————————————————————————————————————
Mic EQ
Spectrum*
All Off*
Yes†
Off*
Delay finder
Select
1 kHz Sine
Freq. Response
Enable
Var Sine
All On
Noise
Pulse
————————————————————————————————————————————————————
Mic Compare
Spectrum*
All Off
Yes†
Off*
Delay finder
Select*
1 kHz Sine
Freq. Response
Enable
Var Sine
All On
Noise
Pulse
————————————————————————————————————————————————————
Show
Spectrum*
All On†
Yes†
Off†
Delay finder
Freq. Response
Feedback find
————————————————————————————————————————————————————
Post process
Freq. Response
All On†
Yes or No
Off†
* Default (Original Setting)
† Only Available Setting or not user adjustable
72
All On†
No†
Section 4: Service
In the event that a malfunction occurs in the SIM hardware, call Meyer Sound as soon as possible. The system is covered by a limited one-year warranty.
Failure types
There are three types of failure modes:
•
•
•
Non-fatal hardware failure modes that may be circumvented temporarily in the field.
Fatal hardware failure modes that are user serviceable
Fatal hardware failure modes that require factory service and calibration.
4.1 Non-fatal failures
4.1.1 Power supply surge protection. The power supply contains current surge protection circuits designed to limit
in-rush current. It is possible that during turn-on, this circuit will engage. The system will appear to be totally dead although anything plugged onto the courtesy outlet, such as the monitor, may function normally. This is most likely to
occur in the event of an immediate re-powering after shut down. If this should occur, simply wait at least fifteen seconds and try again. The system should power up normally.
4.1.2 Hard drive dead or missing <HDD Failure>
Power down. Remove hard drive cartridge. Insert floppy disk of the program that you wish to run and reboot. Bootup
will take approximately two minutes. The floppy disk may be removed after boot-up so that data can be saved to another disk. Do not attempt to save data to hard drive.
4.1.3 Floppy drive dead <FDD Failure>
No immediate action required. Do not attempt to save data to floppy drive.
4.1.4 BIOS battery failure <CMOS Memory Mismatch>
The BIOS chip contains basic instructions for the computer such as disk drive configurations, memory types and keyboard parameters. The BIOS instructions are kept in CMOS memory by a lithium battery while the system is turned
off. If this battery fails, the system will no longer be capable of booting up normally. To fully remedy the problem will
require battery replacement and a resetting of the BIOS. In the short term, the BIOS may be reprogrammed on-site.
As an emergency backup, you will find the BIOS instruction set printed on the bottom of the keyboard. Follow the
BIOS instructions. The system will retain the BIOS settings until powered down. Until the battery is replaced, the BIOS
will need to be reset each time the system is powered up.
73
4.2 SIM 2201 BIOS Setup
Accessing BIOS Setup Program
1)
2)
3)
4)
With the removable hard drive installed, reboot the SIM 2201 by turning the power on or pressing the frontpanel Reset key.
The system will begin running its POST (Power On Self Test) routines, starting with a memory check. Following the memory check, the system will prompt you to run the BIOS Setup Program.
Press <F1> in response to the prompt.
The BIOS Setup Program will run, and a menu of options will appear.
Press <ENTER> to select the first option, Standard CMOS Setup.
Navigating and Selecting Values
The keys used to navigate within the Setup Program and select values are:
ESC — Exit to previous screen.
Arrow keys — Move Cursor to desired location.
PG UP, PG DN — Select the values for the highlighted item. PG UP decrements the value (in the case of numerical
values like the time of day), and PG DN increments it.
F1 — Display help screen for the highlighted item.
F5 — Retrieves the value that the highlighted item was set to at the start of the editing session.
F10 — Saves all changes and exits the BIOS Setup Program.
Standard CMOS Setup Values
1)
Press any key in response to the initial warning prompt. The system BIOS will show these values:
Base Mem = 640 kB
Ext. Memory = 15104 kB or 15360 kB (7808 kB for machines with serial numbers below D920011)
2)
Where necessary, edit the values shown in the Standard CMOS Setup display to be as shown below:
Hard disk C: type
: User Type
47
Hard disk D: type
Floppy drive A:
Floppy drive B:
Primary Display
Keyboard
: Not Installed
: 1.44 MB, 3 1⁄2"
: Not Installed
: VGA/PGA/EGA
: Installed
3)
Cyln
Head WPcom
LZone Sect
Size
1024 6
0
1024 38
114MB
(You will have to type in the above values manually)
Press <ESC> to return to the main menu page. Use the down arrow key to select Advanced CMOS Setup,
then press <ENTER>.
Advanced CMOS Setup Values
1)
2)
Press any key in response to the initial warning prompt.
Where necessary, edit the values shown in the Advanced CMOS Setup display to be as shown below:
Typematic Rate Programming
74
: Disabled
Typematic Rate Delay (msec)
Typematic Rate (Chars/sec)
Above 1MB Memory Test
Memory Test Tick Sound
Memory Parity Error Check
Hit <ESC> Message Display
Hard Disk TYPE 47 RAM Area
Wait for <F1> if Any Error
System Boot Up Num Lock
Weitek Processor
Floppy Drive Seek At Boot
System Boot Up Sequence
System Boot Up CPU Speed
Password Checking Option
Shadow RAM option
3)
: 250
: 10.0
: Enabled
: Disabled
: Enabled
: Disabled
: 0:300
: Disabled
: Off
: Absent
: Enabled
: A:,C:
: High
: Setup
: Enabled
Press <ESC> to return to the main menu page. Use the down arrow key to select Advanced Chipset Setup,
then press <ENTER>.
Advanced Chipset Setup Values
1)
2)
Press any key in response to the initial warning prompt.
Where necessary, edit the values shown in the Advanced CMOS Setup display to be as shown below:
8-bit DMA Wait states
16-bit DMA Wait states
DMA Clock
Command Delay, 8-bit Cycle
Command Delay, 16-bit Cycle
8-bit I/O Wait States
16-bit I/O Wait States
3)
: 2 W/S
: 2 W/S
: SCLK/2
: No
: No
: 4 W/S
: 0 W/S
Press <ESC> to return to the main menu page. Use the down arrow key to select Auto Configuration with
BIOS Defaults, then press <ENTER>.
Auto Configuration with BIOS Defaults
1)
2)
Answer the prompt “Load BIOS Setup Default Values from ROM Table (Y/N)?” by pressing <N> and <ENTER>.
Press <ESC> to return to the main menu page. Use the down arrow key to select Auto Configuration with
Power-On Defaults, then press <ENTER>.
Auto Configuration with Power-On Defaults
1)
2)
1)
2)
Answer the prompt “Load Power-On Default Values from ROM Table (Y/N)?” by pressing <N> and <ENTER>.
Press <ESC> to return to the main menu page. Saving the Changes
Use the down arrow key to select Write to CMOS and Exit, then press <ENTER>.
Answer the prompt “Write to CMOS and Exit (Y/N)?” by pressing <Y> and <ENTER>.
The BIOS is now configured.
The SIM software will run from the removeable hard drive. Note that, until the backup battery is replaced, you will
have to reconfigure the BIOS after each time that you turn the SIM 2201 off. Pressing the front-panel reset key will not
affect the BIOS, however.
75
4.3 User-Serviceable
All user serviceable repairs require the removal of the top cover (8 screws).
#1 Not used
#2 Room DSP (V2.3 Only)
#3 EQ DSP (V2.3 Only)
#4 Result DSP
#5 Delay
#6 SVGA
#7 IDE Disk Controller
#8 Metrabyte I/O (Multi-channel only)
Low
Voltage
Power
Supply
Mic
Phantom
Power
DC-DC
Converter
A/D PCB
Internal Switcher PCB
Oscillator PCB
Meter PCB
Drive
Bay
Figure 53 — SIM-2201 PCB layout
4.3.1 SVGA
Remove hold down bracket from top of card cage (4 screws). Remove screws (4) from rear panel and fold down. Note
the two plastic fasteners that hold the bottom of the Power Supply. The SVGA card is located in slot 6 of the
motherboard PCB. Remove SVGA connector from rear bracket (2 screws). Remove screw on bracket card. Replace
the SVGA card.
4.3.2 IDE Disk controller
Remove hold down bracket from top of card cage (4 screws). Remove screws (4) from rear panel and fold down. Note
the two plastic fasteners that hold the bottom of the Power Supply. The IDE card is located in slot 7 of the
motherboard PCB. Remove serial and mouse port connectors from rear bracket (4 screws). Remove floppy, hard
drive, drive LED indicator connectors from component side. Remove screw on bracket. Replace the IDE card.
76
4.3.3 I/O Card
Remove hold down bracket from top of card cage (4 screws). Remove screws (4) from rear panel and fold down. Note
the two plastic fasteners that hold the bottom of the Power Supply. The I/O card is located in slot 8 of the motherboard
PCB. Remove D25 connector from rear bracket (2 screws). Remove screw on bracket card. Replace the I/O card.
4.3.4 DSP Card
Remove hold down bracket from top of card cage (4 screws). The DSP cards are located in slots 2,3 and 4 of the
motherboard PCB. Remove the ribbon connector from that connects to the Delay PCB (Slot 5). The ribbon connectors
are specific lengths to prevent connection errors. To remove the card from slot 4 will require the removal of the other
DSP boards as well. Be careful not to bend the pins. Remove screw on bracket card. Set the replacement DSP card
address according to Figure 56, then install it. Ensure proper connection of the ribbon cables.
Room - Slot 2
1 2 3 4 5 6
OFF
Addr. 280 Hex
Eq - Slot 3
1 2 3 4 5 6
OFF
Addr. 320 Hex
Result - Slot 4
1 2 3 4 5 6
OFF
Addr. 340 Hex
= switch depressed
Figure 54 — Setting the Addresses of DSP cards for the SIM-2201
4.3.5 Motherboard
Remove all PC bus cards as above. Remove motherboard power supply connections. Remove battery connection.
Use a needlenose pliers or flathead screwdriver to unlock the plastic fasteners and ease the motherboard over each
fastener. It is easiest to work your way up from the rear. Remove the SIMM’s (see below) and move them to the new
motherboard. Place board into conductive plastic bag. Install new motherboard.
4.3.6 SIMMs (Single In-line Memory Modules.)
There are 4 SIMMs each containing 4 Mbytes of memory. Remove by unlocking the both of the clips and sliding out. It
is necessary to remove them in order from last to first and insert them in the reverse order.
4.3.7 Power Supply
Remove screws (4) from rear panel and fold down. Note the two plastic fasteners that hold the bottom of the Power
Supply. Unscrew the power supply from the rear panel (4 Screws). Clip away wire tie on power supply output cables
and disconnect. Each of the cables are indentical therefore it is not important to keep track of their routing. Replace
the Power Supply. Take care to insure that cables are connected to:
•
•
•
•
DC Conveter PCB
Fans (2)
Hard drive
Floppy Drive
Tie wrap cables as before.
77
4.3.8 DC Converter PCB
Remove screws from DC Converter PCB. Remove input and output cabling from PCB. Replace and reconnect.
4.3.9 Floppy drive
Remove top cover (8 screws). Remove power and signal connections from the hard and floppy drives. Note orientation of signal connecors. Remove 4 screws from the bottom panel that hold the drive bay. Lift drive bay and remove.
Unscrew drive bracket (8 screws) and remove. Replace and reconnect.
4.3.10 Hard Drive Receptacle
Same as floppy drive (above).
4.3.11 Hard drive Cartridge
Remove and replace.
4.4 Rear panel service
1)
2)
3)
4)
Remove top cover
Remove power supply screws (4)
Remove rear panel screws
Fold down panel
4.5 Front panel service
1)
2)
3)
4)
Remove top cover
Front panel screws on chassis side and bottom. (5)
Disconnect front panel cabling
Fold down panel
4.6 Factory service required
The user serviceable failures are limited primarily to the replacement of computer PCB’s. Any failures in the audio signal path will require the system to be returnde to the factory for recalibration. This would include:
1)
2)
3)
78
Audio channel failure
Excess noise or distortion
Switching /routing errors
Section 5 — Appendices
A. Connection Diagrams
Source
Level
Input
(A)
Overload
0 dB
0
1
-2 dB
-5 dB
Pulse
Output
(B)
Overload
0 dB
-2 dB
-5 dB
Mic
(C)
System
Level
0 dB
-2 dB
0
1
-5 dB
-9 dB
-9 dB
-9 dB
-15 dB
-15 dB
-15 dB
Noise
-21 dB
-21 dB
-21 dB
-27 dB
-27 dB
-27 dB
1 kHz Sine
-33 dB
-33 dB
-33 dB
-39 dB
-39 dB
-39 dB
-42 dB
-42 dB
-42 dB
Var. Sine
Phones
Overload
Input (A)
Output (B)
+ 48 VDC
Sine Freq.
Mic (C)
Source
Input (A)
Output (B)
Mic (C)
Phones
System
Reset
Power
®
Disk
SOURCE INDEPENDENT MEASUREMENT
SIM - 2201 SOUND ANALYZER
Power
Keyboard
To Keyboard
Measurement
Microphone
To DUT From
Input
DUT
Input
From
DUT
Output
Figure 55 — v. 2.0 Lab Connections
79
To Monitor
SOURCE
®
SOURCE INDEPENDENT MEASUREMENT
SIM - 2201 SOUND ANALYZER
Control
Mouse
Serial
Printer
SVGA
To Console
Line Input
BUSS INPUT
110V
SVGA
Cable
(15 pins,
D9 shell)
IEC Power
Cable
To
Monitor
To AC
Outlet
Stereo
Snake
10 ft.
To Front-Panel
Mic Input
Measurement
Microphone
8 Blk 7
6 Blu 5
4 Wht 3
2 Red 1
B
B
B
B
A
To Equalizer
Inputs
A
From Equalizer
Outputs
Figure 56 — v. 2.3 Stereo Connections
80
Souriau
# 851-01A20-39550
LOCK
A
To Speaker
Systems
A
From System
Sends
To Monitor
SOURCE
®
SOURCE INDEPENDENT MEASUREMENT
SIM - 2201 SOUND ANALYZER
Control
Mouse
Serial
Printer
SVGA
To Console
Line Input
BUSS INPUT
110V
Grn
D-25
male
SVGA
Cable
(15 pins,
D9 shell)
IEC Power
Cable
Control
Cable
To AC
Outlet
10 ft.
LOCK
Souriau
# 851-01A20-39550
To
Monitor
Bus Output
Cable
10 ft.
From Previous
SIM 2403
AMP
# 211766-1
D-25
female
Bus Extender
Cable (2 ft.)
BUSS OUT
BUSS IN
MICROPHONE
EQ IN / OUT
SYSTEM SAFE
SYSTEM MUTING
CONTROL
15VA, 50-60 Hz 1/4 A SLO BLO
120Vac
Power
Cable
Control
Cable (10 ft.)
From Previous
SIM 2403
To AC
Outlet
Figure 57 — v. 2.3 Multi-Channel Connections Between the SIM-2201 Sound Analyzer and SIM-2403 Interface
Network
81
BUSS OUT
BUSS IN
MICROPHONE
EQ IN / OUT
SYSTEM SAFE
SYSTEM MUTING
CONTROL
15VA, 50-60 Hz 1/4 A SLO BLO
120Vac
Red
Yellow
Blue
LOCK
LOCK
LOCK
Souriau
# 851-01A24-61S50
Souriau
# 851-06A24-61P50
Souriau
# 851-06A20-39P50
10 ft.
10 ft.
10 ft.
Microphone
Snake
EQ In/Out
Snake
PUSH
PUSH
PUSH
PUSH
Blk
1
PUSH
PUSH
PUSH
PUSH
To
Microphones
to
System
Snake
Red
Blu
8
To Equalizer
Inputs
1
to
8
From Equalizer
Outputs
1
to
Wht
8
From System
Sends
1
to
8
To Speaker
Systems
Figure 68 — Connections Between the SIM-2403 Interface Network and the PA System
82
B. Cable Pinout Charts
Mic Snake Pinout Chart
Pair #
Pin 3+ Color Pin 2- Color
1
Black
Red
2
Black
White
3
Black
Green
4
Black
Blue
5
Black
Yellow
6
Black
Brown
7
Black
Orange
8
Red
White
9
Red
Green
Buss Output Pinout Chart
Pair #
Pin 3+ Color Pin
1
Black
2
3
4
5
Black
6
7
8
9
Red
Pin 3 +
n
A
f
e
d
c
b
a
B
39 pin
Pin 2P
W
N
L
J
G
E
D
C
Channel
Pin1(C)
q
x
P
M
K
H
F
Z
Y
Mic 1
Mic 2
Mic 3
Mic 4
Mic 5
Mic 6
Mic 7
Mic 8
Spare
Pin 3 +
n
39 pin
Pin 2P
Yellow
d
J
K
EQ Out Buss
6-5-4
Green
B
C
Y
Mic Buss
9-8-7
2- Color
Red
Stereo Snake Pinout Chart
Pair #
Pin 3+ Color Pin 2- Color
1
Black
Red
2
Black
White
3
Black
Green
4
Black
Blue
5
Black
Yellow
6
Black
Brown
7
Black
Orange
8
Red
White
9
Red
Green
Buss Extender Pinout Chart
Pair #
Pin 3+ Color Pin 2- Color
1
Black
Red
2
Black
White
3
Black
Green
4
Black
Blue
5
Black
Yellow
6
Black
Brown
Channel
Pin1(C)
q
EQ In Buss
Pin 3 +
n
A
f
e
d
c
b
a
B
39 pin
Pin 2P
W
N
L
J
G
E
D
C
Pin1(C)
q
x
P
M
K
H
F
Z
Y
Pin 3 +
3
6
9
9 pin
Pin 22
5
8
Pin1(C)
1
4
7
CPC
Pins 3-2-1
3-2-1
Channel
Console 1
Console 2
To Amp 1
To Amp 2
EQ Out 1
EQ Out 2
EQ In 1
EQ In 2
Spare
Channel
Eq In Buss
Eq Out Buss
Mic Buss
83
84
System Snake Pinout Chart
Pair #
Pin 3+ Color Pin 2- Color
1
Black
Red
2
Black
White
3
Black
Green
4
Black
Blue
5
Black
Yellow
6
Black
Brown
7
Black
Orange
8
Red
White
9
Red
Green
10
Red
Blue
11
Red
Yellow
12
Red
Brown
13
Red
Orange
14
Green
White
15
Green
Blue
16
Green
Yellow
Pin 3 +
HH
KK
AA
FF
EE
D
E
DD
P
N
k
K
i
G
F
C
61 pin
Pin 2JJ
M M
BB
s
r
e
f
q
S
P
m
L
J
H
g
d
Pin1(C)
NN
PP
CC
W
V
x
y
U
T
R
n
M
j
h
z
w
EQ Snake Pinout Chart
Pair #
Pin 3+ Color
1
Black
2
Black
3
Black
4
Black
5
Black
6
Black
7
Black
8
Red
9
Red
10
Red
11
Red
12
Red
13
Red
14
Green
15
Green
16
Green
Pin 3 +
HH
KK
AA
FF
EE
D
E
DD
P
N
k
K
i
G
F
C
61 pin
Pin 2JJ
M M
BB
s
r
e
f
q
S
P
m
L
J
H
g
d
Pin1(C)
NN
PP
CC
W
V
x
y
U
T
R
n
M
j
h
z
w
Pin 2- Color
Red
White
Green
Blue
Yellow
Brown
Orange
White
Green
Blue
Yellow
Brown
Orange
White
Blue
Yellow
Channel
Console
Console
Console
Console
Console
Console
Console
Console
To Amp
To Amp
To Amp
To Amp
To Amp
To Amp
To Amp
To Amp
1
2
3
4
5
6
7
8
1
2
3
4
5
6
7
8
Channel
EQ In 1
EQ In 2
EQ In 3
EQ In 4
EQ In 5
EQ In 6
EQ In 7
EQ In 8
EQ Out 1
EQ Out 2
EQ Out 3
EQ Out 4
EQ Out 5
EQ Out 6
EQ Out 7
EQ Out 8
C. ISO™ Input (Channels A and B)
Signal Source
Configuration
Wiring of SIM-2201 Input
Pin 1
Pin 2
Pin 3
Transformer or
Push-Pull Drive
Single-ended
Drive
Key:
+
C
n/c
Signal high
Signal low
Common
No connection
Polarity
n/c
n/c
+
+
-
+
-
C
C
+
+
+
+
n/c
+
n/c
-
+
+
+
n/c
n/c
+
+
+
+
n/c
n/c
C
+
+
C
+
-
C
C
C
+
C
+
C
+
n/c
n/c
+
C
+
C
+
C
n/c
n/c
+
+
+
Comments
Best CMRR,
lowest hum
Best
performance
Figure 59 — ISO™ Input Connection Truth Table
5k1
3
+
-
+
1
+
5k1
-
-
2
Shell
Chassis
Earth
Figure 60 — ISO™ Input Circuit Configuration (patented)
85
D. ASCII Data File Example
Data: Save Ascii saves to disk a file containing the current measurement data in Ascii format. This allows porting SIM
System II measurement data into other programs for post-analysis. Below is an example of an Ascii data file, including
header and data for one Group.
ASCII 101
format
1
Branch number
Left
Branch name
Venue
Engineer’s name
Artist
Mon Mar 15 14:01:47 1993
date/time
0.00
Branch delay in ms
0.00
trace offset in dB
-60
transfer function Amplitude threshold in dB
4
number of room/result averages
0
Group number 0-7
1
data flag: 0 = no data, 1 = data in this Group
2
Procedure number: 2 = single sys
0
Branch Eq address
1
speakers on
0
Branch mic address
1
Branch mic channel
4
Group number of room/result averages
0
Group average type 0 = vector 1= RMS
1
Group avg sum type 0 = none, 1 = cycle, 2 = accumulate
-60
Group tranfer function Amplitude threshold dB
60
Group Coherence threshold
732222051
Group time/date code
0.00
Group delay time
0.00
Group trace offset in dB
Room
Frequency Valid
Real
Imag
Valid Coher
7.629395
1
-8.300267e-001 -5.306641e-001
1
8.836815e-001
9.155273
1
1.866838e-001
9.649961e-001
1
9.898558e-001
10.68115
1
2.940286e-001
8.383676e-001
1
9.881984e-001
12.20703
1
5.385644e-001
7.546250e-001
1
9.863895e-001
13.73291
1
7.860123e-001
7.340807e-001
1
8.880601e-001
15.25879
0
0.000000e+000 0.000000e+000
1
5.797662e-001
16.78467
1
1.048826e+000 1.923313e-001
1
9.252884e-001
18.31055
1
5.663163e-001
8.439134e-001
1
9.786824e-001
19.83643
1
-6.006017e-001
3.571306e-001
1
9.770353e-001
21.36230
1
-1.691158e-001
9.381513e-002
1
7.763644e-001
22.88818
1
6.022303e-001 -4.340758e-001
1
7.807058e-001
24.41406
1
2.733261e-001 -7.722968e-001
1
7.033427e-001
25.93994
1
1.138830e+000 6.943674e-001
1
9.858620e-001
27.46582
1
-1.405302e+000 1.034664e+000
1
9.872375e-001
28.99170
1
5.814646e-001 -1.970626e+000
1
9.884516e-001
86
30.51758
1
32.04346
1
33.56934
1
35.09521
1
36.62109
1
38.14697
1
39.67285
1
41.19873
1
42.72461
1
44.25049
1
45.77637
1
47.30225
1
.
.
.
22265.63
1
22656.25
1
1/Eq
frequency
Valid
7.629395
0
9.155273
1
10.68115
1
.
.
.
21875.00
1
22265.63
1
22656.25
0
Result
frequency
Valid
7.629395
1
9.155273
1
10.68115
1
.
.
.
21875.00
1
22265.63
1
22656.25
1
Notepad line #1
Notepad line #2
Notepad line #3
-4.983518e-001
-2.167822e+000
7.843834e-001
5.120405e-001
1.871092e+000
1.193832e-001
-1.274758e+000
5.897506e-001
-4.834534e-001
-2.227576e-001
-2.797758e-001
7.594414e-001
2.200281e+000
-1.481548e+000
1.618317e+000
2.049959e+000
8.288648e-001
-1.862051e+000
-6.395878e-001
-5.475165e-001
-4.368375e-001
-1.675267e-001
4.639234e-001
3.534277e-001
1
1
1
1
1
1
1
1
1
1
1
1
9.894276e-001
8.720998e-001
8.474381e-001
9.064807e-001
9.909747e-001
8.526236e-001
9.784470e-001
7.539119e-001
8.460298e-001
9.889500e-001
9.411441e-001
6.861296e-001
3.145627e+000
4.933742e+000
3.499455e+000
3.295355e-001
1
1
9.387659e-001
8.691644e-001
Real
0.000000e+000
-1.893269e-001
1.884563e-001
Imag
0.000000e+000
9.821295e-001
8.887328e-001
Valid
1
1
1
Coher
8.074194e-001
9.962614e-001
9.961203e-001
1.898098e+000
-6.710988e-001
0.000000e+000
-3.587669e+000
-4.724140e+000
0.000000e+000
1
1
1
9.723826e-001
9.751457e-001
8.210352e-001
Real
1.104442e+000
8.867108e-001
4.380753e-001
Imag
1.433564e-002
-6.845629e-001
7.903274e-001
Valid
1
1
1
Coher
9.155470e-001
8.042046e-001
9.926020e-001
1.732928e-001
2.270072e+000
-2.630178e+000
-3.264641e+000
-2.904307e+000
4.097490e+000
1
1
1
7.997649e-001
6.258271e-001
9.592857e-001
87
E. Shortcut Keys
v. 2.0 Lab
Data:
F5
F6
F10
Freeze Frequency response trace and place in memory buffer
Data: Clear
Hides Live or Memory Traces (Toggle)
Setup:
= or +
-
Setup: trace Offset up 1 dB
Setup: trace Offset down 1 dB
Util:
F3
<Ctrl> F3
<Ctrl> Page Up
<Ctrl> Page Dn.
<Shift> >
<Shift> <
<Shift> F1/F2
<Shift> F3/F4
<Shift> F5/F6
Util: Autoset delay
Util: Autoset delay; sets to ± 70 ms
Util: Zoom (Next)
Util: Zoom (Previous)
Util: Smooth (Next)
Util: Smooth (Previous)
Util: Gain A Up/Down 10 dB
Util: Gain B Up/Down 10 dB
Util: Gain C Up/Down 10 dB
Averages:
R
Space Bar
Averaging Restart
Disable/enable input toggle
Generator:
F1
Generator: Off
Cursor:
L/R arrow keys
<Ctrl> L/R
Up/Dn. arrow keys
<Alt> P
88
Moves cursor 1 bin L or R, disables peak track
Moves cursor 24 bins L or R, disables peak track
Moves cursor to next/previous trace
Cursor Peak track
v. 2.3 Stereo, v. 2.3 Multi-channel
Branch:
<Alt> + or N
<Alt> -
Branch (Next)
Branch (Previous)
Data:
F5
F6
F10
Freeze Frequency response trace and place in memory buffer
Data: Clear
Hides Live or Memory Traces (Toggle)
Setup:
= or +
-
Setup: trace Offset up 1 dB
Setup: trace Offset down 1 dB
Util:
F3
<Ctrl> F3
<Ctrl> Page Up
<Ctrl> Page Dn.
<Shift> >
<Shift> <
<Shift> F1/F2
<Shift> F5/F6
Util: Autoset branch delay
Util: Autoset branch delay; sets to ± 70 ms
Util: Zoom (Next)
Util: Zoom (Previous)
Util: Smooth (Next)
Util: Smooth (Previous)
Util: Master gain Up/Down 10 dB
Util: Position (Mic Gain) Up/Down 10 dB
Averages:
R
Space Bar
Averaging Restart
Disable/enable input toggle
Generator:
F1
Generator: Off
Cursor:
L/R arrow keys
<Ctrl> L/R
Up/Dn. arrow keys
<Alt> P
Moves cursor 1 bin L or R, disables peak track
Moves cursor 24 bins L or R, disables peak track
Moves cursor to next/previous trace
Resume peak track
89
Sound
engineering
for the art
and science
of sound.
Meyer Sound Laboratories, Inc.
2832 San Pablo Avenue
Berkeley, CA 94702
(510) 486-1166
FAX (510) 486-8356
90