1
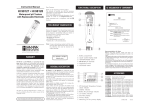
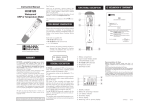
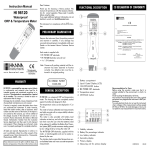
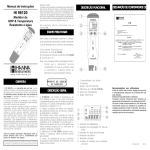
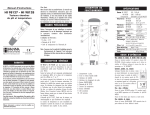
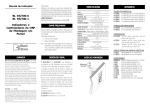
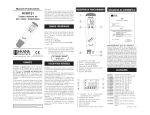
Instruction Manual
HI 98121
Waterproof pH / ORP &
Temperature Meter
Dear Customer,
FUNCTIONAL DESCRIPTION
CE DECLARATION OF CONFORMITY
Thank you for choosing a Hanna product. This
manual will provide you with the necessary information for correct operation. Please read it carefully
before using the meter.
If you need additional technical information, do not
hesitate to e-mail us at [email protected].
This instrument is in compliance with the
tives.
direc-
PRELIMINARY EXAMINATION
Remove the instrument from the packing material and
examine it carefully. If any damage has occurred
during shipment, immediately notify your Dealer or
the nearest Hanna Customer Service Center.
Each meter is supplied with:
• HI 73127 pH electrode
• HI 73128 Electrode removal tool
• 4 x 1.5V batteries
www.hannainst.com
WARRANTY
HI 98121 is warranted for one year against defects
in workmanship and materials when used for its
intended purpose and maintained according to instructions. The electrode is warranted for a period
of six months. This warranty is limited to repair or
replacement free of charge.
Damages due to accident, misuse, tampering or lack
of prescribed maintenance are not covered.
If service is required, contact the dealer from whom
you purchased the instrument. If under warranty,
report the model number, date of purchase, serial
number and the nature of the failure. If the repair is
not covered by the warranty, you will be notified of
the charges incurred. If the instrument is to be returned to Hanna Instruments, first obtain a Returned
Goods Authorization Number from the Customer
Service department and then send it with shipment
costs prepaid. When shipping any instrument, make
sure it is properly packaged for complete protection.
All rights are reserved. Reproduction in whole or in
part is prohibited without the written consent of the
copyright owner.
Hanna Instruments reserves the right to modify the design, construction and appearance of its products without advance notice.
Note: Conserve all packing material until the instrument has been observed to function correctly.
Any defective item must be returned in its
original packing.
US DESIGN PATENT
D462,024
GENERAL DESCRIPTION
HI 98121 is a waterproof pH, ORP and temperature
meter. The housing has been completely sealed against
humidity and designed to float.
All pH readings are automatically temperature compensated (ATC), and temperature values can be
displayed in °C or °F units.
The meter can be calibrated at one or two points for
pH (with auto-buffer recognition and against five
memorized buffer values), while the mV (ORP) range is
factory calibrated.
Measurements are highly accurate with a unique
stability indicator right on the LCD.
This meter is also provided with battery level indication
at start-up, and with a low battery symbol which
warns the user when the batteries need to be replaced.
In addition the Battery Error Prevention System (BEPS)
avoids erroneous reading caused by low voltage level
by turning the meter off.
The HI 73127 pH electrode, supplied with the meter, is
interchangeable and can be easily replaced by the user.
The stainless steel encapsulated temperature sensor
facilitates faster and more accurate temperature measurement and compensation.
1.
2.
3.
4.
5.
6.
7.
Battery compartment
Liquid Crystal Display (LCD)
ON/OFF/MODE button
HI 73127 pH electrode
Temperature sensor (behind)
ORP electrode
SET/HOLD button
1. Automatic Temperature Compensation
Indicator
2. Stability indicator
3. Battery life percentage indicator
4. Low battery indicator
5. Secondary display
6. Primary display
7. Measuring unit for primary display
Recommendations for Users
Before using this product, make sure that it is entirely
suitable for the environment in which it is used.
The glass bulb at the end of the electrode is sensitive
to electrostatic discharges. Avoid touching the glass
bulb and the ORP electrode at all times.
Any variation introduced by the user to the supplied equipment may degrade the instrument’s EMC performance.
To avoid electrical shock, do not use this instrument
when voltages at the measurement surface exceed 24
VAC or 60 VDC. To avoid damages or burns, do not
perform any measurement in microwave ovens.
ACCESSORIES
HI 73127
HI 73128
HI 70004P
HI 70006P
HI 70007P
HI 70009P
HI 70010P
HI 7004M
HI 7006M
HI 7007M
HI 7009M
HI 7010M
HI 7021M
HI 7022M
HI 7061M
HI 70300M
HI 7091M
HI 7092M
Replaceable pH electrode
Electrode removal tool
pH 4.01 solution, 20 mL sachet (25 pcs)
pH 6.86 solution, 20 mL sachet (25 pcs)
pH 7.01 solution, 20 mL sachet (25 pcs)
pH 9.18 solution, 20 mL sachet (25 pcs)
pH 10.01 solution, 20 mL sachet (25 pcs)
pH 4.01 solution, 230 mL bottle
pH 6.86 solution, 230 mL bottle
pH 7.01 solution, 230 mL bottle
pH 9.18 solution, 230 mL bottle
pH 10.01 solution, 230 mL bottle
ORP test solution (240 mV), 230 mL bottle
ORP test solution (470 mV), 230 mL bottle
Electrode cleaning solution, 230 mL bottle
Electrode storage solution, 230 mL bottle
Pretreatment reducing solution, 230 mL
Pretreatment oxidizing solution, 230 mL
IST98121
05/05
SPECIFICATIONS
Range
-2.00 to 16.00 pH
±1000 mV
-5.0 to 60.0°C / 23.0 to 140.0°F
Resolution
0.01 pH
1 mV
0.1°C or 0.1°F
±0.05 pH
Accuracy
±2 mV
(@20°C/68°F)
±0.5°C or ±1°F
Typical EMC
±0.02 pH
Deviation
pH MEASUREMENTS & CALIBRATION
Taking measurements
Select pH mode with the SET/HOLD button.
Submerge the electrode in the solution to be tested
while stirring it gently.
The measurements should be taken when the stability
symbol
on the top left of the LCD disappears.
The pH value automatically compensated for temperature is
shown on the primary LCD
while the secondary LCD shows
the temperature of the sample.
±2 mV
±0.3°C or ±0.6°F
Temp. Compensation
Calibration
Automatic for pH
pH: at 1 or 2 points with 2 sets of
memorized buffers (pH 4.01/7.01/
10.01 or pH 4.01/6.86/9.18)
ORP: factory calibrated
Electrode
HI 73127 pH electrode (included)
Environment
-5 to 50°C (23 to 122°F); RH 100%
BatteryType / Life
4 x 1.5V / approx. 250 hours
Auto-off
After 8 minutes of non-use
Dimensions
163 x 40 x 26 mm (6.4 x 1.6 x 1.0”)
Weight
100 g (3.5 oz)
OPERATIONAL GUIDE
To turn the meter on and to check battery status
Press and hold the /MODE button until the LCD
lights up. All the used segments on the LCD will be
visible for 1 second (or as long as the button is
pressed), followed by the percent indication of the
remaining battery life (E.g. % 100 BATT).
To freeze the display
While in measurement mode,
press the SET/HOLD button until
HOLD appears on the secondary
display. The reading will be frozen on the LCD.
Press any button to return to normal mode.
To turn the meter off
While in measurement mode, press the /MODE
button. OFF will appear on the secondary display.
Release the button.
Note: Before taking any pH measurement make sure
the meter has been calibrated (CAL tag present on
the LCD).
pH Calibration
For better accuracy, frequent calibration of the instrument is recommended. In addition, the instrument
must be recalibrated whenever:
a) The pH electrode is replaced.
b) After testing aggressive chemicals.
c) Where high accuracy is required.
d) At least once a month.
Calibration procedure
From normal measuring mode, press and hold the
/MODE button until OFF on the secondary LCD is
replaced by CAL. Release the button. The LCD enters
the calibration mode displaying “pH 7.01 USE” (or
“pH 6.86 USE” if the NIST buffer set was selected).
After 1 second the meter activates the automatic buffer
recognition feature. If a valid buffer is detected then its
value is shown on the primary display and REC
appears on the secondary LCD. If no valid buffer is
detected, the meter keeps the USE indication active for
12 seconds, and then it replaces it with WRNG,
indicating the sample being measured is not a valid
buffer.
• For a single-point calibration with buffers pH 4.01,
9.18 or 10.01, the meter automatically accepts the
calibration when the reading is stable; the meter
displays the accepted buffer, with the message “OK
1”. After 1 second the meter automatically returns to
the normal measuring mode.
If a single-point calibration with buffer pH 7.01 (or
pH 6.86) is desired, then after the calibration point
has been accepted the /MODE button must be
pressed in order to return to normal mode. After the
button is pressed, the meter shows “7.01” (or “6.86”)
- “OK 1” and, after 1 second, it automatically returns
to the normal measuring mode.
Note: It is always recommended to carry out a twopoint calibration for better accuracy.
Note: If measurements are taken in different samples
successively, rinse the probe thoroughly to eliminate
cross-contamination; and after cleaning, rinse the
probe with some of the sample to be measured.
• For a two-point calibration, place the electrode in
pH 7.01 (or pH 6.86) buffer. After the first calibration
point has been accepted, the “pH 4.01 USE” message
appears. The message is held for 12 seconds, unless a
valid buffer is recognized. If no valid buffer is recognized, then the WRNG message is shown. If a valid
buffer (pH 4.01, pH 10.01, or pH 9.18) is detected,
then the meter completes the calibration procedure.
When the buffer is accepted, the LCD shows the
accepted value with the “OK 2” message, and then
the meter returns to the normal measuring mode.
Note: When the calibration procedure is completed,
the CAL tag is turned on.
To quit calibration and to reset to the default
values
• After entering the calibration mode and before the
first point is accepted, it is possible to quit the
procedure and return to the last calibration data by
pressing the /MODE button. The secondary LCD
displays “ESC” for 1 second and the meter returns to
the normal measuring mode.
• To reset to the default values and clear a previous
calibration, press the SET/HOLD button after entering
the calibration mode and before the first point is
accepted. The secondary LCD displays “CLR” for 1
second, the meter resets to the default calibration and
the CAL tag on the LCD disappears.
ORP MEASUREMENTS
Taking measurements
Select ORP mode with the SET/HOLD button.
Submerge the electrode in the solution to be tested.
The measurements should be taken when the stability
symbol on the top left of the LCD disappears.
The ORP (mV) value is shown
on the primary LCD while the
secondary LCD shows the temperature of the sample.
The ORP range is factory calibrated
Contact your nearest Hanna Service Center for
recalibration, if necessary.
SETUP
Setup mode allows the selection of temperature unit
and pH buffer set.
To enter the Setup mode, select pH mode and then
press the /MODE button until CAL on the secondary display is replaced by TEMP and the current
temperature unit (E.g. TEMP °C). Then:
• for °C/°F selection: Use the SET/HOLD button.
After the temperature unit has been selected, press the
/MODE button to enter the buffer set selection
mode; press the /MODE button twice to return to
the normal measuring mode.
• to change the calibration buffer set: After setting
the temperature unit, the meter will show the current
buffer set: “pH 7.01 BUFF” (for 4.01/7.01/10.01) or
“pH 6.86 BUFF” (for NIST 4.01/6.86/9.18). Change
the set with the SET/HOLD button, then press /MODE
to return to the normal measuring mode.
ELECTRODE MAINTENANCE
• When not in use, rinse the electrodes with water to
minimize contamination and store them with a few
drops of HI 70300 storage solution in the protective
cap after use. DO NOT USE DISTILLED OR DEIONIZED WATER FOR STORAGE PURPOSES.
• If the electrodes have been left dry, soak in storage
solution for at least one hour to reactivate them.
• To prolong the life of the electrodes, it is recommended to clean them monthly by immersing them in
the HI 7061 cleaning solution for half an hour.
Afterwards, rinse it thoroughly with tap water and
recalibrate the meter.
• The pH electrode can be easily replaced by using
the supplied tool (HI 73128). Insert the tool into the
probe cavity as shown below.
Rotate the electrode counterclockwise.
Pull the electrode out by using the other side of the tool.
Insert a new pH electrode following the above instructions in reverse order.
BATTERY REPLACEMENT
The meter displays the remaining battery percentage
every time it is switched on. When the battery level is
below 5%, the
symbol on the bottom left of the LCD
lights up to indicate a low battery condition. The batteries should be replaced soon. If the battery level is low
enough to cause erroneous readings, the meter shows
“0%” and the Battery Error Prevention System (BEPS) will
automatically turn the meter off.
To change the batteries, remove the 4 screws located on
the top of the meter.
Once the top has been removed, carefully replace the 4
batteries located in the compartment while paying attention to their polarity.
Replace the top, making sure that the gasket is properly
seated in place, and tighten the screws to ensure a
watertight seal.