1
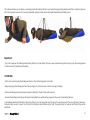
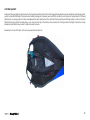
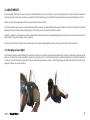
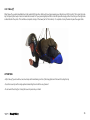
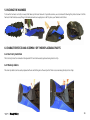
THANK YOU! We would like to thank you for having chosen one of our products, and we invite you to read this important document, the User Manual for the harness. Please pay special attention to the two most important paragraphs, regarding: Insertion of the reserve parachute. The reserve parachute is a piece of equipment that may save your life. It must be treated so that it works correctly when it is required, whether this happens in two days’ time, or two years from now. Adjusting the harness. The harness forms the connection between the pilot and the paraglider, and it is an essential component in optimizing performance and the pleasure of flying. A bad harness that is well adjusted may enable you to fly well, but a good harness that is badly adjusted may put you off flying altogether. We are confident that this harness will give you greater comfort, control, performance and enjoyment in flight. We are conscious of the fact that reading an instruction manual is not an exciting experience. However, please remember that the respective product is not a citrus juicer or a mobile phone, and that correct use of the harness helps reduce the risk of flying accidents. This manual contains all the information necessary to assemble, adjust, fly and store your harness. Thorough knowledge of your equipment will improve your personal safety and your level of flying. Team Woody Valley SAFETY NOTE You have purchased a piece of equipment manufactured by us, and so you are aware of your identity as a hang-gliding pilot holding the re- spective pilot’s licence, and you accept all the risks connected to hang-gliding including the possibility of injury and death. The incorrect or inappropriate use of Woody Valley equipment greatly increases this risk. In no case can Woody Valley and the Woody Valley retailer be held responsible for personal injury caused to yourself or to third parties, or for whatever type of damage. If you have any doubts on the use of our equipment, please contact your retailer or the importer for your country. CONTENTS 1- GENERAL INFORMATION.................................................................................................................................................................................... 4 1.1- Concept................................................................................................................................................................................................................................................ 4 2- BEFORE USING.................................................................................................................................................................................................... 5 2.1- Support boards. .................................................................................................................................................................................................................................. 5 2.2- Reserve parachute. ............................................................................................................................................................................................................................. 6 2.2.1- Connecting the deployment handle to the float bag...................................................................................................................................................... 6 2.2.2- Connecting and inserting the reserve parachute........................................................................................................................................................... 7 2.3- Braking parachute............................................................................................................................................................................................................................... 8 2.4- Rear pocket........................................................................................................................................................................................................................................10 2.5- Foot rest. ..........................................................................................................................................................................................................................................11 3- ADJUSTMENTS.................................................................................................................................................................................................. 12 3.1- Changing set up in flight...................................................................................................................................................................................................................12 3.2- Shoulder-pad adjustment.................................................................................................................................................................................................................13 3.3- Leg-strap adjustment. ......................................................................................................................................................................................................................13 3.4- Hooking up to the hang glider..........................................................................................................................................................................................................13 4- FLYING WITH FLEX 2......................................................................................................................................................................................... 14 4.1- Preflight Checks...............................................................................................................................................................................................................................14 4.2- How to put flex 2 on.........................................................................................................................................................................................................................15 4.3- Take-off.............................................................................................................................................................................................................................................16 4.3.1- Assisted take-off ...................................................................................................................................................................................................................17 4.4- In flight..............................................................................................................................................................................................................................................17 4.5- Landing...............................................................................................................................................................................................................................................17 5- STOWING THE HARNESS.................................................................................................................................................................................. 18 6- CHARACTERISTICS AND ASSEMBLY OF THE REPLACEABLE PARTS.............................................................................................................. 18 6.1- Foot rest protection.........................................................................................................................................................................................................................18 6.2- Main zip sliders..................................................................................................................................................................................................................................18 7- MAINTENANCE AND REPAIR............................................................................................................................................................................ 19 1- GENERAL INFORMATION This equipment must contain: The available replaceable parts are: Harness Foot rest protection Transportation backpack Main zip sliders Moschettone di aggancio Coupling snap-hook Reserve parachute deployment handle 2 reserve elastic loops for closing the reserve parachute Braking parachute deployment handle 1.1- Concept FLEX 2 is a product developed entirely by Woody: this hang glider harness was created thanks to cooperation with the best schools and our resellers. Thanks to its simplicity and how easy it is to use, FLEX 2 is the ideal harness for first timers up to first long distance flights. 4 2- BEFORE USING FLEX 2 is provided by the manufacturer already completely assembled except for the reserve parachute. Nevertheless it will be necessary to illustrate how to assemble and disassemble some important parts of the harness which require constant monitoring of wear. We recommend that you ask a qualified professional hang glider operator for help, for example your instructor. In particular, maximum care and attention must be given to arranging the reserve parachute appropriately in the harness. Only then should the pilot adjust the harness for comfort. 2.1- Support boards The purpose of the fibre support boards is to divide the load of the pilot and to sustain the weight with a simple rope that goes from the shoulders to the legs. Periodic inspection of them is simple: simply open the Velcro on the pockets where they are contained and check their integrity. Also check the wear of the rope in correspondence to the hole. Reposition the to boards and close the pocket Velcro strips. In case of any doubt we recommend that you contact a qualified professional hang glider operator for help, for example your instructor. 5 2.2- Reserve parachute 2.2.1- Connecting the deployment handle to the float bag FLEX 2 is supplied with a special parachute deployment handle. Remember that this handle must be used exclusively. The black handle connection loop should be inserted in the float bag loop and then the entire handle should be passed through the same loop in order to obtain a tight connection. For easier deployment the connection loop on the float bag must be positioned far from the reserve chute centre. If your float bag does not have this loop please contact your reserve parachute reseller. 6 2.2.2- Connecting and inserting the reserve parachute The retaining rope must be folded and secured to the outside of the float bag. Insert the parachute in the harness container with the handle visible toward the outside and with the handle coupling loop to the float bag facing upward. Introduce a thin rope (1 or 2 mm diameter) into each elastic loop which you will use to help close the container. Introduce the elastic loops into the two smaller eyelets. Follow the closing order of the various flaps visible in the drawings/photos below. Insert the handle pins into the elastic loops. The cord must absolutely be removed at the end of this phase, and must be extracted slowly in order to avoid damaging the elastic loops due to excessive friction between the parts. At the end the handle should be fastened onto the special Velcro. The retainer rope should then be passed into the cordura tubing until reaching the main snap-hook, to which it should be retained. ATTENTION: -Each new combination of reserve parachute and harness or external container that is assembled for the first time must be inspected by an official reseller of the harness or the reserve chute or a flight instructor to verify that it can be effectively deployed. Deployment of the emergency chute must be perfectly possible from the normal flying position. We recommend doing at least one dry run on the ground in flight position. 7 2.3- Braking parachute The container built into the braking parachute is on the opposite side as the one where the reserve parachute is positioned. If you ordered the braking parachute together with the harness you will find it already inserted and secured. If you already have your own braking parachute, secure it to the strap predisposed near the container with a small snap-hook with a ring nut. Deployment system: Fasten the included handle to the apex of the cap using a cat’s paw knot. Carefully refold the cables and the parachute cap, observing the dimensions of the internal pocket, allowing the handle to protrude which will lock everything into place with the Velcro. 8 This system will allow you to deploy your braking parachute holding it firmly in your hand while approaching landing and then to release it precisely at the most opportune moment. If you want immediate opening simply release the handle immediately after deployment. Important: - If you are a beginner the braking parachute may distract you from piloting. Therefore we recommend using this accessory only after having gained a certain amount of familiarity with landing. ATTENTION: - At all costs avoid releasing the braking parachute in front of the hang glider control bar - Before deploying the braking parachute take your legs out of the harness in order to be ready for landing - Each now braking parachute deployment system installed for the first time must be tested - By using the braking parachute periodically in training flights you will be better prepared in the event of demanding field use. - The braking parachute drastically reduces the efficiency of your hang glider and, the more the speed increases, the more efficiency decreases. Therefore take care not to open it too far from the landing or with obstacles in the field. The ground effect is reduced and the final stop will be facilitated. 9 2.4- Rear pocket Arrange all the hang glider protection devices in the external side pocket. Position the hang glider bag and the harness backpack inside the large rear pocket, located behind the pilot’s back where a flexible drinking pouch and any personal effects can be stored in its special compartment. If the hang glider bag is very large, position it in the area between the pelvis and the feet. It is important that everything is folded up neatly in order to create as little thickness as possible. This will allow you to close the main zip of the harness more easily both on the ground and in flight. Use the two straps predisposed outside the rear pocket to help decrease its volume. Remember to close all the zips of the various pockets before take-off. 10 2.5- Foot rest If the harness length needs to be increased in order to maintain the correct centre of gravity, subdivide the adjustment between shoulder-straps and foot rest. Then reposition it with the rigid board inward. 11 3- ADJUSTMENTS During assembly the FLEX 2 harness is precision adjusted based on the size ordered. In any case the adjustments can be modified to guarantee optimum position for the pilot. Some time is required to find this optimum position, but the time spent will be well compensated in flying comfort. Before carrying out any adjustment the reserve parachute must be inserted. To find the optimum position we recommend hanging with the harness, simulating flight position and conditions. Therefore it is best to place all the material which you normally take into flight with you in the rear pocket. or simulate with other material. Length: if you feel too much pressure on the shoulders the shoulder-straps need to be lengthened (see photo) and a spacer needs to be removed from the foot rest to stay in the harness centre of gravity. Central cord: this must be under tension and must give the harness a slight upward curvature. If necessary shorten it with some knots. 3.1- Changing set up in flight The standard system provides sliding of the central cord with a lock on the left shoulder-strap. Balance shift in flight is obtained by applying a slight push or vertical traction on the hang glider control bar, locking the front cord in the desired position. Standard assembly provides for the incidencelock knot in a horizontal position (see photo). We recommend using variable incidence only after gaining good familiarity with flying and all of your equipment. Simply move the limit knot. 12 3.2- Shoulder-pad adjustment Adjustment of the shoulder pads compensates for the variation in pilot height and the adjustment buckle is located at the apex of the same and under a neoprene cover. Once the adjustment has been completed restore the position of the neoprene cover using the Velcro fasteners, taking care that it is tightly fastened but not under excessive tension. 3.3- Leg-strap adjustment The leg-straps should be shortened as much as possible symmetrically using the adjustable double window buckles. This helps to assume an erect position in landing during the push for final stopping. The leg-straps must be carefully adjusted because they should not be in traction when the pilot is in the harness in flight position. ATTENTION: - After each adjustment test first on the ground and then in flight. - Each adjustment must be carried out symmetrically on both sides. 3.4- Hooking up to the hang glider The hook is already predisposed by the manufacturer with a standard length which is suited for most hang gliders that provide a distance between the hang glider control bar and hook of about 120 cm. 13 4- FLYING WITH FLEX 2 4.1- Pre-flight Checks For maximum safety use a valid and complete preflight inspection method and repeat the same sequences mentally for each flight. Check that: - All the buckles are closed. Take particular care in the event of ice or snow. Always clean the snow or ice off before closing the buckles; - The reserve parachute is correctly fitted in its position and the pins are firmly inserted; - The pockets and zips are closed; - the harness is correctly hooked to the hang glider and the snap-hook is perfectly tightened by means of the relative closing mechanism; - The parachute deployment handle inspection should be repeated immediately after take-off. Simply touch it with your hand. 14 4.2- How to put FLEX 2 on Place your arms in the shoulder-straps, secure the leg-straps taking care to slide the leg-strap buckles back, close the zip starting from the top downward until passing the low safety buckle and hook them both. FLEX 2 should be put on in a way that is very snug in order to become your second skin in flight. We recommend using adequate clothing, avoiding bulky footwear, jackets and pants. The parts of the body subject to the cold are the ones that come out of the harness and, as such, should be adequately covered in order to prevent unwanted losses of body heat. The harness padding allows the rest of the body to withstand even the most extreme temperatures in flight. We also recommend wearing clothing without buckles, buttons or other appendages which create areas of overpressure in the body’s contact points and/or which inhibit closing the main zip in flight. 15 4.3- Take-off After take-off you will immediately be in the natural flight position. Enter with your legs, keeping your attention on flight control. Then close the main zip, first placing the body in tension inside the harness. Lift your pelvis slightly and then close the zip with a single pull on the string on the right side as illustrated in the photo. This will allow complete closing of the lower part of the main zip. To complete closing the main zip use the upper slide. ATTENTION: - After take-off you should be concerned only with maintaining control of the hang glider and then with closing the zip - Close the lower zip with a single pull and extending the arm all the way forward - Do not wind the string for closing the lower zip around your hand 16 4.3.1- Assisted take-off There are two pairs of hooking loops for assisted take-off. A first pair is located at shoulder strap height and is suitable for aeroplane assisted take-off. The second pair is located about 25 cm lower, at the centre of gravity position, and it is suitable for windlass assisted take-off. For further details see your tow hook instructions or ask a qualified towing instructor at your air field. 4.4- In flight For the first flights we recommend not using the variable incidence of your FLEX 2, but using it once you have mastered your hang glider and harness. The best aerodynamic advantage is obtained by flying with the longitudinal axis of the harness as parallel as possible to the glide angle, therefore in case of high speed motion, incline the harness based on the speed you want to reach. Only then should you act on changing the glider’s flight set up Flying for a long time with your head lower than your feet can be very tiring. We recommend flying short sections with the head higher than the feet, thereby resting your arms and back muscles in order to conserve energy. 4.5- Landing Open the main zip before approach. In the final phase raise up decisively on the speed-bar and move your hands to the stanchions always maintaining control of the hang glider’s balance. In your first flights with FLEX 2 we recommend trying the main zip opening procedure while you are still flying at a height. 17 5- PACKING THE HARNESS To stow the harness correctly in a way that takes up the least amount of possible volume, we recommend following the photos below. Fold the harness in half and stow everything in the backpack where enough space is left to place your helmet and clothing. 6- CHARACTERISTICS AND ASSEMBLY OF THE REPLACEABLE PARTS 6.1- Foot rest protection The foot rest protection is made in transparent PVC and can be easily replaced using a Velcro strip. 6.2- Main zip sliders The main zip sliders can be easily replaced without unstitching since the end part of them is secured using sturdy Velcro strips. 18 7- MAINTENANCE AND REPAIR Check the harness after every impact, bad landing or launch, or in the case that there are signs of damage or excessive wear. We recommend having the harness checked by your retailer every two years, and likewise we recommend replacing the hook-in karabiner every two years. Every 30 hours’ flight, check the cord on which the main bridle slides for wear, particularly where it enters the grommets in the back plate, and the parts in which it is in contact with the bridle slider. To prevent unnecessary wear and deterioration of the harness, it is important to avoid its scraping against the ground, rocks or abrasive surfaces. Do not expose the harness unnecessarily to UV radiation (sunlight) outside normal flying activities. Wherever possible, protect the harness from humidity and heat. Store all your paragliding equipment in a cool, dry place, and never put it away while damp or wet. Keep your harness as clean as possible by regularly cleaning off dirt with a plastic bristle brush and/or a damp cloth. If the harness gets exceptionally dirty, wash it with water and a mild soap. Allow the harness to dry naturally in a well-ventilated area away from direct sunlight. If your reserve parachute ever gets wet (e.g. in a water landing) you must remove it from the harness, dry it and repack it before putting it back in the container. Repairs and replacement of harness components cannot be performed by the user, but exclusively by the manufacturer or staff authorized by the manufacturer. The manufacturer and authorized service staff alone can use materials and techniques ensuring correct product functionality and its complete conformity to product certification. The harness can be washed using a tepid solution of water and mild soap. Zip fasteners should be kept clean and lubricated with silicone spray. In the case of making any request to an official retailer or Woody Valley for maintenance operations, please quote the complete identification number shown on the silver label in the rear pocket. We hope that you enjoy great flights and happy landings with FLEX 2! Every effort has been made to ensure that the information contained in this manual is correct, but please remember that it has been produced for guidance only. This owner’s manual is subject to change without prior notice. Please check at www.woodyvalley.com for the latest information regarding the FLEX 2 harness. Latest update: MARCH 2013 19