1
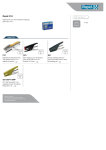
GB
INTRODUCTION
This Operator’s Manual describes the Rapid 100E.
Read the operator’s manual carefully before using the machine.
The manual contains safety regulations and descriptions of checks on parts
which are critical for safety, together with directions for the correct use and
maintenance of the machine. The figures will be found on the cover fold-out.
SAFETY REGULATIONS
-
The machine may only be used by personnel with knowledge of the
safety regulations and correct handling as described in this manual.
-
The visor must always be folded down when stapling.
-
Only the papers (or other objects) to be stapled should be put into
position under the visor.
-
It must not be possible to staple with the visor in the upper position.
Check on this every day as described in the section “Checking safety
functions”.
-
The machine must be turned off before it is moved.
-
The machine must be connected to an electric socket which has a
protective earth.
-
The machine must not be subjected to moisture. It must not be located in
a position where rain or splashes of water can fall on it.
-
Repairs and other measures, besides those described in this manual,
must be carried out by authorised service personnel.
-
Repair of faults or damage to the machine or its electrical connection
must be carried out by authorised service personnel.
SYMBOLS
Symbols in this manual
Read the operator’s manual carefully and make sure you understand it properly before using the machine.
Warning text. Information critical for safety follows after this
symbol.
Symbols on the machine
See figure 1.
A Forbidden to put fingers underneath the visor when it is folded down.
B Adjusting the stapling power.
31
GB
C Rating plate with the following data:
Manufacturer.
Type designation of machine.
Serial number.
Electrical data.
Max. number of staples per minute.
Marking for type approval.
CE mark for compliance according to EU Directive
(This mark will be found on machines sold in certain
countries).
Year of manufacture.
D The machine complies with the German requirements for radio
interference suppression. (This mark will be found on machines sold in
certain countries).
E The machine has been tested and approved by TÜV. (This mark will be
found on machines sold in certain countries).
F The machine has been tested and approved by UL and CSA. (This mark
will be found on machines sold in certain countries).
DESCRIPTION OF RAPID 100E
The Rapid 100E is an electrically powered table stapler. Stapling is
automatic when the object to be stapled is pushed into position under the
visor.
The parts of the machine are shown in figure 2.
G Visor
L
Switch
H Magazine
M Trigger
J
N Depth scale
Stapling anvil
K Wheel for adjusting
stapling force
The Rapid 100E is suitable for two different types of stapling and by simple
manipulation can be switched from one to the other:
- Normal stapling with the staple legs folded inwards.
- Pinning with the staple legs folded outwards.
Pinning can be used for stapling small bundles of paper which will be
unstapled later, e.g. for copying. Pinning is easy to remove by pulling out the
staple in its longitudinal direction.
The Rapid 100E is available with various types of magazine suitable for
staples with different wire thickness. Staples of different types are
designated 44 and 66. Always use original Rapid staples.
The Rapid 100E is designed for staples with a leg length of 6 and 8 mm. To
ensure proper stapling the leg length should be at least 3 mm longer than
the thickness of the stapling object.
The type of original Rapid staple that should be used is shown on the front of
the magazine.
32
GB
ACCESSORIES
As extra equipment there is a pedal available for foot manoeuvring the
machine.
The pedal must be fitted permanently and by authorised personnel.
INSTALLATION
The Rapid 100E is installed as follows:
1
Position the machine on a stable horizontal surface that is smooth and
clean so that the suction pads on the feet affix themselves to the surface.
2
Check that the machine is suitable for the electrical power supply
available (voltage and frequency) by reading the data on the rating plate.
3
Insert the machine’s plug into the electric socket.
OPERATION
Filling staples
Fill the machine with staples when required as shown in figure 3:
1
Turn off the switch on the machine.
2
Lift up the visor.
3
Open the magazine by pressing down the lock. Pull out the magazine.
4
Put the staples into the magazine as shown in the figure. Use the type of
staple stated on the magazine. Use only Rapid original staples.
Interruptions in operation can be caused by use of the wrong type of
staple.
5
Close the magazine so that it locks in the closed position.
Adjusting the trigger position
The distance between the staple and the edge of the stapling object is
determined by adjusting the position of the trigger as follows. See figure 4:
1
Turn off the switch on the machine.
2
Lift up the visor.
3
Adjust the trigger position (M) by lightly squeezing the rider above the
graduated scale (N) and then move the trigger along the hexagonal rod.
4
The distance between the staple and the edge of paper can be read on
the graduated scale.
Pinning
Select pinning or normal stapling as follows. See figure 5:
1
Turn off the switch on the machine.
2
Lift up the visor.
3
Move the anvil to the rear position for pinning, or to the front position for
normal stapling.
33
GB
Adjusting the stapling force
The stapling force is adjusted using a wheel (K) at the back of the machine.
See figure 2. The correct setting can depend on the thickness and hardness
of the stapling object.
The stapling force adjuster can also be used to compensate for variations in
the local power supply, and when using long extension cables.
When the force is set too low, this can lead to deficient stapling.
When the force is set too high, this can cause unnecessary noise and wear.
Stapling
Stapling is done as follows. See figure 6:
1
Check that the trigger is adjusted for the correct stapling depth.
2
Switch on the machine. An indicator lamp in the switch shows when the
machine is on.
Warning: Only the stapling object may be pushed under the visor.
3
Move the stapling object forwards to the stapling position so that the
trigger is pushed in.
4
Switch the machine off when not in use.
MAINTENANCE
Checking safety functions
One of the safety checks that should be done every day before the machine
is used is to check on the visor’s safety function.
Check the visor’s safety switch as follows:
1
Switch on the machine.
2
Lift up the visor.
3
Test whether or not the machine will staple a piece of paper with the visor
up.
If the machine operates with the visor in the upper position it must be
switched off immediately and sent for repair.
Cleaning
The machine should be cleaned when required as follows:
34
1
Switch off the machine and pull out the plug from the electric socket
before cleaning.
2
Clean the machine as required by blowing away dust and paper
remnants.
3
If the machine is heavily soiled it should be cleaned with a moist rag.
GB
TROUBLE SHOOTING
Some suggestions for the causes of operational interruptions.
Staples not bent sufficiently
-
Stapling force insufficient. Increase the force with the adjusting wheel (K)
at the back.
-
Stapling object too thick. At least 3 mm of the staple legs must penetrate
through the object to ensure satisfactory results.
-
Stapling object is too hard.
-
Wrong type of staple. Check that the type of staple in use corresponds to
the type stated on the magazine. Always use original Rapid staples.
-
The machine is worn. Send it away for service.
Stapling movement is triggered but the machine does not staple
-
Magazine empty. Check and fill the magazine with staples as described
in this manual.
-
A staple has stuck in the discharger. Switch off the machine and carefully
remove the staple that is stuck using another staple. Avoid using tools
because they can easily damage the machine.
-
Wrong type of staple. Check that the type of staple in use corresponds to
the type stated on the magazine. Always use original Rapid staples.
-
Magazine damaged or worn. Replace the insert stapler as described in
this manual.
Stapling movement not triggered
-
Power supply not turned on.
Check that the machine is connected to the electric socket.
Check that the lamp in the switch is illuminated when the machine is in
operation.
Check that there is voltage at the electric socket (a fuse may have
blown).
-
Check that the trigger springs back again when stapling.
-
The machine is damaged. Send it away for service.
35
GB
REPLACING THE INSERT STAPLER
The insert is replaced as follows. See figure 7:
1
Remove the power supply by pulling out the plug from the electric socket.
2
Remove the plate from the front of the base.
3
Move the trigger close to the anvil.
4
Pull the insert out carefully and remove it from the machine, being careful
not to damage the trigger mechanism.
5
Test the new insert before fitting it by manual stapling in a piece of paper.
6
Refit the insert in the machine being careful not to damage the trigger.
7
Mount the plate on the front of the base using the two screws. The
angled edge should be pointing downwards.
8
Check on the following before switching on the machine:
- That the insert is fitted straight and stable in the machine.
- That the trigger is undamaged and can be adjusted to the desired
position.
- That the magazine can be pressed down against the anvil.
TECHNICAL SPECIFICATION
Complete designation
Rapid A100E
Width
130 mm
Length
270 mm
Height
150 mm
Weight
3.6 kg
Max. capacity
45 sheets (80g copying paper)
Max. stapling depth
85 mm
Staple type
See front of magazine
No. of staples in magazine
Strip staples
(66/6-8 approx. 210 staples)
(44/6-8 approx. 150 staples)
Equivalent noise level dB(A) at max. capacity and max. stapling force.
Example: See figure 8.
455 staples in 8 hours
70 dB(A)
Noise measurements carried out according to ISO 7779 with supplementary
proposal “Electrical staplers: Noise test code”.
The limit value 70 dB(A) equivalent noise level is a requirement in Germany
for the max. noise level in general premises of the type, shops, airport
check-in areas, receptions, and similar.
36