1
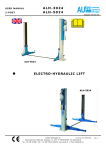
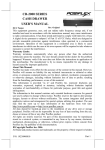
YCT-3 EMBOSSING MACHINE
USER MANUAL
(2006)
WITH GRATITUDE:
We thank you for your choice of Embossing
machine YCT-3. You have been one of our
clients and you will achieve all round and good
service from us.
Attention:
Before you carry out installing, adjusting and operating,
please take some time to read the user’s manual carefully.
It will be help to let you feeling easier and can be sure
that the machine is running normally.
BEIJING YC DIGITTECH LTD.
MARCH 2006
Embossing machine YCT-3 control system
BYCD ® YCT-3 V1.00, 2004
© 1999-2005 BYCD BEIJING, CHINA
Contents
1
Safety directions
1 Safety directions
1.1 Safety prompts
1.1 Safety prompts
The design of this machine is in accord with the safety rules for factories. The safety
1.2 Safety points before the machine is in operation
units equipped are used for protecting operators of machine and avoiding any danger
1.3 Safety points for operating machine
caused by accident of machine itself. The operator should not just count on these safety
1.4 Prevent from seriously harming body
units and also have to read and understand the safety preventive measures mentioned
in the safety chapters of manual, then can start to run machine.
Note: unsuitable operation might do harm to people and other equipments around
2
Specifications
2.1 Appearance of machine
the machine.
1.2 Safety points before the machine is in operation
2.2 Main technical parameters
1.2.1 Confirmation before turning on the power supply
3
Installation
3.1 Environment of install
a. Make sure to do routine inspection well, which are required in the safety
chapters of the user’s manual.
3.2 Lift and unload machine
b. Make sure that all safety doors of machine are closed completely.
3.3 Unpack and lay down machine
c. Make sure that all operating switches of machine are at correct operating
3.4 Connection between machine and master power supply
positions.
3.5 Connect air source
1.2.2 Turn on power supply
4
Operation
4.1 Directions of operation panel
4.2 Touch screen menu and parameters definition
4.3 Operate machine
5
Maintenance and adjustment
a. Make sure the rotations of the motors are in the correct directions.
b. Make sure the indicate lights are normal.
c. Make sure all of safety units as the protectors, the switches of the safety doors,
the emergency stop button and grounding wires are set correctly.
1. 3 Safety points for operating machine
The machine has some heating components.
Therefore if the operator does not
5.1 Mechanical adjustment
follow the safety points as below, the machine might have some potential dangerous
5.2 Maintenance of machine
situations.
1.3.1The operators have to be trained for running the machine,
carefully read the safety points as below and make sure to have
acquainted with all means of operation.
a. The operator must know well about the means of operation of the machine.
b. Do not take off the safety units, the protection units, the emergency stop button
and the grounding wires of the machine.
c. Must make sure to know how to stop the machine in an emergency.
d. Do not try to stop the machine with an article or your hands when the machine
is running, especially heat parts and stamping parts.
2 Specifications
2.1 Appearance of machine
e. More than one person operated machine at the same time to be definitely
prohibited.
1.3.2 Just the qualified technician can do maintenance of electric
system and mechanical system
a. Turn off the power supply before opening the door of electric cabinet.
b. Make sure that all of power sources are off before taking off and changing the
electric parts.
c. Use the tools with insulation in working.
d. Neither using a fuse beyond the designed limit nor other wires.
e. When changing any wire, be sure to use the same standard and color as original
one.
f. Be sure that nobody is running the machine before turning on the power supply.
g. Nothing is allowed to put on the control box or operating place, for example
water and food.
h. Do not touch the switches of machine or any electric parts with wet hands.
1.4 Prevent from seriously harming body
a. Face to the machine to operate the panel in regular procedure.
b. Do not let your hand or any parts of body stretch into the running machine
when you bend down.
c. Do not let other people be close to the machine from behind or beside when the
motor is rotating.
d. Do not stretch your hand or any part of body into the area of the motion
stamping board or the other parts when the motor is running.
e. Follow the instructions to operate the machine and do maintenance.
f. Do not examine and repair the mould board when the motor is rotating and
heating.
g. Be sure to turn off the power supply whenever leaving the machine or doing
any machine adjustment.
h. If the machine is not functioning normally, please inform to your chief or
instructor to do repair.
2.2 Main technical parameters
Applicable material:
PVC or other plastic material or paper
Thickness of material:
0.6-0.8mm
Size of material:
54×85.6
Most code digit:
19 codes, 3 letters plus 16 numbers
Temp. of heating:
200ºC
Temp. control:
±3.0ºC
Pressure of hydraulic system:
3MPa
Pressure of compressed air:
0.7MPa
Power supply:
AC380V 50Hz
3-phase, 5-wire
Power
1.5kW
Production:
3600 cards per hour
Dimension:
L1550×W900×H1800mm
Weight:
appr. 750 kg
3 Installation
carelessly making a wrong connection of wires, it might lead to get an electric shock,
damage machine or cause injuries of people.
3.1 Environment of install
3.1.1 Install place
3.4.1 Must be in accordance to a circuit diagram to connect a power source of
The place should be far away from inflammables, there is no
combustible gas in the workshop and do not stack any goods around the machine.
3.1.2 Ground requirement
machine on an assigned wiring position. The machine must be in safety grounding.
Caution: never sharing a single grounding wire by two machines or more.
The machine should be installed into a standard
3.4.2 After connecting the power, check the rotary direction of motor of oil pump, it
industry factory building. The installed ground should be smooth and solid. A depth of
should be as the same direction as the arrow point. The way to check the rotary
concrete pad will not be less than 50mm. If an installation is at second floor or above,
direction of motor: enter into a manual operation display of touch screen, press the
have to be sure that the bearing of floor meets requirements.
button of the motor of the oil pump then stopping it at once to see if the rotary
3.1.3 Environment of install
direction is correct, if it is not, swap the places of 2 input power wires of the AC380V.
It should be airtight, dustless and there is the
ventilation installation inside the workshop.
3.1.4 Requirements of power supply
Power is as AC380V/50Hz, 3 phases in 5
wires, ground wire is grounded reliably. Ground resistance < 0.1
, ground wire > 2
2
mm .
Repeat doing as indicated above, make sure that the rotary direction of motor is
correct.
Caution: Be sure never make the motor rotate in incorrect direction more than
one minute
3.2 Lift and unload machine
U
Select lifting place based on the mark of gravity center. Keep the machine in
Line No.
equilibrium throughout lifting. When using a crane to lift, need to select the suitable
Pin No.
V
W
N
sling rope. The rope should be pulled straight and try first to slide down. Do not let the
rope damage the outside and any parts of the machine.
3.3
Unpack and lay down machine
3.3.1 Check on the outer package of machine, if there is any serious damage, please
inform the supplier. Otherwise unpack the package.
3.3.2 Level the body of machine by a gradienter. It is possible to adjust a stand screw
of machine until making the machine level. Four wheels should be off ground and not
be bearing.
3.3.3 Open a cap of oil tank then fully pouring oil. Using a wear hydraulic oil of 46#.
Note: hydraulic oil must be in accord with the standards and be sure that the oil
is clean. Either using improperly or unclean oil, it can speed up damaging the cylinder
and hydraulic system.
3.4 Connection between machine and master power supply
Caution: Only the qualified technician can make a connection of master power
source. The power voltages of the machine are as AC380V, AC220V, DC24V, if
3.5 Connect air source
Connector of an air source is at rear side of the machine, open the board of rear side
then inserting an air pipe into the connector. The diameter of air pipe is as 8 mm.
a. Press down the button then PLC halts output immediately.
4 Operation
b. When the machine works under an abnormity status, press this button at once
to stop the machine so that find out a reason of abnormity status.
4.1 Directions of operation panel
c. After eliminating the fault, turning this button clockwise, when hearing a sound
4.1.1 Illustration of operation panel
by spring bounces back, stop turning and set the button free, then releasing from
emergency stop. It is reset and self-lock.
STAMP
ON/OFF
TEMPORAL
STOP
8
TEMPORAL STOP pause button
turning button
COLLECT
ON/OFF
TEMPERATURE
DIRECTOR
START
d. After eliminating emergency stop, press the start button to return zero anew,
press the start button once again to restart working.
SPEED
CONTROLLER
TOUCH
SCREEN
POWER
Emergency
Stop
RID
SELECT
POWER
INDICATION SMALL/LARGE ON/OFF
a. Press down this button, PLC halts output immediately and put currently status
in memory.
b. When it is necessary to stop work temporarily, press down this button then the
POWER a power supply switch turning switch
1
4.1.2 Directions of switch functions
Turn it clockwise to
switch on power supply, the system is electrified and the power indicator on; turn
counterclockwise to turn off the power supply, the power indictor off.
standby.
b. When needing to stop the machine, turn off power supply commonly; if no
work for a long time, then disconnecting the power connection line.
c. No other than turn on the power supple, all of the electrical equipments are able
to run.
a start button reset button Press down this button to start
auto-cycle; it works continuously based on the set parameters. To stop it, press the
pause button or emergency button.
3
SELECT SMALL/LARGE
a button for changing small or big
COLLECT ON/OFF
an on/off button of film strap motor reset
4
Press down this button to start the film strap motor, press again to stop.
Press down the button
5 RID ON/OFF an eliminate button reset button
letter turning switch Select large or small letters to work.
button
Press down this
turn to reset button
an emergency button
EMERGENCY STOP
7
reset button
to carry out elimination. Press again to stop.
6 STAMP ON/OFF a bronzing button
button to do bronzing, press again to stop.
c. When needing to go back to work, turn this button clockwise, when hearing a
sound by spring bounces back, stop turning and set the button free, then releasing from
a. When the power supply is on, all of electrical equipments are electrified and
2 START
machine stops running.
emergency stop as well as it is reset and self-lock, the machine continues to run.
4.2
Touch screen menu and parameters definition
Parameters definition:
Time after feed: A waiting time after feeding material. It is a waiting time (delay
4.2.1 Initial menu
Press down the button of power supply then power on and a menu is showed as below:
time) after a pushing card cylinder arrives at a front limit position, it postpones until
the feed material cylinder returns back.
Space Time: An interval between each cycle.
Time after embossing: A waiting time after finishing embossing. A waiting time
(delay time) when the embossing cylinder arrives at a lower limit position, it postpones
until the cylinder return back.
Foil speed: A speed of foil movement, i.e. the rotate speed of a step motor.
Time after stamping: A waiting time after finishing bronzing. A waiting time
(delay time) when a bronzing cylinder arrives at a lower limit position, it postpones
If touching SETTING then entering into the menu of setting parameters.
until the cylinder returns back.
Foil length: A distance of foil moved, i.e. an angle of a step motor rotated. Unit is
4.2.2 Setting parameters menu
pulse, for one pulse, the motor rotates by 18 degree.
Setting parameters menu has 3 pages, press NEXT to enter into a next page, press
PREVIOS to go back a previous page, press RETURN to return to the initial menu.
angle of a step motor rotated. Unit is pulse, for one pulse, the motor rotates by 18
Manual foil length: A distance of foil moved under the manual mode, i.e. an
degree.
Manual foil speed: A speed of foil moved under a manual mode, i.e. a rotate
speed of a step motor.
4.2.3 Manual operation menu
After touching MANUAL at an initial menu, enter into a manual operation menu. This
menu is only used for adjusting machine.
Definition of keys as below:
FEED Feed material (cards). Press once, a pushing card cylinder acts once.
STAMPING Bronzing. Press once, a bronzing cylinder acts once.
FOIL MOVE Control start/stop of a step motor (feed stamping material). Press
down to start, put up to stop.
EMBOSSING Control start/stop of a donkey motor (collect cards). Press down to
start, press again to stop.
MOTOR Control start/stop of a pushing card cylinder. Press down to push cards,
put up to return.
RETURN Return to the initial menu.
5 Maintenance and adjustment
5.1 Mechanical adjustment
Must adjust the position of delivery groove depending on the position of letters before
embossing.
To do it refer to the below picture.
4.3 Operate machine
Caution: No card in a delivery groove, no start machine. Must be sure that the
upper letter moulds are consistent with the under letter moulds completely before
starting machine and must be sure that there are cards between the upper moulds
and under moulds. Otherwise the moulds would be damaged.
Normally loosen the housing screw first then turning the adjusting screw, last tighten
4.3.1 Set temperature
the housing screw after adjusting right.
Set the temperature of the hot stamping board through the temperature controller on
Adjust the pressure of embossing, refer to the below picture.
the operation panel. Turn the knob to a demand temperature. Highest temperature
must not be higher than 200°C.
Note: when not process bronzing, turn the knob to the lowest temperature position.
4.3.2 Select small/large letters
Select small/large letters through the select switch on the operation panel.
4.3.3 Select bronzing
Select do bronzing or not do bronzing through the select button on the operation panel.
4.3.4 Set the parameters. See the section 4.2.2.
4.3.5 Start machine
If the pressure is uneven, it is possible to adjust it by adjusting the housing screw.
Ought to be sure the distance of the mould and the feed speed of material of hot
distance, so that the stamping distance to small and the pressure too big,
stamping have been adjusted right before starting formally.
When adjusting the distance of the letter moulds, do not move by too long
cause the spare parts of the machine to be damaged.
5.2 Maintenance of machine
Item
Matter and means of maintenance
Period
1
Must keep the machine cleanness and dryness, clean all of
mechanical parts regularly
1/1wk.
2
Must clear and lubricate all of moving parts (all of the guide
poles) regularly.
1/1wk.
3
Check the electrothermal tubes to see if damaged.
1/1wk.
4
Check all of joint and tighten screws, see if loosened,
according to circumstance to tighten or change.
1/2wks.
5
Check all of the wires’ connectors, see if loosen or split,
reconnect or change wires.
1/1month
6
Check all of fixing screws, in accordance with circumstance
to screw up or change.
1/6months
7
Lubricate all of bearings, use a lithium base lubricating
grease.
1/1year
8
See if hydraulic oil reaches at the position indicated by oil
mark, if not, fill up to the position.
Often
9
Check the hydraulic system regularly, it should not be in
leakage, change the damaged parts immediately (for example
a pressure meter, sealed parts etc.)
Often
10
After the machine works for 1 year, should change hydraulic
oil, its grade is as ISO VG46, wearproof hydraulic oil.
1/1year