1
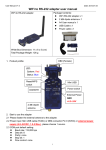
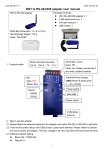
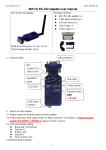
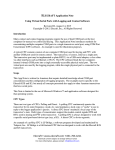
User Manual V1.0 Date: 2015.01.10 WiFi to RS-422/485 adapter user manual Package Contents: WiFi to RS-232 adapter WiFi RS-422/485 adapter x 1 2 dBi dipole antenna x 1 A4 User manual x 1 USB Cable x 1 White Box Dimension: 11 x 6 x 5 (cm) Total Package Weight: 132 g Label: “WA-422B” 1. Product profile: Block Terminal Connector: RX-/B RX+/A TX- TX+ Terminator: 2 pins Open: Off Close: On, Please connect the 2 pins with a cable to enable. External Power Supply: LED: Data: Red Status: Blue GND (Power & Serial port) + : 4.5 ~24VDC Power switch Switch: RS485 RS422 Mini USB Reset switch 2 dBi dipole antenna 2. Start to use the adapter 2.1 Please fasten the external antenna to the adapter and switch RS-422 or RS-485 in right side. 2.2 There’re two power inputs, mini USB or blue 2 ports block terminal. Please switch to choose one way to power the adapter. The max voltage is 24 VDC input from the blue block terminal. 2.3 COM port default setting: Baud rate: 115200 bps Data bit: 8 1 User Manual V1.0 Date: 2015.01.10 Parity: none Stop bit: 1 Flow control: none 2.4 Network default setting: Simple AP with DHCP Server SSID: Serial2WiFi_ab_cd (“ab” and “cd” is the last 4 code of Mac address) Security(WPA2): 12345678 IP: 192.168.10.1 Socket port: 8080 Channel: 6 Log in ID: admin Log in password: admin 2.5 Power switch: mini USB side by default. The user will switch to the blue 2 ports block terminal side if the power input comes from other sources. 3. Modbus: The adapter support RS-485 Modbus TCP RTU Please check the box below: The function is available on RS-485 adapter 4. Configuration: 4.1 Log in: Connect with the WiFi RS-232 adapter by PC,NB or Mobile terminal SSID: Serial2WiFi_ab_cd (abcd: Last 4 code of the Mac address) Security code: 12345678 Execute browser, type IP address: 192.168.10.1 ID: admin Password: admin 2 User Manual V1.0 Date: 2015.01.10 4.2 Serial setting: Baud Rate: 9600~921600 bps Data Bits: 8 only Parity: None, Odd, Even Stop Bits: 1 only Please type the none-standard baud rate here 4.3 WiFi setting: Mode: Simple AP, Station, Dual (AP & Station) Encryption: Open, WPA TKIP, WPA AES, WPA2 TKIP, WPS2 AES Channel: auto,1~11, 6 (default) 3 User Manual V1.0 Date: 2015.01.10 4.4 Network setting: 4.5 Applications: 4.5.1 M2M: TCP Server and TCP Client 4.5.2 HTTP Client: GET and POST 4 User Manual V1.0 Date: 2015.01.10 4.6 System: F/W version and Mac address Mac address will output to serial port The I/O function is not available for serial adapter Enable 5 User Manual V1.0 Date: 2015.01.10 Remark: The NTP data will be bundled with the sensor data for the application of IOT, Internet of Things. If you need the function, the F/W will be modified. 5. LED indication: LED Status Red Indicates system ready Blue Solid On: WiFi connected Flash: data is transmitted through WiFi 6. WPS/Reset button: Please put the paperclip or small pin into the hole for pressing the button. 6.1 WPS: Press the button in short time which is not longer than 3 seconds. 6.2 Reset to default setting: Press the button over 5 seconds, the WiFi adapter will reset to default value. The LEDs will be off for some time and then reboot to the default value. 7. RS232 Interface: DB9 Female with Nut 7.1 Pin-out: 7.2 Signals: Pin 1 CD Input 2 TxD Output DCE Direction Output Input 3 RxD Input Output Received data Input Output Contact manufacturer to set this N/A N/A Signal ground Contact manufacturer to set this 4 5 Signal DSR GND DTE Direction Description Not connected Transmitted data 6 DTR Output Input 7 CTS Input Output Clear to send 8 RTS Output Request to send (Default) 9 Vcc Input Input Input External Power supply (Remark 1) 6 User Manual V1.0 Date: 2015.01.10 7.3 DSR/DTR Connection: 8. Command set: Not Available ITEM FUNCATION 1 Inquire the setting of the adapter 2 Set the COM port parameters COMMAND 9. Network: 9.1 One to one connection: The two WiFi adapters will be connected directly without access point. Connect directly Simple AP (Default) 1 Client (Station) 9.2 One to 5 connection via Simple AP Broadcast Simple AP (Default) Uni-cast 5 Clients (Station) 9.3 One to 5 connection via other Access Point: Broadcast Simple AP (Default) 5 Clients (Station) Uni-cast 10. Virtual COM port 10.1 Factory Mac bundled Virtual Serial Port (VSP) Driver (Will be available soon) 7 User Manual V1.0 Date: 2015.01.10 10.2 Reference Driver: www.eterlogic.com 11. Test software: 11.1 Teraterm: ASCII code terminal emulator for TCP/IP socket and COM Port. Please search “teraterm” on Google searching and install the main program. IP: 192.168.10.1 (Default) TCP Port: 8080 (Default) Protocol: IPV4, Telnet 11.2 Android APP: Android terminal emulator of TCP/IP socket. Support ASCII or Binary format. Please search “uconnect” on Google Play site choose the TCP/IP type. IP: 192.168.10.1 (Default) TCP Port: 8080 (Default) Click the menu on the corner Select “Connect” Remark: All contents are subject to change without notice. 8