1
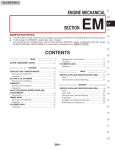
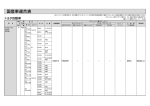
STARTING & CHARGING SYSTEMS
SECTION
SC
CONTENTS
PRECAUTIONS ...............................................................2
Supplemental Restraint System (SRS) ″AIR
BAG″ and ″SEAT BELT PRE-TENSIONER″...............2
Wiring Diagrams and Trouble Diagnoses....................2
BATTERY .........................................................................3
How to Handle Battery ................................................3
Battery Test and Charging Chart.................................6
STARTING SYSTEM .....................................................13
System Description....................................................13
Wiring Diagram - START -.........................................14
Trouble Diagnoses.....................................................16
Construction...............................................................17
Magnetic Switch Check .............................................19
Pinion/Clutch Check ..................................................19
Brush Check ..............................................................20
Field Coil Check ........................................................20
Armature Check.........................................................21
Assembly ...................................................................22
CHARGING SYSTEM ....................................................23
System Description....................................................23
Wiring Diagram - CHARGE -.....................................24
Trouble Diagnoses.....................................................26
Construction...............................................................27
Disassembly...............................................................28
Inspection...................................................................28
Assembly ...................................................................29
SERVICE DATA AND SPECIFICATIONS (SDS) ..........30
Battery........................................................................30
Starter ........................................................................30
Alternator ...................................................................30
PRECAUTIONS
Supplemental Restraint System (SRS) “AIR
BAG” and “SEAT BELT PRE-TENSIONER”
The Supplemental Restraint System such as “AIR BAG” and “SEAT BELT PRE-TENSIONER” used along with
a seat belt, helps to reduce the risk or severity of injury to the driver and front passenger for certain types of
collision. The SRS system composition which is available to NISSAN MODEL R20 is as follows (The composition varies according to the destination and optional equipment.):
I For a frontal collision
The Supplemental Restraint System consists of driver air bag module (located in the center of the steering wheel), front passenger air bag module (located on the instrument panel on passenger side), front seat
belt pre-tensioners, a diagnosis sensor unit, warning lamp, wiring harness and spiral cable.
I For a side collision
The Supplemental Restraint System consists of front side air bag module (located in the outer side of front
seat), side air bag (satellite) sensor, diagnosis sensor unit (one of components of air bags for a frontal
collision), wiring harness, warning lamp (one of components of air bags for a frontal collision).
Information necessary to service the system safely is included in the RS section of this Service Manual.
WARNING:
I To avoid rendering the SRS inoperative, which could increase the risk of personal injury or death
in the event of a collision which would result in air bag inflation, all maintenance should be performed by an authorized NISSAN dealer.
I Improper maintenance, including incorrect removal and installation of the SRS, can lead to personal injury caused by unintentional activation of the system. For removal of Spiral Cable and Air
Bag Module, see the RS section.
I Do not use electrical test equipment on any circuit related to the SRS unless instructed to in this
Service Manual. SRS wiring harnesses can be identified by yellow harness connector.
Wiring Diagrams and Trouble Diagnoses
When you read wiring diagrams, refer to the following:
I GI-10, “HOW TO READ WIRING DIAGRAMS”
I EL-6, “POWER SUPPLY ROUTING” for power distribution circuit
When you perform trouble diagnoses, refer to the following:
I GI-25, “HOW TO FOLLOW TEST GROUPS IN TROUBLE DIAGNOSES”
I GI-22, “HOW TO PERFORM EFFICIENT DIAGNOSIS FOR AN ELECTRICAL INCIDENT”
SC-2
BATTERY
How to Handle Battery
CAUTION:
If it becomes necessary to start the engine with a booster battery and jumper cables,
1) Use a 12-volt booster battery.
2) After connecting battery cables, ensure that they are
tightly clamped to battery terminals for good contact.
METHODS OF PREVENTING OVER-DISCHARGE
The following precautions must be taken to prevent over-discharging a battery.
I The battery surface (particularly its top) should always be kept
clean and dry.
I The terminal connections should be clean and tight.
I At every routine maintenance, check the electrolyte level.
This also applies to batteries designated as “low maintenance”
and “maintenance-free”.
MEL040F
I
When the vehicle is not going to be used over a long period of
time, disconnect the negative battery terminal.
I
Check the charge condition of the battery.
Periodically check the specific gravity of the electrolyte. Keep
a close check on charge condition to prevent over-discharge.
MEL041F
MEL042F
CHECKING ELECTROLYTE LEVEL
WARNING:
Do not allow battery fluid to come in contact with skin, eyes,
fabrics, or painted surfaces. After touching a battery, do not
touch or rub your eyes until you have thoroughly washed your
hands. If acid contacts eyes, skin or clothing, immediately
flush with water for 15 minutes and seek medical attention.
SC-3
BATTERY
How to Handle Battery (Cont’d)
I
I
Remove the cell plug using a suitable tool.
Add distilled water up to the MAX level.
MEL043F
Sulphation
SEL709E
A battery will be completely discharged if it is left unattended
for a long time and the specific gravity will become less than
1.100. This may result in sulphation on the cell plates.
To determine if a battery has been “sulphated”, note its voltage and current when charging it. As shown in the figure, less
current and higher voltage are observed in the initial stage of
charging sulphated batteries.
A sulphated battery may sometimes be brought back into service by means of a long, slow charge, 12 hours or more, followed by a battery capacity test.
SPECIFIC GRAVITY CHECK
1. Read hydrometer and thermometer indications at eye level.
MEL042FA
2. Convert into specific gravity at 20°C (68°F).
Example:
I When electrolyte temperature is 35°C (95°F) and specific gravity of electrolyte is 1.230, converted specific gravity at 20°C
(68°F) is 1.240.
I When electrolyte temperature is 0°C (32°F) and specific gravity of electrolyte is 1.210, converted specific gravity at 20°C
(68°F) is 1.196.
SC-4
BATTERY
How to Handle Battery (Cont’d)
SEL007Z
SC-5
BATTERY
Battery Test and Charging Chart
CHART I
SEL754W
*1: SC-4
*2: SC-7
*3: SC-8
*4: SC-10
*5: SC-11
SC-6
BATTERY
Battery Test and Charging Chart (Cont’d)
CHART II
SEL755W
*:
SC-6
I Check battery type and determine the specified current using the following table.
Fig. 1 DISCHARGING CURRENT (Load Tester)
Type
Current (A)
28B19R(L)
90
34B19R(L)
99
46B24R(L)
135
55B24R(L)
135
50D23R(L)
150
55D23R(L)
180
65D26R(L)
195
L2-580 R/L (65 Ah)
195
80D26R(L)
195
75D31R(L)
210
063 [YUASA type code]
210
L3-760 R/L (75 Ah)
225
95D31R(L)
240
115D31R(L)
240
025 [YUASA type code]
240
065 [YUASA type code]
255
027 [YUASA type code]
285
SC-7
BATTERY
Battery Test and Charging Chart (Cont’d)
Type
Current (A)
075 [YUASA type code]
300
110D26R(L)
300
95E41R(L)
300
067 [YUASA type code]
325
130E41R(L)
330
096 [YUASA type code]
375
096L [YUASA type code]
375
010S [YUASA type code]
360
A: SLOW CHARGE
SEL756W
*1: SC-4
*2: SC-7
SC-8
BATTERY
Battery Test and Charging Chart (Cont’d)
Fig. 2 INITIAL CHARGING CURRENT SETTING (Slow charge)
Below 1.100
I
I
4.0 (A)
5.0 (A)
7.0 (A)
8.0 (A)
8.5
9.0 (A)
(A)
10.0 (A)
11.0
(A)
130E41R(L)
010S [YUASA type code]
096L [YUASA type code]
075 [YUASA type code]
065 [YUASA type code]
95E41R(L)
110D26R(L)
115D31R(L)
95D31R(L)
L3-760 R/L (75 Ah)
75D31R(L)
096 [YUASA type code]
067 [YUASA type code]
063 [YUASA type code]
L2-580 R/L (65 Ah)
80D26R(L)
65D26R(L)
027 [YUASA type code]
025 [YUASA type code]
55D23R(L)
50D23R(L)
55B24R(L)
46B24R(L)
34B19R(L)
CONVERTED
SPECIFIC
GRAVITY
28B19R(L)
BATTERY TYPE
14.0
(A)
Check battery type and determine the specified current using the table shown above.
After starting charging, adjustment of charging current is not necessary.
Fig. 3 ADDITIONAL CHARGE (Slow charge)
SEL757W
*:
SC-7
CAUTION:
I Set charging current to value specified in Fig. 2. If charger is not capable of producing specified
current value, set its charging current as close to that value as possible.
I Keep battery away from open flame while it is being charged.
I When connecting charger, connect leads first, then turn on charger. Do not turn on charger first,
as this may cause a spark.
I If battery temperature rises above 60°C (140°F), stop charging. Always charge battery when its
temperature is below 60°C (140°F).
SC-9
BATTERY
Battery Test and Charging Chart (Cont’d)
B: STANDARD CHARGE
SEL758W
*1: SC-4
*2: SC-7
Fig. 4 INITIAL CHARGING CURRENT SETTING (Standard charge)
130E41R(L)
010S [YUASA type code]
096L [YUASA type code]
075 [YUASA type code]
065 [YUASA type code]
95E41R(L)
110D26R(L)
115D31R(L)
95D31R(L)
L3-760 R/L (75 Ah)
75D31R(L)
096 [YUASA type code]
067 [YUASA type code]
063 [YUASA type code]
80D26R(L)
L2-580 R/L (65 Ah)
65D26R(L)
027 [YUASA type code]
025 [YUASA type code]
55D23R(L)
50D23R(L)
55B24R(L)
46B24R(L)
34B19R(L)
CONVERTED
SPECIFIC
GRAVITY
28B19R(L)
BATTERY TYPE
1.100 - 1.130 4.0 (A)
5.0 (A)
6.0 (A)
7.0 (A)
8.0 (A)
9.0 (A)
10.0
(A)
13.0
(A)
1.130 - 1.160 3.0 (A)
4.0 (A)
5.0 (A)
6.0 (A)
7.0 (A)
8.0 (A)
9.0 (A)
11.0
(A)
1.160 - 1.190 2.0 (A)
3.0 (A)
4.0 (A)
5.0 (A)
6.0 (A)
7.0 (A)
8.0 (A)
9.0
(A)
1.190 - 1.220 2.0 (A)
2.0 (A)
3.0 (A)
4.0 (A)
5.0 (A)
5.0 (A)
6.0 (A)
7.0
(A)
I
I
Check battery type and determine the specified current using the table shown above.
After starting charging, adjustment of charging current is not necessary.
SC-10
BATTERY
Battery Test and Charging Chart (Cont’d)
Fig. 5 ADDITIONAL CHARGE (Standard charge)
SEL759W
*:
SC-7
CAUTION:
I Do not use standard charge method on a battery whose specific gravity is less than 1.100.
I Set charging current to value specified in Fig. 4. If charger is not capable of producing specified
current value, set its charging current as close to that value as possible.
I Keep battery away from open flame while it is being charged.
I When connecting charger, connect leads first, then turn on charger. Do not turn on charger first,
as this may cause a spark.
I If battery temperature rises above 60°C (140°F), stop charging. Always charge battery when its
temperature is below 60°C (140°F).
C: QUICK CHARGE
SEL760W
*:
SC-7
SC-11
BATTERY
Battery Test and Charging Chart (Cont’d)
CONVERTED SPECIFIC GRAVITY
CURRENT
[A]
10 (A)
15 (A)
20 (A)
25 (A)
1.100 1.130
2.5 hours
1.130 1.160
2.0 hours
1.160 1.190
1.5 hours
1.190 1.220
1.0 hours
Above
1.220
0.75 hours (45 min.)
30 (A)
130E41R(L)
95E41R(L)
110D26R(L)
115D31R(L)
95D31R(L)
L3-760 R/L (75 Ah)
75D31R(L)
010S [YUASA type code]
096L [YUASA type code]
075 [YUASA type code]
065 [YUASA type code]
096 [YUASA type code]
067 [YUASA type code]
063 [YUASA type code]
027 [YUASA type code]
025 [YUASA type code]
80D26R(L)
L2-580 R/L (65 Ah)
65D26R(L)
55D23R(L)
50D23R(L)
55B24R(L)
46B24R(L)
34B19R(L)
BATTERY
TYPE
28B19R(L)
Fig. 6 INITIAL CHARGING CURRENT SETTING AND CHARGING TIME (Quick charge)
40
(A)
I Check battery type and determine the specified current using the table shown above.
I After starting charging, adjustment of charging current is not necessary.
CAUTION:
I Do not use quick charge method on a battery whose specific gravity is less than 1.100.
I Set initial charging current to value specified in Fig. 6. If charger is not capable of producing
specified current value, set its charging current as close to that value as possible.
I Keep battery away from open flame while it is being charged.
I When connecting charger, connect leads first, then turn on charger. Do not turn on charger first,
as this may cause a spark.
I Be careful of a rise in battery temperature because a large current flow is required during quickcharge operation.
If battery temperature rises above 60°C (140°F), stop charging. Always charge battery when its
temperature is below 60°C (140°F).
I Do not exceed the charging time specified in Fig. 6, because charging battery over the charging
time can cause deterioration of the battery.
SC-12
STARTING SYSTEM
System Description
M/T MODELS
Power is supplied at all times
I through 40A fusible link (letter C, located in the fuse and fusible link box)
I to ignition switch terminal 1.
With the ignition switch in START position, power is supplied
I from ignition switch terminal 1
I to starter motor harness connector terminal 4.
The starter motor plunger closes and provides a closed circuit between the battery and starter motor. The
starter motor is grounded to the engine block. With power and ground supplied, cranking occurs and the engine
starts.
A/T MODELS
Power is supplied at all times
I through 40A fusible link (letter C, located in the fuse and fusible link box)
I to ignition switch terminal 1.
With the ignition switch in the START position, power is supplied
I from ignition switch terminal 1
I to park/neutral position relay terminal 4.
With the ignition switch ON or START position, power is supplied
I through 10A fuse [No. 8, located in the fuse block (J/B)]
I to park/neutral position (PNP) relay terminal 1.
With the selector lever in the P or N position, ground is supplied
I to park/neutral position relay terminal 2 through the park/neutral position switch
I from body grounds, M754 and M33.
Then park/neutral position relay is energized and power is supplied
I from park/neutral position relay terminal 3
I to starter motor harness connector terminal 1.
The starter motor plunger closes and provides a closed circuit between the battery and starter motor. The
starter motor is grounded to the engine block. With power and ground supplied, cranking occurs and the engine
starts.
SC-13
STARTING SYSTEM
Wiring Diagram — START —
TD27Ti ENGINE MODELS
YEL053D
SC-14
STARTING SYSTEM
Wiring Diagram — START — (Cont’d)
ZD30DDTi ENGINE MODELS
YEL054D
SC-15
STARTING SYSTEM
Trouble Diagnoses
If any abnormality is found, immediately disconnect battery negative terminal.
SEL761W
SC-16
STARTING SYSTEM
Construction
MEL440H
MEL701P
SC-17
STARTING SYSTEM
Construction (Cont’d)
YEL350D
SC-18
STARTING SYSTEM
Magnetic Switch Check
Magnetic Switch Check
I Before starting to check, disconnect battery ground cable.
I Disconnect “M” terminal of starter motor.
1. Continuity test (between “S” terminal and switch body).
I
No continuity ... Replace.
SEL555E
2. Continuity test (between “S” terminal and “M” terminal).
I
No continuity ... Replace.
SEL556E
Pinion/Clutch Check
1. Check to see if pinion locks in one direction and rotates
smoothly in the opposite direction.
I
If it does not lock (or locks) in either direction or unusual
resistance is evident ... Replace.
YEL546D
2. Check pinion movement
I
If it is hard to move, apply grease or, if necessary, replace.
YEL547D
3. Check ball bearing.
Spin outer race of ball bearing to ensure that it turns smoothly
without binding.
I
Abnormal resistance ... Replace.
YEL548D
SC-19
STARTING SYSTEM
Pinion/Clutch Check (Cont’d)
4. Inspect pinion teeth.
I
Replace pinion if teeth are worn or damaged. (Also check
condition of ring gear teeth.)
5. Inspect reduction gear teeth.
I
Replace reduction gear if teeth are worn of damaged.
(Also check condition of armature shaft gear teeth.)
Brush Check
BRUSH
Check wear of brush.
Wear limit length:
Refer to SDS (SC-30).
I
Excessive wear ... Replace.
SEL014Z
BRUSH HOLDER
1. Perform insulation test between brush holder (positive side)
and its base (negative side).
I
Continuity exists ... Replace.
2. Check brush to see if it moves smoothly.
I
If brush holder is bent, replace it; if sliding surface is dirty,
clean.
YEL549D
Field Coil Check
1. Continuity test (between field coil positive terminal and positive
brushes).
I
No continuity ... Replace field coil.
YEL550D
2. Insulation test (between field coil positive terminal and yoke).
I
Continuity exists ... Replace field coil.
SEL103E
SC-20
STARTING SYSTEM
Armature Check
1. Continuity test (between two segments side by side).
I
No continuity ... Replace.
SEL625B
2. Insulation test (between each commutator bar and shaft).
I
Continuity exists ... Replace.
SEL104E
3. Check commutator surface.
I
Rough ... Sand lightly with No. 500-600 emery paper.
SEL020Z
4. Check diameter of commutator.
Commutator minimum diameter:
Refer to SDS (SC-30).
I
Less than specified value ... Replace.
SEL021Z
SC-21
STARTING SYSTEM
Armature Check (Cont’d)
5. Check depth of insulating mold from commutator surface.
I
Less than 0.2 mm (0.008 in) ... Undercut to 0.5 - 0.8 mm
(0.020 - 0.031 in)
SEL022Z
Assembly
Carefully observe the following instructions.
GREASE POINT
I
I
I
I
I
I
I
Rear cover metal
Gear case metal
Center bracket metal
Frictional surface of pinion
Moving portion of shift lever
Plunger of magnetic switch
Reduction gear
PINION PROTRUSION LENGTH ADJUSTMENT
Reduction gear type
Compare movement “” in height of pinion when it is pushed out
with magnetic switch energized and when it is pulled out by hand
until it touches stopper.
Movement “”:
Refer to SDS (SC-30).
SEL497D
I
Not in the specified value ... Adjust by adjusting plate.
SEL573B
SC-22
CHARGING SYSTEM
System Description
The alternator provides DC voltage to operate the vehicle’s electrical system and to keep the battery charged.
The voltage output is controlled by the IC regulator.
Power is supplied at all times to alternator terminal 4 (S) through:
I 10A fuse (No. 31, located in the fuse and fusible link box).
Terminal B supplies power to charge the battery and operate the vehicle’s electrical system. Output voltage
is controlled by the IC regulator at terminal 4 (S) detecting the input voltage (ZD30DDTi engine models). The
charging circuit is protected by the 100A (A/T models) fusible link.
The alternator is grounded to the engine block.
With the ignition switch in the ON or START position, power is supplied
I through 10A fuse [No. 12, located in the fuse block (J/B)]
I to combination meter terminal 28 for the charge warning lamp.
Ground is supplied to terminal 2 of the combination meter through terminal 1(L) (TD27Ti engine models) or
3(L) (ZD30DDTi engine model) of the alternator. With power and ground supplied, the charge warning lamp
will illuminate. When the alternator is providing sufficient voltage with the engine running, the ground is opened
and the charge warning lamp will go off.
If the charge warning lamp illuminates with the engine running, a malfunction is indicated.
SC-23
CHARGING SYSTEM
Wiring Diagram — CHARGE —
TD27Ti ENGINE MODELS
YEL055D
SC-24
CHARGING SYSTEM
Wiring Diagram — CHARGE — (Cont’d)
ZD30DDTi ENGINE MODELS
YEL056D
SC-25
CHARGING SYSTEM
Trouble Diagnoses
Before conducting an alternator test, make sure that the battery is fully charged. A 30-volt voltmeter and suitable test probes are necessary for the test. The alternator can be checked easily by referring to the Inspection Table.
I Before starting, inspect the fusible link.
I Use fully charged battery.
WITH IC REGULATOR
SEL338V
NOTE:
I If the inspection result is OK even though the charging system is malfunctioning, check the B terminal
connection. (Check the tightening torque.)
I When field circuit is open, check condition of rotor coil, rotor slip ring and brush. If necessary, replace faulty
parts with new ones.
MALFUNCTION INDICATOR
The IC regulator warning function activates to illuminate “CHARGE” warning lamp, if any of the following
symptoms occur while alternator is operating:
I Excessive voltage is produced.
I No voltage is produced.
SC-26
CHARGING SYSTEM
Construction
MEL658K
YEL351D
SC-27
CHARGING SYSTEM
Disassembly
REAR COVER
CAUTION:
Rear cover may be hard to remove because a ring is used to
lock outer race of rear bearing. To facilitate removal of rear
cover, heat just bearing box section with a 200W soldering
iron.
Do not use a heat gun, as it can damage diode assembly.
SEL032Z
REAR BEARING
CAUTION:
I Do not reuse rear bearing after removal. Replace with a
new one.
I Do not lubricate rear bearing outer race.
Inspection
ROTOR CHECK
SEL033Z
1. Resistance test
Resistance: Refer to SDS (SC-30).
I Not within the specified values ... Replace rotor.
2. Insulator test
I Continuity exists ... Replace rotor.
3. Check slip ring for wear.
Slip ring minimum outer diameter:
Refer to SDS (SC-30).
I Not within the specified values ... Replace rotor.
BRUSH CHECK
1.
I
2.
I
Check smooth movement of brush.
Not smooth ... Check brush holder and clean.
Check brush for wear.
Replace brush if it is worn down to the limit line.
SEL631DA
SC-28
CHARGING SYSTEM
Inspection (Cont’d)
STATOR CHECK
1.
I
2.
I
Continuity test
No continuity ... Replace stator.
Ground test
Continuity exists ... Replace stator.
SEL037Z
Assembly
RING FITTING IN REAR BEARING
I
Fix ring into groove in rear bearing so that it is as close to the
adjacent area as possible.
CAUTION:
Do not reuse rear bearing after removal.
SEL044Z
REAR COVER INSTALLATION
1. Fit brush assembly, diode assembly, regulator assembly and
stator.
2. Push brushes up with fingers and install them to rotor.
Take care not to damage slip ring sliding surface.
SEL048Z
SEL049Z
SC-29
SERVICE DATA AND SPECIFICATIONS (SDS)
Battery
Applied model
TD27Ti
Type
Capacity
L2-580 R (65 Ah)
V-AH
ZD30DDTi
L2-580 L (65 Ah)
L3-760 R (75 Ah)
12-55
L3-760 L (75 Ah)
12-64
Starter
S13-327
S13-527B
S14-405B
Type
HITACHI make
Applied model
TD27Ti
System voltage
No-load
ZD30DDTi
V
12
Terminal voltage
V
11.0
Current
A
Less than 160
Revolution
rpm
Minimum diameter of commutator
mm (in)
Minimum length of brush
mm (in)
More than 4,000
More than 3,300
More than 2,700
35.5 (1.398)
35.5 (1.398)
9.0 (0.354)
11.0 (0.433)
11.0 (0.433)
N (kg, lb)
—
28.4 - 34.3
(2.9 - 3.5, 6.4 - 7.7)
28.4 - 34.3
(2.9 - 3.5, 6.4 - 7.7)
Clearance between bearing metal and armature shaft
mm (in)
—
—
—
Clearance “” between pinion front edge and
pinion stopper
mm (in)
—
—
—
Movement “” in height of pinion assembly
mm (in)
0.3 - 1.5
(0.012 - 0.059)
0.3 - 2.0
(0.012 - 0.079)
0.3 - 2.0
(0.012 - 0.079)
Brush spring tension
Alternator
LR190-752
0 123 310 051
HITACHI make
BOSCH make
ZD30DDTi
TD27Ti
12-90
12-70
Type
Applied model
Nominal rating
V-A
Ground polarity
Negative
Minimum revolutions under no-load (When
13.5V is applied)
rpm
Hot output current (When 13.5V is applied)
A/rpm
Regulated output voltage
Minimum length of brush
Brush spring pressure
Slip ring minimum diameter
Rotor coil resistance at 20° (68°F)
Less than 1,000
Less than 1,000
More than 23/1,300
More than 65/2,500
More than 87/5,000
More than 26/1,300
More than 58/2,500
More than 72/5,000
V
14.1 - 14.7
mm (in)
More than 6.0 (0.237)
2 (0.08)
N (g, oz)
1.00 - 3.43 (102 - 350, 3.60 - 12.34)
1.80 - 2.40 (184.6 - 244.8, 6.47 - 8.63)
mm (in)
More than 26.0 (1.024)
13.8 (0.543)
2.67
2.47 - 2.73
Ω
SC-30