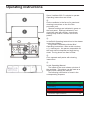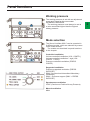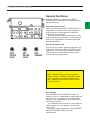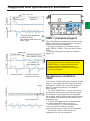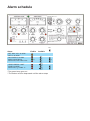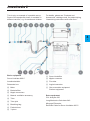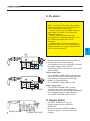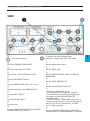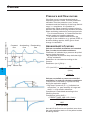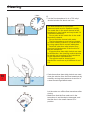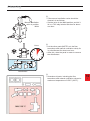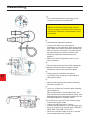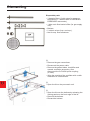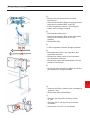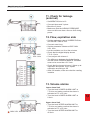
1
SERVO VENTILATOR 900 C
OPERATING MANUAL
CRITICAL CARE
Important
! General information
▲
• Servo Ventilator 900 C must be operated only by authorized
personnel who are well trained in its use.
It must be operated according to the instructions in this
Operating Manual.
• After unpacking, the ventilator must be checked and, if
necessary, calibrated.
• All data on pressures for Servo Ventilator 900 C are given in
cm H2O.
1 kPa (kilopascal) ≈ 10 cm H2O
100 kPa = 1 bar ≈ 1 atm ≈ 1 kgf/cm2 (kp/cm2)
100 kPa ≈ 15 psi
• Responsibility for the safe functioning of the equipment
reverts to the owner or user in all cases in which service or
repair has been done by a non-professional or by persons
who are not employed or authorized by MAQUET, and when
the equipment is used for other than its intended purpose.
• A full technical description – including circuit diagrams, parts
list and service data – is contained in the service
documentation, copies of which are held by your supplier.
Connection
• When connected to a patient, the ventilator must never be
left unattended.
• A check on functions must be done before a patient is
connected to the ventilator.
• When anaesthetic gas is metered via a flow meter on the low
pressure inlet, compressed air must not be connected at the
same time.
• To avoid explosion hazards, flammable agents such as ether
and cyclopropane must not be used in this machine. Only
agents which comply with the requirements on nonflammable agents in the IEC standard “Particular
requirements for electrical safety of anaesthetic machines”
are suitable in this machine.
• As this machine is not suitable for use with flammable agents
such as ether and cyclopropane, the use of antistatic
breathing tubes and face masks is not necessary.
The use of antistatic or electrically conductive breathing
tubes when using high frequency electric surgery equipment,
may cause burns and is therefore not recommended in any
application of this machine.
• Never connect or disconnect auxiliary equipment to the outlet
on the rear of the ventilator when the ventilator is connected
to mains.
• All gases must fulfill the specifications for medical grade gas.
The gases supplied must be dry and free from oil and dust.
Air
H2O < 5 g/m3
Oil
< 0.5 mg/m3
Oxygen
H2O < 20 mg/m3
Nitrous oxide/gaseous phase)
H2O < 58 ppm
Operation
• The APNEA ALARM is not intended to and will not monitor
for disconnections.
• The APNEA ALARM is not functional in VOL. CONTR., VOL.
CONTR. + SIGH, PRESS. CONTR. or MAN.
• In the case of a power failure, manual ventilation using a
Servo Ventilator 900 C is possible only with the help of
power supply from external battery. A resuscitator should
always be available, however, as an extra safety measure.
• The SV 900 C is certified, with regard to safety, to be
compatible with electromagnetic environments complying
with IEC 601-1-2. It is the responsibility of the user to take
necessary measures in order to ascertain that the specified
limits are not exceeded as this may impair the safety of the
ventilator.
Such measures should include, but are not limited to:
– normal precautions with regard to relative humidity and
conductive characteristics of clothing in order to minimize the
build-up of electrostatic charges.
– avoiding the use of radio emitting devices in close
•
•
•
•
•
proximity of the ventilator, such as high-frequency surgery
apparatus or cordless (mobile) telephones, resulting in a field
level exceeding 3 V/m (IEC 601-1-2).
Magnetic fields of MR equipment having flux densities above
20 mT may cause deactivation of the ventilator functions and
may result in permanent damage to the Servo Ventilator.
To protect the patient against high pressures, the WORKING
PRESSURE and UPPER PRESS. LIMIT must always be set
at suitable values.
Do not forget to set the manual ventilation valve to position
AUT after completed manual ventilation. Otherwise the
patient may be hypoventilated without any alarm from the
ventilator. (Not applicable to manual ventilation accessory
with motor).
When mains supply is switched off or in the case of a mains
power failure, the inspiratory and expiratory valves will
automatically open. This may also occur in the case of an
internal electronic failure. Thus, if the WORKING
PRESSURE is set too high and the gas supply through the
gas supply unit continues, this may result in increased airway
pressure.
When excess gas is being scavenged, the scavenging
system must meet the following requirements:
– At the point at which the scavenging system is
connected to the ventilator, the sub-atmospheric pressure
must not exceed 0.5 cm H2O or cause an induced flow from
the breathing system greater than 0.5 l/min.
– With continuous air flows of 30 l/min and 90 l/min for
not less than 5 seconds at the inlet of the anaesthetic
gas scavenging system, the resistance in the system
shall not exceed 0.25 cm H2O and 2.5 cm H2O, respectively.
The Servo Evac 180 basic evacuation unit meets these
requirements.
If the ventilator is equipped with electronic gas supply unit,
the following applies:
When mains supply is switched off or in the case of power
failure, the gas supply is automatically blocked.
Cleaning
• The ventilator must not be gas sterilized.
• The flow transducers must not be cleaned in a dish washing
machine, by ultrasonic methods or by using agents that
contain aldehydes.
• Agents used for cleaning must have a pH value between
4–8.5.
• Complete cleaning should be done after every 1000 hours
of operation or, at the latest, after every six months.
Service
• The Servo Ventilator 900 C must be serviced at regular
intervals by specially trained personnel. Any maintenance
must be noted in the log book provided for that purpose,
in accordance with national regulations. We recommend that
service is done as a part of a service contract with MAQUET.
• The 1000 hours overhaul shall be done after every 1000
operating hours or, at the latest, every six months. In
addition, the ventilator shall undergo a technical safety check
twice a year, at six months intervals, according to national
regulations.
• Service and repairs on the ventilator may be done only
by MAQUET authorized personnel.
• Only original parts from MAQUET must be used in the
ventilator.
Equipment combinations
• Only MAQUET-approved accessories and auxiliary
equipment may be connected to the ventilator.
• In order to maintain system safety and integrity only
accessories complying with IEC 601-1, or the safety of which
has been verified in another way must be
connected to the signal outputs on the rear of the ventilator.
For details on connections and allowed
voltages, please see Circuit Diagram.
Product information program
This Operating Manual is a part of a comprehensive
information program for Servo Ventilator 900 C.
The program is planned to contain the following:
Promotional and Scientific Publications
Brochure
Servo
Ventilator
Concept
Application
Brochures:
Intensive Care
Anesthesia
Transportation
Product Leaflet
Reprints
Wall Diagram
with Cleaning
Instructions
Service Manual
Circuit Diagram
The Patient’s
ABSee®
Cards
and Poster
Operating and Service Instructions
Operating
Manual
Brief
Operating
Instructions
Product Training Material
Training
Instructions
Advisory
Booklet
for Instructors
Slide Series
including
Textbook
“I am breathing
through a
ventilator”
Film and
Booklet
Front Panel
Flip-chart
Panel Block
Trainee’s set
Video programs
Video guide
Video news
Servo Ventilator 900 C-Front
Operating instructions
Servo Ventilator 900 C is simple to operate.
Operating instructions are found:
!
On the ventilator in the form of a panel and
cleaning instructions on the lid of the
pneumatic unit.
“Normal” settings are indicated in green on
the front panel. Settings indicated in red
should be used with caution, since these
settings may involve a certain risk for the
patient.
@
In the Brief Operating Instructions in the drawer
under the ventilator.
A log sheet is available with the Brief
Operating Instructions. After certain routines,
e. g. cleaning etc., the person responsible for
the work should complete and sign the log
sheet. The log sheet can then be filed.
#
On a separate wall poster with cleaning
instructions.
$
In this Operating Manual.
The inside of the cover shows a picture of
the ventilator. This picture can be used as a
foldout when reading the manual.
The following information is found in the
corresponding chapters:
Description ............................................ 1-3
Operating ............................................... 4-9
Maintenance ...................................... 10-13
Technical specifications ......................... 14
Contents
1. Arbetsprincip
Basic principles
2. Kontrollpanel
Control panel och
and ventilationssätt
ventilation modes
3. Patientsäkerhet
Patient safety
4. Uppställningar
Set-ups
5. Förberedelser
Preparations
6. Funktionskontroll
Check on functions
7. Anslutning
Connectiontill
to patient
8. Klinisk
och troubleshooting
felsökning
Clinicalbedömning
judgement and
9. Registrering
Recording
10. Rutinrengöring
Routine cleaning
11. 1000-tim.-översyn
med
fullständig
1000 hours overhaul
with
completerengöring
cleaning
12. Utbyte
av O2-cell
Replacement
of O2 cell
13. Kalibrering
Calibration
14. Tekniska
Technicalspecifikationer
specifications
1
2
Chapter 1
Basic principles
In this chapter:
General design ................. 1:2
Pneumatic unit.................. 1:3
Rear ...................................1:4
11
General design
12
Low pressure
High pressure
Pneumatic unit
Electronic unit
The pneumatic unit comprises the gas
conduction system, pressure and flow
transducers and control valves.
The control of flow and pressure is done by a
feed-back system. The transducers continually
measure the flow and pressures. The
information is compared with the panel settings
and a difference between the actual and the
preset values results in correction signals to
the control valves.
For detailed description, see chapter “Basic
principles” in the Training Instructions.
The electronic unit contains a number of plugin PC-boards with the circuits for regulation,
alarms and monitoring.
The unit effects the electronic control of the
pneumatic unit.
Servicing of the ventilator is facilitated by the
spare parts exchange system. The faulty parts
are replaced by factory trimmed exchange
parts.
Service on the electronic unit must be done
by MAQUET, or by MAQUET authorized
personnel only.
Pneumatic unit
13
!
(
Gas connection. The upper inlet, not visible in
the picture, is used for low pressure gas and
the lower inlet is used for high pressure gas.
For anaesthesia, a gas supply unit with three
inlets is available.
The flow transducer on the inspiration side
measures the gas flow to the patient.
BL
@
The inspiration valve regulates the inspiratory
gas flow. It is closed during the pause and
expiratory parts of the respiratory cycle.
The gas supply is regulated by a valve so that a
constant pressure is maintained in the bellows.
BM
#
The pressure transducer on the inspiration side
measures the airway pressure.
The O2 cell measures the O2 concentration in
the gas.
BN
$
The gas flows through a bacteria filter.
%
The respiratory gases are mixed and stored at
a constant pressure in the bellows.
^
The working pressure is set with an adjustment
screw.
&
A manometer shows the working pressure.
*
A safety valve opens if the bellows is overfilled,
or if the pressure exceeds approx. 120 cm H2O.
The flow transducer on the expiration side
measures the gas flow from the patient.
To prevent condensation, the transducer is
heated to approx. 60°C.
BO
The pressure transducer on the expiration side
measures the airway pressure.
BP
The expiration valve is closed during
inspiration. During the expiratory phase it is
either fully open or regulating the PEEP level.
BQ
The flap valve prevents a back flow of exhaled
gases. It is also necessary for the trigg function.
Rear
14
Operating time meter
Equipotential socket
On/Off switch
Fuse holders
Outputs for
auxiliary
equipment
Control
terminal
Recorder
output
Rear of
Servo Ventilator 900 C
To the right on the electronic unit are the mains
inlet socket, fuse holders, On/Off switch,
voltage rating, equipotential socket and
operating time meter.
To the left on the electronic unit are three
15-pole sockets for auxiliary equipment.
The 37-pole socket is used for recording of
pressure and flow curves.
There are labels with the serial number of the
apparatus on both the pneumatic unit and the
electronic unit.
Mains inlet socket
Control terminal
Under the secured lid, there is a connector for
external control of ventilation.
For details see separate Operating Manual.
Chapter 2
Control panel and
ventilation modes
In this chapter:
Panel design
and symbols ................... 2:2
Panel functions............... 2:3
Working pressure ........... 2:3
Mode selection ............... 2:3
Respiratory pattern ........ 2:4
I:E ratio ............................ 2:5
Expired minute volume .. 2:6
Special functions............ 2:7
Airway pressure ............. 2:8
SIMV ................................ 2:10
O2 alarm ........................... 2:11
Parameter selection ....... 2:11
Controlled ventilation .... 2:12
Supported ventilation .... 2:13
Spontaneous ventilation. 2:15
Manual ventilation .......... 2:16
2
1
Panel design and symbols
2
2
For easy operation, the panel is divided into
fields. Each field is described in this chapter.
“Normal” settings are indicated in green on
the front panel. Settings indicated in red should
be used with caution since these settings may
involve a certain risk for the patient.
A number of knobs and the EXPIRED
MINUTE VOLUME meter have dual scales.
The blue scale is always to be used when the
low range is selected.
Power on is indicated by a green lamp.
A yellow lamp is either an indication of a
certain setting or a reminder to set an alarm
limit.
A red lamp always indicates an alarm.
!
Working Pressure
@
Mode Selection
#
Respiratory Pattern
$
Expired Minute Volume
%
Special Functions
^
Airway Pressure
&
SIMV
*
O2 Concentration Alarm
(
Monitoring
Panel functions
Working pressure
The working pressure is set with an adjustment
screw and is read on the manometer
WORKING PRESSURE.
The working pressure must always be set at
a value somewhat higher than the highest
airway pressure.
Mode selection
The Servo Ventilator 900 C can be operated in
8 different modes, which are selected by means
of the mode selector.
The modes are described in special sections
in this chapter.
Controlled ventilation
Volume controlled ventilation (VOL. CONTR.)
Volume controlled ventilation + sigh (VOL.
CONTR. + SIGH)
Pressure controlled ventilation (PRESS.
CONTR)
Supported ventilation
Pressure supported ventilation (PRESS.
SUPPORT)
SIMV (Synchronized Intermittent Mandatory
Ventilation)
SIMV + Pressure support (SIMV + PRESS.
SUPPORT)
Spontaneous ventilation
CPAP (Continuous Positive Airway Pressure)
Manual ventilation
MAN
2
3
Panel functions
Respiratory pattern
Preset inspiratory minute volume
The inspiratory minute volume is set with the
knob PRESET INSP. MIN.VOL. l/min. The
knob has a locking button on the underside.
A suitable initial value can be calculated by,
for instance, using a Radford nomogram. The
minute volume can be readjusted after
indication from a CO2 Analyzer 930, which is
auxiliary equipment for the Servo Ventilator.
The setting range is 0.4-40 l/min.
The tidal volume =
PRESET INSP. MIN. VOL. l/min
BREATHS/min
The tidal volume can be read on the digital
display.
At extremely high flows it may be necessary
to increase the working pressure in order to
obtain the desired minute volume.
2
4
Flow pattern switch
During VOL. CONTR. and VOL. CONTR. +
SIGH, a constant or an accelerating inspiratory
flow can be selected. Constant flow gives a
lower peak pressure and is the pattern
normally used.
A decelerating flow will be obtained in
PRESS. CONTR.
PRESET INSP. MIN. VOL./min
50
60
70
40
25
80
33
50
90
30
100
20
110
120
BREATHS/min
INSP. TIME %
PAUSE TIME 10 %
(INSP. PAUSE)
Breaths per minute
The respiratory rate is steplessly adjustable
within the range of 5 to 120 BREATHS/min.
Inspiration time %
There are 6 fixed inspiration times, 20, 25, 33,
50, 67 and 80% of the breathing cycle.
Pause time %
There are 5 fixed pause times, 0, 5, 10, 20 and
30% of the breathing cycle.
Panel functions
I:E ratio
Insp.
Pause
time
%
20
0
20
5
25
0
20
10
25
5
33
0
25
10
33
5
20
20
33
10
25
20
20
30
50
0
33
20
25
30
50
5
50
10
33
30
67
0
50
20
67
5
67
10
67
20*
80
0
* Reduced to 13%
I:E ratio
time
%
1:4
1:3
1:3
1:2.3
1:2.3
1:2
1:1.9
1:1.6
1:1.5
1:1.3
1:1.2
1:1
1:1
1.1:1
1.2:1
1.2:1
1.5:1
1.7:1
2:1
2.3:1
2.6:1
3.4:1
4:1
4:1
To the left is a conversion table for INSP. TIME
% and PAUSE TIME % to I:E ratio for those
who are more used to working with the latter.
On the basis of an I:E ratio, i.e. the relation of
inspiration time to expiration time, the pause is
allocated to inspiration time.
For example, insp. time 25% and pause time
10% = I:E ratio 35/65 = approx. 1:1.9.
If the ventilator has been set so that insp. time
+ pause time exceeds 80%, then expiration
automatically begins when 20% of the
respiratory cycle remains (safety function).
The pause time is then reduced.
Example 1:
Preset insp. time = 67% ➞ 67% inspiration
Preset pause time = 20% ➞ 13% pause
20% expiration
Example 2:
Preset insp. time = 80% ➞ 80% inspiration
Preset pause time = 30% ➞ 0% pause
20% expiration
The settings are independent of changes in the
patient’s compliance and resistance.
Inspiratory flow
In mode VOL. CONTR. (constant flow) or SIMV the
inspiratory flow is calculated by:
Inspiration time settings of 33%, 67% or
80% should be avoided in volumecontrolled respiration with accelerating flow
patterns. With these settings patient
triggering may cause the temporary partial
blocking of the inspiration valve which,
however, would be indicated by a minute
volume alarm. Should the valve be blocked,
the situation can be remedied immediately
by switching over to a constant flow.
PRESET INSP. MIN. VOL. l/min
INSP./TIME %
Example:
PRESET INSP. MIN. VOL. l/min
INSP. TIME %
Results in an inspiratory flow:
= 8 l/min
= 25%
= 8 × 100/25
= 32 l/min
Or
Adjustment of INSP. TIME% (use reverse value)
20% = 1/5 = 5
25% = 1/4 = 4
33% = 1/3 = 3
50% = 1/2 = 2
67% = 2/1.5 = 1.5
80% = 4/1.25 = 1.25
× PRESET INSP. MIN. VOL = inspiratory flow (l/min)
2
5
Panel functions
Expired minute volume
2
6
EXPIRED MINUTE VOLUME is indicated on a
meter which has dual scales: 0-40 l/min and
0-4 l/min.
The scale 0-4 l/min is intended for use when
greater accuracy, e. g. for infants, is needed.
The knobs for LOWER ALARM LIMIT and
UPPER ALARM LIMIT also have the same
dual scales.
The end stop positions for the knobs do not
coincide with the end positions on the scale.
This is correct and no attempt should be made
to alter the range.
The desired scale is selected with the switch
INFANTS/ADULTS.
The alarm limits for expired minute volume
must always be set. If either of the knobs has
been set in end position (out of scale), the
yellow lamp SET MIN. VOL. ALARM flashes.
The alarm limits are normally set at approx.
20% below and above the selected minute
volume. The upper limit may be set at approx.
30% above the selected minute volume in the
mode VOL. CONTR. + SIGH.
The APNEA ALARM is activated with audible
signals and flashing light if the time between
any two consecutive breaths, spontaneous or
mandatory or a combination of the two, is
greater than approximately 15 seconds
(4 breaths per minute or less). The APNEA
ALARM is not intended to and will not monitor
for disconnections. The APNEA ALARM is
operative in CPAP, PRESS. SUPPORT, SIMV
and SIMV + PRESS. SUPPORT.
Failure of gas supply to the ventilator will
result in visual and audible GAS SUPPLY
ALARM signals. The GAS SUPPLY ALARM is
not operative at respiratory rates over 80
breaths/min., and INSP. TIME % 20 or 25.
Panel functions
Special functions
Under the small hood below the UPPER
ALARM LIMIT knob are three pushbuttons for
special functions.
Inspiratory pause hold
When the pushbutton INSP. PAUSE HOLD is
depressed, the valves close after inspiration
and the pause is prolonged as long as the
pushbutton is depressed.
This provides an exact measurement of the
end inspiratory lung pressure. It may also give
time for an equilibration of the blood gas and
alveolar pressures.
INSP.
PAUSE
HOLD
EXP.
PAUSE
HOLD
GAS
CHANGE
Expiratory pause hold
The valves are closed, after the expiration, as
long as the pushbutton EXP. PAUSE HOLD is
depressed, i.e. a prolonged expiratory pause.
This provides an exact measurement of the
end expiratory lung pressure.
EXP. PAUSE HOLD must not be used in
SIMV or SIMV + PRESS. SUPPORT mode.
Two inspirations may occur at the same
time. However, the UPPER PRESS. LIMIT
is still functional.
Gas Change
The pushbutton GAS CHANGE is used, for
instance, when it is desirable to rapidly alter the
gas mixture to the patient. The concentration
setting on the vaporizer/gas mixer/flowmeters
must be altered first.
The inspiration and expiration valves open so
that the pressure in the patient circuit is max.
20 cm H2O.
During the gas changing time, the EXPIRED
MINUTE VOLUME meter is zeroed
automatically.
2
7
Panel functions
Airway Pressure
2
8
Airway pressure meter
The meter continually indicates the airway
pressure reading.
Upper pressure limit
The knob UPPER PRESS. LIMIT is used to set
the upper limit for airway pressure. When this
pressure limit has been reached, inspiration is
immediately discontinued and there is a
change over to the expiratory phase. Visual
and audible alarms are activated.
Since the inspiration is discontinued, the
complete tidal volume will not be delivered and,
consequently, the LOWER ALARM LIMIT for
EXPIRED MINUTE VOLUME may be
activated.
Upper pressure limit is connected in all
modes.
There are safety catches on the knob at 80
and 100 cm H2O.
PEEP
PEEP is the setting of a Positive End
Expiratory Pressure, e.g. used to counteract
the formation of atelectasis.
The PEEP range is from 0 to 50 cm H2O.
There are safety catches on the PEEP knob at
0 and at 20 cm H2O.
In case of a leakage, e.g. if a tracheal tube
without cuff is being used, the PEEP-setting
may cause self-triggering. To avoid this, the
TRIG. SENSITIVITY should be set at a
somewhat lower value.
The PEEP knob is prepared for NEEP
(Negative End Expiratory Pressure). In order
to use NEEP, it is necessary to connect
auxiliary equipment to the expiration outlet.
The NEEP range is from 0 to -10 cm H2O.
Panel functions
Trig. sensitivity
The knob TRIG. SENSITIVITY is used to set
the value of negative pressure that the patient
must produce in order to trigger a breath.
The TRIG. SENSITIVITY is relative to PEEP.
For instance, PEEP +10 and TRIG.
SENSITIVITY -2 cm H2O mean that the patient
must produce a pressure of -2 cm H2O relative
to the setting to trigger a breath.
This corresponds to a pressure of +8 cm H2O
relative to atmospheric pressure in the patient’s
airways.
The airway pressure, measured on the
expiration side, is compared with the preset
TRIG. SENSITIVITY + PEEP. If the airway
pressure drops below TRIG. SENSITIVITY +
PEEP, a breath is triggered.
If it is desirable for the patient to be able to
easily trigger the ventilator, the knob is set at
green value.
If it is undesirable for the patient to be able to
trigger the ventilator, the knob is set at
-20 cm H2O.
Trig. sensitivity is connected in all modes
except MAN. For further details, see
description on different modes.
Inspiratory pressure level
The knob INSP. PRESS. LEVEL is used to set
the constant inspiratory pressure, relative to
PEEP, when any of the following modes of
ventilation are used: PRESS. CONTR.,
PRESS. SUPPORT, SIMV + PRESS.
SUPPORT.
A safety catch is located at 30 cm H2O.
The total inspiratory pressure level also
includes PEEP. This is why there is a
marking under the PEEP knob leading to
the INSP. PRESS. LEVEL knob. At a PEEP
of +5 cm H2O and an INSP. PRESS.
LEVEL of +15 cm H2O, the total inspiratory
pressure level would be +20 cm H2O,
relative to atmospheric pressure.
2
9
Panel functions
SIMV
2
10
SIMV (Synchronized Intermittent Mandatory
Ventilation) means that the patient gets
mandatory breaths controlled by the ventilator,
and that he also has the possibility of breathing
spontaneously.
The mandatory breaths are synchronized
with the breaths of the patient so that he need
not breathe against the ventilator.
SIMV-rate (SIMV BREATHS/min) is the rate
of the mandatory breaths per minute. The rate
is set between 0.4 and 4 breaths per minute on
the LOW RATE scale, and between 4 and 40
breaths/min on the HIGH RATE scale. The
desired rate is selected by means of a switch.
There are two indicating lamps, one for each
rate.
The tidal volume and the frequency can be
read on the digital display.
Minute volume, respiratory rate, inspiration
time and pause time must be set for the
SIMV mode. These functions determine the
respiratory pattern of the mandatory
breaths. The BREATHS/min must always
be set higher than the SIMV BREATHS/min
to allow time for the spontaneous period.
The SIMV cycle is divided into SIMV period and
spontaneous period. See page 2:14.
Panel functions
O2 alarm
Alarm limits for O2 concentration are set with the
knobs UPPER ALARM LIMIT and LOWER
ALARM LIMIT. The SET O2 ALARM flashes if the
alarm limits have not been set.
The end stop positions for the knobs do not
coincide with the end positions on the scale.
This is correct and no attempt should be made to
alter the range.
The alarm limits are set as follows:
• Set O2 concentration on the gas mixer/
flowmeters.
• Set the parameter selector at O2 CONC. %
and read the value.
• Set the alarm limits at approx. 6% by volume
(3 scale divisions) below and above the O2
concentration reading on the digital display.
Visual and audible alarms are activated when
any of the alarm limits is exceeded.
If the O2 cell is expended but still mounted in
the ventilator, the O2 cell has to be disconnected.
If not, the LOWER ALARM LIMIT will activate
alarm.
If no O2 cell is mounted, neither digital displays
nor alarm is activated when the parameter
selector is set at O2 CONC. %.
Parameter selection
A digital display of the O2 concentration is given
when the selector is set in position O2 CONC. %.
Other displayable parameters are:
INSPIRED TIDAL VOLUME ml—the volume
provided by the ventilator at each breath.
EXPIRED TIDAL VOLUME ml—the volume
produced by the patient at each breath (with no
leakage in the patient circuit).
EXPIRED MINUTE VOLUME l/min—(also
indicated on the EXPIRED MINUTE VOLUME
meter).
PEAK PRESSURE cm H2O—the pressure at
the end of the inspiration phase.
PAUSE PRESSURE cm H2O—the pressure at
the end of the pause. This pressure normally
corresponds to the maximal alveolar pressure in
the lungs.
MEAN AIRWAY PRESSURE cm H2O—the
mean value in the patient circuit, continually
measured.
BREATHS/min—the respiratory rate of the
patient. In controlled ventilation, this value
equals the set respiratory rate plus eventual
patient triggered breaths. In the SIMV mode, it is
the sum of the spontaneous and the mandatory
breaths. In the CPAP and PRESSURE
SUPPORT modes, the value represents the
spontaneous breaths/min of the patient.
2
11
Pause
Exp.
Sigh
Flow
Pressure
Insp.
Volume controlled ventilation (VOL. CONTR.)
ensures that the patient receives a certain preset
tidal volume.
Servo Ventilator 900 C delivers a specific tidal
volume at a specific rate during a specific time
(preset values).
If the patient makes inspiratory efforts so that
the airway pressure falls below the triggering
level, a preset tidal volume will be delivered
earlier and the expired minute volume will
increase.
A constant or an accelerating flow can be
selected.
A patient trigg initiates a breath with the preset
values.
Volume controlled ventilation
+ sigh
In this mode of operation, the Servo Ventilator
900 C delivers a sigh every hundredth breath.
At sigh, double tidal volume is delivered since
the flow is constant and the inspiration time is
doubled.
The first sigh will occur at the second
inspiration after setting the mode selector to
VOL. CONTR. + SIGH.
The UPPER ALARM LIMIT for EXPIRED
MINUTE VOLUME may have to be set
somewhat higher in this mode.
Pressure controlled
ventilation
Pressure
12
Volume controlled ventilation
Flow
2
Flow
l/s
Pressure
cm H2O
Controlled ventilation
WORKING PRESSURE and UPPER
PRESS. LIMIT must always be set at
adequate values. This is extremely
important when treating infants.
In the mode PRESS. CONTR., gas is delivered
at a constant pressure during the set inspiration
time.
The pressure is set with the knob INSP.
PRESS. LEVEL.
The flow is decelerating in this mode.
The set inspiratory pressure, respiratory rate,
and inspiration time determine the volume the
patient will receive.
Servo Ventilator 900 C works with a constant
pressure during the entire inspiration.
The minute volume can be read on the
EXPIRED MINUTE VOLUME meter.
Tidal volume can be read on the digital display
with the parameter selector in position INSP.
TIDAL VOLUME or EXP. TIDAL VOLUME.
In case of leakage in the system, e.g. due to
the use of a tracheal tube without cuff, a pause
time of 0% is recommended to ensure that the
measurement of the expired minute volume will
be as correct as possible.
A patient trigg initiates a breath with the preset
values.
Supported ventilation
Flow
Pressure
Pressure supported
ventilation
Trig.
PRESS. SUPPORT is a spontaneous breathing
mode in which the patient must trigger breaths.
Some applications for PRESS. SUPPORT
are: weaning, patients suffering from asthma
or, in post-operative use, when the patient’s
own breathing efforts are insufficient.
When the patient triggers the ventilator, an
inspiration pressure support is given at a preset
constant pressure.
The ventilator regulates the pressure during
inspiration so that it corresponds to preset
INSP. PRESS. LEVEL + PEEP.
The pressure during expiration drops to
0 cm H2O, or alternatively to PEEP-level.
The change from inspiration to expiration
occurs when the flow decreases to 25% of the
peak inspiratory flow.
There are also safety functions to control the
change from inspiration to expiration, for
instance in the case of a leakage.
Expiration will then start when the step motor
has closed the inspiratory valve and the airway
pressure has increased to +3 cm H2O above
the preset INSP. PRESS. LEVEL + PEEP or
after 80% of the preset respiratory cycle.
Because of this safety function the respiratory
rate should always be set with the knob
BREATHS/min.
2
13
Supported ventilation
2
Pressure
SIMV cycle 10 s
SIMV period 4 s
Spontaneous period 6 s
SIMV cycle 10 s
SIMV period 4 s
Spontaneous period 6 s
Flow
14
!
@
A patient trig. during the SIMV period initiates a
mandatory breath. After that, spontaneous
breathing.
During the SIMV period no breath has been
triggered. The next period begins with a
mandatory breath. After that, spontaneous
breathing.
SIMV
SIMV (Synchronized Intermittent Mandatory
Ventilation) means that a preset number of
breaths are ventilator controlled, mandatory
breaths (SlMV BREATHS/min). The patient
may breathe spontaneously between those
breaths.
Breathing pattern and tidal volume for the
mandatory breaths are selected with the knobs
PRESET INSP. MIN. VOL., BREATHS/min,
INSP. TIME % and PAUSE TIME %.
The time in seconds for one SIMV cycle is
calculated from the formula
60
preset SIMV freq.
The SIMV cycle is divided into SIMV period
and spontaneous period.
The spontaneous period consists of
spontaneous breathing time if the patient has
triggered a mandatory breath during the
previous SIMV period.
If the patient has insufficient spontaneous
breathing, the maximum time between two
mandatory breaths is just over one SIMV cycle,
(cp 1 to 2 in the picture above).
To ensure adequate ventilation, apnea alarm is
activated if the time between two breaths
exceeds approx. 15 sec., and the minute volume
alarm is activated if any of the preset alarm limits
is exceeded.
Either of these alarms is a command to take
the necessary action (e.g. clinical judgement of
the patient, increased SIMV frequency, altered
trig. sensitivity).
The SIMV period is approx. equal to one
respiratory cycle.
The spontaneous period is calculated as SIMV
cycle-SIMV period.
Example:
BREATHS/min 15 ➞ SIMV period = 60 = 4 s
15
SIMV BREATHS/min 6 ➞SIMV cycle = 60 = 10 s
6
Spontaneous period ➞10-4 = 6 s
A patient trig during the SIMV period initiates a
breath with the preset values. A patient trig
during the spontaneous period opens the
inspiratory valve, and the patient can breathe
through the ventilator.
Supported and spontaneous ventilation
Spontaneous
period 6 s
2
15
Flow
Pressure
SIMV cycle 10 s
SIMV
period 4 s
These settings determine
the SIMV period.
This setting determines the
SIMV cycle.
SIMV period
Spontaneous period
INSP. PRESS. LEVEL
0 or PEEP-level
TRIG. SENSITIVITY
Flow
Pressure
SIMV cycle
Mandatory breath
Pressure supported
spontaneous breaths
Pressure
PEEP
Flow
TRIG. SENSITIVITY
SIMV + pressure support
The main difference between this mode and the
SIMV mode is that the spontaneous, triggered
breaths are pressure supported.
The level of support is set with the control
INSP. PRESS. LEVEL. The level also includes
PEEP.
See also description of pressure support on
page 2:13.
Care should be taken in setting the preset
BREATHS/min, so that the spontaneous
pressure-supported breaths are not
prematurely time-cycled rather than flowcycled to expiration.
Spontaneous ventilation
CPAP
In this mode, CPAP (Continuous Positive Airway
Pressure), the patient breathes spontaneously
through the ventilator at an elevated pressure
level. The positive pressure is set with the
PEEP control.
The TRIG. SENSITIVITY control must be set
at a position which allows the patient to trigger
the ventilator. Upon triggering, the inspiration
valve opens, and the patient can inspire through
the ventilator and control the tidal volume and
respiratory rate.
To avoid self-triggering due to leakage, the
trig. level should be set at a low value.
If CPAP (PEEP) = 0, it will be possible to
check the patient’s ability to breathe
spontaneously without help from the ventilator.
The minute volume, tidal volume and
respiratory rate can be monitored.
Manual ventilation
Manual ventilation
2
MAN
16
Electronic unit
MAN
AUT
Motor/
valve unit
The Manual Ventilation Accessory with Motor
consists of two units:
• Electronic unit
• Motor/valve unit
With this accessory switching between
manual ventilation and other modes is done with
the mode selector.
The valve is automatically set to the correct
position by a motor. The switch-over time is
about 5 seconds. An alarm with audible signals
and red light is activated if the positions of the
valve and mode selector are not the same.
In position MAN., the breathing bag is filled to a
pressure of about 4 cm H2O, then the inspiratory
valve closes.
When the breathing bag is squeezed, the gas
flows to the patient via a non-return valve.
AUT
Mode selector
If the breathing bag becomes overfilled, the
expiratory valve in the ventilator may go to a
locked position.
To unlock the valve:
• Set UPPER PRESS. LIMIT below 20 cm
H2O.
• Squeeze the breathing bag and check that
the pressure in the bag is lowered.
• Set UPPER PRESS. LIMIT back to the
lowest possible value for normal operation.
If the breathing bag becomes overfilled with
the manual ventilation valve in posotition AUT:
• Remove the breathing bag.
• Exchange the manual ventilation valve.
Always set UPPER PRESS. LIMIT at the
lowest possible value for normal operation.
The APNEA alarm is inoperative during
manual ventilation.
In the case of a power failure, manual
ventilation is not possible unless an
external power pack is connected.
PEEP cannot be used in manual
ventilation mode.
Set the mode selector to VOL. CONTR.
immediately before connecting the
ventilator to a patient. The reason is to zero
the gas flow reading.
At spontaneous breathing during manual
ventilation the following readings will be
incorrect.
– the displayed values for BREATHS/min.,
EXP. TIDAL VOLUME and EXP.
MINUTE VOLUME.
– the alarm monitoring instrument
EXPIRED MINUTE VOLUME.
The accuracy of the EXPIRED MINUTE
VOLUME meter reading decreases. After
about 5 minutes, the accuracy is about
±2 l/min. To get a correct meter reading,
the breathing bag should be squeezed at
least every 5 minutes.
For spontaneous breathing, the
PRESSURE SUPPORT mode is
recommeded. The INSP. PRESS. LEVEL
should be set at zero or at a low value. This
enables continuous monitoring of pressure
and volume.
Chapter 3
Patient safety
In this chapter:
Protective devices ......... 3:2
Alarm schedule.............. 3:4
3
1
Protective devices
3
2
Alarms
Important!
There are a number of alarms on the ventilator
which protect the patient by alerting ward
personnel to any malfunctions. Alarms are
given with audible signals and flashing red
lights. An audible signal only is given as alarm
for power failure and certain technical
malfunctions.
Some audible alarms can be switched off for
a period of approximately 2 minutes. For details
see the alarm schedule on page 3:4.
In addition there are panel indicators with
fixed or flashing yellow lights.
Examples are given in chapter 8,
Troubleshooting, regarding actions for various
alarms.
The patient is protected against high
pressure by an electronic limiter, which is
controlled by the knob UPPER PRESS. LIMIT.
If the value set with this knob is too high or if
the limiting function should fail, the pressure is
limited to the set WORKING PRESSURE.
The WORKING PRESSURE is prevented
from exceeding the set value by a safety valve
and cannot be set at values exceeding
120 cm H2O.
As an extra patient safety protection against
too high an airway pressure, there is a HIGH
PRESSURE PROTECTION circuit incorporated
when either of the modes CPAP, PRESS.
CONTR. or PRESS. SUPPORT is selected.
This protection circuit functions when the
airway pressure in the inspiration channel for
some reason, e.g. coughing, exceeds
30 cm H2O above INSP. PRESS. LEVEL/PEEP
level.
The SV 900 is not designed to withstand
severe negative pressures, which, if applied
to the system may damage the internal
pressure transducers rendering the unit
inoperable.
All audible alarms, with the exception of
upper pressure limit for airway pressure and
alarm for mains power failure, are switched
off for a period of 2 minutes when the button
2 min is depressed, while the red light
continues flashing. This means that no new
audible alarm will be possible during
approximately 2 minutes.
To switch off the power failure alarm, the
button must be depressed until the audible
alarm stops.
The APNEA ALARM is not intended to
and will not monitor for disconnections.
Transducer pressure range
SV 900 up to and including SIN 188499 are
factory equipped with pressure transducers
that will tolerate pressures down to -100 cm
H20(mbar), whereas units from S/N 188500
are factory equipped with pressure
transducers that will tolerate pressures
ranging from -500 cm H20(mbar) to +500
cm H20(mbar).
Earlier units may have been retrofitted with
Transducer Upgrade EM12102/l featuring the
same pressure tolerance as units with S/N
≥188500. Uppgraded units are identified with
a label !Upgrade EMO12/02/l’ attached to
the inside of the pneumatic unit lid.
If closed system suctioning is applied, the
following must be considered:
A suctioning flow exceeding the flow
delivered by the ventilator will result in a
negative pressure affecting the patients
airways as well as the ventilators breathing
system.
Do not use the “Pause hold” function during
the procedure.
Protective devices
3
3
!
Set minute volume alarm
Indicates that the alarm limits for expired
minute volume have not been set.
expiration. The alarm is given as a single
audible signal and a visual flashing signal.
^
Mains power failure
The green lamp for POWER ON goes out.
Slow audible signals which stop after 5-10
minutes.
Alarm limit, expired minute volume
Upper or lower alarm limit has been exceeded.
There are two alarm limit settings:
UPPER ALARM LIMIT
3-43 l/min (adults)
0-4.3 l/min (infants)
LOWER ALARM LIMIT
0-37 l/min (adults)
0-3.7 l/min (infants)
#
&
Set O2 alarm
Indicates that the alarm limits for O2
concentration have not been set.
Apnea alarm
The APNEA ALARM is activated with audible
signals and flashing light if the time between
any two consecutive breaths, spontaneous or
mandatory or a combination of the two, is
greater than approximately 15 seconds
(4 breaths per minute or less). The APNEA
ALARM is not intended to and will not monitor
for disconnections. The APNEA ALARM is
operative in CPAP, PRESS. SUPPORT, SIMV
and SIMV + PRESS. SUPPORT.
@
$
Alarm limit, O2 concentration
Upper or lower alarm limit has been exceeded.
If no O2 cell is mounted, neither digital
displays nor alarm is given.
A deterioration in the linearity and/or a rapid
fall in the values of O2 concentration, despite
adequate O2 supply, indicates that the O2 cell is
exhausted.
%
Upper pressure limit, airway pressure
The airway pressure exceeds the preset upper
pressure limit. When the alarm is activated,
inspiration and/or pause in progress is
immediately terminated and changed to
*
Gas supply alarm
This alarm is inoperative if the respiratory rate
exceeds 80 breaths/min (with inspiration time
20 or 25%).
In the CPAP and PRESS. SUPPORT modes,
a patient trig is required to activate the alarm.
Alarm schedule
2 min
Alarm
Visible
Audible
SET. MIN. VOL. ALARM
SET O2 ALARM
GAS SUPPLY ALARM
Mains power failure
Alarm limit, EXP. MIN. VOL.
UPPER PRESS. LIMIT
APNEA ALARM
Alarm limit, O2 CONC. %
*The green lamp goes out
**The button must be depressed until the alarm stops
Chapter 4
Set-ups
The Servo Ventilator 900 C is designed for
several different applications.
It can be positioned in many different ways,
e.g. on a cart, on an anesthesia table, on a wall
rail, or in an ambulance or a helicopter.
In this chapter:
Intensive care ................ 4:2
Anesthesia ..................... 4:4
Patient transportation ... 4:6
4
1
Intensive care 1
Two proposals are given regarding the set-up
of Servo Ventilator 900 C in intensive care.
This is only an example of a possible set-up.
Some of the equipment shown is available in
different versions, e.g. for adults and children.
For details, please see “Products and
Accessories” catalogue and, for patient tubing,
“Assembling instructions with order form”.
Basic equipment
Servo Ventilator 900 C
Extra equipment
CO2 Analyzer 930
!
@
#
$
%
^
&
*
(
BL
BM
BN
Lung Mechanics Calculator 940
4
2
Mobile cart
Mixer
Clamp
Support arm
Bacteria filter
Nipple connector
Patient tubes
Y-piece
Servo Humidifier
Nipple connector
Flex tube
Angled connector
Mingograf Recorder
Recorder Cable for Servo Ventilator 900 C
Manual ventilation accessory
Intensive care 2
This is only an example of a possible set-up.
Some of the equipment shown is available in
different versions, e.g. for adults and children.
For details, please see “Products and
Accessories” catalogue and, for patient tubing,
“Assembling instructions with order form.”
4
3
Basic equipment
Servo Ventilator 900 C
!
@
#
$
%
^
&
*
(
BL
BM
BN
Mobile cart
BO
BP
BQ
Exp. water trap
Water trap
Y-piece
Mixer
Bacteria filter
Humidifier
Extra equipment
CO2 Analyzer 930
Nipple connector
Lung Mechanics Calculator 940
Patient tubes
Mingograf Recorder
Muff, angled
Recorder Cable for Servo Ventilator 900 C
Nipple
Nipple
Flex tube
Angled connector
Cup for water trap
Manual ventilation accessory
Anesthesia 1
Two proposals are given regarding the set-up
of Servo Ventilator 900 C in anesthesia
applications.
This is only an example of a possible set-up.
Some of the equipment shown is available in
different versions, e.g. for adults and children.
For details, please see “Products and
Accessories” catalogue and, for patient tubing
“Assembling instructions with order form”.
Basic equipment
Servo Ventilator 900 C
BO
BP
BQ
BR
4
4
!
@
#
$
%
^
&
*
(
BL
BM
BN
Mobile cart
Mixer
Nipple connector
Flex tube
Angled connector
Gas evacuation equipment
Vaporizer
Nipple connector
Extra equipment
CO2 Analyzer 930
Manual ventilation accessory
Lung Mechanics Calculator 940
Tube
Mingograf Recorder
Bacteria filter
Tube joint
Breathing bag
Patient tubes
Y-piece
Servo Humidifier
Recorder Cable for Servo Ventilator 900 C
Anesthesia 2
This is only an example of a possible set-up.
Some of the equipment shown is available in
different versions, e.g. for adults and children.
For details, please see “Products and
Accessories” catalogue and, for patient tubing,
“Assembling instructions with order form.”
4
5
Basic equipment
Servo Ventilator 900 C
Anesthesia table
Rotameter box
!
@
#
$
%
^
&
*
(
Mixer
Bacteria filter
BL
BM
BN
BO
BP
Servo Humidifier
Nipple connector
Flex tube
Angled connector
Gas evacuation equipment
Suction equipment
Nipple connectors
Manual ventilation accessory
Tube
Tube joint
Breathing bag
Patient tubes
Y-piece
Extra equipment
CO2 Analyzer 930
Lung Mechanics Calculator 940
Mingograf Recorder
Recorder Cable for Servo Ventilator 900 C
Patient transportation
A proposal is given regarding the set-up of
Servo Ventilator 900 C during patient
transportation within the hospital, in an
ambulance or a helicopter.
This is only an example of a possible set-up.
Some of the equipment shown is available in
different versions, e.g. for adults and children.
For details, please see “Products and
accessories” catalogue and, for patient tubing
“Assembling instructions with order form”.
Basic equipment
Servo Ventilator 900 C
BM
BN
BO
BP
4
6
!
@
#
$
%
^
&
*
(
BL
Mobile cart
Mixer
Servo Humidifer
Nipple connector
Flex tube
Angled connector
Vaporizer
Bacteria filter
Manual ventilation accessory
Power pack
Gas cylinders
Tube
Tube joint
Patient tubes
Extra equipment
CO2 Analyzer 930
Y-piece
Lung Mechanics Calculator 940
Breathing bag
Chapter 5
Preparations
If any malfunction is detected during the
preparations, see chapter 8, Troubleshooting, or
chapter 13, Calibration.
In this chapter:
Prechecks and
presettings ..................... 5:2
Connections................... 5:3
5
1
Prechecks and presettings
!
Make sure that the ventilator has been cleaned
(see the log sheet).
@
Set the following on the ventilator:
• Mode selector at VOL. CONTR.
• Alarm limits to end positions, according to the
picture.
• Scale range for ADULTS.
• TRIG. SENSITIVITY to –20 cm H2O.
• UPPER PRESS. LIMIT to 80 cm H2O.
• PEEP and INSP. LEVEL to 0 cm H2O.
5
#
2
ADULTS
VOL. CONTR.
Make sure that the meters for EXPIRED
MINUTE VOLUME and AIRWAY PRESSURE
give a zero reading. If not, see Calibration,
chapter 13.
Connections
!
Connect patient tubes, holder arm, humidifier,
test lung and, if required, manual ventilation
accessory and gas evacuation accessory.
For details, see previous chapter.
The Manual Ventilation Accessory 963
must not be connected to Servo Ventilator
900 C. Always use the manual ventilation
accessory intended for Servo Ventilator
900 C only.
5
3
@
If required, connect CO2 Analyzer 930 and Lung
Mechanics Calculator 940.
#
POWER ON
GAS SUPPLY ALARM
SET MIN. VOL. ALARM
SET O2 ALARM
• Connect the ventilator to mains.
• Set the mains switch on the rear of the
ventilator to on. The switch has to be pulled
out before switching.
• Make sure that the green lamp lights up when
you switch on.
• Make sure that the meters for EXPIRED
MINUTE VOLUME and AIRWAY PRESSURE
still give a zero reading. If not, see
Calibration, chapter 13.
• Make sure that the GAS SUPPLY ALARM
activates.
• Make sure that the SET MIN. VOL. ALARM
and SET O2 ALARM flash.
$
Connect gases:
Alternative 1, via O2-air mixer or via O2-N2O/
O2-air mixer
• Set the desired O2 concentration.
At extremely high flows it may be
necessary to increase the working
pressure, in order to obtain the desired
minute volume.
Connections
Alternative 2, via O2-N2O/O2-air mixer and
vaporizer
• Connect a Halothane, Enflurane or Isoflurane
vaporizer.
• Set the desired O2 concentration.
5
4
Alternative 3, via low-pressure flowmeters
• Connect O2-N2O (air) via low-pressure
flowmeters, necessary pressures at least
equal to WORKING PRESSURE.
• Set the desired flow proportions of O2 and
N2O on the flowmeters, so that the total gas
flow exceeds PRESET INSP. MIN. VOL. of
the ventilator by 10-20%. The working
pressure will be constant and the flow pattern
unchanged in mode VOL. CONTR. In other
ventilation modes, only breaths with limited
tidal volumes can be maintained. The
limitation is shown by falling WORKING
PRESSURE.
Alternative 4, compressed air
• Connect compressed air.
Check on functions
• Carry out a check on functions according to
chapter 6.
Chapter 6
Check on
functions
A check on functions must always be carried out
after cleaning and before connecting a patient.
Accessories: Patient tubes, Y-piece, test lung
and manual ventilation accessory. If any
malfunction is detected during the check, see
chapter 8, Troubleshooting, or chapter 13,
Calibration.
In this chapter:
1. Checks prior to
connection of power
and gas ....................... 6:2
2. Start-up ....................... 6:2
3. Check for leakages .... 6:3
4. Check, manual
ventilation................... 6:3
5. Upper pressure limit
alarm ........................... 6:4
6. Minute volume ........... 6:4
7. Minute volume alarm . 6:4
8. O2 alarm ...................... 6:5
9. Apnea alarm ............... 6:5
10. Digital display ............ 6:6
11. Check on pressure
levels .......................... 6:6
12. Mains supply failure .. 6:6
13. Log sheet.................... 6:6
6
1
Prechecks
If preparation and prechecks, according to
chapter 5, have been done, start from para. 3.
1. Checks prior to
connection of power and gas
6
2
ADULTS
VOL. CONTR.
• Connect patient tubes, Y-piece, holder arm
and humidifier.
• Make sure that the meters for AIRWAY
PRESSURE and EXPIRED MINUTE
VOLUME give a zero reading.
• Set the mode selector at VOL. CONTR.
• Set alarm limits to end positions, according
to the picture.
• Set the scale range for ADULTS.
• Set the TRIG SENSITIVITY to -20 cm H2O.
• Set the UPPER PRESS. LIMIT to 80 cm H2O.
• Set PEEP and INSP. PRESS. LEVEL to
0 cm H2O.
2. Start-up
• Connect the ventilator to mains.
• Set the mains switch on the rear of the
ventilator to on.
• Make sure that the green lamp lights up
when you switch on.
• Make sure that the meters for AIRWAY
PRESSURE and EXPIRED MINUTE
VOLUME still give a zero reading.
• Make sure that GAS SUPPLY ALARM
activates.
• Make sure that SET MIN. VOL. ALARM and
SET O2 ALARM flash.
POWER ON
SET MIN. VOL. ALARM
GAS SUPPLY ALARM
SET O2 ALARM
3. Check for leakage
7.5
900C003S
60
10
INSP.=
30
25
EXP.=
60
0
1
2
4. Check of manual
ventilation accessory
MAN
3
CPAP
VOL. CONTR.
MAN.
VOL.CONTR + SIGH
4
VOL. CONTR.
PRESS. CONTR.
VOL.CONTR + SIGH
PRESS. SUPPORT
CPAP
MAN.
PRESS. CONTR.
PRESS. SUPPORT
5
6
VOL. CONTR.
VOL.CONTR + SIGH
O2 FLUSH
CPAP
MAN.
PRESS. CONTR.
PRESS. SUPPORT
7
8
VOL. CONTR.
VOL.CONTR + SIGH
CPAP
MAN.
PRESS. CONTR.
PRESS. SUPPORT
900C004S
9
• Connect gases according to chapter 5.
• Set the following: WORKING PRESSURE:
60 cm H2O, PRESET INSP. MIN. VOL.: 7.5 l/
min., BREATHS/min.: 10, PAUSE TIME:
30%, constant flow and INSP. TIME: 25%.
• Cover the Y-piece/Servo Humidifier and
make sure that AIRWAY PRESSURE and
the manometer WORKING PRESSURE
show the same reading during inspiration
and pause.
• Press and hold the INSP. PAUSE HOLD
button and make sure that the AIRWAY
PRESSURE reading does not drop more
than 3 cm H2O during 5 seconds.
• Release INSP. PAUSE HOLD and make
sure that the AIRWAY PRESSURE reading
falls to 0 during expiration.
• If AIRWAY PRESSURE drops more than
allowed, block the outlet pipe on the insp.
side and repeat as described. If the pressure
drop is within the allowed limit, the leakage is
to be found in the breathing system or the
exp. channel.
10
0
Applicable to manual ventilation accessory with
motor.
1. Attach a test lung.
2. Separate the valve and the motor units and
make sure that alarm is activated.
3. Set mode selector to MAN and make sure
that alarm is activated.
4. Set the valve arm to MAN and attach the
valve unit to the motor unit.
5. Push O2 FLUSH and make sure that the
breathing bag fills.
6. Set VOL. CONTR.
7. Compress the breathing bag and make
sure that there is no leakage (the gas
remains in the breathing bag).
8. Set MAN.
9. Compress the breathing bag with one hand
to fill the test lung. With the other hand,
immediately compress the test lung and
make sure that the expiration valve opens.
10. Let the breathing bag hang loose and be
filled. Then make sure that the EXPIRED
MINUTE VOLUME meter drops to 0.
6
3
Alarms
5. Upper pressure limit alarm
UPPER PRESS. LIMIT
• Set the mode selector at VOL. CONTR.
• Block the Y-piece/Servo Humidifier.
• Turn the knob UPPER PRESS. LIMIT to
55 cm H2O.
• Make sure that inspiration is terminated and
the alarm is activated.
• Turn the knob back to 80 cm H2O.
VOL. CONTR.
6. Minute volume
• Set the respiratory rate at 20 BREATHS/min.
• Connect a test lung.
• Set the parameter selector at EXP. MIN.
VOL. l/min.
• Make sure that the digital display and the
meter EXPIRED MINUTE VOLUME read
7.5 ± 0.5 l/min after a few minutes.
6
7. Minute volume alarm
4
EXP. MIN.
VOL. l/min
MIN. VOL. ALARM
Lower alarm limit
• Turn the knob LOWER ALARM LIMIT to
7.5 l/min and make sure that the alarm is
activated at 7.5 ± 0.5 l/min.
• Turn the knob LOWER ALARM LIMIT to
0 l/min.
If gas evacuation should be used:
• Connect the gas evacuation accessory.
• Set the LOWER ALARM LIMIT to the value
which is to be used during the treatment.
• Remove the test lung (“disconnect”).
• Make sure that the LOWER ALARM LIMIT is
activated.
• Make sure that the EXPIRED MINUTE
VOLUME meter reading is at least 25%
below the alarm limit setting.
• If the alarm is not activated:
—Set PEEP to 1 cm H2O
—Check the alarm and meter reading as
described above
or
—Decrease the evacuation flow until the
alarm is activated. Also check the meter
reading as described above.
Upper alarm limit
• Turn the knob UPPER ALARM LIMIT to
7.5 l/min and make sure that the alarm is
activated at 7.5 ± 0.5 l/min.
• Turn the knob UPPER ALARM LIMIT to
40 l/min.
Alarms
Alarmas
8. O2 alarm
When checking the O2 alarm, the working
pressure must be 60 cm H2O since the O2
cell is calibrated at this pressure.
If there is no O2 cell, no digital display is
given when O2 CONC. % is set on the
parameter selector.
If the O2 cell is expended but still
mounted, it has to be disconnected. If not,
the LOWER ALARM LIMIT will be
activated.
A deterioration in the linearity and/or a
rapid fall in the values of O2 concentration,
despite adequate O2 supply, indicates that
the O2 cell is exhausted.
6
5
60
900C000S
2022%
O2 KONC.
%
O
2 CONC. %
• Set the parameter selector at O2 CONC. %.
• Set the gas mixer at the lowest O2
concentration value (air) and make sure that
the digital display shows 20-22%.
• Set the gas mixer so that 40% is read on the
digital display.
900C001S
Lower alarm limit
• Turn LOWER ALARM LIMIT clockwise and
make sure that alarm is activated when the
knob setting corresponds to the digital
display (±1 scale division).
• Turn LOWER ALARM LIMIT to 18%.
O22 LARM
ALARM
Upper alarm limit
• Turn UPPER ALARM LIMIT counterclockwise and make sure that alarm is
activated when the knob setting corresponds
to the digital display (±1 scale division).
• Turn UPPER ALARM LIMIT to 100%.
9. Apnea alarm
APNEA ALARM
PRESS. SUPPORT
• Set TRIG. SENSITIVITY at -10.
• Set the mode selector at PRESS.
SUPPORT.
• Make sure that the APNEA ALARM is
activated approx. 15 s after the mode
change.
Pressures
10. Digital display
• Set the parameter selector at BREATHS/min.
• Make sure that the value set with the
BREATHS/min knob corresponds to the
BREATHS/min value read on the digital
display.
11. Check on pressure levels
BREATHS/min
6
6
PRESS. CONTR.
EXP.
VOL. CONTR.
•
•
•
•
•
Set the mode selector at PRESS. CONTR.
Set BREATHS/min. to lowest value.
Set PEEP at +10 cm H2O.
Set INSP. PRESS. LEVEL at +10 cm H2O.
Make sure that the reading on the AIRWAY
PRESSURE meter remains at
+20 ± 2 cm H2O during inspiration.
• Make sure that a PEEP level of
10 ± 2 cm H2O is maintained on the AIRWAY
PRESSURE meter at the end of expiration.
• Set PEEP and INSP. PRESS. LEVEL at
0 cm H2O.
• Set the mode selector at VOL. CONTR.
12. Mains supply failure
alarm
• Switch off the ventilator with the mains switch
on the rear.
• Make sure that the green lamp POWER ON
goes out and the audible alarm sounds.
13. Log sheet
• Note on the log sheet that a check on
functions has been carried out.
If any malfunctions are detected during the
check, see chapter 8, Troubleshooting, or
chapter 13, Calibration.
Chapter 7
Connection to
patient
Be careful when moving the ventilator from the
preparation room to the operating theatre. If you
bump into something, it may be necessary to
check the functions before connection to
patient.
For detailed description of the functions, see
chapter 2.
Always start with ventilator checked
according to chapter 6.
In this chapter:
Compressible volume and
dead space ........................7:2
Controlled ventilation
VOL. CONTR. or
VOL. CONTR. + SIGH .............. 7:4
PRESS. CONTR. ...................... 7:5
Supported ventilation
PRESS. SUPPORT ................... 7:6
SIMV .......................................... 7:7
SIMV + PRESS. SUPPORT ...... 7:8
Spontaneous ventilation
CPAP......................................... 7:9
Manual ventilation
MAN ....................................... 7:10
7
1
Compressible volume and dead space
Compensation for
compressible volume
Some of the preset minute volume does not
reach the patient because it is needed for
compression of gas in tubes and humidifier.
The compressible volume of the Servo
Ventilator itself is negligible.
When setting the preset insp. minute volume,
the compressible volume must be compensated
for by adding a corresponding minute volume to
the minute volume for the patient.
Compensation procedure
!
Connect the complete breathing system with
patient tubes and Servo Humidifier or heater
humidifier to the Servo Ventilator.
7
2
@
VOL. CONTR.
Set WORKING PRESSURE at 60 cm H2O.
#
Set the front panel values as shown. (Values
marked in green).
$
Set PRESET INSP. MIN. VOL. at 10 l/min.
%
Set UPPER PRESS. LIMIT for AIRWAY
PRESSURE at 80 cm H2O.
^
Set the parameter selector at INSP. TIDAL
VOLUME.
&
INSP. TIDAL VOL.
Block the opening of the Y-piece/Servo
Humidifier.
*
Note the reading on the INSP. TIDAL VOLUME
(ml) display.
Compressible volume and dead space
(
Set the Servo Ventilator as desired for the
patient (including the desired minute volume for
the patient) and connect the patient. See pages
7:4 to 7:10.
BL
PAUSE
PRESS.
PRESET INSP.
MIN. VOL. (l/min)
Set the parameter selector at PAUSE
PRESSURE and read actual pause pressure
when the patient is connected.
BM
Calculate compensation (l/min) for compressible
volume =
=
read INSP. TIDAL. VOLUME (ml)
according to item 8 above
1000 (ml/l)
×
read PAUSE PRESSURE (cm H2O) set BREATHS/
according to item 10 above
× min according
60 (cm H2O)
to item 9 above
BN
Set PRESET INSP. MIN. VOL. = desired minute
volume for the patient + compensation (l/min)
for compressible volume (calculated in item
Example 1 (Servo Humidifer):
11 above).
Read INSP. TIDAL VOLUME (item 8)
= 54 ml (at pause pressure 60 cm H2O).
Desired minute volume for the patient
= 7.5 l/min.
Set BREATHS/min (item 9)
= 15.
Read PAUSE PRESSURE (item 10)
= 22 cm H2O.
Compensation for compressible volume (item 11) = 54 × 22 × 15 = 0.3 l/min.
1000
60
PRESET INSP. MIN. VOL. (item 12)
7.5 + 0.3 = 7.8 l/min.
Example 2 (Heater humidifier):
Read INSP. TIDAL VOLUME (item 8)
Desired minute volume for the patient
Set BREATHS/min (item 9)
Read PAUSE PRESSURE (item 10)
Compensation for compressible volume (item 11)
PRESET INSP. MIN. VOL. (item 12)
=
=
=
=
=
88 ml (at pause pressure 60 cm H2O).
9.0 l/min.
17.
24 cm H2O.
88 × 24 × 17 = 0.6 l/min.
1000
60
9.0 + 0.6 = 9.6 l/min.
Compensation for dead space
– Servo Humidifier 151:
– Servo Humidifier 152:
– Servo Humidifier 153 (incl. flex tube):
– CO2 cuvette adult (for CA 930/CM 130):
– CO2 cuvette infant (for CA 930/CM 130):
35 ml
55 ml
70 ml
5 ml
2.5 ml
When setting PRESET INSP. MINUTE VOLUME,
dead space in the breathing system between the
Y-piece and the patient should also be
compensated for.
Dead space for some accessories is shown in
the table to the left.
7
3
Controlled ventilation
VOL. CONTR. or VOL. CONTR. + SIGH
7
Connect the patient
4
!
To protect the patient against high pressures,
always start from a low value.
BN
Set the WORKING PRESSURE.
Set the UPPER PRESS. LIMIT for AIRWAY PRESSURE to
approximately 10 cm H2O above the patient’s airway pressure.
@
BO
Set the mode selector at VOL. CONTR. or VOL. CONTR. +
SIGH.
Set the TRIG. SENSITIVITY.
#
Set the scale INFANTS/ADULTS.
Set the desired minute volume (e.g. by means of a Radford
nomogram).
BQ
$
Select the curve shape for the inspiration flow.
%
Set the respiratory rate, BREATHS/min.
^
Set the INSP. TIME %.
&
Set the PAUSE TIME %.
*
BP
Connect the ventilator to the patient and check:
– that the patient’s chest rises and falls in time with the preset
respiratory rate.
– the tidal volumes on the digital display and the reading on the
EXPIRED MINUTE VOLUME meter.
– that the AIRWAY PRESSURE meter gives a reading during
inspiration, and that the reading falls to 0 cm H2O or,
alternatively, to PEEP-level during expiration.
BR
Set the LOWER ALARM LIMIT and UPPER ALARM LIMIT for
EXPIRED MINUTE VOLUME. If the VOL. CONTR. + SIGH
mode is selected, it may be necessary to increase the UPPER
ALARM LIMIT for EXPIRED MINUTE VOLUME as well as the
UPPER PRESS. LIMIT for AIRWAY PRESSURE. This is done
in order to avoid activating the alarms when the sigh occurs.
Set the mixer.
(
Set the LOWER ALARM LIMIT and UPPER ALARM LIMIT
for O2 CONC. %.
BL
Set the parameter selector.
BM
Set the PEEP-level.
In VOL. CONTR. or VOL. CONTR. + SIGH mode
with respiratory rate above 80 BREATHS/min,
INSP. TIME % should be set at 33 or 50%.
Otherwise the ventilator may give incorrect
minute volumes and incorrect EXPIRED
MINUTE VOLUME meter readings.
Controlled ventilation
PRESS. CONTR.
Connect the patient.
To protect the patient against high pressures,
always start from a low value.
!
BM
Set the WORKING PRESSURE.
@
Set the UPPER PRESS. LIMIT for AIRWAY
PRESSURE.
Set the mode selector at PRESS. CONTR.
BN
#
Set the TRIG. SENSITIVITY.
Set the respiratory rate, BREATHS/min.
BO
$
Set the scale INFANTS/ADULTS.
Set the INSP. TIME %.
BP
%
Set the LOWER ALARM LIMIT and UPPER
ALARM LIMIT for O2 CONC. %.
Connect the patient and adjust the INSP.
PRESS. LEVEL so that the patient receives
decided tidal volumes and check:
– the reading on the EXPIRED MINUTE
VOLUME meter.
– that the AIRWAY PRESSURE meter gives a
reading during inspiration, and that the reading
falls to 0 cm H2O, or alternatively, to PEEPlevel, during expiration.
*
BQ
Set the parameter selector.
Set the LOWER ALARM LIMIT and UPPER
ALARM LIMIT for EXPIRED MINUTE VOLUME.
Set the PAUSE TIME %.
^
Set the mixer.
&
(
Set the INSP. PRESS. LEVEL.
BL
Set the PEEP-level.
7
5
Supported ventilation
PRESS. SUPPORT
7
Connect the patient
6
To protect the patient against high pressures,
always start from a low value.
!
(
Set the WORKING PRESSURE.
@
Set the UPPER PRESS. LIMIT for AIRWAY
PRESSURE.
Set the mode selector at PRESS. SUPPORT.
BL
#
Set the TRIG. SENSITIVITY.
Set the respiratory rate, BREATHS/min.
(determines the length of inspiration time).
BM
$
BN
Set the mixer.
Set the INSP. PRESS. LEVEL.
Connect the patient and check that he can
trigger the ventilator. Adjust the INSP. PRESS.
LEVEL so that the patient receives decided
tidal volumes and check:
–the reading on the EXPIRED MINUTE
VOLUME meter.
– that the AIRWAY PRESSURE meter gives a
reading during inspiration, and that the reading
falls to 0 cm H2O or, alternatively, to PEEPlevel during expiration.
*
BO
Set the PEEP-level.
Set the LOWER ALARM LIMIT and UPPER
ALARM LIMIT for EXPIRED MINUTE VOLUME.
%
Set the LOWER ALARM LIMIT and UPPER
ALARM LIMIT for O2 CONC. %.
^
Set the parameter selector.
&
Set the scale INFANTS/ADULTS.
Supported ventilation
SIMV
Connect the patient.
To protect the patient against high
pressures, always start from a low value.
!
BM
Set the WORKING PRESSURE.
Set the parameter selector.
@
BN
Set the mode selector at SIMV.
Set the PEEP-level.
#
BO
Set the rate, LOW RATE/HIGH RATE.
Set the UPPER PRESS. LIMIT for AIRWAY
PRESSURE.
$
Set the SIMV BREATHS/min.
BP
%
Set the TRIG. SENSITIVITY.
Set the PRESET INSP. MIN. VOL. l/min.
BQ
^
Set the scale INFANTS/ADULTS.
Set the respiratory rate, BREATHS/min.
BR
&
Connect the patient and check:
– that the patient can trigger the ventilator.
– the tidal volumes on the digital display and
the reading on the EXPIRED MINUTE
VOLUME meter.
– that the AIRWAY PRESSURE meter gives a
reading during inspiration, and that the reading
falls to 0 cm H2O or, alternatively, to PEEPlevel, during expiration.
Set the INSP. TIME %.
*
Set the PAUSE TIME %.
(
Set the mixer.
BL
Set the LOWER ALARM LIMIT and UPPER
ALARM LIMIT for O2 CONC. %.
BS
Set the LOWER ALARM LIMIT and UPPER
ALARM LIMIT for EXPIRED MINUTE VOLUME.
7
7
Supported ventilation
SIMV + PRESS. SUPPORT
To protect the patient against high pressures,
7
8
Connect the patient.
!
always start from a low value.
BN
Set the WORKING PRESSURE.
Set the INSP. PRESS. LEVEL.
@
BO
Set the mode selector at SIMV + PRESS. SUPPORT.
Set the PEEP-level.
#
BP
Set the rate, LOW RATE/HIGH RATE.
$
Set the UPPER PRESS. LIMIT for AIRWAY
PRESSURE.
Set the SIMV BREATHS/min.
BQ
%
Set the TRIG. SENSITIVITY.
Set the PRESET INSP. MIN. VOL. l/min.
BR
^
Set the scale INFANTS/ADULTS.
Set the respiratory rate, BREATHS/min.
BS
&
Connect the patient and check that he can trigger the
ventilator. Adjust the INSP. PRESS. LEVEL so that
the patient receives the decided tidal volumes and
check:
– the reading on the EXPIRED MINUTE VOLUME
meter.
– that the AIRWAY PRESSURE meter gives a
reading during inspiration, and that the reading falls
to 0 cm H2O or, alternatively, to PEEP-level during
expiration.
Set the INSP. TIME %.
*
Set the PAUSE TIME %.
(
Set the mixer.
BL
Set the LOWER ALARM LIMIT and UPPER ALARM
LIMIT for O2 CONC. %.
BM
Set the parameter selector.
BT
Set the LOWER ALARM LIMIT and UPPER ALARM
LIMIT for EXPIRED MINUTE VOLUME.
Spontaneous ventilation
CPAP
Connect the patient.
To protect the patient against high
pressures, always start from a low value.
!
*
Set the WORKING PRESSURE.
Set the TRIG. SENSITIVITY.
@
(
Set the mode selector at CPAP.
Set the scale INFANTS/ADULTS.
#
BL
Set the mixer.
^
Connect the patient and check:
– that he can trigger the ventilator.
– the tidal volumes on the digital display and
the reading on the EXPIRED MINUTE
VOLUME meter.
– that the AIRWAY PRESSURE meter gives a
reading during inspiration, and that the reading
falls to 0 cm H2O or, alternatively, to PEEPlevel during expiration.
Set the PEEP-level.
BM
&
Set the LOWER ALARM LIMIT and UPPER
ALARM LIMIT for EXPIRED MINUTE VOLUME.
$
Set the LOWER ALARM LIMIT and UPPER
ALARM LIMIT for O2 CONC. %.
%
Set the parameter selector.
Set the UPPER PRESS. LIMIT for AIRWAY
PRESSURE.
7
9
Manual ventilation
Manual ventilation valve in position MAN.
Connect the patient.
7
10
Set the values to be used after completed
manual ventilation.
*
!
Set the WORKING PRESSURE.
@
Set the mode selector at MAN.
To protect the patient against high
pressures, always start from a low
value.
BL
Set the scale INFANTS/ADULTS.
BM
Set the parameter selector.
Connect the patient and check:
– that the patient’s chest rises and falls when
manual ventilation is performed.
– the tidal volumes on the digital display and
the reading on the EXPIRED MINUTE
VOLUME meter.
– that the AIRWAY PRESSURE meter gives a
reading during inspiration, and that the reading
falls to 0 cm H2O or, alternatively, to PEEPlevel during expiration.
^
BN
Make sure that the manual ventilation valve is
in position MAN.
Set the LOWER ALARM LIMIT and UPPER
ALARM LIMIT for EXPIRED MINUTE VOLUME.
#
Set the mixer.
$
Set the LOWER ALARM LIMIT and UPPER
ALARM LIMIT for O2 CONC. %.
%
&
Set the PRESET INSP. MIN. VOL. l/min. (Set
the value so that the breathing bag becomes
satisfactorily filled).
*
Set the UPPER PRESS. LIMIT for AIRWAY
PRESSURE.
(
Set the PEEP-level.
Always set UPPER PRESS. LIMIT during
manual ventilation.
In the case of a power failure, manual
ventilation is not possible with Servo
Ventilator 900 C.
The Manual Ventilation Accessory 963
must not be connected to Servo Ventilator
900 C.
Chapter 8
Clinical judgement
and Troubleshooting
Clinical judgement when an alarm indicates that
preset ventilation can no longer be maintained.
If possible, try to first eliminate technical faults
by carrying out a check on functions.
In this chapter:
Clinical judgement ........... 8:2
Technical troubleshooting 8:6
81
Clinical judgement — Minute volume
LOWER ALARM LIMIT for EXPIRED MINUTE VOLUME has activated an alarm
82
Cause
Symptoms and diagnostic Suggested treatment
aids
Leakage between the
tracheal wall and tracheostomy
tube or cannula.
An air leakage may be detected
by palpation or auscultation over
the trachea.
Temporary increase of lung
volume.
Variations in measured expired
minute voume (spontaneous
breaths or sigh).
Ventilation obstruction, resulting
UPPER PRESS. LIMIT for
See UPPER PRESS. LIMIT for
in a pressure activated
interruption of inspiration.
AIRWAY PRESSURE has also
activated an alarm.
AIRWAY PRESSURE.
Insufficient patient respiration
during SIMV, CPAP, PRESS.
SUPPORT.
Variations in the measured
expired minute volume.
Revert to normal ventilation, or
SIMV-position which gives an
increased, controlled ventilation.
In SIMV, increase the SIMV
BREATHS/min. or the preset tidal
volume.
In PRESS. SUPPORT, increase
the INSP. PRESS.LEVEL if the
tidal volume is too small but the
patient has adequate respiratory
rate.
Correct cuff pressure. If the
leakage cannot be sealed, increase
the PRESET INSP. MIN. VOL. so
that expired minute volume settles
at a suitable level. Leakages
mainly occur during the inspiration
phase and the pause at the end of
inspiration when the pressure in
the trachea is high.
Prolonged inspiration time.
Clinical judgement — Minute volume
UPPER ALARM LIMIT for EXPIRED MINUTE VOLUME has activated an alarm
Cause
Symptoms and diagnostic
aids
Temporary decrease in lung
volume.
Variations in measured expired
minute volume (spontaneous
breaths, compression of the lungs
during thoracic surgery).
Increase in respiration rate.
A signal is also given by the yellow
lamp below TRIG. SENSITIVITY,
indicating that the patient triggers
breaths at a faster rate than the
preset basic rate of the ventilator.
However, in volume controlled
ventilation the patient can also
be breathing at the same rate as
the preset rate on the ventilator.
In assisted ventilation, check the
BREATHS/min. on the digital
display.
Suggested treatment
In conjunction with suction of the
trachea and other measures, and
also due to a number of other
factors (hypoxia, rise in
temperature, pain, restlessness,
physical activity, physiotherapy,
etc.) increased ventilation may
be necessary. The patient can
compensate for an increased
demand on ventilation by
using the patient-triggering
system, if it is set at a suitable
level.
If the necessity of increased
ventilation is long-term, this
indicates some action (like
increasing the ventilation volume,
but with increased oxygen supply,
reduction of oxygen consumption
by sedatives, analgesics and
antipyretics).
83
Clinical judgement — Pressures
UPPER PRESSURE LIMIT for AIRWAY PRESSURE has activated an alarm
(Combined with an interruption of inspiration, in which case LOWER ALARM for EXPIRED
MINUTE VOLUME may also have been activated.)
Cause
84
Symptoms and diagnostic
aids
Suggested treatment
Airways obstructions
In cases of substantial
obstructions, recordings of flow
and airway pressure indicate
increased airway resistance.
Increased elastic resistance
(low compliance) may also occur
at the same time. When the
UPPER PRESS. LIMIT for AIRWAY
PRESSURE is repeatedly
exceeded and, at the same time,
accompanied by interruptions of
inspiration, the expired minute
volume falls, and an alarm is
activated.
a) Accumulation of mucus in
airways.
Auscultatory rales, Rhoncal
fremitus on parts of the chest.
Suction, Expectorants,
Physiotherapy.
b) Bronchospasm. Bronchit.
Whistling or wheezing respiratory
sounds during auscultation.
Bronchodilator drugs, etc.
c) Tracheostomy tube or cannula
has slipped out of the trachea, or
has been kinked or twisted, so
that the opening is blocked. The
cuff protrudes over the opening
of the tube or cannula. Coagulate
or dried mucus block the airway.
Often occurs suddenly and with
variations. Difficult to insert a
suction catheter. Resistance is
felt when ventilating manually
with a breathing bag.
Removal of kinks or correction of
position. Possibly a reduction of
pressure in the cuff, and possibly
a replacement of tracheostomy
tube or cannula. In case of an
absolute blockage, it may be
necessary to withdraw the
cannula or tube. The blockage
can often be located in the orifice
of the tube.
Clinical judgement — Pressures
Cause
Symptoms and diagnostic
aids
Suggested treatment
Reduced elasticity of the
respiratory organs.
Recordings of flow and pressure
indicate a high elastic resistance
(low compliance).
a) Increased muscular tonus
in the patient. Coughing.
Sometimes caused by mucus,
often after suction. The patient
works against the ventilator.
Temporary increase of minute
volume and BREATHS/min.
Often more convenient for the
patient if the inspiratory flow is
increased by reducing INSP.
TIME %, until negative airway
pressure caused by spontaneous
breathing ceases. Consider
administering analgesics and
sedatives. Blood gas tests.
Adjustment of ventilator settings
and alarm limits.
b) Atelectasis, pneumonia,
pulmonary edema.
Reduced respiratory sounds over
affected sections of the lungs.
Possible rales during auscultation.
Roentgenologic changes. Often
accompanied by hypoxia.
Check of blood gases. PEEP,
physiotherapeutic treatment,
change of patient’s position,
postural drainage, sigh function.
c) Blockage of main bronchus.
The cause is often that the
tracheal or the tracheostomy tube
has slipped too far down.
Reduced respiratory sounds.
Roentgenologic changes.
Irregular movements of the
thorax. Hypoxia, increased
resistance and reduced
compliance.
Adjustment of tube position.
Often occurs suddenly.
Reduced respiratory sounds,
and increased percussive tone
over the affected side. Sometimes
followed by subcutaneous
emphysema. Roentgenologic
changes.
Out-suction of air in pleura.
d) Pneumothorax.
85
TRIG. SENSITIVITY lamp flashes
Cause
Patient triggers spontaneous
breaths.
Symptoms and diagnostic
aids
Suggested treatment
The airway pressure (SIMV not
used) is usually negative (or
under preset PEEP-level) only at
the start of inspiration. Negative
pressure (or pressure under
preset PEEP-level) during the
whole inspiration indicates a
considerable deviation between
preset minute volume and the
minute volume the patient needs.
SIMV treatment normally. Patient
triggering is more often
acceptable and suitable. Usually
the patient requires a larger gas
volume than that supplied by the
controlled breaths. In cases of
unexpected patient triggering, an
increase of preset minute volume
should be considered.
Technical trouble — Power
Ventilator does not start
Malfunction
Possible cause
Action
Power cable not connected.
Connect power cable.
Blown fuse in ventilator.
Replace fuse.
On-Off switch in the Offposition.
Switch to On.
Ventilator stops during operation
Malfunction
Possible cause
Action
Green lamp goes out, ventilator
stops, audible alarm.
No mains supply.
Ventilate patient manually.
Manual ventilation accessory
on Servo Ventilator 900 C
cannot be used during a
power failure.
Green lamp goes out at intervals
+ simultaneous stop of ventilator.
86
Loose connection.
Insert the power cable in wall
socket or ventilator socket
properly.
Technical trouble — Pressures
Fault in working pressure
Malfunction
Possible cause
Action
Pressure/flow from gas source not
enough.
Fault in gas supply.
Low-pressure connection:
increase gas volume/pressure.
High-pressure connection:
check gas source/mixer.
Large tidal volumes and short
inspiration times set on ventilator.
Incorrectly adjusted inlet valve in
gas supply unit.
Change respiratory pattern or gas
volume.
To be dealt with by service
technician.
WORKING PRESSURE reading
is 0, but GAS SUPPLY ALARM
not activated.
Tube connection is loose between
the safety valve and the
manometer for WORKING
PRESSURE.
Connect tube connections.
WORKING PRESSURE reading
is 0. GAS SUPPLY ALARM is
activated. (Alarm is also activated
for the LOWER ALARM LIMIT for
EXPIRED MINUTE VOLUME).
Working pressure not set.
Insufficient gas supply.
Deformed valve arm on gas
supply unit.
Set working pressure.
Check gas connections/gas
mixers/flowmeters.
To be dealt with by service
technician.
Possible cause
Action
Loose tube between inspiration
channel and pressure transducer.
Attach the tube.
Working pressure varies.
No airway pressure
Malfunction
AIRWAY PRESSURE reading
is 0.
UPPER PRESS. LIMIT ALARM for AIRWAY PRESSURE has been activated
Malfunction
Possible cause
Action
Accumulation of secretion.
Suction of trachea
Kink in tracheal tube.
Remove the kink or replace the
tube.
Patient tries to breathe, increased
muscle-tonus.
Clinical judgement.
The tracheal tube has slipped
down into a bronchus.
Correct the tube position.
Spasms in respiratory airways.
Medicaments.
Change in patient’s positioning
e.g. on operation table.
Possible change of respiratory
pattern.
Pneumothorax.
Suction drainage.
Sigh.
Set the UPPER PRESS. LIMIT
alarm somewhat higher.
87
Technical trouble — Minute volume
LOWER ALARM LIMIT for EXPIRED MINUTE VOLUME has been activated
Malfunction
88
Leakage in ventilator
Possible cause
Action
Connection between patient and
ventilator has loosened.
Reconnect the connections, e.g.
Y-piece, trach. tube, patient tube,
water trap.
Leakage in trach. tube/cannula
cuff.
Adjust the cuff, or change trach
tube/cannula cuff.
Changes in upper airway
pressure so that the expiration
valve opens at attained upper
pressure limit.
Same action as for UPPER
PRESS. LIMIT alarm for airway
pressure.
Insufficient patient respiration,
during SIMV, SIMV + PRESS.
SUPPORT, PRESS. SUPPORT
or CPAP.
Change SIMV-rate, INSP.
PRESS. LEVEL, or change to
controlled ventilation.
Working pressure too low (lower
than the airway pressure needed
to provide preset ventilation).
Increase working pressure, or
change respiratory pattern.
Insufficient gas supply, e.g. from
flowmeters.
At low pressure: increase gas
flow. At high pressure: check gas
source/mixer.
Leakage due to poor assembling
of parts of inspiration channel or
expiration channel.
Assemble correctly.
Safety valve out of position.
Put the valve in position.
Connection to one of the pressure
transducers has loosened.
Reconnect.
Rubber valve defect on insp./exp.
side.
Replace rubber valve.
Technical trouble — Minute volume
UPPER ALARM LIMIT for EXPIRED MINUTE VOLUME has been activated
Malfunction
Possible cause
Action
Deeper breaths in VOL. CONTR. +
SIGH, increase in expired minute
volume (every hundredth breath).
Set the UPPER ALARM LIMIT
somewhat higher.
Patient breathes more than
expected during SIMV, SIMV +
PRESS. SUPPORT, CPAP,
PRESS. SUPPORT.
Clinical judgement.
Condensation in exp. flow
transducer.
Empty water trap if necessary.
Protect exp. inlet by an angled
humidity trap or a bacteria filter.
Dry run the ventilator with a test
lung if these actions are not
enough.
Particles of medicines in exp. flow
transducer.
Replace exp. flow transducer (or
try to clean the transducer
according to chapter 10).
Flow transducer is defective.
Replace exp. flow transducer.
89
Technical trouble—Others
O2 cell
Malfunction
Possible cause
Action
No digital display when O2
O2 cell not inserted.
CONC. % is selected.
Insert an O2 cell (see chapter 12).
Rapidly falling O2 CONC. %
values. LOWER ALARM LIMIT
activates an alarm.
a) Insufficient O2 supply.
b) O2 cell exhausted.
c) O2 cell not properly inserted.
a) Regulate O2 supply.
b) Replace O2 cell (see chapter 12)
c) Insert properly.
UPPER ALARM LIMIT activates
an alarm.
Insufficient air/N2O supply.
Regulate gas supply.
Leakage detected in ventilator during check on functions
Malfunction
Possible cause
Action
Connection between safety valve
and manometer has loosened.
Reconnect.
Leakage at inlet valve of gas
supply unit.
Replace gas supply unit.
Leakage in non-return valve of
gas supply unit.
Replace gas supply unit.
Leakage in bellows.
Replace bellows (see chapter 11).
Overfilling of bellows, safety valve Valve arm to be adjusted by
opens (caused by deformed valve service technician.
arm on gas supply unit).
8
10
Leakage in bacteria filter.
Replace gas supply unit.
Bad connections in the inspiratory Connect properly.
or expiratory channel.
Incorrect values/readings during check on functions
Malfunction
Possible cause
Action
Ventilator not calibrated.
Calibrate ventilator (see chapter
13).
Possible cause
Action
Noises
Malfunction
Rattle from step motor.
“Singing” noise from springs
under the bellows.
Must be dealt with by service
technician as soon as possible.
Springs hook into one another.
Dealt with by service technician,
Not dangerous and does not
when convenient.
interfere with function of ventilator.
Trig sensitivity flashes without activity from the patient
Malfunction
Possible cause
Leakage in the expiratory channel
which causes spontaneous
triggering (when PEEP is used in
the presence of leakages).
Action
Chapter 9
Recording
The ventilator can be connected to a recorder,
e.g. a Siemens-Elema Mingograf.
In this chapter:
Connection..................... 9:2
Calibration...................... 9:3
Curves ............................ 9:4
9
1
Connection
Recorder output
9
2
• Connect the recorder cable to the 37-pin
socket at the rear of the ventilator. The cable
has two connections to the Mingograf
Recorder, i.e. one for recording of pressure
curves and one for recording of flow curves.
• The output signals from the recorder cable
are adapted to the inputs of SiemensElema’s Mingograf Recorders.
Use only the recorder cable intended for
Servo Ventilator 900 C.
Never connect or disconnect auxiliary
equipment while the ventilator is connected
to a patient.
Calibration
a) Flow
!
Adjust the 0-line on the recorder.
@
Set WORKING PRESSURE to 60 cm H2O.
#
Set the UPPER PRESS. LIMIT higher than the
WORKING PRESSURE.
$
Select constant flow.
%
VOL. CONTR.
Set the respiratory rate to 10 BREATHS/min.
^
Set the mode selector at VOL. CONTR.
&
Calculate inspiratory flow as follows:
Insp. flow (l/s) =
PRESET INSP. MIN. VOL. (l/min)
×
60
100
×
INSP. TIME (%)
*
A suitable calibration level for normal conditions
is to allow 0.5 l/s correspond to 1 cm deflection
on the recorder paper. 0.5 l/s corresponds to a
setting of 7.5 l/min for PRESET INSP. MIN.
VOL. and 25% INSP. TIME.
(
After this, adjust the recorder to desired
reading.
b) Pressure
!
Adjust the 0-line on the recorder.
@
Block the inspiration outlet during the inspiration
phase, or connect the inspiration outlet to the
expiration inlet with a patient tube.
#
A suitable calibration level for normal conditions
is to allow 20 cm H2O correspond to 1 cm
deflection on the recorder paper. The preset
WORKING PRESSURE should then,
temporarily, be set to 20 cm H2O.
$
Adjust the recorder to desired reading.
9
3
Curves
If the flow curve is square-shaped and an
inspiratory pause is used, it will be possible to
calculate, from the pressure curve, airway
resistance and the elasticity of the lungs and rib
cage, i.e. compliance. It is possible to
continuously follow changes in these values in
patients with obstructive lung diseases and also
when ventilating patients for prolonged periods.
For all measurements, it is assumed that the
patient makes no breathing attempts.
It is possible to read the effects from the
changes in the ventilation, e.g. optimal PEEP or
broncho-dilating agents, which give a direct
change in resistance.
Constant
flow
Accelerating Decelerating
flow
flow
Flow
Airway pressure
Pressure and flow curves
Insp. Pause Exp.
9
Flow
Airway pressure
4
Assessment of curves
Volume controlled ventilation and constant
flow, in order to calculate resistance
Resistance is indicated by a pressure drop that
occurs during the pause.
• Big amplitude of pressure drop indicates high
airway resistance.
Resistance is calculated according to the
formula:
Resistance (cm H2O/l/s) =
60
×
= Pres.(cm H2O) ×
PRESET INSP. MIN. VOL.
(l/min)
×
Insp. %
100
Volume controlled or pressure controlled
ventilation, in order to calculate compliance
Compliance is indicated by a pressure drop
during the expiration phase.
• Big drop in pressure (P compl) indicates low
compliance, i.e. poor elasticity in lungs and
chest, i.e. high elastic resistance.
Compliance is calculated according to the
following formula:
Compliance (ml/cm H2O) =
= PRESET INSP. MIN. VOL. (l/min)
BREATHS/min
×
1000
Pcompl. (cm H2O)
Not valid if the flow has not reached zero when
the next expiration starts or if the patient makes
breathing efforts.
Chapter 10
Routine cleaning
Servo Ventilator 900 C has been constructed so
that the cleaning and sterilizing of contaminated
parts can be carried out simply and rapidly.
Routine cleaning should be carried out after
every patient or daily, according to the hospital
routines.
In this chapter:
Hygiene ..........................
Dismantling ....................
Cleaning .........................
Assembling ....................
10:2
10:2
10:4
10:6
10
1
Hygiene
The gas, which passes the ventilator’s
inspiration system and is supplied to the patient
is usually clean and dry. It also passes a
bacteria filter.
The dry environment gives unfavorable
conditions for bacterial growth, and bacteria
spreading against the gas flow is considered
virtually impossible.
Bacteria from the patient will, on the other
hand, appear in the moist environment of the
expiration side. By attaching a disposable
bacteria filter to the expiratory inlet of the
ventilator, the transmission of bacteria to the
expiratory channel and out into the room is
reduced. This reduces the risks of infections
being spread to the staff as well as cross
infections between patients.
Exchange or cleaning of patient tubes and
the parts of the expiratory channel and
exchange of expiratory bacteria filter is
recommended after each patient or according
to the hospital routines. The bacteria filter
should be replaced according to manufacturer
recommendations.
The gas conveying parts of the expiration
system can be decontaminated and sterilized.
The parts of the inspiration system should be
sterilized or replaced by clean parts after an
operating time of 1000 hours or, at the latest,
half-yearly, according to chapters 10 and 11 in
this manual.
All personnel should be aware of the risk of
parts being infected when disassembling and
cleaning the ventilator.
Dismantling
!
10
2
• Remove gas connections.
• Disconnect the power cable.
• Remove patient tubes, humidifier and manual
ventilation accessory.
• Remove the O2FLUSH quick-coupling
(if used).
• Wipe the outside of the ventilator with a cloth
moistened in a disinfectant.
@
• Open the lid on the pneumatic unit.
• Disconnect the connector from the flow
transducer on the expiration side.
• Remove the bacteria filter from the pressure
transducer marked EXP.
Dismantling
#
• Lift the whole expiration channel upwards.
• Dismantle the different parts.
• Discard the tube and bacteria filter for the
pressure transducer.
10
3
Cleaning
1 hour
!
• Let the flow transducer lie in a 70% ethyl
alcohol solution for about one hour.
Ethyl alcohol
The flow transducer is a precision
instrument and must be handled carefully.
The metal disc in the small channel of the
transducer is very fragile and may break if it
is handled carelessly.
Do not poke at the metal disc in the small
transducer channel.
Do not flush the channel with water.
The flow transducer must not be cleaned
in a dish washing machine, by ultrasound or
by using agents which contain aldehydes.
Solutions other than ethyl alcohol may
give rise to disturbances in the function of
the flow transducer.
If agents other than ethyl alcohol are used
for disinfection, the cleaning routines should
be carried out according to the instructions
of the respective manufacturers.
The agents used for cleaning and
disinfection must have a pH between 4 and
8.5.
• If solutions other than ethyl alcohol are used,
rinse the solution from the flow transducer by
carefully moving the transducer to and fro in
a bowl containing distilled water.
10
4
Water
Let the water run off the flow transducer after
rinsing.
• Make sure that the fine mesh net in the
transducer is not blocked or damaged, and
that the disc in the small channel is in
position.
Cleaning
@
Manual ventilation
valve in position
MAN
MAN
• If the manual ventilation valve should be
cleaned, do as follows:
• Set the valve in the MAN position, and let it
lie in a 70% ethyl alcohol solution for about
one hour.
AUT
1 hour
#
• Let the other parts (NOTE! not the flow
transducer and manual ventilation valve) lie
in a disinfectant for about one hour.
• After this, rinse the parts in water to remove
the disinfectant.
Disinfectant
$
• Autoclave all parts, including the flow
transducer and manual ventilation valve at a
maximum temperature of 150˚C (300˚F).
10
5
Assembling
!
• Put a new bacteria filter with tube on the
pressure transducer marked EXP.
Make sure that the bacteria filter (without
caps) is properly connected to the pressure
transducer. Otherwise, the expiration could
be blocked.
@
• Assemble the expiration channel.
• Connect the tube from the pressure
transducer on the expiration side to the metal
pipe. Make sure that the pressure transducer
tube is not bent or pinched. The tube should
be placed below the silicone rubber muff.
• Push the expiration channel down into
position.
• Make sure that the expiration valve is not
bent or twisted.
#
• Connect the connector to the flow transducer.
• Make sure that the serial numbers on the
transducer and on the connector agree.
$
• Fit the manual ventilation accessory,
O2FLUSH quick-coupling (if required) and
new patient tubes.
10
6
%
• Note on the log sheet that routine cleaning
has been carried out.
^
VOL. CONTR.
• Carry out a check on functions after cleaning
(see chapter 6).
After autoclaving in certain autoclaves, the
flow transducer may be somewhat damp, and
this may give rise to incorrect readings on the
EXPIRED MINUTE VOLUME meter.
The moisture is removed in the following way:
• Connect the power cable.
• Connect a test lung to the Y-piece.
• Connect compressed air to the ventilator and
let it run for about 15 minutes with a PRESET
INSP. MIN. VOLUME of 7.5 l/min.
• Store the ventilator under a cover in normal
room temperature and humidity.
Chapter 11
1000 hours
overhaul with
complete cleaning
After every 1000 hours of operation or after
every six months, at the latest, a 1000 hours
overhaul should be carried out.
In this chapter:
Dismantling .................... 11:2
Cleaning ......................... 11:4
Assembling .................... 11:6
11
1
Dismantling
Disposable parts
• 3 bacteria filters (2 with tubes for pressure
transducers + 1 without tube for WORKING
PRESSURE manometer),
• 1 blue main flow bacteria filter (for gas supply
unit),
• Bellows,
• 2 rubber valves (insp. and exp.),
• Net for exp. flow transducer.
!
• Remove the gas connections.
• Disconnect the power cable.
• Remove the patient tubes, humidifier and
manual ventilation accessory. Also
disconnect the O2FLUSH quick-coupling
(if used).
• Wipe the outside of the ventilator with a cloth
moistened in a disinfectant.
11
2
@
• Open the lid on the pneumatic unit.
#
• Open the lid over the bellows by releasing the
locking pawls on the front edge of the lid.
• Remove the bellows.
• Discard the bellows.
Dismantling
$
• Disconnect the connectors to the flow
transducers.
• Remove the bacteria filters from the pressure
transducers marked INSP. and EXP.
• Lift the inspiration channel, excluding the
safety valve, straight upwards.
%
• Remove the safety valve.
• Remove the bacteria filter of the manometer
tube from the safety valve (Luer-lock
adapter).
• Discard the filter.
^
• Lift the expiration channel straight upwards.
&
• Dismantle the parts in the inspiration and
expiration channels.
• Discard the rubber valve in the inspiration
and expiration channels.
• Discard the tubes and bacteria filters for the
pressure transducers.
*
• Grasp the gas connection nipples and lift the
gas supply unit straight upwards.
(
• Unscrew the filter container with a hexagonal
spanner 5 mm.
• Discard the blue bacteria filter.
BL
• Remove the connector at the top of the
O2 cell.
• Remove the O2 cell by turning it counterclockwise.
• Discard the O2 cell if it is exhausted.
11
3
Cleaning
1 hour
!
• Let the flow transducers lie in a 70% ethyl
alcohol solution for about one hour.
The flow transducers are precision
instruments and must be handled with care.
The metal disc in the small channel of the
transducer is very fragile and may break if it
is handled carelessly.
Do not poke at the metal disc in the small
transducer channel.
Do not flush the channel with water.
The flow transducers must not be cleaned
in a dish washing machine, by ultrasound or
by using agents which contain aldehydes.
Solutions other than ethyl alcohol may
give rise to disturbances in the function of
the flow transducers.
If agents other than ethyl alcohol are used
for disinfection, the cleaning routines should
be carried out according to the instructions
of the respective manufacturers.
The agents used for cleaning and
disinfection must have a pH between 4 and
8.5.
Ethyl alcohol
Water
11
4
Manual ventilation
valve in position
MAN
MAN
AUT
• If solutions other than ethyl alcohol are used,
rinse the solution from the flow transducers
by carefully moving the transducer to and fro
in a bowl containing distilled water.
Let the water run off the flow transducers
after rinsing.
• Make sure that the fine mesh nets in the
transducers are not blocked or damaged,
and that the disc in the small channel is in
position.
@
Clean the manual ventilation valve:
• Set the valve in the MAN position, and let it
lie in a 70% ethyl alcohol solution for about
one hour.
Cleaning
#
1 hour
• Clean the gas supply unit.
The gas supply unit must not be immersed
in any liquid.
The gas supply unit must not be
autoclaved.
Only the lid and the gasket can be
cleaned and autoclaved.
Disinfectant
• Open the gas supply unit.
• Put the lid, gasket and screws in a
disinfectant for about one hour.
• Wipe the outside of the gas supply unit with
a soft cloth moistened in a disinfectant.
$
• Let the other parts lie in a disinfectant
solution for about one hour. (NOTE! Not the
flow transducers, manual ventilation valve,
O2 cell and gas supply unit).
%
• After cleaning and rinsing, all parts (not the
O2 cell and gas supply unit) can be
autoclaved at a maximum temperature of
150˚C (300˚F).
11
5
MAX 150° C
Assembling
!
• Insert a new blue filter in the filter container.
• Ensure that the filter is positioned correctly,
i.e. with the indicating arrow in the flow
direction.
• Tighten the filter container.
@
• Put, if required, a new O2 cell with O-ring in
place by turning it clockwise.
• Connect the connector to the top of the
O2 cell.
#
• Place the gas supply unit in the ventilator.
$
• Put a new bacteria filter on the manometer
tube.
• Connect the bacteria filter to the safety valve.
• Mount the safety valve in position in the
ventilator.
11
6
Assembling
%
• Put in a new bellows. Make sure it is right
side up, i.e. upper side marked UP.
• Push the bellows onto the connection tubes.
• Make sure that the bellows is centered.
• Shut the lid over the bellows and secure the
locking pawls on the front edge of the lid.
^
• Replace the fine mesh net in the expiratory
flow transducer as follows:
• Loosen the screw.
• Shake the flow transducer gently until the net
loosens.
• Insert and secure the new net.
&
• Replace the rubber valve in the inspiration
channel.
11
7
Assembling
*
• Assemble the parts of the inspiration channel.
• Put a new pressure transducer tube and
bacteria filter on the pipe of the inspiration
channel (see picture).
(
• Push the inspiration channel down into
position and thread the silicone rubber bend
onto its supporting pin.
• Make sure that the inspiration valve is
correctly positioned and that it is not bent or
twisted.
• Connect the filter to the pressure transducer
marked INSP.
• Make sure that the pressure transducer tube
is not bent or pinched.
11
8
BL
• Connect the connector to the flow transducer.
• Make sure that the serial numbers on the
transducer and on the connector agree.
Assembling
BM
• Replace the rubber valve in the expiration
channel.
BN
• Assemble the parts of the expiration channel.
• Put a new pressure transducer tube and
bacteria filter on the pipe of the expiration
channel.
• Connect the filter to the pressure transducer
marked EXP.
BO
• Push the expiration channel into position.
Thread the silicone rubber bend onto its
supporting pin.
• Make sure that the expiration valve is not
bent or twisted.
• Make sure that the pressure transducer tube
is not bent or pinched.
Make sure that the bacteria filter is properly
connected to the pressure transducer.
Otherwise, the expiration could be blocked.
11
9
BP
• Connect the connector to the flow
transducer.
• Make sure that the serial numbers on the
transducer and on the connector agree.
BQ
• Connect manual ventilation accessory,
O2FLUSH quick-coupling (if required) and
new patient tubes.
Assembling
BR
• Note on the log sheet that a complete cleaning
has been carried out.
BS
• Calibrate the ventilator (see chapter 13).
BT
• Check/Calibrate the O2 cell (see chapter 12).
BU
• Carry out a check on functions (see chapter 6).
VOL. CONTR.
11
10
After autoclaving in certain autoclaves, the flow
transducers may be somewhat damp, and this
may give rise to incorrrect readings on the
EXPIRED MINUTE VOLUME meter.
The moisture is removed in the following
way:
• Connect the ventilator to mains.
• Connect a test lung to the Y-piece.
• Connect compressed air to the ventilator and
let it run for about 15 minutes with a
PRESET INSP. MIN. VOLUME of 7.5 l/min.
• Store the ventilator under a cover in normal
room temperature and humidity.
Chapter 12
Replacement of
O2 cell
The O2 cell is an expendable item. An indication
of an expended O2 cell is a deterioration of the
linearity and/or a rapid drop in the O2
concentration readings on the digital display. To
avoid alarm when the O2 cell is exhausted, the
connector at the top of the O2 cell must be
disconnected. If the O2 cell is removed, a
plastic cover with an O-ring has to be put in its
place.
Sealed unit contains caustic. Leaked liquid
may cause severe burns to skin and eyes.
In case of contact, immediately flush with
plenty of water for at least 15 minutes. For
eyes, get medical attention.
In this chapter:
Replacement .................. 12:2
Calibration...................... 12:2
Log sheet ....................... 12:2
12
1
Replacement and calibration
Replacement
!
Unpack the O2 cell at least 30 minutes before
replacement/calibration.
@
Disconnect mains supply and compressed air.
#
Disconnect the connector at the top of the
O2 cell.
$
Remove the O2 cell by turning it counterclockwise.
%
Connect the ventilator to mains supply and let it
run for about 15 minutes.
^
Set the parameter selector at O2 CONC. %.
&
Depress the pushbutton and adjust with
trimmer 10 until the display reads 00.0.
*
Put the new O2 cell in place by turning it
clockwise. Do not forget the O-ring at the
bottom of the O2 cell.
(
Connect the connector at the top of the O2 cell.
Calibration of O2 cell
!
Connect compressed air.
O2 CONC. %
12
2
@
Set WORKING PRESSURE to 60 cm H2O.
#
The digital display should read 20.9%. If not,
adjust with trimmer 9.
$
After about 24 hours, make sure that the O2 cell
gives a stable reading (20.9% with compressed
air connected). If the reading is not 20.9%,
calibrate as described above.
Log sheet
• Note on the log sheet that the O2 cell has
been replaced and calibrated.
Chapter 13
Calibration
The calibration must be carried out after the
1000 hours overhaul and after complete
cleaning.
In this chapter:
1. Basic setting for
calibration .....................
2. Check on mechanical
zeroing of instruments .
3. Balancing of flow
transducers ...................
4. Electric zeroing .............
5. Gas supply and
working pressure..........
6. Check of manometer
and for internal leakage
7. Pressure transducers...
8. Upper pressure limit,
airway pressure ............
9. Triggering level .............
10. Flow, inspiration side ...
11. Check for leakage,
(external) .......................
12. Flow, expiration side ....
13. Volume alarms ..............
14. O2 cell.............................
15. Log sheet.......................
13:2
13:3
13:3
13:4
13:4
13:5
13:5
13:6
13:6
13:6
13:7
13:7
13:7
13:8
13:8
13
1
Preparations
Equipment
•
•
•
•
•
Calibration manometer
Screwdriver
2 patient tubes
Y-piece
Test lung
1. Basic settings for
calibration
Set the following on the ventilator:
Mode .......................................... VOL. CONTR.
13
2
Respiratory pattern
PRESET INSP. MIN. VOLUME .
Flow pattern ...............................
BREATHS/min ...........................
min)
INSP. TIME % ............................
PAUSE TIME % .........................
7.5 (l/min)
– –
10 (breaths/
25 (%)
30 (%)
Expired minute volume
Measuring range ........................ ADULTS
LOWER ALARM LIMIT .............. 0 (l/min)
UPPER ALARM LIMIT ............... 40 (l/min)
Airway pressure
TRIG. SENSITIVITY ..........
PEEP .................................
UPPER PRESS. LIMIT ......
INSP. PRESS. LEVEL .......
–20 (cm H2O)
0 (cm H2O)
80 (cm H2O)
0 (cm H2O)
O2 Concentration
LOWER ALARM LIMIT ...... 20 (%)
UPPER ALARM LIMIT ....... 100 (%)
Calibration
2. Check on mechanical
zeroing of instruments
• During this check, the ventilator must not
be connected to mains or to a gas supply.
• Check that the meters EXPIRED MINUTE
VOLUME and AIRWAY PRESSURE read 0.
• If not, adjust the meters.
3. Balancing of flow
transducers
• Open the lid on the pneumatic unit. Open the
lid above the trimmers (variable resistors).
NOTE! The adjustment of trimmers is very
sensitive. When adjusting, turn the trimmers
very slowly while watching the lamp.
List of trimmers
1. Exp. flow. Gain
2. Exp. flow. Lamp
3. Insp. flow. Gain
4. Insp. flow. Lamp
5. Exp. pressure. Gain
6. Exp. pressure. 0-setting
7. Insp. pressure. Gain
8. Insp. pressure. 0-setting
9. O2 %
10. O2, 0 volt
• Connect the ventilator to mains.
• Set the mains switch on the rear of the
ventilator to on. Make sure that the green
lamp POWER ON lights up when you switch
on.
• Let the ventilator run at least 15 minutes.
Then adjust:
a) Flow transducer on insp. side: Adjust
trimmer 4 until the lamp at trimmer 4 lights
up.
b) Flow transducer on exp. side: Adjust trimmer
2 until the lamp at trimmer 2 lights up.
13
3
Calibration
4. Electric zeroing
a) Airway pressure (pressure transducer of
insp. side)
• Check that the meter AIRWAY PRESSURE
reads 0.
• If not, adjust with trimmer 8.
b) Airway pressure (pressure transducer of
exp. side)
• Keep the pushbutton depressed and at the
same time check that the meter reads 0.
• If not, adjust the reading (with pushbutton
depressed) with trimmer 6.
EXP. MIN.
VOL. l/min
13
4
c) Expired minute volume
• Set the parameter selector at EXP. MIN. VOL
l/min.
• Check that the digital display and the meter
EXPIRED MINUTE VOLUME read 0. If not,
the electronic unit is faulty and must be
repaired by a service technician.
5. Gas supply and working
pressure
• Connect compressed air.
• Set the WORKING PRESSURE to
60 cm H2O.
Calibration
6. Check of manometer and
for internal leakage
• Connect a calibration manometer to the
inspiration outlet pipe.
• Block the calibration manometer.
• Check that the manometer WORKING
PRESSURE gives the same reading as the
calibration manometer (60 ± 2 cm H2O).
If not, replace the WORKING PRESSURE
manometer.
• The reading on the meter AIRWAY
PRESSURE should not fall more than a few
cm H2O during the time the inspiration valve
is closed. If the reading falls more, look for
leakage.
• Remove the calibration manometer.
• Connect a patient tube from the inspiration
outlet to the expiration inlet.
• Keep the expiration valve closed.
• The reading on the meter AIRWAY
PRESSURE should not fall more than a few
cm H2O during the time the inspiration valve
is closed. If the reading falls more, look for
leakage in the expiration channel.
7. Pressure transducers
a) Inspiration side
• Keep the expiration valve closed.
• Check that the meter AIRWAY PRESSURE
gives the same reading as the manometer
WORKING PRESSURE (60 ± 1 cm H2O).
• If not, adjust with trimmer 7.
13
b) Expiration side
• Keep the expiration valve closed and
depress the pushbutton.
• Check that the meter AIRWAY PRESSURE
gives the same reading as the manometer
WORKING PRESSURE (60 ± 1 cm H2O).
• If not, adjust with trimmer 5.
5
Calibration
8. Upper pressure limit,
airway pressure
UPPER PRESS. LIMIT
• Block the inspiration outlet.
• Turn the knob UPPER PRESS. LIMIT slowly
counter-clockwise from the position
80 cm H2O until you reach the exact position
where the alarm lamp for UPPER PRESS.
LIMIT flashes. At this instant, the readings
for WORKING PRESSURE and AIRWAY
PRESSURE should agree with the knob
setting ±3 cm H2O. If not, the electronic unit
is faulty and must be repaired by a service
technician.
• Turn the knob back to 80 cm H2O.
9. Triggering level
TRIG. SENSITIVITY
• Remove your hand from the inspiration
outlet.
• Set the TRIG. SENSITIVITY to -10 cm H2O.
• Turn the PEEP knob and check that the
TRIG. lamp lights up when +10 ±2 cm H2O is
passed. If not, the electronic unit is faulty and
must be repaired by a service technician.
• Reset TRIG. SENSITIVITY to -20 cm H2O
and PEEP to 0 cm H2O.
10. Flow, inspiration side
13
6
• Set BREATHS/min to 5.
• Connect a calibration manometer to the
inspiration outlet.
• Let compressed air blow through the
calibration manometer for a few minutes.
• Check that the reading on the calibration
manometer is 45 ±5 cm H2O during
inspiration.
• If not, adjust with trimmer 3.
• Check that the lamp at trimmer 4 lights up at
pause and expiration. If not, repeat
calibration according to 3a.
• After 6-8 breaths, make sure that the
calibration manometer reading is stable
(45 ±5 cm H2O).
• Remove the calibration manometer.
Calibration
11. Check for leakage
(external)
•
•
•
•
Set BREATHS/min to 10.
Connect tubes and Y-piece.
Block the Y-piece.
Make sure that the AIRWAY PRESSURE
does not fall more than a few cm H2O during
pause.
12. Flow, expiration side
EXP. MIN.
VOL. l/min
• Set the respiratory rate at 20 BREATHS/min
and PAUSE TIME at 10%.
• Connect a test lung.
• Set the parameter selector at EXP. MIN.
VOL. l/min.
• Let the ventilator run for a few minutes.
• Check that the digital display shows
7.5 ±0.1 l/min.
• If not, adjust with trimmer 1.
• The difference between the digital display
and the meter EXPIRED MINUTE VOLUME
must not be more than ±0.5 l/min.
• Check that the lamp at trimmer 2 lights up at
inspiration and pause. If not, repeat
calibration according to 3B.
• After 6-8 breaths, make sure that the reading
is stable.
13. Volume alarms
Lower alarm limit
• Turn the knob LOWER ALARM LIMIT to
7.5 l/min and make sure that the alarm is
activated at 7.5 ±0.5 l/min.
• Turn the knob LOWER ALARM LIMIT to
0 l/min.
MIN. VOL. ALARM LIMITS
Upper alarm limit
• Turn the knob UPPER ALARM LIMIT to
7.5 l/min and make sure that the alarm is
activated at 7.5 ±0.5 l/min.
• Turn the knob UPPER ALARM LIMIT to
40 l/min.
13
7
Calibration
14. O2 cell
• Set the parameter selector at O2 CONC. %.
• The digital display should read 20.9% (with
compressed air connected and WORKING
PRESSURE 60 cm H2O).
• If not, adjust with trimmer 9.
• Normally, trimmer 10 needs not to be
adjusted. If necessary, see chapter 12.
• Make sure that the UPPER ALARM LIMIT
and LOWER ALARM LIMIT are functioning
correctly.
O2 CONC. %
15. Log sheet
• Note on the log sheet that the ventilator has
been calibrated.
13
8
Chapter 14
Technical
specifications
In this chapter:
Gas and power supply ..
Ventilation parameters
and controls ...................
Special functions...........
Monitoring ......................
Alarm and indicators .....
General ...........................
14:2
14:2
14:2
14:2
14:3
14:4
14
1
Technical specifications
Gas and power supply
Gas ....................................................................
Gas consumption ...............................................
Gas supply via high pressure inlet ....................
Electronic gas supply unit, inlet pressure ..........
Other gas supply unit, inlet pressure ................
Gas supply via low pressure inlet ......................
Power supply .....................................................
Power consumption ...........................................
Must fulfill specifications for medical gases.
Approximately equal to preset inspiratory
minute volume or equal to flow meter setting.
From central gas supply, compressor or gas
cylinder.
2.5-5 bar (250-500 kPa).
2.5-7 bar (250-700 kPa).
From flowmeter(s).
(100), 110 120 220 240 V ±10%, 50 or 60 Hz.
Approximately 40 W.
Ventilation controls,
control ranges
Working pressure ..............................................
Modes ................................................................
Preset inspiratory minute volume ......................
Flow pattern .......................................................
Respiratory rate .................................................
Inspiration time ..................................................
Pause time .........................................................
Inspiratory pressure (above PEEP) ...................
PEEP .................................................................
Upper pressure limit ..........................................
Trig sensitivity (below PEEP) ............................
SIMV-rate ...........................................................
Sigh ....................................................................
Compressible volume (internal) ........................
Up to 120 cm H2O.
VOL. CONTR. (Volume controlled).
VOL. CONTR. + SIGH (Volume controlled with
sigh). PRESS. CONTR. (Pressure controlled).
PRESS. SUPPORT (Pressure support). SIMV
(Synchronized Intermittent Mandatory
Ventilation). SIMV + PRESS. SUPPORT.
CPAP (Continuous Positive Airway Pressure).
MAN. (Manual ventilation—auxiliary equipment
necessary).
0.5-40 l/min. With sufficient working pressure.
Accuracy (for momentary insp. flow up to
1.6 l/s): ±10% or 0.2 l/min.
Constant or accelerating.
5-120 breaths/minute.
20, 25, 33, 50 or 80% of the respiratory cycle.
0, 5, 10, 20 or 30% of the respiratory cycle.
0-100 cm H2O.
0-50 cm H2O.
15-120 cm H2O.
-20-0 cm H2O.
HIGH RATE (4-40 SIMV breaths/min). LOW
RATE (0.4-4 SIMV breaths/min.).
Double tidal volume every hundredth breath.
0.075 l.
Special functions
14
2
Inspiratory pause hold
Expiratory pause hold
Gas change
Monitoring
Analog presentation
Airway pressure .................................................
Range -20-120 cm H2O.
Accuracy: ±5% or ±2 cm H2O.
Technical specifications
Expired minute volume ......................................
ADULTS range 0-40 l/min. Accuracy (for
momentary exp. flow up to 1.6 l/s): ±5% or
±0.5 l/min. INFANTS range 0-4 l/min. Accuracy
(for momentary exp. flow up to 1.6 l/s): ±5% or
±0.2 l/min.
Digital presentation
Respiratory rate .................................................
O2 concentration ................................................
Inspired tidal volume ..........................................
Expired tidal volume ..........................................
Expired minute volume ......................................
Peak pressure ....................................................
Pause pressure ..................................................
Mean airway pressure .......................................
Range 5-120 breaths/min. Accuracy (in
controlled ventilation: ± 10% or ± 1 breath/min.
Presented in % by volume; Range 20-100%.
Accuracy (applying for the barometric pressure
and working pressure at which the O2 cell is
calibrated): ±5% of read value.
Range 0-1999 ml. Accuracy (for momentary
insp flow up to 1.6 l/s): ±10% or 0.2 l/min.
resp. rate.
Range 0-1999 ml. Accuracy (for momentary
exp, flow up to 1.6 l/s): ±5% or 0.2 l/min.
resp. rate.
ADULTS range 0-40 l/min. INFANTS range
0-4 l/min. Accuracy (for momentary exp. flow
up to 1.6 l/s): ±5% or ±0.2 l/min.
Range 0-120 cm H2O. Accuracy: ±5% or
±2 cm H2O.
Range 0-120 cm H2O. Accuracy: ±5% or
±2 cm H2O.
Range 0-120 cm H2O. Accuracy: ±5% or
±2 cm H2O.
Alarms and indicators
Push button
2 min. ........................................
Alarms
Gas supply alarm ...............................................
Apnea alarm ......................................................
Expired minute volume ......................................
O2 concentration ................................................
Upper pressure limit ..........................................
Power failure ......................................................
Audible signals, below marked *, muted for
2 minutes. (max).
Flashing red light, audible * signal. Inoperative
at respiratory rates higher than 80 breaths/
minute and INSP. TIME % 20 or 25.
The APNEA ALARM is activated with audible
* signals and flashing light if the time between
any two consecutive breaths, spontaneous
or mandatory or a combination of the two, is
greater than approximately 15 seconds (4
breaths/min or less). The APNEA ALARM is
not intended to and will not monitor for
disconnections. The APNEA ALARM is
operative in CPAP, PRESS. SUPPORT, SIMV,
and SIMV + PRESS. SUPPORT.
Flashing red light, audible * signal.
Flashing red light, audible * signal.
Red light, audible * signal.
Green light POWER ON goes out, audible
signal for approximately 5 minutes.
14
3
Technical specifications
Indicators
Set minute volume alarm ...................................
Set O2 alarm ......................................................
Pressure support ...............................................
CPAP .................................................................
MAN ...................................................................
SIMV, HIGH/LOW RATE ...................................
Expired minute volume INFANTS .....................
Patient trig ..........................................................
Alarm limit unset: Flashing yellow light.
Alarm limit unset: Flashing yellow light.
Mode indication: Yellow light.
Mode indication: Yellow light.
Mode indication: Yellow light.
Mode and range indication: Two yellow lights.
Range indication: Yellow light.
Trig indication: Yellow light.
General
Maximum working pressure ..............................
Dimensions ........................................................
Weight ................................................................
Specified accuracies apply for medical air and
imply that the ventilator is calibrated according
to the Operating Manual. For accuracies
specified in more than one way, the highest
value applies.
14
4
120 cm H2O.
W50 × D23 × H32 cm.
Approximately 19 kg.
•
SV 900 is an intensive care/anesthetic ventilator intended for adults,pediacrics and
neonates.
•
The device, if marked with the CE-symbol (including the number of the
notified body) shown to the left, complies with the requirements of
the Medical Device Directive 93/42/EEC.
0413
•
Classification according to IEC 601:
Class I equipment
Type B
Continuous operation
•
Symbols on the equipment:
Type B according to IEC 601.
Attention, consult Operating Manual
Alternating current
On (Power: Connection to mains)
Off (Power: Disconnection from mains)
•
A device to monitor the concentration of anesthetic agents in the inspiratory gas
shall be used during anesthesia.
•
All measured and set parameters are referenced to ATP (Ambient Temperature
and Pressure).
• Old non-functioning O2 cells must be returned to the plae of purchase or
to a place where they can be disposed of properly. O2 cells must not be
disposed of with ordinary waste.
14
5
Servo Ventilator 900 C – Operating Manual.
Order No.: 69 78 761 E313E.
© Maquet Critical Care AB, 1997-2001. All rights reserved. No part of this publication may
be reproduced, strred in a retrival system, or transmitted in any form or by any means, electronic, mechanical,
photocopying, recording, or otherwise, without the prior permission of the copyright owner in writing.
Subject to alterations without prior notice.
Issued by Maquet Critical Care AB, SE-171 95 SOLNA, Sweden.
Printed in Sweden
Price: Group 0
0803.0.6
9th English edition, August 1997
SERVO VENTILATOR 900 C – OPERATING MANUAL