1
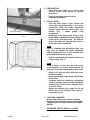
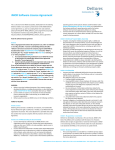
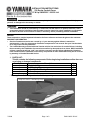
INSTALLATION INSTRUCTIONS
230 Series Cockpit Cover
’07 & Up SX/AR230 - ’08 232 Ltd.
Please read and understand these instructions completely before installation to avoid possible injury to
yourself, or damage to the accessory or vehicle.
•
This installation should be performed by an authorized Yamaha dealer or a qualified mechanic. Some
components require information from the model’s service manual for proper installation or adjustment.
Be sure to have the service manual on hand, if necessary, before proceeding with the installation.
DEALER:
These instructions contain important information for future reference and must be given to the customer.
WARRANTY INFORMATION:
Genuine Yamaha accessories are covered by a 1 year warranty against defects in material or
workmanship. Labor for replacement of defective components is not covered. See your Yamaha dealer
for a copy of the warranty statement.
•
The Limited Warranty provided with new Yamaha vehicles has exclusions for certain failures, including
those caused by the installation of accessories as well as by abnormal strain or abuse. While installation
of these components will not “void” your vehicle’s warranty, specific failures adjudged by Yamaha to
have resulted from the installation of accessory components or other modifications may not be covered
by warranty or Yamaha Extended Service.
•
1. PARTS LIST:
This kit contains the following components. Before beginning installation confirm there are
no missing or damaged components.
Part Number
Description
Qty
*
Windshield Clips
29
*
Self-Tapping Clips
26
*
Adjustable Anti-Pooling Pole
1
*
Canvas Cover
1
*
Instruction Set
1
* Part supplied with kit only and not available separately.
Cockpit Cover shown on a 2008 SX230 High Output
7/2008
Page 1 of 2
PAK-230CC-VR-XX
2. PREPARATION:
• Place Boat and Trailer on a secure level
surface. Chock trailer wheels to prevent
movement.
• Clean all mounting surfaces before
beginning installation.
Black Rubber Molding
Fig. 1
3. INSTALLATION:
• Find the front center of the canvas and
install three windshield clips to the center
windshield, using the rubber windshield
bumper cutout and the center seam as a
locator. (Fig. 1 shows proper snap
installation)
• Beginning at the front center of the cover,
begin filling in windshield snaps, pulling the
cover taut as you move back. Do three or
four on the right side, then the left and so on
to the back of the windshield.
Note:
Prior to installing the windshield clips, you
may want to remove the black windshield
rubber molding (See Fig. 1), then reinstall after
all windshield snaps are in place.
•
Fig. 2
Pull the canvas taut back and locate the rear
corner snaps. (Fig. 2)
Note:
Using a helper, ensure the two rear corner
snap locations are evenly spaced below the
body line of the deck before drilling pilot holes.
•
•
•
•
Using a 1/8” drill bit, drill a pilot hole at the
marked locations.
Install self-tapping snaps using a #2 phillips
screwdriver.
Continue install the remaining self-tapping
snaps in a similar manner as the windshield,
starting from front to back, installing three
or four at a time.
Adjust the pooling pole height to lift the
center part of the Cockpit Cover about 2”
and snap in place.
4. CARE AND CLEANING:
Wash using a mild soap and water solution.
Renew the water repellent characteristics with
Yamaha High Tech Fabric Guard (ACC-FABRCGA-RD).
ESTIMATED TIME TO INSTALL: 0.8 HRS
7/2008
Page 2 of 2
PAK-230CC-VR-XX