1
- Installation Manual 925 311 A30
Stabilizer / Anti-Sway Bar
- Installation Manual Stabilizer / Anti-Sway Bar
[ Part Number ]
925 311 A30
[ Application ]
Toyota Estima FF [ACR50W]
Toyota Alphard FF [GGH20W, ANH20W]
Toyota Corolla Rumion FF [ZRE152N]
Toyota Vellfire [GGH20W, ANH20W, ATH20W]
Toyota Prius α [ZVW40, ZVW41]
Scion XB [ZRE152N]
[
Stabilizer / Anti-Sway Bar
Product
]
[ Description ]
Front 30mm Sway Bar
[ Contents
Sway Bar
Bushing
]
x1
x2
NOTE
Always use a proper vehicle lift when installing Cusco Sway Bars. Always follow OSHA safety
standards when working on or under a vehicle.
This installation manual serves as a general guideline for Cusco product install. Please refer to
the factory service manual for the proper procedure for engine and transmission mount install.
- Installation Manual Stabilizer / Anti-Sway Bar
Installation method will vary depending on vehicle make and model.
Please use this manual as a base reference.
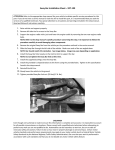
Installation for Estima (ACR50W), Alphard (ANH20W)
1.) Remove center cover.
2.) Disconnect the end link from the sway bar on
both sides.
3.) Remove the nuts and bolt on the driver side
lower arm knuckle.
4.) Loosen the driver side rear crossmember bolt
3 turns.
5.) Remove the driver side front crossmember bolt.
6.) Pivot the lower arm unit towards the rear of the
vehicle by using the bolt loosened in step 4 as
an axis point. This is to give enough space to
remove the sway bar.
- Installation Manual Stabilizer / Anti-Sway Bar
7.) Remove the bolts holding the sway bar brackets.
Use caution as the sway bar will drop after all the
bolts have been taken off.
8.) Remove the sway bar from the driver side area.
Front Sway Bar Installation
Use the included bushings in the kit and the factory brackets. Installation is performed in the reverse order of the factory
sway bar removal. Always consult within the manufacturer factory service manual for the proper procedures and torque
specifications.
Note
Use lubrication if the bushing is difficult to push into the bracket.
*Periodically inspect and retorque all nuts and bolts after vehicle operation.
- Installation Manual Stabilizer / Anti-Sway Bar
Installation method will vary depending on vehicle make and model.
Please use this manual as a base reference.
Installation for Alphard (GGH20W), Corolla Rumion (ZRE152N), Scion XB (ZRE152N)
1.) Remove center cover.
2.) Disconnect the end link from the sway bar on
both sides.
Caution
B
Support the cross member with a hydraulic jack before loosening the nuts and bolts.
B
3.) Remove the 4 bolts displayed as “A”.
Loosen the 2 nuts displayed as “B”, three full
turns. (Do not completely remove the nuts)
4.) Loosen the 6 bolts three full turns.
(Do not completely remove the nuts)
5.) Remove the 2 nuts and 1 bolt located on the
lower left suspension knuckle.
- Installation Manual Stabilizer / Anti-Sway Bar
6.) Remove 1 bolt and 4 nuts holding the
transmission mount.
7.) Begin loosening the nuts and bolts until the
left side of the cross member is lowered approx.
10mm and the right side at 30mm.
Remove one of the lower arm bolt located on
the front side.
Caution
Support the engine and lower the left
side of the cross member. Use caution
not to put any stress on the steering
rack and steering shaft.
8.) Rotate the lower arm towards the rear of the
car. (Use the loosened bolt as a pivot axis)
- Installation Manual Stabilizer / Anti-Sway Bar
9.) Remove the 4 bolts on both sides to remove the
plates. The sway bar may fall so use caution when
removing. The sway bar can be pulled out from
the left side.
Front Sway Bar Installation
Use the included bushings in the kit and the factory brackets. Installation is performed in the reverse order of the factory
sway bar removal. Always consult within the manufacturer factory service manual for the proper procedures and torque
specifications.
Note
Use lubrication if the bushing is difficult to push into the bracket.
*Periodically inspect and retorque all nuts and bolts after vehicle operation.