1
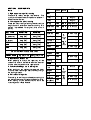
CHIEFTAIN HEAVY DUTY
ELECTRIC APPLIANCES
USERS INSTRUCTIONS
SECTION 1 - GENERAL DESCRIPTION
SECTION 2 - CONTROLS and OPERATION
SECTION 3 - COOKING HINTS
SECTION 4 - CLEANING and MAINTENANCE
This appliance has been CE-marked on the basis of compliance with the Low Voltage and EMC Directives for
the voltages stated on the Data Plate.
IMPORTANT
This appliance must only be installed by a competent person in compliance with the regulations in
force at the time.
UK regulations are listed on the front of the Installation and Service Manual.
Regular servicing by a qualified person is recommended to ensure the continued safe and efficient
performance of the appliance.
WARNING - THIS APPLIANCE MUST BE EARTHED!
Upon receipt of this manual, the installer should instruct a responsible person (or persons) as to the correct
operation and maintenance of the unit.
This equipment is designed FOR PROFESSIONAL USE ONLY and be operated by QUALIFIED persons. It is
the responsibility of the supervisor or equivalent to ensure that the user wears SUITABLE PROTECTIVE
CLOTHING. Attention should also be drawn to the fact that some parts of the appliance will, by necessity,
become VERY HOT and could cause burns if touched accidentally.
Falcon Foodservice Equipment
HEAD OFFICE AND WORKS
Wallace View, Hillfoots Road, Stirling. FK9 5PY. Scotland.
AFE SERVICELINE CONTACT PHONE - 01438 363 000
FAX - 01438 369 900
T100525 Ref. 1
SECTION 1 - GENERAL DESCRIPTION
This manual covers the operation of the following
units. These are Chieftain Heavy duty appliances.
If for any reason it is considered necessary to
maintain a hotplate hot when not being used, turn
the control to a low setting, say 2 or 3.
The hob is constructed of cast iron. The hotplates are
controlled by six position rotary switches.
The oven has a cubic capacity of 4.8ft3 (gross)/
3.8ft3 (nett) with a drop down door. Two non-tilt
shelves are included which will accomodate two 1/1
size gastronorm containers per shelf.
All appliances are mounted on adjustable feet with
shrouds.
The oven is controlled by means of a thermostat,
located at the top of the RH control panel. There are
two neons, RED indicates that the mains electricity to
the unit is ON and AMBER illuminates when the
thermostat is switched on and the oven is heating up.
When the oven is at the selected temperature the
AMBER light will go out.
The oven temperature is automatically controlled by
the thermostat so that after a dish has been cooked
satisfactorily it may be repeated with confidence. The
cooking chart gives basic temperatures and times
required. For best performances the following instructions should be carried out -
E1006 Range with Three Solid Hotplates
E1016 General Purpose Oven (Single Tier)
E1016/2 General Purpose Oven (Double Tier)
E1026 Boiling Table with Three Solid Hotplates
SECTION 2 - CONTROLS and OPERATION
Hotplate
The hotplate arrangement consists of three
rectangular hotplates, each controlled by a six-heat
switch. This controls variable temperatures from 1
(the lowest) progressively increasing to 6 (the highest). The neons at the top of the control panel
indicate which hotplate is ON.
The requisite setting for simmering pots of various
sizes will quickly be found by experience. For
efficient operation of the hotplates it is essential that
there should be intimate contact between the hotplate
and the utensil. Ground base pans should be used
and the plate surface should be clean and in good
condition.
Spillage should not be allowed to accumulate around
the edges of the hotplates. It will burn on and become
difficult to remove.
There is a pull out
spillage tray beneath
the hotplates and this
is readily withdrawn for
emptying and cleaning
when the unit is cool.
Important
Oven Control
Situated on unit RH side
Hotplate Controls
Situated below the hob
To ensure long life of
the hotplates and to
conserve electricity,
DO NOT LEAVE THE
H O T P L A T E S
SWITCHED ON
WHEN NOT IN USE,
particularly at high
settings.
Oven
Shelves
Two oven shelves are supplied. There are four shelf
positions in the oven. If both shelves are being used
at once, these should be positioned with at least one
shelf space left between them (i.e. top and second
bottom or second top and bottom). Always push the
shelves right to the back of the oven.
Tray Size
The full area of each shelf may be used for cooking.
Smaller trays or dishes can be placed centrally on the
shelves. Gastronorm trays 650mm x 530mm can be
fitted between the runners without the need to use the
shelves.
Pre-heat Time
Allow at least one hour from having lit the oven cold
before commencing loading. Put the food in quickly
and close the doors firmly.
DO NOT leave the oven doors open for prolonged
periods while the oven is switched ON.
Getting the best use out of this type of unit is largely a
matter of experience, coupled with the needs of the
particular task in hand. It is not possible to provide
detailed instructions for cooking any particular dish
but obviously the temperature of the plate must be
regulated for different needs.
SECTION 3 - COOKING HINTS
Notes
1. High temperature (quick) roasting
These times reflect average requirements. The
quality and shape of meat and personal tastes will
effect the time requried.
2. Low temperature (slow) roasting
These items require longer cooking times but reduce
weight loss and achieves more even cooking. This
method is preferable for tougher joints and old
poultry.
QUICK
SLOW
ROASTING
ROASTING
MEAT TYPE
BEEF
15 minutes per
20 minutes per
(on the bone)
0.5kg (1lb)
0.5kg (1lb)
BEEF
20 minutes per
30 minutes per
(no bones)
0.5kg (1lb)
0.5kg (1lb)
MUTTON,
20 minutes per
30 minutes per
LAMB
0.5kg (1lb)
0.5kg (1lb)
VEAL,
25 minutes per
35 minutes per
PORK
0.5kg (1lb)
0.5kg (1lb)
For joints up to 2.7kg (6lbs) in weight
add a further 20 minutes to these times
CHICKEN,
15 minutes per
20 minutes per
TURKEY, DUCK 0.5kg (1lb) + 15 0.5kg (1lb) + 15
3. Small Cakes, Scones etc.
When preparing two trays, the upper tray will be
cooked first. It should then be removed from the oven
and the lower tray raised to the upper position.
4. Yorkshire Puddings etc. in baking tins
When cooking on two shelves the upper and lower
tins should be interchanged about half-way through
the cooking process.
5. Fruit cakes in large tins
The cooking time will vary considerably accordingly to
the weight of the cake, richness and depth of mixture.
When cooking on two shelves the tins should be
interchanged as in Note 4 above.
FOOD
THERMOSTAT
SETTING
RUNNER
POSITION
Meat Roast
(Quick)
Poultry
(Slow)
Braising
230
3&4
180
3&4
165
3&4
Casseroles
135
3&4
TIME
NOTES
MEAT
according to 1 & 2
weight
according to 1 & 2
weight
30 mins per
0.5kg+30 mins
11/2 - 3 hours
-
35 - 45 minutes
3
30 - 40 minutes
3
15 - 25 minutes
3
20 - 25 minutes
3
10 - 15 minutes
3
PASTRY
Fruit Pies
230
Plate Tarts
230
Puff & Rough
Puff Tarts
245
Sausage
Rolls
Scones
245
260
3
for
single
tray
2&4
for
two
trays
PUDDINGS
Custards
165
40 - 60 minutes
-
Milk
150
45 - 90 minutes
-
Yorkshire
Pudding
245
33 - 40 minutes
4
165
3 hours
5
25 - 35 minutes
-
15 - 25 minutes
3
20 - 25 minutes
-
2 - 21/2 hours
-
15 - 25 minutes
-
CAKES
Slab Cake
(Rich)
Slab
Sponges
Queen
Cakes
Sponge
Sandwich
Xmas Cake
(Very Rich)
Bread Rolls
205
205
205
165
245
3
for
single
tray
2&4
for
two
trays
SECTION 4 - CLEANING and MAINTENANCE
Important
BEFORE ANY CLEANING IS UNDERTAKEN,
SWITCH OFF AND ISOLATE THE APPLIANCE
FROM THE MAINS SUPPLY.
THE APPLIANCE MUST NOT BE CLEANED WITH
A JET OF WATER.
All surfaces are easier to clean if spillage is removed
before it becomes burnt on and also, if the unit is
cleaned daily.
Before removing any parts described below, pay
attention to how they are arranged and replace them
in the same position after cleaning.
Oven
The linings of the oven are vitreous enamelled and
approved cleaning agents, bearing the mark of the
Vireous Enamel Development Centre, are
recommended.
It is advisable to clean the unit daily after use. Wipe
clean the vitreous enamel surfaces whle they are still
warm using a soft cloth and hot soapy water. Badly
stained, removable parts should be soaked in hot
water with an approved detergent. If the parts are not
removable, the application of warm water with an
approved detegent using nylon or scotch cleaning
pads will achieve a good result.
The base lining may be removed for cleaning by lifting
one end to clear door frame.
The shelf runners can be removed as follows Grip at the bottom and lift upward until the lower ends
slip out of the brackets. Pull outward towards the
centre of the oven and lower.
Hotplate
A smooth bladed metal scraper is handy for removing
deposits of burned on grease etc. from the hotplate
surface.
The hotplate spillage tray below the hotplates may be
readily withdrawn for cleaning when the appliance is
cool by sliding the tray out from the front.
Stainless Steel Surfaces
These should be cleaned with hot water and
detergent then dried and polished with a soft cloth.
Cleaning agents containing bleach, abrasives or
caustic chemicals will damage or stain a stainless
steel surface and must not be used.