1
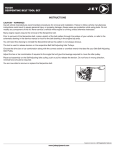
Oil Pressure Sensor Adapter Kit Install Guide
Oil Pressure Sensor Adapter Install Guide
For most Mazda and Ford 4 cylinder engines including
2.0L, 2.3L, and 2.5L engines
1
Copyright DD2, Inc.
Oil Pressure Sensor Adapter Kit Install Guide
WARNING:
By installing this Product, you understand that:
The buyer/user assumes all risk as to quality, performance and use of these products and
agrees to hold DD2, Inc. DBA Damond Motorsports (“DM”) and its representatives not
responsible for any injury, loss, or damage; including any and all incidental or consequential
damages arising from the sale, installation, or use of our products.
Many parts are intended for “OFF ROAD ” and “RACING” applications only. It is suggested that
State and Federal emission regulation be checked, to see whether or not this product complies
with those laws. Read through the instruction guide thoroughly, before attempting this install.
Do not install any components while the engine is running or shortly after the car has been
running. Give the car some time to cool down. Failure to install this product correctly, or
failure to remove/reinstall existing components correctly, could result in poor running
conditions, or even component and engine failure, which the sole user of this product is
responsible for. The install instructions are intended to guide you on how to install this product
properly. Only an experienced mechanic should perform this install. In addition, DM, and its
representatives reserve the right to modify and or discontinue parts without notice. If you the
user/buyer of this product do not agree with the above, contact DM immediately, to discuss a
possible return of our product for a full refund minus shipping costs, and other fees.
Tools required:
Vice
Drain pan
Hose cutters or sharp blade
9/16” or 15mm wrench
24mm wrench or adjustable wrench
Socket wrench:
10mm
14mm or 17mm depending on oil drain bolt
6mm hex key or 6mm allen
¼” hex key or ¼” allen
76mm 14 flute oil filter socket, 76mm 15 flute socket, or oil filter removal
tool
Torque wrench:
9/16” or 15mm crowfoot wrench (or adjustable crowfoot wrench)
24mm crowfoot wrench (or adjustable crowfoot wrench)
This was preformed on an automatic Mazda5, you vehicle may differ
slightly, but the install is generally the same.
2
Copyright DD2, Inc.
Oil Pressure Sensor Adapter Kit Install Guide
Begin by lifting the car, and supporting it on a lift, jack stands, or ramps.
Remove the under tray(10mm clips noted with arrows):
Mazda3, Mazdaspeed3, Mazda5, other models:
Locate the oil filter housing:
3
Copyright DD2, Inc.
Oil Pressure Sensor Adapter Kit Install Guide
Note: The oil does not need to be fully drained, to install the OPSA, but we
recommend doing so. Refer to your factory service manual, for proper oil
draining and filling procedures. This guide does go over common Mazda
oil drain and fill procedures, including torque specs.
With your drain pan ready, remove the 14mm or 17mm drain plug bolt:
If your car is equipped with a cartridge style filer, loosen the drain plug, do
not remove(6mm hex bit or allen key):
4
Copyright DD2, Inc.
Oil Pressure Sensor Adapter Kit Install Guide
Loosen the oil filter cover, roughly 1 full turn(75.6mm 14 flute oil filter
socket), remove the drain plug, let the oil drain, then remove the filter
cover.
Remove the filter, dump excess oil from the filter cover, and clean the
cover and drain plug. Remove the oil o-ring gaskets, and replace them
with new ones provided with the new oil filter:
Put the new oil filter onto the cover:
5
Copyright DD2, Inc.
Oil Pressure Sensor Adapter Kit Install Guide
Reinstall the filter cover and drain plug, and torque them to these specs:
Oil filter cover: 30-35NM or 23-26lb-ft
Drain plug: 9-11NM or 80-97lb-in
If your car is equipped with a spin-on oil filter, remove the oil filter(76mm 15
flute oil filter socket, or oil filter removal tool). Check to make sure the oil
filter gasket is not stuck to the housing. Reinstall new oil filter, check to see
if new gasket is provided and in place on the filter, and tighten to 1520MN/12-14lb-ft.
Reinstall the drain plug, with a new aluminum washer, and torque to these
specs:
30-41NM or 23-30lb-ft
Locate the oil pressure switch, and remove the harness clip from the
sensor:
6
Copyright DD2, Inc.
Oil Pressure Sensor Adapter Kit Install Guide
The harness clip is sometimes difficult to remove from the sensor. You will
want to push down on the clip(red arrow), and slide the clip off of the
sensor(you can use a 24mm wrench or adjustable wrench to turn the
sensor slightly, for better access):
7
Copyright DD2, Inc.
Oil Pressure Sensor Adapter Kit Install Guide
With the harness clip removed, remove the oil pressure switch from the
filter housing(24mm wrench or adjustable wrench)
Now it’s time to put the OPSA kit together. Using a vice, clamp the
provided T-fitting. Begin by lightly screwing in one of the push-lock hose
fittings, BY HAND, until it no longer turns.
8
Copyright DD2, Inc.
Oil Pressure Sensor Adapter Kit Install Guide
Grab some motor oil(we like to use brake parts cleaner for this) and very
lightly lube up the barb end of the fitting. Slide the provided hose onto the
hose fitting. This will take some force, you will want to get the hose onto
the fitting, where the yellow plastic piece does not turn freely, and the
plastic piece will need slight force to turn.
9
Copyright DD2, Inc.
Oil Pressure Sensor Adapter Kit Install Guide
You can see above how the hose is fully seated onto the fitting.
Remove the push-lock hose fitting and hose from the T-fitting. Now take
the other push-lock hose fitting, and wrap the threads with the provided
Teflon tape:
10
Copyright DD2, Inc.
Oil Pressure Sensor Adapter Kit Install Guide
Insert the fitting with the Teflon tape into one of the ports on the T-fitting.
Tighten until snug(roughly 15-20NM or 12-14lb-ft).
Clean the threads of the oil pressure switch and wrap them with Teflon
tape. Insert the oil pressure switch into one of the ports of the T-fitting.
Tighten until snug(roughly 15-20NM or 12-14lb-ft).
11
Copyright DD2, Inc.
Oil Pressure Sensor Adapter Kit Install Guide
Take the hose with fitting attached, and lightly screw the fitting into the oil
filter housing. Figure out where exactly you’d like the end of the hose and
T-fitting to be located on the vehicle(keep in mind the wire for the oil
pressure switch harness clip can only go a certain distance, you may
need to extend the wire if you wish to locate the sensor far from the
harness clip). Mark the hose at the length you’d prefer, and cut the hose
using a hose cutter, or sharp blade(if cutting with a blade, you want the
hose to be as even and straight as possible).
With the hose cut to length, take the hose and install it onto the push-lock
hose fitting. Lightly screw the push-lock fitting into the T-fitting, as
mentioned previously, to install the hose.
Now position the T-fitting in the vice to accept your oil pressure sensor. If
your sensor is ¼” NPT, wrap the threads of the sensor with Teflon tape, and
insert the sensor into the T-fitting. If your sensor is 1/8” NPT, wrap the
provided reducer fitting threads with Teflon tape, and insert the reducer
fitting into the T-fitting. Wrap the 1/8” NPT sensor threads with Teflon tape,
and install into the reducer. Tighten the reducer and/or sensor until
snug(roughly (15-20NM or 12-14lb-ft).
12
Copyright DD2, Inc.
Oil Pressure Sensor Adapter Kit Install Guide
If you do not have a sensor at the time of the OPSA install, or are removing
a sensor, you can use the screw plug. Wrap the threads with Teflon tape,
and insert the plug into the T-fitting using a ¼” hex key socket, or ¼” allen,
tighten until snug(roughly 15-20NM or 12-14lb-ft).
13
Copyright DD2, Inc.
Oil Pressure Sensor Adapter Kit Install Guide
Wrap the exposed threads of the push-lock fitting with Teflon tape, and
screw the assembly into the oil filter housing. Be cautious when inserting
the fitting, as to not strip the threads, or rub the sensors in the T-fitting
against any soft coolant hoses. Using a 9/16” crowfoot, or adjustable
crowfoot wrench, and torque wrench, tighten the fitting in the oil filter
housing to 15-20NM or 12-14lb-ft.
14
Copyright DD2, Inc.
Oil Pressure Sensor Adapter Kit Install Guide
Secure the T-fitting assembly and hose to a solid structure, using the
provided zip ties:
Locate the oil cap on the valve cover, and fill the engine with the
Manufacture’s or engine builder’s oil weight specification. Refer to the
owner’s manual or factory service manual for your vehicle’s oil fill
procedure and correct oil fill amount. Use a funnel to avoid spillage.
15
Copyright DD2, Inc.
Oil Pressure Sensor Adapter Kit Install Guide
Start the car for 10 seconds, and turn off the engine. Inspect the oil level,
and check for leaks. Top off the oil, let the engine run up to operating
temperatures, and check to see if your oil pressure gauge is functioning
properly, and the dashboard oil light is not illuminated. Check again for
leaks.
Congrats! You’ve install the Damond Motorsports OPSA. In a few days,
check the oil level, and check the car for any oil leaks.
16
Copyright DD2, Inc.