1
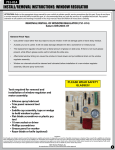
741-753
INSTALL/REMOVAL INSTRUCTIONS: WINDOW REGULATOR
ATTENTION: Refer to the appropriate shop manual for your vehicle to obtain specific service procedures for this part. If you do not have
a service manual or lack the skill to install this part, it is recommended that you seek the services of a qualified technician. Pay special
attention to all cautions and warnings included in the shop manual. Read and follow all instructions carefully.
REMOVAL/INSTALL OF WINDOW REGULATOR (741-753)
Dodge Ram Pickup 1994–2002
General Tech Tips:
•
Usepainter’staperatherthanducttapetosecurewindow.Itwillnotdamagepaintorleavestickyresidue.
•
Aplasticprytoolisuseful.Itwillnoteasilydamagedelicatetrimlikeascrewdriverormetalprybar.
•
Thereplacementregulatorshouldhavealiberalamountofgreaseonslidearea.Ifthereisnotmuchgrease
present,whitelithiumgreaseworkswelltolubricatetheslidearea.
•
Aftermarketwindowtintingcancausethewindowtotravelslowerandputadditionalstrainonthewindow
regulatorassembly.
•
Windowrunchannelsshouldbecleanedandlubricatedbeforeinstallationofanewwindowregulator
assembly.Siliconesprayworkswell.
PLEASE WEAR SAFETY
GLASSES!
Tools required for removal and
installation of window regulator and
motor assembly:
• Siliconespraylubricant
• Trimpanelremovaltool
• Pick
• Saddlecupassembly,tape,orwedge
to hold window in place
• Flat-bladescrewdriverorplasticpry
tool
• 10mmsocketordriver
• Phillipsscrewdriver
• Greasepencilormarker
Disclaimer:
Even though every attempt is made to ensure this information is complete and accurate, it is impossible to account for all possible circumstances or situations. Please consult with a qualified auto technician
before attempting to perform any work you are not qualified to do. Automobiles can be hazardous to work on; be sure to take all necessary safety precautions. Failure to do so may result in property damage
or personal injury. Certain motor vehicle standards and performance requirements may apply to your motor vehicle (such as Federal Motor Vehicle Safety Standards by the National Highway Traffic Safety
Administration). Be sure that your work is performed in accordance with such standards and that you do not disable any motor vehicle safety feature.
1
741-753
INSTALL/REMOVAL INSTRUCTIONS: WINDOW REGULATOR
ATTENTION: Refer to the appropriate shop manual for your vehicle to obtain specific service procedures for this part. If you do not have
a service manual or lack the skill to install this part, it is recommended that you seek the services of a qualified technician. Pay special
attention to all cautions and warnings included in the shop manual. Read and follow all instructions carefully.
Removal Instructions
STEP 1: Remove the door trim panel
retaining screws.
STEP 2: Remove the door handle retaining
screw.
STEP 3: In an upward motion, lift the interior door trim panel out of its retaining slots in
the door.
Disclaimer:
Even though every attempt is made to ensure this information is complete and accurate, it is impossible to account for all possible circumstances or situations. Please consult with a qualified auto technician
before attempting to perform any work you are not qualified to do. Automobiles can be hazardous to work on; be sure to take all necessary safety precautions. Failure to do so may result in property damage
or personal injury. Certain motor vehicle standards and performance requirements may apply to your motor vehicle (such as Federal Motor Vehicle Safety Standards by the National Highway Traffic Safety
Administration). Be sure that your work is performed in accordance with such standards and that you do not disable any motor vehicle safety feature.
2
741-753
INSTALL/REMOVAL INSTRUCTIONS: WINDOW REGULATOR
ATTENTION: Refer to the appropriate shop manual for your vehicle to obtain specific service procedures for this part. If you do not have
a service manual or lack the skill to install this part, it is recommended that you seek the services of a qualified technician. Pay special
attention to all cautions and warnings included in the shop manual. Read and follow all instructions carefully.
STEP 4: With the interior door trim panel
removed from the door, disconnect the
master power switch assembly.
STEP 5: Remove the door speaker assembly.
STEP 5a: Disconnect the door speaker.
Disclaimer:
Even though every attempt is made to ensure this information is complete and accurate, it is impossible to account for all possible circumstances or situations. Please consult with a qualified auto technician
before attempting to perform any work you are not qualified to do. Automobiles can be hazardous to work on; be sure to take all necessary safety precautions. Failure to do so may result in property damage
or personal injury. Certain motor vehicle standards and performance requirements may apply to your motor vehicle (such as Federal Motor Vehicle Safety Standards by the National Highway Traffic Safety
Administration). Be sure that your work is performed in accordance with such standards and that you do not disable any motor vehicle safety feature.
3
741-753
INSTALL/REMOVAL INSTRUCTIONS: WINDOW REGULATOR
ATTENTION: Refer to the appropriate shop manual for your vehicle to obtain specific service procedures for this part. If you do not have
a service manual or lack the skill to install this part, it is recommended that you seek the services of a qualified technician. Pay special
attention to all cautions and warnings included in the shop manual. Read and follow all instructions carefully.
STEP 6: Remove the interior door handle
mechanism attaching hardware.
STEP 6a: Disconnect the interior door latch
rod.
STEP 7: Disconnect the power mirror
connector.
Disclaimer:
Even though every attempt is made to ensure this information is complete and accurate, it is impossible to account for all possible circumstances or situations. Please consult with a qualified auto technician
before attempting to perform any work you are not qualified to do. Automobiles can be hazardous to work on; be sure to take all necessary safety precautions. Failure to do so may result in property damage
or personal injury. Certain motor vehicle standards and performance requirements may apply to your motor vehicle (such as Federal Motor Vehicle Safety Standards by the National Highway Traffic Safety
Administration). Be sure that your work is performed in accordance with such standards and that you do not disable any motor vehicle safety feature.
4
741-753
INSTALL/REMOVAL INSTRUCTIONS: WINDOW REGULATOR
ATTENTION: Refer to the appropriate shop manual for your vehicle to obtain specific service procedures for this part. If you do not have
a service manual or lack the skill to install this part, it is recommended that you seek the services of a qualified technician. Pay special
attention to all cautions and warnings included in the shop manual. Read and follow all instructions carefully.
STEP 8: Remove the water vapor barrier
from the door.
STEP 9: Disconnect the door latch
connector.
Disclaimer:
Even though every attempt is made to ensure this information is complete and accurate, it is impossible to account for all possible circumstances or situations. Please consult with a qualified auto technician
before attempting to perform any work you are not qualified to do. Automobiles can be hazardous to work on; be sure to take all necessary safety precautions. Failure to do so may result in property damage
or personal injury. Certain motor vehicle standards and performance requirements may apply to your motor vehicle (such as Federal Motor Vehicle Safety Standards by the National Highway Traffic Safety
Administration). Be sure that your work is performed in accordance with such standards and that you do not disable any motor vehicle safety feature.
5
741-753
INSTALL/REMOVAL INSTRUCTIONS: WINDOW REGULATOR
ATTENTION: Refer to the appropriate shop manual for your vehicle to obtain specific service procedures for this part. If you do not have
a service manual or lack the skill to install this part, it is recommended that you seek the services of a qualified technician. Pay special
attention to all cautions and warnings included in the shop manual. Read and follow all instructions carefully.
STEP 10: Temporarily connect the master
power switch to lower the window glass.
Doing so will allow you to disconnect the
window glass from the window regulator.
STEP 11: Once the glass is disconnected, slide the door glass into the up position. Hold
the glass with either a saddle cup assembly, tape, or wedge.
Disclaimer:
Even though every attempt is made to ensure this information is complete and accurate, it is impossible to account for all possible circumstances or situations. Please consult with a qualified auto technician
before attempting to perform any work you are not qualified to do. Automobiles can be hazardous to work on; be sure to take all necessary safety precautions. Failure to do so may result in property damage
or personal injury. Certain motor vehicle standards and performance requirements may apply to your motor vehicle (such as Federal Motor Vehicle Safety Standards by the National Highway Traffic Safety
Administration). Be sure that your work is performed in accordance with such standards and that you do not disable any motor vehicle safety feature.
6
741-753
INSTALL/REMOVAL INSTRUCTIONS: WINDOW REGULATOR
ATTENTION: Refer to the appropriate shop manual for your vehicle to obtain specific service procedures for this part. If you do not have
a service manual or lack the skill to install this part, it is recommended that you seek the services of a qualified technician. Pay special
attention to all cautions and warnings included in the shop manual. Read and follow all instructions carefully.
STEP 12: Disconnect the power window
motor.
STEP 13: Remove the window regulator
attaching hardware.
STEP 14: Collapse the window regulator and
remove through an access hole.
Disclaimer:
Even though every attempt is made to ensure this information is complete and accurate, it is impossible to account for all possible circumstances or situations. Please consult with a qualified auto technician
before attempting to perform any work you are not qualified to do. Automobiles can be hazardous to work on; be sure to take all necessary safety precautions. Failure to do so may result in property damage
or personal injury. Certain motor vehicle standards and performance requirements may apply to your motor vehicle (such as Federal Motor Vehicle Safety Standards by the National Highway Traffic Safety
Administration). Be sure that your work is performed in accordance with such standards and that you do not disable any motor vehicle safety feature.
7
741-753
INSTALL/REMOVAL INSTRUCTIONS: WINDOW REGULATOR
ATTENTION: Refer to the appropriate shop manual for your vehicle to obtain specific service procedures for this part. If you do not have
a service manual or lack the skill to install this part, it is recommended that you seek the services of a qualified technician. Pay special
attention to all cautions and warnings included in the shop manual. Read and follow all instructions carefully.
Installation Instructions
STEP 1: Place the window regulator
through the access hole. NOTE: YOU MAY
HAVE MORE ROOM PLACING THE WINDOW
REGULATOR THROUGH THE BOTTOM
ACCESS HOLE.
STEP 2: Attach the window regulator to the
door.
STEP 3: Attach the power window motor
connector.
Disclaimer:
Even though every attempt is made to ensure this information is complete and accurate, it is impossible to account for all possible circumstances or situations. Please consult with a qualified auto technician
before attempting to perform any work you are not qualified to do. Automobiles can be hazardous to work on; be sure to take all necessary safety precautions. Failure to do so may result in property damage
or personal injury. Certain motor vehicle standards and performance requirements may apply to your motor vehicle (such as Federal Motor Vehicle Safety Standards by the National Highway Traffic Safety
Administration). Be sure that your work is performed in accordance with such standards and that you do not disable any motor vehicle safety feature.
8
741-753
INSTALL/REMOVAL INSTRUCTIONS: WINDOW REGULATOR
ATTENTION: Refer to the appropriate shop manual for your vehicle to obtain specific service procedures for this part. If you do not have
a service manual or lack the skill to install this part, it is recommended that you seek the services of a qualified technician. Pay special
attention to all cautions and warnings included in the shop manual. Read and follow all instructions carefully.
STEP 4: At this point, it may be necessary to connect the power window master switch to
raise/lower the regulator into position so that you can connect the window glass.
STEP 5: Connect the door glass.
STEP 6: Install the water vapor barrier.
Disclaimer:
Even though every attempt is made to ensure this information is complete and accurate, it is impossible to account for all possible circumstances or situations. Please consult with a qualified auto technician
before attempting to perform any work you are not qualified to do. Automobiles can be hazardous to work on; be sure to take all necessary safety precautions. Failure to do so may result in property damage
or personal injury. Certain motor vehicle standards and performance requirements may apply to your motor vehicle (such as Federal Motor Vehicle Safety Standards by the National Highway Traffic Safety
Administration). Be sure that your work is performed in accordance with such standards and that you do not disable any motor vehicle safety feature.
9
741-753
INSTALL/REMOVAL INSTRUCTIONS: WINDOW REGULATOR
ATTENTION: Refer to the appropriate shop manual for your vehicle to obtain specific service procedures for this part. If you do not have
a service manual or lack the skill to install this part, it is recommended that you seek the services of a qualified technician. Pay special
attention to all cautions and warnings included in the shop manual. Read and follow all instructions carefully.
STEP 7: Attach the interior door handle
mechanism.
STEP 8: Attach the interior door latch rod.
STEP 9: Attach the power door lock
connector.
Disclaimer:
Even though every attempt is made to ensure this information is complete and accurate, it is impossible to account for all possible circumstances or situations. Please consult with a qualified auto technician
before attempting to perform any work you are not qualified to do. Automobiles can be hazardous to work on; be sure to take all necessary safety precautions. Failure to do so may result in property damage
or personal injury. Certain motor vehicle standards and performance requirements may apply to your motor vehicle (such as Federal Motor Vehicle Safety Standards by the National Highway Traffic Safety
Administration). Be sure that your work is performed in accordance with such standards and that you do not disable any motor vehicle safety feature.
10
741-753
INSTALL/REMOVAL INSTRUCTIONS: WINDOW REGULATOR
ATTENTION: Refer to the appropriate shop manual for your vehicle to obtain specific service procedures for this part. If you do not have
a service manual or lack the skill to install this part, it is recommended that you seek the services of a qualified technician. Pay special
attention to all cautions and warnings included in the shop manual. Read and follow all instructions carefully.
STEP 10: Attach the door speaker connector.
STEP 11: Attach the door speaker to the
door.
STEP 12: Connect the master power switch
assembly.
Disclaimer:
Even though every attempt is made to ensure this information is complete and accurate, it is impossible to account for all possible circumstances or situations. Please consult with a qualified auto technician
before attempting to perform any work you are not qualified to do. Automobiles can be hazardous to work on; be sure to take all necessary safety precautions. Failure to do so may result in property damage
or personal injury. Certain motor vehicle standards and performance requirements may apply to your motor vehicle (such as Federal Motor Vehicle Safety Standards by the National Highway Traffic Safety
Administration). Be sure that your work is performed in accordance with such standards and that you do not disable any motor vehicle safety feature.
11
741-753
INSTALL/REMOVAL INSTRUCTIONS: WINDOW REGULATOR
ATTENTION: Refer to the appropriate shop manual for your vehicle to obtain specific service procedures for this part. If you do not have
a service manual or lack the skill to install this part, it is recommended that you seek the services of a qualified technician. Pay special
attention to all cautions and warnings included in the shop manual. Read and follow all instructions carefully.
STEP 13: Attach the power mirror connector.
STEP 14: Attach the interior door trim panel
by aligning the door panel post with the
corresponding holes in the door.
STEP 15: Install the interior door handle.
Disclaimer:
Even though every attempt is made to ensure this information is complete and accurate, it is impossible to account for all possible circumstances or situations. Please consult with a qualified auto technician
before attempting to perform any work you are not qualified to do. Automobiles can be hazardous to work on; be sure to take all necessary safety precautions. Failure to do so may result in property damage
or personal injury. Certain motor vehicle standards and performance requirements may apply to your motor vehicle (such as Federal Motor Vehicle Safety Standards by the National Highway Traffic Safety
Administration). Be sure that your work is performed in accordance with such standards and that you do not disable any motor vehicle safety feature.
12
741-753
INSTALL/REMOVAL INSTRUCTIONS: WINDOW REGULATOR
ATTENTION: Refer to the appropriate shop manual for your vehicle to obtain specific service procedures for this part. If you do not have
a service manual or lack the skill to install this part, it is recommended that you seek the services of a qualified technician. Pay special
attention to all cautions and warnings included in the shop manual. Read and follow all instructions carefully.
STEP 16: Install the interior door trim panel
attaching screws.
STEP 17: Verify that the window regulator is operating properly and that all of the
attaching hardware is tight.
We appreciate your opinions regarding this product!
Please call our Technical Assistant with any challenges or suggestions
regarding the installation or operation of this product.
1-800-523-2492
Disclaimer:
Even though every attempt is made to ensure this information is complete and accurate, it is impossible to account for all possible circumstances or situations. Please consult with a qualified auto technician
before attempting to perform any work you are not qualified to do. Automobiles can be hazardous to work on; be sure to take all necessary safety precautions. Failure to do so may result in property damage
or personal injury. Certain motor vehicle standards and performance requirements may apply to your motor vehicle (such as Federal Motor Vehicle Safety Standards by the National Highway Traffic Safety
Administration). Be sure that your work is performed in accordance with such standards and that you do not disable any motor vehicle safety feature.
13