1
FORMECH INTERNATIONAL LTD
MODEL: 450
Single Heater Vacuum Forming Machine
Installation
Operating and Service Manual
For Parts, Service & Technical Assistance
Telephone: + 44 (0) 1747 851060
Telefax: + 44 (0) 1747 855031
www.formech.com
Contents
Safety ........................................................................................................................................ 3
Introduction .............................................................................................................................. 4
General Layout ......................................................................................................................... 5
Features................................................................................................................................. 5
Mechanical specification
Electrical specification ...................................................... 5
Optional extras ..................................................................................................................... 5
Initial Assembly........................................................................................................................ 6
Electrical connection ........................................................................................................... 6
Heat cover assembly and fitting ......................................................................................... 6
450 Heater - no fitting required. .......................................................................................... 6
Attaching the stabiliser bar ................................................................................................. 6
Optional cooling system...................................................................................................... 6
Operating Procedure ............................................................................................................... 7
Operating Techniques ............................................................................................................. 8
Heaters .................................................................................................................................. 8
Heater timer........................................................................................................................... 8
Bubble moulding .................................................................................................................. 8
Tools.......................................................................................................................................... 9
Plastics.................................................................................................................................... 10
Post Forming Operations...................................................................................................... 10
After forming....................................................................................................................... 10
Trimming ............................................................................................................................. 10
Warranty.................................................................................................................................. 11
Heating elements................................................................................................................ 11
Vacuum system .................................................................................................................. 11
Service\Repair ........................................................................................................................ 12
To replace a damaged or worn seal ................................................................................. 12
Replacing a heating element............................................................................................. 12
Electrical troubleshooting ................................................................................................. 13
Unplug the machine from the mains ................................................................................ 13
Vacuum\pressure system.................................................................................................. 14
To check the vacuum filter ................................................................................................ 14
2
Safety
Formech 450
Thank you for choosing Formech.
Please read and follow the below safety instructions
before attempting to install or operate your machine.
!
Do not operate the machine until you have been trained and are fully conversant with it.
!
Read and understand all of this user's manual.
!
Check your supply voltage and frequency. Make sure it is compatible with your machine.
Your machines electrical specification is on the plate on the right hand side.
!
You must ensure that the machine is properly earthed and fused.
!
!
!
The earth wire is GREEN with a YELLOW stripe.
The live wire is BROWN
The neutral wire is BLUE
!
Call in a suitably qualified technician if you are in any doubt.
!
Turn off the machine and disconnect the power supply when the machine is not in use.
!
The heater and pump on this model are not intended to be left running indefinitely.
!
Never remove any panels unless the electrical supply has been isolated.
!
Never remove any warning labels from the machine.
!
Only use the machine for vacuum forming plastic. It is not intended for any other purpose.
!
Ensure that the area you are working in is properly ventilated and that you are aware of
the potential hazards from the plastics you are forming.
!
Always let the machine cool down before attempting to work on it. Some parts of the
heater and heat shield become extremely hot during operation.
!
Ensure that the area surrounding the machine is clean and frequently cleared of finished
product and any scrap.
!
This machine is fitted with a dry running vacuum pump. Do not lubricate. Do not allow any
liquid to enter the vacuum system. Ensure that moulds are properly sealed to prevent
ingress of dust into the vacuum circuit. Severe damage may be caused if the above is
not observed.
!
Daily repetitive use of this or any other machine may lead to a) fatigue and loss of
concentration b) possible strains. Operators should be trained in the use of correct lifting
techniques in order to minimise these effects.
!
Users of this machine should complete regular competence tests.
3
Introduction
Formech 450
The Formech
rmech 450 is a manually operated vacuum forming machine that is capable of
producing high quality plastic mouldings from material up to 450mm x 450mm with a
maximum draw height of 229mm. Materials up to 6mm can be specified.
Operating from a normal domestic electrical supply the 450 is easy to use and with its simple,
accessible controls provides a fast sampling and production back up facility avoiding the
costly interruption of production equipment.
The 450 incorporate powerful infrared ceramic heaters, which are thermostatically controlled
in concentric zones. A powerful reverse-blow facility to release the moulding from the tool is
integrated into the 450.
Incorporating the latest technology the Formech
450 is ready to use in minutes, quickly
Fo
producing prototype or production runs of components in a variety of plastics. A timer is fitted
as standard.
The machine has been designed to be highly adaptable and functions such as changing a
mould, or fitting reducing windows (which allow smaller sheets to be used) can be carried out
in the minimum amount of time.
This manual informs the user on machine assembly, operation and service. It also provides
an introduction into vacuum forming with some useful advise on mould making and post
forming processes. If you would like a more comprehensive guide to the vacuum forming
process then please visit the support section of the Formech web page. A Training Manual is
provided in download and printable format.
4
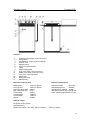
General Layout
Formech 450
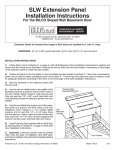
Features
1
2
3
4
5
6
7
8
9
10
11
12
13
14
Isolator box and heater power connection
Pump switch
Aux switch for cooling system (optional)
Inflation valve
Material clamp
Heater movement handle
Timer
Heater safety guard
Inner zone heater control and neon
Middle zone heater control and neon
Outer zone control and neon
Mains neon
Drape table lever
Stabiliser bar
Mechanical specification
Electrical specification
Material size
Forming area
Maximum depth draw
Max. sheet thickness
Overall width
Overall height
Overall depth
Weight
Standard voltage
220-240V
Standard frequency
50/60Hz
Standard max. wattage 3000W
Standard machines are single phase
Other electrical specification to order
450mm x 450mm
422mm x 422mm
229mm
6mm
660mm
1200mm
1240mm
95 Kilos
Optional extras
Single fan cooling system
Reel feed gantry
Reducing windows – two sizes; 300mm x 300mm - 150mm x 150mm
5
Initial Assembly
Formech 450
The machine should be sited on a level concrete floor. Dusty or draughty areas will
compromise machine performance but it is important to allow enough space around the
machine to allow access into the various panels and to ensure a good airflow to prevent
overheating. During all of the following installation ensure that the power supply is properly
isolated.
Electrical connection
220-240V Single phase
An electric supply of correct voltage, current & frequency is required. An isolating switch with
facility to be locked in 'OFF' position and capable of handling full current should be wall
mounted, within easy reach of the operator.
This machine must be properly earthed in accordance with local regulations.
Heat cover assembly and fitting
The Heater Cover is attached to the rear heat shield plate and is fitted directly to the rails
using the small orange-capped screws and nuts, one on each side.
450 Heater - no fitting required.
The heater is attached to the machine and located with the heater wheels sitting on the rails.
The heater is connected to the isolator switch located at the rear of the machine with electrical
conduit.
Attaching the stabiliser bar
The kit comprises two sidepieces and one stabiliser bar.
1
2
3
4
5
6
Remove the two screws from the bottom left hand panel.
Align stabiliser sidepiece with panel holes.
Insert screws. DO not tighten at this stage.
Repeat procedure on right hand side panel.
Now place stabiliser bar between both sidepieces and insert screws.
Tighten up all six screws
Fitting of rear stabiliser is now complete.
Optional cooling system
Attaching the Cooling System;
1
2
3
Fit the gantry to the two heater tracks at the boltholes on either side of the moulding area
with the four nuts and bolts supplied.
Fit the fan unit to the cross section of the gantry using the attached bracket. Before
tightening the bracket position the fan so that the cool air is directed over the forming
area.
Plug the fan unit to the socket position at the back of the machine.
Using the Cooling System;
The cooling system is brought into operation by switching on the AUX paddle switch located
next to the PUMP switch on the front panel.
6
Operating Procedure
Formech 450
!
Turn the isolator switch situated at the rear of the machine to the ON position.
!
Using the heater controls turn the zones on to provide power to the heaters. It usually
takes between 10 and 15 minutes before the heaters have reached their operating
temperature.
!
Place your mould onto the drape table. See the section dealing with mould design to
ensure that your mould is suitable.
!
Place the table into the lower position by pushing the table lever (13) away from you.
!
Open the material clamps (4) and raise the clamp frame.
!
Position a sheet of plastic over the aperture. See the section dealing with plastics to
ensure that your material is suitable.
!
Pull the clamp frame down and close the material clamps. The plastic should
completely cover the white seals around the aperture. Use the adjusting screws at
the front and rear of the material clamps to properly grip the plastic.
!
After the heater has reached operating temperature, pull it forward over the plastic.
!
As the plastic heats up it will begin to rise slightly. It will then soften and begin to drop
back.
!
If the heating cycle time is known then the timer can be set.
!
If not using the timer push the heater back slightly to test the softness of the plastic.
Continue heating until it is soft enough to form.
!
At this point, push back the heater all the way. Turn on the vacuum pump (7) and
raise the table (9) until you can feel it lock into place.
!
Let the finished moulding cool down a little, then pull the Vacuum/Pressure valve (6)
downwards. This will blow air between the mould and the moulding and assist in
removing the moulding. If the plastic is still too soft some distortion may occur. In this
instance then reverse the pump to apply vacuum and wait till plastic has cooled
sufficiently.
!
Finally, lower the table and release the material clamps to remove the finished
moulding.
7
Operating Techniques
Formech 450
Heaters
The powerful infrared ceramic heaters are designed to heat the plastic rapidly without burning
the surface. The time required to heat the plastic sheet remains fairly constant once the
heaters have reached their operating temperature.
When using the full forming area it is advisable to keep the central zones 1 and 2 turned down
slightly. These areas retain the heat the most and the outer zones lose the heat the fastest.
When using reducing frames the zones not in use should be turned down. Always push
heaters over rear heat shield when not heating plastic.
Heating cycle times vary according to a number of factors. With a little experience, timings
may be easily estimated.
Some plastics such as styrene have a wide tolerance to heating times giving consistently
good mouldings. Care must be taken with materials, which are Hygroscopic (retain moisture)
such as ABS, as the surface will blister if the material has not been pre-dried.
The moulding should be formed when the plastic is sufficiently ‘relaxed’ or at its ‘plastic
transition’ temperature. A properly heated sheet will give an excellently defined moulding. If
the sheet is not hot enough while forming the moulding will not pick up all the detail from the
tool.
The times below were recorded using styrene at an ambient temperature of 20 degrees C
With the machine at operating temperature. Please note that these times are a guide only.
Various factors will affect the heating time including the colour and surface finish of the
material.
1.5mm Thick = 45 seconds
2.0mm Thick = 95 seconds
4.0mm Thick = 170 seconds
Heater timer
The timer is intended to assist the production of a large number of similar mouldings.
Operating the switch to the left of the timer panel turns on the timer. The timing value is set by
pushing the ‘+’ or ‘-‘ buttons above and below the respective display digits.
The value displayed represents the number of seconds elapsed between the heater being
pulled forward and the sounding of a buzzer. The buzzer indicates that the heating cycle is
complete and the heater may be pushed back.
Timing value may be changed at any time although the new value will not be recognised until
the start of a new cycle. When the heater is brought forward it strikes a micro switch, which
starts the countdown. Pushing the heater backwards or forwards will not interrupt the
countdown.
Bubble moulding
With the 450 it is possible to produce bubble mouldings without using a tool. To form a bubble
the plastic sheet should be heated with the drape table in the lowered position. When the
plastic sheet has heated right through, raise the table, push back the heater, pull down the
pressure lever and hold. Turn on the pump. The plastic will start to inflate.
8
Tools
Formech 450
Tools for vacuum forming should always be solidly constructed as the operating air pressure
reaches approximately 100 kg over an area 100mm x 100mm (one ton per square foot)
All tools should be mounted on a baseboard. They cannot have undercuts and must be
produced with slightly angular sides ('draft angle') to aid release. Vent holes are needed to
allow the air to be evacuated from pockets and sharp angles on the tool. Providing these
holes are kept small they will not leave marks on the surface of the finished moulding.
Tools made from wood or medium density fibreboard (MDF) are easily constructed and can
give short runs of good quality mouldings at a low cost. (See note below)
The use of close-grained wood will avoid grain patterns appearing on the mouldings.
Plaster of Paris may be used for one-offs but the plaster must be allowed to properly dry out.
(See note below)
Metal tools have the advantages of carrying fine detail and being more resistant to both
distortion and surface damage. Metal tools should be pre-heated before use. A cool metal
mould will absorb some of the heat from the plastic sheet before it can take up the full
definition.
Resin tools combine most of the advantages of metal moulds with relative ease of
manufacture. Various resinous materials are commercially available especially for vacuum
forming tool production.
NOTE: Porous mould materials such as wood and plaster should be properly sealed to
prevent the vacuum pump from sucking out any moisture or sawdust, loose plaster etc. The
vacuum circuit may quickly become choked with dust or slurry if moulds are not properly
sealed.
Repairs to the vacuum circuit can be costly.
As the plastic cools after forming it will contract, gripping the tool tightly. If the tool has been
made with sloping sides and has a good surface finish it will release more easily. Where the
draft angle must be kept to a minimum a release agent may be used to assist release.
Sealed moulds will usually release more easily. Silicon based release agents may be used
on more difficult moulds. Silicon based release agents are rapidly absorbed by porous
(unsealed) moulds, rendering them ineffective.
The use of talc as a release agent is not recommended. It may clog the vacuum circuit.
9
Plastics
Formech 450
Plastic sheet is commercially available in a wide variety of grades, thickness and colours.
Materials such as styrene and PVC are most suited to vacuum forming. Other materials such
as acrylic, polypropylene and polycarbonate will mould but difficulties may be encountered.
It is not within the scope of this manual to attempt to list all the potential problems and their
solutions. It is recommended that the newcomer to vacuum forming gains experience and
confidence with easily formed materials before moving onto the more difficult materials.
Post Forming Operations
Formech 450
After forming
After forming, most plastics can be subsequently heat formed to add such details as folds or
clips. Although many plastics can be printed, and in some cases painted, the presence of
release agent used to help free a tight moulding may make the surface resistant to further
decoration.
Trimming
An ideal moulding will be ready for use when removed from the machine and requires no
finishing. However, most mouldings do require trimming before they can be used.
There are numerous methods available for this process.
Thin materials can be trimmed with a sharp knife. Shaped cutting dies can be used to cut out
intricate shapes. If no flange is required on the finished product then a trimming saw mounted
in a pillar drill will cut the moulding in a horizontal plane to free it from the surrounding
material.
In mass production environments the range of equipment available for this requirement
encompasses clicking presses, roller presses, routers, horizontal band saws, water jet
cutters, laser cutters and many others.
10
Warranty
Formech 450
Reliability and a long service life are synonymous with the Formech brand. However, as with
any machinery, certain parts will require periodic replacement.
The silicon seals applied to the mould table and to the top aperture of the machine (clamp)
are seen as being consumable parts, their service life will depend on how the machine is
treated and how often it is used.
The table and clamp seals are not covered by our warranty.
Heating elements
The infrared heating elements supplied with this machine are manufactured from a ceramic
material and are very brittle. A shock to the machine may break an element.
The heating elements contain a length of resistance wire internally, which becomes extremely
hot when electricity is applied. The wire expands and contracts as it heats and cools.
Eventually, due to the continual expansion and contraction, the wire will fracture and a new
element will be needed. This may take a decade or more. Alternatively it could happen as a
result of an impact or shock. Because of this we are unable to apply our standard warranty to
ceramic heating elements.
The heating elements are not covered by our warranty.
Vacuum system
The vacuum system on this machine is fairly simple but uses high quality components
throughout. The life expectancy of the vacuum system will be compromised by the ingress of
dirt, shavings, dust, liquid etc.
THE VACUUM CIRCUIT INCLUDING THE VACUUM PUMP WILL NOT BE COVERED BY
OUR WARRANTY IF THEY ARE FOUND TO BE BLOCKED WITH FOREIGN MATTER OR
CORRODED BY THE INGRESS OF LIQUID.
11
Service\Repair
Formech 450
Apart from the table and clamp seals, which are considered to be consumable items, it is
unlikely that you will need to service or repair your machine for many years. This is providing
that you have noted the sections regarding the vacuum system and heating elements.
Listed below are the procedures for replacing seals and heating elements.
To replace a damaged or worn seal
Remove the existing seal with a sharp knife. Remove as much of the original sealant as
possible. Using masking tape, make a frame inside where the seal will go (table) or outside
(clamp) squeeze some glue around the area where the seal is to be placed. Do not be too
economical with the glue.
Bed down a strip of silicon seal until it is firmly seated in the glue.
Do not attempt to stretch the rubber seal; it will contract back to its original size before the
glue is dry. Cut the ends at 45 degrees. Continue this process for all 4 sides of the seal. Fill
up any gaps in the mitred joints with glue. Place masking tape over the mitred corners to help
keep them firmly positioned until the glue is dry. Leave overnight then remove masking tape
and trim any excess glue off with a sharp knife.
We supply a kit comprising the necessary seal and glue for the Formech 450
The service\repair procedures below should only be attempted by suitably qualified
technicians.
Replacing a heating element
!
If the plastic is not being heated evenly and there is an obvious cold spot then follow
the below procedure.
!
Switch off machine and let heater cool completely, this will take at least 15 minutes.
!
Bring the heater half way forward, place hand near but not on elements to see if
they are still hot. If they are, let machine cool for a further 15 minutes.
!
When elements are completely cool, turn on each zone individually and feel each
element connected to that specific zone. The difference in temperature will quickly
become noticeable. If one or more elements fail to heat then follow below.
!
Unplug the machine from the mains.
!
Bring the heater completely forward.
12
Service\Repair
Formech 450
Replacing a heating element - continued
!
Undo the two Allen screws on the top and the two on the underside of the front
section of the heater enclosure. The front section of the heater panel can now be
pulled away from the main body of the heater. Rest it forward on the clamp frame.
The temperature regulator blocks are now visible. At this stage check that the wires
are fully tightened and that the fault was not merely a loose connection or a
disconnected clip.
!
Loosen the two Allen screws located on the top right and left sides of the heater
holding the frame onto the black mesh. Do not unscrew these any more than
necessary.
!
Remove the mesh by sliding forward and out of the frame.
!
Remove screw from the terminal block of offending element.
!
Remove the retaining clip holding the faulty element.
!
Place hand underneath heater and remove element.
!
Push new element into hole and fix clip from top.
!
Ensure that the connections are fully tightened and correctly wired.
!
Reverse the above procedure to re-assemble.
Electrical troubleshooting
In the event that neither the heater nor the pump will work check that your supply is OK.
Check the fuse located in the mains plug. The fuse is a standard 1" x 1\4" BS1362 type.
It is rated at 13Amps.
Machines supplied outside the UK may not be fitted with a fused plug. The machine will be
fused by a wall mounted circuit breaker or fuse.
If neither the fuse nor the mains supply are faulty then turn off the machine.
Unplug the machine from the mains
If the fault still cannot be found remove the front or side panel to allow access to the machine
interior.
Check the pump switch connections if the pump only is down.
If all the connections are good then the switches can be checked for continuity.
Note: Continuity should be obtained between the top and bottom contacts of the switch
not side to side.
If the vacuum pump motor does not run, check the electrical supply. If the motor smells
strongly of burnt lacquer then it is probably burnt out and the entire pump\motor assembly
needs replacing.
If the supply is present but the motor does not run, the capacitor may be faulty.
13
Service\Repair
Formech 450
Vacuum\pressure system
If the vacuum or pressure appears to be weak or non-existent check the following.
!
The mould baseboard is not restricting the vacuum inlet in the drape table.
!
NOTE: If the mould baseboard is too soft it may pull down under vacuum and block
the vacuum inlet.
!
The mould is adequately vented to allow trapped air to be evacuated.
!
The table and clamp seals are in good order and the table is locking properly at the
top of its travel.
!
There are no holes drilled in the drape table.
If all the above points are OK and you can hear the pump running when you switch it on then
one of the following points will be the cause of the problem. If the pump does not run, refer to
the Electrical trouble shooting section above.
!
A pipe is loose, damaged or blocked.
!
The pump filter is blocked
!
The vacuum\pressure valve is blocked or corroded.
!
The vacuum pump is blocked or corroded.
If the heater has been left in the forward position, with no plastic in the clamp frame, the table
will start to overheat. The pipe attached to the back of the table will shrink and constrict the
passage of air. Pipes become less flexible over time and may loosen or crack.
To check the vacuum filter
Unplug the machine from the mains
Remove the left hand panel. You will see the cylindrical vacuum filter with a pipe attached to
each end. Discard the blocked filter and fit a new one.
If you are unable to cure any problem relating to your machine, or if you wish to order spare
parts please contact us at the below address, stating the model (450) the serial No. (on
specification plate) and a full description of the fault or parts you need.
FORMECH INTERNATIONAL LTD.
Spare Parts, Service & Technical Support.
Unit 7 Semley Industrial Estate
Semley
Shaftesbury
Dorset SP7 9AN UK
Tel: +44 (0) 1747 851060
Fax: +44 (0) 1747 855031
Email: [email protected]
14