1
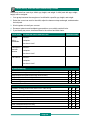
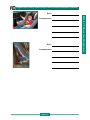
MODULE
9
National Child Passenger Safety Certification Training Program
Children in Forward-Facing Car Seats
OBJECTIVES
• Describe when children should travel forward-facing.
• Identify types of forward-facing car seats.
• Apply 5 steps for forward-facing car seat use.
• Explain best practices about forward-facing car seats to caregivers.
• Identify forward-facing car seat errors and consequences.
WHEN CHILDREN SHOULD TRAVEL FORWARD-FACING
Children should:
•
Remain in a rear-facing car seat until reaching the top height or weight limit allowed by the
car seat manufacturer.
•
Ride in a forward-facing car seat with a harness until they reach the top height or weight limit
allowed by the car seat manufacturer – usually until they are between ages 4 to 7.
•
It is dangerous to exceed height or weight limits.
There are five types of forward-facing car seats: convertible, combination, forward-facing-only,
large medical seats or vests, and integrated seats.
NOTE: There are always car seats that do not fit into these categories. For example, there are
car seats that rear-face, forward-face, and then become booster seats.
FORWARD-FACING CONVERTIBLE CAR SEAT
•
Manufacturer instructions for many car seats
recommend they be in the upright position
when used forward-facing.
•
Some manufacturers meet testing standards
with their seat in a forward-facing, semireclined position, as well as fully upright.
Consider this position if the child has special
needs or if seat belts cannot be made tight
when the car seat is upright.
•
Some harness systems are approved for use
to 40 pounds, but the marketplace is
changing and now includes more seats with
higher weight limit harnesses.
•
A 5-point harness provides more protection
for a child than a booster seat with a lap-andshoulder seat belt.
•
Read the owner's manual to ensure correct
use of the belt path and harness slots.
Page 9-1
Forward-facing convertible car seat
FORWARD-FACING COMBINATION CAR SEAT
The forward-facing combination car seat is used with a
harness until a certain height or weight limit specified by the
manufacturer is reached. The harness must then be removed
or stored.
•
Make sure the mid-point of the back of head or top of ears
are NOT above the top of the shell or as directed by the
car seat manufacturer.
•
The backs of all combination seats are reinforced. Any
harness slot can be used as long as it is at or above the
child’s shoulders.
•
This car seat does not have air bag warning labels because
combination car seats are forward-facing-only and most
have a lower weight limit of 20 pounds.
•
Once the harness is removed, this seat can then be used
as a belt-positioning booster seat.
Forward-facing
combination car seat
FORWARD-FACING-ONLY CAR SEATS
Forward-facing-only car seats are sometimes used for children
with special health needs or for heavier children who are not
behaviorally mature enough for a booster seat.
•
•
With forward-facing-only car seats, the weight limits can
vary. Some have higher harness weight limits than other
forward-facing car seats.
Forward-facing-only car seat
It is important to research and remain aware of currently
available car seats with higher weight harnesses.
LARGE MEDICAL SEATS AND VESTS
Large medical seats, vests, and harnesses may help children
with behavioral issues, weak muscles, excess weight, or other
situations when a conventional car seat cannot be used.
•
Large medical seats are designed for occupants who require
supplemental positioning support from a car seat beyond
that offered by a conventional restraint. Typically, large
medical seats will fit occupants weighing up to 102 to 135
pounds (a few go higher).
•
There are different vests available in different sizes for use
as restraints. In order to use a vest, a child must have good
head control. Some products are made just for school bus
use.
•
It is important for families to work with an occupational
therapist (OT) or physical therapist (PT) to evaluate a child’s
positioning needs and determine which restraint provides the
best positioning options for the child.
•
•
Heavy-duty tethers are sometimes required.
Always follow the manufacturer instructions.
Page 9-2
Large medical seat
Vest
INTEGRATED SEATS
Some vehicles have seats/restraints built into the vehicle.
Check the vehicle owner’s manual for instructions and
weight limits.
•
Many integrated seats face forward. Some can be used as
a booster seat. They CANNOT be moved.
•
•
Some have a 5-point harness.
•
Caregivers should call the service department of the vehicle
dealership and ask to be given information in the repair
section of the service manual about replacing car seat parts.
Integrated seats, as with other car seats, may need to be
replaced after a vehicle collision, if webbing is frayed, or
parts are missing or broken. Check the vehicle owner’s
manual for instructions.
Integrated seat
HARNESS FIT
Tighten harness straps snugly. A snug harness lies flat and
passes the pinch test. Bulky clothing can interfere with proper
harness fit.
•
Avoid bulky clothing or padding behind the child’s head,
back, or under buttocks.
•
Bulky jackets can be put on backwards (over child’s arms
and torso) after the harness is secured.
•
Place blankets over and around the child after the harness is
snug.
Children should sit with:
!
!
Their back and bottom flat against the car seat back.
!
The harness straps placed over the shoulders and buckled
at the crotch.
!
The retainer clip at armpit level.
The harness placed through proper slots, usually at or
above the child’s shoulders. Refer to the car seat
manufacturer instructions.
Page 9-3
TIPS FOR DISCUSSING
HARNESS FIT
• Some car seats have
unusual belt paths or
routing instructions.
• Harness slot
reinforcement and
structures that look like
reinforcement may not
be visible.
• The only way to know
for certain is to read the
manufacturer
instructions.
MODULE 9 • Children in Forward-Facing Car Seats
•
Practice Activity: Adjust a Harness and Locate the Belt Path
In small groups, adjust a harness for height and weight limits. A child (doll and card with age,
weight, and height) will be assigned to your group.
1. Working with a forward-facing car seat and doll, move the harness to a different harness
slot. Adjust the harness to loosen and tighten.
2. Adjust the car seat harness so it fits the doll.
3. Identify the location of the harness adjustments.
4. Identify the forward-facing seat belt path, lower anchor attachment belt path, and tether
strap on the car seat.
5. Adjust the car seat to either the upright or forward-facing recline position (if allowed by the
manufacturer.
6. Answer the following questions.
Questions
1. Is the harness adjustment in the front or on the back of the car seat?
2. Is it easy to read labels and instruction manual, locate and identify harness adjustment
lock-offs, etc.?
3. Where are the lower anchors and tether stored when not in use?
5 STEPS FOR FORWARD-FACING CAR SEAT USE
The following is an application of 5 steps to forward-facing car seat use.
1. Selection: Choose the Right Car Seat
As with all car seats, select the one that is right for the child’s height, weight, developmental
levels, AND that a caregiver can use correctly.
2. Direction: Face the Car Seat the Right Way
A child should be kept in a forward-facing car seat with a harness until reaching the top
height or weight limit allowed by the car seat manufacturer. This is generally between the
ages of 4 to 7.
3. Location: Install the Car Seat in an Appropriate Location in the Vehicle
•
As with rear-facing car seats, while there may be many seating positions in a vehicle, not
all may be suitable for installing a car seat.
•
As long as the car seat fits, the rear center seating position may be safer because it is
furthest from impact and intrusion from any direction. However, some rear center
positions are not usable and many families transport more than one child.
•
Weight limits on lower anchors and tether anchors can affect the seating position choice.
Each vehicle manufacturer sets these weight limits. Check the vehicle owner’s manual or
most current LATCH Manual (if available) for individual vehicle limits.
Page 9-4
4. Installation: Secure the Car Seat to the Vehicle in the Right Way
•
•
A tether increases safety by limiting forward movement
and rotation of the car seat. Using the tether strap can
stabilize a car seat and limit head movement.
•
NEVER place noodles or towels behind or under a
forward-facing car seat unless allowed by the
manufacturer.
General methods to obtain a tight installation include:
1. Place the car seat on the selected vehicle seat in the
proper direction, ensuring that the angle adjustment is in
the correct position for the child.
2. Place the seat belt or lower anchor webbing through the
car seat belt path as directed by the manufacturer.
3. Buckle and lock the seat belt or secure lower anchors.
4. Place your hand in the car seat and use leverage to
compress the car seat into the vehicle seat cushion while
tightening the seat belt or lower anchors.
5. Tighten to ensure the seat does not move more than
1 inch when testing at the belt path.
6. Identify the vehicle tether anchor. Attach and tighten the
tether strap.
7. Test again for a tight installation.
Page 9-5
TIPS FOR DISCUSSING
FORWARD-FACING CAR
SEATS
• Always discuss the
transportation needs of
the family.
• Unused seat belts may
be within reach of a
child when a car seat is
installed with lower
connectors. Technicians
should educate the
caregiver to evaluate
the risk of entanglement
from unused seat belts.
Secure unused seat
belts as directed by the
vehicle manufacturer.
• Encourage caregivers to
use the tether with a
forward-facing car seat
whenever possible,
whether installing with
the seat belt or lower
anchors.
• Show caregivers how to
place lower anchors
through a forwardfacing belt path.
• Explain the importance
of storing the LATCH
attachments.
MODULE 9 • Children in Forward-Facing Car Seats
Consider seating positions with seat belts that can be
locked (locking latchplate, switchable, or automatic
locking retractors) or approved lower anchor positions for
car seat use.
VIDEO • Install a Forward-Facing Car Seat
Record steps you observe to install a forward-facing car seat
with a harness using a seat belt.
1.
2.
3.
4.
HOW TO TEST THE
INSTALLATION
• To test the installation,
grip the car seat at or
near the belt path and
pull on the car seat.
• There should be no more
than 1 inch of side-toside or forward
movement at the belt
path.
• Tighten the harness
straps snugly. You
should NOT be able to
pinch excess webbing at
the shoulders once the
harness is buckled and
tightened.
5.
6.
7.
8.
What do you need to take into account when using the lower anchors to secure the car seat?
Page 9-6
Common Forward-Facing Installation Errors
Caregivers make the following common forward-facing installation errors:
A seat belt or lower anchor attachment that is too loose or not locked
•
Incorrect use of lower anchors and tether, not installing lower anchor attachments to the
correct designated lower anchor bars or attaching the connectors upside down
•
•
•
Not using the appropriate tether anchor or using it when it should not be used
•
Installing a seat with LATCH when the child weighs more than the vehicle and/or car
seat LATCH weight limits
A rear-facing-only car seat that is forward-facing
Seat belt or lower anchor attachments routed incorrectly through the wrong belt path
Recline angle not adjusted appropriately for forward-facing direction
Using two seat belts, or using a seat belt and lower anchor attachments together (unless
allowed by the car seat and the vehicle manufacturers)
Locking clip installed incorrectly
Installing a car seat with lower anchors in a seating position that is not a designated
LATCH position
5. Harnessing: Place the Child Correctly in the Car Seat
There are four steps for correctly harnessing a child in a car seat.
1. Place the child all the way back in the car seat.
2. Put the harness straps over the shoulders and buckle at the crotch. The harness holds
the child back against the car seat so he or she does not slide out in a crash. The crotch
strap keeps the child from moving forward.
3. Tighten the harness straps snugly. You should NOT be able to pinch excess webbing at
the shoulders once the harness is buckled.
4. Secure and place the harness retainer clip at armpit level.
Common Forward-Facing Harnessing Errors
Caregivers make the following common forward-facing harnessing errors:
•
•
•
•
Harness not used (child just sitting in the car seat)
•
•
•
•
•
Harness is twisted or incorrectly routed
Harness straps are too loose
Retainer clip not at armpit level
Harness routed through the wrong slots. (NOTE: Harness may look as though it is
properly routed through the pad, but it may not be routed correctly through the shell.)
Harness not placed on the child correctly
Harness is frayed or damaged
Metal adjuster not flush with a slot or out of position
Crotch strap is adjusted too long, or not through slot closest to the child
Page 9-7
MODULE 9 • Children in Forward-Facing Car Seats
•
•
•
•
•
Practice Activity: Select and Install Forward-Facing Car Seats
Select and install car seats by a child’s age, height, and weight. A child (card with age, weight,
height) will be assigned.
1. Your group becomes the caregivers of a child with a specific age, height, and weight.
2. Select the correct car seat for the child, adjust the harness straps and angle, and determine
the belt path.
3. Work together to install your car seat.
4. Document retractor and latchplate types and how your vehicle seat belt locks.
5. If you identify any errors, document them in the second and third charts.
Seat to Install
How Does the Vehicle Seat Belt Lock?
Forwardfacing
convertible
Retractor:
Instructor Initials
Latchplate:
How does it lock?
Combination
seat with
harness
Retractor:
Latchplate:
How does it lock?
Your choice
Retractor:
Latchplate:
How does it lock?
Car Seat Harnessing
Harness slots used are best for child’s age and size
Parts present and in good condition
Straps around frame/shell and through slots correctly
Straps and harness fit correctly
Retainer clip positioned correctly
Harness snug enough
Y
Y
Y
Y
Y
Y
N
N
N
N
N
N
NA
NA
NA
NA
NA
NA
Y
Y
Y
Y
Y
Y
Y
Y
Y
N
N
N
N
N
N
N
N
N
NA
NA
NA
NA
NA
NA
NA
NA
NA
Car Seat Installation
Installed in seating position with active front or side air bag
Best seating position being used
Correct forward or rear-facing position
Correct recline angle used
Seat belt routed correctly
Seat belt locked
Lower attachments used correctly
Tether installed and used correctly
Installation tight enough
Page 9-8
Explain Best Practices About Forward-Facing Car Seats
Key Questions
!
!
What are the age, weight, and height of the child?
!
!
!
!
!
!
What type of forward-facing car seat is this?
What does the car seat owner’s manual (or label) say about the minimum and maximum
weights and heights for the child using this car seat?
Is the car seat facing the right way in the vehicle?
Considering everyone who rides in this vehicle, is the car seat in the best seating position?
Is the car seat secured by a seat belt or with lower anchor attachments?
Is the car seat installed tightly?
Is the tether used if present/able?
Best Practices
Answer the following questions to prepare for conversations you will have with caregivers to
educate them about forward-facing car seats.
1. My child is two years old and weighs 39 pounds. Which car seat should I buy?
2. May I use this car seat with a side air bag in a back seat?
3. My child fits in the harness, but weighs 43 pounds. Can I keep using this car seat?
4. Should I use LATCH or the seat belt?
5. Do I have to use the tether?
6. My child climbs out of the car seat. What should I do?
Page 9-9
MODULE 9 • Children in Forward-Facing Car Seats
There are key questions to answer related to forward-facing car seats. Explain and demonstrate
best practices to caregivers.
Progress Check: Identify Forward-Facing Car Seat Errors and Consequences
1. Examine each photograph to determine if the forward-facing car seat is fitted properly.
2. If not fitted properly, identify the errors and consequences to the child.
1.
Error:
Consequences:
2.
Error:
Consequences:
3.
Error:
Consequences:
Page 9-10
Progress Check: Identify Forward-Facing Car Seat Errors and Consequences (continued)
4.
Error:
5.
Error:
Consequences:
Page 9-11
MODULE 9 • Children in Forward-Facing Car Seats
Consequences:
Practice Activity: Identify Misuse with Car Seats
Identify misuse with several car seats.
1. In small groups, carefully examine the information about the child’s age, height, and weight.
Also, check car seat labels that have been set up in the classroom.
2. Take notes on what you discover regarding car seat misuse for each scenario.
3. Use the sample checklists provided below to record your answers for at least one of the
scenarios.
1.
2.
3.
4.
5.
6.
7.
Car Seat Selection
Car Seat Used
" Rear-facing-only
" Harness vest
Car seat type best for age/size?
Car seat manufacturer:
Model #:
" Convertible
" Forward-facing with harness
" High-back booster
" Backless booster
Y
N
NA
Car seat model name:
Mfg date:
Under recall? Y
N NA
Car Seat Use
Type of harness best for age and size?
Parts present and good condition?
Straps around frame/shell and through slots correctly?
Straps and harness fit correctly?
Retainer clip positioned correctly?
Harness adjustment mechanism locked?
Harness snug enough?
Correct front-facing position?
Correct recline angle used?
Page 9-12
Y
Y
Y
Y
Y
Y
Y
Y
Y
N
N
N
N
N
N
N
N
N
NA
NA
NA
NA
NA
NA
NA
NA
NA
Progress Check and Summary
1. How do you determine which harness slots to use for a forward-facing child?
3. How do you find the correct belt path?
4. How tightly should a forward-facing car seat be installed?
5. What is the benefit of using a tether?
Page 9-13
MODULE 9 • Children in Forward-Facing Car Seats
2. What is the correct way to secure a child in a forward-facing car seat?
Page 9-14