1
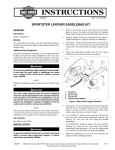
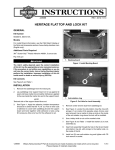
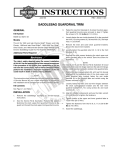
-J04798
REV. 2008-06-19
SADDLEBAG FILLER STRIP KITS
GENERAL
is05575
Kit Number
91422-09, 91614-09XXX, 91670-09, 91741-09XXX
Models
5
For model fitment information, see the P&A Retail Catalog or
the Parts and Accessories section of www.harley-davidson.com
(English only).
3
The rider's safety depends upon the correct installation
of this kit. Use the appropriate service manual procedures.
If the procedure is not within your capabilities or you do
not have the correct tools, have a Harley-Davidson dealer
perform the installation. Improper installation of this kit
could result in death or serious injury. (00333a)
2
2
1
4
NOTE
3
This instruction sheet references Service Manual information.
A Service Manual for your model motorcycle is required for
this installation and is available from a Harley-Davidson Dealer.
Kit Contents
3
See Figure 3 and Table 1.
INSTALLATION
1.
Remove the saddlebags following the instructions in the
service manual.
2.
Remove bottom exhaust mounting bolt and discard.
3.
See Figure 1. For solid filler strips align as shown in Figure
1.
See Figure 2. For slotted version align as shown in Figure
2 after assembling Nostalgic saddlebag rails.
4.
Insert screw (1) and washer (2) into bottom mounting hole
in top bracket. Start flange nut (3) onto back side of screw
and tighten finger tight.
5.
Figure 1. Solid Filler Strips: Feed screw (4) through
bottom exhaust mounting bracket on the saddlebag support for solid filler strips, note screw orientation.
1.
2.
3.
4.
5.
Button head screw
Washer
Nut
Pan head screw
Solid filler strip
Figure 1. Solid Filler Strip Installation
is05580a
1
Figure 2. Slotted Filler Strips: For slotted version, when
used with Nostalgic Saddlebag Rails, reuse the bottom
mounting hardware supplied with the rails.
1. Slotted Filler Strip
Figure 2. Slotted Filler Strip
-J04798
Many Harley-Davidson® Parts & Accessories are made of plastics and metals which can be recycled.
Please dispose of materials responsibly.
1 of 2
6.
Align fender mounting bracket and exhaust mounting,
continuing to feed screw through until it protrudes through
the bottom filler strip mounting slot.
7.
See Figure 1. Start flange locking nut (3) onto screw and
tighten until finger tight.
8.
Insert final mounting screw (1) into the top mounting hole
of the top mount bracket and tighten finger tight.
9.
Adjust filler strip to desired location and tighten all screws
to 15-20 ft-lbs (20.3-27.1 Nm).
10. Repeat Steps 2 through 9 for opposite side.
SERVICE PARTS
is05581
3
4
1
2
5
6
Figure 3. Service Parts: Saddlebag Filler Strips
Table 1. Service Parts Table
Kit
Item
Description (Quantity)
Part Number
Kit 91422-09
Solid Chrome
1
Filler strip, left
91449-09
2
Filler strip, right
91451-09
Kit 91670-09
Slotted Chrome
1
Filler strip, left
91749-09
2
Filler strip, right
91769-09
Common Hardware
3
Hex socket button head screw (4)
3540
4
Washer, type A (4)
6702
5
Flange lock nut (6)
7531
6
TORX®
3648
pan head tapping screw (2)
Service parts are not available for Colormatch kits.
-J04798
2 of 2