1
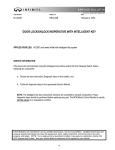
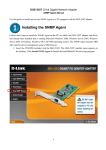
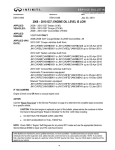
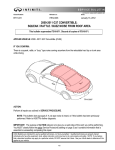
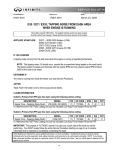
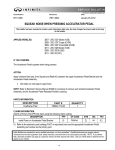
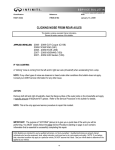
Classification:
Reference:
Date:
BT12-002
ITB12-019
April 17, 201 2
G SEDAN; PAINT CHIPPING OFF EDGE OF TRUNK LID
APPLIED VEHICLES:
APPLIED VINS &
DATES:
2007-2012 G25/G35/G37 Sedan (V36)
2007-2011 G25/G35/G37 Sedan – ALL
2012 G25: 2WD – Vehicles built before JN1DV6AP(*)CM 812266 // Jan 31, 2012
AWD – Vehicles built before JN1DV6AR(*)CM 862082 // Feb 1, 2012
2012 G37: 2WD – Vehicles built before JN1CV6AP(*)CM 628061 // Jan 31, 2012
AWD – Vehicles built before JN1CV6AR(*)CM 680590 // Jan 31, 2012
IF YOU CONFIRM
Paint is chipping off the edge of the trunk lid in the locations
shown in Figure 2. Surface corrosion in this area may also be
visible.
Paint chipping
ACTION
1. Inspect the trunk lid for proper clearance and latching, and
make adjustments if needed.
Figure 1
2. Adjust the bumper rubbers (“stoppers”). ACTION
3. Confirm the rear combination lamp lens located below the chipped paint is flush/even with the housing.
4. If not flush/even, replace the rear combination lamp assembly.
5. Using standard auto body repair practices, perform a Refinish Half-Block Repair to the area of the trunk lid
where paint has chipped off.
Paint chipping off trunk edge in
these locations
Figure 2
IMPORTANT: The purpose of ACTION (above) is to give you a quick idea of the work you will be performing.
You MUST closely follow the entire Service Procedure as it contains information that is essential to successfully
completing this repair.
Infiniti Bulletins are intended for use by qualified technicians, not 'do-it-yourselfers'. Qualified technicians are properly trained
individuals who have the equipment, tools, safety instruction, and know-how to do a job properly and safely. NOTE: If you believe
that a described condition may apply to a particular vehicle, DO NOT assume that it does. See your Infiniti dealer to determine if this
applies to your vehicle.
1/6
PARTS INFORMATION
DESCRIPTION
PART #
QUANTITY
RH Rear Combination Lamp
26550-JK60D
1 (if needed)
LH Rear Combination Lamp
26555-JK60D
1 (if needed)
CLAIMS INFORMATION
Submit a Primary Part (PP) type line claim using the following claims coding:
DESCRIPTION
ADJUST TRUNK LID STOPPER
PFP
84840-EJ70A
OP CODE
BX3AAA
SYM
FB
DIA
45
FRT
0.2
OR
Submit a Primary Part (PP) type line claim using the following claims coding:
DESCRIPTION
ADJUST TRUNK LID STOPPER & REPLACE
REAR COMB LAMP (ONE SIDE)
PFP
OP CODE
SYM
DIA
FRT
84840-EJ70A
BX3BAA
FB
45
0.3
OR
Submit a Primary Part (PP) type line claim using the following claims coding:
DESCRIPTION
PFP
OP CODE
SYM
DIA
FRT
ADJUST TRUNK LID STOPPER & REPLACE
REAR COMB LAMP (BOTH SIDES)
84840-EJ70A
BX3CAA
FB
45
0.4
***On the same repair line, claim for the Refinish Half Block paint repair operation code and paint expense.
2/6
ITB12-019
SERVICE PROCEDURE
1. Visually inspect the clearance/gap between the trunk lid and rear fender, rear combination lamp, back up
lamp, and rear bumper.
•
If clearance/gap does not appear even, refer to section DLK > Trunk Lid Assembly: Adjustment in
the applicable Electronic Service Manual (ESM) and make adjustments as instructed.
Visually confirm clearance/gap is even
between trunk lid and:
• rear fender
• rear combination lamp
• back up lamp
• rear bumper
Figure 3
2. Open and close the trunk lid. If abnormal force is required to close the trunk lid, refer to section DLK >
Trunk Lid Assembly: Adjustment in the applicable ESM and adjust the trunk striker and hinge as
instructed.
3/6
ITB12-019
“Stoppers”
3. Open the trunk lid and adjust both
bumper rubbers (“stoppers”).
a. Unlock the stopper by rotating
the lock nut counterclockwise
until fully loose. See Figures 5
and 6.
Figure 4
b. Pull the stopper outward until fully extended. DO NOT remove the stopper.
Locked
Unlocked
Lock nut
Stopper
Rotate lock nut counterclockwise to unlock
Pull stopper outward until fully extended
Figure 5
Figure 6
4/6
ITB12-019
c. Gently lower the trunk lid, increasing pressure slowly until it latches.
d. Open the trunk lid, then hold each stopper in place while rotating the lock nut clockwise until it stops.
The stoppers are now locked in position.
Rotate
Hold
Stopper is locked
Figure 7
Figure 8
4. Confirm the position of the rear combination lamp located below the chipped paint.
a. Visually inspect and run your finger along the top of the rear combination lamp lens in the area shown
in Figure 9.
b. If the lens is positioned above the rear combination lamp housing (see Figure 10) within the area
shown in Figure 9, replace the affected rear combination lamp assembly.
c. If the lens is flush/even with the housing, proceed to step 5.
RH side shown;
inspect LH rear
combination
lamp lens if paint
chipping is on
the driver’s side
NG: The lens is higher than the housing
Lens
Housing
Inspect this area
Figure 9
Figure 10
5/6
ITB12-019
5. Using standard auto body repair practices, perform a Refinish Half-Block Repair to the area of the trunk lid
where paint has chipped off.
6/6
ITB12-019