1
VERTEX STANDARD CO., LTD.
4-8-8 Nakameguro, Meguro-Ku, Tokyo 153-8644, Japan
VX-210AV
VERTEX STANDARD
VHF Band
Service Manual
P.O. Box 75525, 1118 ZN Schiphol, The Netherlands
US Headquarters
10900 Walker Street, Cypress, CA 90630, U.S.A.
YAESU EUROPE B.V.
YAESU UK LTD.
Unit 12, Sun Valley Business Park, Winnall Close
Winchester, Hampshire, SO23 0LB, U K.
VERTEX STANDARD HK LTD.
Unit 5, 20/F., Seaview Centre, 139-141 Hoi Bun Road,
Kwun Tong, Kowloon, Hong Kong
©2005 VERTEX STANDARD CO., LTD.
EC020N90B
Introduction
The Vertex VX-210AV is a compact hand portable transceiver for the VHF land mobile band that offers the convenience of small size, light weight, and simple operation.
The VX-210AV can be simply programmed by your
VERTEX STANDARD Dealer with up to 16 channels for
single and split frequency operation. The VX-210AV provides up to 5 watts of RF output power and includes a
flexible quick-connect antenna.
The transceiver and Ni-Cd battery packs are constructed of thick high-impact polycarbonate plastic, with special attention paid by the designers to tight seals and ruggedness, assuring years of reliable operation even in harsh
environments.
The following pages describe the operation, features
and accessories of the VX-210AV. With proper care and
operation, the transceiver will provide many years of reliable communications.
Contents
Operating Manual Reprint ................................................................................................................................................ 2
Specifications ....................................................................................................................................................................... 5
Cloning .................................................................................................................................................................................. 6
Exploded View & Miscellaneous Parts ........................................................................................................................... 7
Block Diagram ...................................................................................................................................................................... 8
Circuit Description .............................................................................................................................................................. 9
Alignment ........................................................................................................................................................................... 11
Board Units (Schematics, Layouts & Parts)
MAIN Unit ...................................................................................................................................................................... 13
SW Unit ........................................................................................................................................................................... 31
Optional Board Units (Schematics, Layouts & Parts)
VTP-50 VX-Trunk Unit ................................................................................................................................................. 32
FVP-25 Encryption / DTMF Pager Unit ...................................................................................................................... 34
Specifications
General
Frequency Range:
Number of Channels:
Channel Spacing:
PLL Steps:
Power Supply Voltage:
Battery Life (5-5-90 duty):
Operating Temperature Range:
Frequency Stability:
Dimensions:
Weight (Approx):
134-160 MHz (A), 148-174 MHz (C)
16 channels
12.5/15/25/30 kHz
2.5/6.25 kHz
7.5 V DC ±20 %
8.2 hrs. (9.9 hrs. w/saver) @5 W
–22° F to +140° F (–30° C to +60° C)
±2.5 ppm
4.21" (W) × 2.28" (H) × 1.0" (D) (108 × 58 × 26 mm)
0.75 lb. (340 g) w/FNB-V57
Receiver (Measurements made per EIA standard TIA/EIA-603)
l.c
rv
ic
ere
pa
5 / 1 W (Selectable) or 3.5 / 1 W (Selectable) w/FBA-25
16K0F3E / 11K0F3E (Direct FM)
60 dB Below Carrier
40 dB (25 kHz) / 35 dB (12.5kHz)
<5%
se
Power Output:
Modulation:
Conducted Spurious Emission:
FM Hum & Noise:
Audio Distortion (@1 kHz):
irm
Transmitter (Measurements made per EIA standard TIA/EIA-603)
an
ua
EIA 12 dB SINAD: 0.20 µV
20 dB Quieting: 0.30 µV
Adjacent Channel Selectivity: 65 dB (25 kHz)/60 dB (12.5 kHz)
Intermodulation:
65 dB
Spurious and Image Rejection: 65 dB
Hum & Noise:
45 dB
Audio Output:
500 mW @4 Ohms, 5% THD
om
Sensitivity:
Specifications subject to change without notice or obligation.
5
l.c
om
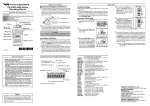
Operating Manual Reprint
o or & Connectors
C ne t s
Contorols
an
ua
Low Battery Indication
LED Indicator
irm
pa
re
Antenna
ACC on
Busy Channel (or SQL off)
Transmitting
Battery Voltage is low
Receiving a Selective Call
CH (Channel) Selector
ic
e-
Glows Green
Blinking Green
Glows Red
Blinking Red
Blinking Yellow
se
rv
VOL/PWR Knob
Push To Talk
(PTT) Switch
MIC/SP Jack
(External Mic/Earphone)
ACC Button
Speaker
As the battery discharges during use, the voltage gradually
becomes lower. When the battery voltage becomes to low,
substitute a freshly charged battery and recharge the depleted pack. The TX/BUSY indicator on the top of the radio
will blink red when the battery voltage is low.
Avoid recharging Ni-Cd batteries often with little use
between charges, as this can degrade the charge capacity. We recommend that you carry an extra, fullycharged pack with you so the operational battery may
be used until depletion (this “deep cycling” technique
promotes better long-term battery capacity).
p at
at
Operation
Preliminary Steps
Battery Pack Installation and Removal
Caution!
Do not attempt to open any of the rechargeable NiCd packs, as they could explode if accidentally shortcircuited.
2
11
9
CH
V
15
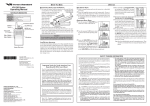
To remove the battery, turn the radio off and remove
any protective cases. Open the Battery Pack latch on
the bottom of the radio, then slide the battery downward and out from the radio while holding the Belt
Clip.
Turn the top panel’s VOL/
PWR knob clockwise to
turn on the radio on.
1
To install the battery, hold the transceiver with your
left hand, so your palm is over the speaker and your
thumb is on the top of the belt clip. Insert the battery
pack into the battery compartment on the back of the
radio while tilting the Belt Clip outward, then close
the Battery Pack Latch until it locks in place with a
“Click.”
Operation Quick Start
7
re You Begin
Begin
Before
re
Be
3
Battery Pack
Latch
Install a charged battery pack onto the transceiver, as
described previously.
Screw the supplied antenna onto the Antenna jack.
Never attempt to operate this transceiver without an
antenna connected.
If you have a Speaker/Microphone, we recommend that
it not be connected until you are familiar with the basic operation of the VX-210A.
1
Microphone
Pull and turn the top
panel’s CH selector knob
to choose the desired operating channel.
Rotate the VOL/PWR knob
to set the volume level. If no
signal is present, press and
hold in the ACC button (the
lower button on the left
side) for more than 1 second
(when “MONITOR” is assigned to the ACC button); background noise will now be heard, and you may use this to
set the VOL/PWR knob for the desired audio level.
Press and hold in the ACC
button (when “MONITOR” is assigned to the
ACC button) for more
than 1 second (or press the
ACC button twice) to
quiet the noise and resume normal (quiet) monitoring.