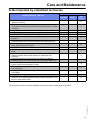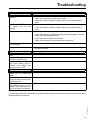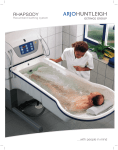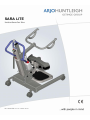
1
SARA LITE
Instructions for Use
001.20058.EN rev. 10 • March 2014
Design Policy and Copyright
® and ™ are trademarks belonging to the ArjoHuntleigh group of companies.
© ArjoHuntleigh 2011.
As our policy is one of continuous improvement, we reserve the right to modify designs without prior
notice.The content of this publication may not be copied either whole or in part without the consent of
ArjoHuntleigh.
Table of Contents
001.20058.EN rev. 10
General Information ................................................................................................................... 5
Foreword.............................................................................................................................. 5
Service and Support .......................................................................................................... 5
Manufacturer Information .................................................................................................. 5
Definitions Used in this Manual ......................................................................................... 6
Operational Life ................................................................................................................. 6
Intended Use ..................................................................................................................... 6
Product Identification........................................................................................................ 6
Package Contents ............................................................................................................. 6
How to Use this Manual .................................................................................................... 6
Symbols ............................................................................................................................... 7
Safety Instructions ..................................................................................................................... 8
General Instructions............................................................................................................. 8
Shock Prevention .............................................................................................................. 8
Human and Environmental Safety Practices ..................................................................... 9
Environmental Advice........................................................................................................ 9
Battery and Battery Charger Safety Practices................................................................... 9
Homecare Environment Considerations............................................................................ 9
Part Designation ....................................................................................................................... 10
SARA LITE Floor Lift and Battery Station .......................................................................... 10
Compatible Slings .................................................................................................................... 11
Product Description/Functions ............................................................................................... 12
Hand Control: Legs Opened or Closed ........................................................................... 12
Raising and Lowering a Patient....................................................................................... 12
Correct Use of the Brakes ............................................................................................... 12
Emergency Switch-off ..................................................................................................... 12
Sleep Mode ..................................................................................................................... 13
Transferring a Patient ...................................................................................................... 13
Safety Features.................................................................................................................. 13
Automatic Cut-out............................................................................................................ 13
Automatic Stop Function ................................................................................................. 13
System Failure Lower Override ....................................................................................... 13
Foot Support.................................................................................................................... 14
Battery Charge indicator.................................................................................................. 14
Hour Meter ...................................................................................................................... 14
Lifting a Patient......................................................................................................................... 15
Using a Standing Sling....................................................................................................... 15
Battery Charging ...................................................................................................................... 17
Battery Information............................................................................................................. 17
Removing the Battery ...................................................................................................... 17
Battery Charging ............................................................................................................. 17
Care and Maintenance ............................................................................................................. 18
Preventive Maintenance Schedule .................................................................................... 18
To Be Inspected by the User ............................................................................................. 18
To Be Inspected by a Qualified Technician ....................................................................... 19
Troubleshooting ....................................................................................................................... 21
Labels ........................................................................................................................................ 22
3
Table of Contents
001.20058.EN rev. 10
Technical Specifications .........................................................................................................
Lift Dimensions ...............................................................................................................
Electromagnetic Compatibility ...............................................................................................
Electromagnetic Compliance ..........................................................................................
Electromagnetic Emissions.............................................................................................
Electromagnetic Immunity...............................................................................................
4
23
24
25
25
25
26
General Information
Thank you for buying the
LITE from ArjoHuntleigh.
SARA
Foreword
Your SARA LITE is part of a series
of quality products designed
specially for home care, nursing
homes and other health care uses.
Please read this manual in its entirety. The information
contained in it is crucial to the proper use and
maintenance of the SARA LITE. It will help protect your
product as well as ensure that the equipment performs to
your satisfaction.
We are dedicated to serving your
needs and providing the best
products available along with
training that will bring your staff
maximum benefit from every
ArjoHuntleigh product.
Lifting and transferring a person always present a potential
risk. Some of the information in this manual is important for
your safety and must be read and understood to help
prevent injuries.
Contact us if you have any
questions about the use or
maintenance of your ArjoHuntleigh
product.
WARNING: ArjoHuntleigh strongly advises and
warns that only parts designated by ArjoHuntleigh
should be used on products and other devices
supplied by ArjoHuntleigh. Injuries can be caused
by the use of inadequate parts.
WARNING:
Unauthorized
changes
on
any
ArjoHuntleigh product may affect its safety.
ArjoHuntleigh will not be held responsible for any
accidents, incidents or deficiencies of performance
that occur as a result of any unauthorized changes
to its products.
Service and Support
A service routine must be done on your SARA LITE by
ArjoHuntleigh trained service staff. This will ensure the
product remains safe and functional. See the “Care and
Maintenance” section.
Please contact your local ArjoHuntleigh agent if you need
more information, want to report an unexpected event or
lack of performance, or if you need any help in setting up,
using or maintaining your ArjoHuntleigh SARA LITE. The
agent can offer support and service programs to maximize
the long-term safety, reliability and value of the product.
Contact your local agent for replacement parts.
Additional copies of this manual can be bought from your
local ArjoHuntleigh agent. When ordering, include the
Instructions for Use part number (see front page) and the
product part number.
Manufacturer Information
This product has been manufactured by:
001.20058.EN rev. 10
ArjoHuntleigh AB
Hans Michelsensgatan 10
211 20 Malmö
SWEDEN
5
General Information
Definitions Used in this Manual
WARNING:
Means: Failure to understand and follow these
instructions may result in injury to yourself
and others.
CAUTION:
Means: Failure to follow these instructions
may cause damage to the product.
NOTE:
Means: This is important information
regarding the correct use of the equipment.
Operational Life
The product is designed and tested for a useful
life of seven (7) years or 10,000 transfers,
whichever comes first. It is subject to preventative
maintenance as specified in the “Care and
Maintenance” section. Time equivalence between
the number of transfers versus the number of
years is made clear in the table below (see
Fig. 1).
•
Has a significant need for the stimulation of
his/her remaining abilities.
WARNING: The SARA LITE is intended to be
used for patients whose weight is within a
specified safe working load. Do not attempt
to lift more than the lowest weight limit
indicated on the following:
•
the “maximum load” label on the SARA
LITE;
•
on the sling.
Surcharge of any of these elements may
lead to a patient fall and to injuries.
Product Identification
The unit's identification number (specification,
model, serial number) appears on a silver
nameplate attached to the lift’s mast.
Package Contents
Upon receipt of the equipment, verify it against
the packing list to ensure it is complete. Inspect it
for possible damage due to shipping. If this the
case, contact your local ArjoHuntleigh agent.
How to Use this Manual
Years
Transfers per Day
(10,000
transfers)
4
7
6
4.5
8
3.5
Fig. 1
001.20058.EN rev. 10
Intended Use
The SARA LITE is a mobile raising aid, with a
Safe Working Load of 175 kg (385 lb). It is
intended to be used to raise patients to a standing
position and to transfer them over short distances
(e.g. raising from a bed and transferring to a
wheelchair, or from a wheelchair to a toilet) on a
flat surface. It can be used in hospitals, nursing
homes or other health care facilities where the
patient:
• Sits in a wheelchair;
• Is able to partially bear weight on at least one
leg;
• Has some trunk stability;
• Is dependant on caregivers in most situations;
• Is physically demanding for caregivers;
6
WARNING: Do not attempt to use this lift
without fully understanding the information
contained in this manual. A misuse of this
unit may lead to a patient fall and to injuries.
Keep this manual with the lift and refer to it as
required.
General Information
Symbols
General
Symbols
General
Symbols
Key to symbols
Key to symbols
Direct current.
This symbol is accompanied by
a date to indicate the date of
manufacture and by the
address of the manufacturer.
the
the
This symbol indicates a type
BF applied part.
This symbol is accompanied by
the manufacturer's catalogue
number.
This symbol indicates a type B
applied part.
This symbol is accompanied by
the
manufacturer's
serial
number.
This symbol refers
Instructions for Use.
to
This symbol locates the
emergency stop system on the
lift.
the
This symbol locates the reset
switch on the lift.
This
symbol
indicates
“separate collection” for all
batteries and accumulators as
per the WEEE Directive.
This symbol indicates a risk of
pinching.
SWL
Safe Working Load represents
the maximum load the lifter is
rated for safe operation.
IPN1N2
Degree of protection provided
by enclosure.
N1: Ingress of particles,
N2: Ingress of water.
Charger
Related
Symbol
Key to symbol
This symbol indicates a
class II electrical equipment:
term referring to electrical
equipment in which protection
against electric shock does
not rely on basic insulation
only.
001.20058.EN rev. 10
This symbol indicates
products comply with
medical device directive
93/42/EEC.
Alternating current.
7
Safety Instructions
General Instructions
•
Always perform the recommended daily
maintenance before using the lift.
WARNING: Before attempting a transfer, a
clinical assessment of the patient’s suitability
for transfer should be carried out by a
qualified health professional. The transfer,
among other things, may induce substantial
pressure on the patient’s body. A transfer
conducted when it should not can degrade
the patient’s health condition.
•
Make sure special consideration is taken when
transferring a patient who is connected to
electrodes, catheters or other medical devices.
•
Always maneuver the lift by using the handle
located on the mast. If necessary, initiate the
movement by pushing on the back of the base
with your foot. Do not push on the legs.
•
•
•
Do not push the lift at speeds which exceed a
slow walking pace (3 km/hour or 0.8 meter/
second).
This mobile patient lift must be used by a
caregiver trained with these instructions and
qualified to work with the patient.
Always ensure that controls and safety
features are used only in accordance with the
directives specified in this manual. Never
attempt to force a control or a button on the lift.
•
While the chassis legs on the lift can be
opened to ease the transfer of a patient, they
should be kept closed when the lift is in
movement.
•
Avoid any impacts during transfer.
•
Any precautionary or instruction labels that
cannot be easily read are replaced.
001.20058.EN rev. 10
WARNING: Do not put fingers, hands or feet
where space is limited (see image below).
This could pinch, cut, or cause serious
harm.
8
WARNING: There is possible strangulation
risks related to the hand control cable.
Please take precautions to prevent these.
WARNING: This product contains small
parts that might present a choking danger
to children if swallowed or inhaled.
Do not attempt to push or pull a loaded lift over
obstructions on the floor—including steps,
door thresholds or moving sidewalks—if the
castors are unable to travel over them
smoothly.
WARNING: The lift must never be operated
by the patient. In the unlikely case of a
failure, the patient might get stuck in the
unit.
•
Fig. 2
CAUTION: Keep all components of the lift
clean and dry to avoid a malfunction of the
lift.
Shock Prevention
•
Do not touch a damaged power cord.
Electrically live equipment can result in serious
injuries. If the lift or charger has any exposed
or damaged wires, contact your local
ArjoHuntleigh agent immediately.
•
Check the nameplate for voltage and cycle
requirements. These requirements differ from
country to country. Do not attempt to use the
equipment in an area that has a different
voltage and cycle requirement than what is
indicated on it.
CAUTION: Although the product is
manufactured according to high standards,
the SARA LITE and its accessories must
not be left in humid or wet areas for
extended periods of time. Do not spray the
SARA LITE or accessories (excluding
slings or ArjoHuntleigh approved wet
environment equipment) with water, such
as under the shower.
Safety Instructions
Human and Environmental Safety
Practices
•
Should the battery casing crack and cause
contents to come in contact with skin or
clothing, rinse immediately with plenty of
water.
•
If contents come in contact with the eyes, rinse
immediately with plenty of water and seek
medical attention.
•
Inhalation of the contents can cause
respiratory irritation. Provide fresh air and
medical attention.
•
For recycling and disposal of the batteries and
the lift, the rules according to the WEEE
directive (Waste of Electronic and Electrical
Equipment) as well as local laws and
regulations must be followed. If not they may
explode, leak and cause personal injury. When
returning batteries, insulate their terminals with
adhesive tape. Otherwise, the residual
electricity in used batteries may cause fire or
explosion. Fig. 3 below shows the symbols for
disposal and recycling.
Battery and Battery Charger Safety
Practices
WARNING: Following the instructions is
important for the safe use of the battery.
•
Do not expose the battery charger or
connector to water.
•
Do not expose the battery or chargers to
flames.
•
To avoid bodily injury, do not crush, puncture,
open, dismantle or otherwise mechanically
interfere with the battery.
•
Be careful not to drop the batteries.
•
Only use the charger that has been supplied
with the lift.
•
Do not charge the batteries in an unventilated
area.
•
The charger must not be covered or exposed
to dust.
Homecare Environment Considerations
WARNING: The SARA LITE is not intended
to be operated by children. Serious injuries
could occur.
Fig. 3
Environmental Advice
NOTE: Rigorous cleaning actions are
needed
when the SARA LITE is near
animals. Pet hair trapped inside castors and
leg mechanism can reduce the product’s
performance.
001.20058.EN rev. 10
When disposing of any items associated with the
equipment, contact the appropriate local
authorities for information.
9
Part Designation
SARA LITE Floor Lift and Battery Station
13
14
1
16
15
2
17
18
19
6
7
3
8
9
4
20
5
3
10
21
11
22
23
12
Legend
001.20058.EN rev. 10
1)
2)
3)
4)
5)
6)
7)
8)
Mast
Maneuvering handle
Split rings
System failure lower override
Rear castors with brakes
Patient support arms
Clip attachment points
Motor/actuator
9) Knee support
10) Adjustable chassis legs
11) Foot support
12) Front castors
13) Hand control
14) Emergency stop button (red)
15) Power button (green)
16) Raise button
Fig. 4
10
17)
18)
19)
20)
21)
22)
23)
Lower button
Hour meter
Battery charge indicator
Hand control connector
Battery release button
Battery pack
Battery charger
Compatible Slings
ArjoHuntleigh standard sling profiles that can be used with the SARA LITE.
TSS.500
SMALL
RED edging
TSS.503
EXTRA LARGE
BLUE edging
TSS.501
MEDIUM
YELLOW edging
TSS.504
EXTRA EXTRA
LARGE
TERRACOTTA edging
TSS.502
LARGE
GREEN edging
001.20058.EN rev. 10
Fig. 5
11
Product Description/Functions
The SARA LITE is delivered to you fully
assembled. Unpack the battery pack supplied,
and charge it fully as described in the “Battery
Charging” section. When the battery pack is fully
charged, remove the pack from the charger and
insert it back into the SARA LITE battery
compartment. An electrical connection is made
automatically. Ensure that the green button
(located on the control panel above the battery) is
pushed in.
Hand Control: Legs Opened or
Closed
The base of the lift can
be set with the legs
opened or closed by
using the two bottom
buttons on the hand
control (see Fig. 6).
Chassis
“Legs
Closed”
button
Chassis
“Legs
Open”
Fig. 6
Raising and Lowering a Patient
Correct Use of the Brakes
Foot operated brakes are fitted on both rear
castors.
Brakes should only be used in the following
situations:
•
When raising the patient from a bed or chair.
•
When the lift and the patient are momentarily
at rest; for example, while preparing for a
transfer to a bed or a chair.
•
Whenever movement of the lift has to be
halted while transferring a patient.
Brakes should NOT be used in the following
situation:
•
When lowering a patient in the lift onto a bed or
chair. Leaving the brakes off allows the lift (with
patient) to maintain its center of gravity
throughout the transfer.
Brakes application and release:
•
To apply the brakes, step on the back part of
the pad (see Fig. 8).
•
To release the brakes, step on the front portion
of the pad or lift it with the toe of your shoe.
Brakes off
Brakes on
Both the hand control or the control panel can be
used to operate the lift (see Fig. 7).
Raise
Fig. 8
Lower
Raise
Lower
Fig. 7
While the hand control allows for more versatility,
the auxiliary “Raise” and “Lower” buttons located
on the control panel are secondary controls in the
event the hand control stops functioning.
If two buttons are pushed simultneously, the first
button pushed will override all other functions until
it is released.
001.20058.EN rev. 10
All functions of the lift are "hold to run". It means
that movement will stop on button release
WARNING: Always maneuver the lift using
the handles in the travel direction indicated
in the diagram above and with the lift’s
chassis legs closed. This will provide
maximum stability of the lift and prevent a
patient fall.
Emergency Switch-off
The operator can shut off the power at any time
by pressing the red emergency button on the
control panel or by pressing the red button on the
battery while pulling it backward to remove it.
Reset the emergency switch-off function by
pressing on the green power button or by
replacing the battery (see Fig. 9). First-time users
should practice the switch-off maneuver before
operating the lift with a patient in it.
Emergency
switch-off
button
B Emergency
release button
Pull
Fig. 9
12
Product Description/Functions
Sleep Mode
lowered by pressing the “lower” function button on
the hand control.
The lift is equipped with an automatic switch-off
control that disables part of the circuitry to reduce
energy consumption when it is not being used.
When in sleep mode, the unit remains functionnal
as it wakes up when a control button is pressed.
Transferring a Patient
If the patient is not able to grip the support arms
with both hands, have someone assist you when
transferring the patient. For information about
how to attach a sling to the lift, read the “Lifting a
Patient” section.
WARNING: A patient must always be
transferred with the use of a sling. This will
prevent the patient from falling in case of
losing grip to handle bar.
WARNING: Do not attempt to maneuver the
lift by pulling on the mast, boom, actuator
or the patient. The lift might become
unstable and lead to a patient fall.
References to left or right in these instructions are
as viewed from the caregiver’s pushing position,
standing at the rear of the SARA LITE, facing
forward
Automatic Stop Function
For use when lowering the patient. Great care
must be taken not to lower the patient support
arms onto the patient or any other obstruction,
particularly when the patient is standing up and in
a weight bearing position. When this occurs, the
motor will continue to run but downward
movement will be blocked by the obstruction. If
this happens, release the “lower” button
immediately and operate the “raise” button until
the lift can be relocated or the obstruction can be
removed.
System Failure Lower Override
This can be used in the event of main control
failure. In the unlikely event that the hand control
or control panel fails to run the SARA LITE while
a patient is being transferred, lowering the patient
is still possible using the system failure lower
override, situated on the actuator.
To use this safety feature, make sure a suitable
support is underneath, ready to receive the
patient, pull the slide control upwards until the
patient’s own weight enables the patient support
arm to slowly lower. To stop lowering the patient,
release the slide control (see Fig. 11).
CAUTION: This function should only be
used in the event of regular control
failures, and not as a regular lowering
function for the product.
LEFT
RIGHT
Fig. 10
Safety Features
The following safety features have been installed:
Automatic Cut-out
Fig. 11
WARNING: The emergency lowering speed
is proportional to the strength applied to the
system override lowering device handle. If
it’s pulled up with too much force, the lift
may lower too quickly. This could cause
serious injuries.
13
001.20058.EN rev. 10
If the equipment is inadvertently overloaded (i.e.
trying to raise a patient heavier than permitted, or
where the patient support arms are being
accidentaly obstructed), an automatic ‘cut-out’
engages to prevent the SARA LITE from lifting
the load that is in excess of the safe working load
(SWL). This will stop the lifting motion
automatically. If this automatic cut-out occurs, the
electronics will reset when the button on the hand
control is released. After that, the patient can be
Product Description/Functions
Foot Support
Hour Meter
The foot support is there to position the patient’s
feet before the transfer and to support them while
he/she is being raised and transferred.
The hour meter (see Fig. 4) is a LCD display
which shows the total duration of powered
operation (in hours). This is primarily intended as
an aid to service technicians and to help them
calculate maintenance intervals.
Battery Charge indicator
001.20058.EN rev. 10
The battery charge indicator (see Fig. 4) is a LED
display, located on the battery pack holder, which
shows the charge condition of the battery.
14
Lifting a Patient
For more instructions about the use of various
slings, refer to the instructions provided by the
manufacturer of the sling, such as the
ArjoHuntleigh Sling Guide.
The lifting techniques described can be used for
seated patients regardless of where they may be
(on the edge of a bed, in a chair, a wheelchair,
etc.).
To fasten the support strap securely, press the
buckles (if available) or velcro (if available)
together. The strap must be tight, but not
uncomfortable for the patient (see Fig. 14).
Remember to tighten the strap once the patient
has been raised from the chair.
The sling may be applied before or after the
SARA LITE is brought into position.
1
2
3
Fig. 14
WARNING: The sling chest support strap
must always be applied and fastened to
prevent a fall risk.
Fig. 12
Using a Standing Sling
The top of the sling can be recognized by the
washing label which is located on the outside top
rim of the sling.
Encourage the patient to lean forward slightly to
enable the sling to be placed around his/her lower
back (see Fig. 13).
Position the sling around the patient’s back so
that the bottom of the sling lies horizontally about
two inches or five centimeters above the patient’s
waistline, with the patient’s arms outside the sling.
Ensure that the support strap is separated and
brought loosely around the body, and is not
twisted or trapped behind the patient’s back.
The sling support strap will help to support the
patient in the sling during the lifting procedure.
The strap also keeps the sling in the correct
position around the patient.
Position the SARA LITE in front of the patient
(see Fig. 15).
NOTE: Adjust the height of the patient
support arms to avoid approaching the
patient at eye level. Make allowances for
the patient’s arms and any obstructions,
such as chair arms, fixed handrails,
shower grips, etc.
Apply the clips to the attachment points, and
fasten them securely by pulling the clips (see
Fig. 12).
Fig. 13
15
001.20058.EN rev. 10
Fig. 15
Lifting a Patient
WARNING: Always check that all the sling
attachment clips are securely connected
and fully in position before and during the
lifting cycle, as well as in tension as the
patient’s weight is gradually taken up.
Make sure each clip is attached to the
correct clip attachment point on the patient
support arms. Misconnected clips may lead
to a patient fall.
When the patient is ready, help the patient to
place his/her feet on the foot support. Push the
SARA LITE toward the patient to easily assist
with this. If required, the chassis legs may be
opened to go around a chair, by operating the
appropriate hand control button.
If patients can stand sufficiently well and lock their
knees normally when fully raised, their knees may
come away from the knee support and they will
be able to lean back into the sling. Patients who
can only hold on to the support grips with one
hand, such as those who have suffered a stroke,
can still be transferred using the SARA LITE.
However, their disabled arm must be held down in
front of the body while they are being helped by
the caregiver (or a second caregiver). Their
functioning hand holds the support grip in a
normal way.
Use the “Raise” button on the hand control to
raise the patient to a suitable and comfortable
height. The patient can be raised to a fully
standing position (see Fig. 17).
Carefully push the SARA LITE in closer to make
full lower leg contact with the knee support (see
Fig. 16). Adjust the knee support if required.
Apply the foot operated rear castor brakes to
keep the SARA LITE in position.
Fig. 17
Now, transfer the patient to the desired location,
such as the toilet, wheelchair, chair, bed, etc.
Fig. 16
When raising the patient with the standing sling,
the patient’s body position will go from seated to
standing position. The patients’s body will be
supported by the sling under the armpits, on the
lower back and the chest. If the patients’s feet lift
off from the foot support during the raise, lower
the patient immediately until the patient’s feet are
in full contact with the foot support.
001.20058.EN rev. 10
WARNING: The patient’s feet must always
remain in full contact with the foot support.
The lift might become unstable if part of the
patient weight is not supported by the
footrest plate.
WARNING: To avoid a patient fall, never
leave patients unattended while they are
raised and standing in the lift.
The transfer must be performed with the chassis
legs closed, in order to allow easier
maneuverability of the lift (through doorways,
etc).
While the patient is raised, make any necessary
adjustments to clothing, incontinence pads, etc.,
before lowering the patient again.
Use the hand control to carefully lower the
patient.When lowering the patient back into a
seated position, ensure that the patient is fully
supported by the seat, chair, toilet, etc.
WARNING: The patient’s arms must always
be outside of the sling as per Fig. 17 to
prevent the patient sliding out of the sling.
WARNING: Great care must be taken not to
lower the patient support arms onto the
patient to prevent contact and injury.
The patient then must hold on to the support grips
with one or both hands. It may be good for the
patient’s self-confidence if the patient is able to
offer some assistance in standing up, providing
some muscular exercise as well. Encourage the
patient to give as much assistance as possible to
rise from the chair and/or to steady themselves.
Ensure that the patient lies back against the sling
at all times.
When the patient is seated, remove the sling by
opening the chest support strap, then pull the
clips of the sling upward to unlock them from the
patient support arms.
16
WARNING: Do not attempt to release the
attachment clips or the chest support strap
while the patient is still being supported by
the sling. This could lead to a patient fall.
Battery Charging
Battery Information
Removing the Battery
For safe handling and to extend the battery
lifetime, please follow and remember these
instructions.
To remove a discharged battery pack, push the
red button and pull straight out towards you.
Replace the pack with a fully charged one from
the wall mounted charging unit.
CAUTION: Not following these instructions
can cause short battery life.
Make sure the battery belongs to the floor lift by
comparing the battery label with the technical
specifications in the Instructions for Use. If battery
type cannot be confirmed, call qualified
personnel.
Battery life depends on many factors : frequency
of use, frequency of charging, temperature of
operation, storage and storage time.
Make sure to have a replacement battery ready
when needed. Do this by having additional battery
packs available and keeping one charging while
the other is in use.
The SARA LITE uses sealed lead-acid batteries
mounted to the control box. The battery pack
assembly consists of two 12-volt, 4 Ah (24 volts
capacity). Battery life is variable (2-3 years) and is
influenced by proper charging practices and load
exertion. Lead-acid battery packs are not subject
to a memory effect. Therefore, they need not to
be completely drained before being recharged.
CAUTION: Remove the battery pack from
the lift when storing for an extended period
of time. Stored batteries should be
recharged at least every two weeks to
maximize their life span.
Fig. 18
Battery Charging
The battery should be recharged as soon as the
charge indicator displays amber.
Refer to Battery Charger Instructions for Use for
charging details.
Note that the battery pack may remain connected
to the charger when fully charged.
A discharged battery should take approximately
eight hours to fully recharge.
When the battery pack is fully charged, remove it
from the charger, and insert it back into the SARA
LITE.
WARNING: Hold the battery pack firmly to
ensure that it does not drop and become
damaged or cause injury.
NOTE: Batteries need to be charged for a
minimum of 8 hours prior to initial use of
this lift.
To prolong the battery pack life, recharge it before
it reaches a low state of battery charge, and
certainly before it is totally discharged.
Your lift is equipped with an audible warning
device, which will make a noise when the battery
charge indicator reaches the red light range.
When a fully charged battery is inserted into the
lift, the display will return to the green fully
charged position, regardless of the level the
indicator had reached previously.
001.20058.EN rev. 10
If a partially charged battery is inserted, the
previous indicator level will be maintained, even
though the recently inserted battery may be in a
better state of charge than indicated. To achieve a
true indication of battery condition, a fully charged
battery must be inserted into the lift. This will reset
the indicator.
17
Care and Maintenance
Preventive Maintenance Schedule
The product is subjected to wear and tear, and the following maintenance instructions must be acted upon
when specified to ensure that the equipment remains within its original manufacturing specifications. Care
and maintenance must be carried out in accordance with the preventive maintenance schedule below.
Customer obligations must be carried out by qualified personnel in accordance with the instructions in this
manual.
WARNING: The maintenance described in the following checklist is the minimum that the
manufacturer recommends. In some cases more frequent inspections should be carried out.
Continuing to use this equipment without conducting regular inspections or when a fault is
found will seriously compromise the safety of the user and of the patient. Service and
preventative maintenance can be arranged with the manufacturer. Preventive maintenance
specified in this manual can prevent accidents and reduce repair costs.
WARNING: Maintenance and authorized service must be carried out by qualified personnel, fully
trained in servicing procedures by ArjoHuntleigh, and equipped with correct tools and proper
documentation, including Parts List and Service Manual. Failure to meet these requirements
could result in personal injuries and/or unsafe equipment.
To Be Inspected by the User
INSPECTIONS OF THE LIFT
•
•
•
•
•
•
•
•
•
•
•
•
Make sure that the split rings are correctly fastened on the actuator
pivot shaft.
Verify the good function of the rear castor brakes.
Clean and disinfect.
Ensure that the battery pack is in a good state of charge by looking
at the display on the control box.
Make sure that all actuator’s clevis pins and split rings are securely
assembled.
Carefully inspect all parts, in particular where there is close contact
with the patient’s body; ensure that no cracks or sharp edges have
developed which could injure the patient’s skin or become
unhygienic.
Check that all external fittings are secure and that all screws and nuts
are tight.
Check front and rear castors for hair and debris, clean when
necessary.
Check brake function on rear castors.
Ensure that the castors are firmly secured to the chassis.
The slings, the sling attachment cords, their straps and attachment
clips must be checked before use with each patient. If they are
damaged they should be withdrawn from use immediately and
replaced.
Check handset and cable.
FREQUENCY
Before
Every
Every
every
year
week
use
(15h*)
X
X
X
X
X
X
X
X
X
X
X
001.20058.EN rev. 10
* Once a year or every 15 hours recorded on the hour meter—which ever occurs first.
18
X
Care and Maintenance
To Be Inspected by a Qualified Technician
FREQUENCY
INSPECTIONS OF THE LIFT
•
•
•
•
•
•
•
•
•
•
•
•
•
•
•
•
•
Before
every use
Every
week
Inspect all weld sites for cracking or separation on lift and
spreader bar/DPS.
Make sure that all nuts and locknuts of the base open/close
mechanism are securely fastened and the ball joints are in good
condition.
Check both mast bolts to ensure that they are tight.
Verify if the pivot bolts on legs are tight.
Check that the casters are securely tightened.
Lubricate pivot points if necessary (use food grade type
grease).
Check the function of the emergency lowering device by
applying weight to the lift and activating the lowering device.
Make sure that the legs are perpendicular at 90 degrees to the
base with the help of a square.
Verify that the hole for the clevis pin has not widened.
Verify that the boom is not abnormally loose in relation with the
mast.
To ensure that the limit stops are functioning, run the boom
actuator as well as the base actuator to maximum and
minimum.
Press the emergency stop button and make sure that all
electrical power is cut off and that the green power light is off.
Check all functions of the hand control - ensure that the hand
control touch pad membrane is intact.
Check for the proper function of each auxiliary switch located on
the control box.
Verify that the batteries are in good condition and that they are
not leaking.
Inspect all cables.
Verify the actuator’s anti-crush system by physically retaining
the boom from lowering while pushing on the DOWN button. The
boom is supposed to stop.
Every
year
(15h*)
X
X
X
X
X
X
X
X
X
X
X
X
X
X
X
X
X
001.20058.EN rev. 10
* Once a year or every 15 hours recorded on the hour meter—which ever occurs first.
19
Care and Maintenance
Cleaning and Care
How often the following actions are taken
depends on how often the equipment is used.
NOTE: It is recommended that patient lifts,
equipment and accessories are regularly
cleaned and/or disinfected between each
patient use. If the lift and/or equipment
needs cleaning, or is suspected of being
contaminated, follow the cleaning and/or
disinfection procedures recommended
below, before reusing the equipment.
To clean your lift and its accessories (except
slings), wipe it down with a damp cloth using
warm water to which “ARJO CLEAN” disinfectant
cleaner (or equivalent) has been added.
Note: “ARJO CLEAN” disinfectant cleaner is
available from ArjoHuntleigh or their approved
distributors.
CAUTION: Do not drench the product as
this could cause problems with electrical
components or cause internal corrosion.
If a hot air dryer is used to dry the
equipment, the temperature must not
exceed 80°C (176°F).
Do not use petroleum-based solvents or
similar fluids, since this may damage
plastic parts.
001.20058.EN rev. 10
CAUTION: Do not use petroleum-based
solvents or similar fluids, since this may
damage plastic parts.
20
Cleaning products must be used in accordance
with the manufacturer’s instructions. To avoid
injuries, suitable eye, hand and clothing
protection must be worn at all times when
handling disinfectants.
Service Advice
WARNING: The SARA LITE must be
maintained at regular intervals to prevent
any risk related to wear of the device
WARNING: If there is any doubt regarding
the proper function of the SARA LITE,
withdraw it from use and contact your
ArjoHuntleigh agent.
Slings
WARNING: To avoid contamination between
patients, slings must be cleaned and
disinfected only in strict accordance with
the manufacturer’s instructions.
WARNING: To prevent deterioration of the
sling and lack of performance, mechanical
pressure should be avoided during the
washing and drying procedures (e.g. rolling
or pressing) as these can damage parts
vital to the safe and comfortable operation
of the sling.
Troubleshooting
Lift Trouble
Hand control
respond
Resolution
does
not •
•
Check the connector on hand control cord.
•
Check the battery condition (replace with a fully charged battery
pack).
Check the red emergency stop button on the control box.
RAISE and LOWER buttons •
on control box do not
•
respond
Actuator does not respond
•
Check if the battery is installed correctly and fully charged. Test with
a new, fully-charged battery pack.
•
Check if the hand control is connected.
Check if the actuator is connected to the control box.
Battery is low. Replace with a freshly charged battery pack.
Battery is low. Replace with a freshly charged battery. Do not exceed
the lifting capacity.
Resolution
“Power on” light on charger is •
not lit
Charger is plugged in, but •
“Power on” light is not lit
Yellow indicator does not •
light when battery pack is
inserted in the charger, and
the green light is “ON”
Battery Trouble
Check the battery condition (replace with a fully charged battery
pack).
Check the red emergency stop button on control box.
•
•
Audible “beep” is heard from •
the control box
Actuator “stalls” during lift
•
Charger Trouble
Check the red emergency stop button on the control box.
Check if the charger is plugged into the wall receptacle.
Check that there is power to the wall outlet.*
Check that the battery pack is properly seated in the charger.
Resolution
Battery pack is properly •
seated but no lights are
visible.
Yellow indicator light does •
not go off after several hours
of charging time.
Battery pack indicates it is •
fully charged when in the
charger, but when placed in
the lift, will only do a few lifts.
Call for service (charger may be faulty).
Battery pack needs replacing. Call ArjoHuntleigh for replacement.
Battery pack needs replacing. Call ArjoHuntleigh for replacement.
001.20058.EN rev. 10
(*) Some wall outlets are controlled by wall/light switches. Ensure that power to wall outlet continues when
wall/light switch is turned off.
21
Labels
Fig. 19
Labels legend
1. Safe working load (SWL of 175 kg [385 lb])
2. Product name
3. Emergency stop and reset button identification
4. Date of manufacture, product code, serial number and manufacturer
5. Operating specifications
001.20058.EN rev. 10
6. Battery Information
22
Technical Specifications
PRODUCT INFORMATION
Weight, complete
Lifting capacity (SWL)
Battery pack weight
59 kg (130 lb)
175 kg (385 lb)
5 kg (11 lb)
Minimum door requirement
660 mm (26 in)
Operating Force of Control
< 21 N
ELECTRICAL
Degree of protection of hand control
Internally powered
Duty cycle
Sound power level
Degree of protection (hoist)
Fuse - Overload
Fuse - PCB
Medical equipment
IPX7
24 VDC
10%, 6 min / hour, 1 min continuous
< 65 dBA
Refer to product label
5 A (thermal cutout)
10 A (time delay)
Refer to product label
The SARA LITE conforms to ISO 10535: 2006, AAMI ES60601-1,
CSA C22#60601-1, IEC 60601-1, CAN/CSA C22.2 No 601.1-M90, UL 60601-1.
WARNING: Wireless communications equipment such as wireless home network devices, mobile
phones, cordless telephones and their base stations, walkie-talkies, etc., can affect the SARA
LITE and should be kept at least 2.34 m away from it. Cables from potentially strong sources of
electromagnetic fields should not be placed near the unit. See the “Electromagnetic
Compatibility”section for more details.
BATTERY AND CHARGER UNIT
Battery type
Battery capacity
Battery charger (part number NDA8200) - Input
Battery charger rated output voltage
Rechargeable (sealed lead acid)
24 V, 4 Ah
100-240 VAC, 50-60 Hz, 50 VA
24 VDC, 24 VA, 1 A
Battery charger - protection class - intrusion of liquid
IP40
Battery charger - protection class - shock prevention
Class 2, double insulated
OPERATION AND STORAGE CONDITIONS
Ambient temperature range
Relative humidity range
Atmospheric pressure range
Operation: 5° to 40°C (+41° to +104°F)
Storage : - 25° to 70°C (-13° to 158°F)
Operation: 15 % to 93 %, non condensing
Storage : 0 % to 93 %, non condensing
Operation: 795 hPa to 1060 hPa (2000 m max)
Storage : 500 hPa to 1060 hPa
WARNING: This equipment is not suitable in the presence of flammable anesthetic mixtures with
air or oxygen, or with nitrous oxide. Using the SARA LITE in this environment might lead to an
explosion. The lift might create some spark internally and ignite the gaz.
RECYCLING
Package
The lift
Sealed lead-acid, rechargeable, recyclable
Cardboard recyclable
Separated and recycled, according to the European Directive
2002/96/EG (WEEE).
001.20058.EN rev. 10
Battery
23
Technical Specifications
001.20058.EN rev. 10
Lift Dimensions
Fig. 20
24
Electromagnetic Compatibility
Electromagnetic Compliance
The SARA LITE has been tested for compliance with current regulatory standards regarding its capacity
to block EMI (electromagnetic interference) from external sources.
Nonetheless, some procedures can help reduce electromagnetic interferences:
•
Use only ArjoHuntleigh cables and spare parts to avoid increased emissions or decreased immunity
which can compromise the correct functioning of the equipment.
•
Ensure that other devices in patient-monitoring and/or life-support areas comply to accepted emissions
standards.
•
Maximize the distance between electro-medical devices. High-powered devices may produce EMI that
can affect the lift. Refer to separation distance table further on in this document.
For more information on how to manage the unit’s RF electromagnetic environment, please consult the
AMI TIR 18-1997 - Guidance on Electromagnetic Compatibility of Medical Devices for Clinical/Biomedical
Engineers.
Electromagnetic Emissions
Guidance and Manufacturer’s Declaration Electromagnetic Emissions - For all Equipment and Systems
The SARA LITE is intended for use in the electromagnetic environment indicated below. The customer
or the user of the SARA LITE should assure that it is used in such an environment.
Emissions test
Compliance
Electromagnetic environment - guidance
RF emissions
CISPR 11
Group 1
The SARA LITE uses RF energy only for its internal
function. Therefore, its RF emissions are very low and are
not likely to cause any interference in nearby electronic
equipment.
RF emissions
CISPR 11
Class B
Harmonic
emissions
Not applicable
The SARA LITE is suitable for use in all establishments,
including domestic establishments and those directly
connected to the public low-voltage power supply network
that supplies buildings used for domestic purposes.
IEC 61000-3-2
Not applicable
001.20058.EN rev. 10
Voltage
fluctuations/flicker
emissions
IEC 61000-3-3
25
Electromagnetic Compatibility
Electromagnetic Immunity
Guidance and Manufacturer’s Declaration Electromagnetic Immunity - For all Equipment and Systems
The SARA LITE is intended for use in electromagnetic environment specified below. The customer or
the user of the SARA LITE should assure that it is used in such an environment.
Immunity test
Electrostatic
discharge (ESD)
IEC 60601 test level
Compliance level
±6 kV contact
±8 kV air
±6 kV contact
±8 kV air
Floors should be wood,
concrete or ceramic tile. If
floors are covered with
synthetic material, the relative
humidity should be at least
30%.
±2 kV for power supply
lines
±1 kV for input/output
lines
±2 kV for power
supply lines
±1 kV for input/
output lines
Mains power quality should
be
that
of
a
typical
commercial
or
hospital
environment.
±1 kV differential mode
±2 kV for common mode
±1 kV differential
mode
±2 kV for common
mode
Mains power quality should
be
that
of
a
typical
commercial
or
hospital
environment.
<5% UT
(>95% dip in UT) for 0.5
cycle
<5% UT
(>95% dip in UT) for
0.5 cycle
40% UT
(60% dip in UT) for 5
cycles
40% UT
(60% dip in UT) for 5
cycles
Mains power quality should
be
that
of
a
typical
commercial
or
hospital
environment.
70% UT
(30% dip in UT) for 25
cycles
70% UT
(30% dip in UT) for
25 cycles
<5% UT
(>95% dip in UT) for 5
sec.
<5% UT
(>95% dip in UT) for
5 sec.
3 A/m
3 A/m
IEC 61000-4-2
Electrical
fast
transient/burst
Electromagnetic
environment - guidance
IEC 61000-4-4
Surge
IEC 61000-4-5
Voltage
dips,
short
interruptions and
voltage variations
on power supply
input lines
IEC 61000-4-11
Power frequency
(50/60 Hz)
magnetic field
IEC 61000-4-8
001.20058.EN rev. 10
NOTE: UT is the AC mains voltage prior to application of the test level.
26
Power frequency magnetic
fields should be at levels
characteristic of a typical
location
in
a
typical
commercials
or
hospital
environment.
Electromagnetic Compatibility
(continued)
Guidance and Manufacturer’s Declaration Electromagnetic Immunity - For Equipment and Systems that are Not Life-Supporting
Immunity test
IEC 60601
test level
Compliance
level
Electromagnetic environment - guidance
Portable and mobile RF communications equipment should
be used no closer to any part of the SARA LITE, including
cables, than the recommended separation distance calculated
from the equation applicable to the frequency of the
transmitter.
Conducted RF
IEC 61000-4-6
Radiated RF
IEC 61000-4-3
3 Vrms
150 kHz to
80 Mhz
10 V/m
80 MHz to
2.5 GHz
3 Vrms
150 kHz to 80
Mhz
10 V/m
80 MHz to 2.5
GHz
Recommended separation distance
3.5
d = ------3
P
3.5
d = ------10
P
7
d = -----10
P
80 MHz to 800 MHz
800 MHz to 2.5 GHz
where P is the maximum output power rating of the transmitter
in watts (W) according to the transmitter manufacturer and d is
the recommended separation distance in meters.
Field strengths from fixed RF transmitters, as determined by
an electromagnetic site survey, (a) should be less than the
compliance level in each frequency range. (b)
Interference may occur in the vicinity of equipment marked
with the following symbol:
NOTE 1: At 80 MHz and 800 MHz, the higher frequency range applies.
NOTE 2: Theses guidelines may not apply in all situations. Electromagnetic propagation if affected by absorption
and reflection from structures, objects and people.
(a) Field strengths from fixed transmitters, such as base stations for radio (cellular/cordless) telephones and land
mobile radios, amateur radio, AM and FM radio broadcast and TV broadcast cannot be predicted theoretically
with accuracy. To assess the electromagnetic environment due to fixed RF transmitters, an electromagnetic site
survey should be considered. If the measured field strength in the location in which the SARA LITE is used
exceeds the applicable RF compliance level above, the SARA LITE should be observed to verify normal
operation. If abnormal performance is observed, additional measures may be necessary, such as reorienting or
relocating the SARA LITE.
001.20058.EN rev. 10
(b) Over the frequency range 150 kHz to 80 MHz, field strengths should be less than 3 V/m.
27
Electromagnetic Compatibility
(continued)
Recommended Separation Distance Between Portable and Mobile RF Communications Equipment and the SARA LITE
for Equipment and Systems that are not Life-Supporting
Recommended separation distances between portable and mobile RF communications equipment and the
SARA LITE.
The SARA LITE is intended for use in electromagnetic environment in which radiated RF disturbances are
controlled. The customer or the user of the SARA LITE can help prevent electromagnetic interference by
maintaining a minimum distance between portable and mobile RF communication equipment (transmitters) and
the SARA LITE as recommended below, according to the maximum output power of the communications
equipment.
Separation distances according to frequency of transmitter m
150 kHz to 80 MHz
Rated maximum
output power of
transmitter
W
3.5
d = ------3
P
80 MHz to 800 MHz
3.5
d = ------10
P
800 MHz to 2.5 GHz
7
d = -----10
0.01
0.12
0.12
0.24
0.1
0.37
0.37
0.74
1
1.17
1.17
2.34
10
3.69
3.69
7.38
100
11.67
11.67
23.34
P
For transmitters rated at a maximum output power not listed above, the recommended separation distance d in
metres (m) can be estimated using the equation applicable to the frequency of the transmitter, where P is the
maximum output power rating of the transmitter in watts (W) according to the transmitter manufacturer.
NOTE 1: At 80 MHz and 800 MHz, the separation distance for the higher frequency range applies.
001.20058.EN rev. 10
NOTE 2: These guidelines may not apply in all situations. Electromagnetic propagation is affected by absorption
and reflection from structures, objects and people.
28