1
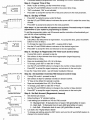
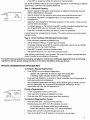
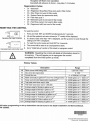
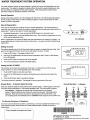
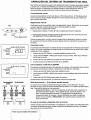
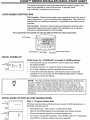
LOGIXTMSERIES INSTALLER QUICK-START SHEET
This sheet is intended for use by the water treatment system installer. This
sheet is not intended for use by the end user. A separate sheet
(PN 1240200) is available for the end user.
LOGlX SERIES CONTROLLERS
740 Controller - Electronic time clock control capable of doing 7day (day of
week) regeneration, or up to a 99 intewal day regeneration. This control will
operate both in a conditioner (softener) or 3-cycle filter mode with the same
controller.
-
760 Controller Electronic metereddemand (volumetric) controller which
regenerates based on the water usage of the installation site. A calendar
override is a standard feature on this controller.
The Logix Series will operate o n both the 255 and Performa valve body series.
LCD Display
Manual Regeneration
-
Initial Power Up (CAMSHAFT proceeds to HOME position)
U.OIII.zT"RU-
w
At initial power-up, the camshaft will need to rotate to the HOME
(in sewice) position.
Camshaft may take 1-2minutes to return to home position.
Err 3 will be displayed until the camshafl returns to home.
If more than 2 minutes elapses, verify that the motor is tuming the
camshaft. If it is not tuming, see the troubleshooting section in Dealer
Installationand Service Manual.
NOTE: The Logix controller features a self-test sequence. At first powerup of the control, you may see a number such as 1.00, 1.02, or 1.04,
displayed. This is an indication that the self-test is not completed. To
complete the test, verify that the turbine cable is connected. Blow into the
turbine port (valve outlet) to spin the turbine. The controller will verify that
Ihe turbine works and the setf test will finish. Proceed with the initial start up
procedure.
INITIAL START-UP STEP-BY-STEP INSTRUCTIONS
Step 1: Program System Size
This step may have been performed by your system's OEM manufacturer. In
this case, proceed to step 2
-
Input system size - resin volume in cubic feet or liters.
Use UP and DOWN buttons to scroll through resin volume choices.
Choose the nearest volume to your actual system size.
To choose a 3-cycle filter operation press DOWN until an 'F' is displayed.
Press SET to accept the system size you've selected.
-
If incorrect setting is programmed, see 'Resetting the Control' section below.
Step 2: Program Time o f Day
While '12:00' is blinking, set the correct time of day.
Use the UP and DOWN buttons to scroll to the correct time of day.
'PM' is indicated, 'AM' is not indicated.
Press SET to accept the correct time of day and advance to the next parameter.
Step 3: Set Day of Week
Press SET to make the arrow under SU flash.
Use the UP and DOWN buttons to advance the arrow until it is under the correct day
of week
Press SET to accept and advance to the next parameter.
After s t e p 1-3, the controller will operate most systems. Proceed to step 4 If further
adjustments to your system's programming is needed.
To exit the programming state, wait 30 seconds and the controller will automatically put
you into the normal operating mode.
Step 4: Set Regen Time
2:00 (AM) is the default time of regeneration. To accept this time, press the DOWN
button to move to step 5.
To change the regen time, press SET causing 2:00 to flash.
Use the UP and DOWN buttons to advance to the desired regen time.
Press SET to accept the time and advance to the next parameter.
-
Step 5: Set Days to Regenerate (740 Time-clock Control Only)
If using 760 control -proceed to step 5a
Set number of days between time-clock regeneration (regen frequency).
Default time is 3 days.
Days can be adjusted from 112 (3)to 99 days.
= To change, press SET to make the '3' flash.
Use the UP and DOWN buttons to change to the number of days desired.
Press SET to accept the regen frequency, and advance to the next cycle.
To use the 7day timer option see full Dealer InstallationManual.
-
Step 5a: Set Calendar Override (760 Demand Control Only)
If using 740 control proceed to step 6
Set number of days for calendar override on demand control.
'0'days is the default for calendar override.
Days can be adjusted from 112 (5) to 99 days.
To change, press SET to make the '0' flash.
Use the UP and DOWN buttons to change to the number of days desired.
Press SET to accept the regen frequency, and advance to the next cycle.
-
Step 6: Set Salt Amount (Regenerant Amount)
Set desired saN amount.
Default setting is 'S' standard salting.
3 salt settings are available on 740 and 760 controls:
S Standard Salt 9 Ibdcubic foot of resin (120 gramshier of resin)
H High Salt 15 lbs/cubic foot of resin (200 gramshiter of resin)
L Low Salt 3 Ibdcubic foot of resin (40 grarnsniter of resin)
Low Salt is the 'Highly Efficient Mode'.
To change salt setting, press the SET button and use the UP and DOWN buttons to
change to the desired setting.
-
-
-
-
-
Press SET to accept the setting and advance to next parameter.
See Dealer lnstallation Manual for more complete information on salt settings for different
system sizes, capacities and expected efficiencies
Step 7: Estimated Capacity
System capacity is displayed in total ldlograins or kilograms of hardness removed
IIm,".=DIII.,before
a regeneration
is necessary.
I
Value is derived from the system's resin volume input, and salt amount input.
The capacity displayed is a suggested value - as recommended by resin
-4
manufacturers.
Capacity is only displayed for information purposes on 740 control it does not (and
cannot) need to be changed.
To change capacity on 760 control, press SET to make the default capacity flash. Use
the UP and DOWN buttons to increment to the desired capacity.
Press SET to accept the setting and advance to the next parameter.
If using 740 control, programming is camplete. The control will return you to the normal
operation mode.
- -1
25.1
-
Step 8: Enter Hardness (760 Demand Control Only)
Enter inlet water hardness at installation site.
Default hardness setting is 10 grains (ppm for metric)
To change hardness, press SET to make the setting flash. Use the UP and DOWN
buttons to scroll to the correct hardness.
Press SET to accept the entered hardness value.
The control will return you to the normal operation mode.
Initialsystem programmingis now complete. The control will return to normal operation
mode, if
a button is not pushedfor30 seconds.
For system start-up procedure, Including: purglng the mineral tank, refilling the regenerant tank, and drawlng
regenerant, see the system startup procedure in the Dealer lnstallation & Service Manual.
MANUAL REGENERATION PROCEDURES
To Initiate a Manual Regeneration:
Press REGEN once for delayed regeneration.
System will regenerate at next set regen time (2:OO AM).
A flashing regen (recycle) symbol will be displayed.
Press and hold REGEN for 5 seconds to initiate immediate manual regeneration. A
solid regen symbol will be displayed.
After immediate regeneration has begun, press REGEN again to initiate a second
manual regeneration. An X2 symbol will be displayed, indicating a second
regeneration will follow the first regeneration.
.,-m""mw-
/
R-W
During a Regeneration:
A 'G#' is displayed to show current cycle.
Total regen time remaining is displayed on screen.
Press and hold SET to show current cycle time remaining.
\
Cydelndcator
To Advance Regeneration Cycles:
Press and hold SET - showing current cycle time.
Simunaneously press SET and UP to advance one cycle.
An hourglass will display while cam is advancing.
When cam reaches next cycle. 'C2' will be displayed.
Repeat SET and UP to advance through each cycle.
Press and hold SET and UP buttons for 5 seconds to cancel regen.
Hourglass will flash once cancelled.
Camshaft will advance to home - may take 1-2 minutes.
Regeneration Cycles:
C1 - Backwash
C2 - Regenerant DrawlSlow Rinse (not used in filter mode)
C3 - Slow Rinse (not used in filter mode)
C4 - System Pause (to repressurizetank)
C5 - Fast rinse cycle 1
C6 -Backwash cycle 2 (not used in filter mode)
C7 - Fast Rinse cycle 2 (not used in filter mode)
C8 - Regenerant refill (not used in filter mode)
RESElTING THE CONTROL
- - - --- --
371
To reset the control:
1. Press and hold SET and DOWN simultaneously for 5 seconds.
2. HO and the system's set resin volume (or 'F mode) will be displayed.
1.UU
Resetting the Logk G~ntmller 3. If a history value other than 'HO' is displayed, use the up arrow to scroll through the
settings until 'HO' is displayed.
4. To reset the control, press and hold SET for 5 seconds.
5. The control will be reset to an unprogrammed state.
6. Go to 'Initial Set-up' section of this sheet to reprogram control.
Unpmgrammedconhol after reset
-----""-
- =:El
-
WARNING: Resetting the control will delete all information stored in
its memory. This will require you to reprogram the control
completely from the initial power up mode.
History Values
All further programming or set-up instructions can be found in the Dealer hstallatfon and Service Manual,
PN 1255652.
WATER TREATMENT SYSTEM OPERATION
This water treatment system has been designed to de
o
p
vri
your home with dependable, lowcost.
treated water. The system is designed to operate without the need for regular maintenance, other
than the addition of a regenerant if the system requires. These instructions pmvide the basic
information needed to operate the system's control valve.
Nonnal Operation
During normal valve operation. the 740 will display the time of day. The 760 will alternate between
the time of day, and the Mlume of water remaining (in gallons or cubic meters) before the water
system will need to regenerate.
Manual Rageneration
There may be times that you would like to start a manual regeneralion. This override feature is
used when you would like to refresh the system's media bed before the automatic control calls for a
regeneration. There are two types of manual regeneration:
1. Immediate Regeneration: Press and hold the REGEN button for 5 seconds to start
2. Delayed Regeneration: Press the REGEN button once. This will cause a regeneration to occur
at the next set regenerationtime.
While in regeneration. the control will display the total regenerationtime remaining in minutes. It is
recommended that you minimize the amount of water used any water used is not treated during
regeneration
SET
\&For REGEN
-
Setting the Clock
S.YT.w.TL
The system controller has an 8 to 24-hour built-in badc up system to maintain the time of day. W the
power is out longer than 8 hours, the time is lost and needs to be reset. To reset:
1. Press the SET button. The display will Rash 12:OO.
2: Use the UP or DOWN buttons to advance to the correct time. Note: There is a PM indicator,
but no AM indicator.
3. Press the SET button to accept the time of day selected.
4. The control will advance to the DAY OF WEEK setting.
R L.-
Sefflng the DAY OF WEEK
The controller can be set for the specific day of the week. It is important to set this for proper
system operation. A cursor will be displayed under'SU" (Sunday).
1. Press the SET button to make the cursor Rash.
2: Use the UP or DOWN buttons to advance the flashing cursor under the correct day of the
week.
3. Press the SET button again to accept the changes.
The system should be in operation. The settings that were programmedwill be used.
Bypass Mode -11 System Needs Servicing
Nonnal Operation
Most water tmabnent systems will be plumbedwith a system bypass. A water bypass is used when
the system is being maintained, or i f the system develops a leak. To put the system in bypass:
Valve Bypass Rotate the two bypass dials counterclockwise to the m a s s '
position. Ifthey are dimcult to turn, a pliers or wrench may be used. The system will be
bypassed. Water will not enter the valve but, the pressure in the tank will remain. Call
your installingdealer for immediate service. CAUTION: Rotate to bypass arrow position only.
-
In
&
7
In Bypass
Out
In
A
&
4
7
Out
A
4
For Sewice Concerns or Questions:
If you have concerns about the operation or performance, or for more operation information on your
water treatment system, please contact your water treahnent dealer or installer for service or
maintenance.
Conditioner
Canditioner
Place Installer business card here
Log& Install Card 2%-26fl40-760 EngliiWSpanish
PN 1240200 Rev B 1212004
O Copyright 2004 GE InfrastructureWater LL PmcessTechnalogies
Printed in the USA
OPERACIÓN DEL SISTEMA DE TRATAMIENTO DE AGUA
Este sistema de tratamiento de agua ha sido diseñado para darla a su hogar agua tratada. confiable
y de bajo cosio. El sistema este diseñado para funcionar sin necesidad de mantenimiento regular.
aparte de agregar un regenerante si lo necesita el sistema. Estas inslnicciones ofrecen la
información básica necesaria para hacer funcionar la válvula de control del sistema.
Funcionamientononnal
Durante el funcionamiento normal de la válvula. el 740 tnoStrará la h o s El 760 altema entre la
hora y el volumen de agua restante (en galones o metros cúbicos) antes de que el sistema de
agua necesite regenerarse.
Regeneración manual
Puede haber veces en que prefiera iniciar una regeneración manual. Esta función se usa cuando
se quiere regenerar el sistema antes de que el control automático lo solicite.
Existen dos tipos de regeneración manual:
1. Regeneración inmediata: Presione el bot4n de regeneracióndurante 5 segundos.
Abajo
Para regeneración
2. Regeneración retardada: Presione el botón de regeneración una vez. Esto hará que ocurra
una regeneración a la hora programada siguiente.
Durante la regeneración, al control muestra el tiempo total de regeneración resante en minutos.
Se recomienda minimizar la cantidad de agua utilizada durante la regeneraciónya que esta no
es tratada.
Cómo fijar el reloj
El controlador del sistema tiene un sisfema de resenm incorporado de 8 a 24 horas para maniener
la hora. Si se corta el suministro de energía más de 8 a 24 horas horas. se pierde la hora y debe
restablecerse. Para restablecer:
1. Presione el botón SET (Definir). La pantalla desiellará indicando 12:OO.
2. Use los botones ARRIBA o ABAJO para avanzar a la hora conecta. Nota: Hay un indicador
de PM, pero no de AM.
3. Presione el botón SET (Definir) para aceptar la hora seleccionada.
4. El control avanzará a la definición del DíA DE LA SEMANA.
Cómo establecer el D ~ A
DE L A SEMANA
El controlador puede definirse para el día especffico de la semana. Es importante definir eslo para
que funcione correctamente el sistema. Aparecerá un cursor bajoSS'SV(Domingo).
1. Presione el botón S E i (Definir) para hacer destellar el cursor.
2. Use los botones ARRIBA o ABAJO para avanzar el curros destellante bajo el dla correcto de
la semana.
3. Presione el botón S I 3 (Definir) para aceptar los cambios.
El sistema debe estar funcionando. Se usarán las selecciones programadas.
hRIcionamientD
Enanivadnki
normal
Entreda
Calida Entreda
I
A
I
Saiida
A
Modo de derivación -Si el sistema necesita servicio
La mayoría de los sistemas de tratamiento de agua cuentan con una derivación. Se usa la
derivación de aoua cuando se hace el mantenimiento del sistema. o si el sistema Dresenta alouna
fuga.
- Para ~ o n eelr sistema en modo derivaci6n:
Dirivaci6n de válvula Gire los dos selectores de derivación hacia la izquierda a la
posición de derivación m a s " . Si son difíciles de girar, puede usar alicates o una
llave. El sistema ouedará en derivación. No entrará aoua a la válvula oero se
en el tanque. Llame al distribuidor que instaló la'unidad para
mantendrá la
obtener servicio inmediato. PRECAUCIÓN: Gire solamente hacia la posición de la
flecha de derivación.
-
-
En caso de consultas o preguntas sobre el servicio:
Si tiene consultas sobre el funcionamiento o el rendimiento, o para obtener más información sobre
su sistema de tratamiento de agua. diríjase al distribuidor de tratamiento de agua o al instalador
Dara recibir servicio o mantenimiento.