1
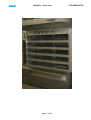
Service handbook
for deck oven
COLUMBUS ECO
service manual
and
instruction for user
GmbH & Co.
Hans – Sachs - Straße 2 u. 3
D-40721 Hilden
Tel. +49 2103 490 40
Fax . +49 2103 419 40
Multiple – deck oven
COLUMBUS ECO
Inhaltsverzeichnis
1. Introduction------------------------------------------------------------------------------------ 4
1.1
1.2
1.3
1.4
1.5
1.6
1.7
1.8
Use according to determination------------------------------------------------------------------------ 4
Transport and installation -------------------------------------------------------------------------------- 4
Description of manufacturer----------------------------------------------------------------------------- 4
Basic equipment --------------------------------------------------------------------------------------------- 5
Accessories --------------------------------------------------------------------------------------------------- 5
Technical data ------------------------------------------------------------------------------------------------ 5
Oven types – COLUMBUS ECO ------------------------------------------------------------------------ 6
Safety regulations ------------------------------------------------------------------------------------------- 6
2. Indications for baking ---------------------------------------------------------------------- 8
2.1
2.2
2.3
2.4
Preheating of the oven ------------------------------------------------------------------------------------ 8
Steaming the oven ------------------------------------------------------------------------------------------ 8
Matching upper heat with lower heat----------------------------------------------------------------- 8
Operation------------------------------------------------------------------------------------------------------- 9
3. Initial operation ----------------------------------------------------------------------------- 10
3.1
3.2
3.3
3.4
Switch on and warm up --------------------------------------------------------------------------------- 10
Load and steam -------------------------------------------------------------------------------------------- 10
Switch off----------------------------------------------------------------------------------------------------- 10
Operation and control elements --------------------------------------------------------------------- 10
4. Maintenance and cleaning -------------------------------------------------------------- 11
4.1
4.2
General drawing ------------------------------------------------------------------------------------------- 11
Safety regulations ----------------------------------------------------------------------------------------- 12
5. Weekly Maintenance and Cleaning -------------------------------------------------- 13
5.1
5.2
5.3
Clean the oven---------------------------------------------------------------------------------------------- 13
Cleaning the baking room doors--------------------------------------------------------------------- 13
Cleaning the cloth setting devices ------------------------------------------------------------------ 13
6. Quarterly Maintenance and Cleaning ----------------------------------------------- 14
6.1
6.2
6.3
6.4
6.5
6.6
6.7
Burner --------------------------------------------------------------------------------------------------------- 14
Baking room light (26) ----------------------------------------------------------------------------------- 14
The injection tubes---------------------------------------------------------------------------------------- 14
Clean cooling wheel of circulation ventilator [29].--------------------------------------------- 15
Clean dirt pans [31]. -------------------------------------------------------------------------------------- 16
Clean electrovalves --------------------------------------------------------------------------------------- 16
Clean water discharge box----------------------------------------------------------------------------- 16
7. Yearly ------------------------------------------------------------------------------------------ 17
7.1
7.2
7.3
7.4
7.5
7.6
Electric -------------------------------------------------------------------------------------------------------- 17
Motor must turn clockwise (see direction arrow). --------------------------------------------- 18
Disorders and their clearance------------------------------------------------------------------------- 18
Disorder circulation -------------------------------------------------------------------------------------- 18
Disorder overheating------------------------------------------------------------------------------------- 18
Disorder circulation ventilator motor--------------------------------------------------------------- 18
8. After-sales service------------------------------------------------------------------------- 19
8.1
MAINTENANCE CONTRACT --------------------------------------------------------------------------- 20
9. Guarantee conditions--------------------------------------------------------------------- 24
page 2 of 24
Multiple – deck oven
page 3 of 24
COLUMBUS ECO
Multiple – deck oven
COLUMBUS ECO
1.
Introduction
1.1
Use according to determination
The multiple-deck oven COLUMBUS ECO is used to bake any kind of dough, especially
bread, buns and fine cakes.
CAUTION: Use the oven ONLY to bake dough, this means: NEVER bake or warm up
other things. Also never use the oven to dry.
The multiple-deck oven COLUMBUS ECO is delivered, in series, with an analogue
command with conventional equipment.
Loading is done with pullout devices, swing pan units and baking sheets.
After baking time is over, an acoustic signal is heard and you can take off the baked
goods.
A regular cleaning and maintenance of the baking oven is necessary (see chapter 4), so
that your oven is always ready to operate and has a long life.
Our "
after-sales service" specialists are at your disposal for regular
maintenance. Service technicians with well-equipped workshop cars are at your disposal,
see chapter 6.
1.2
Transport and installation
Preparation of installation place of the oven is done on site according to the connection
plans. Transport and installation is done by specialists of
or authorized staff.
1.3
Description of manufacturer
The multiple-deck oven COLUMBUS ECO is a baking oven in full steel construction with
heating gas circulation heating. The heating of the decks is done by heating gases that
are lead inside a close system in channels above and below the decks.
The multiple-deck oven COLUMBUS ECO is heated either with heating oil EL or with
natural or liquid gas.
The COLUMBUS ECO is a technical working tool in the sense of law for technical
working tools (GtA) from 24.06.1968. The construction and equipment this baking oven
correspond to DIN 30 683, part 2 (publication of December 1984). The COLUMBUS ECO
has been proofed by the DVGW-research centre at the "Engler-Bunte-Institut" of the
"University Karlsruhe (TH)" and registered by the German Association of Gas and Water
in Eschborn, DIN-DVGW. The register number DIN-DVGW is listed on the type plate.
The COLUMBUS ECO meets the valid safety technical requirements of Germany and
fulfil the regulation of recommendation 89/392/EWG (changed by 91/368/EWG). The test
certificates of the test centre for alimentation in Mannheim are available. The location of
the proof plates displays on the inside cover page.
The value of firing-nominal heating output can be read from the wiring diagrams. Oil
burners according to DIN 4787 or gas burners according to DIN 4788 are used. The
exhaust gas mass flow rate can also be read from the wiring diagrams. The exhaust gas
temperature average is 280°C. In case of oil heating the CO2 content is between 8 and
10 Vol. % for a rust average of max.1. In case of gas heating the CO2 content is between
6 and 8 Vol. % for a CO content under 0,03 Vol. %. The pressure necessary for the safe
operation of the oven is about 20 N/m² (0,2 mbar).
In case the baking oven is operated with a hot water boiler (oven boiler), these
correspond to DIN 4753 in the construction or equipment
page 4 of 24
Multiple – deck oven
1.4
COLUMBUS ECO
Basic equipment
(one component per group)
Command
Burner / heating
digital command
analogue command
oil burner (heating oil EL)
natural gas burner
liquid gas burner
Technical data and indications on fuel are to be found on a separate wiring diagram.
1.5
Accessories
Loading devices
Push-through proving deck,
stainless steel, draw-out support sheet
D 10 with 10 sheets, pitch 155 mm
D 12 with 12 sheets, pitch 130 mm
D 15 with 15 sheets, pitch 117 mm
Total height 1.940 mm
Tilt board
effective surface 1600 x 600 mm
effective surface 2000 x 600 mm
Water boiler
Boiler, enamelled inside
100 l, 300 mm diameter, 1550 mm length
150 l, 300 mm diameter, 1950 mm length
Cloth setting device
effective surface 1600 x 600 mm
effective surface 2000 x 600 mm
Plastic cloth setting device for bretzels
effective surface 1600 x 600 mm
effective surface 2000 x 600 mm
Aluminium backing-out shovel
with handle, length of blade 470 mm
Night switch device
Night switch device with 7-day program with digital display
Fine filter
Fine filter R1"
Heat recuperation
Energiehamster
1.6
Technical data
Net current*:---------------------------------------------------------------------Net frequency*:-----------------------------------------------------------------Connection values:
Models C-------------------------------------------------------------------------Models E -------------------------------------------------------------------------Max. operation temperature:------------------------------------------------for a short time:------------------------------------------------------------------
3/N/PE
50 Hz
230/400 V
3.0 kW
6,0 kW
280°C
300°C
Noise measuring
The calculation of the sound level has been done according to DIN 45635, part 1,
paragraph 7.2 and part 29, paragraph 7.2. It is:
L wA = 70 dB
The calculation of the emissions value at the working place have been done according to
DIN 45635, part 1, paragraph 3.27, 7.3 and part 29, paragraph 5.4.4. It is:
L pAeq = 45 dB
* Data are valid only in Germany. See type plates for net current and net frequency in foreign countries.
page 5 of 24
Multiple – deck oven
1.8
Width of the
decks [mm]
Length of the
decks [mm]
Width of the
oven [mm]
Length of the
oven [mm]
C 516 / 96 ECO
C 520 / 120 ECO
E 516 / 144 ECO
E 520 / 180 ECO
Height of the
decks [mm]
Columbus ECO
Quantity of
decks
Oven types – COLUMBUS ECO
Baking area
[m²]
1.7
COLUMBUS ECO
9,6
12,0
14,4
18,0
5
5
5
5
165/205
165/205
165/205
165/205
1200
1200
1800
1800
1600
2000
1600
2000
1520
1520
2120
2120
2380
2780
2380
2780
Safety regulations
The multiple-deck oven COLUMBUS ECO meets the general acknowledged rules of
science and technique. If operation is done professionally and if the valid regulations for
protection against accidents are followed, there is no danger at all for the user.
The following safety regulations have to be followed absolutely. If not, an exclusion or
reduction of guarantee may occur in case of damage:
• Read carefully the instructions for use before operating the baking oven.
• Only authorized personnel may do maintenance and repair works installation.
• For the operation of the oven, we presuppose that the operation personnel have been
trained and have enough knowledge in the operation of ovens.
• Auxiliary personnel and trainees may only work at the oven in the presence of
specialized personnel.
• The baking oven may only be used in its determined function. Only the baking of
baking goods is allowed, with a baking temperature of max. 280°C.
• The baking oven is NOT suitable to heat other food, for example, meat dishes, dried
fruit. Also other use like drying of old backed goods, wood, textiles etc. are not
authorized.
• The operation of the oven and the baking should be done only under supervision, it
means supervisors have to be present in the baking room.
• Caution: Danger of getting burnt!
- Open the multiple-deck doors only at special door grip. Never touch hot parts at
baking oven like multiple-deck doors or neighbouring parts of multiple-deck doors.
- Caution: Opening the baking room door hot air and remaining steam escapes.
- Always use gloves when working with hot baking sheets or baking forms.
• Caution: Danger of burning!
- Hot exhaust gas tubes: Do not dry old baked goods on the oven. Also, the leaving of
combustible objects on the baking oven is not allowed, like for example cardboard
boxes, wooden shovel, etc.
- Do not leave light inflammable objects or liquids like cleaning agents’ etc. near the
baking oven.
page 6 of 24
Multiple – deck oven
COLUMBUS ECO
• Caution: Danger of explosion!
- Never cover the burner incoming air (fresh air), also at cold days.
- When pressing the burner suppress button several times, there is danger of
explosion. Do not press this button more than twice. If the disorder has not been
cleared, please call your burner after-sales service.
- In case of gas-heated ovens, the main gas cock has to be closed after baking is over.
• Caution: Danger of splitter!
Do not put water in contact with the door pane or the ovens light glasses when they
are hot. There is a danger of splitter, caused by the sudden shock.
• Cleaning:
- The oven has to be switched off and cooled down for cleaning purposes. - Main
switch = OFF.
- The oven may not be cleaned with a steam or water beam.
- Use only authorized cleaning liquids to clean the oven. • Caution: Danger of explosion!
• In case of disorder:
Look for the cause of the disorder first and clear it.
• Electric machines and motors may not be covered, which would prevent cooling.
• Ensure that there is enough incoming air when a steam-aspirating ventilator is in
operation - An open window is not sufficient; see also technical document "Aeration in
the baking room".
• Working at the switch cabinet and at the electrical parts can only be done by the
authorized electrician. Before opening the switch cabinet, the main switch has to be
turned off and secured against any unintentional switching on.
• Protection devices can only be removed, if maintenance or repair is necessary.
• The baking oven can only be operated with the nominal-heating load indicated on the
machine plate. Also, all other data and values need to be observed
page 7 of 24
Multiple – deck oven
COLUMBUS ECO
2.
Indications for baking
2.1
Preheating of the oven
• In order to preheat the oven, the temperature regulator (11) is set at 20 – 30 °C under
the desired baking room temperature. The desired loading temperature is set only
about 10 minutes before loading.
• In all COLUMBUS-ECO models, the temperature regulator is located in the circulation
heating gases. The effective baking room temperature is then about 40°C under the
indicated temperature.
• For example: if the temperature regulator indicates 280°C, the baking room
temperature is only about 240°C.
2.2
Steaming the oven
• In order to humidify the dry baking room air, steam has to be given before loading
breads or buns.
• After loading the dough pieces, steam anew immediately.
• In case tilt boards are used, do not load immediately after pre-steaming, so that the
downsides of the buns do not get wet.
In case of rye and rye-mixed breads, the steam cursors (20) are opened after steam has
been given. It is recommended to also open the deck doors a short time. After about
10
minutes,
the
steam
cursors
are
totally
or
partly
closed.
If very hard crusts are required, the steam cursors have to be opened about 10
minutes before end of baking.
2.3
Matching upper heat with lower heat
• If the oven has been to long at loading temperature, the lower heat will get too high, as
the baking plates take too much heat. This is why the oven temperature has to be kept
about 20 to 30 °C under desired loading temperature in case of longer baking pauses.
• Only about 10 minutes before loading, the temperature regulator (11) is set up. If the
baking plates are too hot because of too long pauses, it is possible to cool them down
by passing a wet cloth.
• If lower heat is too high, set loading temperature lower and let the burner burn longer
during baking.
• If lower heat is too low, set loading temperature higher and let the burner burn not so
long during baking.
• If the oven is loaded without pauses, the loading temperature has to be set higher after
every loading.
• Buns have to be baked with growing temperature that is that the temperature regulator
should be set so high that the burner is heating. The loading temperature is then
correct when the buns are baked in 18 to 20 minutes with the desired colour and
crispiness.
• Breads are baked with falling temperature. The loading is done with high baking room
temperature and running burner. After about 5 minutes, when the dough pieces have
risen, the temperature regulator (11) is set back by about 50°C. If the breads do not
have the right colour, temperature should be set higher again before baking is over. If
more is baked immediately after last baking ends, the temperature regulator has to be
brought to the new loading temperature before baking ends.
page 8 of 24
Multiple – deck oven
2.4
COLUMBUS ECO
Operation
4
5
Temperature Controller
The temperature is adjusted with the + / - push buttons
(pos. 1 and 2). The LED (pos. 4) illuminates when the
burner is switched on. The small display (pos. 3) shows
the set temperature value. The large display (pos.5)
shows the current temperature.
3
1
2
1
2
3
4
The baking time timer
The display (pos. 1) shows the baking time. Provided no
baking time has been started, the + and – push buttons
can be used to permanently readjust the baking time. If a
baking time has been started, the display (pos. 1)
indicates the remaining baking time. The baking time can
still be changed but the adjustments are not stored.
The push button pad (?) is located on the top left side of the burner chamber cover. The
switches
and
LEDs
are
described
from
left
to
right
according to their
arrangement.
Turn the operation switch (I) to the left to switch on the oven. In the middle position
the oven is switched off. Turn the switch to the right to start the oven via a timer
clock (optional).
Use the light switch to turn the oven lights on and off. The lights must be off when
changing a lamp!
Use the burner switch to switch the burner on and off. All other devices inside the
oven continue to function.
To switch on the fan, turn the fan switch to the left to reduce the fan speed and to
the right to increase the fan speed. The fan is off when the switch is in the middle
position.
The "Burner" LED illuminates when the burner is switched on.
The "Burner Failure" LED illuminates when there is a burner failure. Reset the burner
by pressing the reset button on the burner.
The "Motor Failure" LED illuminates when the motor circuit breaker has tripped. This
can be caused by a phase failure, low or excess voltage or a motor defect.
The " Over Temperature" LED illuminates when the safety thermostat has tripped.
This can be caused by setting too high a temperature, a failure of the circulation fan
or a defect on the temperature controller.
The "Insufficient Flow" LED illuminates when the circulation fan fails without causing
a motor failure. This can result from failure of two phases, a broken line or wrong
rotational direction.
page 9 of 24
Multiple – deck oven
3.
Initial operation
3.1
Switch on and warm up
3.2
Load and steam
3.3
3.4
COLUMBUS ECO
• Switch on main switch (2). The circulation ventilator starts immediately, or in night start
operation at programmed start time.
• In case of gas-heated ovens: open the main gas cock.
• Switch on the burner with switch (4) – the yellow control lamp (6) = ON.
• Open the main cock of water supply.
• To preheat the oven, set temperature regulator (11) on desired baking temperature. The
burner switches automatically on and off, dependent on the heat needs.
•
•
Load the oven only:
after preheating (5 to 10 minutes after reaching preset temperature) or
if baking room temperature is sufficient.
Steaming is done manually – press the steam button (13) about 10 to 20 seconds.
Switch off
•
•
•
•
First, switch off the burner, switch (4).
In case of gas-heated ovens: close the main gas cock.
Close the main cock of the water supply.
Switch off the circulation ventilator after about 15 minutes by actuating the main switch (2).
Operation and control elements
Night start device (1) (accessory)
The night start device switches your oven ON and OFF at any requested time.
Setting the timer
See attached instructions.
Main switch (2)
•
•
-
0: oven = OFF
selection switch day/night operation:
Day operation: circulation fan starts. All other oven functions are ready to operate.
Night operation: the oven switches automatically ON / OFF at the times set on the timer (1).
Switch baking room light (3)
ON – OFF
Burner switch (4)
0 burner = OFF
I burner = ON
Switch steam hood ventilator (5)
0 OFF
h ON: step 1, low power
n ON: step 2, high power
Control light (6) (yellow)
• burner in operation
Disorder lights (red)
•
•
•
•
disorder burner (7)
disorder motor circulation fan (8)
disorder overheating (9)
disorder circulation (10), (only in case of gas-heated ovens)
page 10 of 24
Multiple – deck oven
4.
Maintenance and cleaning
4.1
General drawing
1
2
3
4
5
6
7
8
9
10
11
12
13
14
15
16
Steam outlet flap (adjustable steam damper)
Hood ventilator
Baking room light
Door handle
Joystick (Option)
Ligth trafo
Circulation ventilator
Electrovalve group, 5 times (and Water supply)
Pressure control device (only in case of gas-heated ovens)
Water outlet box
Burner room
Injection tubes for baking room 1-5
Control panel
Servo motor
Deck door
Hood light
overpressure control device (33 next page)
page 11 of 24
COLUMBUS ECO
Multiple – deck oven
COLUMBUS ECO
17 –21 Solenoid valve unite
31
Safety temperature limiter
32
Securety thermostat (only for gasheated ovens)
33
Pressure control device
17-21
31
32
33
4.2
Safety regulations
At all times take into account the safety prescriptions for users at chapter 1.7!
• Read the complete instructions for use before maintaining or repairing the oven.
• Installation, maintenance or repair works may only be done by authorized specialists.
• During maintenance and repair works, the oven has to be switched off. The main
switch must be switched off and secured against any unintentional switching on.
• The following maintenance and repair works may be done only by
technicians
or authorized specialists: working on burner, control devices, limiter, flame control
devices and their safety devices.
• Protection devices can only be taken off for reasons of maintenance or repair works.
• Working at the switch cabinet and at the electric part may only be done by the
authorized electrician. Before opening the switch cabinet, the main switch has to be
switched off and secured against any unintentional switching on.
Notice:
• The maintenance intervals are foreseen for a one working shift operation. Before the
quarterly maintenance works, the manual valve [37] has to be closed and opened
again before resetting the oven.
• This has to be done in case of all maintenance and repair works at the dirt pan [31],
electrovalves [35], injection tubes [30], water discharge [43] and water discharge box
[42].
page 12 of 24
Multiple – deck oven
5.
COLUMBUS ECO
Weekly Maintenance and Cleaning
Caution:
• Clean the oven only when main switch is OFF and when the oven has cooled down.
• Only use suitable cleaning liquids - Caution: danger of explosion.
5.1
Clean the oven
• Clean the stainless steel parts with physiologically harmless cleaning liquids like
WWG- cleaning products. Telephone: +49 7721 51800, telefax: +49 7721 51831, Use
a usual glass cleaning liquid for cleaning the baking room doors.
5.2
Cleaning the baking room doors
• Take out the door panes by loosen the snap buckles, and clean them.
• The snap buckles used to fasten the doors can be simply opened with a screw driver.
If needed, soften remnant baking parts on the doors with warm soap water. Then,
clean the parts with a soft cloth.
5.3
Cleaning the cloth setting devices
- It is impossible after some time, to prevent dough remnants to stick to the cloth of the
setting devices. If you remove these remnants regularly with a dry hard brush, you will
always have hygienic setting devices.
- If cleaning has not been done for a longer period of time, so that a thick layer is on the
cloth, it is possible to wash the cloth with lukewarm water. Never remove the cloth from
the device and wash it with hot water or cock it. This way, the cloths would shrink and
you could not pull those on the setting device any more. Dry brushing is recommended
with some setting devices in a row. The setting devices that are to be cleaned should
not be used 2 to 3 days before cleaning.
page 13 of 24
Multiple – deck oven
COLUMBUS ECO
6.
Quarterly Maintenance and Cleaning
6.1
Burner
•
Clean the burner chamber [27].
•
Take care of your burner [14], following the maintenance instructions of the
manufacturer.
6.2
Baking room light (26)
• Screw off the lamp glass of the baking room light,
turning to the left, and clean it.
• The halogen lamp may not be touched with the
hands.
• Renew the 2 seals every time.
• Rescrew the lamp glass.
6.3
The injection tubes
Take off the injection tubes [30] and clean the injection holes.
• Loosen the hexagonal nuts at connection piece
with a 19 mm socket wrench and screw off.
• Loosen both flanges (connection piece and
injection tube) by hammering lightly.
• Take off connection piece.
• Pull out injection tube.
• Push through all holes in the injection tube with a
broach or similar tool and drill in hard cases.
• Check whether water goes through the injection tube.
• Mount injection tube and connection piece.
• Clean connection surfaces of the flange.
Exchange rectangular flange seals against new ones.
• Check impermeability of flange connections.
Notice: The maintenance of the burner [41] is done by a special maintenance service.
Please finalize a maintenance contract with the burner after-sales office.
page 14 of 24
Multiple – deck oven
6.4
Clean cooling wheel of circulation ventilator [29].
•
Pull front cover to the front and remove.
•
Loosen front part and move to the side.
•
Take off protection hood of circulation ventilator with a
screwdriver.
•
Clean cooling wheel, cooling ribs and aeration slots with
a hand brush or paint brush.
•
Remount the protection hood.
page 15 of 24
COLUMBUS ECO
Multiple – deck oven
6.5
Clean dirt pans [31].
• Unscrew the dirt pans with a fork wrench (19
mm).
•
•
6.6
6.7
Clean sieve.
Rescrew the dirt pans.
Clean electrovalves
electrovalves [35]
•
Take off the tappet and clean the seal surfaces.
Pos. 1 = magnetic part
Pos. 2 = tappet guidance
Pos. 3 = tappet
Pos. 4 = conical fields
Pos. 5 = seal ring
Pos. 6 = valve body
Clean water discharge box
Clean water discharge box [42].
• Unscrew the cap on the box (fork wrench 40
mm).
• Clean the inside of the box with a paint brush
and flush with water.
page 16 of 24
COLUMBUS ECO
Multiple – deck oven
COLUMBUS ECO
7.
Yearly
7.1
Electric
Electric installation safety devices (without photos)
• The electric installation and the safety devices should be
checked by
after-sales
service.
Clean the support of the drive for the
circulation ventilator [29] and change grease.
• Switch off circulation ventilator. Pull front cover to the front and
remove. Loosen front part and move to the side. Switch off the
3-pole fuse in the switch cabinet. Disconnect motor electrically
and mark the cable ends.
• Loosen the tension screws [61] in the coupling [53] and remove.
Both coupling half [53] and [54] have to be mounted together
again exactly in the same place.
T Loosen nut [55] of motor fixation and remove motor [50]
together with the front coupling half [53].
• Switch off circulation ventilator. Pull front cover to the front and remove. Loosen front
part and move to the side. Switch off the 3-pole fuse in the switch cabinet. Disconnect
motor electrically and mark the cable ends.
• Loosen the tension screws [61] in the coupling [53] and remove. Both coupling half [53]
and [54] have to be mounted together again exactly in the same place.
• Loosen nut [55] of motor fixation and remove motor [50] together with the front
coupling half [53].
• Loosen tension screws [51] and [52] and remove together with the discs [59] and [60].
Pull out coupling part [53] with simple setting device.
• Loosen fixation screws on motor and remove support cover. Clean all parts of flour
dust and other grease rests. Fill about one-third of the interval between running
channels, roll barrels and cage with hot bearing grease using a non fraying wooden
spattle. Also fill the cavities in the bearing covers edges with hot bearing grease.
• In case of defectuous rolling bearings, take off the bearing plate also. Pull off the rolling
bearings with simple setting device. Never give blows! Take new rolling bearings
(model 6206 DIN 625) only just before mounting out of the original package and heat it
in oil or hot air to 80°C, and push it on the shaft. Regrease according to above
mentioned.
• Mount motor again.
• Set coupling part [53] on the shaft of the
motor and screw the screws [52] on the discs
[59] and tighten. Turn in the threaded pin [51]
and tighten.
• Fasten motor with screws [56], discs [57] and
nut [55]. Align both coupling half [53] and [54]
by means of the marked pen. Screw in the
fixation screws [61] and the safety discs [62].
Tighten fixation screws over cross.
CAUTION: The centering shoulder may not
cant. Turn ventilator manually and align motor
so that the ventilator wheel does not touch.
• Tighten motor fixation screws [56] with nuts [55].
• Connect motor electrically and check turning direction.
page 17 of 24
Multiple – deck oven
COLUMBUS ECO
7.2
Motor must turn clockwise (see direction arrow).
Check doors and buffers, retighten fixations.
• Retighten all screws at the doors and buffers.
Check water hoses.
• Move strongly hoses at connection parts and check for breaches.
• Loosen defectuous hoses by means of a screwdriver and shorten, or replace if
necessary.
• Humidify hose ends and nozzles.
• Push in the hoses and clamp.
• Check impermeability of connection places.
7.3
Disorders and their clearance
Disorder burner
•
Red disorder lamps of disorder light [7] and at suppress button [40] are on.
•
Press suppress button [40]. If the burner then does not start or if there is a new
disorder after a short time, please call the burner after-sales service.
Never actuate suppress button more than twice.
•
If the red disorder lamp of the disorder light is not on, check safety temperature
limiter [33].
7.4
Disorder circulation
(only in case of gas-heated ovens)
Notice: The pressure control [36] controls the flow of the heating gas produced by the
circulation ventilator.
•
In case of disorder, the red disorder lamp [10] is on.
•
The pressure control did not recognize flow of heating gas, and has disconnected
the electric circuit. The burner is off.
•
Check circulation ventilator.
Attention: If a disorder cannot be cleared, please be sure to call the after-sales service!
7.5
Disorder overheating
•
A safety temperature limiter [33] is mounted near the burner chamber as a
protection against overheating. This safety temperature limiter is provided with a
reswitch-lock, so that the oven installation is not being reswitched.
•
In case of disorder, the red disorder light [9] is on.
•
Check the safety temperature limiter [33].
•
Remove the protection cap at suppress button [32] and clear the disorder at the
installation by pressing the suppress button. Fix again the protection cap.
7.6
Disorder circulation ventilator motor
•
The red disorder light [8] is on.
•
The bi-relay in the switch cabinet has switched off the circulation fan because of
overload or phase failure.
•
Call your electrician and clear cause.
•
The oven is again ready to operate after pressing the suppress button on bi-relay
(motor protection).
Notice: If a disorder cannot be cleared, please be sure to call the after-sales service!
page 18 of 24
Multiple – deck oven
8.
COLUMBUS ECO
After-sales service
Naturally you wish
that your COLUMBUS ECO multiple-deck is maintained and checked regularly.
We recommend to finalize an after-sales contract to a lump sum, in which the travelling
costs of our technician are included. All necessary maintenance works, checking
and adjustments will be done and registered in our company files.
This ensures the good operating and a long life of your oven.
Forms can be requested from our representative or directly from our company in
Villingen. You can also take the form on page 19 and send it to us.
Phones:
+49 2103 490 440 (service)
+49 2103 490 441 (spare parts)
page 19 of 24
8.1
Multiple – deck oven
MAINTENANCE CONTRACT
Original:
customer
COLUMBUS ECO
Duplicate:
MAINTENANCE CONTRACT
between
...
and
to perform the necessary maintenance works on the following
prices:
Items
Description of
aggregate
Type
-aggregates, for following fixed
Aggregate No. Year of
construction
The maintenance should be done preferably in quarter 1., 2., 3., 4.
Please see our notice on the next page!
......................................................................
city and date
......................................................................
signature of client
......................................................................
signature of representative of
...
page 20 of 24
Interval
yearly 1x/2x
Fixed price
per service
Multiple – deck oven
COLUMBUS ECO
1.
The fixed price includes all costs for travelling with the installation car, wages and expense of the
after-sales service technician. Spare parts, if needed, will be charged separately. Repair works
not included in the maintenance service will be charged separately.
2.
The fixed price for the second unit is valid only if the second unit and any further unit is maintained
on the same day as the first.
3.
A reasonable increase of the maintenance price is subject to change yearly.
4.
The maintenance works include checking and complete maintenance of the oven or machine and
installations. Maintenance works t be performed are described in a separate after-sales list
(Checklist), which the client will receive.
5.
We recommend the following maintenance intervals:
- COLUMBUS multiple-decks
2 x yearly
- all other aggregates
1 x yearly
- with multiply operation on principle
2 x yearly
Please mark the chosen maintenance interval and quarter in the service table on the front side.
6.
The exact date of maintenance in the chosen quarter is timed between the customer and the aftersales of
.
7.
For the completion of this order, the general delivery and sales conditions for the company
GmbH & Co., D-40668 Hilden are valid.
8.
This contract can be terminated in written form withkeeping a six months' notice. The period
of notice starts at the end of the month in which the last maintenance works was done.
After-sales service memorandum
COLUMBUS ECO type : ............................................................................
year of construction: ................................ oven no.: ............................
Name of client: ............................................................................
Street:.............................................................................
City: .............................................................................
telephone:.............................................................................
person in charge of oven:.............................................................................
____________________________________________________________________________
page 21 of 24
Multiple – deck oven
COLUMBUS ECO
The maintenance marked with an X have been performed:
1.
Check flowing-through of water pipes up to the injection tubes. In case of hose pipes, shorten hoses at the injection
tubes or insert new ones, fixing them with new hose clamps. Check tightness.
2.
Disassemble right and left baking room wall (slot and perforated metal wall). Clean all nozzles and injection tubes,
check flowing-through, spray characteristics and spray direction, and insert new nozzles (with seals) if necessary.
3.
Clean left and right water discharge boxes, connection tube between left and right condense grooves as well as all
evacuation tubes, including siphon, and check tightness.
4.
Check calcification of steam generator segments. (If calcification starts to set, inform client about this.)
5.
Clean electrovalves and check their function and tightness. Exchange seals if necessary. Check function of
pressure regulator (pressure at rest____bar, flow pressure____bar). Clean fine filter. If needed change filter
cartridge. Empty water quantity and reset if necessary (distribute total water quantity of about 3 litres in 10 seconds
regularly on all injection tubes).
6.
Check main cock, set a new seal if necessary.
7.
Check bedding of circulation fan. Open both ventilator bearings and regrease with Klüber Barriert L 55/2. (front
bearing 14 gr., back bearing 9 gr.). Secure enough cooling of the bearing casing.
8.
Check age of V-belts and replace if necessary. The V-belt tension has to be set according to prescription in order to
protect the front bearing. Check rotation direction of circulation fan (clockwise).
9.
Remove protection hoods of circulation fan motor and multiple-deck drive. Clean cooling wheels, aeration slots and
cooling ribs.
10.
Retighten fixation of motors and of pulleys.
11.
Disassemble chain and rotating plate. Clean baking room floor. Check if bearing has a smooth run. Regrease
bearing only with Klüber Barriert L 55/2 grease, 1 gr. per bearing, or replace complete bearing. All fixation screws of
the rotating plate bedding have to be well lubricated with graphite or copaslip grease, to facilitate the unscrewing
later.
12.
Replace drive chain of rotating plate as well as drive groove and both guide grooves by new ones. Check
alignment between rotating plate, drive groove and guide groove, and realign if necessary. Check chain support
and replace if necessary.
13.
Grease chain with Klüber chain oil Hotemp 2000 according to prescription. Tighten chain, setting a large spring
tension path. Check movement of chain or tension wheels and of rotating plate. Inform client on any necessary
weekly regrease of chain, also retighten if necessary.
14.
Renew chain tightness straps between baking room and drive room and readjust sheet profiles.
15.
Clean motor steam flap and check function.
16.
Clean steam overpressure valve and check function.
17.
Check switch function of safety temperature limiter and readjust.
18.
Retighten screws of adjusting slots and lubricate with graphite grease.
19.
Clean door seal and check tightness. Replace defected door seals. If no new seal is necessary, the current seal
has to be treated with talcum powder.
20.
Check baking room and front lights electrically and mechanically. Free contact of lamps and lamp cover from
oxidation. Clean light glasses. Set new seals.
21.
Retighten screws on door hinges, door seal and door lock.
22.
Clean and grease door hinges.
23.
Switch off main switch. Retighten all clamp screws in switch cabinet.
24.
In case of baking ovens with computer command, check life time of battery, and set a new battery if necessary
and write down next replacement date. Perform lamp test. Check seal in switch cabinet and replace with new seal.
Check tightness of all cable sorts and treat with installation cement if necessary.
25.
Check tension limiter.
26.
If there is a cooling fan, check function of cooling fan and room thermostats (set on 50°C).
27.
Check fresh air connection to burner.
28.
Clean burner room as well as all aggregates.
29.
Check function of complete oven installation.
page 22 of 24
Multiple – deck oven
Other works and all spare parts
COLUMBUS ECO
Spare parts
part no.
items
are not included in this service contract and will be charged separately. On client's
request, the following works have been performed:
- all guide rolls of multiple-deck have been cleaned and regreased. Fixation screws have
been retighten.
Remarks of the technician:
The feed and discharge wiring/conducts that have not been laid by
have to be
checked by the specialist companies.
A separate maintenance contract has been finalized with the burner after-sales for the
maintenance and checking of the oil and gas burners.
__________________________________________________________________________
Checking memo burner:
Burner manufacture:
General condition of burner:
Burner start:
Pre-flushing time of burner (seconds):
Pre-heating time, normal yes/no (8k-10k/min.)
if not:
In case of oil heating:
Smoke-test acc. to Bacherach (smoke spot no.)
CO2-measurement (Vol. V):
Feed pressure (N/M²):
Exhaust gas temperature:______°C
Burner type:
In case of gas heating:
Gas flow rate kW (m³/h):
Natural gas H:
CO-measurement (Vol. %):
CO2-measurement (Vol. %):
Feed pressure (N/M²):
Exhaust gas temperature:_____°C
All measurements have to be done with empty oven and between 230°C and 250°C thermostat
temperature.
Burner problems have been reported to the following burner service:
_____________
date
_______________________
(signature of technician)
page 23 of 24
_____________________
(signature of client)
Multiple – deck oven
9.
COLUMBUS ECO
Guarantee conditions
We give 12 months guarantee from the day of commissioning, for the latest 30 days after
delivery, for the multiple-deck oven COLUMBUS ECO that we delivered in terms of material
goodness and considering an appropriate working at the oven in a one-shift operation, according to
our "General delivery conditions for baking ovens".
The extended warranty includes only repairs or replacement of defective produced parts including
the arising exchange costs. The replacement of damages caused by operation disorders are
excluded from the guarantee anyway.
The claim to the warranty absolute requires that the maintenance works given and defined in the
corresponding operation instructions of
are performed or kept demonstrably.
Damages that have been caused by an insufficient maintenance, using inappropriate operating
material, incorrect operation or damage by third do not fall under the warranty.
In the above mentioned warranty, the free repair of burner disorders is not included. Therefor we
recommend to finalize a maintenance contract with the burner deliverer, which includes not only a
free disorder service (24 h) but also the necessary maintenance work to up-keep the warranty.
We recommend to finalize a maintenance contract with
which insures the service to up-keep the warranty.
for safety operation of your oven,
For the foreign products that are built in our multiple-deck oven COLUMBUS ECO, we give the
same guarantee as that of our subsuppliers.
Any guarantee claim has to be done in written form.
page 24 of 24