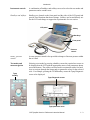
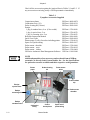
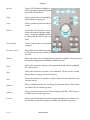
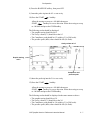
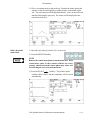
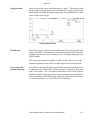
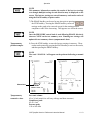
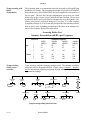
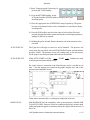
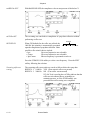
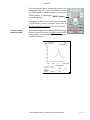
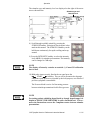
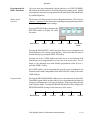
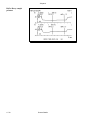
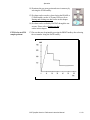
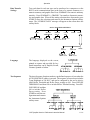
1
Part Number 2000-0100 Rev. C Title: GSI TympStar Version 1 Middle-Ear Analyzer Reference Instruction Manual Copyright © 2011 Grason-Stadler. All rights reserved. No part of this publication may be reproduced or transmitted in any form or by any means without the prior written permission of Grason-Stadler. The information in this publication is proprietary to Grason-Stadler. Compliance The CE 0344 mark identifies compliance with the medical Device Directive 93/42/EEC. Grason-Stadler is an ISO 13485 certified corporation. European Authority Representative Grason-Stadler Kongebakken 9 2765 Smørum Denmark 0344 Electromagnetic Compatibility Preface This manual contains the information necessary to install and operate the GSI TympStar Version 1 Middle-Ear Analyzer. This information is essential for the efficient use of the middle-ear analyzer, and must be read and understood to avoid test errors. GSI TympStar Version 1 Reference Instruction Manual i Preface Conventions used in this manual Icons This manual uses the following icon conventions to draw special attention to information: NOTES Note icons indicate important related information, reminders, recommendations, and suggestions. Notes are shown in bold type. CAUTIONS Caution icons indicate information regarding a situation or condition that could result in equipment malfunction or damage, or in lost data. Cautions are shown in bold type. WARNINGS Warning icons indicate information regarding a situation or condition that could result in personal injury or death. Do not proceed until having thoroughly read and understood the warning information. Warnings are shown in bold type. Operating controls Equipment Symbols References to user controls on the instrument’s front panel or LCD panel are shown as UPPER CASE in operating procedures and other instructions. Attention, consult accompanying documents Serial Number Reference Symbol Manufacturer Manufacture Date Warning Dangerous Voltage B Patient Applied Part according to IEC60601-1 ii Grason-Stadler Preface Equipment Symbols Continued Fuse EU Authorized Representative Return to Authorized Representative Keep Dry Fragile Consult Operating Instructions This Side Up Monitor Disk Drive Patient Response Switch Keyboard Input Output Grason-Stadler iii Preface Safety Considerations General safety precautions must be followed when operating electical equipment. Failure to observe these precautions could result in damage to the equipment and injury to the operator or patient. Warning! Accessory equipment connected to the analog and digital interfaces must be certified to the respective IEC standards (IEC950 for data processing or IEC 60601-1 for medical equipment). Furthermore, all configurations shall comply with the system standard IEC 60601-11. Everyone who connects additional equipment to the signal input or signal output port configures a medical system, and is therefore responsible that the system complies with the requirements of the system standard IEC 60601-1-1. If in doubt, consult the technical service department or your local representative. The employer should instruct each employee in the recognition and avoidance of unsafe conditions and the regulations applicable to his or her work environment to control or eliminate any hazards or other exposure to illness or injury. It is understood that safety rules within individual organizations vary. If a conflict exists between the material contained in this manual and the rules of the organization using this instrument, the more stringent rules should take precedence. WARNING The GSI TympStar Middle-Ear Analyzer is designed to be used with a hospital grade outlet. Injury to personnel or damage to equipment can result when a three-prong or two-prong adapter is connected between the GSI TympStar power plug and an AC outlet or extension cord. WARNING The use of ACCESSORY equipment not complying with the equivalent safety requirements of this equipment may lead to a reduced level of safety of the resulting system. Consideration relating to the choice shall include: • Use of the ACCESSORY in the PATIENT VICINITY • Evidence that the safety certification of the ACCESSORY has been performed in accordance with the appropriate IEC 601-1 and/or IEC 601-1-1 harmonized national standard. ANY EQUIPMENT CONNECTED TO THE GSI TYMPSTAR AND USED IN THE PATIENT VICINITY MUST BE POWERED BYAN ISOLATED POWER SOURCE TO MAINTAIN THE ELECTRICAL SAFETY OF THE OVERALL SYSTEM. The isolated power source can be purchased directly from GSI, or elsewhere when approved for use by GSI. GSI TympStar Version 1 Reference Instruction Manual iv Preface WARNING - ELECTRIC SHOCK HAZARDS Do not open the case of the TympStar. Refer servicing to qualified personnel. Do not remove any TympStar covers. Refer servicing to qualified personnel. WARNINGS - ELECTRICAL GROUNDING This device uses a three wire power cord with a hospital grade plug (for international applications, IEC 601-1 approved plug). The chassis is earth grounded. For grounding reliability, connect the device to a hospital grade or hospital only receptacle (for international applications, IEC 601-1 approved receptacle). Inspect the power cord often for fraying or other damage. Do not operate the apparatus with a damaged power cord or plug. Improper grounding is a safety hazard. Do not use extension cords for the TympStar. Extension cords can cause ground integrity and impedance problems. Periodically check the system ground integrity. WARNING - EXPLOSION This system is not explosion proof. Do not use in the presence of flammable anesthetics or other gasses. WARNINGS - CONNECTIONS Do not switch on any system power until all cables have been properly connected and verified. See this manual for setup instructions, which accompanies all deliveries of the system. Switch off the system power before connecting or disconnecting any system component(s) or accessories. This may damage the device(s). WARNINGS - GENERAL Proper use of this device depends on careful reading of all instructions and labels. Follow all safety standards set by each place of employment. Prolonged use of auditory stimuli can cause damage to patient hearing. v Grason-Stadler Preface CAUTIONS - ELECTRICAL POWER Electrical Shock Hazard. Do not remove covers. Refer servicing to qualified personnel only. Make sure the power cord plug is proper for the power outlet into which it will be plugged. I.e., plug in a 120V rated power cord into a 120V outlet only. TympStar test results data is not stored when the power is turned off. To maintain test results data in the presence of power brown-outs or temporary power interruptions, an Uninterruptable Power Supply (UPS) must be used. CAUTION - CONNECTIONS Please be careful to reconnect cables in their proper locations. CAUTIONS - PREVENTIVE MAINTENANCE Preventative maintenance does not require access to the interior of the instrument and may be performed by the user. For this device, preventative maintenance consists of periodically cleaning and inspecting the exterior of the instrument. Periodic electrical safety testing is recommended. It is recommended a schedule be established for these purposes, with at least an annual cleaning, calibration and safety testing. Cleaning consists of removing all dust from the exterior surface of the system with a soft brush or cloth. Use a brush to dislodge any dirt on or around the connectors and panel edges. Remove any dirt with a soft cloth. CAUTIONS - GENERAL If the system is not functioning properly, do not operate it until all necessary repairs are made and the unit is tested and calibrated for proper functioning in accordance with Grason-Stadler published specifications. Equipment is not user repairable. Repairs and battery replacement must be performed by a qualified service representative only. Prolonged use of auditory stimuli can cause damage to patient hearing. GSI TympStar Version 1 Reference Instruction Manual vi Preface Product Warranty We, Grason-Stadler, warrant that this product is free from defects in material and workmanship and, when properly used, will perform in accordance with applicable specifications. If within one year after original shipment, it is found not to meet this standard, it will be repaired, or at our option, replaced at no charge except for transportation costs, when returned to an authorized GrasonStadler facility. Changes in the product not approved by Grason-Stadler shall void this warranty. Grason-Stadler shall not be liable for any indirect, special or consequential damages, even if notice has been given of the possibility of such damages. THIS WARRANTY IS IN LIEU OF ALL OTHER WARRANTIES, EXPRESSED OR IMPLIED, INCLUDING, BUT NOT LIMITED TO, ANY IMPLIED WARRANTY OF MERCHANTABILITY OR FITNESS FOR A PARTICULAR PURPOSE. Recycling / disposal CAUTION Many local laws and regulations require special procedures to recycle or dispose of electric equipment-related waste including batteries, printed circuit boards, electronic components, wiring and other elements of electronic devices. Follow all of your respective local laws and regulations for the disposal of batteries and any other parts of this system. Check the Grason-Stadler website for recommended instructions and addresses for proper return or disposal of electronic wastes relating to Grason-Stadler products in Europe and other localities. The contact information for the WEEE – In Europe Grason-Stadler A/S Kongebakken 9 2765 Smørum Denmark CRV no. 21113379 Grason-Stadler vii Contents Preface Title………………………………………………………………………..……..i Conventions used in this manual…………………………………………….….ii Icons………………………………………………………………………..…...ii Equipment Symbols………………………………………………………….….ii Safety Considerations…………………………………………………………..iv Product Warranty……………………………………………………….…..…..v Recycling/Product Disposal……………………………………………….......vii Introduction General ............................................................................................................. 1-1 Equipment connections and options................................................................. 1-2 The probe ......................................................................................................... 1-2 Instrument controls .......................................................................................... 1-3 Hardkeys and softkeys ............................................................................... 1-3 Rotary pressure control .............................................................................. 1-3 Test modes and menu navigation .................................................................... 1-3 Changing parameter settings ........................................................................... 1-5 Menu diagrams ................................................................................................ 1-5 GSI default parameter settings ........................................................................ 1-5 Installation Unpacking and inspecting the GSI TympStar Version 1................................. 2-1 TympStar Accessories Supplied ............................................................... 2-2 Equipment connections ................................................................................... 2-4 Rear panel .................................................................................................. 2-4 Probe .......................................................................................................... 2-5 Power ......................................................................................................... 2-5 Preparing the probe assembly .......................................................................... 2-6 Powering the instrument .................................................................................. 2-7 Prior to applying power ............................................................................. 2-7 Applying power ......................................................................................... 2-7 Preparing the printer ........................................................................................ 2-8 Paper supply............................................................................................... 2-8 Adjusting the display contrast ....................................................................... 2-12 Front panel controls ....................................................................................... 2-13 Hardkeys .................................................................................................. 2-13 Softkeys ................................................................................................... 2-15 Menu diagrams .................................................................................. 2-15 GSI default parameter settings .......................................................... 2-15 GSI TympStar Version 1 Reference Instruction Manual Contents - 1 Contents Pre-Operation Cleaning probe tubes .......................................................................................... 3-1 Caring for eartips ................................................................................................ 3-2 Preparing test materials ...................................................................................... 3-3 Calibration checks............................................................................................... 3-3 Test cavity calibration .................................................................................. 3-3 Altitude/Barometric pressure calibration ..................................................... 3-4 Equivalent compliance values ................................................................ 3-4 Tracing/Meter Calibration check for Tympanometry .................................. 3-5 Pressure range check for tympanometry ...................................................... 3-9 Manual pressure check for tympanometry ................................................... 3-9 Screening reflex check - tymp screening ................................................... 3-10 Reflex threshold mode check ..................................................................... 3-11 Intensity limits check for reflex threshold ................................................. 3-14 Instructing the patient....................................................................................... 3-15 General ....................................................................................................... 3-15 Positioning the probe box ........................................................................... 3-15 Suggested probe insertion technique .......................................................... 3-15 Operation Overview of functions......................................................................................... 4-1 Test and other functions ............................................................................... 4-1 Default parameters ........................................................................................ 4-2 Program modes ............................................................................................. 4-3 Probe tone frequencies .................................................................................. 4-3 LCD graphic traces ....................................................................................... 4-3 Probe lights.................................................................................................... 4-3 LCD screen.................................................................................................... 4-3 Erasing and clearing test data ....................................................................... 4-4 Paging test data.............................................................................................. 4-5 Printing tests ................................................................................................. 4-5 Error codes and problem reporting ............................................................... 4-5 Test procedures ................................................................................................... 4-6 Tympanometry (Tymp Mode)............................................................................. 4-6 Two component tympanometry .......................................................................... 4-7 Gradient .............................................................................................................. 4-7 Tymp width method ...................................................................................... 4-7 Ratio method ................................................................................................. 4-8 Selecting the gradient method ...................................................................... 4-8 Tymp diagnostic softkey menu structure ........................................................... 4-9 Automatic tympanometry test procedure ........................................................... 4-9 Sweep direction........................................................................................... 4-10 Tymp test: Y at 226Hz ................................................................................ 4-11 Baseline ON ................................................................................................ 4-11 Baseline OFF .............................................................................................. 4-11 Stopping the test ......................................................................................... 4-11 Contents - 2 Grason-Stadler Contents Manual tympanometry test procedure ............................................................. 4-12 Tympanometry printout samples ..................................................................... 4-13 Tympanometry normative values Ytm, 226 Hz .............................................. 4-13 Tymp screening with Reflex (Tymp mode) .................................................... 4-14 Tymp screening softkey menu structure .......................................................... 4-14 AUTO START ON .................................................................................... 4-15 AUTO START OFF................................................................................... 4-15 BASELINE ON ......................................................................................... 4-15 BASELINE OFF ....................................................................................... 4-16 REFLEX OFF ............................................................................................ 4-16 REFLEX ON ............................................................................................. 4-16 Screening reflex test scoring ........................................................................... 4-16 Tymp screening sample printout...................................................................... 4-17 Program mode for tympanometry ............................................................. 4-18 Program mode softkey menu structure ..................................................... 4-18 Screen and diagnostic softkeys ................................................................. 4-18 User softkeys ............................................................................................. 4-18 Program Mode .......................................................................................... 4-18 Programming default parameters for SCREEN and DIAGNOSTIC modes ………………………………………………………………….... 4-19 Programming default parameters for user tests ........................................ 4-20 Acoustic Reflex testing ................................................................................... 4-21 Non-acoustic Reflex testing ............................................................................ 4-22 Reflex Threshold softkey menu structure ....................................................... 4-22 Reflex Threshold automatic test procedure .................................................... 4-23 Stimulus Timing ........................................................................................ 4-23 Auto timing of stimuli ............................................................................... 4-24 Minimum and maximum timing allowable for reflex threshold ..................... 4-24 Manual timing of stimuli............................................................................ 4-24 Auto Zero .................................................................................................. 4-26 Mark Threshold ......................................................................................... 4-26 Threshold Seek .......................................................................................... 4-27 Manual threshold testing ........................................................................... 4-28 Reflex threshold sample printouts ................................................................... 4-30 Reflex Threshold MANUAL test procedure..................................................... 4-31 Reflex threshold summary ............................................................................... 4-32 Program mode for Reflex Threshold ............................................................... 4-33 Softkey menu structure .............................................................................. 4-33 Program mode ............................................................................................ 4-33 Reflex Decay testing......................................................................................... 4-35 Softkey menu structure .............................................................................. 4-35 Minimum and maximum timing levels allowable in Reflex Decay................. 4-36 Reflex Decay sample printout.......................................................................... 4-38 Program mode for Reflex Decay ..................................................................... 4-39 Eustachian Tube Function Testing for Intact Eardrums ................................... 4-41 Pressure-swallow test ................................................................................. 4-41 Softkey menu structure .............................................................................. 4-42 GSI TympStar Version 1 Reference Instruction Manual Contents - 3 Contents ETF-Intact automatic test procedure ....................................................................... 4-43 ETF-Intact sample printout ...................................................................................... 4-45 ETF-Intact normative data ....................................................................................... 4-45 Eustachian Tube function testing for perforated eardrums ...................................... 4-46 Softkey menu structure ...................................................................................... 4-46 ETF-Perforated TM automatic test procedure ......................................................... 4-47 Minimum and maximum levels allowable ......................................................... 4-48 ETF-Perforated TM sample printout ....................................................................... 4-49 ETF-Perforated TM manual test procedure ............................................................. 4-50 ETF-Perforated TM normative data .................................................................. 4-50 Program mode for ETF............................................................................................. 4-51 Softkey menu structure ...................................................................................... 4-51 Program mode .................................................................................................... 4-51 Altitude Calibration Mode ........................................................................................ 4-53 Calibration procedure ......................................................................................... 4-53 Auto Sequence testing .................................................................................................... 4-55 Auto Sequence test procedure .................................................................................. 4-55 Auto Sequence program mode.................................................................................. 4-57 Instrument options ......................................................................................................... 4-58 Softkey menu structure............................................................................................. 4-58 Print format .............................................................................................................. 4-58 Data Transfer Settings .............................................................................................. 4-61 Language................................................................................................................... 4-61 Test Sequence............................................................................................................ 4-61 Remote Settings ....................................................................................................... 4-62 GSI Suite ….............................................................................................................. 4-62 Date and Time .......................................................................................................... 4-62 Facility Name ........................................................................................................... 4-63 Index Appendix A Specifications………………………………………………………………………….A-1 Appendix B Bibliography…………………………………….……………………………………..B-1 Appendix C Basic Problem Solving………………………………………………………………...C-1 Appendix D Remote Specifications…………………………………………………………………D-1 Contents - 4 Grason-Stadler Introduction General 1 The GSI TympStar Version 1 Middle-Ear Analyzer is a technically advanced, computer-based admittance instrument designed to be used in a clinical or research setting. The TympStar builds on the sophistication, functionality and flexibility of the GSI 33, offering unparalleled testing capabilities. It contains total capabilities for complete, manual or automatic diagnostic testing for analysis of middle ear function. Admittance (Y) may be measured with a probe tone frequency of 226 Hz. The extensive battery of test mode choices include: • Diagnostic Tympanometry • Acoustic Reflex Threshold and Decay Measurements • Eustachian-Tube Function Testing (Both intact and perforated eardrums) • Screening Tympanometry/Reflex (Automatic Only) Operators have a choice of using GSI preprogrammed test parameters, or programming their own test criteria. Alarge liquid crystal display (LCD) clearly displays test parameter choices and the possible alternatives. Admittance and pressure indications are shown on the LCD along with a continuous digital readout. Test status and invalid choices are also shown on the LCD. The tympanometric measurement results are automatically scaled and presented in equivalent ml of compliance at “Y,” 226 Hz. Sensitivity scales for the display of reflex measurement results can be selected manually. A cursor is available in all test modes for calling out numeric positions on the X and Y axes. Test results are displayed in real-time. The user can view the results as they are being measured and then has the choice of printing the display or retesting the patient. The high-speed printer generates reports in concise graphic formats that are easy to read. GSI TympStar Version 1 Reference Instruction Manual 1-1 Chapter 1 Equipment connections and options TympStar Version 1 options that can be connected to the rear panel include RS232 serial communication, a keyboard for entering patient information, an HP DeskJet® or LaserJet® printer and a VGA monitor for displaying test results. Other options offered for the TympStar Version 1 for managing and archiving data, include: • Internal memory for storing up to 26 test results • Data export to an external PC via RS232 serial interface • Remote control of the TympStar via RS232 commands from an external PC. Functional in TympStar Version 2 only The probe The innovative lightweight probe is designed for patient comfort, ease-of-seal, and accurate test results. A wide variety of both standard and special sized eartips are supplied with the GSI TympStar to hermetically seal the ear canal. In addition, a set of screening eartips is provided for screening tymp and reflex tests. The operator has a choice of three mountings to support the probe box; the standard lightweight shoulder mounting, standard clothes clip, or an optional operator wrist attachment. The probe box has 2 LED’s to indicate test status. Within the probe box there are two small loudspeakers, a microphone and a pressure transducer. One loudspeaker delivers the probe tone to the ear canal, while the microphone monitors the intensity of the probe tone within the ear canal. The second loudspeaker delivers the ipsilateral (ipsi) stimuli to the ear canal. The contralateral (contra) insert phone contains its own loudspeaker. The pressure within the ear canal can be varied up to a range of +400 daPa to -600 daPa. At no time is it possible to exceed specified maximum limits. Pressure can be varied automatically or manually and from negative to positive or from positive to negative values. Pressure within the ear canal is monitored continuously in order to maintain pressure accuracy throughout each test sequence. 1-2 Grason-Stadler Introduction Instrument controls A combination of hardkeys and softkeys are used to select the test modes and parameters and to conduct tests. Hardkeys and softkeys Hardkeys are located on the front panel and the sides of the LCD panel and provide fixed functions that do not change. Softkeys are located directly under the LCD and change to support the requirements of a test session. LCD panel Softkey Hardkeys Front panel Pressure control Rotary pressure control A rotary pressure control is also provided to change or fine-tune pressure within the ear canal. Test modes and menu navigation Selecting a test mode by pressing a hardkey causes the required test screen to be displayed on the LCD with the appropriate menu of test parameters shown across the bottom. The softkeys are then used in conjunction with a few hardkeys to navigate through the menus and set parameter values for the selected tests. For example, pressing the TYMP hardkey causes the Tymp Diagnostic screen to be displayed. Tymp hardkey Tymp Diagnostic screen Tymp parameter menu GSI TympStar Version 1 Reference Instruction Manual 1-3 Chapter 1 Pressing the softkeys displayed across the bottom of the LCD allows the user to navigate through the Tymp Diagnostic parameter menus diagrammed below. GSI default softkey selections are circled on menu diagrams. The first level of parameter menu selections includes AUTO SEQUENCE, P-RANGE, START, GRADIENT, EAR and MORE. First level AUTO SEQUENCE START daPa P-RANGE daPa NORMAL WIDE -600 -400 -200 +200 +400 MORE -500 -300 0 EAR GRADIENT TYMP WIDTH daPa RATIO ml OFF RIGHT MORE LEFT +300 MORE Second level P-RATE daPa/s 12.5 50 200 BASELINE 600/200 MORE ON OFF Default selection First level A second level of menus can be displayed by pressing the MORE softkey and includes P-RATE, BASELINE and MORE. Second level The MORE softkey is used to toggle between the top and lower levels of menus while the test screen portion above the softkeys remains unchanged. 1-4 Grason-Stadler Introduction Pressing a parameter menu softkey causes a sub-menu of parameter settings to be displayed. Often submenus will contain MORE softkey selections that provide access to additional setting alternatives. START daPa Sub-menu of START daPa -600 -400 -200 +200 +400 MORE -500 -300 0 +300 MORE Sub-menu of START daPa Changing parameter settings Settings can be changed for a selected parameter by pressing the desired softkey as shown in this example of changing the Probe Hz from 226 to 1000. Making the new selection returns the display to the previous menu level with the new setting shown above the selected parameter. If no change is desired, the display can be returned to the previous level by pressing the RETURN hardkey. In the manner described above, menus can be navigated and settings can be changed for any of the test modes. Menu diagrams Menu structure diagrams like the diagrams shown on these pages will be used throughout the remainder of this manual as a convenience to the user. GSI default parameter settings GSI default parameters are circled on menu structure diagrams shown throughout the remainder of this manual. START daPa -600 -400 -200 +200 +400 MORE GSI default value GSI TympStar Version 1 Reference Instruction Manual -500 -300 0 +300 MORE 1-5 Chapter 1 1-6 Grason-Stadler Installation This chapter contains the following information: • Unpacking and inspecting the GSI TympStar and accessories • Equipment connections • Preparing the probe assembly • Powering the instrument • Preparing the internal printer • Preparing an external printer • Adjusting display contrast • Front panel controls 2 page 2-1 page 2-4 page 2-6 page 2-7 page 2-8 page 2-9 page 2-12 page 2-13 Unpacking and inspecting the GSI TympStar This GSI TympStar was carefully tested, inspected, and packed for shipping. It is a good practice after receiving the instrument to examine the outside of the container for any signs of damage. Notify the carrier if any damage is noted. Carefully remove the GSI TympStar and TympStar accessories from the shipping container. If the instrument or accessories appears to have suffered damage, notify the carrier immediately so that a proper claim can be made. Be certain to save all packing material so that the claim adjuster can inspect it as well. As soon as the carrier has completed the inspection, notify a GSI Representative. If the instrument or an accessory must be returned to the factory, repack it carefully (in the original container if possible) and return it prepaid to the factory for the necessary adjustments. GSI TympStar Version 1 Reference Instruction Manual 2-1 Chapter 2 Check all the accessories against the itemized lists in Tables 2-1 and 2-2. If any accessories are missing, notify a GSI Representative immediately. Table 2-1 TympStar Accessories Supplied Contra insert phone Calibration cavity (V1) Probe cleaning kit (2 boxes) Eartips: 1 pkg. 8 standard sizes, 4 ea. (Color coded) 1 pkg. 6 special sizes, 2 ea. 1 pkg. 6 screening sizes, 2 ea. Reference Instruction Manual Quick User Guide Printer paper (2 rolls) for orders including printer Spare set of probe tubing Probe mount - shoulder Probe mount - wrist Probe mount - clothes GSI Suite Audometic Data Management Software GSI Part # 8000-0078 GSI Part # 2000-1036 GSI Part # 2000-9610 GSI Part # 1700-9660 GSI Part # 1700-9670 GSI Part # 1700-9622 GSI Part # 2000-0100 GSI Part # 2000-0108 GSI Part # 1700-9619 GSI Part # 2000-9617 GSI Part # 1700-9646 GSI Part # 1700-9642 GSI Part # 1700-9608 GSI Part # 1010-9686 NOTE Additional quantities of any accessory can be ordered from a GSI Representative or directly from Grason-Stadler, Inc. See the Specifications for optional accessories available and their respective catalog numbers. Printer paper Probe cleaning kit Probe mount wrist Probe clothes clip Eartips special sizes Probe mount shoulder Eartips screening sizes Eartips standard sizes Calibration cavity 2-2 Contra insert phone Grason-Stadler Spare set of probe tubing Installation Table 2-1 (Continued) TympStar Accessories Supplied Printer paper, adhesive-backed for orders including a printer GSI Part # 1770-9643 GSI TympStar dustcover GSI Part # 1700-9618 Power cord with hospital-grade plug GSI Part # 4204-0251 (USA) Power cord part # varies depending on location Printer paper Power cord with hospital-grade plug GSI TympStar dustcover GSI TympStar Version 1 Reference Instruction Manual 2-3 Chapter 2 Equipment connections Rear panel TympStar options that can be connected to the rear panel include RS232 serial communication, a keyboard for entering patient information, an HP DeskJet® or LaserJet® printer and a VGA monitor for displaying test results. Functional in TympStar Version 2 only RS232 serial port Keyboard VGA monitor NOTE Please refer to Appendix A: Specifications for the technical requirements of each of the connections shown above. CAUTION Improper connections to the GSI TympStar can damage the instrument and void the warranty. WARNING Connecting unapproved sources of energy to the GSI TympStar can create a serious electrical shock hazard. Refer to Appendix A: Specifications for the technical requirements of each of the connections shown above. WARNING ANY EQUIPMENT CONNECTED TO THE GSI TYMPSTAR AND USED IN THE PATIENT VICINITY MUST BE POWERED BYAN ISOLATED POWER SOURCE TO MAINTAIN THE ELECTRICAL SAFETY OF THE OVERALL SYSTEM. The isolated power source can be purchased directly from GSI, or elsewhere when approved for use by GSI. NOTE A 226 Hz Y tympanogram is displayed on the LCD screen in a 1:1 aspect ratio and on the external VGA monitor in a 1.4:1 aspect ratio. The Pressure (horizontal) axis appears to be “stretched out” by 40% on the VGA monitor. 2-4 Grason-Stadler Installation Probe Acoustic, electric and pneumatic connections to the probe are provided by the connector on the right side of the GSI TympStar enclosure. The connectors allow for removal of probe pod assembly. Power The power entry module contains the power plug outlet, power ON/OFF switch and instrument fuses. Prior to applying power to the instrument, make sure that the power cord is plugged firmly into the power entry module by pressing the cord connector into its receptacle. GSI TympStar Version 1 Reference Instruction Manual 2-5 Chapter 2 Preparing the probe assembly The ipsi probe tip and tubing are attached to the probe box at the factory. Connect the contra insert phone cable to the jack on the top of the probe pod if contra reflex testing is to be performed. If contra testing will not be performed on a regular basis, it is not necessary to keep the contra phone attached to the probe box at all times. CAUTION Be sure that the plug is inserted all the way into the jack to ensure proper operation. CAUTION To ensure the accuracy of calibration, the tygon tubing supplied with the ipsi probe assembly should not be cut or altered in any way. The system has been specifically calibrated to meet specifications with the tubing length supplied with your unit. A spare set of tubing is provided. If the replacement tubing supplied with your instrument is used, recalibration is unnecessary. 2-6 Grason-Stadler Installation Powering the instrument Prior to applying power Place the GSI TympStar on a desk or countertop. CAUTION Do not place instrument on power or probe cord. The location should be near a hospitalgrade grounded electrical outlet. Confirm that the power cord is plugged firmly into the power entry module on the left side of the GSI TympStar and insert the power plug into the hospitalgrade electrical outlet. WARNING Injury to personnel or damage to equipment can result when a threeprong to two-prong adapter is connected between the GSI TympStar power plug and the source of electrical power. Applying power Operate the POWER SWITCH on the left side of the instrument to the ON position (marked as “1”). NOTE The LCD will not display any information during the first approximately 5 seconds while the instrument’s computer performs a number of internal tests to verify the condition of internal hardware. Upon the conclusion of internal system tests, an Initialization screen will be displayed showing the time and date, TympStar model version and software version number. This screen will be displayed for approximately 20 seconds while the system software prepares for testing. GSI TympStar Version 1 Reference Instruction Manual 2-7 Chapter 2 Preparing the internal printer The thermal printer is located in the center of the front panel. Confirm that an adequate paper supply is installed in the GSI TympStar prior to beginning a test session. NOTE The edges of the thermal paper will turn red as the paper supply runs out. Paper supply Raise the printer cover by pressing the bottom edge of the cover and lifting it. The roll of thermal paper rests in the paper tray directly in front of the printer. If it is necessary to replace a nearly exhausted roll of paper, rotate the release lever on the left side of the printer to its “back” position and gently pull the remaining paper out of the printer. Orient the new paper roll as shown on the inside of the paper tray, rotate the release lever back to the “forward” position and feed the paper into the printer paper entrance until the printer motor and roller pulls the paper into the printer. 2-8 Grason-Stadler Installation NOTE Thermal paper can be printed on only one side. If printing is unsuccessful after changing paper rolls, check the paper orientation. Advance the paper if necessary by pressing the PRINT hardkey and then the PAPER ADVANCE softkey. Feed the paper through the opening in the cover, close the cover and tear off any excess paper. Return to the previous menu by pressing the RETURN softkey. NOTE Thermal paper supplies should be stored in a cool dry place to extend the life of the paper. Preparing an external printer The GSITympStar is compatible with most Hewlett Packard DeskJet® and LaserJet® printers with PCL3. Contact GSI Service for specific models. These printers provide full sheet printouts of test data. Atest printout of results containing: • One left and right tympanogram • A reflex threshold table for both left and right (Ipsi or Contra only) • A reflex decay table for both left and right (Ipsi or Contra only) will print on one 8.5 x 11 inch (or A4) sheet of paper. 1) Turn the TympStar and printer off, then attach the printer data cable to the printer connector on the rear of the TympStar. Connect the printer power cable to AC power. WARNING ANY EQUIPMENT CONNECTED TO THE GSI TYMPSTAR AND USED IN THE PATIENT VICINITY MUST BE POWERED BYAN ISOLATED POWER SOURCE TO MAINTAIN THE ELECTRICAL SAFETY OF THE OVERALL SYSTEM. The isolated power source can be purchased directly from GSI, or elsewhere when approved for use by GSI. GSI TympStar Version 1 Reference Instruction Manual 2-9 Chapter 2 2) Turn the TympStar and printer on. Anytime the external printer is connected and turned on, the TympStar will automatically direct printing to the external printer. To redirect printing to the internal printer, turn the external printer off or disconnect it. Setting external printer parameters To set the external printer parameters: 1) Press the ETF hardkey to select the ETF test mode, then press the RETURN hardkey to display the ETF submenu. INTACT TM PERF INSTRUMENT TM OPTIONS PROGRAM MODE 2) Press the INSTRUMENT OPTIONS softkey, then the MORE softkey to dis- play the PRINT FORMAT softkey selection. 3) Press the PRINT FORMAT softkey, and then the MORE softkey to display the 2 - 10 Grason-Stadler Installation EXTERNAL PRINTER SETUP softkey selection. 4) PresstheEXTERNALPRINTERSETUPsoftkeytodisplaytheExternalPrinter Left column printout data Setup Menu. 5) Press the LEFT COLUMN SETTING softkey of the External Printer Setup Color or black and white Menu to set the left column of the printed data to the left or right ear. 6) Press the PRINT TYPE softkey of the External Printer Setup Menu to set the printout to Black and White or Color. NOTE The setting must be Black and White for grayscale printers. GSI TympStar Version 1 Reference Instruction Manual 2 - 11 Chapter 2 Adjusting the display contrast The contrast of the Liquid Crystal Display (LCD) can be adjusted to suit individual viewing tastes at any time by turning the LCD CONTRAST control, located at the left side of the enclosure. 2 - 12 Grason-Stadler Installation Front panel controls LCD housing Softkey Front panel Pressure Control Hardkey Hardkeys Front panel controls consist of a combination of “hardkeys” with fixed functions that do not change, and “softkeys” located under the LCD that change to support the changing requirements of a test session. A rotary pressure control is provided to change or fine-tune pressure within the ear canal. All of the push-button controls on the front panel are hardkeys. Three hardkeys are also located on the left and right sides of the LCD housing. Their functions are printed directly on the push-button or nearby on the panel and do not change. The front panel hardkey functions include: Tymp Causes GSI (or operator programmed) default criteria for diagnostic tymp test to be automatically set up. Reflex Causes GSI (or operator programmed) default criteria for reflex threshold testing to be automatically set up. Etf Causes GSI (or operator programmed) default criteria for eustachian tube function (intact eardrum) test to be automatically set up. GSI TympStar Version 1 Reference Instruction Manual 2 - 13 Chapter 2 Special Causes GSI TympStar to initialize to GSI (or operator programmed) default criteria for reflex decay test. Page Allows operator to recall and display tests in memory or in progress. Print Allows operator to print selected test results. Remote Used when GSI TympStar is interfaced with external computer. Implements a common handshake routine to ensure that the RS232 link is in place. Data Transfer Used to send test data to an external computer. Pressure control Rotary knob used to manually change or fine-tune the pressure within the ear canal. Manual Allows the user to run each applicable test procedure manually. The pressure control is used to change pressure manually within the ear canal. Hold Allows the current test sequence to be temporarily halted without venting the ear canal pressure. Stop Allows the current test sequence to be terminated. The ear canal is vented. Data on the current page is stored in memory. Start Causes the selected test sequence to begin in the direction indicated by the associated arrow. Stimulus Allows available stimuli to be scrolled up or down and selected. This feature is available only for Reflex type tests. Intensity Allows operator to select and set desired intensity (dB HL). This feature is available only for Reflex type tests. Present Allows selected stimulus to be presented either manually or according to preset automatic timing. This feature is available only for Reflex type tests. 2 - 14 Grason-Stadler Installation Three hardkeys are also located on the left and right sides of the LCD housing. Their functions are printed directly on the push-button and do not change. The LCD housing hardkey functions include: Clear Deletes selected tests stored in memory. Erase Erases current display of test results prior to placing test results in memory. Return Allows the operator to go back to next higher level in the softkey menu. Depressing Return while in Clear, Page, or Print mode restores the instrument to the mode previously selected. Softkeys Only the push-buttons located directly under the LCD are softkeys. Their functions are displayed on the LCD and change in support of the current test activities. Softkeys Menu diagrams Menu structure diagrams like the diagrams shown on these pages will be used throughout the remainder of this manual as a convenience to the user. GSI default parameter settings GSI default parameters are circled on menu structure diagrams shown throughout the remainder of this manual. START daPa -600 -400 -200 +200 +400 MORE GSI default value -500 -300 0 +300 MORE GSI TympStar Version 1 Reference Instruction Manual 2 - 15 Chapter 2 2 - 16 Grason-Stadler 3 Pre-Operation This chapter contains the following information: • Cleaning probe tubes • Eartips • Preparing test materials • Calibration checks • Instructing the patient • Suggested probe-insertion technique page 3-1 page 3-2 page 3-3 page 3-3 page 3-15 page 3-15 Cleaning probe tubes To ensure measurement accuracy, it is essential to clean the probe tip daily to be certain that the tubes are clean and free of cerumen. Remove the probe eartip and tygon tubing attached to the three metal probe tubes at the rear of the probe tip. CAUTION Do not alter the length of the tubing by cutting it. When reconnecting the tygon tubing to the probe tubes, ensure that there are no sharp edges or burrs on the probe tubes that could cut the tygon tubing. Using the cleaning wires shipped with this instrument, remove debris from each tube by pushing the wire through the tube from the back to the front of the probe tip as follows: CAUTION Avoid getting the probe moist Do not place an eartip on the probe unless it is thoroughly dry. GSI TympStar Version 1 Reference Instruction Manual 3-1 Chapter 3 Feed the stiff end of the cleaning wire into the tube and pull the wire completely through the tube. Discard the used wire. Repeat this process for each of the remaining probe tubes. Do not reuse wires. Reconnect the tygon tubing to the probe tubes. The center tube has the larger diameter. Eartips NOTE: Eartips are single-use only. The disposable eartip should be pushed firmly onto the tip of the probe until it is fully seated. The three probe tubes should be nearly flush with the top surface of the eartip. 3-2 Grason-Stadler Pre-Operation Preparing test materials The following items should be placed within easy reach prior to a test session: • Otoscope • Contra insert phone (8000-0078) • A container for storing disposable eartips • Probe cleaning wire (2000-9610) • A roll of printer paper (1700-9619) • Calibration Cavity Assembly (2000-1036) • Probe Box Mounts (Shoulder, Wrist, Clothes Clip) • Several sets of eartips (1700-9660) (1700-9670) (1700-9620) NOTE Do not attempt to use eartips of another manufacturer unless completely confident that using them will not create air leaks between the probe tip and eartip. Calibration checks Before using the instrument each day, use the test cavity provided with this instrument to check the calibration of the ml/mmho meter and graphic display at each sensitivity. A qualitative check of each test mode is also recommended. This is accomplished by listening to each test tone using the ipsi probe and contra phone. Test cavity calibration Cushion the probe box assembly and test cavity on the velcro shoulder mount provided. Rest it on your lap or in a nearby chair, away from instrument and other vibrations that may cause artifact and affect measurements. NOTE If the GSI TympStar does not function properly during pre-operation checks or test routines contact a local GSI Representative or the GSI Service Department. Insert the probe all the way into the test cavity when running a test. 1 cc = 1 ml 1 mmho = 10-8m3 /Pa.s GSI TympStar Version 1 Reference Instruction Manual 3-3 Chapter 3 Altitude/Barometric pressure calibration Altitude and weather (barometric pressure and temperature changes) affect admittance measurements due to the resulting changes in air density. These changes cause a shift in admittance readings. For example, the density of air molecules in a given volume decreases with dropping barometric readings or with increasing altitudes. GSI calibrates the GSI TympStar to a barometric pressure of 760 mm Hg (30" of Hg) at 21 degrees C (70 degrees F). If this instrument has not been calibrated to the on-site altitude, perform the altitude calibration contained in Chapter 4; Altitude Calibration Mode. To verify that this instrument has calibrated at this site’s altitude, press the SPECIAL softkey, the RETURN hardkey, then the ALTITUDE CAL key. The Altitude Calibration screen will be displayed. Altitude stored for this site Equivalent (corrected) compliance values If the altitude shown on the screen is correct, it is likely that the instrument is calibrated. If the altitude shown on the screen is not correct, or to be absolutely certain of a valid altitude calibration, perform the calibration procedure contained in Chapter 4; Altitude Calibration Mode. CAUTION Do not proceed with the calibration checks in this section unless completely certain that the altitude calibration for this instrument is valid at your location. Equivalent compliance values 3-4 Equivalent (corrected) compliance values for pre-operation calibration checks at various altitudes are shown on the screen and in the table below. For example, if located at 4,000 feet, using the 226 Hz probe tone in the 2.0 cc cavity, the screen should show an altitude of 4000 feet, a site value of 2.31 ml ml and the test cavity measurement should read 2.31 ml (±0.1ml). Pre-Operation Equivalent Compliance Values Altitude (feet) 0 Small Vol (cc) 0.5 Large Vol (cc) 2.0 0 0.5 2 1000 0.52 2.07 2000 0.54 2.15 3000 0.56 2.23 4000 0.58 2.31 5000 0.6 2.4 6000 0.62 2.49 7000 0.65 2.59 8000 0.67 2.69 NOTE The Table has been corrected for changes in altitude in reference to a 226 Hz probe tone. Tracing/Meter Calibration check for Tympanometry The Tymp Diagnostic screen and menus will be used for this calibration check. Tymp Diagnostic screen AUTO SEQUENCE START daPa P-RANGE daPa NORMAL WIDE -600 -400 -200 +200 +400 MORE -500 -300 0 EAR GRADIENT TYMP WIDTH daPa RATIO ml OFF RIGHT MORE LEFT +300 MORE P-RATE daPa/s 12.5 50 200 BASELINE 600/200 MORE ON OFF Tymp Diagnostic menus To check the tracing/meter calibration for tympanometry: 1) In the Tymp Diagnostic mode place the eartip on the probe tip and listen to the 226 Hz probe tone. 2) Depress the START daPa softkey at the bottom of the LCD. The following sub-menu will appear: GSI TympStar Version 1 Reference Instruction Manual 3-5 Chapter 3 3) Press the MORE softkey to display the following choices: -500 -300 0 +300 MORE 4) Press the 0 softkey to set 0 daPa as the starting pressure for the test. The display will return to the top menu level. 5) Confirm that the BASELINE is ON. Use the BASELINE sub-menu to change the settings if necessary. 6) Insert the ipsi probe tip into the 2.0 cc test cavity. 7) Press the START BASELINE ON OFF hardkey. Allow the tracing to sweep to +100 daPa then press START hardkey to reverse direction. Allow the tracing to sweep to -100 daPa and press the STOP hardkey. The following results should be displayed: • The graphic tracing should be at 0.0 • The EAR CANAL VOLUME should be 2.0 (within ± 5% of full scale). • Compliance peak (ml) and pressure peak (daPa) values should be NP (No Peak). Ear Canal volume at 2.0 Graphic tracing at 0 Compliance and pressure peak at NP 3-6 Grason-Stadler Pre-Operation 8) Press the BASELINE softkey, then press OFF. 9) Insert the probe tip into the 0.5 cc test cavity. 10) Press the START hardkey. Allow the tracing to sweep to +100 daPa then press START hardkey to reverse direction. Allow the tracing to sweep to -100 daPa and press the STOP hardkey. The following results should be displayed: • The graphic tracing should be at 0.5 • The cavity volume (C1) should be at the 0.5 • The Compliance peak should be 0.5 (within ± 5% of full scale). • The pressure peak (daPa) values should be NP (No Peak). Cavity volume at 0.5 Graphic tracing at 0.5 Compliance and pressure peak 11) Insert the probe tip into the 2.0 cc test cavity. 12) Press the START hardkey. Allow the tracing to sweep to +100 daPa then press START hardkey to reverse direction. Allow the tracing to sweep to -100 daPa and press the STOP hardkey. The following results should be displayed in the same manner as above: • The graphic tracing should be at 2.0 • The cavity volume (C1) should be at the 2.0 • The Compliance peak should be 2.0 (within ± 5% of full scale). • The pressure peak (daPa) values should be NP (No Peak). GSI TympStar Version 1 Reference Instruction Manual 3-7 Chapter 3 13) Insert the probe tip into the 5.0 cc test cavity. 14) Press the START hardkey. Allow the tracing to sweep to +100 daPa then press START hardkey to reverse direction. Allow the tracing to sweep to -100 daPa and press the STOP hardkey. The following results should be displayed in the same manner as above: • The graphic tracing should be at 5.0 • The cavity volume (C1) should be at the 5.0 • The Compliance peak should be 5.0 (within ± 5% of full scale). • The pressure peak (daPa) values should be NP (No Peak). 3-8 Grason-Stadler Pre-Operation Pressure range check for tympanometry 1) Press the P-RANGE daPa softkey, then select the WIDE pressure range. Check to insure that the X-axis of the graph and the pressure meter display a range of -600 to +400 daPa. P-RANGE daPa NORMAL WIDE 2) Press the P-RANGE daPa softkey, then select the NORMAL pressure range. Check to insure that the X-axis of the graph and the pressure meter display a range of -400 to +200 daPa. P-RANGE daPa NORMAL WIDE 3) While in the NORMAL pressure range, press the START daPa softkey, and then select - 600 as the starting pressure. Note that the X-axis and meter ranges change to the WIDE pressure range values. START daPa -600 -400 -200 +200 +400 MORE -500 -300 0 +300 MORE NOTE The START daPa values override the normal pressure range selection. Manual pressure check for tympanometry 1) Confirm that the BASELINE is ON. Use the BASELINE sub-menu to change the settings if necessary. BASELINE ON OFF 2) Insert the probe tip into the 2.0 cc test cavity, and press the MANUAL hardkey. The cavity size should be recorded as EAR CANAL VOLUME. 3) Rotate the PRESSURE KNOB and note the resulting change on the pressure meter and graphic display. GSI TympStar Version 1 Reference Instruction Manual 3-9 Chapter 3 Screening reflex check - tymp screening 1) Confirm that the BASELINE is ON. Use the BASELINE sub-menu to change the settings if necessary. BASELINE ON OFF 2) Insert the ipsi probe tip into the 2.0 cc test cavity. 3) Press the TYMP hardkey, and then press the RETURN hardkey. The following submenu will be displayed: SCREEN DIAGNOSTIC USER 1 USER 2 USER 3 PROGRAM MODE 4) Press the SCREEN softkey. The tymp sweep will begin automatically upon pressurization of the test cavity. The following results should be displayed: • The graphic tracing should be at 0.0 • EAR CANAL VOLUME should be 2.0 • TYMP should be NP • REFLEX should be I 1000 Hz NR NOTE NR indicates No Reflex response for the stimulus presented. 3 - 10 Grason-Stadler Pre-Operation 5) Place a screening eartip on the probe tip. Position the probe against the entrance of the ear canal applying a gentle pressure to maintain a tight seal. The screening test will begin automatically. Listen to the reflex test stimulus following the tymp test. The results will be displayed at the conclusion of the test. Reflex threshold mode check 1) Insert the ipsi probe tip into the 2.0 cc test cavity. 2) Press the REFLEX hardkey. NOTE Remove the contra insert phone from the probe box. If the contra insert comes in close contact with the test cavity, acoustic radiation from the contra phone may cause artifact affecting the test cavity measurements. 3) Press the START hardkey. The pressure meter reading will be 0 daPa, and the compliance will be zeroed automatically. GSI TympStar Version 1 Reference Instruction Manual 3 - 11 Chapter 3 4) Press the PRESENT hardkey momentarily. A stimulus “ON” message will be displayed at the right upper corner of the screen and the tracing will sweep at the .00 ml position for the length of time automatically set. 5) Press the STIMULUS TIMING softkey and select MANUAL TIMING. STIMULUS TIMING MANUAL TIMING 6) Press the PRESENT hardkey. A stimulus “ON” message will be displayed at the right upper corner of the screen and the tracing will sweep at the .00 ml position for the length of time automatically set. 7) Press the STOP hardkey. 3 - 12 Grason-Stadler AUTO TIMING ON TIME 1.5 SET OFF TIME QTY EXIT 1.5 SET Pre-Operation 8) To check the ipsi stimuli, place an eartip on the ipsi probe. 9) Select the 500 Hz stimulus in the upper right corner of the screen by pressing the STIMULUS hardkey. 10) Hold the ipsi probe against the outer portion of the ear canal and press the PRESENT hardkey. Listen for the time multiplexed tone (available in ipsi). Ascertain that the 226 Hz probe tone can also be heard. 11) Repeat the above procedure selecting 1000, 2000, 4000 Hz, the three noise bands, and clicks. 12) Connect the contra insert phone to probe box. Ensure that the contra phone jack is firmly seated in the probe box receptacle. Place the eartip on the contra insert phone. 13) Press the STIMULUS EAR softkey, and select CONTRA STEADY. STIMULUS EAR IPSI 14) Check the contra steady stimuli following the procedure described above for the ipsi probe. CONTRA STEADY CONTRA PULSED 15) Press the STIMULUS EAR softkey, and select CONTRA PULSED. 16) Check the contra pulsed stimuli following the procedure described above for the ipsi probe. GSI TympStar Version 1 Reference Instruction Manual 3 - 13 Chapter 3 Intensity limits check for reflex threshold 1) Press the STIMULUS EAR softkey and select IPSI. 2) Select the 500 Hz stimulus in the upper right corner of the screen by pressing the STIMULUS hardkey. STIMULUS EAR IPSI CONTRA STEADY CONTRA PULSED 3) Continuously increase the stimulus intensity by pressing the INTENSITY (up) hardkey. The “INTENSITY LIMIT REACHED” message will be displayed under the level meters at intensities above 105 dB HL. This message is displayed for intensity limits of: • 110 dB HL for selected stimuli of 500 Hz & 1000 Hz • 105 dB HL for selected stimulus of 2000 Hz • 100 dB HL for selected stimulus of 4000 Hz • 95 dB HL for noise bands NOTE Any signal intensity greater than 100 dB HL for the ipsi probe or contra phone causes the “HIGH INTENSITY SELECTED” message to be displayed. 4) Press the STIMULUS EAR softkey, and select CONTRA STEADY or CONTRA PULSED. STIMULUS EAR IPSI CONTRA STEADY CONTRA PULSED 5) Continuously increase the stimulus intensity by pressing the INTENSITY (up) hardkey. The “INTENSITY LIMIT REACHED” message will be displayed at the following levels: • 120 dB HL for selected stimuli 500, 1000, 2000 Hz • 115 dB HL for selected stimulus 4000 Hz • 115 dB HL for noise bands 3 - 14 Grason-Stadler Pre-Operation Instructing the patient General Explain to the patient that they are about to have their ears tested, and that unlike other audiometric tests, they are asked to refrain from speaking, excessive movement, and swallowing unless directed to do so. When testing children, it is often desirable to seat them so that they are able to watch the instrument as the tests are conducted. This tends to increase their cooperation and lessens any feelings of apprehension. Positioning the probe box Position the shoulder mount for the probe box over the patient’s shoulder on the same side as the ear to be tested. The velcro strip should be facing away from the body. The probe box is then positioned on front of the velcro strip. Suggested probe insertion technique Ear canal examination with an illuminated otoscope is an essential prerequisite to successful middle-ear testing. Such examination achieves the following: • Detects the presence of potentially obstructive cerumen. • Assists in determining the proper angle of probe insertion. • Helps to determine the proper size eartip to achieve an airtight seal of the ear canal. Select the correct size eartip and position it fully on the probe. The eartip should be pushed firmly onto the tip of the probe until it is fully seated. The three probe tubes should be nearly flush with the top surface of the eartip. Insert the probe tip securely into the ear canal with a back-and-forth twisting motion. Pull the pinna upward and backward for adults, and down and back for children. The probe tip should sit firmly within the ear canal without being held. If leakage occurs, a different size eartip may be needed. If the wrist attachment is used for screening tests, the operator should wrap the wristband around their wrist with the velcro facing away from wrist. The probe box should be placed on top of the wrist with the LEDs visible to the operator. SCREENING EARTIPS should be used to achieve a hermetic seal when the probe tip is hand-held against the outer portion of the ear canal. GSI TympStar Version 1 Reference Instruction Manual 3 - 15 Chapter 3 3 - 16 Grason-Stadler 4 Operation This chapter contains the following information: • Overview of functions • Test procedures TYMP REFLEX ETF SPECIAL • Auto sequence tests • Instrument Options page 4-1 page 4-6 page 4-6 page 4-21 page 4-41 page 4-53 page 4-55 page 4-58 Overview of functions Test and other functions The four test modes of automatic or manual operation available are: • TYMP • REFLEX • ETF • SPECIAL Tymp mode includes: • Diagnostic Tymp • Screening Tymp and Reflex (Automatic Only) Reflex mode includes: • Acoustic and Non-Acoustic Reflex Threshold. ETF mode includes: • Eustachian Tube Function for intact and perforated eardrums. • Instrument Options Special test mode includes: • Reflex Decay • Altitude Cal Auto sequence tests can include: • Diagnostic Tymp • Acoustic Reflex Threshold, if desired • Reflex Decay, if desired GSI TympStar Version 1 Reference Instruction Manual 4-1 Chapter 4 Default parameters GSI-developed default parameters for each selected test are displayed on the lower portion of the LCD above the six softkeys. Alternative choices may be made by pressing the appropriate test parameter softkey. Test parameters Test parameter soft keys Pressing a test parameter softkey causes a new menu of choices to be presented across the bottom of the screen for that function. The menu structure for the Tymp diagnostic functions is diagrammed below as an example: AUTO SEQUENCE START daPa P-RANGE daPa NORMAL GSI default parameter WIDE -600 -400 -200 +200 +400 MORE -500 -300 0 EAR GRADIENT TYMP WIDTH daPa RATIO ml OFF RIGHT MORE LEFT +300 MORE P-RATE daPa/s 12.5 50 600/200 BASELINE MORE ON OFF The MORE softkey is used to toggle between the top and lower levels of menus while the test screen portion above the softkeys remains unchanged. NOTE The GSI default parameters are circled on the menu structure diagrams. 4-2 Grason-Stadler Operation Program modes All test modes allow the user to individually program a unique set of default test parameters. User-programmed parameters override GSI-developed default parameters. Probe tone frequency The TympStar Version 1 measures compliance using a 226 Hz probe tone. LCD graphic tracing The TympStar Version 1 measures compliance, and shows the tracing on the graphic display as a solid line. Probe lights Lights are provided on the probe to indicate test status in the following manner: • Solid Green = Test In Progress • Solid Amber = Occlusion • Blinking Amber = Leak • Blinking Green = OK to begin a test Probe lights LCD screen The liquid crystal display (LCD) shows axes for the graphic display of the selected test, and pressure and compliance meters. GSI TympStar Version 1 Reference Instruction Manual 4-3 Chapter 4 THE TEST STATUS line to the right of the graphics area of screen displays alert messages, invalid selections, and other messages to user. Test Status Line Test tracings, meter displays with digital readouts, and ear canal volume are recorded in real time. NOTE A 226 Hz Y tympanogram is displayed on the LCD screen in a 1:1 aspect ratio and on the external VGA monitor in a 1.4:1 aspect ratio. The Pressure (horizontal) axis appears to be “stretched out” by 40% on the VGA monitor. PAGE hardkey CLEAR hardkey PRINT hardkey ERASE hardkey Erasing and clearing test data The display of current test data may be erased prior to stopping a test or continuing to the next test by pressing the ERASE hardkey. Previous test data can be selectively cleared from the instrument’s storage by selecting the desired test with the PAGE hardkey, then pressing the CLEAR hardkey It is suggested that all testing be completed on one ear before proceeding to the other ear. Changing the test ear causes a new page of test data to be generated. 4-4 Grason-Stadler Operation Paging test data Up to 26 test screens can be stored in memory as “pages.” These pages of data can be recalled with appropriate titles and labels for viewing by pressing the PAGE hardkey and then scrolling through pages using up/down arrows. Each screen of data equals a page. Paging up/down arrows Printing tests Up to 26 test screens stored in memory can be printed by selecting PAGE-ALL followed by PRINT. Individual test results can be printed by selecting PAGE and then using the arrow key to display the test. To begin printing, press the PRINT hardkey. Test results can be printed in graphic or tabular format. Please refer to the Instrument Options section at the end of this chapter for more information. Error codes and problem reporting If a problem is encountered during operation that causes the control processor or signal processor to shut down, an alert message will appear on the screen with a code number. The code number indicates the source of the problem. PRINT the displayed code for reference when reporting an operational failure before attempting to RESUME testing. Report repeated operational failures to a local representative, or to the GSI Service Department. GSI TympStar Version 1 Reference Instruction Manual 4-5 Chapter 4 Test procedures Tympanometry (Tymp Mode) Tympanometry provides an objective means for determining the amount of mobility present within the eardrum and the ossicular chain. It is, however, important to keep in mind the fact that the amount of mobility present within the ossicular chain may be camouflaged by a scarred or thickened eardrum. Acoustic energy, commonly referred to as the probe tone (226 Hz) is introduced into a hermetically sealed ear canal by means of a loudspeaker located within the probe box. The intensity of this tone is monitored via a microphone, also located within the probe box. Measurements are taken at fixed time intervals. As pressure within the ear canal is varied, the eardrum is subjected to varying degrees of stress which alters mobility of the eardrum. Maximum mobility will occur when the pressure on both sides of the eardrum are equal. Changes in mobility of the eardrum tend to produce changes in the probe tone level within the ear canal. Probe tone intensity changes indicate the amount of sound energy entering the middle ear. Compliance is calculated based on these measurements. Since the sound pressure level of the probe tone within the ear canal varies as a function of mobility, it is possible to record these changes in mobility as a function of pressure. While the recording is visualized in the horizontal direction (X-axis) as a function of differential pressure across the eardrum, the tracing also moves in the vertical direction (Y-axis) as a function of mobility or compliance of the middle ear system. A graphic presentation of this information is known as a tympanogram. 4-6 Grason-Stadler Operation Gradient Tymp width method The Gradient function can be activated from the Tymp menu by pressing the GRADIENT softkey in the TYMP menu, then selecting the TYMP WIDTH or RATIO method of calculating the gradient value. GRADIENT TYMP WIDTH daPa RATIO ml OFF When TYMP WIDTH is selected, tympanometric gradient will be determined and displayed numerically below the compliance and pressure peak data. TYMPANOMETRIC GRADIENT is a quantitative description of the shape of a tympanogram in the vicinity of the peak. The gradient calculation is based on determining the width of the tympanogram in decaPascals (daPa) at one half, or 50% of the amplitude (height) of the tympanogram as shown below: Tymp width method of calculating gradient Normative gradient values † Children (3-5 years of age) Adults † 60-150 daPa 50-110 daPa American Speech Language Hearing Association (1990). Guidelines for screening for Hearing Impairments and Middle Ear Disorders. ASHA (suppl. 2), 17-24. GSI TympStar Version 1 Reference Instruction Manual 4-7 Chapter 4 Ratio method A second formula for the calculation of gradient may be selected by pressing the GRADIENT hardkey, then selecting RATIO. Brooks (1969) defined gradient as the change in ‘compliance’ from peak value to the value obtained at a pressure interval of 50 daPa on either side of the peak as shown below. RELATIVE GRADIENT is determined by dividing “G” (the compliance of the tympanogram from peak to a horizontal line with intersection points on the tympanogram at an interval of 100 daPa) by “C” (the compliance measured from start pressure of the tympanogram to the compliance peak). The GSI TympStar Version 1 calculates “G” as the average of the compliance points at an interval of ±50 daPa. Ratio method of calculating gradient Normative gradient values † † Greater than 0.2 † † Selecting the gradient Method 4-8 Fiellau-Nikolajsen, M., “Tympanometric and Middle Ear Effusion: A Cohort Study in Three-Year-Old Children.”, Int. J. Ped. Otorhinolaryngology, (1980), 2: 39-49. To select the gradient calculation to be used as part of a tymp measurement, press the GRADIENT softkey in the TYMP menu, then press the TYMPWIDTH or RATIO sub-menu softkey. Grason-Stadler GRADIENT TYMP WIDTH daPa RATIO ml OFF Operation Tymp diagnostic softkey menu structure AUTO SEQUENCE The structure of Tymp Diagnostic softkey menu selections is diagrammed below. Please refer to Chapter 1: Introduction for instructions regarding navigating through softkey menus and changing parameter settings. START daPa P-RANGE daPa NORMAL WIDE -600 -400 -200 +200 +400 MORE -500 -300 0 EAR GRADIENT TYMP WIDTH daPa RATIO ml OFF RIGHT MORE LEFT +300 MORE P-RATE daPa/s 12.5 50 600/200 BASELINE MORE ON OFF Tymp diagnostic softkey menu structure Automatic Tympanometry test procedure 1) Select the Tymp test mode if necessary by pressing the TYMP hardkey. NOTE The instrument automatically initiates the Tymp Diagnostic test mode when power is applied. 2) Attach the probe box to the velcro strip on the shoulder mount or clothes clip and position it on the patient. 3) Position the appropriate size eartip on the probe tip and securely insert it in the ear canal to obtain a hermetic seal. 4) Press the EAR softkey to select the right or left ear. Navigate through the softkey menus shown above and change parameter settings for the test as required. NOTE Changes to default parameters remain selected until the system power is turned off or a different test mode (Reflex, ETF or Special) is selected. 5) Press the START hardkey to pressurize the ear canal to selected start pressure and initiate collection of tymp data from a positive to negative direction. START initiates data collection from a negative to positive direction. GSI TympStar Version 1 Reference Instruction Manual 4-9 Chapter 4 NOTE The START daPa pressure selection overrides the P-RANGE daPa pressure range choice. For example, if the current P-RANGE is set at NORMAL (-400 daPa to +200 daPa), the user can still select + 400 daPa as the starting pressure for a test. The START daPa pressure setting can be changed while in STOP. 6) If the occlusion message appears on the LCD, the probe tip should be examined for the presence of cerumen. 7) If the leak message is displayed, attempt to reposition the probe, or select an alternate size eartip 8) View ongoing test results on the graphic display area, and on the pressure and Compliance meters. The Y-axis of the graph is labeled in ml of equivalent compliance at Y 226 Hz. The X-axis, or pressure axis, is labeled in daPa (1 daPa air pressure = 1.02 mm H20). Specifications comply with the current ANSI Middle-Ear Standard. 9) The pressure sweep continues to the end of the pressure range and automatically enters HOLD. The HOLD hardkey can be pressed prior to completion of the sweep. 10) Otherwise, the numeric measure for ear canal volume is displayed in real time at the right of the level meters. Up to three tympanograms can be run on one test screen. Sweep direction 4 - 10 The direction of the pressure sweep may be reversed via selection of the appropriate START hardkey. An arrow below the X-axis of the graphic trace indicates the direction of the pressure sweep for the last tymp tracing. Grason-Stadler Operation Tymp test: Y at 226 Hz, Baseline ON Upon completion of a pressure sweep, or reversal of direction, BASELINE numeric values for compliance peak (ml), pressure peak (daPa), ON OFF and gradient (if selected) for the last tymp run appear as summary data to the right of the meter area on the LCD as shown below. With the Baseline on, it is possible to read the tymp peak compliance value directly because the ear canal volume is removed from the measurement. Baseline OFF When the baseline function is off, the label C1 appears in place of ear canal volume indicating compliance at start pressure. BASELINE ON OFF With the Baseline off, it is not possible to read the static acoustic compliance directly. In this case the tymp peak compliance is calculated by subtracting C1 from the tymp ml value (static acoustic compliance = tymp ml - C1). Stopping the test 11) Pressing the STOP hardkey ends the tymp test. Further tymp data cannot be stored on that page. STOP is automatically entered upon completion of the third pressure sweep. The user may abandon automatic testing by pressing the STOP hardkey at any point for difficult to test patients. The Manual mode may be entered as described later in this section. Automatic scaling Upon completion of a pressure sweep, or if the STOP hardkey is pressed, the compliance scale automatically changes to provide an optimal display of the peak measurement. GSI TympStar Version 1 Reference Instruction Manual 4 - 11 Chapter 4 Manual Tympanometry test procedure The Manual mode allows the operator to use the Pressure Control Knob to vary the pressure within the ear canal. The operator can also control the speed of the tympanometric test. This feature can be invaluable in testing impatient children or difficult-to-test patients. 1) Press the TYMP hardkey and make sure the probe is securely positioned within the patient’s ear canal. 2) Press the EAR softkey and select the right or left ear, then if desired, navigate through the Tymp Diagnostic softkey menu and change parameter settings for the test as required. Please refer to Chapter 1: Introduction for instructions regarding navigating through softkey menus and changing parameter settings. 3) Press the MANUAL hardkey to pressurize the ear canal to the previously selected start pressure. 4) Once the start pressure is established, rotate the PRESSURE knob to vary the pressure within the ear canal. 5) View the test results in real-time on the pressure and compliance meters as well as on the graph tracing. Multiple tracings can be displayed on the screen. 6) The test summary information is shown at the right of the meters. One line is dedicated to Tymp peak data collected in the negative direction and a second line is dedicated to Tymp peak data collected in the positive direction. This summary information is updated per line when: • The Pressure knob is rotated in the opposite direction by at least 50 daPa • The STOP hardkey is pressed 4 - 12 Grason-Stadler Operation NOTE This summary information contains the results of the last two tracings even though multiple tracings in each direction may be displayed on the screen. The last two tracings are stored in memory and can be retrieved using the PAGE hardkey to print results. 7) The ERASE hardkey can be used at any time prior to pressing the STOP hardkey. Pressing the ERASE hard key causes all tracings on the graph to be removed except for the starting pressure compliance value of the last tracing. This appears as a dot on the screen. NOTE Once the PRESSURE control knob is used following ERASE, this dot is shown as NP/NP on the test summary area. Running two tracings will update this test summary data to tympanometric data. Tympanometry printout samples 8) Press the STOP hardkey to store the last two tracings in memory. These results can be printed by pressing the PAGE hardkey to retrieve the results, and then pressing the PRINT hardkey. NOTE The word “MANUAL “will appear on the printout indicating a manual test. Manual test Tympanometry normative values Ear canal volume: 0.2 to 2.0 ml (actual size will vary with age and bone structure) Compliance peak: 0.2 to 1.8 ml Pressure peak: -150 to 100 daPa GSI TympStar Version 1 Reference Instruction Manual 4 - 13 Chapter 4 Tymp screening with Reflex (Tymp mode) The Screening mode is an automated test mode designed to yield rapid Tymp and Reflex test results. The screening eartips that are provided will comfortably seal the ear by HAND HOLDING the probe against the outer portion of the ear canal. The user may run one tympanogram sweep on a test screen followed by an Ipsi, Contra, or Ipsi/Contra Reflex test if desired. The pressure at which the Reflex test is performed is automatically set to the dynamic compliance peak pressure measured during the Tymp test. If a reflex response (compliance change of .05 ml) is not detected upon the first stimulus presentation, up to two more ascending presentations will follow in an attempt to locate a reflex response. Refer to the table below. Screening Reflex Test Intensity Presentations (dB HL) per Frequency HL level Tymp screening softkey menu structure P-RANGE daPa NORMAL WIDE Ipsi 1 2 3 500Hz (dBHL) 85 95 105 Contra 1 2 3 90 100 110 Stimulus Frequency 1000Hz 2000Hz (dBHL) (dBHL) 85 85 95 95 105 105 4000Hz (dBHL) 80 90 100 90 100 110 90 100 110 Tymp screening includes screening acoustic reflex. The structure of softkey menu selections is diagrammed below. Please refer to Chapter 1: Introduction for instructions regarding navigating through softkey menus and changing parameter settings. P-RATE daPa/s 200 600/200 START daPa -600 -400 -200 +200 +400 BASELINE AUTO START ON OFF ON OFF EAR GRADIENT TYMP WIDTH daPa RATIO ml REFLEX OFF IPSI CONTRA IPSI/CONTRA Tymp screening softkey menu structure 4 - 14 90 100 110 Grason-Stadler OFF RIGHT MORE LEFT STIMULUS Hz 500 1000 2000 4000 EXIT MORE Operation 1) Select Tymp test mode if necessary by pressing the TYMP hardkey. 2) Press the RETURN hardkey on the LCD panel and the SCREEN softkey to display the Tymp Screening menu. 3) Place the appropriate size SCREENING eartip on probe tip. The probe box may be positioned on the velcro wristband as a convenience during screening tests. 4) Press the EAR softkey and select the right or left ear, then if desired, navigate through the softkey menus shown above and change parameter settings for the test as required. 5) Holding the probe in hand, obtain a hermetic seal at the entrance to the ear canal. AUTO START ON The Tymp test will begin as soon as a seal is obtained. The pressure will sweep from the previously selected START daPa Pressure toward ambient pressure, 0 daPa. The pressure sweep will continue only as far as necessary for the tymp to reach its peak point and return to the baseline. AUTO START OFF When AUTO START is off, the to initiate pressurization and the sweep. START hardkeys are used Ear canal volume is measured at the Start-Pressure and is recorded in real time. View the ongoing test results on the graphic display area, and on the pressure and compliance meters. Tymp data is automatically re-scaled upon completion of the test. BASELINE ON With BASELINE ON, the compliance value at start pressure is labeled EAR CANAL VOLUME. Numeric values for compliance peak (ml), pressure peak (daPa) and gradient appear as summary data at the right of the meter area of the LCD. GSI TympStar Version 1 Reference Instruction Manual 4 - 15 Chapter 4 BASELINE OFF With BASELINE OFF, the compliance value at start pressure is labeled as C1. REFLEX OFF The screening test concludes at completion of tymp data collection without performing a reflex test. REFLEX ON When GSI defaults for the reflex are utilized, the 1000 Hz Ipsi stimulus is automatically presented OFF IPSI CONTRA upon the completion of tymp data collection. Other possible reflex stimuli choices include: • Ipsi Up to two frequencies are selectable. • Contra Up to two frequencies are selectable. • Ipsi/Contra One test frequency is presented to each ear. REFLEX IPSI/CONTRA Press the STIMULUS Hz softkey to select a test frequency. Press the EXIT softkey following the selection. Screening reflex test scoring 4 - 16 The screening reflex test results are scored as follows below the tymp data: REFLEX: I 1000 Hz YES (If an acoustic reflex was present) REFLEX: I 2000 Hz NR (If no reflex was measured) NT (No Test) is used in place of NR to indicate that the reflex test was aborted due to an inability to maintain pressure, or if the STOP hardkey was pressed before reflex testing was completed. Grason-Stadler Operation The screening test data is automatically stored at the completion of the test. It can be recalled by pressing the PAGE hardkey, and then printed by pressing the PRINT hardkey. A sample printPRINT hardkey out is shown below. Screening test data can be cleared by pressing the CLEAR hardkey on the LCD panel. Please refer to Erasing and clearing test data earlier in this chapter. Tymp screening sample printout Screening test data can be recalled by PAGING through the test screens. Please refer to Paging test data earlier in this chapter. Tests can then be printed by pressing the PRINT hardkey. GSI TympStar Version 1 Reference Instruction Manual 4 - 17 Chapter 4 Program mode for Tympanometry Up to three users may permanently redefine and store, per USER NUMBER, individualized default criteria to fit testing needs. Default test parameters may be reprogrammed for the Tymp Diagnostic or Tymp Screening tests. Program mode softkey menu structure The structure of softkey menu selections is diagrammed below. Please refer to Chapter 1: Introduction for instructions regarding navigating through softkey menus and changing parameter settings. Press the TYMP hardkey, then press the RETURN hardkey to display the tymp sub-menu. SCREEN DIAGNOSTIC USER 1 USER 2 USER 3 PROGRAM MODE Screen and diagnostic softkeys Pressing the SCREEN or DIAGNOSTIC softkey provides direct access to screening or diagnostic test functions that use the system defaults. For example, to run screening tests with system defaults, press the SCREEN softkey. User softkeys Pressing one of the 3 USER softkeys provides access to test functions with defaults previously programmed by (or for) one of up to three users. For example, to run screening tests or diagnostic tests with defaults programmed earlier by user 1, press the USER 1 softkey. Each USER softkey can be programmed to provide access to either screening or diagnostic test functions, but not both. For example, the USER 1 softkey might have been programmed to initiate screening but USER 1 can not initiate diagnostic tests unless it is reprogrammed. Each USER softkey is totally independent of others, and can be programmed to provide either screening or diag- SCREEN DIAGNOSTIC nostic functions. Program Mode 4 - 18 Pressing the PROGRAM MODE softkey places the instrument in the Program Mode and provides access to programming functions for setting overall instrument or user-specific defaults. Tests can not be performed in the Program Mode. Pressing the PROGRAM MODE softkey displays the Program Mode sub-menu and displays the PROGRAM MODE message in the status area of the screen. Grason-Stadler Operation System in PROGRAM MODE Programming default parameters for SCREEN and DIAGNOSTIC modes When the system is in the Program Mode, select the test for which defaults will be defined. Pressing the SCREEN or DIAGNOSTIC softkey displays the screening or diagnostic softkey menu across the bottom of the screen with a PROGRAM MODE status message as shown in the example below. System in PROGRAM MODE Test parameters can now be selected from the softkey menu to modify their default settings. Once all the test parameters have been selected, pressing the RETURN hardkey returns the display to the PROGRAM MODE sub-menu. SCREEN DIAGNOSTIC USER 1 USER 2 USER 3 STORE Pressing the STORE softkey stores the selected parameters as defaults for future tests. The STORING DATA status message will be displayed. Press the TYMP (or other test mode) hardkey to return from the Program Mode to the Test Mode with the new test parameter defaults. GSI TympStar Version 1 Reference Instruction Manual 4 - 19 Chapter 4 Programming default parameters for user tests When the system is in the Program Mode, select the USER softkey for which default screening or diagnostic test parameters will be defined. SCREEN DIAGNOSTIC USER 1 USER 2 USER 3 Press the USER 1, USER 2 or USER 3 softkey to program individualized test parameters that will only be defaults for the specified user. Select the USER NUMBER softkey followed by SCREEN or DIAGNOSTIC. A user sub-menu will be displayed. STORE USER 1 SCREEN DIAGNOSTIC Pressing the SCREEN or DIAGNOSTIC softkey displays the screening or diagnostic softkey menu across the bottom of the screen with a PROGRAM MODE status message as shown in the example below. System in PROGRAM MODE Test parameters can now be selected from the softkey menu to modify their default settings. Once all the test parameters have been selected, pressing the RETURN hardkey returns the display to the PROGRAM MODE sub-menu. Pressing the STORE softkey stores the selected parameters as defaults for future screening or diagnostic tests performed by that user. The STORING DATA status message will be displayed. Press the TYMP (or other test mode) hardkey to return from the Program Mode to the Test Mode with the new test parameter defaults. 4 - 20 Grason-Stadler Operation Acoustic Reflex testing The acoustic reflex consists of a response by one or more middle-ear muscles to suprathreshold acoustic stimulation of the auditory pathway. To elicit an acoustic reflex, an acoustic stimulus (pure-tone or noise) is presented to the ear canal by a probe or earphone. A portion of this stimulus is carried by the ossicular chain to the cochlea. From the cochlea, the 8th nerve carries the information to the brain stem where a determination is made as to whether the stimulus is sufficiently intense to elicit a response. When a response is elicited, the 7th nerve carries the command to the stapedius muscle to contract. Contraction of this muscle and/or the tensor tympani stiffens the eardrum and the ossicular chain; thereby, decreasing the ease with which sound enters the auditory pathway. Thus, the end result of an acoustic reflex is a slight decrease in the ability of the eardrum and the ossicular chain to conduct acoustic energy to the cochlea. Since the acoustic reflex causes a relatively small decrease in mobility (0.02 ml or greater using a probe tone of 226 Hz) within the middle ear system, it is important to conduct this test at a pressure level where the greatest response occurs. Therefore, acoustic reflex threshold and decay measurements are generally carried out at the pressure value where peak mobility occurred during a tympanogram. If no peak is observed, the acoustic reflex tests are performed at atmospheric pressure (0 daPa). Acoustic reflex measurements can be obtained Ipsilaterally or Contralaterally. For Ipsilateral testing, the stimulus is presented to the same ear where the measurements are made. For Contralateral testing, the measurements are made with the probe in one ear while the stimulus is presented to the opposite ear through an earphone or insert phone. NOTE Refer to Appendix A: Specifications for the following information: • Method used for transfer of reference equivalent threshold values. • Reference equivalent hearing threshold levels, in dB SPL. • Transfer data of Ipsi and Contra phones. • Compensations in SPL for volumes below 1.2 ml. GSI TympStar Version 1 Reference Instruction Manual 4 - 21 Chapter 4 Non-acoustic Reflex testing Studies have shown that it is possible to activate the middle-ear muscles bilaterally by sound as well as by non-acoustic stimulation.* It is not always possible to obtain acoustic reflex measurements (e.g., in cases of severe to profound hearing loss). The ability to elicit a reflex independent of the hearing level in the stimulated ear permits the examination of 7th nerve integrity and ossicular continuity up to the point of insertion of the stapedius muscle even in deaf people. Studies indicate that the response is greater if the Ipsilateral ear is stimulated. One non-acoustic reflex test consists of mechanical stimulation of the external ear with a cotton swab. Other test procedures consist of blowing air toward the eyes with a Politzer balloon or of lifting the upper eyelids simultaneously so as to elicit the startle response. Reflex Threshold softkey menu structure The structure of softkey menu selections is diagrammed below. Please refer to Chapter 1: Introduction for instructions regarding navigating through softkey menus and changing parameter settings. STIMULUS EAR IPSI CONTRA STEADY CONTRA PULSED THRESHOLD SEEK MARK THRESHOLD EXIT MARK LINE 1 MARK LINE 2 NR LINE 1 NR LINE 2 ON OFF CONFIGURE START dBHL MIN CHANGE 0.02 ml STIMULUS TIMING MANUAL TIMING 1.5 SET 15 SEC OFF TIME 1.5 SET 70 dBHL MANUAL AUTOMATIC STOP dBHL SET 95 dBHL SET SET EAR RIGHT MORE LEFT EXIT SET ml SCALE TIMEBASE AUTO TIMING ON TIME AUTO ZERO MORE -0.16 -0.32 -0.48 -0.64 -0.80 QTY EXIT 1 SET Reflex diagnostic softkey menu structure * Djupesiand, Gisle. “Non-acoustic Reflex Measurement - Procedures, Interpretations, and Variables.” Acoustic Impedance and Compliance - The Measurement of Middle Ear Function, A. Feldman and L. Wilber, eds. Williams and Wilkins, 1976. 4 - 22 Grason-Stadler Operation Reflex Threshold automatic test procedure Ipsi time-multiplexed stimuli are delivered to the ear canal via the probe insert. Contralateral steady or pulsed stimuli are delivered to the ear canal via the Contra insert phone fitted with an appropriate size standard eartip. 1) Press the REFLEX hardkey to select the Reflex Diagnostic test mode. 2) Default test parameters are displayed above the softkeys across the bottom of the LCD screen. 3) Press the EAR softkey and select the right or left ear, then if desired, navigate through the Reflex Diagnostic softkey menu and change parameter settings for the test as required. Please refer to Chapter 1: Introduction for instructions regarding navigating through softkey menus and changing parameter settings. Three special features are available in Reflex Threshold. They are: • Auto Timing • Mark Threshold • Threshold Seek. Stimulus Timing Auto Timing provides the ability to preset the stimulus timing for reflex threshold testing. This timing sequence includes the ON TIME for the stimulus presentation and the OFF TIME for measuring the recovery after the stimulus is turned off. When Auto Timing is selected, press and release the PRESENT hardkey to activate the Auto Timing sequence. NOTE The programmed Auto Timing parameters are also used during Threshold Seek and Auto Sequence. GSI TympStar Version 1 Reference Instruction Manual 4 - 23 Chapter 4 Auto timing of stimuli The GSI Default ON TIME is 1.5 seconds, and the GSI Default OFF TIME is 1.5 seconds. The GSI default quantity (QTY) of presentations is 1. 4) Change the ON TIME, OFF TIME or Quantity of stimulus presentations if necessary by navigating to the desired sub-menu and using the arrow and SET softkeys. Any of these changes will be temporary, and the default values will be used the next time that the REFLEX test mode is initiated. Use the Program Mode to change these parameters permanently. STIMULUS TIMING MANUAL TIMING AUTO TIMING ON TIME 1.5 SET QTY EXIT OFF TIME 1.5 SET 1 SET 5) Press the EXIT softkey to return to the Reflex Threshold menu. Minimum and maximum timing allowable for reflex threshold Manual timing of stimuli 6) Press the PRESENT hardkey momentarily to present the stimuli for the length of time set above. Time in Seconds Timebase 15.00 30.00 45.00 60.00 Prestimulus Time Inter Trace Time Minimum On Time Maximum On Time On Time Increment Off Time Increment 1.50 0.25 1.00 13.50 0.50 0.50 3.00 0.25 1.00 27.00 0.50 0.50 4.50 0.75 2.00 40.00 2.00 2.00 6.00 0.75 2.00 54.00 2.00 2.00 The manual timing feature allows the stimulus to be presented for the length of time the PRESENT hardkey is pressed. Upon release of the PRESENT hardkey, the tracing continues on the screen for 1.5 seconds to allow visualization of recovery. 7) Press the ml SCALE softkey to select the sensitivity for the display of test results. ml SCALE -0.16 -0.32 -0.48 -0.64 -0.80 4 - 24 Grason-Stadler Operation The stimulus type and intensity level are displayed at the right of the meter area as shown below: Stimulus type and intensity level 8) Scroll through available stimuli by pressing the STIMULUS hardkey. Selection of Non-Acoustic is also made in this manner. The STIMULUS hardkey can be held down continuously for rapid scrolling and wrap around. 9) Press the INTENSITY hardkey to select the intensity level (dBHL) for stimulus presentations. The intensity can be changed in 5 dB steps. NOTE The display of Intensity contains an asterisk (*) if non-GSI calibration data is used. 10) With probe insert securely fitted in the ear canal press the START hardkey. The ear will be pressurized to dynamic compliance peak pressure as recorded by the last tymp run, or to 0 daPa if previous tymp data is unavailable. The Pressure Knob is active for fine tuning pressure between stimulus presentations for all reflex type tests. NOTE For testing patients exhibiting hyperflaccid or sharply sloped tymps, it is helpful to OFFSET THE PRESSURE in reflex threshold tests. This removes the fluctuations seen on the Compliance meter between stimulus presentations. GSI TympStar Version 1 Reference Instruction Manual 4 - 25 Chapter 4 Offset the pressure 20-30 daPa in the same direction as the pressure peak as shown below: Auto Zero 11) Compliance can be automatically zeroed each time AUTO ZERO the PRESENT hardkey is pressed to maintain a constant baseline. To activate the this feature, press MANUAL AUTOMATIC the AUTO ZERO softkey and then press AUTOMATIC before selecting START. Press AUTO ZERO after START to manually AUTO ZERO the compliance meter. 12) Press PRESENT hardkey. A brief prestimulus baseline is drawn. The stimulus is presented for the time specified by STIMULUS TIMING parameters in AUTO TIMING, or for as long as the PRESENT hard key is pressed in MANUAL timing. 13) The intensity of the reflex-activating signal is labeled above the initial baseline of the reflex tracing. The amplitude of the response is labeled below the intensity. NOTE The criterion for a reflex response is a repeatable compliance change of 0.02 ml or greater. Mark Threshold Often multiple tracings are obtained for one stimulus presentation, but only one represents the reflex threshold. Mark Threshold allows the operator to scroll across each line of data and select the intensity values determined to be the threshold. MARK THRESHOLD EXIT MARK LINE 1 MARK LINE 2 NR LINE 1 NR LINE 2 Press the MARK THRESHOLD softkey. Use the arrow key to move from the top left to the bottom right tracing. Press the MARK LINE 1 softkey when the cursor line is at the desired threshold value for Line 1. An Asterisk will appear 4 - 26 Grason-Stadler Operation next to this tracing. Continue to press the right arrow key to move to the desired threshold value for line 2. An asterisk will appear next to this tracing. Press the EXIT softkey when finished. Use NR LINE 1 or NR LINE 2 when no reflex threshold is measurable. NOTE Mark Threshold is available during testing once data appears on the display. It is also available in the PAGE mode. It is possible to modify the Mark Threshold selection at any time. Threshold Seek Threshold Seek automates the sequence of button presses used to arrive at reflex threshold values and also automates the marking of reflex threshold values. To configure this function, it is necessary to set the intensity range for the stimulus presentation. THRESHOLD SEEK ON OFF CONFIGURE MIN CHANGE START dBHL STOP EXIT dBHL This includes the START dBHL and the STOP dBHL. The Minimum Change parameter is used to determine how to Mark CONFIGURE the threshold value. The factory default settings are: MIN START STOP EXIT CHANGE dBHL dBHL Minimum Change = 0.02 START dBHL = 70 dBHL 0.02 SET 70 SET 95 SET ml dBHL dBHL STOP dBHL = 95 dBHL 14) Press the THRESHOLD SEEK softkey to activate automatic threshold detection and marking. When THRESHOLD SEEK is on, an amplitude change equal to or greater than the MIN CHANGE value is automatically marked on the tracing as the threshold value. Pressing the MIN CHANGE softkey displays up/down arrows for setting the minimum change to mark a threshold. This value can be set in the range from 0.02 to 0.8. NOTE Threshold Seek should only be used with quiet, cooperative patients. 15) Use the STIMULUS hardkeys to select the desired activating stimulus, then press and release the PRESENT hardkey. Auto Timing controls the stimulus presentation timing for each intensity level. 16) The reflex graph will display the response to the selected stimulus at 70 dBHL. If the compliance change is measured as 0.02 or greater, the stimulus presentation is presented at the same level a second time to ensure that a repeatable response is acquired. GSI TympStar Version 1 Reference Instruction Manual Asterisk and TS indicator 4 - 27 Chapter 4 If it is, the stimulus presentation sequence will stop and the display will contain the tracing as well as an asterisk and the letters TS. The asterisk indicates reflex threshold and the letters TS indicate that the threshold was determinedwith the Threshold Seek protocol. 17) If the measured compliance change is less than the programmed MIN CHANGE, the intensity will automatically increased by 5 dB and the stimulus will be presented at 75 dBHL. Once again the response will be displayed and automatically evaluated against the MIN CHANGE criterion. If it is met, the same intensity will be presented a second time as a check for repeatability. NOTE The stimulus intensity is automatically incremented in 5 dB steps up to the STOP dB HL only if a repeatable response is not measured at the lower intensity level. CAUTION Care should be taken when programming the STOP dB HL parameters to avoid exposure to high intensity levels. 18) Erase sub-threshold tracings on a reflex line in reverse sequence by pressing the ERASE hardkey on the LCD panel prior to pressing the CONTINUE softkey. Pressing the CONTINUE softkey places data on a line in memory. Manual threshold testing 19) The intensity level may be changed between stimulus presentations without using the Threshold Seek feature by pressing the appropriate INTENSITY hard key. WARNING The time period of exposure to intensity levels above 100 dB HL should be kept to a minimum. Selecting an intensity above 100 dBHL results in the alert message “High intensity selected” to appear. Extreme care should be used in presenting stimuli at high intensity levels during acoustic reflex measurements. 20) Press the CONTINUE softkey at the end of a line of tracings to resume tracings on the next line or next page. NOTE The MARK THRESHOLD softkey is also available prior to selecting CONTINUE. This allows the operator to set the threshold value per line. 4 - 28 Grason-Stadler Operation 21) If STIMULUS EAR, TIMING, or STIMULUS settings are changed during a reflex test, a new line of tracings is generated. Each line is appropriately labeled and indicates the pressure of the last reflex presentation. 22) Changing the test EAR or TIMEBASE settings causes a new test page to be selected. The previous test page is automatically stored in memory. 23) Initiate Reflex Decay testing by pressing the SPECIAL hardkey, or terminate the threshold test by pressing the STOP hardkey. NOTE Pressure from the last reflex threshold presentation is retained and automatically set when any other Reflex type test mode is selected. If the STOP hardkey has been depressed in a Reflex test mode, the START hardkey must be pressed to repressurize the ear canal to the peak value. 24) Test data can be erased or cleared using the ERASE or CLEAR hardkey on the LCD panel. Please refer to Erasing and clearing test data earlier in this chapter. 25) Test data can be recalled by PAGING through the test screens. Please refer to Paging test data earlier in this chapter. GSI TympStar Version 1 Reference Instruction Manual 4 - 29 Chapter 4 Reflex Threshold sample printout 26) The test data is automatically stored at the completion of the test and may be printed by selecting the PAGE hardkey followed by the PRINT hardkey. NOTE An asterisk indicates an operator-selected reflex threshold value. An asterisk accompanied by the letters “TS” indicate a reflex threshold value selected automatically by the Threshold Seek feature. Operator-selected threshold Threshold selected automatically by the Threshold Seek feature 4 - 30 Grason-Stadler Operation Manual reflex testing is useful when a quick reflex test is preferred, or when an approximate starting intensity level for threshold testing is desired. Reflex Threshold MANUAL test procedure 1) Press the REFLEX hardkey to select the Reflex Diagnostic test mode. 2) Default test parameters are displayed above the softkeys across the bottom of the LCD screen. 3) Press the EAR softkey to toggle between the right and left ear, then if desired, navigate through the Reflex Diagnostic softkey menu and change parameter settings for the test as required. Please refer to Chapter 1: Introduction for instructions regarding navigating through softkey menus and changing parameter settings. MARK THRESHOLD STIMULUS EAR IPSI CONTRA STEADY CONTRA PULSED EXIT MARK LINE 1 MARK LINE 2 THRESHOLD SEEK NR LINE 1 NR LINE 2 ON OFF CONFIGURE START dBHL MIN CHANGE 0.02 ml STIMULUS TIMING MANUAL TIMING ON TIME 1.5 SET 15 SEC OFF TIME 1.5 SET 70 dBHL TIMEBASE AUTO TIMING SET AUTO ZERO SET MANUAL AUTOMATIC STOP dBHL SET 95 dBHL EAR RIGHT MORE LEFT EXIT SET ml SCALE MORE -0.16 -0.32 -0.48 -0.64 -0.80 QTY EXIT 1 SET GSI TympStar Version 1 Reference Instruction Manual 4 - 31 Chapter 4 4) Select the test stimulus by depressing the STIMULUS hardkey. Select the desired intensity by depressing the INTENSITY hardkey. 5) Press MANUAL hardkey to pressurize the ear canal to dynamic compliance peak pressure, or to 0 daPa if the previous tymp data is unavailable. The word “MANUAL” will appear on the screen. 6) Fine tune the pressure if necessary by rotating the PRESSURE knob. 7) Use the AUTO ZERO softkey (if necessary) to ensure zeroing of compliance meter prior to presenting the stimulus. AUTO ZERO compliance can be automatically zeroed each time the PRESENT hardkey is pressed to maintain a constant MANUAL AUTOMATIC baseline, by setting the AUTO ZERO softkey to AUTOMATIC before selecting the MANUAL Mode. 8) Depress PRESENT hardkey. View the Compliance Meter for a detectable compliance change of 0.02 ml or greater. The intensity level may be changed between stimulus presentations. Reflex threshold manual mode: Results are viewed on the compliance meter only and no printout is available. MANUAL or AUTOMATIC timing can be used. Reflex threshold summary 4 - 32 Reflex threshold automatic (START key) mode: Results are displayed in real-time on the compliance meter and graph. The stimulus timing may be set to: • Manual timing: Pressing and holding the PRESENT hardkey determines how long the stimulus is ON. • Automatic timing: A momentary press of the PRESENT hardkey causes the preset ON/OFF times to be utilized. Grason-Stadler Operation Program mode for Reflex Threshold Up to four users may permanently redefine and store, per USER NUMBER, individualized default criteria to fit Reflex Diagnostic testing needs. Default test parameters may also be programmed for the main Reflex Threshold hardkey called Diagnostic. Softkey menu structure The structure of softkey menu selections is diagrammed below. Please refer to Chapter 1: Introduction for instructions regarding navigating through softkey menus and changing parameter settings. Press the REFLEX hardkey, then press the RETURN hardkey to display the reflex sub-menu. DIAGNOSTIC USER 1 USER 2 USER 3 USER 4 PROGRAM MODE Pressing the DIAGNOSTIC softkey provides direct access to diagnostic test functions that use the current system defaults. Most often this test mode is entered directly by pressing the REFLEX hardkey. Pressing one of the 4 USER softkeys provides access to test functions with defaults previously programmed by (or for) one of up to four users. For example, to run diagnostic tests with defaults programmed earlier by user 1, press the USER 1 softkey. Each USER softkey can be programmed to provide access to diagnostic test functions, and is totally independent of the DIAGNOSTIC softkey or the other USER softkeys. Program mode Pressing the PROGRAM MODE softkey places the instrument in the Reflex Threshold Program Mode and provides access to programming functions for setting overall instrument or user-specific defaults. Tests can not be performed in the Program Mode. Pressing the PROGRAM MODE softkey displays the PROGRAM MODE message in the status area of the screen. DIAGNOSTIC USER 1 USER 2 USER 3 GSI TympStar Version 1 Reference Instruction Manual USER 4 STORE 4 - 33 Chapter 4 System in PROGRAM MODE When the system is in the Program Mode, select the test (diagnostic or userspecific) for which defaults will be defined. Pressing any softkey displays the Reflex Threshold mode softkey menu across the bottom of the screen with a PROGRAM MODE status message. Test parameters can now be selected from the usual softkey menu as done in preparation for a test. Once all the test parameters have been selected, pressing the RETURN hardkey returns the display to the PROGRAM MODE submenu. Pressing the STORE softkey stores the selected parameters as defaults for future tests. The STORING DATA status message will be displayed. Press the REFLEX (or other test mode) hardkey to return from the Program Mode to the Reflex Threshold mode with the new test parameter defaults. To run a reflex threshold diagnostic test, press the REFLEX hard key. To select a USER reflex threshold test, press the REFLEX hardkey followed by the RETURN hardkey and then the USER softkey. 4 - 34 Grason-Stadler Operation Reflex Decay testing Reflex Decay is a diagnostic test particularly useful in confirmation of retrocochlear pathology. The stimulus for the test is typically presented as a steady tone, Ipsilaterally or Contralaterally at 10 dB HL above reflex threshold intensity level. 500 Hz and 1000 Hz are the best frequencies for this test. An individual exhibits adaptation (decay) if the amplitude of the reflex response decays to 50% of peak amplitude typically within 10 seconds. Softkey menu structure STIMULUS EAR IPSI CONTRA The structure of softkey menu selections is diagrammed below. Please refer to Chapter 1: Introduction for instructions regarding navigating through softkey menus and changing parameter settings. STIMULUS ON TIME 10 SEC SET TIMEBASE 15 SEC SET AUTO ZERO MANUAL ml SCALE AUTOMATIC EAR RIGHT LEFT -0.16 -0.32 -0.48 -0.64 -0.80 1) Press the SPECIAL hardkey to enter the Reflex Decay test mode. 2) Default test parameters are displayed above the softkeys across the bottom of the LCD screen. 3) Press the EAR softkey to toggle between the right and left ear, then if desired, navigate through the Reflex Decay softkey menu and change parameter settings for the test as required. Please refer to Chapter 1: Introduction for instructions regarding navigating through softkey menus and changing parameter settings. GSI TympStar Version 1 Reference Instruction Manual 4 - 35 Chapter 4 Minimum and maximum timing levels allowable in Reflex Decay 4) The maximum selectable On Time of the stimulus is limited by the selected Timebase as shown in the following table: Time in Seconds TIMEBASE 15.00 30.00 45.00 60.00 Prestimulus Time Minimum On Time Maximum On Time On Time Increment 1.50 1.00 13.00 1.00 3.00 1.00 27.00 1.00 4.50 2.00 40.00 2.00 6.00 2.00 54.00 2.00 5) The 5 and 10 second points on the 15 and 30 second timebases are identified by vertical lines on the LCD and printout. 6) Press the ml SCALE softkey to select a sensitivity for the display of test results. 7) Stimulus and Intensity levels are displayed to the right of the meter area of the LCD as follows: STIMULUS: 1000 Hz INTENSITY: 80 dBHL ml SCALE -0.16 -0.32 -0.48 -0.64 -0.80 8) Press the appropriate INTENSITY hardkey to select an intensity 10 dB above the reflex threshold intensity level found previously. 9) Compliance can be automatically zeroed each time the PRESENT hardkey is pressed to maintain a constant baseline. To activate this feature, AUTO ZERO press the AUTO ZERO softkey and then press AUTOMATIC before the MANUAL AUTOMATIC START key is pressed. 10) Press the PRESENT hardkey momentarily. A brief prestimulus baseline will be drawn. The selected stimulus will be presented for the preset time. The fixed Off Time following the signal allows visualization of recovery. 4 - 36 Grason-Stadler Operation 11) View the change in compliance over time on the graphic display and on the pressure and compliance meters. 12) Numeric data is summarized to the right of the meter area. The time at which the response decayed to 50% of peak amplitude is identified as DECAY TIME (SEC) (if applicable). 13) Depress the CONTINUE softkey to resume tracings on the next line or next page. 14) Press the STOP hardkey to end and store the Reflex Decay Test. 15) Test data can be erased or cleared using the ERASE or CLEAR hardkey on the LCD panel. Please refer to Erasing and clearing test data earlier in this chapter. 16) Test data can be recalled by PAGING through the test screens. Please refer to Paging test data earlier in this chapter. 17) The test data is automatically stored at the completion of the test and may be selected using the PAGE hardkey and printed by pressing the PRINT hardkey. NOTE The letters “NA” indicate that no decay occurred during the test. GSI TympStar Version 1 Reference Instruction Manual 4 - 37 Chapter 4 Reflex Decay sample printout 4 - 38 Grason-Stadler Operation Program mode for Reflex Decay Default test parameters may be programmed for the system Reflex Decay tests. The structure of softkey menu selections is diagrammed below. Please refer to Chapter 1: Introduction for instructions regarding navigating through softkey menus and changing parameter settings. Press the SPECIAL hardkey, then press the RETURN hardkey to display the Special tests sub-menu. REFLEX DECAY ALTITUDE CAL PROGRAM MODE Pressing the PROGRAM MODE softkey places the instrument in the Program Mode and provides access to programming functions for setting overall instrument defaults. Tests cannot be performed in the Program Mode. Pressing the PROGRAM MODE softkey displays the PROGRAM MODE message in the status area of the screen. Once the system is in the Program Mode, press the REFLEX DECAY softkey System in PROGRAM MODE to display the Reflex Decay menu across the bottom of the screen. The PROGRAM MODE REFLEX DECAY status message will shown in the status area of the screen. GSI TympStar Version 1 Reference Instruction Manual 4 - 39 Chapter 4 Test parameters can now be selected from the usual softkey menu as done in preparation for a test. Once all the test parameters have been selected, pressing the RETURN hardkey returns the display to the PROGRAM MODE submenu. Pressing the STORE softkey stores the selected parameters as defaults for future tests. The STORING DATA status message will be displayed. Press the SPECIAL (or other test mode) hardkey to return from the Program Mode to the Reflex Decay test with the new test parameter defaults. 4 - 40 Grason-Stadler REFLEX DECAY STORE Operation Eustachian Tube Function Testing for Intact Eardrums One purpose of the Eustachian tube is to equalize pressure between the middleear space and ambient pressure. Normally, the Eustachian tube temporarily opens during a swallow or yawn; thereby, allowing an exchange of air between the middle-ear and the nasopharynx. Between swallows, slight fluctuations may occur in the pressure level within the middle-ear since the cells which line the middle-ear absorb air from the cavity. If the Eustachian tube should remain closed for an extended period of time, a negative pressure (relative to atmospheric pressure) may develop within the middle-ear. This causes the tympanic membrane to retract inward, thus stiffening the eardrum. (Air pressure is decreased at the rate of 50 mm H2O/hour if the tube remains closed.) In time, fluid may develop within the middle-ear space further stiffening the middle-ear system and reducing the ability of the ossicular chain to conduct sound to the cochlea. Since a malfunctioning Eustachian tube can lead to middle-ear disease and hearing loss, it is helpful to be able to determine the patency of the Eustachian tube in patients who are susceptible to middle-ear problems. Pressure-swallow test The purpose of this test is to try to force the Eustachian tube to open through use of pressure gradients and swallowing on the part of the patient. A series of three tympanograms are obtained under the three different conditions described below. NOTE In each case, to avoid the effects of hysteresis, the tympanogram is recorded in the SAME sweep direction. Condition #1: A tympanogram sweep is performed with the normal pressure range selected (+ 200 to - 400 daPa). Condition #2: A positive pressure of 400 daPa is established within the ear canal, and the eardrum is pushed inward. As this membrane moves inward, the volume of the middle-ear space is reduced. This, in turn, causes air that is present within the middle-ear space to be more compressed, so that as the patient swallows and the Eustachian tube opens, more air than normal flows out of the middleear. When the Eustachian tube closes and the ear canal is no longer subjected to induced positive pressure, less air than normal is present within the middleear space. In other words, there is negative pressure within the middle ear. Therefore, when the second tympanogram is recorded, the point of peak mobility will be shifted in the negative direction (approximately 15 to 20 daPa) relative to the point of peak mobility recorded during the first tympanogram. GSI TympStar Version 1 Reference Instruction Manual 4 - 41 Chapter 4 Condition #3: A negative pressure of 400 daPa is established within the ear canal. As the pressure is reduced within the ear canal, the eardrum moves outward. Stressing the membrane outward leads to a temporary increase in middle-ear cavity volume. When the same amount of air is present within a larger volume, the air pressure within the cavity is reduced. Thus, the middle-ear pressure is negative relative to atmospheric pressure. As the patient drinks some water and the Eustachian tube opens, more air than normal will flow into the middleear space. When the Eustachian tube closes and the ear canal is vented, a positive pressure condition will exist within the middle-ear relative to atmospheric pressure. When the third tympanogram is recorded, the point of peak mobility will be shifted in the positive direction (approximately 15 to 20 daPa) relative to the first tympanogram. NOTE If the Eustachian tube is functioning properly, a shift in the pressure peak of approximately 15 to 20 daPa in both directions will be observed. However, if the Eustachian tube is malfunctioning, there will be little, if any, observable difference in the pressure peak recorded from Condition #1, to Condition #2, to Condition #3. Softkey menu structure The structure of softkey menu selections are diagrammed below. Please refer to Chapter 1: Introduction for instructions regarding navigating through softkey menus and changing parameter settings. NORMAL WIDE START daPa BASELINE -600 -400 -200 +200 +400 MORE ON OFF P-RATE daPa/s P-RANGE daPa 12.5 50 600/200 -500 4 - 42 -300 0 +300 MORE Grason-Stadler EAR RIGHT LEFT Operation 1) Press the ETF hardkey to select the ETF test mode and display the ETFIntact menu. ETF-Intact automatic test procedure 2) Pressure range automatically defaults to the Normal. 3) Default test parameters are displayed above softkeys on the LCD. 4) Press the EAR softkey to toggle between the right and left ear, then if desired, navigate through the ETF-Intact softkey menu and change parameter settings for the test as required. Please refer to Chapter 1: Introduction for instructions regarding navigating through softkey menus and changing parameter settings. P-RANGE daPa NORMAL WIDE START daPa BASELINE -600 -400 -200 +200 +400 MORE ON OFF P-RATE daPa/s 12.5 50 600/200 -500 -300 0 EAR RIGHT LEFT +300 MORE GSI TympStar Version 1 Reference Instruction Manual 4 - 43 Chapter 4 5) With the probe eartip securely sealing the ear canal, press the START hardkey. 6) The ear canal will be pressurized to +200 daPa. The pressure will automatically sweep to -400 daPa or until the HOLD hardkey is pressed. The ear canal will be vented. 7) The ear canal will AUTOMATICALLY be pressurized to +400 daPa. Pressure will be maintained while a prompt message on the LCD directs the operator to have patient swallow water. The ear canal will be vented, once the CONTINUE softkey is pressed. 8) Tymp #2 will sweep automatically as above. The ear canal will be vented when either -400 daPa is reached or the HOLD hardkey is pressed. 9) The ear canal will AUTOMATICALLY be pressurized to -400 daPa. Pressure will be maintained while a prompt message asking to have patient swallow is displayed. The ear canal will be vented once the CONTINUE softkey is pressed. 10) Tymp #3 will sweep automatically as above. NOTE The anatomical structure of the Eustachian tube is such that equalization of negative pressure in ear canal is more difficult than equalization of positive pressure. 11) Tymps #1, #2 and #3 are displayed and stored on the same page in memory for recall. 12) Test data can be erased or cleared using the ERASE or CLEAR hardkey on the LCD panel. Please refer to Erasing and clearing test data earlier in this chapter. 13) Test data can be recalled by PAGING through the test screens. Please refer to Paging test data earlier in this chapter. 4 - 44 Grason-Stadler Operation ETF-Intact sample printout 14) The test data is automatically stored at the completion of the test and may be printed by selecting the test number using the PAGE hardkey, followed by pressing the PRINT hardkey. 15) Numeric summary data appears to the right of the meters on the LCD as follows: EAR CANAL VOLUME: (for Tymp #1 only) daPa ml TYMP 1: 5 0.4 TYMP 2: -20 0.5 TYMP 3: 20 0.5 ETF-Intact normative data The amount of pressure peak shift between tymp tracings is relatively small (i.e. 15 - 20 daPa) or nonexistent if there is an ETF problem. An observable peak shift for tracing #3 is difficult to obtain even for normally functioning Eustachian tubes. GSI TympStar Version 1 Reference Instruction Manual 4 - 45 Chapter 4 Eustachian Tube function testing for Perforated Eardrums The operator may follow a protocol similar to that outlined by Holmquist for determining patency of the Eustachian tube in a patient with pressure equalization tubes in place or with a perforated eardrum.* During the test, positive (or negative) pressure is presented to the ear canal/ middle-ear space until a pre-selected pressure limit is reached. The purpose of this test is to determine if the Eustachian tube will open as a direct result of this pressure. Specific opening pressure provides some information about the status of the tube (i.e., properly functioning vs. malfunctioning). It is suggested that the operator perform the ETF test with the maximum pressure (+400 daPa) pre-selected. This eliminates the possibility of the Eustachian tube not opening at a lower pressure which might otherwise be forced open closer to the maximum pressure value. If the tube opens as a direct result of the pressure within the ear canal/middleear space, only a portion of the positive pressure will escape before the tube closes again. NOTE If negative pressure is used during the test and the tube opens, some air will enter the ear canal/middle-ear, thereby, reducing the amount of negative pressure. To further check the Eustachian tube function while a pressure gradient exists between the ear canal/middle-ear space and the nasopharynx, the patient is asked to swallow some water. If the tube is functioning properly, some air pressure will be released as the patient swallows the water. If the tube is malfunctioning, very little (if any) pressure will be released. Thus, it is possible to record changes in pressure when the Eustachian tube opens and closes in response to swallowing as a function of time. Softkey menu structure The structure of softkey menu selections are diagrammed below. Please refer to Chapter 1: Introduction for instructions regarding navigating through softkey menus and changing parameter settings. TIME SEC PRESSURE MAX daPa -600 +400 SET 50 SEC SET EAR RIGHT LEFT * Holmquist, J., “Eustachian Tube Evaluation,” Acoustic Impedance and Admittance - The Measurement of Middle Ear Function, A. Feldman and L. Wilber, eds. Williams and Wilkins, 1976. 4 - 46 Grason-Stadler Operation ETF-Perforated TM automatic test procedure 1) Press the ETF hardkey to select the ETF test mode, then press the RETURN hardkey to display the ETF sub-menu. INTACT TM PERF INSTRUMENT TM OPTIONS PROGRAM MODE 2) Press the PERF TM softkey to place the instrument in the ETF-Perforated TM test mode. Default test parameters will be displayed above the softkeys on the LCD. 3) Press the EAR softkey to toggle between the right and left ear, then if desired, navigate through the ETF-Perforated TM softkey menu and change parameter settings for the test as required. Please refer to Chapter 1: Introduction for instructions regarding navigating through softkey menus and changing parameter settings. TIME SEC PRESSURE MAX daPa -600 +400 SET 50 SEC SET GSI TympStar Version 1 Reference Instruction Manual EAR RIGHT LEFT 4 - 47 Chapter 4 Minimum and maximum levels allowable The minimum and maximum levels allowable in the ETF - Perforated TM mode are shown below: Default Pressure Max +400 Time 50 Seconds Minimum Maximum Increment -600 daPa +400 daPa 50 daPa 30 Seconds 60 Seconds 10 Seconds 4) Ensure that the probe is placed securely in the ear canal and press the START hardkey. 5) The pressure will sweep at 50 daPa/sec. toward the selected maximum pressure value for the test. 6) The pressure sweep as a function of time can be viewed on the graphic display on the LCD. 7) If the Eustachian tube opens before the maximum pressure is reached, the tracing will indicate the pressure value where the tube opened as O1. The reduced pressure value where the tube closes again is recorded as Cl. 8) If the Eustachian tube does not open before the maximum pressure is reached, the tracing will continue at the maximum pressure as a straight line. 9) Instruct the patient to swallow water while the tracing is in progress. 10) If the Eustachian tube opens while swallowing, some pressure will be released from the ear canal/middle-ear space. 11) The tracing will move downward to the pressure level present after the tube closes again. 12) Repeat steps 9 through 11 until no more pressure is released while swallowing, or until the allowable time has elapsed. 13) The opening and closing pressures are summarized to the right of the meter area on the LCD. 4 - 48 Grason-Stadler Operation 14) Terminate the test at any point and store in memory by selecting the STOP hardkey. 15) Test data can be erased or cleared using the ERASE or CLEAR hardkey on the LCD panel. Please refer to Erasing and clearing test data earlier in this chapter. 16) Test data can be recalled by PAGING through the test screens. Please refer to Paging test data earlier in this chapter. ETF-Perforated TM sample printout 17) The test data may be printed by pressing the PRINT hardkey after selecting the test number using the PAGE hardkey. GSI TympStar Version 1 Reference Instruction Manual 4 - 49 Chapter 4 ETF-Perforated TM manual test procedure 1) After placing the instrument in the ETF-Perforated TM test mode, press the MANUAL hardkey. 2) The Pressure Knob will allow the pressure to sweep only in the direction of the pre-selected maximum pressure (i.e. +400 daPa). 3) The Pressure Knob will be inactivated once the maximum pressure is established. 4) A prompt message on the LCD will inform the user when the previously set maximum pressure is reached, or if the Eustachian tube has opened. ETF-Perforated TM normative data A healthy Eustachian tube has been shown to open at approximately + 150 mm H2O *. A higher pressure level (i.e. greater than +350 mm H2O) might be required to open a blocked Eustachian tube. NOTE 1.02 mm H2O=1 daPa * Holmquist, J., “Eustachian Tube Evaluation,” Acoustic Impedance and Admittance - The Measurement of Middle Ear Function, A. Feldman and L. Wilber, eds. Williams and Wilkins, 1976. 4 - 50 Grason-Stadler Operation Program mode for ETF Default test parameters may be programmed for the ETF-Intact and ETF-Perforated TM test modes. Softkey menu structure The structure of softkey menu selections is diagrammed below. Please refer to Chapter 1: Introduction for instructions regarding navigating through softkey menus and changing parameter settings. Press the ETF hardkey, then press the RETURN hardkey to display the ETF submenu. INTACT TM PERF INSTRUMENT TM OPTIONS PROGRAM MODE Pressing the INTACT TM or PERF TM softkey provides direct access to ETFIntact TM or PERF TM test functions that use the system defaults. For example, to run ETF-Intact TM tests with system defaults from this menu, press the INTACT TM softkey. Program mode Pressing the PROGRAM MODE softkey places the instrument in the Program Mode and provides access to programming functions for setting ETF-Intact TM or PERF TM test function defaults. Tests can not be performed in the Program Mode. Pressing the PROGRAM MODE softkey displays the PROGRAM MODE message in the status area of the screen. When the system is in the Program Mode, select the test (ETF-Intact TM or PERF TM) for which defaults will be defined. The appropriate ETF screen will be displayed with the softkey menu across the bottom of the screen and a PROGRAM MODE status message. GSI TympStar Version 1 Reference Instruction Manual 4 - 51 Chapter 4 System in PROGRAM MODE Test parameters can now be selected from the usual softkey menu as done in preparation for a test. Once all the test parameters have been selected, pressing the RETURN hardkey returns the display to the PROGRAM MODE submenu. Pressing the STORE softkey stores the modified parameters as defaults for future tests. The STORING DATA status message will be displayed. Press the ETF (or other test function) hardkey to return from the Program Mode to the ETF-Intact test mode with the new test parameter defaults. 4 - 52 Grason-Stadler Operation Altitude Calibration Mode The GSI TympStar is calibrated at our factory where the altitude is very close to sea level. When the TympStar is installed at higher altitudes, the test cavity readings will be higher than their nominal values due to the differences in the density of air from site to site. Refer to the following table for expected changes in cavity values based upon altitude. Cavity size 0 0.5 ml 0.5 2.0 ml 2.0 Altitude in Feet 1000 2000 3000 4000 5000 6000 7000 0.53 0.55 0.58 0.60 0.63 0.65 0.68 2.1 2.2 2.3 2.4 2.5 2.6 2.7 8000 0.70 2.8 NOTE Day-to-day variations in barometric pressure will have no significant effect on these readings. When to use Altitude Calibration If the location is at an altitude higher than sea level but it is desired to have the test cavities read at sea level, (i.e. read the nominal value of 0.5 ml and 2.0 ml), it will be necessary to perform the Altitude Calibration prior to using the TympStar. If located at altitudes higher than sea level and it is desired to have the test cavity readings reflect the differences in the density of air, do not perform the Altitude Calibration. Calibration procedure 1) Press the SPECIAL hardkey then the RETURN hardkey to display the Special softkey menu. REFLEX DECAY ALTITUDE CAL PROGRAM MODE 2) Press the ALTITUDE CAL softkey to place the instrument in the Altitude Calibration test mode and display the ALTITUDE CALIBRATION screen. Equivalent (corrected) compliance values GSI TympStar Version 1 Reference Instruction Manual 4 - 53 Chapter 4 3) Press the PRINT LEFT softkey to print the text seen on the left side of the screen. Press the PRINT RIGHT softkey to print the instructions on the right side of the screen. 4) Follow the instructions provided on the right side of the screen. Press the DATA TRANFER hardkey to start the sequence. 5) Put the probe into the 2.0 ml cavity. 6) Press the DATA TRANFER hardkey to begin calibration. Wait for the calibration complete notification before proceeding to the next step. 7) Press the RETURN hardkey to exit the Altitude Calibration mode. 4 - 54 Grason-Stadler Operation Auto Sequence testing The Auto Sequence function conducts a predefined sequence of tests when the AUTO SEQUENCE softkey is pressed. The sequence of tests always includes Tymp Diagnostic at 266 Hz, Y, and can be configured by the user to also include Reflex Threshold and Reflex Decay tests. NOTE Auto Sequence testing is useful when conducting an abbreviated battery of middle-ear tests on a cooperative patient. When testing less than cooperative patients, it is best to use the regular Tymp Diagnostic, Reflex Threshold and Reflex Decay test modes to obtain more reliable test results. Auto Sequence test procedure The test sequence for reflex tests is defined under Instrument Options-Test Sequence. The parameters used for Tympanometry Reflex Threshold and Decay tests are those programmed as defaults within each test mode. 1) Press the TYMP hardkey to place the instrument in the Tymp Diagnostic mode and display the Tymp Diagnostic softkey menu. AUTO SEQUENCE START daPa P-RANGE daPa NORMAL WIDE -600 -400 -200 +200 +400 MORE -500 -300 0 EAR GRADIENT TYMP WIDTH daPa RATIO ml OFF RIGHT MORE LEFT +300 MORE P-RATE daPa/s 12.5 50 600/200 BASELINE MORE ON OFF 2) Press the EAR softkey to toggle between the right and left ear, then insert the probe tip securely into the patient’s ear. EAR RIGHT LEFT 3) Press the AUTO SEQUENCE softkey. The sequence of tests will begin with a tympanogram at 226 Hz, Y. If previously programmed as part of the sequence, the sequence will automatically continue to include a Reflex Threshold and Reflex Decay tests. GSI TympStar Version 1 Reference Instruction Manual 4 - 55 Chapter 4 The reflex threshold sequence is automated by using the default parameters for Threshold Seek and Auto Timing. Refer to the Reflex Threshold section of this chapter for instructions for setting the minimum compliance change and intensity range values used to arrive at threshold for each stimulus. All ipsilateral stimuli are tested from low to high frequency. Contralateral stimuli are then tested from low to high frequency. NOTE If the STOP dBHL setting under Threshold Seek exceeds the maximum available intensity level for a stimulus, the stimulus presentation will stop at this maximum level. If reflex decay stimuli have been selected in the TEST SEQUENCE sub-menu, the intensity level for each stimulus is automatically presented at 10 dB above the threshold level obtained during the reflex threshold test sequence described above. NOTE Reflex threshold testing must be performed prior to Reflex Decay testing. The stimuli available for Reflex Decay testing are dependent upon the stimuli selected for Reflex Threshold testing. 4) The test sequence will automatically terminate upon completion. The test data is automatically stored. The results can be reviewed by pressing the PAGE hardkey and then can be printed by pressing the PRINT hardkey. Please refer to Paging test data earlier in this chapter. 5) Test data can be cleared using the CLEAR hardkey on the LCD panel. Please refer to Clearing test data earlier in this chapter. 4 - 56 Grason-Stadler Operation Auto Sequence program mode Reflex Threshold and Reflex Decay tests can be programmed to be included in the Auto Sequence of tests as follows: 1) Press the ETF hardkey, then press the RETURN hardkey to display the ETF sub-menu. INTACT TM PERF INSTRUMENT TM OPTIONS PROGRAM MODE 2) Press the INSTRUMENT OPTIONS softkey to place the instrument in the Instrument Options programming mode and display the Instrument Options softkey menu. TEST SEQUENCE 3) Press the TEST SEQUENCE softkey to display the choices for Auto Sequence tests. 4) Press the REFLEX THRESHOLD softkey to include reflex threshold testing in the Auto Sequence. REFLEX REFLEX THRESHOLD DECAY REFLEX THRESHOLD ON/OFF 5) Press the STIMULUS EAR softkey to select IPSI ONLY, CONTRA ONLY, or IPSI AND CONTRA for reflex testing. STIMULUS EAR STIMULUS Hz STIMULUS EAR IPSI 6) Press the STIMULUS HZ softkey to select the stimuli to be included in the Reflex Threshold Auto Sequence. Scroll through each stimulus and toggle the YES/NO soft key to program it as a stimulus for the test sequence. Press the RETURN hardkey and toggle the ON/OFF softkey to turn Reflex Threshold on. CONTRA IPSI AND CONTRA STIMULUS Hz STIMULUS Hz YES/NO 7) Press the REFLEX DECAY softkey to include Reflex Decay testing in the Auto Sequence. The STIMULUS EAR softkey is used to select the stimulus ear for Reflex Decay as IPSI, CONTRA, or IPSI and CONTRA. NOTE Only the STIMULUS EAR(s) and STIMULUS HZ selected under Reflex Threshold are available for selection in Reflex Decay. 8) Use the up and down arrows to display the stimulus ear(s) selected in Reflex Threshold that will receive stimulus. Toggle the YES/NO softkey to select or deselect the displayed stimulus ear. GSI TympStar Version 1 Reference Instruction Manual 4 - 57 Chapter 4 9) The STIMULUS HZ softkey controls the programming of stimuli for decay testing. Use the up and down arrows to scroll through the available stimuli. Toggle the YES/NO softkey to select or deselect the stimulus. Press the RETURN hardkey and toggle the ON/OFF softkey to ON. NOTE It is not possible to run Reflex Decay tests without running Reflex Threshold tests. 10) Press the RETURN softkey, then press STORE to store the test sequence configuration. Press any test mode hardkey to return from the Instrument Options menu. Instrument Options The Instrument Options softkey menu can be used to configure a variety of printing, communication, language, test sequence, date and time and other instrument parameters. To review or reprogram these instrument options, press the ETF hardkey, then the RETURN hardkey. The following sub-menu will be displayed. INTACT TM PERF INSTRUMENT TM OPTIONS PROGRAM MODE Softkey menu structure Press the INSTRUMENT OPTIONS softkey to display the Instrument Options menu. The software menu structure is shown in full on the next page. Print format Test results can be printed for each test type in graphic format showing the test tracing, or as a table of numeric values. Press GRAPHIC for printed waveform tracings. Press TABULAR for printed numeric tables. When all the formatting selections have been made, press STORE to store the formatting selections and return to the Instrument Options softkey menu. 4 - 58 Grason-Stadler Operation NOTE When the tabular format is selected for printing Reflex Threshold results, the operator must indicate which tracing on the display represents the threshold value per frequency tested. This is accomplished using the Mark Threshold command. Alternatively, when Threshold Seek is used with the tabular print format, the GSI TympStar will automatically enter the threshold data in the table. Press the EXTERNAL PRINTER SETUP softkey. The LEFT COLUMN SETTING softkey is used to select left or right ear data for printing in the left column of the printout. The PRINT TYPE setting is used to select color or black and white printouts. NOTE When using a black and white HPLaserJet® printer, the BLACK + WHITE setting must be used. GSI TympStar Version 1 Reference Instruction Manual 4 - 59 Chapter 4 4 - 60 Grason-Stadler Operation Data Transfer Settings Test result data for each test type can be transferred to a computer over the RS232 serial communications port in the form of a numeric summary or a numeric summary and graphic data. Press SUMMARY for numeric summary transfers. Press SUMMARY + GRAPHIC for transfers of numeric summaries and graphic data. When all the setting selections have been made, press STORE to store the selections and return to the Instrument Options softkey menu. The “STORING DATA” message will appear on the screen above the softkey labels. DATA TRANSFER SETTINGS TYMP SUMMARY SUMMARY + GRAHPIC REFLEX THRESHOLD SUM SUM + GRAPH REFLEX DECAY SUM CLEAR TEST SUM + GRAPH MAN MORE AUTO ETF INTACT SUM STORE SUM + GRAPH ETF PERF TM SUM MORE SUM + GRAPH Language The language displayed on the screen, printed on reports and provided for keyboard interaction can be English, French, German, Spanish or Italian. Test Sequence The Auto Sequence function conducts a predefined sequence of tests when the AUTO SEQUENCE softkey is pressed. The sequence of tests always includes Tymp Diagnostic at 226 Hz Y, and can be configured by the user to also include Reflex Threshold and Reflex Decay testing as well. Press REFLEX THRESHOLD and then ON to include Reflex Threshold testing. Press REFLEX DECAY and then ON to include Reflex Decay testing. Press STORE to store the configurations and return to the Instrument Options softkey menu. GSI TympStar Version 1 Reference Instruction Manual 4 - 61 Chapter 4 NOTE Refer to the Auto Sequence Program Mode for details regarding programming this feature. Remote Settings Communication settings for the RS232 serial port are configured using the Remote Settings softkey menu functions. Press the desired parameter softkey and select the required Baud rate, Parity, Stop bits, RTS/CTS configuration and data format. The following baud rates are available and can be scrolled using the up or down arows: 300, 600, 1200, 2400, 4800, 9600, 19200 Data can be communicated in GSI TympStar or GSI 33 formats. Selecting the GSI 33 format transmits data to the serial output in a format identical to that of the GSI 33. Refer to Appendix D: Remote Specifications for details. Press STORE to store the configurations and return to the Instrument Options Softkey menu. GSI Suite The GSI Suite Audiometric Data Management software is compatible with the GSI TympStar as well as the GSI 61. GSI Suite captures, saves, and stores middle ear evaluation data from the GSI TympStar and allows the addition of comments. It can also provide the data in a PDF format that is compatible with electronic medical records. Data transferred from the GSI TympStar include the following: Tympanometric tracings and numeric summary data along with, reflex threshold and reflex decay results in a tabular format. The patient demographic and test result data are saved to a directory for future retrieval and/or converted to PDF format for easy transfer to an EMR program. If configured, the report can also be e-mailed. Date and Time Note: Selection of the relex threshold values must be done on the TympStar prior to transferring test results to the GSI Suite. This is accomplished automatically if auto sequence is used or manually via the Mark Threshold Softkey. See the GSI Suite User Manual which has been included with all TympStars starting in July 2011 for further details The date and time formats and settings displayed on the screen and on printed reports are configured using the Date/Time softkey menu. Press the desired DATE and TIME formatting softkeys and use the up and down arrows to set the DATE and TIME. Press the STORE softkey to store the configurations and return to the Options softkey menu. NOTE The softkeys labeled MONTH, DAY, YEAR display the value selected using the up and down arrows. Pressing the MONTH, DAY, YEAR keys will not alter the settings and will result in an “Invalid Selection” message. 4 - 62 Grason-Stadler Operation NOTE Be certain to press the STORE softkey prior to returning to the Main Options menu to insure that all data and time settings are saved. Facility Name The Facility Name softkey menu and an external keyboard can be used to store a facility name that will be displayed on the screen and on printed reports. Facility Name location Press the FACILITYNAME softkey. The screen will display the ENTER FACILITY NAME message and the blinking cursor will show the location of the name that can be entered from the keyboard. Enter the desired header information and press the STORE softkey. NOTE The maximum number of characters allowed for a Facility Name is 45. Version The Version function provides an easy way for a TympStar Version 1 to be upgraded to a Version 2 instrument. Version 2 functionality provides expanded testing capability and includes 678 and 1000 Hz probe tones, multifrequency tympanometry and ARLT testing. A license code must be obtained from Grason-Stadler to upgrade a TympStar Version 1 to a Version 2. To change from a TympStar Version 1 to a Version 2: 1) Press the ETF hardkey to select the ETF test mode, then press the RETURN hardkey to display the ETF submenu. INTACT TM PERF INSTRUMENT TM OPTIONS GSI TympStar Version 1 Reference Instruction Manual PROGRAM MODE 4 - 63 Chapter 4 2) Press the INSTRUMENT OPTIONS softkey, then the MORE softkey to display the VERSION softkey selection. 3) Press the VERSION softkey to display the Version Menu. NOTE To return to the Instrument Options menu with no version switching action taken, press the RETURN hardkey from the Version menu. 4 - 64 Grason-Stadler Operation Obtaining a License Code 4) Press the V2 softkey. The following messages will appear: OBTAIN A LICENSE KEY TO LAUNCH V2 TYMPSTAR CONTACT A GSI REPRESENTATIVE WITH THE FOLLOWING CODE: 0A2B3C4E5D (example of lock code) A GSI REPRESENTATIVE WILL PROVIDE A LICENSE KEY CODE. ENTER THE LICENSE KEY CODE HERE: THEN PRESS THE DATA TRANSFER KEY NOTE Press the CONTINUE softkey from this screen to keep the TympStar in V1 mode. 5) Press the PRINT hardkey to print out the lock code. Contact a GSI representative with the lock code. If a V2 upgrade is purchased, a license key code and V2 probe will be provided by GSI. Once you have received the V2 license key and probe, follow the instructions below to change the TympStar to V2 functionality. Replacing the V1 Probe with a V2 Probe To replace the TympStar probe: WARNING Turn off power to the TympStar. 1) Disconnect the air tubing to the brass fitting on the side of the TympStar. 2) Remove the cable clamp on the side of the TympStar. GSI TympStar Version 1 Reference Instruction Manual 4 - 65 Chapter 4 3) Remove the two retaining screws that secure the probe connector to the TympStar. 4) Pull the connector straight out and away from the side of the TympStar chassis. Reverse this sequence to connect the new Version 2 probe to the TympStar. Con- tact a GSI representative to have the removed probe returned to GSI. 1) Press the V2 softkey from the Version menu. The following messages will appear. Switching to Version 2 software OBTAIN A LICENSE KEY TO LAUNCH V2 TYMPSTAR CONTACT GSI REPRESENTATIVE WITH THE FOLLOWING CODE: 0A2B3C4E5D (example of lock code) A GSI REPRESENTATIVE WILL PROVIDE A LICENSE KEY CODE. ENTER THE LICENSE KEY CODE HERE: THEN PRESS THE DATA TRANSFER KEY Using an external keyboard, type in the license key code as indicated by the on-screen instructions. Press the DATA TRANSFER hardkey. The message: SWITCHING TO AV2 INSTRUMENT. WAITING FOR WARMSTART will appear. The system will then reboot and reinitialize as a V2 TympStar. 4 - 66 Grason-Stadler Appendix A A The GSI TympStar Version 1 meets or exceeds the following standards and specifications for aural acoustic admittance instruments: IEC 1027 1991-03 ANSI S3.39-1987 ANSI S3.6-1996 ANSI S3.7-1995 IEC 645-1 1992 IEC 126-1973 (also BS 6111-1981) BS ISO 389-2 1994 Y2K Compliant UL 2601-1 Part 1: General Requirements for Safety CSA C22.2 No. 601.1-M90 (Canada) CE Mark per Medical Device Directive (93/42/EEC) 0344 European authority representative EN60601-1:1990 Safety Requirements for Medical Electrical Equipment EN60601-1-2 Medical Electrical Equipment Emissions and Immunity Requirements This equipment has been tested for radio frequency emissions and has been verified to meet Radiated and Conducted Emissions per EN 55011-1998, Group 1, Class A and per CISPR, Class A. GSI TympStar Version 1 Reference Instruction Manual A-1 Appendix A Sensitivity ranges The following admittance measurements give maximum range at 226 Hz,Y in ml. Table 1: Tymp Mode Frequency Digital Read-Out Including Cursor 226 Hz -7.0 to +7.0 Accuracy at 226Hz: Graphical Display -1.0 to +7.0 0.1 ml or 5%, whichever is greater. Table 2: Reflex Mode Frequency Digital Read-Out Including Cursor 226 Hz -7.0 to +7.0 Accuracy: Probe signal Graphical Display -0.16 to +0.80 +0.16 to -0.80 226 Hz is 0.02 ml or 5%, whichever is greater. Sinusoidal signal with the following characteristics: Frequency: 226 Hz Frequency accuracy: ±1% Harmonic distortion: <2% (Measured in an HA-1 2cc coupler) Signal level: 85 dB SPL (In Real Ear and in Normal Test Mode) NOTE The probe tone level is set to be nominally 70 dB HL. Signal level accuracy: ±1.5 dB SPL A-2 Grason-Stadler Specifications Pneumatic System PressureMaximumLimits: -800 daPa to +600 daPa Programmed Pressure Ranges: Normal: + 200 to - 400 daPa Wide: + 400 to - 600 daPa Pressure Accuracy: ±10% or ±10 daPa, whichever is greater in cavities from 0.5 cc to 5.0 cc. Pressure Sweep Rate: 12.5 daPa/sec 50 daPa/sec 600/200 daPa/sec Manual Sweep Rate Limit: 600 daPa/sec Sweep Rate Accuracy: ±10% Pressure System Leak Rate: < 1. 0 daPa/sec (Measured at -600 and +400 daPa, while pressure servo is disabled.) Acoustic Reflex Activating (Stimulus) Signal Pure Tone Stimulus Frequencies for Contra phone and for Ipsi phone with time multiplexed stimulus. See Table 3. Frequency Accuracy: ±3% Total Harmonic Distortion : < 5% at 500 Hz, 85dBHL < 5% at 1000Hz - 3000Hz, 100dBHL < 5% at 4000Hz, 75dBHL < 10% at the maximum dBHL settings Reference: ANSIS3.39-1987 Section 7.5.2.2 Frequency Accuracy Section 7.5.2.3 Harmonic Distortion Noise Stimulus The uniformity of the spectrum level of acoustic pressure for the noise signal over 20 averages measured acoustically within their respective band limits will be: ±10 dB for insert or probe type earphones ±5 dB for supra-aural type earphones Noise Band Widths: Low Band: 125 -1600 Hz High Band: 1600 - 4000 Hz Broad Band: 125 - 4000 Hz (Relative to level at 1 kHz) Band-edges accurate to within ±15% Roll off rate: >12 dB/Octave Stimulus Level Control Tone Stimulus: The transfer of reference equivalent threshold values are based on the article; “Reference Threshold Levels For The ER-3A Insert Phone”, by Laura Ann Wilber, Barbara A. Krueger and Mead C. Killion, J. Acoustic Soc. Am. Suppl. 1, Vol. 81 Spring 1987. GSI determined the transfer data from an IEC 711 coupler to an ANSI HA-1 coupler. Using this data, the reference threshold values were determined for both the Ipsi and Contra insert earphones for calibration in an ANSI HA-1 2cc coupler. Noise Stimulus: The transfer of reference threshold values was done by GSI using the “Threshold Determination Method.” The transfer data from an IEC 711 to anANSI HA- 1 coupler was determined by GSI. GSI TympStar Version 1 Reference Instruction Manual A-3 Appendix A Intensity levels are reduced as a function of volume at a rate of 1 dB SPL for each .1 ml. Intensity reduction begins at 1.2 ml. Table 3: Upper limit of HL range in Reflex Threshold Mode Lower limit of HL range for all stimulus signals (35 dB HL). Hearing Level Increment: 5.0 dB Hearing Level Increment Accuracy: ±0.5 dB Hearing Level Control Linearity: ±1.0 dB A-4 Grason-Stadler Specifications Stimulus Presentation Control Signal ON/OFF Ratio: >70 dB OFF mode signal level: <20 dB SPL Signal to Noise Ratio: >70 dBA Measured with disabled probe signal and “A” weighting for noise measurement. Residual noise: <25 dBA SPL (Stimulus Present switch in OFF position) Unwanted Acoustic Probe Signals: <60 dBA Measured while pump is operating and probe tone is disabled. Measure it with “A” weighted filter in “SLOW” Time mode. The noise in normal operating mode will not affect the immittance measurement accuracy. Signal separation between Ipsi and Contra channels; all frequencies: >70 dB (Measured at the probes with the “ON” channel set to 90 dB) Leaked signal: <20 dB SPL The radiated acoustic noise from the instrument (with reflex stim off) when measured at 1 meter from the instrument, shall be: <50 dBA (“A” weighting and “SLOW” averaging) Temporal Specifications Of Stimulus Presentation Steady State Stimulus Initial Delay (elapsed time from present bar activation to 10% stimulus amplitude): < 100 msec Terminal Delay (elapsed time from present bar deactivation to 90% stimulus amplitude): <100 msec Risetime: 7.5 ± 2.5 msec Falltime: 7.5 ± 2.5 msec Multiplexed Stimulus (Used in Reflex Threshold test mode) Period data for frequencies: 250 and 500 Hz: Period 124 msec Stimulus on time 44 msec Stimulus off time 62 msec Rise and fall time 18 msec Period data for all other frequencies: Period 115 msec Stimulus on time 44 msec Stimulus off time 53 msec Rise and fall time 18 msec Temporal Spec. Accuracy: ±10% or 5 msec, whichever is greater GSI TympStar Version 1 Reference Instruction Manual A-5 Appendix A Environmental The GSI TympStar Version 1 meets the UL 60601-1, CSA 22.2 and IEC606011 standards for safety. Temperature: Storage/Shipping: -20 degrees C to + 40 degrees C Operating: +15 degrees C to +35 degrees C Humidity: 20% - 90% at 35 degrees C (non-condensing) Warm-UpTime At room temperature; +15°C to +35°C: At room temperature; below +15°C: Calibration Stability All GSITympStarVersion 1 specifications are met over the range of specified power line, temperature and humidity variations. Power Line: Voltage Variation: ±10% Frequency Variation: ± 5% Power line short term variation which affects the performance of the instrument will turn off all probe and stimulus signals. Power Rating: 120 Watts maximum Line Voltage Range: 100 VAC to 240 VAC Power Line Frequency Range: 50 - 60 Hz Temperature Operating Range: +15°C to +35°C Relative Humidity Operating Limit: 90% Guaranteed Operating Elevation: 6000 Ft. (1800m) A-6 Grason-Stadler 10 Minutes 1 Hour Specifications Connectors STIMULUS: ExternalStimulusInput (Phone Jack) Peak Voltage: 3 VAC Input Impedance: 15,000 Ohms PRESENT: External Present Control Input that turns the stimulus signal ON and OFF (Phone Jack). Voltage Range: STIM OFF: +5.0 VDC STIM ON: 0.0 v Input Impedance: 11,000 Ohms Contra PHONE: Output Voltage: 7 VAC Output Impedance: 2.5 Ohms Standard 9-pin RS232C serial port for interfacing with outside computer. RXD (DCE output) CTS (DCE output) TXD (DCE input) RTS (DCE input) Standard VGAport for external monitor. NOTE A 226 Hz Y tympanogram is displayed on the LCD screen in a 1:1 aspect ratio and on the external VGA monitor in a 1.4:1 aspect ratio. The Pressure (horizontal) axis appears to be “stretched out” by 40% on the VGA monitor. GSI TympStar Version 1 Reference Instruction Manual A-7 Appendix A Standard PS-2 keyboard port for external Keyboard. Standard parallel printer port for external printer. Electrical The following apply to the TympStar system: 1) Class 1 Medical Equipment 2) Type B Medical Equipment 3) IPXO ingress of water (ordinary equipment) 4) Equipment not suitable for use in the presence of flammable anesthetic mixture with air or with oxygen or nitrous oxide. 5) Mode of operation - continuous InputVoltage: Input Frequency: Input Current: Power Consumption: A-8 100 – 240 VAC 50 – 60 Hz 3.2Amaximum 120Wmaximum Grason-Stadler Specifications Contra insert phone Calibration cavity (V1) Probe cleaning kit (2 boxes) Eartips: 1 pkg. 8 standard sizes, 4 ea. (Color coded) 1 pkg. 6 special sizes, 2 ea. 1 pkg. 6 screening sizes, 2 ea. Reference Instruction Manual Quick User Guide Printer paper (2 rolls) for orders including printer Spare set of probe tubing Probe mount - shoulder Probe mount - wrist Probe mount - clothes Printer paper, adhesive-backed for orders including a printer GSI TympStar dustcover Power cord with hospital-grade plug (Power cord part # varies depending on location) GSI Suite Audometric Data Management Software GSI Part # 1770-9643 GSI Part # 1700-9618 GSI Part # 4204-0251 (USA) GSI Part # 1010-9686 Optional Accessories OtoAccess (Network Software for GSI Suite) GSI Part # 1015-9600 Mechanical DIMENSIONS AND WEIGHT W x D x H: 20.38 inches x 15 inches x 12.6 inches (LCD raised) 52cm x 38cm x 32cm Height with LCD lowered - 6 inches (15cm) Weight: 16.58 pounds, 7.53 kg Shipping weight: 29.50 pounds, 13.38 kg Materials of manufacture Top Case, LCD Housing Front & Rear & Hinges: Supplied Accessories LCD Lens: Switches: Labels: Softkey Panel: Probe Cord: Probe Top & Bottom Housings: Probe Tip: Eartips: Tubing: GSI Part # 8000-0078 GSI Part # 2000-1036 GSI Part # 2000-9610 GSI Part # 1700-9660 GSI Part # 1700-9670 GSI Part # 1700-9622 GSI Part # 2000-0100 GSI Part # 2000-0108 GSI Part # 1700-9619 GSI Part # 2000-9617 GSI Part # 1700-9646 GSI Part # 1700-9642 GSI Part # 1700-9608 Lexan 500 w/10% Glass & 2% BlowingAgent, UL 94V0 Rated GE HP40S -OR- Duralan II Shincor Shin-Etsu/Novacor KE-951 U Lexan & Polycarbonate Mylar Polyvinyl Chloride (PVC) Cycolac KJW, UL 94V0 Rated Polypropolene Kraton 3226 Vinyl and Polyurethane GSI TympStar Version 1 Reference Instruction Manual A-9 Appendix A Calibration requirements A - 10 GSI recommends quarterly calibration checks for the GSI TympStar along with annual certification. ASHA requires quarterly electro-acoustic calibration checks and annual electro-acoustic calibration. It is good practice to perform daily biologic checks. See the Calibration Checks section of Chapter 3 in this manual more information, or Chapter 4: Calibration in the TympStar Service Manual for complete calibration instructions. Grason-Stadler Appendix B Bibliography TympStar Version 1 GENERAL ANSI S3.39-1987, - “American National Standard Specifications for Instruments to Measure Aural Acoustic lmmittance,” (ASA 71-1987). Feldman, A., Wilbur, L., “Acoustic Impedance & Admittance - The Measurement of Middle Ear Function,” Williams and Wilkins, Baltimore, (1976). IEC 29C - “Int. Electrotech. Comm. Standard for the Measurement of Aural Acoustic Impedance/ Admittance Instruments.” Katz, J., “Handbook of Clinical Audiology,” (3rd Edition), Williams and Wilkins, Baltimore, (1985). DIAGNOSTIC TYMPANOMETRY Alberti, P., Jerger, J., “Probe-Tone Frequency and the Diagnostic Value of Tympanometry,” Arch. Otolaryngol., (1974), 99: 206-210. Beery, Q., Bluestone, C., Andrus, W., Cantekin, E., “Tympanometric Pattern Classification in Relation to Middle Ear Effusions,” Ann. Otol. Rhinol. And Laryngol., (1975), 84 (1): 56. Chesnutt, B., Stream, R., Love, 1, McLarey, D., “Otoadmittance Measurements in Cases of Dual Ossicular Disorders,” Arch. Otolaryngol., (1975), 101: 109-113. Cooper, J., Hearne, E., Gates, G., “Normal Tympanometric Shape,” Ear and Hearing, Williams and Wilkins Co., University of Texas Health Science Center, San Antonio, TX. (1982). Creten, W., Van de Heyning, P., Van Camp, K., “Immittance Audiometry,” Scand. Audiol., (1985),14:115121. Creten, W., Van Camp, K., “Transient and Quasi-Static Tympanometry,” Scand. Audiol., (1974), 3: 3942. Creten, W., Van Camp, K., Maes, M., Vanpeperstraete, P., “The Diagnostic Value of Phase-Angle Tympanograms,” Audiology, (1981), 20: 1-14. GSI TympStar Version 1 Reference Instruction Manual B-1 Appendix B Feldman, A., “Impedance Measurements at the Eardrum as an Aid to Diagnosis,” J. Speech and Hear. Res., (1963), 6 (4): 315-327. Feldman, A., “Diagnostic Application and Interpretation of Tympanometry and the Acoustic Reflex,” Audiol., (1977), 16: 294-306. Hall, J., “Contemporary Tympanometry,” Seminars in Hear., (1987), 8 (4): 319-327. Liden, G., “Impedance Audiometry,” Department of Audiology and Otolaryngology, Sahlgren’s Hosp., Univ. of Goteborg, Goteborg, Sweden. Lilly, D., “Measurement of Acoustic Impedance at the Tympanic Membrane;’Modem Developments In Audiology, 2nd Ed., Academic Press, Inc., New York and London: (1973), 345-405. Margolis, R., Smith, P, “Tympanometric Asymmetry,” J. Speech and Hear., (1977), Res. 20: 437-446. Margolis, R.,”Interactions Among Tympanometric Variables,” J. Speech and Hear., (1977), Res. 20: 447462. Osguthorpe, D., “Effects of Tympanic Membrane Scars on Tympanometry: A Study In Cats,” Laryngoscope, (1986), 96: 1366-1377. Popelka, G., “Acoustic Immittance Measures: Terminology and Instrumentation” Ear and Hear, (1984): 262-267. Porter, T, “Normative Otoadmittance Values for Three Populations,” J. of Aud.. (1972), Res. Xii (1): 5358. Rabinowitz, W., “Measurement of the Acoustic Input lmmittance of the Human Ear,” J. Acoust. Soc. Am., (1981), 70 (4): 1025-1035. Renvall, U., Liden, G., Jungert, S., “Impedance Audiometry in the Detection of Secretory Otitis Media,” Scand. Audiol., (1975), 4: 1-6. Shanks, J., Lilly, D., “An Evaluation of Tympanometric Estimates of Ear Canal Volume,” J. Speech And Hear., (1981), Res. 24: 557-566. Shanks, J., “Tympanometry,” Ear and Hear., (1984), 5 (5): 268-280. Shurin, P, Pelton, S., Finkelstein, J., “Tympanometry in the Diagnosis of Middle-ear Effusion,” N. Eng. J. Med., (1977), 296: 412-417. Thompson, D., Sills, J., Recke, K., Bui, D., “Acoustic Admittance and the Aging Ear,” J. Speech And Hear., (1979), Res. 22: 29-36. B-2 Grason-Stadler Bibliography Van Camp, K., Raman, E., Creten, W., “Two Component Versus Admittance Tympanometry,” Audiol., (1974), 15: 120-127. Van Camp, K., Creten, W., Vanpeperstraete, P, Van de Heyning, P., “Tympanometry - Detection Of Middle Ear Pathologies,” Acta Otolaryngol. Belgica., (1979). Van Camp, K., Vogeleer, M., “A Tympanometric Approach To Otosclerosis,” Scand. Audiol., (1986),15:109-114. Van Camp, K., Creten, W., Van de Heyning, P, Decraemer, W., Vanpeperstraete, P, “A Search For The Most Suitable lmmittance Components and Probe Tone Frequency in Tympanometry,” Scand. Audiol., (1983), 12: 27-34. Van de Heyning, P., Van Camp, K., Creten, W., Vanpeperstraete, P, “Incudo-Stapedial Joint Pathology: A Tympanometric Approach,” J. Speech and Hear., (1982), Res. 25: 611-618. Vanhuyse, V., Creten, W., Van Camp, K., “On the W-Notching Of Tympanograms,” Scand. Audiol., (1975), 4: 45-50 Vanpeperstraete, P., Creten, W., “On the Asymmetry of Susceptance Tympanograms,” Scand. Audiol., (1979). Wilson, R., Shanks, J., Kaplan, S., “Tympanometric Changes At 2a6 Hz And 678 Hz Across 10 Trials and for Two Directions Of Ear Canal Pressure Change,” J. Speech And Hear., (1984), Res. 27: 257-266. Wiley, T, Oviatt, D., Block, M., “Acoustic-Immittance Measures in Normal Ears,” J. Speech and Hear., (1987), Res. 30: 161-170. Zwislocki, J., “An Acoustic Method for Clinical Examination of the Ear,” J. Speech and Hear., (1963), Res. 6 (4): 303-314. Zwislocki, J., Feldman, A., “Acoustic Impedance of Pathological Ears,” ASHA Monograph, (1970), No. 15. Washington. SCREENING TYMPANOMETRY AND REFLEX ASHA, “Guidelines for Acoustic Immittance Screening of Middle-Ear Function,” (1979), April: 283288. Bess, F., Bluestone, C., Harrington, D., Klein, J., Harford, E., “Use of Acoustic Impedance Measurement In Screening for Middle Ear Disease in Children,” Ann. Otol. Rhinol. And Laryngol., (1978), 87 (2): 288. Brooks, D., “An Objective Method of Detecting Fluid in the Middle Ear,” J. Int. Audiol., (1968), 7: 280-286. GSI TympStar Version 1 Reference Instruction Manual B-3 Appendix B Brooks, D., “The Use of the Electro-Acoustic Impedance Bridge in the Assessment of Middle Ear Function,” J. Int. Audiol., (1969), 8: 563-569. Groothius, J., Sell, S., Wright, P., Thompson, J., Altemeier, W., “Otitis Media in Infancy: Tympanometric Findings,” Pediatrics, (1979), 63 (3): 435-442. Lampe, R., Weir, M., McLeod, H. Aspinall, K., Artalejo, L., “Tympanometry in Acute Otitis Media,” Am. J. Dis. Child, (1981), 135: 233-235. Paradise, J., Smith, C., Bluestone, C., “Tympanometric Detection of Middle Ear Effusion in Infants and Young Children,” Pediatrics, (1976), 58: 198-210. GRADIENT Fiellau-Nikolajsen, M., “Tympanometry and Middle Ear Effusion: A Cohort-Study in Three-Year-Old Children,” Int. J. Ped. Otorhinolaryngology, (1980), 2: 39-49. de Jonge, R., “Normal Tympanometric Gradient: A Comparison of Three Methods,” Audiology, (1986), 25: 299-308. ACOUSTIC REFLEX Block, M.,Wiley,T. “Acoustic Reflex Growth and Loudness,” J. Speech And Hear., (1979), Res. 22: 295-310. Borg, E., “Recovery of the Human Intra-aural Muscle Reflex after “Pauses” of Various Depth,” Acta Otolaryngology, (1980), 90: 1-5. Chiveralls, K., FitzSimons, R., Beck, G., Kerhohan, H., “The Diagnostic Significance of the Stapedius Reflex,” Br. J. Audiol., (1976), 10: 122-128. Clemis, J., “Acoustic Reflex Testing in Otoneurology,” Otolaryngol. - Head and Neck Surg., (1984), 92 (2): 141-144. Cretin, W., Vanpeperstraete, P., Van Camp, K., Doclo, J., “An Experimental Study on Diphasic Acoustic Reflex Patterns in Normal Ears,” Scan. Audiol., (1976), 5: 3-8. Dallos, P, “Dynamics of the Acoustic Reflex: Phenomenological Aspects,” J. Acoust. Soc. Am., (1964), 36 (11): 2175-2183. Djupesland, G., Zwislocki, J., “On the Critical Band in the Acoustic Stapedius Reflex,” J. Acoust. Soc. Am., (1973), 54 (5): 1157-1159. Gersdorff, M., “Dynamic Study of The Acoustico-Facial Reflex by Impedance Measurement,” Arch. Otorhinolaryngol., (1980), 228: 101-112. B-4 Grason-Stadler Bibliography Hodges, A., Ruth, R., “Subject Related Factors Influencing the Acoustic Reflex,” Sem. In Hear., (1987), 8 (4): 339-357. Johnson, N., Terkildsen, K., “The Normal Middle Ear Reflex Thresholds towards White Noise and Acoustic Clicks In Young Adults,” Scand. Audiol., (1980), 9: 131-135. Leis, B., Lutman, M., “Calibration of Ipsilateral Acoustic Reflex Stimuli,” Scand. Audiol., (1979), 8: 9399. Liden, G., Peterson, J., Harford, E., “Simultaneous Recording of Changes In Relative Impedance and Air Pressure During Acoustic and Non-Acoustic Elicitation Of Middle Ear Reflexes,” Acta Otolaryngol., (1970), 263: 208-217. Margolis, R., Dubno, J., Wilson, R., “Acoustic-Reflex Thresholds for Noise Stimuli,” J. Acoust. Soc. Am., (1980), 68 (3): 892-895. Moller, A., “Acoustic Reflex in Man,” J. Acoust. Soc. Am., (1962), 34 (8): 1524-1534. Popelka, G., Margolis, R., Wiley, T, “Effect of Activating Signal Bandwidth on Acoustic-Reflex Thresholds,” J. Acoust. Soc. Am., (1976), 59 (1):153-159. Popelka, G., “Hearing Assessment with the Acoustic Reflex,” Grune & Stratton, Inc., New York, (1981). Silman, S., “The Acoustic Reflex-Basic Principles and Clinical Applications,” Academic Press, Inc., (1984). Stach, B., Jerger, J., “Acoustic Reflex Patterns in Peripheral and Central Auditory System Disease,” Sem. In Hear., (1987), 8 (4): 369-377. Stelmachowicz, R, Lilly, D., “An Indirect Estimate of Auditory-Frequency Selectivity from AcousticReflex Measurements,” J. Acoust. Soc. Am., (1979), 65 (6): 1501-1508. Wilbur, L., Kruger, B., Killion, M., “Reference Threshold Levels For The ER-3A Insert Earphone,” J. Acoust. Soc. Am., (1987), 81, Spring. Wilson, R., McBride, L., “Threshold and Growth of the Acoustic Reflex,” J. Acoust. Soc. Am., (1978), 63 (1): 147-154. Woodford, C., Feldman, A., Wright, H., “Stimulus Parameters, the Acoustic Reflex, and Clinical Implications,” Speech and Hear., (1975), Rev. (Winter), 29-37. Van Camp, K., Vanpeperstraete, P., Creten, W., Vanhuyse, V., “On Irregular Acoustic Reflex Patterns,” Scand. Audiol., (1975), 4: 227-232. GSI TympStar Version 1 Reference Instruction Manual B-5 Appendix B ACOUSTIC REFLEX - INFANTS Bennett, M., Weatherby, L., “Newborn Acoustic Reflexes to Noise and Pure-Tone Signals,” J. Speech and Hear., (1982), Res. 25: 383-387. Kankkunen, A., Liden, G., “Ipsilateral Acoustic Reflex Thresholds in Neonates and in Normal-Hearing And Hearing-Impaired Pre-School Children,” Scand. Audiol., (1984), 13: 139-144. Kruger, B., “The External Ear Resonance in Infants and Young Children,” ASHA Meeting, Detroit, Michigan, (1986). McMillan, P, Bennett, M., Marchant, C., Shurin, P, “Ipsilateral And Contralateral Acoustic Reflexes In Neonates,” Ear And Hear., (1985), 6 (6): 320-324. McMillan, P, Marchant, C., Shurin, P, “Ipsilateral Acoustic Reflexes in Infants,” Ann. Otol. Rhinol. Laryngol., (1985), 94: 145-148. Weatherby, L., Bennett, M., “The Neonatal Acoustic Reflex,” Scand. Audio., (1980), 9: 103-110. Wiley, T, Goldstein, R., “Tympanometric AndAcoustic-Reflex Studies in Neonates,” J..Speech And Hear., (1985), Res. 28: 265-272. REFLEX DECAY (ADAPTATION) Fowler, C., Wilson, R., “Adaptation of the Acoustic Reflex,” Ear and Hear., (1984), 5 (5): 281-288. Givens, G., Seidemann, M., “A Systematic Investigation of Measurement Parameters of Acoustic-Reflex Adaptation:, J. Speech and Hear. Dis., (1979), XLIV: 534-542. Habener, S., Snyder, J., “Stapedius Reflex Amplitude and Decay in Normal Hearing Ears,” Arch. Otolaryngol., (1974), 100: 294-297. Hirsch, A., Anderson, H., “Elevated Stapedius Reflex Threshold and Pathologic Reflex Decay,” Acta Otolaryngol., (1980), 368: 1 -28. Jerger, J., Jerger, S., “Acoustic Reflex Decay: 10-Second or 5-Second Criterion?” Ear and Hear., (1983), 4 (1): 70-71. Olsen, W., Noffsinger, D., Kurdziel, S., “Acoustic Reflex and Reflex Decay,” Arch. Otolaryngol., (1975), 101: 622- 625. Olsen, W., Stach, B., Kurdziel, S., “Acoustic Reflex Decay in 10 Seconds and in 5 Seconds for Meniere’s Disease Patients and for VIIIth Nerve Tumor Patients,” Ear and Hear., (1981), 2 (4): 180-181. Oviatt, D., Kileny, P., “Normative Characteristics of Ipsilateral Acoustic Reflex Adaptation,” Ear and Hear., (1984), 5 (3): 145-152. B-6 Grason-Stadler Bibliography Rosenhall, U., Liden, G., Nilsson, E., “Stapedius Reflex Decay in Normal Hearing Subjects,” J. Am. Aud. Soc., (1979), 4: 157-163. Wilson, R., Stechler, J., Jones, H., Margolis, R., “Adaptation of the Acoustic Reflex,” J. Acoust. Soc. Am., (1978), 64: 782-791. EUSTACHIAN TUBE FUNCTION (ETF) Bluestone, C., Paradise, J., Beery, Q., “Physiology of The Eustachian Tube in the Pathogenesis of Middle Ear Effusion on Children,” Laryngoscope, (1972), 82: 1654-1670. Bluestone, C., Paradise, J., Beery, Q., “Physiology of the Eustachian Tube Function,” Ann. Otol., (1972), 90: 552-562. Givens, G., Seidemann, M., “Acoustic lmmittance Testing of the Eustachian Tube,” Ear and Hearing, 5 (5): 297-299. Holmquist, J., “Eustachian Tube Function Assessed with Tympanometry,” Acta Otolaryngol., (1969), 68: 501-508. Riedel, C., Wiley, T, Block, M., “Tympanometric Measures of Eustachian Tube Function,” J. Speech and Hear. Res., (1987), 30: 207-214. Seidemann, M., Givens, D., “Tympanometric Assessment of Eustachian Tube Patency in Children,” J. Speech and Hear. Disord., (1977), 42: 487-496. Seifert, M., Seidemann, M., Givens, G., “An Examination of Variables Involved in Tympanometric Assessment of Eustachian Tube Function in Adults,” J. Speech and Hear. Disord., (1979), 44: 388-396. Virtanen, H., Marttila, T. “Middle-Ear Pressure and Eustachian Tube Function,” Arch. Otolaryngol., (1982), 108: 766-768. Williams, P., “A Tympanic Swallow Test for Assessment of Eustachian Tube Function,” Ann. Otol. Rhinol. Laryngol., (1975), 84; 339. GSI TympStar Version 1 Reference Instruction Manual B-7 Appendix B B-8 Grason-Stadler Appendix C A few basic troubleshooting instructions are provided below for the TympStar instrument. The problems described below can arise in the normal course of operation and can be resolved quickly. In the unlikely event that a problem occurs that persists or a system malfunction, please contact a GSI service provider for technical assistance. Never open the enclosure. WARNING There are no internal adjustments or assemblies that will ever require end-user attention. Never open the GSI TympStar enclosure. Basic problem solving Problem: • The screen is blank. Possible solutions: • Make sure that the power cord is fully connected on both ends, and that the power switch is in the ON state (1). • Make sure that the power source (wall socket) is providing power. Power must be in the range of 100 – 240 VAC at 50 to 60 Hz. Problem: • The system reports lack of pressure or lost pressure seal when trying to run a test. Possible solutions: • Change the eartip to provide a better seal (correct size) of the patient’s ear canal. • Clean the probe tubes to remove debris/obstructions (see chapter 3). Problem: • Test results do not appear as expected. Possible solutions: • Position the probe box to minimize vibrations. • Clean the probe tubes to remove debris/obstructions (see chapter 3). GSI TympStar Version 1 Reference Instruction Manual C-1 Appendix C Problem: • Paper jams in printer. Possible solutions: • Reorient the paper in the printer (see chapter 2). Problem: • Printed text is not readable. Possible solutions: • The thermal paper can be printed on only one side. Change the paper orientation (see chapter 2). C-2 Grason-Stadler Remote Specifications D 1 The Remote Function The Remote function provides serial communications capability to the GSI TympStar using an RS 232 interface. The serial communication provides the ability for the GSI TympStar to transmit status information and test result data to a Remote Device (such as a computer or data logging device) for further processing or storage. The GSI TympStar may also receive commands from a Remote Device allowing remote control and setup of the GSI TympStar. The Remote function is standard in all TympStar systems. 2 General Operation The Remote function is available during all operating modes of the unit and is selected by pressing the REMOTE hard key or via a command from the Remote Device. When the Remote function is active, it may be turned off by pressing the REMOTE hard key again. Pressing the REMOTE hard key allows the GSI TympStar to send and receive information over the RS 232 interface. Data transmission by the GSI TympStar can be initiated by pressing the DATA TRANSFER hard key or remotely via a command sent by the Remote Device. The GSI TympStar will be able to receive commands from the Remote Device at any time during its operation while the Remote function is selected and the GSI TympStar is not processing a previous front panel operation or remote command. These commands will allow the Remote Device direct access to most of the GSI TympStar front panel hard and soft keys to select test parameters and control test execution. Outgoing data from the TympStar may be sent in one of two formats: GSI 33 or TympStar. The former sends out data in the format identical to the GSI 33 instrument (predecessor to the TympStar). The latter extends the GSI 33 format to include data unique to the TympStar instrument; for example 26 tests (the GSI 33 is limited to 8). The GSI 33 or TympStar formats are selected under the Instrument Options menu - Remote Setup (see Chapter 4). 3 Serial Interface 3.1 General Operation The Remote function will communicate with a Remote Device over an RS 232 compatible asynchronous interface. The GSI TympStar is configured as a DCE (Data Communication Equipment) device and would normally connect to a DTE (Data Terminal Equipment) device, such as a personal computer (PC). 3.2 Interface Connections The GSI TympStar Remote interface connector is a standard 9-pin “D” style female connector. 3.2.1 DCE to DTE Interface Connection Pin Assignments Left arrow () and Right arrow () denote the direction of the signal. TXD = Transmitted Data RTS = Request to Send RXD = Received Data CTS = Clear to Send GSI TympStar Version 1 Reference Instruction Manual D-1 Appendix D 3.3 Interface Configuration The interface configuration requires that 7 data bits be used. This is fixed and not modifiable by the user. The Baud Rate, Parity Number of Stop bits and RTS/CTS handshaking are modifiable in Instrument Options under the Remote Settings option. The baud rate, parity, and stop bits must match that of the remote device or else there can be no communication between the GSI TympStar and the remote device. Baud rate can be set to 300, 600, 1200, 2400, 4800, 9600 or 19200. Available Parity settings are None, Even and Odd. Number of Stop bits can be set to 1 or 2. RTS/CTS handshaking can be enabled or disabled. 3.4 RTS/CTS Hardware Handshaking The Remote Device may use the RTS signal to allow or inhibit data transmission from the GSI TympStar to the Remote Device; when the RTS signal is set true (asserted) by the Remote Device the GSI TympStar is enabled to transmit data. When the RTS signal is set false by the Remote Device, the GSI TympStar is inhibited from transmitting data. The Remote Device should insure that RTS is set true prior to requesting data from the GSI TympStar to prevent a timeout error on the GSI TympStar due to it being inhibited from transmitting data. The GSI TympStar uses the CTS signal to allow or inhibit data transmission from the Remote Device to the GSI TympStar. When the CTS signal is set true (asserted) by the GSI TympStar the Remote Device may transmit to the GSI TympStar. When the CTS signal is set false by the GSI TympStar the Remote Device must not transmit to the GSI TympStar. Failure to comply with this condition may result in loss of data transmitted to the GSI TympStar. The GSI TympStar does not currently use the DTR and DSR signals and therefore does not support handshaking using these signals. The GSI TympStar will set the CTS line false to prevent data transmission by the Remote Device while the GSI TympStar is processing either a front panel pushbutton operation or a command record set from the Remote Device. The CTS line will also be set false by the GSI TympStar during all data transfers to the Remote Device. When the processing is complete the CTS line will be set true to allow transmission by the Remote Device. 3.5 Baud Rate Selection To minimize transmission times the highest baud rate that is supported on both the GSI TympStar and the Remote device should be selected. D-2 Grason-Stadler Remote Specifications 4 Remote Mode Entry and Exit 4.1 Remote Hard key The Remote mode is entered or exited by pressing the REMOTE hard key or via a Remote Mode command sent from the Remote Device. If not in Remote mode, the word REMOTE will show up in the lower right side of the screen when the REMOTE hard key is pressed. If the REMOTE status message is already showing, pressing the REMOTE hard key will exit the remote mode and clear the REMOTE status message. 4.2 Remote Instrument Options settings The Record Type and Clear Test options are set in Instrument Options for the GSI TympStar under Data Transfer Settings. For the Record Type option, all tests can have a selected record type: Summary or Summary and Graphics. The default Record Type setting is SUMMARY. The RECORD TYPE softkey allows the operator to select what type of information is transmitted by the GSI TympStar when the DATA TRANSFER hard key is operated. A Summary Data record contains test identifier information, test parameter selections and summary test results. A Summary + XY Graphical Record format contains test identifier information, test parameter selections, summary test results and the X,Y graphical test results. The current RECORD TYPE softkey selection will be displayed as either “SUMMARY” or “SUMMARY + XY” above the softkey. For the Auto Clear option, two options can be chosen: Automatic or Manual. The default Clear Test setting is MANUAL. The CLEAR TEST softkey allows the operator to have test data automatically cleared from the LCD screen and the page memory when the data is transmitted by selecting the AUTO softkey. If MANUAL is operated the operator must manually clear the test data, if desired, after data transmission. The current CLEAR TEST softkey selection is displayed as either “MANUAL” or “AUTO” directly above the softkey. The outgoing data format is selected as either GSI 33 DATA or GSI TYMPSTAR DATA. The menu DATA FORMAT is found in Instrument Options under Remote settings. The GSI 33 DATA softkey allows for the transfer of a data stream that will be in the same format as the GSI 33 outgoing data while when the GSI TYMPSTAR DATA softkey is selected, a new data stream will be sent which consists of all the information from the GSI 33 data stream as well as any new items specific to the GSI TympStar. Once the Remote Mode is entered, the DATA TRANSFER hard key is enabled. This is indicated on the LCD display by the word “REMOTE” displayed on the right margin of the message line. GSI TympStar Version 1 Reference Instruction Manual D-3 Appendix D 5 Remote Output Operation 5.1 Data Transfer Key Press The transmission of data from the GSI TympStar to the external device is initiated by either operating the DATA TRANSFER hard key or by a command record from the Remote Device. The following conditions indicate when a data transfer request is invalid and the corresponding error message which will indicate the invalid condition: Remote Mode not selected “ALERT REMOTE MODE NOT SELECTED” The current test is in progress i.e. the START LEFT or START RIGHT hard key has been operated and in Reflex type tests, a stimulus is being presented “ALERT - INVALID WHILE TEST IN PROGRESS” If an invalid data transmission is attempted the indicated error message is momentarily displayed with the word ALERT flashing. If the invalid transmission was initiated by a remote command an error record is sent to inform the Remote Device of the error and its cause. When using the DATA TRANSFER hard key, the data which is transmitted to the Remote Device is the data for the test which is currently displayed on the LCD. This allows for the transmission of data for the current test or for a previous test if the transmission is initiated while displaying a previous test in the Page mode. When the status message over the test number in Page mode displays ALL, all the tests in page memory will be transferred. When transmitting data in response to a command from the remote device, the test that is being transferred is not always displayed on the LCD. When a valid DATA TRANSFER operation occurs the message “ALERT DATA TRANSMISSION IN PROGRESS” is displayed. All pertinent parameter and test data are then collected from the page memory, formatted and stored in a buffer area for transmission to the Remote Device. While the data collection, buffering and transmission is in progress all front panel pushbuttons, except for the STOP hard key, are invalid. Pressing any of these invalid keys results in the error message “ALERT INVALID SELECTION. DATA TRANSFER IN PROGRESS” being displayed momentarily with the word “ALERT” flashing. When the transmission is complete all pushbuttons are valid and the “TRANSMISSION IN PROGRESS” message will be erased. If the DATA TRANSFER hard key is operated while a data transfer is already in progress the current transfer is terminated. The warning message “ALERT DATA TRANSFER ALREADY IN PROGRESS” flashes momentarily. When a data transfer from the GSI TympStar to the Remote Device is initiated or at any time during the transmission, if the Remote Device disables the transmission by setting the RTS line false for greater than 10 seconds the GSI TympStar aborts the transmission. The error message “ALERT - DATA TRANSFER INHIBITED DATATRANSFER ABORTED” is displayed momentarily with the word ALERT flashing. This error message replaces the “DATA TRANSFER IN PROGRESS” message. No error record will be sent to the Remote Device. The information that is transmitted consists of either test results or unit status information in formatted records. In all cases the format of the records are the same for a Version 1 and Version 2 TympStar unit. The parameters that are not selectable on Version 1are indicated as the default selection (such as Probe Tone = 226 Hz) or as a null selection (sequence of “-” characters) (such as for the Click Rate). D-4 Grason-Stadler Remote Specifications 5.2 Record Types The types of output records are as follows: Record Type Record Description 1 Summary data record: Contains test parameter and summary test results. 2 XY Graphical data record: Contains X,Y graphical data. Due to the large amount of data that may have to be transmitted, the data is sent in multiple records with each record containing up to 29 XY data pairs. 3 End of XY Graphical data record: Sent to indicate the end of a series of Summary and XY Graphical data records. 4 Error record: Use to indicate error conditions which may occur during remote control of the GSI TympStar. The following error conditions are indicated: See Section 9 for a description of the error codes. 5 Current X,Y data record: Contains the current Y axis and X axis values or other parameter values of importance in the current unit state. 6 Unit identifier data record: Contains the unit type (GSI TympStar), version (1/2), unit identifier number and software revision information. The unit identifier number is defaulted to 0000 until it is set by the Remote Device. Once set by the Remote Device it is defaulted back to 0000 when the User Default data is loaded in the Calibration Mode. At this time the Signal Processor software revision will default to 00.00. 7 Test mode change status record: When enabled, automatically sent by the GSI TympStar when it automatically changes test mode to notify the external device. 8 Summary data record with attached XY Graphical data records: Used when the operator has selected the Summary and XY Graphical data record type. This record is exactly the same as a type 1 summary data record but is used in this case to indicate to the Remote device that additional records will follow this one which contain the XY graphical data associated with this test parameter and summary test result information. 9 Input Query Results Record Contains information that was requested by an input record. Query results could contain parameter values and text strings. 5.3 General Record Information 5.3.1 · · · · Rules for Records All records are sent as ASCII characters starting with an “|” character and ending with a checksum, carriage return and line feed. All multiple ASCII character fields are right justified with unused character positions filled with ASCII “SPACE” characters. All zero (null) fields are filled with “—” characters. All numerical test data or results are sent in the same format and accuracy as they are displayed on the LCD screen whenever possible. Any differences are detailed in Section 7. GSI TympStar Version 1 Reference Instruction Manual D-5 Appendix D · · · All Summary Data records consist of the following general format: | (Start of record symbol) Record Type Record Sequence Number Test type and number Test parameters and numeric test results Checksum Carriage Return Line Feed All status records consist of the following general format: | (Start of record symbol) Record Type Record Sequence Number Status Information Checksum Carriage Return Line Feed All XY Graphical Data records consist of the following general format: | (Start of record symbol) Record Type Record Sequence Number Test number Line number Number of XY data pairs in this record XY graphical data Checksum Carriage Return Line Feed 5.3.2 Checksum The checksum is provided to allow the Remote Device a means to detect data transmission errors. The checksum is generated by the GSI TympStar after the record has been formatted in the transmit buffer. The checksum is the arithmetic sum in hexadecimal of all 8 bit bytes in the record starting with the “|” character until, and including, the last data byte before the first byte of the checksum. The checksum itself and the “CR,” “LF” are not included in the checksum calculation. The checksum is truncated to the least significant 8 bits, converted to 2 ASCII characters, and then inserted into the record before transmission. 5.3.3 Record Sequence Number The record sequence number is a number between 00 and 99 in modulo 99 format which is set by the GSI TympStar when the record is transmitted. For each new record transmitted the number is incremented by 1. If a record must be retransmitted the number is not changed and remains the same value as in the previous transmission. The record sequence number is provided to allow the Remote Device a means to detect if a record it has received is a new record or a retransmission of the previous record. 5.3.4 Record Size The actual length and format of the data records vary based on the type of test and the length of the test (the number and amount of lines used). The record contains data only for the number of lines or traces which were actually used during the test. The maximum total size of all records in any case do not exceed 512 bytes. The record formats defined in Section 7 are for the worst case condition when the maximum amount of data for a test is transmitted. D-6 Grason-Stadler Remote Specifications 5.4 Summary and XY Graphical Data When the Summary and XY Graphical record type is selected upon entering the Remote Mode, the actual X and Y axis values used to plot the graphs on the LCD screen are sent in addition to the test parameter and numerical test results. The test’s summary data and XY graphical data transferred to the Remote Device are broken up into a sequence of records. This is necessary due to the large amount of XY graphical data that may be transmitted for a test. The first record is a summary data record (record type 8) to transfer the test parameter information and summary test results. This record is followed by a series of XY Graphical data records. If no XY data exists yet for this test a summary data record is transmitted followed by an End of XY Graphical data record. See Section 7 for the record format. The actual number of XY Graphical data records vary based on the actual amount of graphical information stored for the test. The last XY Graphical data record for each line may contain a fewer number of XY data pairs than the others of that line based on the number of XY data pairs left to transmit. The sequence in which the XY data pairs are transmitted is the XY data pairs for line 1 in left to right order, the data pairs for line 2 in left to right order and then the data pairs for line 3 in left to right order. The record series will be terminated with an End of XY Graphical data record. See Section 7 for the format of this record. 5.5 Transmission Verification Protocol 5.5.1 ARQ Protocol When any type of record is transmitted to the Remote Device the GSI TympStar knows that the record has been correctly received by the Remote Device. This is accomplished by using an Auto Repeat Request (ARQ) type protocol. Under this protocol the GSI TympStar will transmit a record and then wait for a reply from the Remote Device to indicate the successful or unsuccessful receipt of the record. If the record was received correctly the Remote Device responds with an ACK (acknowledge) response record. The determination of a successful record receipt will be the responsibility of the Remote Device to define, but, at a minimum, should include checking for a valid start of record character (ASCII “|”) and a valid checksum for the record. If the record was not received correctly the Remote Device must respond with a NAK (negative acknowledge) response record. See Section 8 for the format of the ACK and NM records. Upon receipt of an ACK record the GSI TympStar transmits the next record, if additional records are to be transmitted, or deletes the test data just transmitted from the page memory if the Auto Clear feature is selected, and then terminate the transmission process. If a NAK record is received the GSI TympStar retransmits the same record. A maximum of 2 retransmissions of a record will be attempted by the GSI TympStar. If the record is still not received correctly the data transfer will be aborted. The error message “ALERT - DATA TRANSFER ERROR. DATA TRANSFER ABORTED” will be displayed on the LCD screen momentarily with the word ALERT flashing. No error record will be sent to the Remote Device. This ARQ Protocol is required only for data transmission from the GSI TympStar to the Remote Device and is not used for transmissions from the Remote Device to the GSI TympStar. 5.5.2 ACK/NAK Not Received After each record is transmitted by the GSI TympStar the GSI TympStar waits for a maximum of 10 seconds for the ACK or NAK record. If one or the other is not received within the time limit the GSI TympStar assumes that the record was not received correctly by the Remote Device and retransmits the record just as if a NAK record had been received. Each record will contain a record sequence number that allows the Remote Device to determine if a record is a retransmission of an incorrectly received record or is a new record. GSI TympStar Version 1 Reference Instruction Manual D-7 Appendix D 5.5.3 Transmitting Series of Data Blocks When the GSI TympStar is transmitting a series of Summary and XY Graphical data block records, each record is sent using the ARQ protocol and the transmission proceeds in this manner until all data block records have been transmitted. At that time the GSI TympStar transmits an End of Data record (See Section 7 for the record format) to inform the Remote Device that all data has been transferred. The Remote Device must again respond with an ACK or NAK to complete the transfer. 5.6 Auto Clear Operation If the Auto Clear feature is selected prior to the transfer of data, then, after Summary test data or Summary and XY Graphical data has been successfully transmitted to the Remote Device, the test data is automatically cleared from the LCD screen and from the page memory. The Auto Clear function operates only for data transfers initiated by the Data Transfer hard key. If the data transfer occurs while in STOP, all summary and XY Graphical test data for the test just completed are cleared from the LCD screen and the page memory. The test remains in STOP and the test number is not incremented when the next test is started. If the data transfer occurs while in HOLD, all summary and XY Graphical test data for the current test are cleared from the LCD screen and the page memory. The test remains in HOLD and the test number will not change. If the data transfer occurs while a Reflex test is in RUN but without a stimulus being presented, all summary and XY Graphical test data for both lines are cleared from the LCD screen and the page memory. If the CONTINUE softkey was being displayed, it is erased and replaced by the normal menu and stimulus presentations are then allowed. The next stimulus presentation is plotted at the beginning of the top line. The test remains in RUN and the test number is not changed. The Auto Clear function does not operate when data transfer occurs in the Page mode, in the ETF TM test or in a Multiple Frequency Screen #1 and #2 test. 5.6.1 Output Records For the detailed Output Record formats see Section 7. D-8 Grason-Stadler Remote Specifications 6 Remote Input Operation The Remote input feature allows the GSI TYMPSTAR to receive commands or data from the Remote Device. The commands give the Remote Device access to most front panel controls by simulating the operation of the front panel controls. While the Remote Mode is enabled the front panel controls are still active, allowing the unit to be simultaneously manually and remotely controlled. There will be no priority between the Remote commands and the Manual commands. All keys that are pressed while another command is in process are processed when the first key is complete. The STOP key has priority over any other key press. Whenever the Stop Key is pressed all queued keystroke command (both manual and remote) are flushed out and stopped. Remote commands consist of three basic types; single key (soft and hard) presses, special commands and text entry commands. The single keystroke commands allow the Remote Device to directly control all soft or hard keys. Manual is the only key that cannot be pressed since manual mode is not accessible remotely. An example is a command which directly presses softkey 3. The special commands are provided to allow the Remote Device to make selections not available as a soft or hard key, or to directly modify a parameter that is normally changed by scrolling through a range of selections, such as the activator stimulus or intensity. These special commands also allow for querying of values for parameters so that any changes can be checked remotely. The text entry command is used to enter patient, tester and facility information. These commands also have querying capabilities. When a remote command is being processed the status message “ALERT REMOTE COMMAND IN PROGRESS” is displayed on the status line. This message is displayed until the processing of the command is complete or for 1 second, whichever is longer. The Remote Device has the ability to directly modify all parameters for the current test. When a parameter is changed, the menu on the LCD screen does not change as it does when softkeys are manually operated. If a parameter, which is represented by a softkey in the currently displayed menu, is modified the new parameter value is indicated above the softkey on the status line, just as if the parameter had been changed manually. If a single keystroke, softkey or hardkey is remotely pressed, the screen and menu changes as it does when these keys are manually operated. If the softkey corresponding to the modified parameter is not in the currently displayed menu, the parameter will still be changed immediately but the new parameter value is not indicated on the status line until the menu containing that softkey is displayed by manually operating softkeys or the RETURN hard key. If a parameter whose status is indicated on the LCD screen in a position other than the status line (i.e. Intensity, Stimulus, Auto Timing ON, OFF, Quantity, etc) is changed; the new parameter selection is indicated at the time of the change in its normal position on the LCD screen. When mode switches are made by the Remote Device, the same parameter defaults which would have occurred if the parameter was changed manually still occur. Examples of this are remotely pressing the TYMP hard key which causes all of the Tymp test softkeys to be defaulted to the parameters stored in the User memory, or selecting a long Reflex Threshold ON time which may force the OFF time to default to a shorter time. The Remote input consists of short records transmitted from the Remote Device to the GSI TympStar. Since the GSI TympStar has remote querying abilities there are two options for each record, sending a change to a parameter or querying the value of a parameter. When the record is being processed, if a query command is requested, any bytes following the request code are ignored. The query results are sent to the remote system as short records that can be seen in the 9.3.8 Input Record Query Results section of the remote specifications. GSI TympStar Version 1 Reference Instruction Manual D-9 Appendix D Records may be sent during all operating modes of the GSI TympStar at any time that the selected handshaking indicates that the GSI TympStar is able to accept records. When a record is sent the RS232 interface software receives and validates each character of the record as it is sent. When a full record has been received, it is decoded and validated. Most of the special commands are only accepted in the STOP state, while single soft key and hardkey presses are valid whenever the associated manual key press is valid and finally the text entry commands are only valid when the cursor is flashing. The command or operation requested by the record is queued for processing by the GSI TympStar. The command is processed immediately if the GSI TympStar is not currently processing a previous remote command or front panel operation or as soon as the previous processing is completed. From the time a complete and valid command is received until the processing of the command is finished the RS232 interface indicates to the Remote Device that the GSI TympStar is unable to accept additional input by setting the CTS handshaking line false. This is only valid when the CTS/RTS parameter is set to ON in Instrument Options. 6.1 Record Validation In most cases, the validation of incoming remote commands is a three-step process. The three steps are validation of the record itself, validation of the state and test mode, and finally validation of the specific command and subcodes. Validation of the record include making sure the format of the record is correct for processing. · · · Each record must begin with a “|” character and end in a valid “CRLF” sequence. Each received character of a record is checked to insure that it is a valid ASCII character. Each record must contain a valid record type. Each record is valid for specified test modes and test states. For example, almost all tests will be invalid when the TympStar is in Run mode. Finally, validation of specific commands depends on the subcodes and different structures of the commands. Included in validation of specific commands are: · · · · All records must contain the correct number of characters for the record type. Each single keystroke command record must contain a valid function code. Each special commands command record must contain a valid function sub code unless the function sub code is not used. All fields of all other record types must contain a value in the range specified for the record in Section 8. 6.1.1 Keystroke Command Validation For single keystroke commands that remotely control the hard keys and soft keys, the validation process includes the validation of the corresponding pushbutton. These Invalid remote commands display an error message on the LCD screen and are also sent back to the remote device. The error record that is sent is in the standard error record format with 101 as the error code and a subcode representing the string number of the error message that was displayed. Therefore, remote commands which activate a hard or soft key are only valid during tests in which that hard or soft key is normally available. 6.1.2 Non-Keystroke Command Validation For all other invalid remote commands, an error message is not displayed on the LCD screen and an error message record is transmitted to the Remote Device indicating the invalid command. D - 10 Grason-Stadler Remote Specifications 6.1.3 Miscellaneous Validation On a Version 1 unit all test parameters, tests or features that are unique to Version 2 are invalid. If any errors occur, the GSI TympStar will not accept the record and an error message record will be sent back to the Remote Device to indicate the type of error that had occurred. See Section 9 for the description of the error records. All input records must be sent by the Remote Device as a sequence of ASCII characters starting with a vertical bar and ending with an ASCII carriage return (CR) and line feed character (LF). Any record that is sent to the TympStar from a remote system that does not start with a vertical bar is ignored. In order to reduce the risk of an invalid record being accepted by the GSI TympStar due to a transmission error, the GSI TympStar only accepts a CR/LF sequence at the end of a record. All multiple character fields are right justified with any unused character positions filled with ASCII “SPACE” characters. The minus sign of negative values in a numeric field may be located in any character position to the left of the most significant digit of the number. The plus sign of positive values is implied, so a numeric field containing a positive number should not contain a “+” character. 6.2 Special Command Descriptions The types of input records that may be sent to the GSI TympStar are as follows: NOTE All of these commands are only valid in the top menus of the test they are associated with unless otherwise specified. All cursor records are only available when in that specific cursor screen. 001 Single Key Commands Used to initiate a hardkey or softkey press. The remote key press that is sent acts exactly like a key press on the TympStar and the keys are valid in the same instrument states as the corresponding hard or soft key. 002 Start Auto Sequence Command Used to start an Auto-Sequence test. The user must be on the Tymp Diagnostic screen for this remote command to be valid. 003 Set TYMP Diagnostic Probe Hz Used to change the Probe Hz parameter. This command is only valid in the Tymp Diagnostic test mode. Any change that occurs due to a change in Probe Hz changes immediately as if the change was made navigating the menus. 004 Set TYMP Diagnostic Admittance Used to change the Admittance parameter. This command is only valid in the Tymp Diagnostic test mode. Any change that occurs due to a change in Admittance changes immediately as if the change was made navigating the menus. 005 Set TYMP Diagnostic Pressure Range Used to change the Pressure range between Normal and Wide. This command is only valid in the Tymp Diagnostic test mode. GSI TympStar Version 1 Reference Instruction Manual D - 11 Appendix D 006 TYMP Diagnostic Ear Toggle Used to toggle between Left and Right Ear. This command is only valid in the Tymp Diagnostic test mode. 007 Set TYMP Diagnostic Pressure Rate Used to modify the Pressure rate parameter. This command is only valid in the Tymp Diagnostic test mode. 008 Set TYMP Diagnostic Start Pressure Used to modify the Start Pressure parameter. This command is only valid in the Tymp Diagnostic test mode. 009 Set TYMP Diagnostic Baseline Used to modify the Baseline parameter (On or Off). This command is only valid in the Tymp Diagnostic test mode. 010 Set TYMP Diagnostic Gradient Used to set the Gradient ON and modify the type of Gradient to be used. This command is only valid in the Tymp Diagnostic test mode. 011Set TYMP Diagnostic Cursor Allows the cursor to be moved to a specified X-axis position when the cursor is active and allows the user to set the Tymp peaks. This command is valid in Tymp Diagnostic as long as the test is either complete or in HOLD and a line has already been plotted. 012 Set TYMP Screening Pressure Range Used to change the Pressure range between Normal and Wide. This command is only valid in the Tymp Screening test mode. 013Set TYMP Screening Pressure Rate Used to modify the Pressure rate parameter. This command is only valid in the Tymp Screening test mode. 014 Set TYMP Screening Start Pressure Used to modify the Start Pressure parameter. This command is only valid in the Tymp Screening test mode. 015 Set TYMP Screening Gradient Used to set the Gradient ON and modify the type of Gradient to be used. This command is only valid in the Tymp Screening test mode. 016 TYMP Screening Ear Toggle Used to toggle between Left and Right Ear. This command is only valid in the Tymp Screening test mode. D - 12 Grason-Stadler Remote Specifications 017 Set TYMP Screening Baseline Used to modify the Baseline parameter (On or Off). This command is only valid in the Tymp Screening test mode. 018 Set TYMP Screening Auto Start Used to change the Auto Start selection. If selection is OFF and is changed to ON remotely, and the probe is in a sealed cavity, a test starts as it would when the softkey itself was changed using softkey presses. This command is only valid in the Tymp Screening test mode. 019 Set TYMP Screening Reflex Type Used for the selection of the Reflex type or to turn off the Reflex type. This command is only valid in the Tymp Screening test mode. 020 Set TYMP Screening Stimulus Hz Used for modifying the different stimulus Hz (500, 1000, 2000, 4000). When Ipsi or Contra is selected as Reflex type, two stimuli can be turned on. This command is only valid in the Tymp Screening test mode. 021 Set TYMP Screening Cursor Allows the cursor to the moved to a specified X-axis position when the cursor is active and allows the user to set the Tymp peaks. This command is valid in Tymp Screening as long as the test is complete and a line has already been plotted. 022 Set Reflex Threshold Stimulus Ear Allows the Stimulus ear parameter to be selected remotely. This command is valid in a Reflex Threshold test. 023Set Reflex Threshold Mark Threshold Sets the Threshold marker (NR or *) to the specified trace. This command is valid in a Reflex Threshold test after test has been run. This incoming record can only be used when in the mark threshold menu. 024 Set Reflex Threshold—Threshold Seek Allows the configuration of the minimum change, start dBHL, stop dBHL of the Threshold Seek. This command is valid during a Reflex Threshold test. 025 Set Reflex Threshold Auto Zero Used to change the Auto Zero parameter (ON or OFF). This command is valid in a Reflex Threshold test. 026 Reflex Threshold Ear Toggle Used to toggle between Left and Right Ear. This command is only valid in the Reflex Threshold test mode. GSI TympStar Version 1 Reference Instruction Manual D - 13 Appendix D 027 Set Reflex Threshold Probe Hz Used to change the Probe Hz parameter. This command is only valid in the Reflex Threshold test mode. Any additional changes that occurs due to a change in Probe Hz occurs immediately as if the change was made from navigating the menus. 028 Set Reflex Threshold Admittance Used to change the Admittance parameter. This command is only valid in the Reflex Threshold test mode. Any screen or test change that occurs due to a change in Admittance changes immediately as if the change was made navigating the menus. 029 Set Reflex Threshold Stimulus Timing Allows direct modification of timing (ON Time, OFF Time and Quantity) parameters in msec in the defined increments and range for the test. This command is valid in all Reflex Threshold tests as long as a stimulus is not being presented. 030 Set Reflex Threshold Timebase Allows direct modification of timebase. Instead of using arrows like the softkeys, an integer is used to select one of the 4 possible timebases (15s, 30s, 45s, and 60s). This command is valid in Reflex Threshold tests. 031 Set Reflex Threshold Step size Allows the user to remotely change the step-size, which controls the increments for the probe intensity. This command is valid in Reflex Threshold tests. 032 Set Reflex Threshold ml Scale Used to change the scale of the Reflex plot. This command is valid in Reflex Threshold tests. 033 Set Reflex Threshold Click Rate Allows selection of click rate in the standard increment and range. This command is valid during a Reflex Threshold test as long as a stimulus is not being presented. 034 Set Reflex Threshold Cursor Allows the cursor to be moved to a specified X-axis position when the cursor is active. This command is valid in Reflex Threshold as long as a tone is not being processed and there is already data plotted. 035 Set Reflex Threshold Stimulus Allows selection of stimuli based on valid stimuli for the current test. This command is valid during a Reflex Threshold test as long as a stimulus is not being presented. 036 Set Reflex Threshold Intensity Allows direct selection of intensity in 1 dB steps in current valid intensity range. This command is valid during a Reflex Threshold test as long as a stimulus is not being presented. D - 14 Grason-Stadler Remote Specifications 037 Set ETF Intact Probe Hz Used to change the Probe Hz parameter. This command is only valid in the ETF Intact test mode. Any change that occurs due to a change in Probe Hz occurs immediately as if the change was made from navigating the menus. 038 Set ETF Intact Pressure Range Used to change the Pressure range between Normal and Wide. This command is only valid in the ETF Intact test mode. 039 Set ETF Intact Pressure Rate Used to modify the Pressure rate parameter. This command is only valid in the ETF Intact test mode. 040 Set ETF Intact Start Pressure Used to modify the Start Pressure parameter. This command is only valid in the ETF Intact test mode. 041 ETF Intact Ear Toggle Used to toggle between Left and Right Ear. This command is only valid in the ETF-Intact test mode. 042 Set ETF Intact Admittance Used to change the Admittance parameter. This command is only valid in the ETF Intact test mode. Any change that occurs due to a change in Admittance changes immediately as if the change was made navigating the menus. 043 Set ETF Intact Baseline Used to modify the Baseline parameter (On or Off). This command is only valid in the ETF Intact test mode. 044 Set ETF Intact Cursor Allows the cursor to be moved to a specified X-axis position when the cursor is active and allows the user to set the Tymp peaks. This command is valid in ETF Intact as long as the test is complete. 045 Set ETF Intact Continue Processes continue softkey that is displayed between Tymp sweeps. This is valid only when the continue softkey is displayed in ETF Intact test mode. This can only be used when the continue softkey is diaplayed. 046 Set ETF Perforated Pressure Max Allows selection of the maximum pressure in the standard increment and range. This command is valid during an ETF - Perforated TM test while the test is stopped. 047 Set ETF Perforated Time (sec) Allows the selection for the time. Any changes that occur to the screen when the time is changed occur immediately. Instead of using the arrows to change the Time, an integer will be used to select between the 4 Time choices (30s, 40s, 50s, and 60 s). This command is only valid in the ETF – Perforated test mode when the test is stopped. GSI TympStar Version 1 Reference Instruction Manual D - 15 Appendix D 048 Set ETF Perforated Cursor Allows the cursor to be moved to a specified X-axis position when the cursor is active. This command is valid in the ETF Perforated test mode when a test has finished plotting. 049 ETF Perforated Ear Toggle Used to toggle between Left and Right Ear. This command is only valid in the ETF Perforated test mode. 050 Set Reflex Decay Probe Hz Used to change the Probe Hz parameter. This command is only valid in the Reflex Decay test mode. Any change that occurs due to a change in Probe Hz occurs immediately as if the change was made from navigating the menus. 051 Set Reflex Decay Stimulus Ear Allows the Stimulus ear parameter to be modified remotely. This command is valid in a Reflex Decay test. 052 Set Reflex Decay Stimulus On-Time Allows direct selection of the On-Time parameter in msec under the constraints of the defined increments and range for the test. This command is valid in the Reflex Decay test mode as long as a stimulus is not being presented. 053 Set Reflex Decay Auto Zero Used to change the Auto Zero parameter (ON or OFF). This command is valid in a Reflex Decay test. 054 Reflex Decay Ear Toggle Used to toggle between Left and Right Ear. This command is only valid in the Reflex Decay test mode. 055 Set Reflex Decay Admittance Used to change the Admittance parameter. This command is only valid in the Reflex Decay test mode. Any change that occurs due to a change in Admittance changes immediately as if the change was made navigating the menus. 056 Set Reflex Decay Timebase Allows direct selection of timebase. Instead of using arrows like the softkeys, an integer is used to select one of the 4 possible timebases (15s, 30s, 45s, and 60s). This command is valid in the Reflex Decay test mode. 057 Set Reflex Decay Step size Allows the user to remotely change the step-size, which controls the increments for the probe intensity. This command is valid in the Reflex Decay test mode. 058 Set Reflex Decay ml Scale Used to change the scale of the Reflex plot. This command is valid in the Reflex Decay test mode. D - 16 Grason-Stadler Remote Specifications 059Set Reflex Decay Cursor Allows the cursor to be moved to a specified X-axis position when the cursor is active. This command is valid in Reflex Decay as long as a tone is not being processed and there is already data plotted. 060 Set Reflex Decay Stimulus Allows selection of stimuli based on valid stimuli for the current test. This command is valid during a Reflex Decay test as long as a stimulus is not being presented. 061Set Reflex Decay Intensity Allows direct selection of intensity in 1 dB steps in current valid intensity range. This command is valid during a Reflex Decay test as long as a stimulus is not being presented. 062 Set ARLT Stimulus Ear Allows the Stimulus ear parameter to be selected remotely. This command is valid in the ARLT test mode. 063 Set ARLT Stimulus On-Time Allows direct selection of the On-Time parameter in msec under the constraints of the defined increments and range for the test. This command is valid in the ARLT test mode as long as a stimulus is not being presented. 064 Set ARLT Auto Zero Used to change the Auto Zero parameter (ON or OFF). This command is valid in the ARLT test mode. 065 Set ARLT ml Scale Used to change the scale of the Reflex plot. This command is valid in the ARLT test mode. 066 ARLT Ear Toggle Used to toggle between Left and Right Ear. This command is only valid in the ARLT test mode. 067Set ARLT Admittance Used to change the Admittance parameter. This command is only valid in the ARLT test mode. Any change that occurs due to a change in Admittance changes immediately as if the change was made navigating the menus. 068 Set ARLT Timebase Allows direct selection of timebase. Instead of using arrows like the softkeys, an integer is used to select one of the 4 possible timebases (500ms, 1000ms, 1500ms, 2000ms). This command is valid in the ARLT test mode. 069 Set ARLT Step size Allows the user to remotely change the step-size, which controls the increments for the probe intensity. This command is valid in the ARLT test mode. GSI TympStar Version 1 Reference Instruction Manual D - 17 Appendix D 070 Set ARLT Average Allows selection of the number of presentations to be averaged in the standard increment and range. This command is valid during an ARLT test as long as a stimulus is not being presented. 071 Set ARLT Cursor Allows the cursor to be moved to a specified X-axis position when the cursor is active. This command is valid in ARLT as long as a tone is not being processed and there is already data plotted. 072 Set ARLT Stimulus Allows selection of stimuli based on valid stimuli for the current test. This command is valid during an ARLT test as long as a stimulus is not being presented. 073 Set ARLT Intensity Allows direct selection of intensity in 1 dB steps in current valid intensity range. This command is valid during an ARLT test as long as a stimulus is not being presented. 074Set A.R. Sensitization Stimulus Ear Allows the Stimulus ear parameter to be selected remotely. This command is valid in the A.R. Sensitization test mode. 075 Set A.R. Sensitization Stimulus Timing Allows direct selection of timing (ON Time, OFF Time and Quantity) parameters in msec in the defined increments and range for the test. This command is valid in the A.R. Sensitization test mode as long as a stimulus is not being presented. 076 Set A.R. Sensitization Auto Zero Used to change the Auto Zero parameter (ON or OFF). This command is valid in the A.R. Sensitization test mode. 077 Set A.R. Sensitization ml Scale Used to change the scale of the A.R. Sensitization plot. This command is valid in the A.R. Sensitization test mode. 078 A.R. Sensitization Ear Toggle Used to toggle between Left and Right Ear. This command is only valid in the A.R. Sensitization test mode. 079 Set A.R. Sensitization Admittance Used to change the Admittance parameter. This command is only valid in the A.R. Sensitization test mode. Any change of test or screen appearance that occurs due to a change in Admittance changes immediately as if the change was made navigating the menus. D - 18 Grason-Stadler Remote Specifications 080 Set A.R. Sensitization Timebase Allows direct selection of timebase. Instead of using arrows like the softkeys, an integer is used to select one of the 8 possible timebases (1.5s, 3.0s, 4.5s, 6.0s, 7.5s, 9.0s, 10.5s, and 12.0s). This command is valid in the A.R. Sensitization test mode. 081 Set A.R. Sensitization Step size Allows the user to remotely change the step-size, which controls the increments for the probe intensity. This command is valid in the A.R. Sensitization test mode. 082 Set A.R. Sensitization Facilitator Allows direct selection of the facilitator values for intensity in 1 dB steps and for the stimulus. These selections will be valid depending on the current test. This command is valid during an A.R. Sensitization test as long as a stimulus is not being presented. 083 Set A.R. Sensitization Cursor Allows the cursor to be moved to a specified X-axis position when the cursor is active. This command is valid in A.R. Sensitization as long as a tone is not being processed and there is already data plotted. 084 Set A.R. Sensitization Stimulus Allows selection of stimuli based on valid stimuli for the current test. This command is valid during an A.R. Sensitization test as long as a stimulus is not being presented. 085 Set A.R. Sensitization Intensity Allows direct selection of intensity in 1 dB steps in current valid intensity range. This command is valid during an A.R. Sensitization test as long as a stimulus is not being presented. 086 Set Multiple Hz #1 Pressure Range Used to change the Pressure range between Normal and Wide. This command is only valid in the Multiple Hz #1 screen. 087 Set Multiple Hz #1 Pressure Rate Used to modify the Pressure rate parameter. This command is only valid on the Multiple Hz screen #1. 088 Set Multiple Hz #1 Start Pressure Used to modify the Start Pressure parameter. This command is only valid on the Multiple Hz screen #1. 089 Set Multiple Hz #1 Delta Plot Used to change the Admittance parameter for screen #2. This command is only valid in Multiple Hz screen #1. 090 Multiple Hz #1 Ear Toggle Used to toggle between Left and Right Ear. This command is only valid on the Multiple Hz #1 screen. GSI TympStar Version 1 Reference Instruction Manual D - 19 Appendix D 091Set Multiple Hz #1 Cursor Allows the cursor to be moved to a specified X-axis position and for a peak to be selected when the cursor is active. This command is valid following the completion of Multiple Hz screen #1. 092 Multiple Hz #1 Continue Processes the continue softkey following the completion of a Multiple Hz screen #1 test. This can only be used when the continue softkey is displayed. 093 Multiple Hz #2 Continue Processes the continue softkey following the completion of a Multiple Hz screen #2 test. This can only be used when the continue softkey is displayed. 094 Set Multiple Hz #2Cursor Allows the cursor to be moved to a specified X-axis position and for a probe tone to be selected when the cursor is active. This command is valid following the completion of Multiple Hz screen #2. 095 Set Multiple Hz #3 Probe Hz Allows selection of the probe tone from Multi Hz #2 in the standard increment and range. This command is valid during a Multiple Frequency Screen #3 test when a Tymp is not in progress. 096 Set Multiple Hz #3 Cursor Allows the cursor to be moved to a specified X-axis position and for a peak to be selected when the cursor is active. This command is valid following the completion of Multiple Hz screen #3. 097 Multiple Hz #3 Continue Processes the continue softkey on the Multiple Hz screen #3 menu. This command will cause a test to be started and data to be plotted. This can only be used when the continue softkey is diaplayed. 098 Set Multiple Hz #3 Admittance Used to change the Admittance parameter. This command is only valid on the Multiple Hz screen #3. Any other changes that result in a change in Admittance changes immediately as if the change was made navigating the menus. 099 Set Multiple Hz #3 Pressure Range Used to change the Pressure range between Normal and Wide. This command is only valid in the Multiple Hz #3 screen. 100 Set Multiple Hz #3 Pressure Rate Used to modify the Pressure rate parameter. This command is only valid on the Multiple Hz screen #1. 101 Set Multiple Hz #3 Start Pressure Used to modify the Start Pressure parameter. This command is only valid on the Multiple Hz screen #3. D - 20 Grason-Stadler Remote Specifications 102 Patient Name Allows the entry of the patient name via the Remote system. The field is still limited to 45 characters and is limited to the same valid character set as if the patient name was being entered from the keyboard. This command is valid when the cursor is active. 103 Patient ID Allows the entry of the patient ID via the Remote system. The field is still limited to 45 characters and is limited to the same valid character set as if the patient ID was being entered from the keyboard. This command is valid when the cursor is active. 104 Tester Name Allows the entry of the tester name via the Remote system. The field is still limited to 45 characters and is limited to the same valid character set as if the tester name was being entered from the keyboard. This command is valid when the cursor is active. 105 Facility Name Allows the entry of the facility name via the Remote system. The field is still limited to 45 characters and is limited to the same valid character set as if the tester name was being entered from the keyboard. This command is valid when facility name is selected from Instrument options and the cursor is active. 106 Print Tests Allows the printing of a single test or all tests. The desired test to be printed will be selected in the remote record. This command is valid when in Page mode. 107 Clear Tests Allows the clearing of a single test or all tests. The desired test to be cleared will be selected in the remote record. This command is valid when in Page mode. 108 Set Print Format Command Provides to the TympStar the format of the printout. This command is valid under Instrument Options. The print format can be changed for all test modes (except A.R. Sensi) between Tabular and Graphical. 109 Set External Printer Settings Provides to the TympStar the format of the external printer printout. The External Printer parameters (Left column setting and Print Type) are changed remotely with this command code. 110 Set Data Transfer Settings Provides to the TympStar the format of the transferred data. This command is valid under Instrument Options. The Data Transfer format can be changed for all tests between summary and summary plus graphics. The clear test parameter can also be modified using this command. 111 Set Language Used to process a language change for either the LCD and printer or the keyboard. The language choices will match the softkey choices (English, French, German, Spanish and Italian). This command is valid only in Instrument Options. GSI TympStar Version 1 Reference Instruction Manual D - 21 Appendix D 112 Set Test Sequence Setting Reflex Threshold Used to setup the Test sequence for Auto Sequence testing. This command controls the Reflex Threshold settings. This command is valid only in Instrument Options 113 Set Test Sequence Setting Reflex Decay Used to setup the Test sequence for Auto Sequence testing. This command controls the Reflex Decay settings. This command is valid only in Instrument Options 114 Set Remote Settings Allows the Remote Settings (Baud Rate, Parity, Stop bits, and RTS/CTS) to be queried using the remote system. 115 Date/Time Formats Used to adjust Date and time formats. This command is valid only in Instrument Options. 116 Set Date Command Used to adjust the Date (month, day, year). This command is valid only in Instrument Options 117 Set Time Command Used to adjust the Time (hour, minute). This command is valid only in Instrument Options 118 Transmit Current XY Data Request Command Allows the Remote Device to get current values of the current Y axis and X axis quantities or other values for the current unit mode. This record is not valid during a Multiple Frequency Screen #2 test. This command is valid at all times except during Screen #2 of a Multiple Frequency test. 119 Transmit Test Data Request Command Allows the Remote Device to get the test data for the specified test in the specified format. This command is valid in all tests as long as the test is not in progress or a stimulus is being presented. 120 Record Received OK Acknowledgement – ACK Indicates to the GSI TympStar that the record just transmitted to the Remote Device was received correctly. This record is valid in all tests after the GSI TympStar has transmitted data to the Remote Device. 121 Record Received Incorrectly Acknowledgement – NAK Indicates to the GSI TympStar that the record just transmitted to the Remote Device was received incorrectly. This record is valid in all tests after the GSI TympStar has transmitted data to the Remote Device 6.2.1 Input Records For the detailed Input record formats see Section 8. D - 22 Grason-Stadler Remote Specifications 7 Output Record Formats · · · X = ASCII character representing the particular value being defined. All compliance values are transmitted as (Compliance x 1000). For example a transmitted value of 1234 equals 1.234 ml or mmho. All Gradient values are transmitted as (Gradient x 100). 7.1 Summary Data Records 7.1.1 Tymp Diagnostic Offset # Char Field Name Field Definition 0 1 1 1 Start of record Record Type 2 4 2 45 Record Sequence Number Patient Name 49 45 Patient ID 94 45 Tester Name 139 45 Facility Name 184 9 Probe S/N 193 20 Date/Time 213 215 216 2 1 1 Test type Test number Ear Under Test 217 1 Auto Sequence 218 2 ProbeTone 220 224 4 1 Start Pressure Baseline Status 225 1 Gradient Status of last Tymp run 226 232 6 1 ECV/Cl data Number of lines “|” 1 = Summary data record 8 = Summary data record with attached XY data records xx 00 to 99 xxxxxxxxxxx 0 to 45 characters “-” for unused characters xxxxxxxxxxx 0 to 45 characters “-” for unused characters xxxxxxxxxxx 0 to 45 characters “-” for unused characters xxxxxxxxxxx 0 to 45 characters “-” for unused characters xxxxxxxxx 9 characters “-” for unused characters xx/xx/xxxx xx:xx xm “—” for xm if 24 Hour time format 0 = Tymp Diagnostic 1 to 9 and A to Q “L” = Left Ear “R” = Right Ear 0 = Off 1 = On 0 = 226Hz 1 = 678 Hz 2 = 1000 Hz 3 —> 38 = Not used +/-xxx -600 to +400 daPa 0 = Off 1 = On 0 = Off 1 = Tymp Width daPa 2 = Ratio ml +/-xxxxx -30800 to +30800 0, 1, 2 or 3 GSI TympStar Version 1 Reference Instruction Manual D - 23 Appendix D 233 1 Y axis scale 234 5 Cursor X value 239 241 2 6 Line 1 data header Line 1 cursor Y value 247 1 Admittance status 248 1 Pressure Range status 249 1 Pressure Rate status 250 6 Peak Compliance data 256 4 Peak Pressure data 260 1 Sweep Direction status 261 3 Gradient data 264 266 2 6 Line 2 data header Line 2 cursor Y value 272 1 Admittance status 273 1 Pressure Range status 274 1 Pressure Rate status 275 6 Peak Compliance data 281 4 Peak Pressure data 285 1 Sweep Direction status D - 24 0 = -0.5 to +1.5 1 = -0.5 to +3.0 2 = -0.5 to +5.0 3 = -1.0 to +7.0 4 = -1.0 to +9.0 5 = -2.5 to +15.0 6 = -5.0 to +25.0 7 = -5.0 to +35.0 +/-xxxx -600 to +400 daPa “—— “ if Cursor not used “L1” +/-xxxxx -30800 to +30800 “—— “ if Cursor not used 0 = Y 1 = B 2 = G 3 = B/G 0 = Normal 1 = Wide 0 = 12.5 daPa/sec 1 = 50 daPa/sec 2 = 200 daPa/sec 3 = 600/200 daPa/sec +/-xxxxx -30800 to +30800 “———” if no Peak found +/-xxx -600 to +400 daPa “——” if no Peak found 0 = positive to negative 1 = negative to positive If Gradient = “RATIO”: xxx 1 to 999 daPa If Gradient = “TYMP WIDTH”: xxxx +00 to +990 “ 0” if Gradient could not be calculated. “—” if Gradient Status = OFF “L2” +/ -xxxxx -30800 to +30800 “———” if Cursor not used 0=Y 1=B 2=G 3 = B/G 0 = Normal 1 = Wide 0 = 12.5 daPa/sec 1 = 50 daPa/sec 2 = 200 daPa/sec 3 = 600/200 daPa/sec +/-xxxxx -30800 to +30800 “———” if no Peak +/-xxx -600 to +400 daPa “——” if no Peak 0 = positive to negative 1 = negative to positive Grason-Stadler Remote Specifications 286 3 Gradient data 289 291 2 6 Line 3 data header Line 3 cursor Y value 297 1 Admittance status 298 1 Pressure Range status 299 1 Pressure Rate status 300 6 Peak Compliance data 306 4 Peak Pressure data 310 1 Sweep Direction status 311 3 Gradient data 314 316 317 2 1 1 Checksum Carriage return Line Feed If Gradient = “RATIO”: xxx 1 to 999 daPa If Gradient = “TYMP WIDTH”: xxxx +00 to +990 “ 0” if Gradient could not be calculated. “—” if Gradient Status = OFF “L3” +/-xxxxx -30800 to +30800 “ ———” if Cursor not used 0=Y 1=B 2=G 3 = B/G 0 = Normal 1 = Wide 0 = 12.5 daPa/sec 1 = 50 daPa/sec 2 = 200 daPa/sec 3 = 600/200 daPa/sec +/-xxxxx -30800 to +30800 “———” if no Peak +/-xxx -600 to +400 daPa “——” if no Peak 0 = positive to negative 1 = negative to positive If Gradient = “RATIO”: xxx 1 to 999 daPa If Gradient = “TYMP WIDTH”: xxxx +00 to +990 “ 0” if Gradient could not be calculated. “—” if Gradient Status = OFF xx “CR” “LF” GSI TympStar Version 1 Reference Instruction Manual D - 25 Appendix D 7.1.2 Offset Tymp Screening # Chars Field Name Field Definition “|” 1= Summary data record 8= Summary data record with attached XY data records xx 00 to 99 xxxxxxxxxxx 0 to 45 characters “-” for unused characters xxxxxxxxxxx 0 to 45 characters “-” for unused characters xxxxxxxxxxx 0 to 45 characters “-” for unused characters xxxxxxxxxxx 0 to 45 characters “-” for unused characters xxxxxxxxx 9 characters “-” for unused characters xx/xx/xxxx xx:xx xm “—” for xm if 24 Hour time format 1 = Tymp Screening 1 to 9 and A to Q “L” = Left Ear “R” = Right Ear 0 = 226Hz +/-xxx -600 to +400 daPa 0 = Off 1 = On 0 = Off 1 = Tymp Width daPa 2 = Ratio ml +/-xxxxx -30800 to +30800 0 or 1 0 = -0.5 to +1.5 1 = -0.5 to +3.0 2 = -0.5 to +5.0 3 = -1.0 to +7.0 4 = -1.0 to +9.0 5 = -2.5 to +15.0 6 = -5.0 to +25.0 7 = -5.0 to +35.0 +/-xxx -600 to +400 daPa “——” if Cursor not used “L1” +/-xxxxx -30800 to +30800 “———” if Cursor not used 0 = Y 0 = Normal 1 = Wide 0 = Not used 1 = Not used 2 = 200 daPa/sec 3 = 600/200 daPa/sec 0 1 1 1 Start of record Record Type 2 4 2 45 Record Sequence Number Patient Name 49 45 Patient ID 94 45 Tester Name 139 45 Facility Name 184 9 Probe S/N 193 20 Date/Time 213 215 216 2 1 1 Test type Test number Ear Under Test 217 219 223 2 4 1 ProbeTone Start Pressure Baseline Status 224 1 Gradient Status 225 231 232 6 1 1 ECV/Cl data Number of lines Y axis scale 233 5 Cursor X value 238 240 2 6 Line 1 data header Line 1 cursor Y value 246 247 1 1 Admittance status Pressure Range status 248 1 Pressure Rate status D - 26 Grason-Stadler Remote Specifications 249 6 Peak Compliance data 255 4 Peak Pressure data 259 1 Sweep Direction status 260 3 Gradient data 263 1 Reflex Type status 264 1 Reflex Frequency #1 265 1 Reflex Frequency #2 266 1 Auto Start status 267 1 Reflex #1 data 268 1 Reflex #2 data 269 271 272 2 1 1 Checksum Carriage return Line Feed +/-xxxxx -30800 to +30800 “———” if no Peak +/-xxx -600 to +400 daPa “——” if no Peak 0 = positive to negative 1 = negative to positive If Gradient = “RATIO”: xxx 1 to 999 daPa If Gradient = “TYMP WIDTH”: xxxx +00 to +990 “ 0” if Gradient could not be calculated. “—” if Gradient Status = OFF 0 = Off 1 = Ipsi 2 = Contra 3 = Ipsi. and Contra 0 = 500 Hz 1 = 1000 Hz 2 = 2000 Hz 3 = 4000 Hz “-” if Reflex Type = Off 0 = 500 Hz 1 = 1000 Hz 2 = 2000 Hz 3 = 4000 Hz “—” = If Reflex Type = Off or Ipsi and Contra 0 = Off 1 = On 0 = NA 1 = NT 2 = NR 3 = YES 4 = NT <> 5 = NR <> 6 = NT CAL “—” if Reflex Type = Off 0 = NA 1 = NT 2 = NR 3 = YES 4 = NT <> 5 = NR <> 6 = NT CAL “—” if Reflex Type = Off or if 2nd frequency not selected xx “CR” “LF” GSI TympStar Version 1 Reference Instruction Manual D - 27 Appendix D 7.1.3 Reflex Threshold Offset # Field Name Chars 0 1 1 1 Start of record Record Type 2 4 2 45 Record Sequence Number Patient Name 49 45 Patient ID 94 45 Tester Name 139 45 Facility Name 184 9 Probe S/N 193 20 Date/Time 213 215 216 2 1 1 Test type Test number Ear Under Test 217 1 Auto Sequence 218 2 ProbeTone 220 225 226 5 1 1 Timebase Number of lines Y axis scale 227 5 Cursor X value 232 234 2 6 Line 1 data header Line 1 cursor Y value 240 1 Admittance status 241 1 Stimulus Ear status 242 1 Timing - Manual/Auto D - 28 Field Definition “|” 1 = 8 = Summary data record Summary data record with attached XY data records xx 00 to 99 xxxxxxxxxxx 0 to 45 characters “-” for unused characters xxxxxxxxxxx 0 to 45 characters “-” for unused characters xxxxxxxxxxx 0 to 45 characters “-” for unused characters xxxxxxxxxxx 0 to 45 characters “-” for unused characters xxxxxxxxx 9 characters “-” for unused characters xx/xx/xxxx xx:xx xm “—” for xm if 24 Hour time format 2 = Reflex Threshold 1 to 9 and A to Q “L” = Left Ear “R” = Right Ear 0 = Off 1 = On 0 = 226Hz 1 = 678 Hz 2 = 1000 Hz xxxxx 15000 to 60000 msec 0, 1 or 2 0 = +.04 to -16 1 = +.08 to -.32 2 = +.12 to -.48 3 = +.16 to -.64 4 = +.20 to -.80 5 = -.04 to +.16 6 = -.08 to +.32 7 = -.12 to +48 8 = -.16 to +.64 9 = -.20 to +.80 xxxxx 0 to 60000 msec “—— “ if Cursor not used “L1” +/-xxxxx -30800 to +30800 “——— “ if Cursor not used 0 = Y 1 = B 2 = G 0 = IPSI 1 = Steady CONTRA 2 = Pulsed CONTRA 0 = Manual 1 = Automatic Grason-Stadler Remote Specifications 243 5 On Time 248 5 Of f Time 253 255 2 1 Zero field Threshold Seek 256 259 262 265 267 3 3 3 2 2 Min. Change Start dBHL Stop dBHL Zero field Activator Stimulus 269 272 274 278 279 3 2 4 1 1 Click Rate Zero field Pressure Number of traces Intensity unit 280 283 289 292 298 301 307 310 316 319 325 328 334 337 343 345 3 6 3 6 3 6 3 6 3 6 3 6 3 6 2 2 Trace 1 intensity Trace 1 amplitude Trace 2 intensity Trace 2 amplitude Trace 3 intensity Trace 3 amplitude Trace 4 intensity Trace 4 amplitude Trace 5 intensity Trace 5 amplitude Trace 6 intensity Trace 6 amplitude Trace 7 intensity Trace 7 amplitude Trace Mark Trace Type 347 349 351 2 2 6 Zero field Line 2 data header Line 2 cursor Y value xxxxx 1000 to 54000 msec “—— “ if Manual Timing xxxxx 0 to 52000 msec “——” if Manual Timing “—” 0 = Off 1 = On x.xx .02 to 0.8 xxx 35 to 120 dB xxx 35 to 110 dB “—” 0 = 250 Hz 1 =500 Hz 2 = 1000 Hz 3 = 2000 Hz 4 = 4000 Hz 5 = Low Band Noise 6 = High Band Noise 7 = Broad band Noise 8 = Click 9 = External 10 = Non Acoustic 11 = Not used xxx 50 to 300 “—” +/-xxx -600 to +400 daPa 0 to 7 0 = HL 1 = HL* 2 = SPL xxx 35 to 120 dB +/-xxxxx -30800 to +30800 xxx 35 to 120 dB +/-xxxxx -30800 to +30800 xxx 35 to 120 dB +/-xxxxx -30800 to +30800 xxx 35 to 120 dB +/-xxxxx -30800 to +30800 xxx 35 to 120 dB +/-xxxxx -30800 to +30800 xxx 35 to 120 dB +/-xxxxx -30800 to +30800 xxx 35 to 120 dB +/-xxxxx -30800 to +30800 0 to 7 0 = NR 1=* 2 = NR + TS 3 = * + TS “—” “L2” +/-xxxxx -30800 to +30800 “ —— “ if Cursor not used GSI TympStar Version 1 Reference Instruction Manual D - 29 Appendix D 357 1 Admittance status 358 1 Stimulus Ear status 359 1 Timing - Manual/Auto 360 5 On Time 365 5 Off Time 370 372 2 2 Zero field Activator Stimulus 374 377 379 383 384 3 2 4 1 1 Click Rate Zero field Pressure Number of traces Intensity unit 385 388 394 397 403 406 412 415 421 424 430 433 439 442 448 450 3 6 3 6 3 6 3 6 3 6 3 6 3 6 2 2 Trace 1 intensity Trace 1 amplitude Trace 2 intensity Trace 2 amplitude Trace 3 intensity Trace 3 amplitude Trace 4 intensity Trace 4 amplitude Trace 5 intensity Trace 5 amplitude Trace 6 intensity Trace 6 amplitude Trace 7 intensity Trace 7 amplitude Trace Mark Trace Type 452 454 2 2 Zero field Checksum D - 30 0 =Y 1 =B 2 =G 0 = IPSI 1 = Steady CONTRA 2 = Pulsed CONTRA 0 = Manual 1 = Automatic xxxxx 1000 to 54000 msec “—— “ if Manual Timing xxxxx 0 to 52000 msec “—— “ if Manual Timing “—” 0 = 250 Hz 1 = 500 Hz 2 = 1000 Hz 3 = 2000 Hz 4 = 4000 Hz 5 = Low Band Noise 6 = High Band Noise 7 = Broad band Noise 8 = Click 9 = External 10 = Non Acoustic 11 = Not used xxx 50 to 300 “—” +/-xxx -600 to +400 daPa 0 to 7 0 = HL 1 = HL* 2 = SPL xxx 35 to 120 dB +/-xxxxx -30800 to +30800 xxx 35 to 120 dB +/-xxxxx -30800 to +30800 xxx 35 to 120 dB +/-xxxxx -30800 to +30800 xxx 35 to 120 dB +/-xxxxx -30800 to +30800 xxx 35 to 120 dB +/-xxxxx -30800 to +30800 xxx 35 to 120 dB +/-xxxxx -30800 to +30800 xxx 35 to 120 dB +/-xxxxx -30800 to +30800 0 to 7 0 = NR 1=* 2 = NR + TS 3 = * + TS “—” xx Grason-Stadler Remote Specifications 456 457 1 1 Carriage return Line Feed 7.1.4 ETF — Intact TM “CR” “LF” Offset # Field Name Chars Field Definition 0 1 1 1 Start of record Record Type 2 4 2 45 Record Sequence Number Patient Name 49 45 Patient ID 94 45 Tester Name 139 45 Facility Name 184 9 Probe S/N 293 20 Date/Time 213 215 216 2 1 1 Test type Test number Ear Under Test 217 2 Probe Tone 219 223 4 1 Start Pressure Baseline Status 224 225 231 232 1 6 1 1 Gradient Status ECV/Cl data Number of lines Y axis scale 233 5 Cursor X value 238 240 2 6 Line 1 data header Line 1 cursor Y value “|” 1= Summary data record 8= Summary data record with attached XY data records xx 00 to 99 xxxxxxxxxxx 0 to 45 characters “-” for unused characters xxxxxxxxxxx 0 to 45 characters “-” for unused characters xxxxxxxxxxx 0 to 45 characters “-” for unused characters xxxxxxxxxxx 0 to 45 characters “-” for unused characters xxxxxxxxx 9 characters “-” for unused characters xx/xx/xxxx xx:xx xm “—” for xm if 24 Hour time format 4 = ETF - Intact TM 1 to 9 and A to Q “L” = Left Ear “R” = Right Ear 0 = 226Hz 1 = 678 Hz 2 = 1000 Hz 3 —> 38 = Not used +/-xxx -600 to +400 daPa 0 = Off 1 = On 0 = Off +/-xxxxx -30800 to +30800 0, 1, 2 or 3 0 = -0.5 to +1.5 1 = -0.5 to +3.0 2 = -0.5 to +5.0 3 = -1.0 to +7.0 4 = -1.0 to +9.0 5 = -2.5 to +15.0 6 = -5.0 to +25.0 7 = -5.0 to +35.0 +/-xxxx -600 to +400 daPa “—— “ if Cursor not used “L1” +/-xxxxx -30800 to +30800 “———” if Cursor not used GSI TympStar Version 1 Reference Instruction Manual D - 31 Appendix D 246 1 Admittance status 247 1 Pressure Range status 248 1 Pressure Rate status 249 6 Peak Compliance data 255 4 Peak Pressure data 259 1 Sweep Direction status 260 263 265 3 2 6 Zero field Line 2 data header Line 2 cursor Y value 271 276 277 278 1 1 1 6 Zero field Zero field Zero field Peak Compliance data 284 4 Peak Pressure data 288 289 292 294 1 3 2 6 Zero field Zero field Line 3 data header Line 3 cursor 300 301 302 303 1 1 1 6 Zero field Zero field Zero field Peak Compliance data 309 4 Peak Pressure data 313 314 317 319 320 1 3 2 1 1 Zero field Zero field Checksum Carriage return Line Feed 7.1.5 ETF — Perforated TM 0 = Y 1=B 2=G 0 = Normal 1 = Wide 0 = 12.5 daPa/sec 1 = 50 daPa/sec 2 = 200 daPa/sec 3 = 600/200 daPa/sec +/-xxxxx -30800 to +30800 “———” if no Peak +/-xxx -600 to +400 daPa “——” if no Peak 0 = positive to negative 1 = negative to positive “—” “L2” +/-xxxxx -30800 to +30800 “———” if Cursor not used “-” “-” “-” +/-xxxxx-30800 to +30800 “—— “ if no Peak +/-xxx -600 to +400 daPa “——” if no Peak “-” “—” “L3” V value +/-xxxxx-30800 to+30800 “———” if Cursor not used “-” “-” “-” +/-xxxxx -30800 to +30800 “———” if no Peak +/-xxx -600 to +400 daPa “——” if no Peak “-” “—” xx “CR” “LF” Offset # Field Name Chars Field Definition 0 1 1 1 Start of record Record Type 2 2 Record Sequence Number “|” 1= 8= xx D - 32 Summary data record Summary data record with attached XY data records 00 to 99 Grason-Stadler Remote Specifications 4 45 Patient Name 49 45 Patient ID 94 45 Tester Name 139 45 Facility Name 184 9 Probe S/N 193 20 Date/Time 213 215 216 2 1 1 Test type Test number Ear Under Test 217 222 226 5 4 4 Timebase Maximum Pressure Open Pressure #1 230 4 Close Pressure #1 234 4 Open Pressure #2 238 4 Close Pressure #2 242 4 Open Pressure #3 246 4 Close Pressure #3 250 1 Y axis scale 251 5 Cursor X value 256 6 Cursor Y value 262 264 265 2 1 1 Checksum Carriage return Line feed xxxxxxxxxxx 0 to 45 characters “-” for unused characters xxxxxxxxxxx 0 to 45 characters “-” for unused characters xxxxxxxxxxx 0 to 45 characters “-” for unused characters xxxxxxxxxxx 0 to 45 characters “-” for unused characters xxxxxxxxx 9 characters “-” for unused characters xx/xx/xxxx xx:xx xm “—” for xm if 24 Hour time format 5 = ETF - Perforated TM 1 to 9 and A to Q “L” = Left Ear “R” = Right Ear xxxxx 30000 to 60000 msec +/—xxx -600 to +400 daPa +/-xxx -600 to +400 daPa “——” if value unavailable or test not started +/-xxx -600 to +400 daPa “——” if value unavailable or test not started +/-xxx -600 to +400 daPa “——” if value unavailable or test not started +/-xxx -600 to +400 daPa “——” if value unavailable or test not started +/-xxx -600 to +400 daPa “——” if value unavailable or test not started +/-xxx -600 to +400 daPa “——” if value unavailable or test not started 0 = -600 to -50 daPa 1 = +400 to +50 daPa “-” if test not started xxxxx 0 to 60000 sec “——— “ if Cursor not used or test not started +/-xxxxx -600 to +400 daPa “———” if Cursor not used or test not started xx “CR” “L” GSI TympStar Version 1 Reference Instruction Manual D - 33 Appendix D 7.1.6 Reflex Decay Offset # Field Name Chars Field Definition 0 1 1 1 Start of record Record Type 2 4 2 45 Record Sequence Number Patient Name 49 45 Patient ID 94 45 Tester Name 139 45 Facility Name 184 9 Probe S/N 193 20 Date/Time 213 215 216 2 1 1 Test type Test number Ear Under Test 217 1 Auto Sequence 218 2 ProbeTone 220 225 226 5 1 1 Timebase Number of lines Y axis scale 227 5 Cursor X value 232 234 240 2 6 1 Line 1 data header Line 1 cursor Y value Admittance status 241 1 Stimulus Ear status 242 243 248 1 5 5 Zero field On Time Zero field “|” 1= Summary data record 8= Summary data record with attached XY data records xx 00 to 99 xxxxxxxxxxx 0 to 45 characters “-” for unused characters xxxxxxxxxxx 0 to 45 characters “-” for unused characters xxxxxxxxxxx 0 to 45 characters “-” for unused characters xxxxxxxxxxx 0 to 45 characters “-” for unused characters xxxxxxxxx 9 characters “-” for unused characters xx/xx/xxxx xx:xx xm “—” for xm if 24 Hour time format 6= Reflex Decay 1 to 9 and A to Q “L” = Left Ear “R” = Right Ear 0 = Off 1 = On 0 = 226Hz 1 = 678 Hz 2 = Not used 3 —> 38 = Not used xxxxx 15000 to 60000 msec 0, 1, or 2 0 = +.04 to -.16 1 = +.08 to -.32 2 = +.12 to -.48 3 = +.16 to -.64 4 = +.20 to -.80 5 = -.04 to +.16 6 = -.08 to +.32 7 = -.12 to +.48 8 = -.16 to +.64 9 = -.20 to +.80 xxxxx 0 to 60000 msec “—— “ if Cursor not used “L1” +/-xxxxx -30800 to +30800 0=Y 1=B 2=G 0 = IPSI 1 = Steady CONTRA “-” xxxxx 1000 to 54000 msec “——— “ D - 34 Grason-Stadler Remote Specifications 253 255 2 2 Zero field Activator Stimulus 257 260 262 266 267 3 2 4 1 1 Click rate Zero field Pressure Number of traces Intensity unit 268 271 277 3 6 5 Trace 1 intensity Trace 1 amplitude 50% Decay time 282 287 292 297 299 5 5 5 2 6 Zero field Zero field Zero field Line 2 data header Line 1 cursor Y value 305 1 Admittance status 306 1 Stimulus Ear status 307 308 313 318 320 1 5 5 2 2 Zero field On Time Zero field Zero field Activator Stimulus 322 325 327 3 2 4 Click Rate Zero field Pressure “—” 0 = Not used 1 = 500 Hz 2 = 1000 Hz 3 = 2000 Hz 4 = 4000 Hz 5 = Low Band Noise 6 = High Band Noise 7 = Broad band Noise 8 = Click 9 = External 10 = Not used 11 = Not used xxx 50 to 300/sec “—” +/-xxx -600 to +400 daPa 0 or 1 0 = HL 1 = HL* 2 = SPL xxx 35 to 120 dB +/-xxxxx -30800 to +30800 xxxxx 1000 to 54000 msec “ NA” if value unavailable “ NO” if 50% point not found “——” “——” “——” “L2” +/-xxxxx -30800 to +30800 “——— “ if Cursor not used 0=Y 1=B 2=G 0 = IPSI 1 = Steady CONTRA “-” xxxxx 1000 to 54000 msec “—— “ “—” 0 = Not used 1 = 500 Hz 2 = 1000 Hz 3 = 2000 Hz 4 = 4000 Hz 5 = Low Band Noise 6 = High Band Noise 7 = Broad band Noise 8 = Click 9 = External 10 = Not used 11 = Not used xxx 50 to 300/sec “—” +/-xxx -600 to +400 daPa GSI TympStar Version 1 Reference Instruction Manual D - 35 Appendix D 331 332 1 1 Number of traces Intensity unit 333 336 342 3 6 5 Trace 1 intensity Trace 1 amplitude 50% decay time 347 352 357 362 364 365 5 5 5 2 1 1 Zero field Zero field Zero field Checksum Carriage return Line Feed 0 or 1 0 = HL 1 = HL* 2 = SPL xxx 35 to 120 dB +/-xxxxx -30800 to +30800 xxxxx 1000 to 54000 msec “ NA” if value unavailable “ NO” if 50% point not found “——” “——” “——” xx “CR” “LF” 7.1.7 ARLT Offset # Chars Field Name Field Definition 0 1 1 1 Start of record Record Type 2 4 2 45 Record Sequence Number Patient Name 49 45 Patient ID 94 45 Tester Name 139 45 Facility Name 184 9 Probe S/N 193 20 Date/Time 213 215 216 2 1 1 Test type Test number Ear Under Test 217 219 224 225 2 5 1 1 Probe Tone Timebase Number of lines Y axis scale “|” 1 = Summary data record 8 = Summary data record with attached XY data records xx 00 to 99 xxxxxxxxxxx 0 to 45 characters “-” for unused characters xxxxxxxxxxx 0 to 45 characters “-” for unused characters xxxxxxxxxxx 0 to 45 characters “-” for unused characters xxxxxxxxxxx 0 to 45 characters “-” for unused characters xxxxxxxxx 9 characters “-” for unused characters xx/xx/xxxx xx:xx xm “—” for xm if 24 Hour time format 7 = ARLT 1 to 9 and A to Q “L” = Left Ear “R” = Right Ear 0 = 226Hz xxxxx 500 to 2000 msec 0, 1, or 2 0 = +.04 to -.16 1 = +.08 to - .32 2 = +.12 to -.48 3 = +.16 to -.64 4 = +.20 to -.80 5 = -.04 to +.16 6 = -.08 to +.32 D - 36 Grason-Stadler Remote Specifications 226 5 Cursor X value 231 233 2 6 Line 1 data header Line 1 cursor Y value 239 1 Admittance status 240 1 Stimulus Ear status 241 242 247 252 254 1 5 5 2 2 Zero field On Time Zero field Number Averaged Activator Stimulus 256 259 261 265 266 3 2 4 1 1 Click rate Zero field Pressure Number of traces Intensity unit 267 270 276 3 6 5 Trace 1 intensity Trace 1 amplitude 10% ON time 281 5 90% ON time 286 5 10% OFF time 291 5 90% OFF time 296 298 2 6 Line 2 data header Line 2 cursor Y value 304 1 Admittance status 305 1 Stimulus Ear status 306 1 Zero field 7 = -.12 to +.48 8 = -.16 to +.64 9 = -.20 to +.80 xxxxx 0 to 1800 msec “—— “ if Cursor not used “L1” +/-xxxxx -30800 to +30800 “ —— “ if Cursor not used 0=Y 1 =B 2=G 0 = IPSI 1 = Steady CONTRA “-” xxxxx 100 to 1800 msec “—— “ “—” 0 to 50 0 = OFF 0 = Not used 1 = 500 Hz 2 = 1000 Hz 3 = 2000 Hz 4 = 4000 Hz 5 = Low Band Noise 6 = High Band Noise 7 = Broad band Noise 8 = Click 9 = External 10 = Not used 11 = Not used xxx 50 to 300/sec “—” +/-xxx -600 to +400 daPa 0 or 1 0 = HL 1 = HL* 2 = SPL xxx 35 to 120 dB +/-xxxxx-30800 to +30800 xxxxx 0 to 1800 msec “ NA” if value unavailable xxxxx 0 to 1800 msec “ NA” if value unavailable xxxxx 0 to 1800 msec “ NA” if value unavailable xxxxx 0 to 1800 msec “ NA” if value unavailable “L2” +/-xxxxx -30800 to +30800 “ ——— “ if Cursor not used 0 = Y 1 = B 2 = G 0 = IPSI 1 = Steady CONTRA “-” GSI TympStar Version 1 Reference Instruction Manual D - 37 Appendix D 307 312 317 319 5 5 2 2 On Time Zero field Zero field Activator Stimulus 321 324 326 330 331 3 2 4 1 1 Click rate Zero field Pressure Number of traces Intensity unit 332 335 341 3 6 5 Trace 1 intensity Trace 1 amplitude 10% ON time 346 5 90% ON time 351 5 10% OFF time 356 5 90% OFF time 361 363 364 2 1 1 Checksum Carriage return Line Feed 7.1.8 Acoustic Reflex Sensitization xxxxx 100 to 1800 msec “—— “ “—” 0 = Not used 1 = 500 Hz 2 =1000 Hz 3 = 2000 Hz 4 = 4000 Hz 5 = Low Band Noise 6 = High Band Noise 7 = Broad band Noise 8 = Click 9 = External 10 = Not used 11 = Not used xxx 50 to 300/sec “—” +/-xxx -600 to +400 daPa 0 or 1 0 = HL 1 = HL* 2 = SPL xxx 35 to 120 dB +/-xxxxx -30800 to +30800 xxxxx 0 to 1800 msec “ NA” if value unavailable xxxxx 0 to 1800 msec “ NA” if value unavailable xxxxx 0 to 1800 msec “ NA” if value unavailable xxxxx 0 to 1800 msec “ NA” if value unavailable xx “CR” “LF” Offset # Field Name Chars Field Definition 0 1 1 1 Start of record Record Type 2 4 2 45 Record Sequence Number Patient Name 49 45 Patient ID 94 45 Tester Name 139 45 Facility Name “|” 1 = Summary data record 8 = Summary data record with attached XY data records xx 00 to 99 xxxxxxxxxxx 0 to 45 characters “-” for unused characters xxxxxxxxxxx 0 to 45 characters “-” for unused characters xxxxxxxxxxx 0 to 45 characters “-” for unused characters xxxxxxxxxxx 0 to 45 characters “-” for unused characters D - 38 Grason-Stadler Remote Specifications 184 9 Probe S/N 193 20 Date/Time 213 215 216 2 1 1 Test type Test number Ear Under Test 217 2 ProbeTone 219 224 225 5 1 1 Timebase Number of lines Y axis scale 226 5 Cursor X value 231 233 2 6 Line 1 data header Line 1 cursor Y value 239 1 Admittance status 240 1 Stimulus Ear status 241 1 Timing - Manual/Auto 242 5 On Time 247 5 Off Time 252 254 2 2 Zero field Activator Stimulus xxxxxxxxx 9 characters “-” for unused characters xx/xx/xxxx xx:xx xm “—” for xm if 24 Hour time format 8 = ARST 1 to 9 and A to Q “L” = Left Ear “R” = Right Ear 0=226Hz 1 = Not used 2 = Not used 3 —> 38 = Not used xxxxx 1500 to 12000 msec 0, 1 or 2 0 = +.04 to -.16 1 = +.O8 to -.32 2 = +.12 to -.48 3 = +.16 to -.64 4 = +.20 to -.80 5 = -.04 to +.I6 6 = -.08 to +.32 7 = -.12 to +.48 8 = -.16 to +.64 9 = -.20 to +.8O xxxxx 0 to 10800 msec “—— “ if Cursor not used “L1” +/-xxxxx -30800 to +30800 “——— “ if Cursor not used 0 =Y 1 =B 2 =G 0 = IPSI 1 = Steady CONTRA 2 = Not used 3 = CfIa 4 = CfCa 5 = IfCa 6 = IfIa 0 = Manual 1 = Automatic xxxxx 125 to 10500 msec “—— “ if Manual Timing xxxxx 0 to 10000 msec 0.0 to 10.0 sec “—— “ if Manual Timing “—” 0 = Not used 1 = 500 Hz 2 = 1000 Hz 3 = 2000 Hz 4 = 4000 Hz 5 = Not used 6 = Not used 7 = Broad band Noise GSI TympStar Version 1 Reference Instruction Manual D - 39 Appendix D 256 3 Facilitator Intensity 259 2 Facilitator Stimulus 261 265 266 4 1 1 Pressure Number of traces Intensity unit 267 270 276 279 285 288 294 297 303 306 312 315 321 323 329 331 3 6 3 6 3 6 3 6 3 6 3 6 3 6 2 6 Trace 1 intensity Trace 1 amplitude Trace 2 intensity Trace 2 amplitude Trace 3 intensity Trace 3 amplitude Trace 4 intensity Trace 4 amplitude Trace 5 intensity Trace 5 amplitude Trace 6 intensity Trace 6 amplitude Trace 7 intensity Trace 7 amplitude Line 2 data header Line 1 cursor Y value 337 1 Admittance status 338 1 Stimulus Ear status 339 1 Timing - Manual/Auto D - 40 8 = Not used 9 = External 10 = Not used 11 = 6000 Hz xxx 35 to 120 dB “—” if Stimulus Ear = Ipsi or Contra 0 = Not used 1 = 500 Hz 2 = 1000 Hz 3 = 2000 Hz 4 = 4000 Hz 5 = Not used 6 = Not used 7 = Broad band Noise 8 = Not used 9 = External 10 = Not used 11 = 6000 Hz “—” if Stimulus Ear = Ipsi or Contra +/-xxx -600 to +400 daPa 0 to 7 0 = HL 1 = HL* 2 = SPL xxx 35 to 120 dB +/-xxxxx -30800 to +30800 xxx 35 to 120 dB +/-xxxxx -30800 to +30800 xxx 35 to 120 dB +/-xxxxx -30800 to +30800 xxx 35 to 120 dB +/-xxxxx -30800 to +30800 xxx 35 to 120 dB +/-xxxxx -30800 to +30800 xxx 35 to 120 dB +/-xxxxx -30800 to +30800 xxx 35 to 120 dB +/-xxxxx -30800 to +30800 “L2” +/-xxxxx -30800 to +30800 “——— “ if Cursor not used 0=Y l =B 2=G 0 = IPSI I = Steady CONTRA 2 = Not used 3 = CfIa 4 = CfCa 5 = IfCa 6 = IfIa 0 = Manual 1 = Automatic Grason-Stadler Remote Specifications 340 5 On Time 345 5 0ff Time 350 352 2 2 Zero field Activator Stimulus 354 3 Facilitator Intensity 357 2 Facilitator Stimulus 359 363 364 4 1 1 Pressure Number of traces Intensity Unit 365 368 374 377 383 386 392 395 401 404 410 413 419 422 428 3 6 3 6 3 6 3 6 3 6 3 6 3 6 2 Trace 1 intensity Trace 1 amplitude Trace 2 intensity Trace 2 amplitude Trace 3 intensity Trace 3 amplitude Trace 4 intensity Trace 4 amplitude Trace 5 intensity Trace 5 amplitude Trace 6 intensity Trace 6 amplitude Trace 7 intensity Trace 7 amplitude Checksum xxxxx 125 to 10500 msec “——” if Manual Timing xxxxx 0 to 10000 msec 0.0 to 10.0 sec “—— “ if Manual Timing “—” 0 = Not used 1 = 500 Hz 2 = 1000 Hz 3 = 2000 Hz 4 = 4000 Hz 5 = Not used 6 = Not used 7 = Broad Band Noise 8 = Not used 9 = External 10 = Not used 11 = 6000 Hz xxx 35 to 120 dB “—” if Stimulus Ear = Ipsi or Contra 0 = Not used 1 = 500 Hz 2 = 1000 Hz 3 = 2000 Hz 4 = 4000 Hz 5 = Not used 6 = Not used 7 = Broad band Noise 8 = Not used 9 = External 10 = Not used 11 = 6000 Hz “—” if Stimulus Ear = Ipsi or Contra +/-xxx -600 to +400 daPa 0 to 7 0 = HL 1 = HL* 2 = SPL xxx 35 to 120 dB +/-xxxxx -30800 to +30800 xxx 35 to 120 dB +/-xxxxx -30800 to +30800 xxx 35 to 120 dB +/—xxxxx -30800 to +30800 xxx 35 to 120 dB +/-xxxxx -30800 to +30800 xxx 35 to 120 dB +/-xxxxx -30800 to +30800 xxx 35 to 120 dB +/-xxxxx -30800 to +30800 xxx 35 to 120 dB +/-xxxxx -30800 to +30800 xx GSI TympStar Version 1 Reference Instruction Manual D - 41 Appendix D 430 431 1 1 Carriage return Line Feed 7.1.9 Multiple Frequency - Screen #1 “CR” “LF” Offset # Field Name Chars Field Definition 0 1 1 1 Start of record Record Type 2 4 2 45 Record Sequence Number Patient Name 49 45 Patient ID 94 45 Tester Name 139 45 Facility Name 184 9 Probe S/N 193 20 Date/Time 213 2 Test type 215 216 1 1 Test number Ear Under Test 217 2 ProbeTone 219 223 224 225 231 232 4 1 1 6 1 1 Start Pressure Baseline Status Gradient Status ECV/C1 data Number of lines Y axis scale 233 5 Cursor X value 238 240 2 6 Line 1 data header Line 1 cursor Y value “|” 1= Summary data record 8= Summary data record with attached XY data records xx 00 to 99 xxxxxxxxxxx 0 to 45 characters “-” for unused characters xxxxxxxxxxx 0 to 45 characters “-” for unused characters xxxxxxxxxxx 0 to 45 characters “-” for unused characters xxxxxxxxxxx 0 to 45 characters “-” for unused characters xxxxxxxxx 9 characters “-” for unused characters xx/xx/xxxx xx:xx xm “—” for xm if 24 Hour time format 9 = Multiple Frequency Screen #1 1 to 9 and A to Q “L” = Left Ear “R” = Right Ear 0 = 226Hz 1 = Not used 2 = Not used 3 —> 38 = Not Used +/-xxx -600 to +400 daPa 0 = Off 0 = Off +/-xxxxx -30800 to +30800 0 or 1 0 = -0.5 to +1.5 1 = -0.5 to +3.0 2 = -0.5 to +5.0 3 = -1.0 to +7.0 4 = -1.0 to +9.0 5 = -2.5 to +15.0 6 = -5.0 to +25.0 7 = -5.0 to +35.0 +/-xxxx -600 to +400 daPa “—— “ if Cursor not used “L1” +/-xxxxx -30800 to +30800 “———” if Cursor not used D - 42 Grason-Stadler Remote Specifications 246 1 Admittance status 247 1 Pressure Range status 248 1 Pressure Rate status 249 6 Peak Compliance data 255 4 Peak Pressure data 259 1 Sweep Direction status 260 263 265 266 3 2 1 1 Gradient data Checksum Carriage return Line Feed 0 =Y 1 = B 2 = G 0 = Normal 1 = Wide 0 = 12.5 daPa/sec 1 = 50 daPa/sec 2 = 200 daPa/sec 3 = Not used +/-xxxxx -30800 to +30800 “———” if no Peak +/-xxx -600 to +400 daPa “——” if no Peak 0 = positive to negative 1 = negative to positive “—” xx “CR” “LF” 7.1.10 Multiple Frequency — Screen #2 Offset # Field Name Chars Field Definition 0 1 1 1 Start of record Record Type 2 4 2 45 Record Sequence Number Patient Name 49 45 Patient ID 94 45 Tester Name 139 45 Facility Name 184 9 Probe S/N 193 20 Date/Time 213 2 Test type 215 216 1 1 Test number Ear Under Test “|” 1 = Summary data record 8 = Summary data record with attached XY data records xx 00 to 99 xxxxxxxxxxx 0 to 45 characters “-” for unused characters xxxxxxxxxxx 0 to 45 characters “-” for unused characters xxxxxxxxxxx 0 to 45 characters “-” for unused characters xxxxxxxxxxx 0 to 45 characters “-” for unused characters xxxxxxxxx 9 characters “-” for unused characters xx/xx/xxxx xx:xx xm “—” for xm if 24 Hour time format 10 = Multiple Frequency Screen #2 1 to 9 and A to Q “L” = Left Ear “R” = Right Ear GSI TympStar Version 1 Reference Instruction Manual D - 43 Appendix D 217 2 Probe Tone/Resonance Frequency 219 223 224 225 231 232 234 4 1 1 6 1 2 1 Start Pressure Zero field Zero field Zero field Number of lines Line 1 data header Admittance status 235 6 Peak Compliance data 241 4 Peak Pressure data 245 5 Cursor X data 250 1 Line 1 Y scale 251 6 Line 1 cursor Y value 257 1 Line 2 Y scale 258 6 Line 2 cursor Y value 264 266 267 2 1 1 Checksum Carriage return Line Feed 0 = Not used 1 = Not used 2 = Not used 3 —> 38 = Frequency “NA” = Resonance frequency could not be determined. Note. See +/-xxx -600 to +400 daPa “-” “-” “——— “ 0 or 2 “Ll” 0 = Delta Y 1 = Delta B 2 = Delta G +/-xxxxx -30800 to +30800 “———” if no Peak +/-xxx -600 to +400 daPa “——” if no Peak xxxxx 250 to 2000 Hz “—— “ if Cursor not used 0 = -3.0 to +3.0 1 = -7.5 to +7.5 2 = -15.0 to +15.0 +/-xxxxx -15000 to +15000 “——— “ if Cursor not used 0 = +5 to -180 degrees 1 = +5 to -90 2 = +5 to -45 +/-xxxxx +5 to -180 degrees “———” if Cursor not used xx “CR” “LF” NOTE Frequency in Hz = (Probe Tone value + 2) x 50 7.1.11 Multiple Frequency — Screen #3 Offset # Field Name Chars Field Definition 0 1 1 1 Start of record Record Type 2 4 2 45 Record Sequence Number Patient Name 49 45 Patient ID 94 45 Tester Name “|” 1= Summary data record 8= Summary data record with attached XY data records xx 00 to 99 xxxxxxxxxxx 0 to 45 characters “-” for unused characters xxxxxxxxxxx 0 to 45 characters “-” for unused characters xxxxxxxxxxx 0 to 45 characters “-” for unused characters D - 44 Grason-Stadler Remote Specifications 139 45 Facility Name 184 9 Probe S/N 193 20 Date/Time 213 2 Test type 215 216 1 1 Test number Ear Under Test 217 2 Probe Tone 219 223 224 225 231 232 4 1 1 6 1 1 Start Pressure Baseline Status Gradient Status ECV/Cl data Number of lines Y axis scale 233 5 Cursor X value 238 240 2 6 Line 1 data header Line 1 cursor Y value 246 1 Admittance status 247 1 Pressure Range status 248 1 Pressure Rate status 249 255 259 6 4 1 Peak Compliance data Peak Pressure data Sweep Direction status 260 263 265 266 3 2 1 1 Gradient data Checksum Carriage return Line Feed xxxxxxxxxxx 0 to 45 characters “-” for unused characters xxxxxxxxx 9 characters “-” for unused characters xx/xx/xxxx xx:xx xm “—” for xm if 24 Hour time format 11 = Multiple Frequency Screen #3 1 to 9 and A to Q “L” = Left Ear “R” = Right Ear 0 = Not used 1 = Not used 2 = Not used 3 —> 38 = Frequency See Note. +/-xxx -600 to +400 daPa 0 = Off 0 = Off +/-xxxxx -30800 to +30800 0 or 1 0 = -0.5 to +1.5 1 = -0.5 to +3.0 2 = -0.5 to +5.0 3 = -1.0 to +7.0 4 = -1.0 to +9.0 5 = -2.5 to +15.0 6 = -5.0 to +25.0 7 = -5.0 to +35.0 +/-xxxx -600 to +400 daPa “——” if Cursor not used “L1” +/-xxxxx -30800 to +30800 “—— “ if Cursor not used 0 = Y I = B 2 = G 0 = Normal 1 = Wide 0 = 12.5 daPa/sec 1 = 50 daPa/sec 2 = 200 daPa/sec 3 = Not used +/-xxxxx -30800 to +30800 +/-xxx -600 to +400 daPa 0 = Positive to negative 1 = Negative to positive “—” xx “CR” “LF” NOTE Frequency in Hz = (Probe Tone value + 2) x 50 GSI TympStar Version 1 Reference Instruction Manual D - 45 Appendix D 7.2 XY Graphical Data Record 7.2.1 Record Format Offset # Char Field Name Field Definition 0 1 2 4 5 1 1 2 1 3 Start of record Record Type Record Sequence Number Test number Number of XY data 8 3 Number of XY data 11 3 Number of XY data 14 15 16 17 18 19 20 21 22 23 24 25 26 27 28 29 238 239 240 241 242 243 244 245 246 248 249 1 1 1 1 1 1 1 1 1 1 1 1 1 1 1 1 1 1 1 1 1 1 1 1 2 1 1 Data pair 1 X digit 4 Data pair 1 X digit 3 Data pair 1 X digit 2 Data pair 1 X digit 1 Data pair 1 Y digit 4 Data pair 1 Y digit 3 Data pair 1 Y digit 2 Data pair 1 Y digit 1 Data pair 2 X digit 4 Data pair 2 X digit 3 Data pair 2 X digit 2 Data pair 2 X digit 1 Data pair 2 Y digit 4 Data pair 2 Y digit 3 Data pair 2 Y digit 2 Data pair 2 Y digit 1 Data pair 29 X digit Data pair 29 X digit Data pair 29 X digit Data pair 29 X digit Data pair 29 Y digit Data pair 29 Y digit Data pair 29 Y digit Data pair 29 Y digit Checksum Carriage Return Line Feed “|” 2 = XY Graphical data record xx 00 to 99 1 to 9 and A to Q xxx 0 to 29 pairs for Line 1 xxx 0 to 29 pairs for Line 2 xxx 0 to 29 pairs for Line 3 Hex digit in ASCII format MSB Hex digit in ASCII format Hex digit in ASCII format Hex digit in ASCII format Hex digit in ASCII format MSB Hex digit in ASCII format Hex digit in ASCII format Hex digit in ASCII format Hex digit in ASCII format MSB Hex digit in ASCII format Hex digit in ASCII format Hex digit in ASCII format Hex digit in ASCII format MSB Hex digit in ASCII format Hex digit in ASCII format Hex digit in ASCII format Hex digit in ASCII format MSB Hex digit in ASCII format Hex digit in ASCII format Hex digit in ASCII format Hex digit in ASCII format MSB Hex digit in ASCII format Hex digit in ASCII format Hex digit in ASCII format xx “CR” “LF” D - 46 4 3 2 1 4 3 2 1 Grason-Stadler Remote Specifications 7.2.2 X Value Description Test Data Type Units Range Tymp Diagnostic Tymp Screening Reflex Threshold ETF - Intact TM ETF - Perf TM Reflex Decay ARLT ARST Mult Hz screen #1 Mult Hz screen #2 Mult Hz screen #3 Pressure Pressure Time Pressure Time Time Time Time Pressure Probe Hz Pressure daPa daPa msec/2 daPa msec/2 msec/2 msec/2 msec/2 daPa Hz daPa -600 to +400 -600 to +400 0 to 30000 -600 to +400 0 to 30000 0 to 30000 0 to 1000 0 to 30000 -600 to +400 250 to 2000 -600 to +400 7.2.3 Y Value Description Test Data Type Units Range Tymp Diagnostic Tymp Screening Reflex Threshold ETF - Intact TM ETF - Perf TM Reflex Decay ARLT ARST Mult Hz Screen #1 Mult Hz Screen #2 Line 1 Line 2 Mult Hz Screen #3 Compliance Compliance Compliance Compliance Pressure Compliance Compliance Compliance Compliance ml/mmho x 1000 ml/mmho x 1000 ml/mmho x 1000 ml/mmho x 1000 daPA ml/mmho x 1000 ml/mmho x 1000 ml/mmho x 1000 ml x 1000 -30800 to +30800 -30800 to +30800 -30800 to +30800 -30800 to +30800 -600 to +400 -30800 to +30800 -30800 to +30800 -30800 to +30800 -30800 to +30800 Compliance Phase Compliance ml/mmho x 1000 degrees ml/mmho x 1000 -30800 to +30800 +5 to -180 -30800 to +30800 NOTE The Y axis values for Tymp Diagnostic and ETF — Intact TM are transmitted as unbaselined values. If baseline is selected the baselined values may be obtained by subtracting the Y axis values from the Earcanal Volume. 7.2.4 Embedded Control Codes 7.2.4.1 Penup Code Value = 7FFFH Purpose = Embedded in the X and Y graphical data to indicate the end of the graph of a stimulus presentation during a Reflex type test. The code indicates to the plotting routines not to plot (draw) between the previous plotted point and the next point to produce the blank space between stimulus graphs on the LCD screen. GSI TympStar Version 1 Reference Instruction Manual D - 47 Appendix D 7.3 End of Summary and XY Data Record Offset # Char Field Name Field Definition 0 1 2 4 6 7 Start of record Record Type Record Sequence Number Checksum Carriage Return Line Feed “|” 3 = End of data record xx 00 to 99 xx “CR” “LF” 1 1 2 2 1 1 7.4 Error Record Offset # Char Field Name Field Definition O 1 2 4 7 11 13 14 Start of record Record Type Record Sequence Number Error Code Error Sub Code Checksum Carriage Return Line Feed “|” 4 = Error record xx 00 to 99 See Section 9 See Section 9 xx “CR” “LF” 1 1 2 3 4 2 1 1 7.5 Current X Axis and Y Axis Data Record - Normal Mode Test X Axis and Y Axis Quantity Tymp Diagnostic X = Pressure (daPa) Y = Compliance - Baseline (ml/mmho x 1000) X = Pressure (daPa) Y = Compliance - Baseline (ml x 1000) X = Time (msec) Y = Compliance - Reference compliance (ml/mmho x 1000) X = Time (msec) Y = Compliance - Reference compliance (ml/mmho x 1000) X = Pressure (daPa) Y = Compliance - Baseline (ml/mmho x 1000) X = Pressure (daPa) Y = Time (msec) X = Time (msec)Y = Compliance — Reference compliance (ml/mmho x 1000) X = Pressure (daPa)Y = Compliance — Reference compliance (ml/mmho x 1000) X = Pressure (daPa) Y = Compliance - Reference compliance (ml/mmho x 1000) X = Pressure (daPa) Y = Compliance (ml/mmho x 1000) Record not valid Tymp Screen-Tymp Tymp Screen-Reflex Reflex Threshold ETF - Intact TM ETF - Perforated TM Reflex Decay ARLT ARST Multiple Frequency Screen #1 Multiple Frequency D - 48 Grason-Stadler Remote Specifications Screen #2 Multiple Frequency Screen #3 X = Pressure (daPa) Y = Compliance (ml/mmho x 1000) NOTE If Baseline is not selected the baseline value = 0. All Time values are referenced to the Y-axis (Time = 0) Offset # Char Field Name Field Definition 0 1 2 4 1 1 2 1 Start of record Record Type Record Sequence Number X axis unit 5 5 X axis value 10 1 Y axis unit 11 6 Y axis value “|” 5 = Current data record xx 00 to 99 0 = Time 1 = Pressure xxxxx Time: 0 to 60000 msec Pressure: +/-xxxxx -600 to +400 daPa 0 = Compliance (Current selected Admittance. If B/G selected = B) 1 = Pressure Compliance: +/-xxxxx -30800 to +30800 Pressure: +/-xxx -600 to +400 daPa For 17 non-Reflex type tests: 12 Zero Field “—————— “ For 17 21 Reflex type tests: 4 Pressure 8 Zero Field Pressure: -600 to +400 daPa “————” 29 31 32 2 1 1 xx “CR” “LF” Checksum Carriage Return Line Feed 7.6 Unit Identifier Record Offset # Char Field Name Field Definition 0 1 2 4 1 1 2 2 Start of record Record Type Record Sequence Number Unit type 6 4 Unit ID Number “|” 6 = Unit identifier record xx 00 to 99 0 = GSI TympStar Version 1 1 = GSI TympStar Version 2 xxxx “0000” = Default number GSI TympStar Version 1 Reference Instruction Manual D - 49 Appendix D 10 15 5 5 Software Revision #1 Software Revision #2 20 24 26 27 4 2 1 1 Zero field Checksum Carriage Return Line Feed xx.xx xx.xx “00.00” = “——” xx “CR” “LF” CP Revision # SP Revision # Default revision 7.7 Mode Change Record Offset # Char Field Name Field Definition 0 1 2 4 1 1 2 1 ‘ Start of record Record Type Record Sequence Number New Mode 5 7 8 2 1 1 Checksum Carriage Return Line Feed “|” 7 = Mode change record xx 00 to 99 0 = Stop 1 = Hold 2 = Run 3 = Continue Softkey displayed 4 = Clear page(s) to continue 5 = Reflex type test stimulus presentation complete 6 = Self Calibration complete 7 = Default Cal data load complete 8 = Y/YBG calibration in current cavity complete xx “CR” “LF” 7.8 Summary Data Record with Attached XY Data Records See Section 1.0 Summary Data Records. D - 50 Grason-Stadler Remote Specifications 7.9 Input Record Query Results 7.9.1 Tymp Diagnostic Query Results 7.9.1.1 TYMP Diagnostic Probe Hz Offset # Char Field Name Field Definition 0 1 2 4 7 1 1 2 3 1 Start of record Request Record Record Sequence # Record type Probe Tone 8 10 11 2 1 1 Checksum Carriage return Line feed “|” 9 = Query Record XX 00 to 99 003 0 = 226 Hz 1 = 678 Hz 2 = 1000 Hz XX “CR” “LF” 7.9.1.2 TYMP Diagnostic Admittance Offset # Char Field Name Field Definition 0 1 2 4 7 1 1 2 3 1 Start of record Request Record Record Sequence # Record type Admittance 8 10 11 2 1 1 Checksum Carriage return Line feed “|” 9 = Query Record XX 00 to 99 004 0=Y 1=B 2=G 3 = B/G XX “CR” “LF” 7.9.1.3 TYMP Diagnostic Pressure Range Offset # Char Field Name Field Definition 0 1 2 4 7 1 1 2 3 1 Start of record Request Record Record Sequence # Record type Pressure Range 8 10 11 2 1 1 Checksum Carriage return Line feed “|” 9 = Query Record XX 00 to 99 005 0 = Normal 1 = Wide XX “CR” “LF” GSI TympStar Version 1 Reference Instruction Manual D - 51 Appendix D 7.9.1.4 TYMP Diagnostic Ear Offset # Char Field Name Field Definition 0 1 2 4 7 1 1 2 3 1 Start of record Request Record Record Sequence # Record type Ear 8 10 11 2 1 1 Checksum Carriage return Line feed “|” 9 = Query Record XX 00 to 99 006 0 = Left 1 = Right XX “CR” “LF” 7.9.1.5 TYMP Diagnostic Pressure Rate Offset # Char Field Name Field Definition 0 1 2 4 7 1 1 2 3 1 Start of record Request Record Record Sequence # Record type Pressure Rate 8 10 11 2 1 1 Checksum Carriage return Line feed “|” 9 = Query Record XX 00 to 99 007 0 = 12.5 daPa/s 1 = 50 daPa/s 2 = 200 daPa/s 3 = 600/200 daPa/s XX “CR” “LF” 7.9.1.6 TYMP Diagnostic Start Pressure Offset # Char Field Name Field Definition 0 1 2 4 7 1 1 2 3 1 Start of record Request Record Record Sequence # Record type Start Pressure 8 10 11 2 1 1 Checksum Carriage return Line feed “|” 9 = Query Record XX 00 to 99 008 0 = -600 daPa 1 = -400 daPa 2 = -200 daPa 3 = +200 daPa 4 = +400 daPa 5 = -500 daPa 6 = -300 daPa 7 = 0 daPa 8 = +300 daPa XX “CR” “LF” D - 52 Grason-Stadler Remote Specifications 7.9.1.7 TYMP Diagnostic Baseline Offset # Char Field Name Field Definition 0 1 2 4 7 1 1 2 3 1 Start of record Request Record Record Sequence # Record type 8 10 11 2 1 1 Checksum Carriage return Line feed “|” 9 = Query Record XX 00 to 99 009 0 = ON 1 = OFF XX “CR” “LF” Baseline 7.9.1.8 TYMP Diagnostic Gradient Offset # Char Field Name Field Definition 0 1 2 4 7 1 1 2 3 1 Start of record Request Record Record Sequence # Record type Gradient 8 10 11 2 1 1 Checksum Carriage return Line feed “|” 9 = Query Record XX 00 to 99 010 0 = OFF 1 = TYMP WIDTH 2 = RATIO XX “CR” “LF” 7.9.1.9 TYMP Diagnostic Cursor Offset # Char Field Name Field Definition 0 1 2 4 7 11 15 19 23 27 31 33 34 Start of record Request Record Record Sequence # Record type Tymp 1 X-value Tymp 1 Y-Value Tymp 2 X-value Tymp 2 Y-Value Tymp 3 X-value Tymp 3 Y-Value Checksum Carriage return Line feed “|” 9 = Query Record XX 00 to 99 011 XXXX -600 to 400 XXXX XXXX -600 to 400 XXXX XXXX -600 to 400 XXXX XX “CR” “LF” 1 1 2 3 4 4 4 4 4 4 2 1 1 GSI TympStar Version 1 Reference Instruction Manual D - 53 Appendix D 7.9.2 Tymp Screening Individual SoftKey Commands 7.9.2.1 TYMP Screening Pressure Range Offset # Char Field Name Field Definition 0 1 2 4 7 1 1 2 3 1 Start of record Request Record Record Sequence # Record type Pressure Range 8 10 11 2 1 1 Checksum Carriage return Line feed “|” 9 = Query Record XX 00 to 99 012 0 = Normal 1 = Wide XX “CR” “LF” 7.9.2.2 TYMP Screening Pressure Rate Offset # Char Field Name Field Definition 0 1 2 4 7 1 1 2 3 1 Start of record Request Record Record Sequence # Record type Pressure Rate 8 10 11 2 1 1 Checksum Carriage return Line feed “|” 9 = Query Record XX 00 to 99 013 0 = 200 daPa/s 1 = 600/200 daPa/s XX “CR” “LF” 7.9.2.3 TYMP Screening Start Pressure Offset # Char Field Name Field Definition 0 1 2 4 7 1 1 2 3 1 Start of record Request Record Record Sequence # Record type Start Pressure 8 10 11 2 1 1 Checksum Carriage return Line feed “|” 9 = Query Record XX 00 to 99 014 0 = -600 daPa 1 = -400 daPa 2 = -200 daPa 3 = +200 daPa 4 = +400 daPa XX “CR” “LF” D - 54 Grason-Stadler Remote Specifications 7.9.2.4 TYMP Screening Gradient Offset # Char Field Name Field Definition 0 1 2 4 7 1 1 2 3 1 Start of record Request Record Record Sequence # Record type Gradient 8 10 11 2 1 1 Checksum Carriage return Line feed “|” 9 = Query Record XX 00 to 99 015 0 = OFF 1 = TYMP WIDTH 2 = RATIO XX “CR” “LF” 7.9.2.5 TYMP Screening Ear Offset # Char Field Name Field Definition 0 1 2 4 7 1 1 2 3 1 Start of record Request Record Record Sequence # Record type Ear 8 10 11 2 1 1 Checksum Carriage return Line feed “|” 9 = Query Record XX 00 to 99 016 0 = Left 1 = Right XX “CR” “LF” 7.9.2.6 TYMP Screening Baseline Offset # Char Field Name Field Definition 0 1 2 4 7 1 1 2 3 1 Start of record Request Record Record Sequence # Record type Baseline 8 10 11 2 1 1 Checksum Carriage return Line feed “|” 9 = Query Record XX 00 to 99 017 0 = ON 1 = OFF XX “CR” “LF” GSI TympStar Version 1 Reference Instruction Manual D - 55 Appendix D 7.9.2.7 TYMP Screening Auto Start Offset # Char Field Name Field Definition 0 1 2 4 7 1 1 2 3 1 Start of record Request Record Record Sequence # Record type Auto Start 8 10 11 2 1 1 Checksum Carriage return Line feed “|” 9 = Query Record XX 00 to 99 018 0 = ON 1 = OFF XX “CR” “LF” 7.9.2.8 TYMP Screening Reflex Type Offset # Char Field Name Field Definition 0 1 2 4 7 1 1 2 3 1 Start of record Request Record Record Sequence # Record type Reflex Type 8 10 11 2 1 1 Checksum Carriage return Line feed “|” 9 = Query Record XX 00 to 99 019 0 = OFF 1 = IPSI 2 = CONTRA 3 = IPSI/CONTRA XX “CR” “LF” 7.9.2.9 TYMP Screening Stimulus Hz Offset # Char Field Name Field Definition 0 1 2 4 7 1 1 2 3 1 Start of record Request Record Record Sequence # Record type 500 Hz 8 1 1000 Hz 9 1 2000 Hz 10 1 4000 Hz 11 13 14 2 1 1 Checksum Carriage return Line feed “|” 9 = Query Record XX 00 to 99 020 0 = OFF 1 = ON 0 = OFF 1 = ON 0 = OFF 1 = ON 0 = OFF 1 = ON XX “CR” “LF” D - 56 Grason-Stadler Remote Specifications 7.9.2.10 TYMP Screening Cursor Offset # Char Field Name Field Definition 0 1 2 4 7 11 15 17 18 1 1 2 3 4 4 2 1 1 Start of record Request Record Record Sequence # Record type Tymp 1 X-value Tymp 1 Y-Value Checksum Carriage return Line feed “|” 9 = Query Record XX 00 to 99 021 XXXX -600 to 400 XXXX XX “CR” “LF” 7.9.3 Reflex Threshold Individual SoftKey Commands 7.9.3.1 Reflex Threshold Stimulus Ear Offset # Char Field Name Field Definition 0 1 2 4 7 1 1 2 3 1 Start of record Request Record Record Sequence # Record type Reflex Type 8 10 11 2 1 1 Checksum Carriage return Line feed “|” 9 = Query Record XX 00 to 99 022 0 = IPSI 1 = CONTRA STEADY 2 = CONTRA PULSED XX “CR” “LF” 7.9.3.2 Reflex Threshold Mark Threshold Offset # Char Field Name Field Definition 0 1 2 4 7 8 1 1 2 3 1 1 Start of record Request Record Record Sequence # Record type Line 1 Marked Trace Line 1 Mark Type 9 10 1 1 Line 2 Marked Trace Line 2 Mark Type 11 13 14 2 1 1 Checksum Carriage return Line feed “|” 9 = Query Record XX 00 to 99 023 X The number of the trace marked 0 = “NR” 1 = “*” 2 = “NR” + “TS” 3 = “*” + “TS” X The number of the trace marked 0 = “NR” 1 = “*” 2 = “NR” + “TS” 3 = “*” + “TS” XX “CR” “LF” GSI TympStar Version 1 Reference Instruction Manual D - 57 Appendix D 7.9.3.3 Reflex Threshold—Threshold Seek Offset # Char Field Name Field Definition 0 1 2 4 7 1 1 2 3 1 Start of record Request Record Record Sequence # Record type Threshold Seek 8 11 14 17 19 20 3 3 3 2 1 1 Min. Change Start dBHL Stop dBHL Checksum Carriage return Line feed “|” 9 = Query Record XX 00 to 99 024 0 = ON 1 = OFF XXX XXX XXX XX “CR” “LF” 7.9.3.4 Reflex Threshold Auto Zero Offset # Char Field Name Field Definition 0 1 2 4 7 1 1 2 3 1 Start of record Request Record Record Sequence # Record type Auto Zero 8 10 11 2 1 1 Checksum Carriage return Line feed “|” 9 = Query Record XX 00 to 99 025 0 = Automatic 1 = Manual XX “CR” “LF” 7.9.3.5 Reflex Threshold Ear Offset # Char Field Name Field Definition 0 1 2 4 7 1 1 2 3 1 Start of record Request Record Record Sequence # Record type Ear 8 10 11 2 1 1 Checksum Carriage return Line feed “|” 9 = Query Record XX 00 to 99 026 0 = Left 1 = Right XX “CR” “LF” D - 58 Grason-Stadler Remote Specifications 7.9.3.6 Reflex Threshold Probe Hz Offset # Char Field Name Field Definition 0 1 2 4 7 1 1 2 3 1 Start of record Request Record Record Sequence # Record type Probe Tone 8 10 11 2 1 1 Checksum Carriage return Line feed “|” 9 = Query Record XX 00 to 99 027 0 = 226 Hz 1 = 678 Hz 2 = 1000 Hz XX “CR” “LF” 7.9.3.7 Reflex Threshold Admittance Offset # Char Field Name Field Definition 0 1 2 4 7 1 1 2 3 1 Start of record Request Record Record Sequence # Record type Admittance 8 10 11 2 1 1 Checksum Carriage return Line feed “|” 9 = Query Record XX 00 to 99 028 0=Y 1=B 2=G XX “CR” “LF” 7.9.3.8 Reflex Threshold Stimulus Timing Offset # Char Field Name Field Definition 0 1 2 4 7 1 1 2 3 1 Start of record Request Record Record Sequence # Record type Auto Timing 8 13 18 23 25 26 5 5 5 2 1 1 ON time OFF time Quantity Checksum Carriage return Line feed “|” 9 = Query Record XX 00 to 99 029 0 = Manual Timing 1 = Auto Timing XXXXX (msec) XXXXX (msec) XXXXX XX “CR” “LF” GSI TympStar Version 1 Reference Instruction Manual D - 59 Appendix D 7.9.3.9 Reflex Threshold Timebase Offset # Char Field Name Field Definition 0 1 2 4 7 1 1 2 3 1 Start of record Request Record Record Sequence # Record type Timebase 8 10 11 2 1 1 Checksum Carriage return Line feed “|” 9 = Query Record XX 00 to 99 030 0 = 15 sec 1 = 30 sec 2 = 45 sec 3 = 60 sec XX “CR” “LF” 7.9.3.10 Reflex Threshold Step size Offset # Char Field Name Field Definition 0 1 2 4 7 1 1 2 3 1 Start of record Request Record Record Sequence # Record type step size 8 10 11 2 1 1 Checksum Carriage return Line feed “|” 9 = Query Record XX 00 to 99 031 0 = 1 dB 1 = 2 dB 2 = 5 dB XX “CR” “LF” 7.9.3.11Reflex Threshold ml Scale Offset # Char Field Name Field Definition 0 1 2 4 7 1 1 2 3 1 Start of record Request Record Record Sequence # Record type ml Scale 8 10 11 2 1 1 Checksum Carriage return Line feed “|” 9 = Query Record XX 00 to 99 032 0 = +.04 to -.16 1 = +.08 to -.32 2 = +.12 to -.48 3 = +.16 to -.64 4 = +.20 to -.80 5 = -.04 to +.16 6 = -.08 to +.32 7 = -.12 to +.48 8 = -.16 to +.64 9 = -.20 to +.80 XX “CR” “LF” D - 60 Grason-Stadler Remote Specifications 7.9.3.12 Reflex Threshold Click Rate Offset # Char Field Name Field Definition 0 1 2 4 7 10 12 13 Start of record Request Record Record Sequence # Record type Click Rate Checksum Carriage return Line feed “|” 9 = Query Record XX 00 to 99 033 XXX (50 to 300 in multiples of 10) XX “CR” “LF” 1 1 2 3 3 2 1 1 7.9.3.13 Reflex Threshold Cursor Offset # Char Field Name Field Definition 0 1 2 4 7 11 15 19 21 22 Start of record Request Record Record Sequence # Record type Cursor X-value Cursor Line 1 Y-Value Cursor Line 2 Y-Value Checksum Carriage return Line feed “|” 9 = Query Record XX 00 to 99 034 XXXX XXXX XXXX XX “CR” “LF” 1 1 2 3 4 4 4 2 1 1 7.9.3.14 Reflex Threshold Stimulus Offset # Char Field Name Field Definition 0 1 2 4 7 1 1 2 3 2 Start of record Request Record Record Sequence # Record type Stimulus 9 11 12 2 1 1 Checksum Carriage return Line feed “|” 9 = Query Record XX 00 to 99 035 00 = 250 Hz 01 = 500 Hz 02 = 1000 Hz 03 = 2000 Hz 04 = 4000 Hz 05 = Low Band Noise 06 = High Band Noise 07 = Broad Band Noise 08 = Click 09 = External 10 = Non Acoustic XX “CR” “LF” GSI TympStar Version 1 Reference Instruction Manual D - 61 Appendix D 7.9.3.15 Reflex Threshold Intensity Offset # Char Field Name Field Definition 0 1 2 4 7 10 12 13 1 1 2 3 3 2 1 1 Start of record Request Record Record Sequence # Record type Intensity Checksum Carriage return Line feed “|” 9 = Query Record XX 00 to 99 036 XXX dBHL XX “CR” “LF” 7.9.4 ETF Intact Individual SoftKey Commands 7.9.4.1 ETF Intact Probe Hz Offset # Char Field Name Field Definition 0 1 2 4 7 1 1 2 3 1 Start of record Request Record Record Sequence # Record type Probe Tone 8 10 11 2 1 1 Checksum Carriage return Line feed “|” 9 = Query Record XX 00 to 99 037 0 = 226 Hz 1 = 678 Hz 2 = 1000 Hz XX “CR” “LF” 7.9.4.2 ETF Intact Pressure Range Offset # Char Field Name Field Definition 0 1 2 4 7 1 1 2 3 1 Start of record Request Record Record Sequence # Record type Pressure Range 8 10 11 2 1 1 Checksum Carriage return Line feed “|” 9 = Query Record XX 00 to 99 038 0 = Normal 1 = Wide XX “CR” “LF” D - 62 Grason-Stadler Remote Specifications 7.9.4.3 ETF Intact Pressure Rate Offset # Char Field Name Field Definition 0 1 2 4 7 1 1 2 3 1 Start of record Request Record Record Sequence # Record type Pressure Rate 8 10 11 2 1 1 Checksum Carriage return Line feed “|” 9 = Query Record XX 00 to 99 039 0 = 12.5 daPa/s 1 = 50 daPa/s 2 = 200 daPa/s 3 = 600/200 daPa/s XX “CR” “LF” 7.9.4.4 ETF Intact Start Pressure Offset # Char Field Name Field Definition 0 1 2 4 7 1 1 2 3 1 Start of record Request Record Record Sequence # Record type Start Pressure 8 10 11 2 1 1 Checksum Carriage return Line feed “|” 9 = Query Record XX 00 to 99 040 0 = -600 daPa 1 = -400 daPa 2 = -200 daPa 3 = +200 daPa 4 = +400 daPa 5 = -500 daPa 6 = -300 daPa 7 = 0 daPa 8 = +300 daPa XX “CR” “LF” 7.9.4.5 ETF Intact Ear Offset # Char Field Name Field Definition 0 1 2 4 7 1 1 2 3 1 Start of record Request Record Record Sequence # Record type Ear 8 10 11 2 1 1 Checksum Carriage return Line feed “|” 9 = Query Record XX 00 to 99 041 0 = Left 1 = Right XX “CR” “LF” GSI TympStar Version 1 Reference Instruction Manual D - 63 Appendix D 7.9.4.6 ETF Intact Admittance Offset # Char Field Name Field Definition 0 1 2 4 7 1 1 2 3 1 Start of record Request Record Record Sequence # Record type Admittance 8 10 11 2 1 1 Checksum Carriage return Line feed “|” 9 = Query Record XX 00 to 99 042 0=Y 1=B 2=G XX “CR” “LF” 7.9.4.7 ETF Intact Baseline Offset # Char Field Name Field Definition 0 1 2 4 7 1 1 2 3 1 Start of record Request Record Record Sequence # Record type Baseline 8 10 11 2 1 1 Checksum Carriage return Line feed “|” 9 = Query Record XX 00 to 99 043 0 = ON 1 = OFF XX “CR” “LF” 7.9.4.8 ETF Intact Cursor Offset # Char Field Name Field Definition 0 1 2 4 7 11 15 19 23 27 31 33 1 1 2 3 4 4 4 4 4 4 2 1 Start of record Request Record Record Sequence # Record type Tymp 1 X-value Tymp 1 Y-Value Tymp 2 X-value Tymp 2 Y-Value Tymp 3 X-value Tymp 3 Y-Value Checksum Carriage return “|” 9 = Query Record XX 00 to 99 044 XXXX -600 to 400 XXXX XXXX -600 to 400 XXXX XXXX -600 to 400 XXXX XX “CR” 34 1 Line feed “LF” D - 64 Grason-Stadler Remote Specifications 7.9.5 ETF Perforated TM Individual SoftKey Commands 7.9.5.1 ETF Perforated Pressure Max Offset # Char Field Name Field Definition 0 1 2 4 7 11 13 14 Start of record Request Record Record Sequence # Record type Max Pressure Checksum Carriage return Line feed “|” 9 = Query Record XX 00 to 99 046 XXXX (-600 to +400 in multiples of 50) XX “CR” “LF” 1 1 2 3 4 2 1 1 7.9.5.2 ETF Perforated Time (sec) Offset # Char Field Name Field Definition 0 1 2 4 7 1 1 2 3 1 Start of record Request Record Record Sequence # Record type Time (sec) 8 10 11 2 1 1 Checksum Carriage return Line feed “|” 9 = Query Record XX 00 to 99 047 0 = 30 sec 1 = 40 sec 2 = 50 sec 3 = 60 sec XX “CR” “LF” 7.9.5.3 ETF Perforated Cursor Offset # Char Field Name Field Definition 0 1 2 4 7 11 15 17 18 Start of record Request Record Record Sequence # Record type Cursor X-value Cursor Y-Value Checksum Carriage return Line feed “|” 9 = Query Record XX 00 to 99 048 XXXX XXXX -600 to 400 XX “CR” “LF” 1 1 2 3 4 4 2 1 1 GSI TympStar Version 1 Reference Instruction Manual D - 65 Appendix D 7.9.5.4 ETF Perforated Ear Offset # Char Field Name Field Definition 0 1 2 4 7 1 1 2 3 1 Start of record Request Record Record Sequence # Record type Ear 8 10 2 1 Checksum Carriage return “|” 9 = Query Record XX 00 to 99 048 0 = Left 1 = Right XX “CR” 11 1 Line feed “LF” 7.9.6 Reflex Decay Individual SoftKey Commands 7.9.6.1 Reflex Decay Probe Hz Offset # Char Field Name Field Definition 0 1 2 4 7 1 1 2 3 1 Start of record Request Record Record Sequence # Record type Probe Tone 8 10 11 2 1 1 Checksum Carriage return Line feed “|” 9 = Query Record XX 00 to 99 050 0 = 226 Hz 1 = 678 Hz XX “CR” “LF” 7.9.6.2 Reflex Decay Stimulus Ear Offset # Char Field Name Field Definition 0 1 2 4 7 1 1 2 3 1 Start of record Request Record Record Sequence # Record type Reflex Type 8 10 11 2 1 1 Checksum Carriage return Line feed “|” 9 = Query Record XX 00 to 99 051 0 = IPSI 1 = CONTRA XX “CR” “LF” D - 66 Grason-Stadler Remote Specifications 7.9.6.3 Reflex Decay Stimulus On-Time Offset # Char Field Name Field Definition 0 1 2 4 7 12 14 15 Start of record Request Record Record Sequence # Record type Parameter value Checksum Carriage return Line feed “|” 9 = Query Record XX 00 to 99 052 XXXXX XX “CR” “LF” 1 1 2 3 5 2 1 1 7.9.6.4 Reflex Decay Auto Zero Offset # Char Field Name Field Definition 0 1 2 4 7 1 1 2 3 1 Start of record Request Record Record Sequence # Record type Auto Zero 8 10 11 2 1 1 Checksum Carriage return Line feed “|” 9 = Query Record XX 00 to 99 053 0 = Automatic 1 = Manual XX “CR” “LF” 7.9.6.5 Reflex Decay Ear Offset # Char Field Name Field Definition 0 1 2 4 7 1 1 2 3 1 Start of record Request Record Record Sequence # Record type Ear 8 10 11 2 1 1 Checksum Carriage return Line feed “|” 9 = Query Record XX 00 to 99 054 0 = Left 1 = Right XX “CR” “LF” GSI TympStar Version 1 Reference Instruction Manual D - 67 Appendix D 7.9.6.6 Reflex Decay Admittance Offset # Char Field Name Field Definition 0 1 2 4 7 1 1 2 3 1 Start of record Request Record Record Sequence # Record type Admittance 8 10 11 2 1 1 Checksum Carriage return Line feed “|” 9 = Query Record XX 00 to 99 055 0=Y 1=B 2=G XX “CR” “LF” 7.9.6.7 Reflex Decay Timebase Offset # Char Field Name Field Definition 0 1 2 4 7 1 1 2 3 1 Start of record Request Record Record Sequence # Record type Timebase 8 10 11 2 1 1 Checksum Carriage return Line feed “|” 9 = Query Record XX 00 to 99 056 0 = 15 sec 1 = 30 sec 2 = 45 sec 3 = 60 sec XX “CR” “LF” 7.9.6.8 Reflex Decay Step size Offset # Char Field Name Field Definition 0 1 2 4 7 1 1 2 3 1 Start of record Request Record Record Sequence # Record type step size 8 10 11 2 1 1 Checksum Carriage return Line feed “|” 9 = Query Record XX 00 to 99 057 0 = 1 dB 1 = 2 dB 2 = 5 dB XX “CR” “LF” D - 68 Grason-Stadler Remote Specifications 7.9.6.9 Reflex Decay ml Scale Offset # Char Field Name Field Definition 0 1 2 4 7 1 1 2 3 1 Start of record Request Record Record Sequence # Record type ml Scale 8 10 11 2 1 1 Checksum Carriage return Line feed “|” 9 = Query Record XX 00 to 99 058 0 = +.04 to -.16 1 = +.08 to -.32 2 = +.12 to -.48 3 = +.16 to -.64 4 = +.20 to -.80 5 = -.04 to +.16 6 = -.08 to +.32 7 = -.12 to +.48 8 = -.16 to +.64 9 = -.20 to +.80 XX “CR” “LF” 7.9.6.10 Reflex Decay Cursor Offset # Char Field Name Field Definition 0 1 2 4 7 11 15 19 21 22 Start of record Request Record Record Sequence # Record type Cursor X-value Cursor Line 1 Y-Value Cursor Line 2 Y-Value Checksum Carriage return Line feed “|” 9 = Query Record XX 00 to 99 059 XXXX XXXX XXXX XX “CR” “LF” 1 1 2 3 4 4 4 2 1 1 7.9.6.11Reflex Decay Stimulus Offset # Char Field Name Field Definition 0 1 2 4 7 Start of record Request Record Record Sequence # Record type Stimulus “|” 9 = Query Record XX 00 to 99 060 00 = 250 Hz 01 = 500 Hz 02 = 1000 Hz 03 = 2000 Hz 04 = 4000 Hz 05 = Low Band Noise 1 1 2 3 2 GSI TympStar Version 1 Reference Instruction Manual D - 69 Appendix D 9 11 12 2 1 1 Checksum Carriage return Line feed 06 = High Band Noise 07 = Broad Band Noise 08 = Click 09 = External XX “CR” “LF” 7.9.6.12 Reflex Decay Intensity Offset # Char Field Name Field Definition 0 1 2 4 7 10 12 13 1 1 2 3 3 2 1 1 Start of record Request Record Record Sequence # Record type Intensity Checksum Carriage return Line feed “|” 9 = Query Record XX 00 to 99 061 XXX dBHL XX “CR” “LF” 7.9.7 ARLT Individual SoftKey Commands 7.9.7.1 ARLT Stimulus Ear Offset # Char Field Name Field Definition 0 1 2 4 7 1 1 2 3 1 Start of record Request Record Record Sequence # Record type Reflex Type 8 10 11 2 1 1 Checksum Carriage return Line feed “|” 9 = Query Record XX 00 to 99 062 0 = IPSI 1 = CONTRA XX “CR” “LF” 7.9.7.2 ARLT Stimulus On-Time Offset # Char Field Name Field Definition 0 1 2 4 7 12 14 15 Start of record Request Record Record Sequence # Record type Reflex Type Checksum Carriage return Line feed “|” 9 = Query Record XX 00 to 99 063 XXXX XX “CR” “LF” D - 70 1 1 2 3 5 2 1 1 Grason-Stadler Remote Specifications 7.9.7.3 ARLT Auto Zero Offset # Char Field Name Field Definition 0 1 2 4 7 1 1 2 3 1 Start of record Request Record Record Sequence # Record type Auto Zero 8 10 11 2 1 1 Checksum Carriage return Line feed “|” 9 = Query Record XX 00 to 99 064 0 = Automatic 1 = Manual XX “CR” “LF” 7.9.7.4 ARLT ml Scale Offset # Char Field Name Field Definition 0 1 2 4 7 1 1 2 3 1 Start of record Request Record Record Sequence # Record type ml Scale 8 10 11 2 1 1 Checksum Carriage return Line feed “|” 9 = Query Record XX 00 to 99 065 0 = +.04 to -.16 1 = +.08 to -.32 2 = +.12 to -.48 3 = +.16 to -.64 4 = +.20 to -.80 5 = -.04 to +.16 6 = -.08 to +.32 7 = -.12 to +.48 8 = -.16 to +.64 9 = -.20 to +.80 XX “CR” “LF” 7.9.7.5 ARLT Ear Offset # Char Field Name Field Definition 0 1 2 4 7 1 1 2 3 1 Start of record Request Record Record Sequence # Record type Ear 8 10 11 2 1 1 Checksum Carriage return Line feed “|” 9 = Query Record XX 00 to 99 066 0 = Left 1 = Right XX “CR” “LF” GSI TympStar Version 1 Reference Instruction Manual D - 71 Appendix D 7.9.7.6 ARLT Admittance Offset # Char Field Name Field Definition 0 1 2 4 7 1 1 2 3 1 Start of record Request Record Record Sequence # Record type Admittance 8 10 11 2 1 1 Checksum Carriage return Line feed “|” 9 = Query Record XX 00 to 99 067 0=Y 1=B 2=G XX “CR” “LF” 7.9.7.7 ARLT Timebase Offset # Char Field Name Field Definition 0 1 2 4 7 1 1 2 3 1 Start of record Request Record Record Sequence # Record type Timebase 8 10 11 2 1 1 Checksum Carriage return Line feed “|” 9 = Query Record XX 00 to 99 068 0 = 500 msec 1 = 1000 msec 2 = 1500 msec 3 = 2000 msec XX “CR” “LF” 7.9.7.8 ARLT Step size Offset # Char Field Name Field Definition 0 1 2 4 7 1 1 2 3 1 Start of record Request Record Record Sequence # Record type step size 8 10 11 2 1 1 Checksum Carriage return Line feed “|” 9 = Query Record XX 00 to 99 069 0 = 1 dB 1 = 2 dB 2 = 5 dB XX “CR” “LF” D - 72 Grason-Stadler Remote Specifications 7.9.7.9 ARLT Average Offset # Char Field Name Field Definition 0 1 2 4 7 9 11 13 Start of record Request Record Record Sequence # Record type Average Checksum Carriage return Line feed “|” 9 = Query Record XX 00 to 99 070 XX (2-50) XX “CR” “LF” 1 1 2 3 2 2 1 1 7.9.7.10 ARLT Cursor Offset # Char Field Name Field Definition 0 1 2 4 7 11 15 19 21 22 Start of record Request Record Record Sequence # Record type Cursor X-value Cursor Line 1 Y-Value Cursor Line 2 Y-Value Checksum Carriage return Line feed “|” 9 = Query Record XX 00 to 99 071 XXXX XXXX XXXX XX “CR” “LF” 1 1 2 3 4 4 4 2 1 1 7.9.7.11ARLT Stimulus Offset # Char Field Name Field Definition 0 1 2 4 7 1 1 2 3 2 Start of record Request Record Record Sequence # Record type Stimulus 9 11 12 2 1 1 Checksum Carriage return Line feed “|” 9 = Query Record XX 00 to 99 072 00 = Unused 01 = 500 Hz 02 = 1000 Hz 03 = 2000 Hz 04 = 4000 Hz 05 = Low Band Noise 06 = High Band Noise 07 = Broad Band Noise 08 = Click 09 = External XX “CR” “LF” GSI TympStar Version 1 Reference Instruction Manual D - 73 Appendix D 7.9.7.12 ARLT Intensity Offset # Char Field Name Field Definition 0 1 2 4 7 10 12 13 1 1 2 3 3 2 1 1 Start of record Request Record Record Sequence # Record type Intensity Checksum Carriage return Line feed “|” 9 = Query Record XX 00 to 99 073 XXX dBHL XX “CR” “LF” 7.9.8 A.R. Sensitization Individual SoftKey Commands 7.9.8.1 A.R. Sensitization Stimulus Ear Offset # Char Field Name Field Definition 0 1 2 4 7 1 1 2 3 1 Start of record Request Record Record Sequence # Record type Reflex Type 8 10 11 2 1 1 Checksum Carriage return Line feed “|” 9 = Query Record XX 00 to 99 074 0 = IPSI 1 = CONTRA 2 = CfIa 3 = CfCa 4 = IfCa 5 = IfIa XX “CR” “LF” 7.9.8.2 A.R. Sensitization Stimulus Timing Offset # Char Field Name Field Definition 0 1 2 4 7 1 1 2 3 1 Start of record Request Record Record Sequence # Record type Auto Timing 8 13 18 23 25 26 5 5 5 2 1 1 ON time OFF time Quantity Checksum Carriage return Line feed “|” 9 = Query Record XX 00 to 99 075 0 = Manual Timing 1 = Auto Timing XXXXX XXXXX XXXXX XX “CR” “LF” D - 74 Grason-Stadler Remote Specifications 7.9.8.3 A.R. Sensitization Auto Zero Offset # Char Field Name Field Definition 0 1 2 4 7 1 1 2 3 1 Start of record Request Record Record Sequence # Record type Auto Zero 8 10 11 2 1 1 Checksum Carriage return Line feed “|” 9 = Query Record XX 00 to 99 076 0 = Automatic 1 = Manual XX “CR” “LF” 7.9.8.4 A.R. Sensitization ml Scale Offset # Char Field Name Field Definition 0 1 2 4 7 1 1 2 3 1 Start of record Request Record Record Sequence # Record type ml Scale 8 10 11 2 1 1 Checksum Carriage return Line feed “|” 9 = Query Record XX 00 to 99 077 0 = +.04 to -.16 1 = +.08 to -.32 2 = +.12 to -.48 3 = +.16 to -.64 4 = +.20 to -.80 5 = -.04 to +.16 6 = -.08 to +.32 7 = -.12 to +.48 8 = -.16 to +.64 9 = -.20 to +.80 XX “CR” “LF” 7.9.8.5 A.R. Sensitization Ear Offset # Char Field Name Field Definition 0 1 2 4 7 1 1 2 3 1 Start of record Request Record Record Sequence # Record type Ear 8 10 11 2 1 1 Checksum Carriage return Line feed “|” 9 = Query Record XX 00 to 99 078 0 = Left 1 = Right XX “CR” “LF” GSI TympStar Version 1 Reference Instruction Manual D - 75 Appendix D 7.9.8.6 A.R. Sensitization Admittance Offset # Char Field Name Field Definition 0 1 2 4 7 1 1 2 3 1 Start of record Request Record Record Sequence # Record type Admittance 8 10 11 2 1 1 Checksum Carriage return Line feed “|” 9 = Query Record XX 00 to 99 079 0=Y 1=B 2=G XX “CR” “LF” 7.9.8.7 A.R. Sensitization Timebase Offset # Char Field Name Field Definition 0 1 2 4 7 1 1 2 3 1 Start of record Request Record Record Sequence # Record type Timebase 8 10 11 2 1 1 Checksum Carriage return Line feed “|” 9 = Query Record XX 00 to 99 080 0 = 1.5 sec 1 = 3.0 sec 2 = 4.5 sec 3 = 6.0 sec 4 = 7.5 sec 5 = 9.0 sec 6 = 10.5 sec 7 = 12.0 sec XX “CR” “LF” 7.9.8.8 A.R. Sensitization Step size Offset # Char Field Name Field Definition 0 1 2 4 7 1 1 2 3 1 Start of record Request Record Record Sequence # Record type step size 8 10 11 2 1 1 Checksum Carriage return Line feed “|” 9 = Query Record XX 00 to 99 081 0 = 1 dB 1 = 2 dB 2 = 5 dB XX “CR” “LF” D - 76 Grason-Stadler Remote Specifications 7.9.8.9 A.R. Sensitization Facilitator Offset # Char Field Name Field Definition 0 1 2 4 7 1 1 2 3 2 Start of record Request Record Record Sequence # Record type Stimulus 9 12 14 15 3 2 1 1 Intensity Checksum Carriage return Line feed “|” 9 = Query Record XX 00 to 99 082 00 = 500 Hz 01 = 1000 Hz 02 = 2000 Hz 03 = 4000 Hz 04 = Broad Band Noise 05 = External 06 = 6000 Hz 07 = Non-Acoustic XXX dBHL XX “CR” “LF” 7.9.8.10 A.R. Sensitization Cursor Offset # Char Field Name Field Definition 0 1 2 4 7 11 15 19 21 22 Start of record Request Record Record Sequence # Record type Cursor X-value Cursor Line 1 Y-Value Cursor Line 2 Y-Value Checksum Carriage return Line feed “|” 9 = Query Record XX 00 to 99 083 XXXX XXXX XXXX XX “CR” “LF” 1 1 2 3 4 4 4 2 1 1 7.9.8.11A.R. Sensitization Stimulus Offset # Char Field Name Field Definition 0 1 2 4 7 Start of record Request Record Record Sequence # Record type Stimulus “|” 9 = Query Record XX 00 to 99 084 00 = 500 Hz 01 = 1000 Hz 02 = 2000 Hz 03 = 4000 Hz 04 = Broad Band Noise 05 = External 06 = Non Acoustic 07 = 6000 Hz 1 1 2 3 2 GSI TympStar Version 1 Reference Instruction Manual D - 77 Appendix D 9 11 12 2 1 1 Checksum Carriage return Line feed XX “CR” “LF” 7.9.8.12 A.R. Sensitization Intensity Offset # Char Field Name Field Definition 0 1 2 4 7 10 12 13 1 1 2 3 3 2 1 1 Start of record Request Record Record Sequence # Record type Intensity Checksum Carriage return Line feed “|” 9 = Query Record XX 00 to 99 085 XXX dBHL XX “CR” “LF” 7.9.9 Multiple Hz #1 Individual SoftKey Commands 7.9.9.1 Multiple Hz #1 Pressure Range Offset # Char Field Name Field Definition 0 1 2 4 7 1 1 2 3 1 Start of record Request Record Record Sequence # Record type Pressure Range 8 10 11 2 1 1 Checksum Carriage return Line feed “|” 9 = Query Record XX 00 to 99 086 0 = Normal 1 = Wide XX “CR” “LF” 7.9.9.2 Multiple Hz #1 Pressure Rate Offset # Char Field Name Field Definition 0 1 2 4 7 1 1 2 3 1 Start of record Request Record Record Sequence # Record type Pressure Rate 8 10 11 2 1 1 Checksum Carriage return Line feed “|” 9 = Query Record XX 00 to 99 087 0 = 12.5 daPa/s 1 = 50 daPa/s 2 = 200 daPa/s XX “CR” “LF” D - 78 Grason-Stadler Remote Specifications 7.9.9.3 Multiple Hz #1 Start Pressure Offset # Char Field Name Field Definition 0 1 2 4 7 1 1 2 3 1 Start of record Request Record Record Sequence # Record type Start Pressure 8 10 11 2 1 1 Checksum Carriage return Line feed “|” 9 = Query Record XX 00 to 99 088 0 = -600 daPa 1 = -400 daPa 2 = -200 daPa 3 = +200 daPa 4 = +400 daPa 5 = -500 daPa 6 = -300 daPa 7 = 0 daPa 8 = +300 daPa XX “CR” “LF” 7.9.9.4 Multiple Hz #1 Delta Plot Offset # Char Field Name Field Definition 0 1 Start of record “|” 1 2 4 7 1 2 3 1 Request Record Record Sequence # Record type Admittance 8 10 11 2 1 1 Checksum Carriage return Line feed 9 = Query Record XX 00 to 99 089 0=Y 1=B 2=G XX “CR” “LF” 7.9.9.5 Multiple Hz #1 Ear Offset # Char Field Name Field Definition 0 1 2 4 7 1 1 2 3 1 Start of record Request Record Record Sequence # Record type Ear 8 10 11 2 1 1 Checksum Carriage return Line feed “|” 9 = Query Record XX 00 to 99 090 0 = Left 1 = Right XX “CR” “LF” GSI TympStar Version 1 Reference Instruction Manual D - 79 Appendix D 7.9.9.6 Multiple Hz #1 Cursor Offset # Char Field Name Field Definition 0 1 2 4 7 11 15 17 18 Start of record Request Record Record Sequence # Record type Cursor X-value Cursor Y-Value Checksum Carriage return Line feed “|” 9 = Query Record XX 00 to 99 091 XXXX XXXX XX “CR” “LF” 1 1 2 3 4 4 2 1 1 7.9.10 Multiple Hz #2 Individual SoftKey Commands 7.9.10.1 Multiple Hz #2 Cursor Offset # Char Field Name Field Definition 0 1 2 4 7 11 15 17 18 Start of record Request Record Record Sequence # Record type Cursor X-value Cursor Y-Value Checksum Carriage return Line feed “|” 9 = Query Record XX 00 to 99 093 XXXX XXXX XX “CR” “LF” 1 1 2 3 4 4 2 1 1 7.9.11 Multiple Hz #3 Individual SoftKey Commands 7.9.11.1Multiple Hz #3 Probe Hz Offset # Char Field Name Field Definition 0 1 2 4 7 11 13 14 Start of record Request Record Record Sequence # Record type Probe Hz Checksum Carriage return Line feed “|” 9 = Query Record XX 00 to 99 095 XXXX (250 - 2000 Hz in multiples of 50) XX “CR” “LF” D - 80 1 1 2 3 4 2 1 1 Grason-Stadler Remote Specifications 7.9.11.2Multiple Hz #3 Cursor Offset # Char Field Name Field Definition 0 1 2 4 7 11 15 1 1 2 3 4 4 4 Start of record Request Record Record Sequence # Record type Cursor X-value Cursor Y-Value Cursor Y-Value 19 21 22 2 1 1 Checksum Carriage return Line feed “|” 9 = Query Record XX 00 to 99 096 XXXX XXXX XXXX Extra cursor value if B/G Admittance otherwise ‘——‘ XX “CR” “LF” 7.9.11.3Multiple Hz #3 Admittance Offset # Char Field Name Field Definition 0 1 2 4 7 1 1 2 3 1 Start of record Request Record Record Sequence # Record type Admittance 8 10 11 2 1 1 Checksum Carriage return Line feed “|” 9 = Query Record XX 00 to 99 098 0=Y 1=B 2=G 3 = BG XX “CR” “LF” 7.9.11.4Multiple Hz #3 Pressure Range Offset # Char Field Name Field Definition 0 1 2 4 7 1 1 2 3 1 Start of record Request Record Record Sequence # Record type Pressure Range 8 10 11 2 1 1 Checksum Carriage return Line feed “|” 9 = Query Record XX 00 to 99 099 0 = Normal 1 = Wide XX “CR” “LF” GSI TympStar Version 1 Reference Instruction Manual D - 81 Appendix D 7.9.11.5Multiple Hz #3 Pressure Rate Offset # Char Field Name Field Definition 0 1 2 4 7 1 1 2 3 1 Start of record Request Record Record Sequence # Record type Pressure Rate 8 10 11 2 1 1 Checksum Carriage return Line feed “|” 9 = Query Record XX 00 to 99 100 0 = 12.5 daPa/s 1 = 50 daPa/s 2 = 200 daPa/s XX “CR” “LF” 7.9.11.6Multiple Hz #3 Start Pressure Offset # Char Field Name Field Definition 0 1 2 4 7 1 1 2 3 1 Start of record Request Record Record Sequence # Record type Start Pressure 8 10 11 2 1 1 Checksum Carriage return Line feed “|” 9 = Query Record XX 00 to 99 101 0 = -600 daPa 1 = -400 daPa 2 = -200 daPa 3 = +200 daPa 4 = +400 daPa 5 = -500 daPa 6 = -300 daPa 7 = 0 daPa 8 = +300 daPa XX “CR” “LF” 7.9.12 Keyboard Entry Records 7.9.12.1 Patient Name Offset # Char Field Name Field Definition 0 1 2 4 7 52 54 55 Start of record Request Record Record Sequence # Record type Patient Name Checksum Carriage return Line feed “|” 9 = Query Record XX 00 to 99 102 45 ASCII characters XX “CR” “LF” D - 82 1 1 2 3 45 2 1 1 Grason-Stadler Remote Specifications 7.9.12.2 Patient ID Offset # Char Field Name Field Definition 0 1 2 4 7 52 54 55 Start of record Request Record Record Sequence # Record type Patient ID Checksum Carriage return Line feed “|” 9 = Query Record XX 00 to 99 103 45 ASCII characters XX “CR” “LF” 1 1 2 3 45 2 1 1 7.9.12.3 Tester Name Offset # Char Field Name Field Definition 0 1 2 4 7 52 54 55 Start of record Request Record Record Sequence # Record type Tester Name Checksum Carriage return Line feed “|” 9 = Query Record XX 00 to 99 104 45 ASCII characters XX “CR” “LF” 1 1 2 3 45 2 1 1 7.9.12.4 Facility Name Offset # Char Field Name Field Definition 0 1 2 4 7 52 54 55 Start of record Request Record Record Sequence # Record type Facility Name Checksum Carriage return Line feed “|” 9 = Query Record XX 00 to 99 105 45 ASCII characters XX “CR” “LF” 1 1 2 3 45 2 1 1 GSI TympStar Version 1 Reference Instruction Manual D - 83 Appendix D 7.9.13 Instrument Options 7.9.13.1 Print Format Command Offset # Char Field Name Field Definition 0 1 2 4 7 1 1 2 3 1 Start of record Request Record Record Sequence # Record type Tymp Diagnostic 8 1 Reflex Threshold 9 1 Reflex Decay 10 1 ETF Intact 11 1 ETF Perforated 12 1 ARLT 13 1 A.R. Sensi. 14 1 Multiple Hz 15 17 18 2 1 1 Checksum Carriage return Line feed “|” 9 = Query Record XX 00 to 99 108 0 = Graphics 1 = Tabular 0 = Graphics 1 = Tabular 0 = Graphics 1 = Tabular 0 = Graphics 1 = Tabular 0 = Graphics 1 = Tabular 0 = Graphics 1 = Tabular 0 = Graphics 1 = Tabular 0 = Graphics 1 = Tabular XX “CR” “LF” 7.9.13.2 Set External Printer Settings Offset # Char Field Name Field Definition 0 1 4 1 3 1 Start of record Record type Left Column Setting 5 1 Print Type 6 8 9 2 1 1 Checksum Carriage return Line feed “|” 109 0 = Left Ear 1 = Right Ear 0 = Color 1 = Black & White XX “CR” “LF” D - 84 Grason-Stadler Remote Specifications 7.9.13.3 Data Transfer Settings Offset # Char Field Name Field Definition 0 1 2 4 7 1 1 2 3 1 Start of record Request Record Record Sequence # Record type Tymp Diagnostic 8 1 Reflex Threshold 9 1 Reflex Decay 10 1 ETF Intact 11 1 ETF Perforated 12 1 ARLT 13 1 A.R. Sensi. 14 1 Multiple Hz 15 1 Clear Test 16 18 19 2 1 1 Checksum Carriage return Line feed “|” 9 = Query Record XX 00 to 99 110 0 = Summary Data 1 = Summary + Graphics 0 = Summary Data 1 = Summary + Graphics 0 = Summary Data 1 = Summary + Graphics 0 = Summary Data 1 = Summary + Graphics 0 = Summary Data 1 = Summary + Graphics 0 = Summary Data 1 = Summary + Graphics 0 = Summary Data 1 = Summary + Graphics 0 = Summary Data 1 = Summary + Graphics 0 = Manual 1 = Auto XX “CR” “LF” 7.9.13.4 Language Offset # Char Field Name Field Definition 0 1 2 4 7 1 1 2 3 1 Start of record Request Record Record Sequence # Record type LCD & Printer Language 8 1 Keyboard Language 9 11 12 2 1 1 Checksum Carriage return Line feed “|” 9 = Query Record XX 00 to 99 111 0 = English 1 = French 2 = German 3 = Spanish 4 = Italian 0 = English 1 = French 2 = German 3 = Spanish 4 = Italian XX “CR” “LF” GSI TympStar Version 1 Reference Instruction Manual D - 85 Appendix D 7.9.13.5 Test Sequence Setting 7.9.13.5.1Set Test Sequence Setting Reflex Threshold Offset # Char Field Name Field Definition 0 1 2 4 7 1 1 2 3 1 Start of record Request Record Record Sequence # Record type Reflex Threshold Switch 8 1 500 Hz 9 1 1000 Hz 10 1 2000 Hz 11 1 4000 Hz 12 1 LB Noise 13 1 HB Noise 14 1 BB Noise 15 1 Stimulus Ear 16 18 19 2 1 1 Checksum Carriage return Line feed “|” 9 = Query Record XX 00 to 99 112 0 = ON 1 = OFF 0 = YES 1 = NO 0 = YES 1 = NO 0 = YES 1 = NO 0 = YES 1 = NO 0 = YES 1 = NO 0 = YES 1 = NO 0 = YES 1 = NO 0 = IPSI 1 = CONTRA 2 = IPSI/CONTRA XX “CR” “LF” 7.9.13.5.2Set Test Sequence Setting Reflex Decay Offset # Char Field Name Field Definition 0 1 2 4 7 1 1 2 3 1 Start of record Request Record Record Sequence # Record type Reflex Decay Switch 8 1 500 Hz 9 1 1000 Hz 10 1 2000 Hz 11 1 4000 Hz “|” 9 = Query Record XX 00 to 99 113 0 = ON 1 = OFF 0 = YES 1 = NO 0 = YES 1 = NO 0 = YES 1 = NO 0 = YES 1 = NO D - 86 Grason-Stadler Remote Specifications 12 1 IPSI 13 1 CONTRA 14 16 17 2 1 1 Checksum Carriage return Line feed 0 = YES 1 = NO 0 = YES 1 = NO XX “CR” “LF” 7.9.13.6 Remote Settings Offset # Char Field Name Field Definition 0 1 2 4 1 1 2 3 Start of record Request Record Record Sequence # Record type “|” 9 = Query Record XX 00 to 99 114 7 1 Baud Rate 0 = 300 8 1 Parity 9 1 Stop Bits 10 1 RTS/CTS 11 1 Data Format 12 14 15 2 1 1 Checksum Carriage return Line feed 1 = 600 2 = 1200 3 = 2400 4 = 4800 5 = 9600 6 = 19,200 0 = NONE 1 = ODD 2 = EVEN 0 = 1 Bit 1 = 2 Bits 0 = ON 1 = OFF 0 = GSI TYMPSTAR 1 = GSI 33 XX “CR” “LF” 7.9.13.7 Date/Time Formats Offset # Char Field Name Field Definition 0 1 2 4 7 1 1 2 3 1 Start of record Request Record Record Sequence # Record type Date Format 8 1 Time Format 9 2 Checksum “|” 9 = Query Record XX 00 to 99 115 0 = MM/DD/YYYY 1 = DD/MM/ YYYY 2 = YYYY/MM/DD 0 = 12 Hour 1 = 24 Hour XX GSI TympStar Version 1 Reference Instruction Manual D - 87 Appendix D 11 12 1 1 Carriage return Line feed “CR” “LF” 7.9.13.8 Date Command Offset # Char 0 1 1 1 2 2 4 3 7 2 9 2 4 11 2 15 17 1 1 18 Field Name Field Definition Start of record Request Record Record Sequence # Record type Month Day Year Checksum Carriage return Line feed “|” 9 = Query Record XX 00 to 99 116 XX XX XXXX XX “CR” “LF” 7.9.13.9 Time Command Offset # Char Field Name Field Definition 0 1 2 4 Start of record Request Record Record Sequence # Record type “|” 9 = Query Record XX 00 to 99 117 1 1 2 3 7 2 Hour XX 9 11 13 14 2 2 1 1 Minute Checksum Carriage return Line feed XX XX “CR” “LF” D - 88 Grason-Stadler Remote Specifications 8 Input Record Formats 8.1 Single Key Commands Offset # Char Field Name Field Definition 0 1 4 1 3 1 Start of record Record type Request code 5 2 Function keycode “|” 001 0 = Send 1 = Not used Function Keycodes 00-26 00 = Softkey 1 01 = Softkey 2 03 = Softkey 4 04 = Softkey 5 06 = TYMP 07 = REFLEX 09 = SPECIAL 10 = START_R 12 = ERASE 13 = RETURN 15 = CLEAR 16 = REMOTE 18 = STIM_D 19 = STIM_U 21 = INTEN_U 22 = PRINT 24 = STOP 25 = HOLD “CR” “LF” 7 8 1 1 Carriage return Line feed 02 = Softkey 3 05 = Softkey 6 08 = ETF 11 = START_L 14 = PAGE 17 = DATA_X 20 = INTEN_D 23 = UNUSED 26 = PRESENT 8.2 Tymp Diagnostic Individual SoftKey Commands 8.2.1 Start Auto Sequence Command Offset # Field Name Char 0 1 4 1 3 1 Start of record Record type Request code 5 6 1 1 Carriage return Line feed 8.2.2 Set TYMP Diagnostic Probe Hz Offset # Field Name Char 0 1 4 1 3 1 Start of record Record type Request code 5 1 Probe Tone 6 7 1 1 Carriage return Line feed Field Definition “|” 002 0 = Send 1 = Not used “CR” “LF” Field Definition “|” 003 0 = Send 1 = Query for Probe Hz value 0 = 226 Hz 1 = 678 Hz 2 = 1000 Hz “CR” “LF” GSI TympStar Version 1 Reference Instruction Manual D - 89 Appendix D 8.2.3 Set TYMP Diagnostic Admittance Offset # Field Name Char 0 1 4 1 3 1 Start of record Record type Request code 5 1 Admittance 6 7 1 1 Carriage return Line feed Field Definition “|” 004 0 = Send 1 = Query for Admittance value 0=Y 1=B 2=G 3 = B/G “CR” “LF” 8.2.4 Set TYMP Diagnostic Pressure Range Offset # Field Name Field Definition Char 0 1 4 1 3 1 Start of record Record type Request code 5 1 Pressure Range 6 7 1 1 Carriage return Line feed 8.2.5 TYMP Diagnostic Ear Toggle Offset # Field Name Char 0 1 4 1 3 1 Start of record Record type Selection code 5 6 1 1 Carriage return Line feed “|” 005 0 = Send 1 = Query for Pressure Range selection 0 = Normal 1 = Wide “CR” “LF” Field Definition “|” 006 0 = Send 1 = Query for ear selection “CR” “LF” 8.2.6 Set TYMP Diagnostic Pressure Rate Offset # Field Name Field Definition Char 0 1 4 1 3 1 Start of record Record type Request code 5 1 Pressure Rate D - 90 “|” 007 0 = Send 1 = Query for Pressure Rate selection 0 = 12.5 daPa/s 1 = 50 daPa/s 2 = 200 daPa/s 3 = 600/200 daPa/s Grason-Stadler Remote Specifications 6 7 1 1 Carriage return Line feed “CR” “LF” 8.2.7 Set TYMP Diagnostic Start Pressure Offset # Field Name Field Definition Char 0 1 4 1 3 1 Start of record Record type Request code 5 1 Start Pressure 6 7 1 1 Carriage return Line feed 8.2.8 Set TYMP Diagnostic Baseline Offset # Field Name Char 0 1 4 1 3 1 Start of record Record type Request code 5 1 Baseline 6 7 1 1 Carriage return Line feed 8.2.9 Set TYMP Diagnostic Gradient Offset # Field Name Char 0 1 4 1 3 1 Start of record Record type Request code 5 1 Gradient 6 7 1 1 Carriage return Line feed “|” 008 0 = Send 1 = Query for Start Pressure selection 0 = -600 daPa 1 = -400 daPa 2 = -200 daPa 3 = +200 daPa 4 = +400 daPa 5 = -500 daPa 6 = -300 daPa 7 = 0 daPa 8 = +300 daPa “CR” “LF” Field Definition “|” 009 0 = Send 1 = Query for Baseline selection 0 = ON 1 = OFF “CR” “LF” Field Definition “|” 010 0 = Send 1 = Query for Gradient selection 0 = TYMP WIDTH 1 = RATIO 2 = OFF “CR” “LF” GSI TympStar Version 1 Reference Instruction Manual D - 91 Appendix D 8.2.10 Set TYMP Diagnostic Cursor Offset # Field Name Char 0 1 4 1 3 1 Start of record Record type Request code 5 1 Cursor 6 3 Number of dots 9 10 1 1 Carriage return Line feed Field Definition “|” 011 0 = Send 1 = get cursor value 0 = Move Cursor Left 1 = Move Cursor Right 2 = Set Tymp 1 Peak 3 = Set Tymp 2 Peak 4 = Set Tymp 3 Peak XXX 0 to 200 (only if cursor = 1 or 2) 0 = Position to Y axis + 1 dot “CR” “LF” 8.3 Tymp Screening Individual SoftKey Commands 8.3.1 Set TYMP Screening Pressure Range Offset # Field Name Field Definition Char 0 1 4 1 3 1 Start of record Record type Request code 5 1 Pressure Range 6 7 1 1 Carriage return Line feed 8.3.2 Set TYMP Screening Pressure Rate Offset # Field Name Char 0 1 4 1 3 1 Start of record Record type Request code 5 1 Pressure Rate 6 7 1 1 Carriage return Line feed D - 92 “|” 012 0 = Send 1 = Query for Pressure Range selection 0 = Normal 1 = Wide “CR” “LF” Field Definition “|” 013 0 = Send 1 = Query for Pressure Rate selection 0 = 200 daPa/s 1 = 600/200 daPa/s “CR” “LF” Grason-Stadler Remote Specifications 8.3.3 Set TYMP Screening Start Pressure Offset # Field Name Char 0 1 4 1 3 1 Start of record Record type Request code 5 1 Start Pressure 6 7 1 1 Carriage return Line feed 8.3.4 Set TYMP Screening Gradient Offset # Field Name Char 0 1 4 1 3 1 Start of record Record type Request code 5 1 Gradient 6 7 1 1 Carriage return Line feed 8.3.5 TYMP Screening Ear Toggle Offset # Field Name Char 0 1 4 1 3 1 Start of record Record type Selection code 5 6 1 1 Carriage return Line feed 8.3.6 Set TYMP Screening Baseline Offset # Field Name Char 0 1 4 1 3 1 Start of record Record type Request code 5 1 Baseline 6 7 1 1 Carriage return Line feed Field Definition “|” 014 0 = Send 1 = Query for Start Pressure selection 0 = -600 daPa 1 = -400 daPa 2 = -200 daPa 3 = +200 daPa 4 = +400 daPa “CR” “LF” Field Definition “|” 015 0 = Send 1 = Query for Gradient selection 0 = TYMP WIDTH 1 = RATIO 2 = OFF “CR” “LF” Field Definition “|” 016 0 = Send 1 = Query for ear selection “CR” “LF” Field Definition “|” 017 0 = Send 1 = Query for Baseline selection 0 = ON 1 = OFF “CR” “LF” GSI TympStar Version 1 Reference Instruction Manual D - 93 Appendix D 8.3.7 Set TYMP Screening Auto Start Offset # Field Name Char 0 1 4 1 3 1 Start of record Record type Request code 5 1 Auto Start 6 7 1 1 Carriage return Line feed 8.3.8 Set TYMP Screening Reflex Type Offset # Field Name Char 0 1 4 1 3 1 Start of record Record type Request code 5 1 Reflex Type 6 7 1 1 Carriage return Line feed 8.3.9 Set TYMP Screening Stimulus Hz Offset # Field Name Char 0 1 4 1 3 1 Start of record Record type Request code 5 1 500 Hz 6 1 1000 Hz 7 1 2000 Hz 8 1 4000 Hz 9 10 1 1 Carriage return Line feed D - 94 Field Definition “|” 018 0 = Send 1 = Query for Auto Start selection 0 = ON 1 = OFF “CR” “LF” Field Definition “|” 019 0 = Send 1 = Query for Reflex Type selection 0 = OFF 1 = IPSI 2 = CONTRA 3 = IPSI/CONTRA “CR” “LF” Field Definition “|” 020 0 = Send 1 = Query for Stimulus Hz selection(s) 0 = ON 1 = OFF 0 = ON 1 = OFF 0 = ON 1 = OFF 0 = ON 1 = OFF “CR” “LF” Grason-Stadler Remote Specifications 8.3.10 Set TYMP Screening Cursor Offset # Field Name Char 0 1 4 1 3 1 Start of record Record type Request code 5 1 Cursor 6 3 Number of dots 9 10 1 1 Carriage return Line feed Field Definition “|” 021 0 = Send 1 = get cursor value 0 = Move Cursor Left 1 = Move Cursor Right 2 = Set Tymp 1 Peak XXX 0 to 200 (only if cursor = 1 or 2) 0 = Position to Y axis + 1 dot “CR” “LF” 8.4 Reflex Threshold Individual SoftKey Commands 8.4.1 Set Reflex Threshold Stimulus Ear Offset # Field Name Char 0 1 4 1 3 1 Start of record Record type Request code 5 1 Reflex Type 6 7 1 1 Carriage return Line feed Field Definition “|” 022 0 = Send 1 = Query for Stimulus Ear selection 0 = IPSI 1 = CONTRA STEADY 2 = CONTRA PULSED “CR” “LF” 8.4.2 Set Reflex Threshold Mark Threshold Offset # Field Name Field Definition Char 0 1 4 1 3 1 Start of record Record type Request code 5 1 Mark Line Selection 6 7 1 1 Carriage return Line feed “|” 023 0 = Send 1 = Query for Mark Threshold selection 0 = Move Right 1 = INVALID 2 = Mark Line 1 3 = Mark Line 2 4 = NR Line 1 5 = NR Line 2 “CR” “LF” GSI TympStar Version 1 Reference Instruction Manual D - 95 Appendix D 8.4.3 Set Reflex Threshold—Threshold Seek Offset # Field Name Field Definition Char 0 1 4 1 3 1 Start of record Record type Request code 5 1 Threshold Seek 6 1 Parameter Type 7 3 Parameter Value “|” 024 0 = Send 1 = Query for Threshold Seek selection 0 = ON 1 = OFF 2 = Configure 0 = Min. Change 1 = Start dBHL 2 = Stop dBHL XXX (Min. Changes 2 to 80 representing 0.02 to 0.80) (Start dBHL XXX 035 dBHL to 110 dBHL) (Stop dBHL XXX 035 dBHL to 110 dBHL) NOTE Start dBHL cannot be larger than Stop dBHL and Stop dBHL cannot be smaller than Start dBHL. 10 11 1 1 Carriage return Line feed 8.4.4 Set Reflex Threshold Auto Zero Offset # Field Name Char 0 1 4 1 3 1 Start of record Record type Request code 5 1 Auto Zero 6 7 1 1 Carriage return Line feed 8.4.5 Reflex Threshold Ear Toggle Offset # Field Name Char 0 1 4 1 3 1 Start of record Record type Selection code 5 6 1 1 Carriage return Line feed D - 96 “CR” “LF” Field Definition “|” 025 0 = Send 1 = Query for Auto Zero selection 0 = Automatic 1 = Manual “CR” “LF” Field Definition “|” 026 0 = Send 1 = Query for ear selection “CR” “LF” Grason-Stadler Remote Specifications 8.4.6 Set Reflex Threshold Probe Hz Offset # Field Name Char 0 1 4 1 3 1 Start of record Record type Request code 5 1 Probe Tone 6 7 1 1 Carriage return Line feed “|” 027 0 = Send 1 = Query for Probe Hz value 0 = 226 Hz 1 = 678 Hz 2 = 1000 Hz “CR” “LF” 8.4.7 Set Reflex Threshold Admittance Offset # Field Name Char 0 1 4 1 3 1 Start of record Record type Request code 5 1 Admittance 6 7 1 1 Carriage return Line feed Field Definition Field Definition “|” 028 0 = Send 1 = Query for Admittance value 0=Y 1=B 2=G “CR” “LF” 8.4.8 Set Reflex Threshold Stimulus Timing Offset # Field Name Field Definition Char 0 1 4 1 3 1 Start of record Record type Request code 5 1 Auto Timing 6 1 Parameter type 7 5 12 1 1 13 Timebase 15000 30000 45000 60000 Parameter value Carriage return Line feed On Time Min Max Incr 1000 13500 500 1000 27000 500 2000 40000 2000 2000 54000 2000 “|” 029 0 = Send 1 = Query for Stimulus timing selection 0 = Manual Timing 1 = Auto Timing 0 = ON time See chart of 1 = OFF time valid selections 2 = Quantity below XXXXX “CR” “LF” Off Time Quantity Min Max Incr Min Max Incr 0 12500 500 1 10 1 0 26000 500 1 10 1 0 38000 2000 1 10 1 0 52000 2000 1 10 1 NOTE The sum of the On-time and Off-Time cannot be greater than 90% of the timebase and the ON-time cannot be 0. GSI TympStar Version 1 Reference Instruction Manual D - 97 Appendix D 8.4.9 Set Reflex Threshold Timebase Offset # Field Name Char 0 1 4 1 3 1 Start of record Record type Request code 5 1 Timebase 6 7 1 1 Carriage return Line feed 8.4.10 Set Reflex Threshold Step size Offset # Field Name Char 0 1 4 1 3 1 Start of record Record type Request code 5 1 step size 6 7 1 1 Carriage return Line feed 8.4.11 Set Reflex Threshold ml Scale Offset # Field Name Char 0 1 4 1 3 1 Start of record Record type Request code 5 1 ml Scale 6 7 1 1 Carriage return Line feed D - 98 Field Definition “|” 030 0 = Send 1 = Query for Timebase selection 0 = 15 sec 1 = 30 sec 2 = 45 sec 3 = 60 sec “CR” “LF” Field Definition “|” 031 0 = Send 1 = Query for Step Size selection 0 = 1 dB 1 = 2 dB 2 = 5 dB “CR” “LF” Field Definition “|” 032 0 = Send 1 = Query for ml Scale selection 0 = +.04 to -.16 1 = +.08 to -.32 2 = +.12 to -.48 3 = +.16 to -.64 4 = +.20 to -.80 5 = -.04 to +.16 6 = -.08 to +.32 7 = -.12 to +.48 8 = -.16 to +.64 9 = -.20 to +.80 “CR” “LF” Grason-Stadler Remote Specifications 8.4.12 Set Reflex Threshold Click Rate Offset # Field Name Char 0 1 4 1 3 1 Start of record Record type Request code 5 8 9 3 1 1 Click Rate Carriage return Line feed 8.4.13 Set Reflex Threshold Cursor Offset # Field Name Char 0 1 4 1 3 1 Start of record Record type Request code 5 1 Cursor 6 3 Number of dots 9 10 1 1 Carriage return Line feed 8.4.14 Set Reflex Threshold Stimulus Offset # Field Name Char 0 1 4 1 3 1 Start of record Record type Request code 5 2 Stimulus 7 8 1 1 Carriage return Line feed Field Definition “|” 033 0 = Send 1 = Query for Timebase selection XXX (50 to 300 in multiples of 10) “CR” “LF” Field Definition “|” 034 0 = Send 1 = get cursor value 0 = Move Cursor Left 1 = Move Cursor Right XXX 0 to 200 (only if cursor = 1 or 2) 0 = Position to Y axis + 1 dot “CR” “LF” Field Definition “|” 035 0 = Send 1 = Query for Stimulus selection 00 = 250 Hz 01 = 500 Hz 02 = 1000 Hz 03 = 2000 Hz 04 = 4000 Hz 05 = Low Band Noise 06 = High Band Noise 07 = Broad Band Noise 08 = Click 09 = External 10 = Non Acoustic “CR” “LF” GSI TympStar Version 1 Reference Instruction Manual D - 99 Appendix D 8.4.15 Set Reflex Threshold Intensity Offset # Field Name Char 0 1 4 1 3 1 Start of record Record type Request code 5 8 9 3 1 1 Intensity Carriage return Line feed Field Definition “|” 036 0 = Send 1 = Query for Intensity selection XXX dBHL (035 – XXX depending of Stimulus) “CR” “LF” 8.5 ETF Intact Individual Softkey Commands 8.5.1 Set ETF Intact Probe Hz Offset # Field Name Char 0 1 4 1 3 1 Start of record Record type Request code 5 1 Probe Tone 6 7 1 1 Carriage return Line feed 8.5.2 Set ETF Intact Pressure Range Offset # Field Name Char 0 1 4 1 3 1 Start of record Record type Request code 5 1 Pressure Range 6 7 1 1 Carriage return Line feed D - 100 Field Definition “|” 037 0 = Send 1 = Query for Probe Hz value 0 = 226 Hz 1 = 678 Hz 2 = 1000 Hz “CR” “LF” Field Definition “|” 038 0 = Send 1 = Query for Pressure Range selection 0 = Normal 1 = Wide “CR” “LF” Grason-Stadler Remote Specifications 8.5.3 Set ETF Intact Pressure Rate Offset # Field Name Char 0 1 4 1 3 1 Start of record Record type Request code 5 1 Pressure Rate 6 7 1 1 Carriage return Line feed 8.5.4 Set ETF Intact Start Pressure Offset # Field Name Char 0 1 4 1 3 1 Start of record Record type Request code 5 1 Start Pressure 6 7 1 1 Carriage return Line feed 8.5.5 ETF Intact Ear Toggle Offset # Field Name Char 0 1 4 1 3 1 Start of record Record type Selection code 5 6 1 1 Carriage return Line feed Field Definition “|” 039 0 = Send 1 = Query for Pressure Rate selection 0 = 12.5 daPa/s 1 = 50 daPa/s 2 = 200 daPa/s 3 = 600/200 daPa/s “CR” “LF” Field Definition “|” 040 0 = Send 1 = Query for Start Pressure selection 0 = -600 daPa 1 = -400 daPa 2 = -200 daPa 3 = +200 daPa 4 = +400 daPa 5 = -500 daPa 6 = -300 daPa 7 = 0 daPa 8 = +300 daPa “CR” “LF” Field Definition “|” 041 0 = Send 1 = Query for ear selection “CR” “LF” GSI TympStar Version 1 Reference Instruction Manual D - 101 Appendix D 8.5.6 Set ETF Intact Admittance Offset # Field Name Char 0 1 4 1 3 1 Start of record Record type Request code 5 1 Admittance 6 7 1 1 Carriage return Line feed 8.5.7 Set ETF Intact Baseline Offset # Field Name Char 0 1 4 1 3 1 Start of record Record type Request code 5 1 Baseline 6 7 1 1 Carriage return Line feed 8.5.8 Set ETF Intact Cursor Offset # Field Name Char 0 1 4 1 3 1 Start of record Record type Request code 5 1 Cursor 6 3 Number of dots 9 10 1 1 Carriage return Line feed D - 102 Field Definition “|” 042 0 = Send 1 = Query for Admittance value 0=Y 1=B 2=G “CR” “LF” Field Definition “|” 043 0 = Send 1 = Query for Baseline selection 0 = ON 1 = OFF “CR” “LF” Field Definition “|” 044 0 = Send 1 = get cursor value 0 = Move Cursor Left 1 = Move Cursor Right 2 = Set Tymp 1 Peak 3 = Set Tymp 2 Peak 4 = Set Tymp 3 Peak XXX 0 to 200 (only if cursor = 1 or 2) 0 = Position to Y axis + 1 dot “CR” “LF” Grason-Stadler Remote Specifications 8.5.9 Set ETF Intact Continue Offset # Field Name Char Field Definition 0 1 4 5 6 “|” 045 0 = Send “CR” “LF” 1 3 1 1 1 Start of record Record type Request code Carriage return Line feed GSI TympStar Version 1 Reference Instruction Manual D - 103 Appendix D 8.6 ETF Perforated TM Individual Softkey Commands 8.6.1 Set ETF Perforated Pressure Max Offset # Field Name Char 0 1 4 1 3 1 Start of record Record type Request code 5 9 10 4 1 1 Max Pressure Carriage return Line feed 8.6.2 Set ETF Perforated Time (sec) Offset # Field Name Char 0 1 4 1 3 1 Start of record Record type Request code 5 1 Time (sec) 6 7 1 1 Carriage return Line feed 8.6.3 Set ETF Perforated Cursor Offset # Field Name Char 0 1 4 1 3 1 Start of record Record type Request code 5 1 Cursor 6 3 Number of dots 9 10 1 1 Carriage return Line feed D - 104 Field Definition “|” 046 0 = Send 1 = query for maximum pressure XXXX (-600 to +400 in multiples of 50) “CR” “LF” Field Definition “|” 047 0 = Send 1 = query for ETF Perf. time 0 = 30 sec 1 = 40 sec 2 = 50 sec 3 = 60 sec “CR” “LF” Field Definition “|” 048 0 = Send 1 = get cursor value 0 = Move Cursor Left 1 = Move Cursor Right XXX 0 to 200 (only if cursor = 1 or 2) 0 = Position to Y axis + 1 dot “CR” “LF” Grason-Stadler Remote Specifications 8.6.4 ETF Perforated Ear Toggle Offset # Field Name Char 0 1 4 1 3 1 Start of record Record type Selection code 5 6 1 1 Carriage return Line feed Field Definition “|” 049 0 = Send 1 = Query for ear selection “CR” “LF” GSI TympStar Version 1 Reference Instruction Manual D - 105 Appendix D 8.7 Reflex Decay Individual Softkey Commands 8.7.1 Set Reflex Decay Probe Hz Offset # Field Name Char 0 1 4 1 3 1 Start of record Record type Request code 5 1 Probe Tone 6 7 1 1 Carriage return Line feed 8.7.2 Set Reflex Decay Stimulus Ear Offset # Field Name Char 0 1 4 1 3 1 Start of record Record type Request code 5 1 Reflex Type 6 7 1 1 Carriage return Line feed 8.7.3 Set Reflex Decay Stimulus On-Time Offset # Field Name Char 0 1 4 1 3 1 Start of record Record type Request code 5 10 11 5 1 1 Parameter value Carriage return Line feed Timebase 15000 30000 45000 60000 D - 106 Field Definition “|” 050 0 = Send 1 = Query for Probe Hz value 0 = 226 Hz 1 = 678 Hz “CR” “LF” Field Definition “|” 051 0 = Send 1 = Query for Stimulus Ear selection 0 = IPSI 1 = CONTRA “CR” “LF” Field Definition “|” 052 0 = Send 1 = Query for Stimulus On-Time selection XXXXX “CR” “LF” On Time Min Max Incr 1000 13000 1000 1000 27000 1000 2000 40000 2000 2000 54000 2000 Grason-Stadler Remote Specifications 8.7.4 Set Reflex Decay Auto Zero Offset # Field Name Char 0 1 4 1 3 1 Start of record Record type Request code 5 1 Auto Zero 6 7 1 1 Carriage return Line feed 8.7.5 Reflex Decay Ear Toggle Offset # Field Name Char 0 1 4 1 3 1 Start of record Record type Selection code 5 6 1 1 Carriage return Line feed 8.7.6 Set Reflex Decay Admittance Offset # Field Name Char 0 1 4 1 3 1 Start of record Record type Request code 5 1 Admittance 6 7 1 1 Carriage return Line feed 8.7.7 Set Reflex Decay Timebase Offset # Field Name Char 0 1 4 1 3 1 Start of record Record type Request code 5 1 Timebase Field Definition “|” 053 0 = Send 1 = Query for Auto Zero selection 0 = Automatic 1 = Manual “CR” “LF” Field Definition “|” 054 0 = Send 1 = Query for ear selection “CR” “LF” Field Definition “|” 055 0 = Send 1 = Query for Admittance value 0=Y 1=B 2=G “CR” “LF” Field Definition “|” 056 0 = Send 1 = Query for Timebase selection 0 = 15 sec 1 = 30 sec GSI TympStar Version 1 Reference Instruction Manual D - 107 Appendix D 6 7 1 1 Carriage return Line feed 8.7.8 Set Reflex Decay Step size Offset # Field Name Char 0 1 4 1 3 1 Start of record Record type Request code 5 1 step size 6 7 1 1 Carriage return Line feed 8.7.9 Set Reflex Decay ml Scale Offset # Field Name Char 0 1 4 1 3 1 Start of record Record type Request code 5 1 ml Scale 6 7 1 1 Carriage return Line feed 8.7.10 Set Reflex Decay Cursor Offset # Field Name Char 0 1 4 D - 108 1 3 1 Start of record Record type Request code 2 = 45 sec 3 = 60 sec “CR” “LF” Field Definition “|” 057 0 = Send 1 = Query for Step size selection 0 = 1 dB 1 = 2 dB 2 = 5 dB “CR” “LF” Field Definition “|” 058 0 = Send 1 = Query for ml Scale selection 0 = +.04 to -.16 1 = +.08 to -.32 2 = +.12 to -.48 3 = +.16 to -.64 4 = +.20 to -.80 5 = -.04 to +.16 6 = -.08 to +.32 7 = -.12 to +.48 8 = -.16 to +.64 9 = -.20 to +.80 “CR” “LF” Field Definition “|” 059 0 = Send 1 = get cursor value Grason-Stadler Remote Specifications 5 1 Cursor 6 3 Number of dots 9 10 1 1 Carriage return Line feed 8.7.11 Set Reflex Decay Stimulus Offset # Field Name Char 0 1 4 1 3 1 Start of record Record type Request code 5 2 Stimulus 7 8 1 1 Carriage return Line feed 8.7.12 Set Reflex Decay Intensity Offset # Field Name Char 0 1 4 1 3 1 Start of record Record type Request code 5 8 9 3 1 1 Intensity Carriage return Line feed 0 = Move Cursor Left 1 = Move Cursor Right XXX 0 to 200 (only if cursor = 1 or 2) 0 = Position to Y axis + 1 dot “CR” “LF” Field Definition “|” 060 0 = Send 1 = Query for Stimulus selection 00 = 250 Hz 01 = 500 Hz 02 = 1000 Hz 03 = 2000 Hz 04 = 4000 Hz 05 = Low Band Noise 06 = High Band Noise 07 = Broad Band Noise 08 = Click 09 = External “CR” “LF” Field Definition “|” 061 0 = Send 1 = Query for Intensity selection XXX dBHL (035 – XXX depending of Stimulus) “CR” “LF” GSI TympStar Version 1 Reference Instruction Manual D - 109 Appendix D 8.8 ARLT Individual Softkey Commands 8.8.1 Set ARLT Stimulus Ear Offset # Field Name Char 0 1 4 1 3 1 Start of record Record type Request code 5 1 Reflex Type 6 7 1 1 Carriage return Line feed 8.8.2 Set ARLT Stimulus On-Time Offset # Field Name Char 0 1 4 1 3 1 Start of record Record type Request code 5 10 11 5 1 1 Reflex Type Carriage return Line feed Timebase 500 1000 1500 2000 “|” 062 0 = Send 1 = Query for Stimulus Ear selection 0 = IPSI 1 = CONTRA “CR” “LF” Field Definition “|” 063 0 = Send 1 = Query for Stimulus On-Time selection XXXX (see chart below for valid values) “CR” “LF” On Time Min Max Incr 100 450 50 100 900 50 150 1350 150 150 1800 150 8.8.3 Set ARLT Auto Zero Offset # Field Name Char 0 1 4 1 3 1 Start of record Record type Request code 5 1 Auto Zero 6 7 1 1 Carriage return Line feed D - 110 Field Definition Field Definition “|” 064 0 = Send 1 = Query for Auto Zero selection 0 = Automatic 1 = Manual “CR” “LF” Grason-Stadler Remote Specifications 8.8.4 Set ARLT ml Scale Offset # Field Name Char Field Definition 0 1 4 1 3 1 Start of record Record type Request code 5 1 ml Scale 6 7 1 1 Carriage return Line feed 8.8.5 ARLT Ear Toggle Offset # Field Name Char “|” 065 0 = Send 1 = Query for ml Scale selection 0 = +.04 to -.16 1 = +.08 to -.32 2 = +.12 to -.48 3 = +.16 to -.64 4 = +.20 to -.80 5 = -.04 to +.16 6 = -.08 to +.32 7 = -.12 to +.48 8 = -.16 to +.64 9 = -.20 to +.80 “CR” “LF” Field Definition 0 1 4 1 3 1 Start of record Record type Selection code 5 6 1 1 Carriage return Line feed 8.8.6 Set ARLT Admittance Offset # Field Name Char 0 1 4 1 3 1 Start of record Record type Request code 5 1 Admittance 6 7 1 1 Carriage return Line feed “|” 066 0 = Send 1 = Query for ear selection “CR” “LF” Field Definition “|” 067 0 = Send 1 = Query for Admittance value 0=Y 1=B 2=G “CR” “LF” GSI TympStar Version 1 Reference Instruction Manual D - 111 Appendix D 8.8.7 Set ARLT Timebase Offset # Field Name Char 0 1 4 1 3 1 Start of record Record type Request code 5 1 Timebase 6 7 1 1 Carriage return Line feed 8.8.8 Set ARLT Step size Offset # Field Name Char 0 1 4 1 3 1 Start of record Record type Request code 5 1 step size 6 7 1 1 Carriage return Line feed 8.8.9 Set ARLT Average Offset # Field Name Char 0 1 4 1 3 1 Start of record Record type Request code 5 7 8 2 1 1 Average Carriage return Line feed D - 112 Field Definition “|” 068 0 = Send 1 = Query for Timebase selection 0 = 500 msec 1 = 1000 msec 2 = 1500 msec 3 = 2000 msec “CR” “LF” Field Definition “|” 069 0 = Send 1 = Query for Step size selection 0 = 1 dB 1 = 2 dB 2 = 5 dB “CR” “LF” Field Definition “|” 070 0 = Send 1 = Query for Timebase selection XX (2-50) “CR” “LF” Grason-Stadler Remote Specifications 8.8.10 Set ARLT Cursor Offset # Field Name Char Field Definition 0 1 4 1 3 1 Start of record Record type Request code 5 1 Cursor 6 3 Number of dots 9 10 1 1 Carriage return Line feed 8.8.11 Set ARLT Stimulus Offset # Field Name Char “|” 071 0 = Send 1 = get cursor value 0 = Move Cursor Left 1 = Move Cursor Right XXX 0 to 200 (only if cursor = 1 or 2) 0 = Position to Y axis + 1 dot “CR” “LF” Field Definition 0 1 4 1 3 1 Start of record Record type Request code 5 2 Stimulus 7 8 1 1 Carriage return Line feed 8.8.12 Set ARLT Intensity Offset # Field Name Char “|” 072 0 = Send 1 = Query for Stimulus selection 00 = Unused 01 = 500 Hz 02 = 1000 Hz 03 = 2000 Hz 04 = 4000 Hz 05 = Low Band Noise 06 = High Band Noise 07 = Broad Band Noise 08 = Click 09 = External “CR” “LF” Field Definition 0 1 4 1 3 1 Start of record Record type Request code 5 8 3 1 Intensity Carriage return “|” 073 0 = Send 1 = Query for Intensity selection XXX dBHL (035 – XXX depending of Stimulus) “CR” GSI TympStar Version 1 Reference Instruction Manual D - 113 Appendix D 8.9 A.R. Sensitization Individual Softkey Commands 8.9.1 Set A.R. Sensitization Stimulus Ear Offset # Field Name Char 0 1 4 1 3 1 Start of record Record type Request code 5 1 Reflex Type 6 7 1 1 Carriage return Line feed Field Definition “|” 074 0 = Send 1 = Query for Stimulus Ear selection 0 = IPSI 1 = CONTRA 2 = CfIa 3 = CfCa 4 = IfCa 5 = IfIa “CR” “LF” 8.9.2 Set A.R. Sensitization Stimulus Timing Offset # Field Name Field Definition Char 0 1 4 1 3 1 Start of record Record type Request code 5 1 Auto Timing 6 1 Parameter type 7 12 13 5 1 1 Parameter value Carriage return Line feed Timebase 1500 3000 4500 6000 7500 9000 10500 12000 Min 125 125 250 250 500 500 500 500 On Time Max Incr 1250 125 2625 125 4000 250 5250 250 6500 500 8000 500 9000 500 10500 500 “|” 075 0 = Send 1 = Query for Stimulus timing selection 0 = Manual Timing 1 = Auto Timing 0 = ON time See chart of 1 = OFF time valid selections 2 = Quantity below XXXXX “CR” “LF” Min 0 0 0 0 0 0 0 0 Off Time Max Incr 1125 125 2500 125 3750 250 5000 250 6000 500 7500 500 8500 500 10000 500 Min 1 1 1 1 1 1 1 1 Quantity Max Incr 10 1 10 1 10 1 10 1 10 1 10 1 10 1 10 1 NOTE The sum of the On-time and Off-Time cannot be greater than 90% of the timebase and the ON-time cannot be 0. D - 114 Grason-Stadler Remote Specifications 8.9.3 Set A.R. Sensitization Auto Zero Offset # Field Name Char 0 1 4 1 3 1 Start of record Record type Request code 5 1 Auto Zero 6 7 1 1 Carriage return Line feed 8.9.4 Set A.R. Sensitization ml Scale Offset # Field Name Char 0 1 4 1 3 1 Start of record Record type Request code 5 1 ml Scale 6 7 1 1 Carriage return Line feed 8.9.5 A.R. Sensitization Ear Toggle Offset # Field Name Char 0 1 4 1 3 1 Start of record Record type Selection code 5 6 1 1 Carriage return Line feed Field Definition “|” 076 0 = Send 1 = Query for Auto Zero selection 0 = Automatic 1 = Manual “CR” “LF” Field Definition “|” 077 0 = Send 1 = Query for ml Scale selection 0 = +.04 to -.16 1 = +.08 to -.32 2 = +.12 to -.48 3 = +.16 to -.64 4 = +.20 to -.80 5 = -.04 to +.16 6 = -.08 to +.32 7 = -.12 to +.48 8 = -.16 to +.64 9 = -.20 to +.80 “CR” “LF” Field Definition “|” 078 0 = Send 1 = Query for ear selection “CR” “LF” GSI TympStar Version 1 Reference Instruction Manual D - 115 Appendix D 8.9.6 Set A.R. Sensitization Admittance Offset # Field Name Char 0 1 4 1 3 1 Start of record Record type Request code 5 1 Admittance 6 7 1 1 Carriage return Line feed 8.9.7 Set A.R. Sensitization Timebase Offset # Field Name Char 0 1 4 1 3 1 Start of record Record type Request code 5 1 Timebase 6 7 1 1 Carriage return Line feed 8.9.8 Set A.R. Sensitization Step size Offset # Field Name Char 0 1 4 1 3 1 Start of record Record type Request code 5 1 step size 6 7 1 1 Carriage return Line feed D - 116 Field Definition “|” 079 0 = Send 1 = Query for Admittance value 0=Y 1=B 2=G “CR” “LF” Field Definition “|” 080 0 = Send 1 = Query for Timebase selection 0 = 1.5 sec 1 = 3.0 sec 2 = 4.5 sec 3 = 6.0 sec 4 = 7.5 sec 5 = 9.0 sec 6 = 10.5 sec 7 = 12.0 sec “CR” “LF” Field Definition “|” 081 0 = Send 1 = Query for Step Size selection 0 = 1 dB 1 = 2 dB 2 = 5 dB “CR” “LF” Grason-Stadler Remote Specifications 8.9.9 Set A.R. Sensitization Facilitator Offset # Field Name Char 0 1 4 1 3 1 Start of record Record type Request code 5 2 Stimulus 7 10 11 3 1 1 Intensity Carriage return Line feed 8.9.10 Set A.R. Sensitization Cursor Offset # Field Name Char 0 1 4 1 3 1 Start of record Record type Request code 5 1 Cursor 6 3 Number of dots 9 10 1 1 Carriage return Line feed 8.9.11 Set A.R. Sensitization Stimulus Offset # Field Name Char 0 1 4 1 3 1 Start of record Record type Request code 5 2 Stimulus Field Definition “|” 082 0 = Send 1 = Query for Facilitator selection 00 = 500 Hz 01 = 1000 Hz 02 = 2000 Hz 03 = 4000 Hz 04 = Broad Band Noise 05 = External 06 = 6000 Hz 07 = Non-Acoustic XXX dBHL (035 – XXX depending of Stimulus) “CR” “LF” Field Definition “|” 083 0 = Send 1 = get cursor value 0 = Move Cursor Left 1 = Move Cursor Right XXX 0 to 200 (only if cursor = 1 or 2) 0 = Position to Y axis + 1 dot “CR” “LF” Field Definition “|” 084 0 = Send 1 = Query for Stimulus selection 00 = 500 Hz 01 = 1000 Hz 02 = 2000 Hz 03 = 4000 Hz 04 = Broad Band Noise 05 = External 06 = Non Acoustic GSI TympStar Version 1 Reference Instruction Manual D - 117 Appendix D 7 8 1 1 Carriage return Line feed 8.9.12 Set A.R. Sensitization Intensity Offset # Field Name Char 0 1 4 1 3 1 Start of record Record type Request code 5 8 3 1 Intensity Carriage return D - 118 07 = 6000 Hz “CR” “LF” Field Definition “|” 085 0 = Send 1 = Query for Intensity selection XXX dBHL (035 – XXX depending of Stimulus) “CR” Grason-Stadler Remote Specifications 8.10Multiple Hz #1 Individual Softkey Commands 8.10.1 Set Multiple Hz #1 Pressure Range Offset # Field Name Char 0 1 4 1 3 1 Start of record Record type Request code 5 1 Pressure Range 6 7 1 1 Carriage return Line feed 8.10.2 Set Multiple Hz #1 Pressure Rate Offset # Field Name Char 0 1 4 1 3 1 Start of record Record type Request code 5 1 Pressure Rate 6 7 1 1 Carriage return Line feed 8.10.3 Set Multiple Hz #1 Start Pressure Offset # Field Name Char 0 1 4 1 3 1 Start of record Record type Request code 5 1 Start Pressure 6 7 1 1 Carriage return Line feed Field Definition “|” 086 0 = Send 1 = Query for Pressure Range selection 0 = Normal 1 = Wide “CR” “LF” Field Definition “|” 087 0 = Send 1 = Query for Pressure Rate selection 0 = 12.5 daPa/s 1 = 50 daPa/s 2 = 200 daPa/s “CR” “LF” Field Definition “|” 088 0 = Send 1 = Query for Start Pressure selection 0 = -600 daPa 1 = -400 daPa 2 = -200 daPa 3 = +200 daPa 4 = +400 daPa 5 = -500 daPa 6 = -300 daPa 7 = 0 daPa 8 = +300 daPa “CR” “LF” GSI TympStar Version 1 Reference Instruction Manual D - 119 Appendix D 8.10.4 Set Multiple Hz #1 Delta Plot Offset # Field Name Char 0 1 4 1 3 1 Start of record Record type Request code 5 1 Admittance 6 7 1 1 Carriage return Line feed 8.10.5 Multiple Hz #1 Ear Toggle Offset # Field Name Char 0 1 4 1 3 1 Start of record Record type Selection code 5 6 1 1 Carriage return Line feed 8.10.6 Set Multiple Hz #1 Cursor Offset # Field Name Char 0 1 4 1 3 1 Start of record Record type Request code 5 1 Cursor 6 3 Number of dots 9 10 1 1 Carriage return Line feed Field Definition “|” 089 0 = Send 1 = Query for Admittance value 0=Y 1=B 2=G “CR” “LF” Field Definition “|” 090 0 = Send 1 = Query for ear selection “CR” “LF” Field Definition “|” 091 0 = Send 1 = get cursor value 0 = Move Cursor Left 1 = Move Cursor Right 2 = Set Peak XXX 0 to 200 (only if cursor = 1 or 2) 0 = Position to Y axis + 1 dot “CR” “LF” 8.10.7 Multiple Hz #1 Continue Offset # Field Name Char Field Definition 0 1 4 5 6 “|” 092 0 = Send “CR” “LF” D - 120 1 3 1 1 1 Start of record Record type Request code Carriage return Line feed Grason-Stadler Remote Specifications 8.11Multiple Hz #2 Individual Softkey Commands 8.11.1 Set Multiple Hz #2 Cursor Offset # Field Name Char 0 1 4 1 3 1 Start of record Record type Request code 5 1 Cursor 6 3 Number of dots 9 10 1 1 Carriage return Line feed Field Definition “|” 093 0 = Send 1 = get cursor value 0 = Move Cursor Left 1 = Move Cursor Right 2 = Set Hz XXX 0 to 200 (only if cursor = 1 or 2) 0 = Position to Y axis + 1 dot “CR” “LF” 8.11.2 Multiple Hz #2 Continue Offset # Field Name Char Field Definition 0 1 4 5 6 “|” 094 0 = Send “CR” “LF” 1 3 1 1 1 Start of record Record type Request code Carriage return Line feed 8.12Multiple Hz #3 Individual Softkey Commands 8.12.1 Set Multiple Hz #3 Probe Hz Offset # Field Name Char 0 1 4 1 3 1 Start of record Record type Request code 5 9 10 4 1 1 Probe Hz Carriage return Line feed Field Definition “|” 095 0 = Send 1 = Query for Admittance value XXXX (250 Hz to 2000 Hz in multiples of 50) “CR” “LF” GSI TympStar Version 1 Reference Instruction Manual D - 121 Appendix D 8.12.2 Set Multiple Hz #3 Cursor Offset # Field Name Char 0 1 4 1 3 1 Start of record Record type Request code 5 1 Cursor 6 3 Number of dots 9 10 1 1 Carriage return Line feed Field Definition “|” 096 0 = Send 1 = get cursor value 0 = Move Cursor Left 1 = Move Cursor Right 2 = Set Peak XXX 0 to 200 (only if cursor = 1 or 2) 0 = Position to Y axis + 1 dot “CR” “LF” 8.12.3 Multiple Hz #3 Continue Offset # Field Name Char Field Definition 0 1 4 5 6 “|” 097 0 = Send “CR” “LF” 1 3 1 1 1 Start of record Record type Request code Carriage return Line feed 8.12.4 Set Multiple Hz #3 Admittance Offset # Field Name Char 0 1 4 1 3 1 Start of record Record type Request code 5 1 Admittance 6 7 1 1 Carriage return Line feed D - 122 Field Definition “|” 098 0 = Send 1 = Query for Admittance value 0=Y 1=B 2=G 3 = BG “CR” “LF” Grason-Stadler Remote Specifications 8.12.5 Set Multiple Hz #3 Pressure Range Offset # Field Name Char 0 1 4 1 3 1 Start of record Record type Request code 5 1 Pressure Range 6 7 1 1 Carriage return Line feed 8.12.6 Set Multiple Hz #3 Pressure Rate Offset # Field Name Char 0 1 4 1 3 1 Start of record Record type Request code 5 1 Pressure Rate 6 7 1 1 Carriage return Line feed 8.12.7 Set Multiple Hz #3 Start Pressure Offset # Field Name Char 0 1 4 1 3 1 Start of record Record type Request code 5 1 Start Pressure 6 7 1 1 Carriage return Line feed Field Definition “|” 099 0 = Send 1 = Query for Pressure Range selection 0 = Normal 1 = Wide “CR” “LF” Field Definition “|” 100 0 = Send 1 = Query for Pressure Rate selection 0 = 12.5 daPa/s 1 = 50 daPa/s 2 = 200 daPa/s “CR” “LF” Field Definition “|” 101 0 = Send 1 = Query for Start Pressure selection 0 = -600 daPa 1 = -400 daPa 2 = -200 daPa 3 = +200 daPa 4 = +400 daPa 5 = -500 daPa 6 = -300 daPa 7 = 0 daPa 8 = +300 daPa “CR” “LF” GSI TympStar Version 1 Reference Instruction Manual D - 123 Appendix D 8.13Keyboard Entry Records 8.13.1 Patient Name Offset # Field Name Char 0 1 4 1 3 1 Start of record Record type Request code 5 45 Patient Name 50 51 1 1 Carriage return Line feed 8.13.2 Patient ID Offset # Field Name Char 0 1 4 1 3 1 Start of record Record type Request code 5 45 Patient ID 50 51 1 1 Carriage return Line feed 8.13.3 Tester Name Offset # Field Name Char 0 1 4 1 3 1 Start of record Record type Request code 5 45 Tester Name 50 51 1 1 Carriage return Line feed D - 124 Field Definition “|” 102 0 = Send 1 = Query for Patient Name Any valid keys including numbers, letters and the special characters of period, comma, hyphen, and apostrophe. There will also be certain foreign characters that are valid depending on the keyboard language that is selected under instrument options. “CR” “LF” Field Definition “|” 103 0 = Send 1 = Query for Patient ID Any valid keys including numbers, letters and the special characters of period, comma, hyphen, and apostrophe. There will also be certain foreign characters that are valid depending on the keyboard language that is selected under instrument options. “CR” “LF” Field Definition “|” 104 0 = Send 1 = Query for Tester Name Any valid keys including numbers, letters and the special characters of period, comma, hyphen, and apostrophe. There will also be certain foreign characters that are valid depending on the keyboard language that is selected under instrument options. “CR” “LF” Grason-Stadler Remote Specifications 8.13.4 Facility Name Offset # Field Name Char Field Definition 0 1 4 1 3 1 Start of record Record type Request code 5 45 Facility Name 50 51 1 1 Carriage return Line feed “|” 105 0 = Send 1 = Query for Facility Name Any valid keys including numbers, letters and the special characters of period, comma, hyphen, and apostrophe. There will also be certain foreign characters that are valid depending on the keyboard language that is selected under instrument options. “CR” “LF” GSI TympStar Version 1 Reference Instruction Manual D - 125 Appendix D 8.14Print/Clear Handling 8.14.1 Print Test Offset # Field Name Char 0 1 4 5 1 3 1 2 Start of record Record type Request code Test 7 8 1 1 Carriage return Line feed 8.14.2 Clear Test Offset # Field Name Char 0 1 4 5 1 3 1 2 Start of record Record type Request code Test 7 8 1 1 Carriage return Line feed D - 126 Field Definition “|” 106 0 = Send 00 = Print All tests 01-26 = Print test selected “CR” “LF” Field Definition “|” 107 0 = Send 00 = Clear All tests 01-26 = Print test selected “CR” “LF” Grason-Stadler Remote Specifications 8.15Instrument Options 8.15.1 Set Print Format Command Offset # Field Name Char 0 1 4 1 3 1 Start of record Record type Request code 5 1 Print Format Selections 6 1 Print Format Settings 7 8 1 1 Carriage return Line feed 8.15.2 Set External Printer Settings Offset # Field Name Char 0 1 4 1 3 1 Start of record Record type Request code 5 1 Print Format Settings 6 1 External Printer Setting 7 8 1 1 Carriage return Line feed 8.15.3 Set Data Transfer Offset # Field Name Char 0 1 4 1 3 1 Field Definition “|” 108 0 = Send 1 = Query for Print Format Settings 0 = Tymp 1 = Reflex Threshold 2 = Reflex Decay 3 = ETF Intact 4 = ETF Perforated 5 = ARLT 6 = A.R. Sensi. 7 = Multiple Hz 0 = Graphics 1 = Tabular “CR” “LF” Field Definition “|” 109 0 = Send 1 = Query for Print Format Settings 0 = Left Column Setting 1 = Print Type if Print Format Settings = 0 (Left Column Setting) 0 = Left Ear 1 = Right Ear if Print Format Settings = 1 (Print type) 0 = Color 1 = Black & White “CR” “LF” Field Definition Start of record Record type Request code “|” 110 0 = Send 1 = Query for Data Transfer Settings GSI TympStar Version 1 Reference Instruction Manual D - 127 Appendix D 5 1 Transfer Data Selections 6 1 Transfer Data Settings 7 8 1 1 Carriage return Line feed 8.15.4 Set Language Offset # Field Name Char 0 1 4 1 3 1 Start of record Record type Request code 5 1 Language Settings 6 1 Language 7 8 1 1 Carriage return Line feed 0 = Tymp 1 = Reflex Threshold 2 = Reflex Decay 3 = ETF Intact 4 = ETF Perforated 5 = ARLT 6 = A.R. Sensi 7 = Multiple Hz 8 = Clear Test if Print format selection = 00 – 07 (test modes) 0 = Summary Data 1 = Summary + Graphics if Print format selection = 08 (External Printer) 0 = Manual 1 = Auto “CR” “LF” Field Definition “|” 111 0 = Send 1 = Query for Language Settings 0 = LCD & Printer 1 = Keyboard 0 = English 1 = French 2 = German 3 = Spanish 4 = Italian “CR” “LF” 8.15.5 Set Test Sequence Setting 8.15.5.1 Set Test Sequence Setting Reflex Threshold Offset # Char Field Name Field Definition 0 1 4 1 3 1 Start of record Record type Request code 5 1 Reflex Threshold Switch 6 1 500 Hz “|” 112 0 = Send 1 = Query for Test Sequence Settings 0 = ON 1 = OFF 0 = YES 1 = NO D - 128 Grason-Stadler Remote Specifications 7 1 1000 Hz 8 1 2000 Hz 9 1 4000 Hz 10 1 LB Noise 11 1 HB Noise 12 1 BB Noise 13 1 Stimulus Ear 14 15 1 1 Carriage return Line feed 0 = YES 1 = NO 0 = YES 1 = NO 0 = YES 1 = NO 0 = YES 1 = NO 0 = YES 1 = NO 0 = YES 1 = NO 0 = IPSI 1 = CONTRA 2 = IPSI/CONTRA “CR” “LF” 8.15.5.2 Set Test Sequence Setting Reflex Decay Offset # Char Field Name Field Definition 0 1 4 1 3 1 Start of record Record type Request code 5 1 Reflex Decay Switch 6 1 500 Hz 7 1 1000 Hz 8 1 2000 Hz 9 1 4000 Hz 10 1 IPSI 11 1 CONTRA 12 13 1 1 Carriage return Line feed “|” 113 0 = Send 1 = Query for Test Sequence Settings 0 = ON 1 = OFF 0 = YES 1 = NO 0 = YES 1 = NO 0 = YES 1 = NO 0 = YES 1 = NO 0 = YES 1 = NO 0 = YES 1 = NO “CR” “LF” GSI TympStar Version 1 Reference Instruction Manual D - 129 Appendix D 8.15.6 Date/Time Settings 8.15.6.1 Date/Time Formats Offset # Char Field Name Field Definition 0 1 4 1 3 1 Start of record Record type Request code 5 1 Date Format 6 1 Time Format 7 8 1 1 Carriage return Line feed “|” 115 0 = Send 1 = Query for Date and Time Formats 0 = MM/DD/YYYY 1 = DD/MM/ YYYY 2 = YYYY/MM/DD 0 = 12 Hour 1 = 24 Hour “CR” “LF” 8.15.6.2 Set Date Command Offset # Char Field Name Field Definition 0 1 4 1 3 1 Start of record Record type Request code 5 1 Parameter Type 6 10 11 4 1 1 Parameter Value Carriage return Line feed “|” 116 0 = Send 1 = Query for Date 0 = Month 1 = Day 2 = Year XXXX “CR” “LF” 8.15.6.3 Set Time Command Offset # Char Field Name Field Definition 0 1 4 1 3 1 Start of record Record type Request code 5 1 Parameter Type 6 8 9 2 1 1 Parameter Value Carriage return Line feed “|” 117 0 = Send 1 = Query for Time 0 = Hour 1 = Minute XX “CR” “LF” D - 130 Grason-Stadler Remote Specifications 8.16 Remote Function Records 8.16.1 Transmit Current XY Data Request Command Offset # Field Name Field Definition Char 0 1 4 5 6 1 3 1 1 1 Start of record Record type Request code Carriage return Line feed “|” 118 0 = Send “CR” “LF” 8.16.2 Transmit Test Data Request Command Offset # Field Name Field Definition Char 0 1 4 5 1 3 1 2 Start of record Record type Request code Test number 7 1 Record format 8 9 1 1 Carriage return Line feed “|” 119 0 = Send XX 00 = Transmit all test 01 to 26 = Transmit test # selected 0 = Summary record 1 = Summary & Graphic record “CR” “LF” GSI TympStar Version 1 Reference Instruction Manual D - 131 Appendix D 8.17ACK/NAK Records 8.17.1 Record Received OK Acknowledgement - ACK Offset # Field Name Field Definition Char 0 1 4 5 6 1 3 1 1 1 Start of record Record type Request code Carriage return Line feed “|” 120 0 = Send “CR” “LF” 8.17.2 Record Received Incorrectly Acknowledgement - NAK Offset # Field Name Field Definition Char 0 1 4 5 6 D - 132 1 3 1 1 1 Start of record Record type Request code Carriage return Line feed “|” 121 0 = Send “CR” “LF” Grason-Stadler Remote Specifications 9 Error Record Formats 9.1 Error Record Definitions Error Code Error Sub code Error Description 001 000 Invalid “CRLF” record termination. The record received was not terminated by the valid ASCII character sequences (CR then LF) in the proper character positions 002 000 Record is invalid for current state. The command specified cannot be processed because it is not valid for the state of the system which is defined by the operating state (RUN, HOLD, STOP or MANUAL), whether the test is stopped, or in hold, or has been started and measurements are being made. 003 000 Record is invalid for current test mode. The command specified cannot be processed because it is not valid for the test selected (Tymp Diagnostic, Reflex Threshold, etc.). 004 000 Record is invalid for current state or test mode. The command specified cannot be processed because it is not valid for the state of the system which is defined by the operating state (RUN, HOLD, STOP or MANUAL), or the command specified cannot be processed because it is not valid for the test selected (Tymp Diagnostic, Reflex Threshold, etc.). 005 000 Invalid character for Request Code. This should be a ‘0’ for sending a remote record and a ‘1’ for querying a value. 006 000 Non numeric character in a numeric field. Example: The ASCII character ,”” in the ON time field of a Set Timing Parameter command to set the ARLT ON time to 1,000 msec, :1201 ,000CRLF. 007 000 Invalid record type. The record type specified in a record is not one of the defined record types. Example: Record type 53 would be invalid since it is not defined. 008 000 Insufficient number of pages left in the page memory to perform the requested command. Example: Selecting a Multiple Frequency test when currently on test #25. Since a Multiple Frequency test requires a minimum of 3 tests this command invalid. 010 Record Type Invalid parameter action for specific test. Some tests do don have are not able to change parameters therefore return this error. 011 Record Type Invalid query for specific test. Some tests do don have query results and therefore return this error. GSI TympStar Version 1 Reference Instruction Manual D - 133 Appendix D 016 000 Received character error - Framing error. The character received by the GSI TympStar did not have the proper number of Stop bits. Could be caused by a transmission error or a mismatch between the Stop bit selections between the GSI TympStar and the Remote Device. 017 000 Received character error - Overrun error. One or more characters transmitted to the GSI TympStar were lost due to insufficient time between characters to allow the GSI TympStar to process one character before another one is sent. 018 000 Received character error - Parity error. The parity of a character received by the GSI TympStar did not match the parity bit in the character. Could be caused by a transmission error or a mismatch in the parity selections between the GSI TympStar and the Remote Device. 019 000 Received character error - Break detect. A Break condition is when the Transmit Data line, TXD Pin 2, is in the “space” (low) state for greater than one character time. 020 000 An invalid Minus sign is present in a record field where it should not exist. 101 see 10.2.1 A Remote invalid key press occurred. The validation performed on single keystroke command is the same as for the corresponding front panel hard or soft key. The error subcode indicates the error or status message, which would flash on the screen if the corresponding hard or soft key had been operated. 102 Test: see 10.2.2 Integer selection for Probe Hz was not a valid selection. For example: in Tymp Diagnostic, a ‘4’ is selected when only ‘0’, ’1’, and ‘2’ are valid choices. The error subcode indicates the current test where the error is occurring. 103 Test: see 10.2.2 Integer selection for Admittance is not a valid selection. Integer may not represent an admittance value or the admittance value may not be valid for this test. The error subcode indicates the current test where the error is occurring. 104 Test: see 10.2.2 Integer selection for Pressure Range is invalid. An integer other than a ‘0’ or a ‘1’ was entered. The error subcode indicates the current test where the error is occurring. 105 Test: see 10.2.2 Integer selection for Pressure Rate is not a valid selection. Integer may not represent a pressure rate value or the pressure rate value may not be valid for this test. The error subcode indicates the current test where the error is occurring. 106 Test: see 10.2.2 Integer selection for Start Pressure is not a valid selection. For example: in an ETF Intact test, a ‘9’ is selected as the integer for start pressure when only ‘0’ to ’8’are valid choices. The error subcode indicates the current test where the error is occurring. D - 134 Grason-Stadler Remote Specifications 107 Test: see 10.2.2 Integer selection for Baseline is invalid. An integer other than a ‘0’ or a ‘1’ was entered. The error subcode indicates the current test where the error is occurring. 108 Test: see 10.2.2 Integer selection for Gradient was not a valid option. For example: in Tymp Diagnostic, a ‘6’ is selected when only ‘0’,’1’, and ‘2’ are valid choices. The error subcode indicates the current test where the error is occurring. 109 Test: see 10.2.2 Integer selection for Cursor is invalid, the integer chosen does not represent the moving of the cursor, turning it off or setting a peak. The error subcode indicates the current test where the error is occurring. 110 001 Integer selection for Auto Start is invalid. An integer other than a ‘0’ or a ‘1’ was entered.. ‘0’ and ‘1’ represent ON and OFF. The error subcode indicates the current test where the error is occurring. 111 001 Integer selection for Reflex Type is invalid. The error subcode indicates the current test where the error is occurring. 112 001 Integer selection for Stimulus Hz is invalid. Either an invalid choice was made or too many stimuli were turned on. Only one stimulus can be turned on for a reflex type of IPSI/CONTRA while two stimuli can be on with a reflex type of IPSI or CONTRA. The error subcode indicates the current test where the error is occurring. 113 Test: see 10.2.2 Invalid Integer selection for Stimulus EAR. Integer may not represent a Stimulus Ear value or the Stimulus Ear value may not be valid for this test. The error subcode indicates the current test where the error is occurring. 114 002 Invalid selection for mark threshold. This could be either that the trace they are trying to mark does not exist or that the integer representing the type of mark is invalid. The error subcode indicates the current test where the error is occurring. 115 002 Invalid selection of the Threshold Seek parameter that needs to be changed. Only the integers 0-4 are valid here. The error subcode indicates the current test where the error is occurring. 116 Test: see 10.2.2 Integer selection for Auto Zero is invalid. An integer other than a ‘0’ or a ‘1’ was entered. The error subcode indicates the current test where the error is occurring. 117 Test: see 10.2.2 Invalid selection of the stimulus timing parameter that is desired to be changed. Only the integers 0-4 are valid here. The error subcode indicates the current test where the error is occurring. 118 Test: see 10.2.2 Integer for selection of timebase is incorrect. The integer selected does not properly represent a valid timebase. The error subcode indicates the current test where the error is occurring. GSI TympStar Version 1 Reference Instruction Manual D - 135 Appendix D 119 Test: see 10.2.2 Integer selection for Step size was not a valid option. For example: in Reflex Decay, a ‘7’ is selected when only ‘0’,’1’, and ‘2’ are valid Step size choices. The error subcode indicates the current test where the error is occurring. 120 Test: see 10.2.2 Integer for selection of ml Scale is incorrect. The integer selected does not properly represent a valid ml Scale. The error subcode indicates the current test where the error is occurring. 121 Test: see 10.2.2 Integer selection for the Stimulus is not a valid selection. Integer may not represent a valid stimulus or the stimulus selected may not be valid for this test. The error subcode indicates the current test where the error is occurring. 122 005 Integer selection for Time (sec) is not a valid selection. For example: if a ‘9’ is selected as the integer for Time (sec) when only ‘0’ to ’3’are valid choices, this error code will be returned. The error subcode indicates the current test where the error is occurring. 123 008 Integer selection for the Stimulus part of the Facilitator is not a valid selection. The number entered may not represent a valid stimulus or the stimulus selected may not be valid for this test. The error subcode indicates the current test where the error is occurring. 124 Test: see 10.2.2 The value of the numeric field for the cursor is out of range. This means that the value entered needs to be changed to a value from 1-200. The error subcode indicates the current test where the error is occurring. 125 Parameter type: The value of a numeric field for the Stimulus timing is out of range or not in the specified increment. The table time below the input record type shows the valid times and Increments. The error subcode indicates the parameter type that is out of range or incremented incorrectly: 000 = ON time 001 = OFF time 002 = Quantity 126 000 The value of a numeric field for the click rate is out of range or not in the specified increment. This means that the value is not in the range from 10-300 or is not a multiple of 10. 127 Intensity The value of the numeric field for the Intensity Timing is out of range. The error subcode indicates the Intensity entered that is out of range. 128 Max Pressure The value of the numeric field for the Pressure Max is out of range or not in the specified increment. Example: Specifying an ETFPerforated TM test maximum pressure of 111 daPa. The specified increment is 50 daPa so valid values would be 100 or 150 daPa. The error subcode indicates the maximum pressure entered that is out of range. 129 000 The value of a numeric field for the Stimulus On-Time out of range or not in the specified increment. The table below the input record type shows the valid times and increments. 130 000 The value of a numeric field for the ARLT Average is out of range. This implies that the value is not in the range from 2-50. D - 136 Grason-Stadler Remote Specifications 131 Intensity The value of the numeric field for the Intensity part of the Facilitator is out of range. The error subcode indicates the Intensity entered that is out of range. 132 000 The value of a numeric field for the Multiple Hz #3 Probe Hz is out of range or not in the specified increment. This means that the value is not in the range from 250-2000 or is not a multiple of 50. 133 Field Invalid character entered for one of the keyboard entry fields. These fields are limited to all numbers, letters, as well as special characters including the hyphen, apostrophe, period and comma. Also, the appropriate foreign characters will be valid with the language selected under keyboard language in instrument options. The error subcode indicates the field for which an invalid character is being entered: 000 = Patient Name 001 = Patient ID 002 = Tester Name 003 = Facility Name 134 Action Invalid test data request. Data was requested to be printed, transferred or cleared for a test which is greater than 26. The error subcode indicates the action requested for the test greater than 26: 000 = Print Test 001 = Clear Test 002 = Transfer Test 135 Action Invalid test data request. Data was requested to be printed, transferred or cleared for a test which has not yet been performed. Example: Current test is #3 but data was requested for test #5.The error subcode indicates the action requested for the invalid test: 000 = Print Test 001 = Clear Test 002 = Transfer Test 136 Menu Item Invalid selection in Instrument Options. An integer selection for setting Instrument options was not valid. The error subcode indicates the instrument options menu item causing the error. 000 = Invalid Menu Item 001 = Print Format 002 = Data Transfer 003 = Language 004 = Test Sequence 005 = Remote Settings 006 = Date/Time Formats 007 =Set Date 008 = Set Time 137 000 Invalid Current XY Data request. This command is invalid in Multiple Frequency Screen #2. 138 000 Invalid selection with Program Mode Records. 139 000 Error entering Altitude Calibration using the remote system. 140 000 Error using record that is not available in Version 1. 141 000 Error using record for single key press. The keycode entered must be between 1 and 26 to represent the hardkeys or softkeys. GSI TympStar Version 1 Reference Instruction Manual D - 137 Appendix D 9.2 Error Subcodes 9.2.1 Error Record 101 Subcode Definitions Error Sub code 164 178 209 214 216 217 218 219 259 260 261 270 271 276 277 278 279 D - 138 Error / Status Message and Description ALERT INVALID SELECTION A General error message indicating that the command is invalid for the current instrument state. This message is used for invalid softkeys and various other common improper selections. LEAK TEST ABORTED Leak occurred while a test other than Tymp Screening with Auto Start selected was in progress. The STOP mode is automatically entered. VALID INTENSITY LIMIT REACHED Indicates that the minimum or maximum Intensity limit was reached for an Intensity Up/Down or Set Activator / Facilitator command. OCCLUSION REMOVE PROBE Occlusion was detected during a Tymp Screening test with Auto Start selected. The STOP mode is automatically entered. ALERT INVALID SELECTION—PRINTER ACTIVE Page, Print or Clear command sent while a printout was in progress. ALERT INVALID SELECTION—IN PROGRAM MODE Clear, Page, Erase, Manual or Hold command sent while in the Program Mode. ALERT INVALID SELECTION—AUTO START SELECTED START RIGHT or START LEFT command sent while in Tymp Screening Test with Auto Start selected. ALERT INVALID SELECTION—PRESSURIZING TO START PRESSURE An invalid command was sent while the system is pressurizing before starting a test. ALERT INVALID SELECTION—TEST IN PROGRESS An invalid command was sent while the system is running a test. This will occur on most key presses other than stop when any data is being plotted. ALERT INVALID SELECTION—MUST MAKE SOFTKEY SELECTION An invalid command when the start keys are pushed from the Multiple Hz stop NEXT SERIES menu. ALERT INVALID SELECTION—NO TEST DATA STORED Page, Print or Clear command sent when there is not any test data stored in page memory. ALERT PAGE MEMORY FULL—MUST CLEAR TEST DATA TO RESUME Command is invalid due to insufficient page memory available. ALERT INVALID SELECTION——NO TEST DATA DISPLAYED Data Transfer or Erase command sent when there is not any test data displayed on the screen. ALERT INVALID SELECTION—STORING TEST DATA Command is invalid while storing the test data when the HOLD or STOP mode is being entered. ALERT TEST IN PROGRESS— LEFT EAR STILL BEING TESTED The Ear selection switch on the Probe box was changed from the Left position to the Right position while a test was in progress. ALERT TEST IN PROGRESS—RIGHT EAR STILL BEING TESTED The Ear selection switch on the Probe box was changed from the Right position to the Left position while a test was in progress. TEST COMPLETE REMOVE PROBE A Tymp Screening test with Auto Start selected has completed successfully. Grason-Stadler Remote Specifications 280 281 283 284 288 295 310 318 333 335 357 358 374 433 437 439 445 446 PRESSURE MAXIMUM REACHED This is a valid status message which is sent when the maximum pressure selected in an ETF perforated test is reached. EUSTACHIAN TUBE OPENED This is a valid status message which is sent when the Eustacian tube is opened during an ETF perforated test MANUAL MODE PRESSURE MAXIMUM REACHED This is a valid status message which is sent when the maximum pressure selected in a Manual ETF perforated test is reached. MANUAL MODE EUSTACHIAN TUBE OPENED This is a valid status message which is sent when the Eustacian tube is opened during a Manual ETF perforated test PRESSURIZING TO START PRESSURE This is a status message displayed when the system pressurizes in a Tymp-type test to the selected start pressure. EXCEEDED TIMEBASE OFF TIME MODIFIED The selection of a new ON time in a Set Timing Parameter command has caused the current OFF time to be decreased so that the total ON and OFF time fits on the current timebase. EXCEEDED TIMEBASE ON/OFF TIMES MODIFIED The selection of a new timebase in a Set Timing Parameter command has caused the ON and OFF times to be decreased so that the total ON and OFF time fits on the new timebase. NOTE SITE ALTITUDE DEFAULTED TO 0—REENTER IF NECESSARY The site altitude was defaulted to 0 feet because it could not be read properly from the memory. NOTE STIMULUS NOT AVAILABLE—CONTACT SERVICE A Stimulus Up/Down or Set Activator/Facilitator Stimulus command is invalid due to a problem with reading the stimulus SPL calibration data from memory. NOTE GSI DEFAULTS USED—REPROGRAM Indicates that there was a problem with reading the Program Mode User test parameters from memory when selecting a test so the GSI default test parameters were used. NOTE TEST NOT AVAILABLE—CONTACT SERVICE Indicates that, when selecting a Reflex type test, the information stored in memory which defines if the stimuli were calibrated in the User Custom SPL mode could not be read properly. NOTE REFLEX DECAY NOT AVAILABLE—CONTACT SERVICE Indicates that, when selecting the Special hard key, the information stored in memory which defines if the stimuli were calibrated in the User Custom SPL mode could not be read properly. The unit will default to a Multiple Frequency test instead. ALERT PRINTER ERROR—CHECK PAPER OR RELEASE LEVER Indicates that the printer is unable to print due to either being out of paper or the release lever is in the wrong position. ALERT INVALID SELECTION—PROBE TONE NOT SELECTED Command was invalid in the Altitude Calibration mode due to not having selected a probe tone. ALERT ALTITUDE LIMIT REACHED The minimum or maximum altitude selection limit was reached for a Step Altitude Up/Down command in the Altitude Calibration mode. ALERT ACTIVATOR STIMULUS DEFAULTED Indicates that the activator stimulus was defaulted due to a Set Facilitator Stimulus command during an ARST test. ALERT INVALID SELECTION—NO DATA STORED ON CURRENT LINE Invalid selection when there is no data stored on the second line of a reflex-type test. The alert I sent so that the user cannot delete data fro the top plot while on the second plot. ALERT INVALID SELECTION—PRESS EXIT Invalid selection when the present bar is pushed from threshold seek and stimulus timing sub menus. The changes have not been committed till these menus are exited so the must be for a test to run. GSI TympStar Version 1 Reference Instruction Manual D - 139 Appendix D 454 456 459 460 463 481 494 495 510 544 545 587 607 608 638 639 640 641 D - 140 ALERT HIGH INTENSITY SELECTED Indicates that an Intensity level of greater than 100 db was selected via an Intensity Up/Down or Set Activator/Facilitator command. NOTE CAN NOT START TEST-DO ALTITUDE CAL-CONTACT SERVICE Indicates that a test could not be started due to an error in reading the altitude information stored in memory when the unit was turned on. ALERT MUST SELECT A TEST TO PROGRAM The Store Program Mode data is invalid in the Tymp Program Mode until a test type to program is selected. ALERT PROBE MUST BE IN CAVITY BEFORE DATA TRANSFER The Data Transfer command in the Altitude Calibration mode is invalid until the probe is placed in a cavity. ALERT INVALID SELECTION—PRESSURIZING TO MAXIMUM PRESSURE Command is invalid in ETF-Perforated test while it is pressurizing to the selected maximum pressure. ALERT PNEUMATIC SYSTEM ERROR-IF ERROR REPEATS CONTACT SERVICE Indicates that a problem exists in the pneumatic system which prevents the pump from establishing the desired pressure. ALERT CAN NOT CONTINUE WITH DIFFERENT COMPONENT Indicates that in a Tymp Diagnostic test, it is invalid to change the admittance selection while in HOLD and then try to restart the tymp sweeping in the same direction. After changing the admittance it is only valid to resume sweeping in the opposite direction. ALERT ONLY ONE LINE LEFT—CHOOSE A DIFFERENT COMPONENT Indicates that in a Tymp Diagnostic test, it is invalid to perform 2 tymps in the same test with B/G selected. ALERT NO VALID PEAK SET The Multiple Frequency Screen #1 Continue command is invalid unless there is a valid peak set for the tymp. ALERT INVALID SELECTION WHILE CURSOR IS ACTIVE Invalid selection when most keys are hit while the cursor is active. ALERT SOFTKEY INVALID IN THIS MODE Invalid selection because Mark threshold or cursor was selected incorrectly from page mode. ALERT MUST CALIBRATE 678HZ BEFORE 1000HZ Indicates that the Data Transfer command in the Altitude Calibration mode is invalid until after 678 Hz has been calibrated if calibration of all probe tone frequencies is required due to an altitude change. OCCLUSION TEST ABORTED Indicates that an occlusion was detected during a test (except Tymp Screening with Auto Start) in progress and that the test was stopped. LEAK TEST ABORTED—REMOVE PROBE Indicates that a leak was detected during a Tymp Screening test with Auto Start selected and that the test was stopped. ALERT REMOTE MODE NOT SELECTED Indicates that the Data Transfer command will not be able to process while not in the remote mode. ALERT INVALID SELECTION. DATA TRANSFER IN PROGRESS Indicates that the TympStar is trying to transfer data and that the key pressed is invalid during a data transfer. ALERT INVALID WHILE TEST IN PROGRESS Invalid while test is running for Tymp-type tests and while Reflex-type tests are plotting. ALERT INVALID WHILE IN PRINT OR CLEAR The Data Transfer or Transmit Test Data Request command is invalid while in the Print or Clear mode. Grason-Stadler Remote Specifications 642 ALERT DATA TRANSFER IN PROGRESS Indicates the status of a data transfer. This will always be displayed on the screen while the data transfer is taking place. The message will be sent remotely every time a data transfer takes place. ALERT DATA TRANSFER INHIBITED - DATA TRANSFER ABORTED Indicates that the instrument has detected tha the RTS line is in a disabled (low) state. ALERT DATA TRANSFER ERROR - DATA TRANSFER ABORTED Indicates that Data Transfer was selected but the TympStar was unable to transfer the data to a remote system and that the data transfer has been cancelled. ALERT INVALID SELECTION —MUST SELECT TEST TO DISPLAY Invalid selection since in page but no test to be displayed was selected yet. LARGE TIMEBASE - ON TIME MODIFIED Indicates the status of the on time since the on time was changed by a change in the timebase. PRINT CANCEL IN PROGRESS Indicates that the print cancel softkey was selected and that the TympStar is currently canceling the print job. ALERT NO PROBE - POWER OFF ATTACH PROBE AND POWER ON This error indicates that there was no probe found. This is usually the resul of trying to run a test with the probe off. ALERT NEW PROBE - POWER OFF & POWER ON Indicates that the TympStar has recognized a new probe and that the calibration process needs o take place before progressing. THRESHOLD SEEK IN PROGRESS Status message that threshold seek is in progress and searching for the correct trace to mark. This is only available in Reflex threshold tests. ALERT NOT AVAILABLE Indicates that a certain function of the Tympstar is not available. It may be available in later versions of the TympStar software. CLEARING TEST DATA Indicates that the clear test command has been called and that the system is in the process of clearing test(s). ALERT INVALID SELECTION WHILE MARK THRESHOLD IS ACTIVE Invalid selection when most keys are pressed while mark threshold is active. ALERT INVALID SELECTION WITH NONACOUSTIC STIMULUS Indicates that the user tried to turn on threshold seek. This is an invalid command while the Non-Acoustic stimulus is selected. 643 644 650 735 740 743 745 756 757 760 762 763 9.2.2 Error Record TEST Subcode Definitions (Errors 101-121) Error Sub code Error / Status Message and Description 001 002 003 004 005 006 007 008 009 010 011 TYMP DIAGNOSTIC TEST TYMP SCREENING TEST REFLEX THRESHOLD TEST ETF INTACT TM TEST ETF PERFORATED TM TEST REFLEX DECAY TEST ARLT TEST A. R. SENSITIZATION TEST MULTIPLE HZ #1 TEST MULTIPLE HZ #2 TEST MULTIPLE HZ #3 TEST GSI TympStar Version 1 Reference Instruction Manual D - 141 Appendix D D - 142 Grason-Stadler Index A Accessories 2-2 Accuracy 3-1 Acoustic energy 4-6 Acoustic reflex testing 4-21 Admittance 1-1 Admittance change 4-32 Admittance meter 4-10 Air density 3-4 Alcohol 3-2 Altitude 3-4 Altitude calibration 4-53 Altitude information 4-53 Altitude/barometric pressure calibration 3-4 Angle of probe insertion 3-15 Applying power 2-7 Apprehension 3-15 Archiving data 1-2 Auto sequence 4-1, 4-55 Auto sequence program mode 4-57 Auto sequence test procedure 4-55 Auto start 4-15 Auto timing 4-23 Auto timing of stimuli 4-24 Automatic tympanometry 4-9 B Brain stem 4-21 C Calibration cavity 2-2 Calibration check for tympanometry 3-5 Calibration checks 3-3 Calibration data 4-25 Calibration procedure 4-53 Canal examination 3-15 Caring for eartips 3-2 Cerumen 3-1, 3-15 Changing parameter settings 1-5 Check for tymp screening 3-10 Children 3-15 Cleaning probe tubes 3-1 Cleaning wires 2-2, 3-1 Clear hardkey 4-4 Clearing test data 4-4 Cochlea 4-21, 4-41 Communication 1-2, 2-4 Compliance 4-8 Compliance change 4-26 Contra insert phone 1-2, 2-2, 2-6 Contralateral testing 4-21 Controls 2-10 Cooperation 3-15 D Damage 2-1, 2-7 Data and the cursor 4-5 Data transfer 2-11 Date and time 4-62 Default parameter settings 1-5, 2-12 Default parameters 4-2 Default parameters 4-20 Default parameters for user tests 4-20 Disinfect eartips 3-2 Dustcover 2-3 E Ear canal 4-6 Ear canal examination 3-15 Eardrum 4-6 Earphone 4-21 Eartips 1-2, 3-2, 3-15 Eartip screening sizes 2-2 Eartip special sizes 2-2 Eartip standard sizes 2-2 Equalize pressure 4-41 Equipment connections 2-4 Equipment connections and options 1-2 Equivalent compliance values 3-4 Erase 2-12 Erase hardkey 4-4, 4-13 Erasing and clearing test data 4-4 Error codes and problem reporting 4-5 ETF 2-10 ETF mode 4-1 ETF-intact automatic test procedure 4-43 ETF-intact normative data 4-45 ETF-perforated TM automatic test procedure 4-47 ETF-perforated TM manual test procedure 4-50 ETF-perforated TM normative data 4-50 GSI TympStar Version 1 Reference Instruction Manual Index - 1 Index ETF-perforated TM sample printout 4-49 Eustachian tube 4-41 Eustachian tube function testing for perforated TM 4-46 Eustachian tube function testingfor intact TM 4-41 F Front panel controls 2-10 Functions 4-1 Fuses 2-5 G Gradient 4-7 Graphic display 4-10 Graphic traces 4-3 GSI 33 1-1 GSI default parameter settings 1-5, 2-12 GSI preprogrammed test parameters 1-1 GSI Suite 4 -62 GSI-developed defaults 4-2 H Hardkeys 1-3, 2-10 Hermetic seal 3-15 High intensity levels 4-28 Hold 2-11 Hospital-grade plug 2-3 Hyperflaccid 4-25 I Injury 2-7 Insert phone 4-21 Inspecting the GSI TympStar 2-1 Installation 2-1 Software 2-1 Instructing the patient 3-15 Instrument controls 1-3 Instrument fuses 2-5 Instrument options 4-59 Intact eardrums 4-41 Intensity 2-11 Intensity limits check for reflex threshold 3-14 Intensity presentations (dB HL) per frequency 4-14 Internal memory 1-2 Introduction 1-1 Ipsi probe 2-6 Ipsi stimuli 1-2 Ipsi stimulus 4-16 Isolated power source 2-4 K Keyboard 1-2, 2-4 L LCD 1-1, 2-12 LCD graphic traces 4-3 LCD panel 1-3 LCD screen 4-3 LED 1-2 Lights 4-3 Line 1 4-26 Loudspeaker 1-2, 4-6 M Managing and archiving data 1-2 Manual 2-11 Manual mode 4-12 Manual timing of stimuli 4-24 Manual tympanometry 4-12 Mark threshold 4-26 Maximum timing allowable for reflex threshold 4-24 Maximum timing levels allowable in reflex decay 4-36 Measurement accuracy 3-1 Memory 1-2 Menu diagrams 1-5, 2-12 Menu navigation 1-3 Menu softkey 1-5 Menu structure diagrams 1-5 Menus 1-4 Microphone 1-2 Middle ear 4-6 Middle-ear space 4-41 Min. change 4-27 Mobility 4-6, 4-21 Modes 4-1 Monitor 1-2, 2-4 N Nasopharynx 4-41 Nerve 4-21 Noise 4-21 Non-acoustic reflex testing 4-22 Normative gradient values 4-7, 4-8 NR 3-10, 4-16 NT 4-16 O On/Off switch 2-5 Operation 3-1, 4-1 Options 2-4 Ossicular chain 4-6, 4-21, 4-41 Otoscope 3-15 Overview of functions 4-1 P Page 2-11 Page hardkey 4-4, 4-13 Language 4-61 Index - 2 Grason-Stadler Index Panel controls 2-10 Paper roll 2-8 Paper supply 2-8 Parameter settings 2-12 Parameters 4-2 Perforated eardrums 4-46 Positioning the probe box 3-15 Power 2-5, 2-7 Power cord 2-3 Power entry module 2-5 Pre-operation 3-1 Preparing test materials 3-3 Preparing the printer 2-8 Preparing the probe assembly 2-6 Present 2-11 Pressure and admittance meters 4-10 Pressure calibration 3-4 Pressure control 1-3, 2-11, 4-12 Pressure range check for tympanometry 3-9 Pressure sweep 4-10 Pressure swallow test 4-41 Print 2-11 Print format 4-59 Print hardkey 4-4, 4-13 Printer 1-1, 2-8 Printer paper 2-2 Probe 1-2, 2-5 Probe assembly 2-6 Probe box 1-2, 2-6, 3-15 Probe cleaning wire 2-2 Probe insertion technique 3-15 Probe lights 4-3 Probe mount shoulder 2-2 Probe mountwrist 2-2 Probe tip 3-1, 3-15 Probe tone frequencies 1-1 Probe tubes 2-2, 3-1 Program mode for ETF 4-51 Program mode for tympanometry 4-18 Program mode softkey menu structure 4-18 Program modes 4-3 Programming default parameters 4-20 Proper size eartip 3-15 Pure-tone 4-21 Reflex decay 4-29 Reflex decay automatic testing 4-35 Reflex decay sample printout 4-38 Reflex diagnostic manual test procedure 4-31 Reflex diagnostic sample printouts 4-30 Reflex diagnostic softkey menu structure 4-22 Reflex mode 4-1 Reflex responses 4-26 Reflex testing 4-21, 4-31 Reflex threshold mode check 3-11 Relative gradient 4-8 Release lever 2-8 Remote 2-11 Remote settings 4-62 Return 2-12 Roll 2-8 RS232 serial communication 1-2 S Qualitative check 3-3 Screening eartips 1-2 Screening reflex 4-14 Screening reflex check for tymp screening 3-10 Screening reflex test scoring 4-16 Seal 3-15 Selecting a test mode 1-3 Serial communication 1-2, 2-4 Settings 2-12 Seventh (7th) nerve 4-21 Shoulder mount 3-15 Size eartip 3-15 Sloped tymps 4-25 Softkeys 1-3, 1-4, 2-12 Software installation 2-1 Special 2-10 Special test mode 4-1 Stapedius muscle 4-21 Start 2-11 Stimuli 4-24 Stimulus 2-11 Stimulus timing 4-23 Stop 2-11 Stop hardkey 4-13 Sub-threshold tracings 4-28 Suprathreshold 4-21 Swallow 4-41 Swallow test 4-41 Sweep 4-10 R T Ratio 4-7 Ratio method 4-8 Rear panel 2-4 Receptacle 2-5 Reflex 2-10, 4-14 Test and other functions 4-1 Test cavity calibration 3-3 Test materials 3-3 Test mode 1-3 Test mode choices 1-1 Q GSI TympStar Version 1 Reference Instruction Manual Index - 3 Index Test modes 4-1 Test modes and menu navigation 1-3 Test parameters 4-2 Test results 1-1 Test results 2-4 Test sequence 4-61 Test status 1-2 Test status line 4-4 Testing capabilities 1-1 Testing children 3-15 Thermal paper 2-9 Thermal printer 2-8 Threshold seek 4-27 Timebase 4-24 Timing allowable for reflex threshold 4-24 Timing levels allowable in reflex decay 4-36 Timing of stimuli 4-24 Tip 3-1, 3-15 Tone 4-21 Traces 4-3 Tracing/meter calibration check for tympanometry 3-5 Tubes 3-1 Tubing 2-6 Tygon tubing 2-6, 3-1 Tymp 2-10 Tymp diagnostic 4-9 Tymp diagnostic functions 4-2 Tymp diagnostic softkey menu structure 4-9 Tymp mode 4-1, 4-6 Tymp peak 4-12 Tymp screening sample printout 4-17 Tymp screening softkey menu structure 4-14 Tymp width 4-7 Tymp width method 4-7 Tympanic membrane 4-41 Tympanometric gradient 4-7 Tympanometry normative values 4-13 Tympanometry printout samples 4-13 U Unpacking and inspecting the GSI TympStar 2-1 User softkeys 4-18 V VGA monitor 1-2, 2-4 Weather 3-4 Z Zephiran chloride 3-2 Index - 4 Grason-Stadler