Transcript
Rev2 Installation Instructions
This product will allow you to set the amount of throttle twist to suit your style and riding conditions. This throttle kit is meant for
off-road and closed course track use ONLY. This kit should only be installed by a professional mechanic and must be installed and
maintained in accordance to these instructions to work properly.
Warning: Incorrect installation or maintenance of this product could result in great bodily injury or death. Always refer to
a factory service manual in conjunction with these instructions when installing or maintaining this throttle assembly.
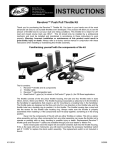
Kit includes:
1. Rev2™ throttle assembly with throttle tube (MX/Off-Road kits include Titan™ Throttle Tube).
2. High-quality Motion Pro Rev2™ cables specifically designed for your bike
3. Street/Road Race kits include RoadControl™ grips and MX/Off-Road kits include DirtControl™ grips (shown)
4. Standard interchangeable reels: 35mm, 40 mm, 45 mm, 50 mm
5. Cam reel: Street/Road Race (orange) or MX/Off-Road (gray)
6. Decal set “Rev2 Throttle Equipped”
1
3
3
1
1
2
2
4
4
5
6
5
6
The throttle consists of a two piece throttle housing, the tube and five included throttle reels (straight rate 35 mm, 40 mm, 45 mm,
50 mm and a progressive cam profile). The throttle reels are designed so that they will only fit in one direction on the throttle tube
and the throttle tube has a locating ring to position it in the throttle housing. The throttle housing has a stop built into the recess
for the throttle tube locating ring. Always make sure the throttle is properly assembled when installing it. If the components don’t
fit easily together, something is in the wrong position.
Never mix the components of this kit with any other throttles or cables. This kit is a standalone assembly and any other
componentsfrom any other assembly can cause the throttle not to operate or possibly stick or drag, resulting in possible injury
or death. Replacement Rev2™ throttle parts and Rev2™ cables are available through your local dealer or Motion Pro. Some
motorcycles have the engine kill and starter switches built into the throttlehousing. If this is the case with your motorcycle, you
will need to purchase the accessory handlebar switch part # 11-0098 to replace the stock switch assembly. The replacement
switch is not included in this kit.
How the Rev2™ Works
The Rev2™ throttle has several different size reels that will change how much twist is necessary for the throttle to completely
open the carbs or throttle bodies on a motorcycle.The larger the reel is, the shorter the twist. Each reel size will shorten the
twist by about 10 degrees. If your stock throttle has a 40mm reel and stock twist is 90 degrees (1/4 turn), the 45mm reel will
reduce the twist to 80 degrees and the 50mm reel will reduce it to 70 degrees. The 35mm reel will increase the throttle twist
to approximately 100 degrees.This is just an example; every model of motorcycle is different.The included cam reel has a
progressive profile that allows the throttle to act like a sensitive, long twist throttle during the initial small throttle openings for
precise control and then acts like a more aggressive short twist throttle at large throttle openings, progressively shortening
the amount of twist needed to reach full throttle.
Installing the Rev2™ Throttle Kit
Step 1
Removing the Stock Throttle and Cables
Consult your factory service manualfor disassemblyprocedures for your particular
motorcycle. On most motorcycles, it will be necessary to removethe seat, gas tank and
airbox to access the throttle cables on the carbs or the throttle bodies. Some bikes will
require additional disassembly. Once you are able to access the cables on the carbs or
the throttle bodies, remove the bar end on the throttle side (if there is one), disassemble
the throttle housing on the handlebar and remove the housing, the stock throttle tube
and the cables. Keep the stock throttle tube handy for use later in the installation. Make
note of how the stock throttle cables are routed and then remove the stock cables from
the carbs or throttle bodies.
Step 2
Installing the Rev2™ Cables
Before installing the new cables, first lubricate the cables using a cable luber
(Motion ProP/N 08-0182) and high quality cable lube (Motion Pro P/N 15-0002). The
cables are not lubed at the factory, so this is animportant step for best feel and cable
life. Install the Rev2™ cables using the same routing as stock and connect them to the
carbs or throttle bodies. Make surethat the pull cable is attached to the pull side of the
throttle bodies or carbs and thereturn cable to thereturn side. If you reverse them, the
throttle will operate backwards. Do not tighten the adjusters all the way on the cable
mounts at this time.
Step 3
Installing the Rev2™ Throttle
Measure the diameter of the stock reel (refer to the illustration for the proper method to
measure the diameter of the reel on your stock tube). Then selecta Rev2™ reel from
the kit that is closest in size to your stock reel, a largerdiameter if you wantto have a
faster turning throttle, or a little smallerdiameter if you would like a slightly slower
turning throttle and install it on the Rev2™ throttle tube.
WARNING: Always select the closest size first. NEVER install the largest reel
right away. Making a major change in how your throttle operates could result in
loss of control of your bike and serious injury or death. Always work one size at
a time and ride the bike long enough to get used to how the throttle operates
before making another change.
Make sure the Rev2™ tube flange fits inside the recess on the Rev2™ reel. Install
the throttle tube on the handlebar. Use some high quality grease on the barrels of the
Rev2™ cables and fit the push and pull cables into the Rev2™ reel. The cable wires
will wrap around thereel and attach to the reel on the opposite side from the cable
elbows. The pull cable barrel hole will fit very closely to the barrel, while the return
barrel hole in the reel is slightly oval. Use a small amount of grease on the outside
diameter of the reel as well, where the cable wires ride. Install the two halves of the
throttle housing around the throttle tube, reel and cable elbows. The housing halves
should fit snugly together and the throttle should operate smoothly. If not, double-check
to make sure the elbows are snapped together and alignedcorrectly and that the wires
are routed properly on the outside of the reel. Once everything is fit correctly, install the
two housing screws and tighten them evenly to clamp the housing on the handlebar.
Do not exceed 90 kg/cm torque (78 lb/in or 6 lb/ft) on the housingscrews. At this time,
the cables will still be slightly loose, but the throttle should operate smoothly and snap
back quickly to the closed position.
Step 4
Cable Adjustments
The aluminum inline adjusters on the cable housing near the throttle should be closed
all the way before starting this step. Some motorcycles have threaded adjusters on the
throttlebody or carb cable mounts. If so, this is where you will start. If there are only
slip-on fittings at the carb or throttle bodies, the adjustments will be made at the inline
adjustersonly. Start with the pull cable and adjust the adjuster until there is approximately 1-2mm of free play in the cable. The throttle should be able to rotate a few
degrees before startingto open the carbs or throttle bodies. Once this adjustment is
complete, twist the throttle andlet go several times. The throttle should snap back
closed very quickly. If it does not, double check all of your previous work to determine
the problem. DO NOT continue until the throttle snapsback quickly on its own once
released. Adjust the return cable after the pull cable is adjusted. The return cable
should have 2-3mm of freeplay. If you are able to access the exposed wire of the return
cable at the carbs orthrottle bodies, you should be able to deflect it fromstraight by a
millimeter or so if it is adjusted properly. Open the throttle and release again and it
should snap back as quickly asbefore. If not, the return cable is too tight. Adjust and
operate the throttle again, until it snaps back quickly.
Step 5:
Install the Grips
Install grips using grip glue. Make sure that the throttle side grip does not contact the
throttle housing, which will cause drag. Reinstall any barends that may have been on
the handlebars and test the throttle again to make sure the grip does not drag on the
bar end and the throttle still snaps back quickly.
Step 6:
Reassemble the Rest of the Bike
Reassemble the airbox, gas tank, seat and anything else that was removed when
you started. Make sure to make all the proper hose andelectrical connections, while
referring to the factory service manual for details.
Step 7:
Stationary Idle Testing
With the bike on its side stand, or a paddock stand turn the bars all the way left and
all the way right. While doing this, check that the cablesare not pulled too tight and
that they are routed properly. Check the throttle operation at full left and then again
at full right to make sure thatit does not drag and that there is some free play. Without
turning the throttle, start the motorcycle. It should start and idle normally. If the idle is
very high, something was not adjusted properly or was not assembled correctly. Turn
off the motorcycle and recheck your work.If the idle is normal, turn the handlebars from
full left to full right with the engine running. The idle should not change. If the idle rises
when the bars are turned, there is not enough free play in the cables. Readjust the
cables to allow more free play and repeat until the idleis steady no matter where the
bars are turned. Then twist the throttle to raise the engine speed above idle and release
the throttle. The engine should return quickly to a normal idle. After installation of the
Revolver throttle and any switches on the handlebar, test the brakelever to make sure
that it has adequate travel without contacting the throttle or switch housing. Some
motorcycles have adjustable span brake levers, that when set at the closest position
to accommodate someone with small hands may contact the throttle or switch housing
before full brake pressure is applied. If this is the case, move or rotate the throttle and/
or switch housing concerned to provide proper clearance. When testing the motorcycle
for the first time, pay close attention to brake function to make sure they are 100%
functional. Ifthere is a problem, do not operate the motorcycle further until proper brake
lever clearance is obtained.
WARNING: Failure to install this kit properly could cause great bodily injury
or death.
Step 8:
Apply a light coating of grease
to barrel mounting points
The Test Ride
The best place for a test ride is at a closed course racetrack. Make sure to ride the bike
for sufficient time at low speeds and under no more than moderate acceleration to get
a good feel for the different throttle response before going back to normal use of your
motorcycle.
Changing Reels
The Rev2™ throttle is designed so that you can easily change reels of the throttle to
adapt to different riding situations. A fast turning throttle can be used for high-speed
tracks and a slower turning throttle for more technical riding where greater control of
the throttle is necessary.To change reels, all that is necessary is to remove the throttle
housing, unhook the cables from the throttle reel and remove the reel from the tube
and replace it with the size desired. Assembly is the reverse. A slight cable adjustment
might be necessary (see step 4).
Maintaining the Rev2™ Throttle
There is not much to maintaining the Rev2™ throttle, but like all of your controls, it will
benefit from regular preventative maintenance. Before each ride, you should do a
quick cable check to make sure cable slack is correct and the throttlealways snaps
back quickly. Once or twice a year, the throttle should be disassembled, cleaned and
lubricated, including lubricating the cables. Give the cables and throttle a visual
inspection for any wear, cracks or other signs of wear ordamage. Always immediately
replace any component that is worn.
Apply a light coating of grease where
throttle cable contacts reel