1
A C ELECTRICAL TESTING
AND TROUBLESHOOTING GUIDE
Be GEN
~
TORS
WESTERBEKE
WESTERBEKE CORPORATION· MYLES STANDISH INDUSTRIAL PARK
150 JOHN HANCOCK ROAD, TAUNTON, MA 02780-7319 U.S.A.
TEL: (508)823-7677· FAX: (508)884-9688· WEBSITE: www.WESTERBEKE.COM
.tWA
MI!m1nr National MariM MWlujactu.rm As,rocialioll
WESTERBEKE #65103 .
MARCH 2000 2ND EDITION
TABLE OF CONTENTS
BC Generator Electrical Testing ............................ 2
Battery Charging Circuit/Bridge Rectifier ......... 10
Generator Troubleshooting Chart...: ................. 2
Testing the Bridge Rectifier .......................... .1 0
Internal Wiring Schematic ..................................3
Integral Controller/Ballast Resistor .................. 11
AC Terminal Board, ..............................................3
Integral Controller (LC.) ............................... .11
Low Voltage-Rotating Field Windings Tests ...... .4
Ballast Resistor .......................... ,................... 11
Measuring Resistance .................................... 11
Testing the Diodes ........................................... .4
Testing the Rotor Field Windings ..................... 5
Integral Controller/No-Load Voltage Adj . ............ 12
Residual Voltage Exciter Circuit Tests ................. 6
Testing the Integral Controller ...................... 12
Fuse Protection .............................................. 12
Testing the Exciter Windings ........................... 6
Single/Dual Capacitor No-Load
Exciter Circuit Capacitor(s) Tests ........................7
Voltage Adjustment ....................................... 12
Measuring Resistance ....................................... 7
Checking Continuity ......................................... 7
No-Load Voltage Adjustment Dual Exciter........ 13
Testing the Capacitor(s) .................................... 7
Dual Exciter Circuit Model ........................... 13
Exciting the Generator ...................................... 8
BC Generator Parts Identification ....................... 14
No Voltage Main Stator Windings Tests ............. 8
Testing Residual Voltage .................................. 8
Checking Resistance ......................................... 8
Testmg
. Contmlilty
. . ............................................. 9
-.Y'
WESTERBEKE
Engines & Generators
1
BC GENERATOR ELECTRICAL TESTING
OESCRIPTION
GENERATOR TROUBLESHOOTING CHART
A, B, C, & 0 refer to the components of the INTERNAL WIRING
DIAGRAM and their test procedures in the following pages.
The Be generator is a brushless, self-excited generator which
requires only the driving force of the engine to produce an
AC output. The stator houses two sets of windings; the main
stator windings and the exciter windings. When the generator
is started, residual magnetism in the four rotating poles
induces a voltage in the stator which then generates an even
larger voltage in the exciter windings. This mutual build up
of voltage in the four rotating poles and in the exciter windings quickly reaches the saturation point of the capacitor(s)
and a regulated energy field is then maintained in the stator.
At the same time, this regulated field produces a steady volt~
age in the stator windings which can then be drawn off the
generator's AC tenrunals to operate AC equipment. The
generator is a single-phase, reconnectable 120 volt AC
two-wire or 115 voltAC two-wire or 230 voltAC two-wire,
at 50 hertz.
NOTE: This fault finding chan is compiled assuming the engine
is operating at the correct speed/henz.
FAULT
No AG Output
Residual Voltage
4-6 VAG (Hot N)
at no-load
The generator's data plate gives the voltage, current and
frequency rating of the generator. An AC wiring decal is
affixed to the inside of the louvered cover at the generator
end. A diagram of the various AC voltage connections is
provided on the decal. An Integral Controller (IC) is mounted
inside the generator and supplies a continuous DC charge to
the generators starting battery when the generator is running.
High AC Output
at No-Load
INTROOUCTION TO TROUBLESHOOTING
The following test procedures can be used to troubleshoot
WESTERBEKE'S 4 POLE SINGLE AND DUAL CAPACITOR BRUSHLESS GENERATORS. Due to the simplicity
of the generator, troubleshooting is relatively easy.
Low AC Output
60-106V
Field testing and repairing can be accomplished with basic
tools and repair parts which should include the following:
Faulty rotor winding
Faulty diode
Faulty capacitor
A
A
!:I
Voltage Drop
Under Load
(or at No-Load)
Faulty diode
A
Faulty capacitor
C
Engine speed [hertz]
is too low
Adjust'
No Battery Charge Faulty bridge rectifier
D
Low Battery Charge
Faulty integral controller D
Blown fuse
B
Faulty winding
B
High Voltage
Engine speed [hertz]
Adjust'
Output when Load . is too high
is applied
Unstable Voltage
Electrical connections
Inspect wiring
are faulty, loose
connections
Faulty support bearing
Noisy Operation
Inspect rear
bearing"
Generator rotor
connection to engine
Check rotor
is loose
security"
A quality multimeter [muititesterj capable of reading
less than one ohm and with a specific diode testing
function.
Basic electrical tools including cutters, soldering iron,
wire strapperlcrimper, terminals connectors, etc.
Repair parts such as diodes, fuses, bridge rectifier, etc.
PRELIMINARY CHECKING
Before electrical testing check for proper engine
speed/hertz adjustment. Low engine speed will cause low
AC voltage output, high engine speed~high AC output.
Refer to WESTERBEKE'S operators manual or service
manual for engine speed/hertz adjustment or for other
possible engine related problems.
Before testing, get a clear explanation of the problem that
exists, be certain it relates to generator components.
A WARNING: AC and DC circuits often share the same
distributor panel. Be certain to unplug AC power cords
and shutdown DC/AC Inverters. Simply switching off
circuit breakers will not do the Job since it will stili
leave hot wires on the supply side of the panel.
• Refer to the GENERATORS OPERATOR MANUAL
** Refer to the GENERATORS SERVICE MANUAL
I "'fIIV'IWESTERBEKE
I
CAUSE
TEST/CORRECTION
Shorted stator
B
Open stator
B
Shorted diodes [two]
A
Faulty capacitor
C
Open exciter
B
Shorted exciter
B
Engine speed [hertz]
is too low
Adjust'
Electrical connections
Inspect wiring
are faulty
connections
Incorrect voltage tap
on capacitor
C
Incorrect capacitor
C
Incorrect hertz tap
C
;on capacitor
Engine speed [hertz]
is too hiqh
. Adjust'
Engines & Generators
2
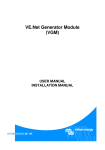
Be GENERATORS PARTS
INTEGRAL CONTROLLER
EARLY BC MODELS
BC GENERATORS
ELECTRICAL COMPONENTS
[DUAL CAPACITOR SHOWN]
GROUND TERMINAl
GENERATOR
CASE
AC TERMINAL
BOARD
/
•.. .)\
CURRENT MODEL
B C GENERATORS
ELECTRICAL COMPONENTS
[SINGLE CAPACITOR SHOWN]
0/
.
BALLAST RESISTER
[EARLY MODElSj
,~NTEGRAL
CONTROLLER
(~ilif"',
,
CAPACITOR
j
30 AMP FUSE
CURRENT MODEL
B C GENERATORS
INTEGRAL CONTROLLER
// . . . _;y._-.. . .
'<®
BRASS
",C '[ERNIiNAI BOARD
CAPACITOR
".yo
WESTERBEKE
Engines & Generators
2A
TO CIRCUIT
BREAKER
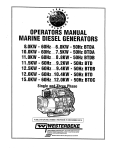
INTERNAL WIRING SCHEMATIC
DC BATTERY CHARGING CIRCUIT
FUSE - INTEGRAL CONTROLLER ______________________ _
D
WINDING: NO TIME DELAY
pn#43634 30A
250V MDA-30
.
r-·-----,I
A - ROTOR WINDINGS
8 - STATOR WINDINGS
C• CAPACITOR WINDING
BATIERY CHARGE WINDING
,
I
,
o.
;Dlooq ~ ~-~-----------1-;------- _______ ~N~ -j
I
I
I
I
,
I
'A
I
I
2,
I
I
3
B
BALLAST RESISTER
I
(EARLY MODELS}
,
_60.,
I
~-~!~!
1S
l_______
r,g-rn-u::----- 18.
C
:
I
L~50":
AND OUTPUT VOLTAG;E.
.. -.t:f~O~ -
J
WINDING RESISTANCE VALUES IN OHMS
MODEL- DUAL
CAPACITOR
MODEL- DUAL
EXCITER CIRCUIT
GND
-=-
DC CHARGE
+
-=--
GND
J
CONNECT FOR THE:
REQUIRED FREQUENCY
MODEL- SINGLE
CAPACITOR
Ie
A
B
C
0
A
B
C
0
A
B
C
0
ROTOR
3.SD
O.6D
STATOR
EXCITER. 1.9D
CHARGER O.14D
ROTOR
STATOR
EXCITER
CHARGER
4.0D
DAD
2.2D
D.14D
r - - - - - - - - - - - - - - - - - - - - - - -------- .. ,
0
I
~
:
i[.-------:-'----------------":'-:
tEl
':
ffI__ J:
• -------,:
i
I
:
J
f
.J
I :
:
:
I
: I
~-----
ROTOR
4.0D
O.3D
STATOR
EXCITER b:~s~mlwinding
CHARGER
*
I I
I
:A
,
28:
~'
:
I I
I
I I
I I
I
I
CAPACITOR RATINGS
18MF· 25MF· 31_5MF
MAKE CERTAIN A REPLACEMENT
CAPACITOR HAS THE CORRECT PART
NUMBER. CHECK THE BODY OFTHE
CAPACITOR FOR THE RATiNG AND
PART NUMBER.
r-n-----:·-:n-~-----~JNNECTFORTHE
,0"
,!
,
9 18!
1
•
REQUIRED FREQUENCY
AND OUTPUT VOLTAGE.
I
:50.____________________
, ~r-J C ~I 60,50.,:
.__ J
~
AC TERMINAL BOARD CONNECTIONS
WITH CIRCUIT BREAKER (CURRENT MODELS]
N
N
CHARGE •
NOTE: When changing from 60Hz 10
50Hz. make certain lhe ground wire is
properly repositioned according 10
these diagrams.
@
115V/50Hz
120V/60Hz
n3EPQl 230V/50Hz
• •
L1
L1 N
Engines & Generators
3
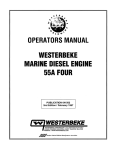
LOW VOLTAGE - ROTATING FIELD AUXILIARY WINDINGS TESTS
TESTING THE DIODES
A WARNING: Some of the following tests require the
If a distinct difference is noted in the ohm value, carefully
unsolder the lead on the top of the diode and remove the
diode from its isolated heat sink using a thin walled, deep
well 7/16 in (II mm) socket.
To check the diode, unsolder the connection from the top of
the diode. Place one ohmmeter lead on the connection at the
top of the diode and the other ohmmeter lead to the diode's
base. Then reverse the position of the ohmmeter leads.
generator to be running, make certain the front pulley
cover and timing belt covers are in place.
ROTATING FIELD/AUXILIARY WINDINGS
r------------------~
•.~ A
1iiiIQ~
:'
lOW RESISTANCE (.)
jL __________________ J
Description
Two sets of windings are found in the rotor assembly. An AC
voltage is produced in two groups of windings as the rotor
turns at rated rpm. The AC voltage passes through each of
the two diodes mounted on the isolated fixture just before the
rotor carrier bearing. The AC sine wave is changed to a DC
and tills DC voltage is passed through the two groups of
rotating field windings producing a DC field around these
windings. This field affects the AC winding of the two main
stator groups inducing an AC voltage in these windings that
is available at the AC terminal block connections.
TESTING THE DIODES
A low resistance should be found with the leads in one
direction, and infinite resistance (blocking) in the other
direction.
DIODES 8 • 9.5 OHMS (APPROXIMATELY) USING A 260 SIMPSO/\
ANALOG METER.
Testing The Windings Thru the Diodes
To check the resistance values, rotate the engine's crankshaft
to position the diode(s) on the generator's shaft at 12 o'clock.
To make a quick check of these windings, presume the
diode is OK and place one of the ohmmeter's leads on the
connection at the top of the diode and the other lead at the
connection at the base of the diode. Compare readings with
the figures below.
STANDARD RESISTANCE VALUES
ROTATING FIELD I AUXILIARY WINDINGS
Single Capacitor
3.8 Ohms
Dual Capacitor
4.0 Ohms
NOTE: Different meter models may show different ohm
values, but should read the same jar both diodes.
DIODE RATING: 1600 AMPS
26 AMPS
The diode's rating is far in excess of the circuit's requirements.
Most likely a diode failure will result from an overspeed or
load surge.
A CAUTION: [ON SOLDERING] When soldering, use a
large enough soldering iron to get the job done quickly.
Excessive heat will damage the diodes.
Also make certain no soldering splashes onto the
windings as it will melt the insulation.
~
WESTERBEKE
Engines & Generators
4
LOW VOLTAGE· ROTATING FIELD AUXILIARY WINDINGS TESTS
Testing the Rotor Field Auxiliary Windings
Testing Continuity
With the diode removed, both leads for the first group of
rotating field/auxiliary windings will be isolated with no
interference from a possibly faulty diode.
Check that no continuity exists between either of the winding leads and the generator shaft. If continuity is found,
there is a short in the windings.
Check the resistance value of the rotating windings by
placing the ohmmeter's probes across the two exposed
leads.
ROTOR WINDINGS RESISTANCE VALUES
Single Capacitor
3.8 ohms
Dual Capacitor
4.0 ohms
Dual Exciter Circuit 4.0 ohms
Repeat the above tests on the second set of windings on
the opposite side.
TESTlNG THE WINDING LEADS
TESTING FOR
CONTINUITY
[TEST BOTH LEADS]
Engines & Generators
5
RESIDUAL VOLTAGE - EXCITER CIRCUIT TESTS
TESTING THE EXCITER WINDINGS
. SINGLE CAPACITOR
AC voltage can be measured across the capacitor(s) while the
generator is operating. This voltage may be as high as 400 to
SOO volts AC. This voltage buildup is accomplished as the
exciter windings charge the capacitor(s) and the capacitor(s)
discharge back into the exciter windings. This AC voltage
reading is taken between the #60 Hertz connector and the #
connection plugged into the capacitor(s) while the generator
is operating at its rated Hertz (60.S - 61.S for gasoline models
and 61.S - 62.0 for diesel models). This flow of saturating
AC in the exciter windings produces a phase-imbalance type
of field that effects the auxiliary windings: a beneficial result
that produces good motor starting characteristics for this type
of generator.
c
DUAL CAPACITOR
MEASURING
ACVOLTAGE
GENERATOR
RUNNING
Engines & Generators
6
DUAl EXCITER
EXCITER CIRCUIT CAPACITOR(S) TESTS
Measuring Resistance
~:.
TESTING THE CAPACITORS
To measure the resistance of the exciter winding locate the
#9 and the #50 Hertz capacitor connections.
_/ - d:: -~l
~(I . i
8/1,
~
NOTE: Three numbered capacitor connections exist: #7, #8,
I
' .)J i
and #9; and two Hertz connections #50 and #60.
Unplug any other connections from the capacitor noting
their position on the capacitor. Place one probe of the multimeter on plug connection #9 and the other probe on the
50 Hertz lead. Measure the resistance value of the exciter
windings and compare to the figures below.
DISCHARGING
THE CAPACITOR
A
WARNING: CapaCitors must be discharged before
handling as they store electricity and can pack a potentially lethal charge even when disconnected from their
power source.
NOTE: Lower residual voltage along with a lower winding
resistance will confirm a/aulty winding.
EXCITER WINDINGS RESISTANCE
Single Capacitor Dual Capacitor
1.9 ohms
2.2 ohms
Dual Exciter
1.3 ohms
8CA Model
1.5 ohms
Discharge the capacitor by a bridging the terminals with an
insulated screwdriver.
GENERATOR \!ll
CASE
Connect a multitester (highest ohm scale) to the capacitor terminals. The meter should go to zero ohms and slowly return
to high. Discharge the capacitor again and reverse the leads,
the same results should be obtained.
CHECKING FOR
CONTINUITY BETWEEN
LEAD 50Hz & LEAO
#9 TO CASE GROUND •
,~;:;:'
If the meter goes down and stays at zero ohms, the capacitor
is faulty (shorted) .
-
...
-","'"
If the meter fails to go down to zero, the capacitor is faulty
(open circuited).
Indications of a defective capacitor:
D Infinite resistance, or no rise in resistance
MEASURING RESISTANCE
VALUE OF THHXCITER
WINDINGS BETWEEN
LEAOS 19 & 50Hz
(shorted capacitor)
11I~~~:~
D Infinite resistance (open capacitor)
CHECKING FOR
CONTINUITY BETWEEN
LEAO 50Hz ANO LEAO 19
TO THE AC TERMINAL LEAOS
MEASURING
CAPACITOR
RESISTANCE
Checking Continuity
AC
TERMINAL
BOARD
Check to make sure there is no continuity to the
ground/generator case from either of the two leads. Also
check that no continuity exists between either the #50
Hertz plug or the #9 plug and any of the main stator
winding leads on the AC output. If continuity is found
here, a fault exists between these two winding groups.
CAPACITOR
CONNECTIONS
An AC voltage is induced in these windings by the
CAPACITOR RATINGS
Single Capacitor Models
Dual Capacitor Models
Dual Exciter Models
rotating field. Checking the residual voltage output from
this winding can determine the condition of the winding
when troubleshooting. Test between leads #50 and #9 with
leads lifted off the capacitor(s).
RESIDUAL VOLTAGE:
Single Capacitor Model:
10 -14 Volts AC from each winding
Dual Exciter Model:
7 - 9 Volts AC from each winding
Dual CapaCitor Model:
14 ·16 Volts AC from each winding
25.0 MFD
31.5 MFD
18.0 MFIl
Pn#035985
Pn#035978
Pn#039556
NOTE: The older single capacitor models have 25.0 microfarad
capacitors. New models now have 31.5 microfarad capacitors.
Dual exciter models have Q 18.0 MFD capacity.
The capacitor rating is marked on the housing of the capaciioT.
Engines & Generators
7
NO VOLTAGE OUTPUT· MAIN STATOR WINDINGS TESTS
NOTE: The studs on the AC terminal board are identified by
the six red wire that attach to them. These wires are num~
bered I thru 6. There are no numbers on the terminal block.
B
EXCITING THE GENERATOR
The generator may be excited using 12 volts DC taken
from the engine's starting battery. This voltage is applied
across the #50 and #9 leads of the exciter circuit windings
(unplugged) with any other numbered leads unplugged
from the capacitors. The generator's reaction <luring
flashing will help determine its fault.
Testing Residual Voltage
Test for residual voltage between terminal #1 and tenninal
#3. Then test between terminal #4 and #6 (shown above).
RESIDUAL VOLTAGE
Correct readings will indicate the stator windings arc okay.
Check the exciter windings.
NORMAL VOLTAGE OUTPUT RANGE OURING 12 VOLT EXCITATION
Single Capacitor
22 - 26 VAC
Dual Capacitor
24 -28 VAC
Dual Exciter
12 -14 VAC
o
o
o
2 - 3 VOLTS AC
A slight rise in the output voltage with the loading of
the engine and/or a growling noise from the generator
end will indicate a fault in the main stator windings.
No rise or a very slight rise in the output voltage will
indicate a fault in the exciter windings.
Normal output voltage as specified above, check
exciter circuit.
12 VOLT DC+
TESTING THE MAIN STATOR WINDINGS
Test the main stator windings at the AC terminal board by
first removing all the AC output leads, the ground
coimection, and the brass interconnects. This will isolate
the six leads on the terminal board which make up the two
stator groups.
12 VOLT
DC~
CHECK RESISTANCE
GROUP 1- Test the resistance value between the #1 tenninal
and the #3 terminal.
GROUP 2 - Test the resistance value between the #4 terminal
and the #6 terminal.
RESISTANCE VALUES
Single Capacitor
Dual Capacilor
SeA Model
Dual Exciter Circuit
AC CONNIEcnON ~
TERMINAL BOARD
TESTING MAIN STATOR
WINDINGS
160 Hz CONFIGURATION SHOWN]
"'" WESTERBEKE
Engines & Generators
8
0.6 ohms
0.5 ohms
0.3 ohms
0.5 ohms
NO VOLTAGE OUTPUT - MAIN STATOR WINDINGS TESTS
Testing Continuity
There should not be any continuity between these two winding groups. Test between terminal #3 and tenninal #6. If continuity exists, there is a short in the windings.
There also should be no continuity between the terminals and
the generator case (ground).
MAIN STATOR
WINDING LEADS
TESTING CONTINUITY
EACH TERMINAL TO
CASE GROUND
TESTING CONTINUITY
BETWEEN THE TWO
WINDING GROUPS
,
I
I
I
I
I
I
I
I
jI
-.v WESTERBEKE
Engines & Generators
9
BATTERY CHARGING CIRCUIT I BRIDGE RECTIFIER
~,
TESTING THE BATTERY CHARGING CIRCUIT
"-
-
rl
-~------,
-~--7-G,
I
,
DC CHARGE,
-.........:..~
''''' ........
,N TESTING
.-.'I~ CONTINUITY
, BETWEEN
: AC LEADS
: : & CASE GROUND
:
:
V/
,,
I ________________________________ oJ
L
.J\~-~~~<?
,1i'
AC LEAD --t-_aJlI
::
~:
NOTE: The battery charging circuit is totally separate from the
"
":,
AC output afthe generator: The generator output affects the
circuits output, but not the reverse.
MEASURING AC RESISTANCE
BETWEEN AC LEADS
Nonnal AC voltage running to the rectifier (while the
engine is operating at 1800 rpm) is measured across the
two AC connections on the bridge rectifier (shown below).
AC VOLTAGE TO THE BRIDGE RECTIFIER (APPROXIMATELY):
No-load 011 the generator
16.0 volts AC
Full-load 011 the generator
17.5 volts AC
ALSO TEST THESE TWO LEADS
TO THE AC TERMINAL BLOCK
STUDS TO VERIFY NO CONTINUITY
TESTING THE ,BRIDGE RECTIFIER
1. Set your multimeter's scale on RXI (+DC) and set the
needle to zero.
2. Connect the (+) positive lead from the multimeter to point
#4. Taking the mullimeter's negative (-) probe, momentarily
touch points #1, #2, #3, and #5. The multimeter should
register no deflection for any of the points touched.
3. Remove the positive (+) probe from point #4 and connect
the negative (-) probe, momentarily touch points #1, #
and #3. The multimeter's needle should deflect when e,
point is touched.
4. Leaving the negative multimeter (-) probe on point #4,
touch point #5 with the positive probe. No deflection should
take place.
5. Place the positive (+) probe on point #1 and the negative
probe (-) on point #3. The multimeter again should not
register any deflection (no deflection indicates infinite
resistance), Reverse these connections and the multimeter
should again register no deflection.
Nonnal DC voltage running out of the rectifier (in volts
DC) is measured across the two DC connections of the
bridge rectifier, that is + and - as illustrated.
~
DC VOLTAGE FROM THE BRIDGE RECTIFIER (APPROXIMATELY):
No-load 011 the generator
17.0 volts DC
Full-load 011 the generator
18.5 volts DC
~
Lift the two AC wire leads off the bridge rectifier and
measure the resistance between these two leads. It should
measure 0.14 ohm. No continuity should exist between
these two leads and the ground or the main stator windings.
RESISTANCE BETWEEN AC LEADS
IF THE BRIDGE
RECTIFIER FAILS
ANY OF THE ABOVE
TESTS. IT SHOULD BE
REPLACED
0.14 OHMS
11
"
~~
#5
MOUNTING HOLE'
Engines & Generators
10
BRIDGE
RECTIFtER
#4
#3
INTEGRAL CONTROLLER I BALLAST RESISTOR
1
~
INTEGRAL CONTROLLER
BALLAST RESISTOR
VOLT. ADJ POT
Early model integral controllers have a ballast resistor
installed along the DC( +) lead running from the bridge rectifier to the integral controller. This coil-type resistor functions
to suppress high amperage draw coming from the controller
when it is trying to charge a discharged starting battery.
,~yyyy
VOLT
®
+
-
+
AC
BRIDGE
RECTIFIER
GND
0
/
BAllAST RESISTO~
-')
'- AC
BLACK
~ 50HZ-'
YEllOW
-~
r ': :
60Hz
DC CHARGE
~.
1-----.lL..---~
GNO
INTEGRAL CONTROLLER
-
=
GROUND
EARLIER MODEL
INTEGRAL CONTROLLER (I.C.)
The Integral Controller (I.e.) is an encapsulated, solid-state
unit that supplies a DC charging voltage to the generator's
starting battery while the generator is operating.
CAPACITOR ---I>-I//'
Charging Voltage: 13.0 -14.0 Yolts DC
Charging Amperage: 0 -10 amps DC [Early Models]
Charging Amperage: 0 - 17 amps DC [Current Models]
A separate group of stator windings supplies AC voltage to a
bridge rectifier which converts the AC current to supply the
I.C. unit. The I.e. unit senses the needs of the starting battery
and supplies a DC charge when one is needed. If you suspect
that the I.C. unit is faulty (that is, if the battery's charge is
low), check the charging circuit and it's components as
described in the following steps. Check all connections for
cleanliness and tightness including the ground before replacing the I.e.. unit.
BRIDGE
RECTIFIER
BALLAST RESISTOR
0.3 OHM
NOTE: When the generator is first started, the I. C. unit will
produce a low charging rate. This charging rate will rise as
the generator is operated.
Measuring Resistance
The Integral Controller is mounted inside the generator housing in the 12:00 position. There is a voltage output adjustment on the controller that will allow a DC voltage output
adjustment of ± 2 volts.
The resistance value of the ballast coil is measured between
the lifted (+) lead at the bridge rectifier and the 60 Hertz
connection unplugged from the controller (that is, controllers
having plugs in the connector).
DC CHARGE
ISOLATOR
TERMINAL 1:CI.....l;v~.,
Controllers with three leads corning from the controller
measure resistance between the unplugged 60 Hertz
connection at the bridge rectifier and the brown lead
connection on the coil resistor tenninal block.
TO GROUNO TERMINAL
EARLIER MODEL
INTEGRAL CONTROLLER
NOTE: New four wire controllers eliminate the ballast resistor
circuit since the ballast resistor sfunction is now handled
internally. Whenever replacing an early style controller with
the newer four wire model, remove the ballast resistor and its
wiring.
THIS CONTROLLER PERFORMS THE
SAME FUNCTION AS THE CURRENT
MODEL CONTROLLERS.
THE DC CHARGE ISOLATDR TERMINAL IS
NO LONGER USEO. THE DC CHARGE LEAO
GO'S DIRECTLY TO THE BATTERY TERMINAL \\",dP\i""t~~
ON THE STARTER SOLENOIO. STRIPEO
. _II
WIRES ARE NOW SOLID COLORS.
«ilo<-_--rr-YOIT. ADJ. POT.
~
WESTERBEKE
Engines & Generators
11
INTEGRAL CONTROLLER I NO-LOAD VOLTAGE ADJUSTMENT
TESTING THE INTEGRAL CONTROLLER
A WARNING: Capacitors must be discharged before
To test the battery charger, put a multimeter between the
positive (+) and negative (-) leads to the battery. It should
indicate l3.5V to l4V with the engine running. !f only the
battery voltage is indicated, check that the battery charger
terminal connections are tight. With the unit running, test
between the (+) and (-) tenninals for l3.5V to l4Y. !fno
charge is indicated, replace the charger.
f
II
GROUND
CONNECTION
handling as they store electricity and can pack a potential/y lethal charge even when disconnected from their
power source_
NOTE: Simply cross the capacitor s two tenninals with an insulated (plastic handle) screwdriver. This will discharge any
excess electricity.
INTEGRAL CONTROLLER
A
WARNING: 00 not attempt to make a no-load
voltage adjustment while the generator is operating.
The capacitor can produce a 400-500 volt charge.
Touching any wiring can produce a severe electrical
shock. In addition, attempting to make a no-load voltage adjustment while the generator is operating could
cause your fingers to be caught in the generator's rotor_
FUSE PROTECTION
5. There are three plugs grouped for the right capacitor
tenninal, #7, #8, and #9. If the generator's no-load voltage
is low, then disconnect the lower numbered plug and
connect the plug with the next higher number. If the
generator's no-load voltage is high, then disconnect the
higher numbered plug and connect the plug with the next
lower number. Note that the plug presently connected to
this tenninal may.be anyone of the three plugs available.
- '-
A 30 amp fuse protects the windings from a failure of the
bridge rectifier or integral controller (high amperage or a
short)
SINGLE AND DUAL CAPACITOR NO-LOAD VOLTAGE
ADJUSTMENT
6. If the generator's no-load voltage cannot be adjusted
because the voltage needs to be increased and the highest
numbered plug is already connected to the right tenninal,
or the voltage needs to be lowered and the lowest numbered
plug is connected, refer to HERTZ ADJUSTMENT in the
operators manual.
}, Remove the louvered metal plate, at the back of the
generator, covering tile AC terminal connections and
the capacitor(s).
2, Start the generator and allow it to run for approximately
five minutes so the engine can warm up. Make sure the
generator is oper.ating without any equipment drawing AC
current from the generator (that is, shut off all electrical
appliances). Make sure the engine's speed (Hertz) is
correct. Adjust the governor as needed to obtain the
correct engine speed before proceeding.
!
3. Refer to the AC TERMINAL BOARD CONNECTIONS
DIAGRAM for the correct configuration then check the
generator's no-load voltage by measuring the voltage
across the neutral lead and the hot lead with a voltmeter.
Make sure you record this reading. The generator's noload voltage is lIS - 124 volts at 60.5 - 61.5 Hertz. If the
voltage output is higher or lower than specified, proceed.
::'i':!
::'i':!#7#8#9
o
0
~
~
4. Shut off the generator. Make sure the correct Hertz lead
THE CONNECTIONS
SHOWN DEMONSTRATE
HOW THESE AOJUSTMENTS
CAN BE MADE
(60 Hertz #6, or 50 Hertz #5) is plugged into the
capacitor(s).
c
SUHz 60Hz
DUAL CAPACITOR
#7
~_
#8 #9
WBTERSEKE
Engines & Generators
12
NO-LOAD VOLTAGE ADJUSTMENT DUAL EXCITER
DUAL EXCITER CIRCUIT MODEL
NOTE: When changing Hertz produced by the generatOl;
These generators have dual Hertz and no-load voltage adjustment connectors at each capacitor. There are five connectors
available for each capacitor. Two connectors are for Hertz
selection, 60 Hertz or 50 Hertz, and three connectors, #7, #8,
and #9, are for no-load voltage adjustment.
When making Hertz change or no-load voltage adjustments
proceed as follows:
1. Shut the generator down.
2. Select the appropriate Hertz connection to plug into each
capacitor #60, 60 Hertz, 1800 RPM or #50 Hertz, 1500
RPM. The three other connectors at each capacitor, #7,
#8, and #9, will have an effect on the no-load voltage
produced by the generator. One connector from each
group can be plugged into each capacitor. No-load voltage
will increase or decrease approximately 8 - 10 volts
between connectors used in any pair combination to
achieve the prescribed no-load voltage.
engine speed adjustment at the governor must be made.
The AC output connections on the terminal blocks must be
selected for the voltage and Hem to be produced The
Hertzp!ug connection at the capacitor must be changed/or
50 Hem (#5) or 60 Hem (#6). Theframe ground wire
must be moved when changing from 11 5 volts, 50 Hem to
230 volts, 50 Hertz. Refer to the AC TERMINAL BOARD
CONNECTIONS.
3. On later model BC generators, a 50Hz/60Hz connection
is provided for the DC battery circuit. When changing
hertz, connect the proper lead (50Hz or 60Hz) to the
bridge rectifier.
C
BATTERY CIRCUIT
CONNECTIONS 5O/60Hz
[CURRENT MODELS]
50Hz
#7 #8 #9
~t---1
50Hz 60Hz
{III
#8 #9
~r----l
A WARNING: Make certain the insulating covers on
the unused leads are in place and are NOT in contact
with each other or in contact with the generator's
housing.
AC CONNECTION
Engines & Generators
13
Engines & Generators
1033 WM/DW 3/2000