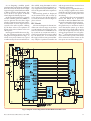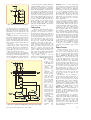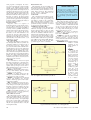
1
PIC SUDOKU Hand-held puzzle generator/player PLUS Puzzle Solving Software PC R E W PO R O T I MON ect? l o v l i a r e h Are t rr o c s tage DIRT CHEAP 17A/13 5V POWER SUPPLY 1 Vol 35 No 7 $5.95 US $7.99 CAN JULY 2006 PRINTED IN THE UK Copyright 2006, Wimborne Publishing Ltd (408 Wimborne Road East, Ferndown, Dorset, BH22 9ND, UK) and TechBites Interactive Inc., (PO Box 857, Madison, Alabama 35758, USA) All rights reserved. WARNING! The materials and works contained within EPE Online — which are made available by Wimborne Publishing Ltd and TechBites Interactive Inc — are copyrighted. You are permitted to make a backup copy of the downloaded file and one (1) hard copy of such materials and works for your personal use. International copyright laws, however, prohibit any further copying or reproduction of such materials and works, or any republication of any kind. TechBites Interactive Inc and Wimborne Publishing Ltd have used their best efforts in preparing these materials and works. However, TechBites Interactive Inc and Wimborne Publishing Ltd make no warranties of any kind, expressed or implied, with regard to the documentation or data contained herein, and specifically disclaim, without limitation, any implied warranties of merchantability and fitness for a particular purpose. Because of possible variances in the quality and condition of materials and workmanship used by readers, EPE Online, its publishers and agents disclaim any responsibility for the safe and proper functioning of reader-constructed projects based on or from information published in these materials and works. In no event shall TechBites Interactive Inc or Wimborne Publishing Ltd be responsible or liable for any loss of profit or any other commercial damages, including but not limited to special, incidental, consequential, or any other damages in connection with or arising out of furnishing, performance, or use of these materials and works. ISSN 0262 3617 PROJECTS . . . THEORY . . . NEWS . . . COMMENT . . . POPULAR FEATURES . . . VOL. 35. No. 7 I N C O R P O R AT I N G E L E C T RO N I C S TO DAY I N T E R N A T I O N A L www.epemag.co.uk EPE Online: www.epemag.com JULY 2006 Projects and Circuits PIC SUDO KU PIC SUDOKU UNIT by John Becker Hand-held game player and PC puzzle solving software 10 PC POWER MONITOR by Jim Rowe Monitors the main DC power rails in your PC 22 A DIRT CHEAP HIGH CURRENT BENCH SUPPLY by Col Hodgson, VK2ZCO Modify that old PC PSU to give 13·5V at up to 17A 31 INGENUITY UNLIMITED – Sharing your ideas with others Magic Bulb 40 DIGITAL INSTRUMENT DISPLAY FOR CARS PART 2 by John Clark Calibration and connection of the unit 54 Series and Features TECHNO TALK by Mark Nelson Terahertz: The Anti-Terrorism Solution 18 PIC N’ MIX by Mike Hibbett Multiplexing – A Trick or Two 20 PRACTICALLY SPEAKING by Robert Penfold Basic project building and soldering problems 28 TEACH-IN 2006 by Mike Tooley BA Find out how circuits work and what really goes on inside them Part 9: Bistable Investigation: Microprocessors and Microcontrollers 42 CIRCUIT SURGERY By Ian Bell Schmitt Trigger Circuits 61 NET WORK – THE INTERNET PAGE surfed by Alan Winstanley The Phone Age? 68 Regulars and Services EDITORIAL 7 NEWS – Barry Fox highlights technology’s leading edge Plus everyday news from the world of electronics 8 CD-ROMS FOR ELECTRONICS A wide range of CD-ROMs for hobbyists, students and engineers 51 SUBSCRIBE TO EPE and save money 60 READOUT John Becker addresses general points arising 64 ELECTRONICS MANUALS The Modern Electronics Manual and Electronics Service Manual on CD-ROM 67 DIRECT BOOK SERVICE A wide range of tehnical books available by mail order, plus more CD-ROMs 71 BACK ISSUES Did you miss these? 76 © Wimborne Publishing Ltd 2006. Copyright in all drawings, photographs and articles published in EVERYDAY PRACTICAL ELECTRONICS is fully protected, and reproduction or imitations in whole or in part are expressly forbidden. EPE PCB SERVICE PCBs for EPE projects 78 ADVERTISERS INDEX 80 Our August 2006 issue will be published on Thursday, 13 July 2006. See page 80 for details Readers Services • Editorial and Advertisement Departments Everyday Practical Electronics, July 2006 7 1 THE UK’s No.1 MAGAZINE FOR ELECTRONICS TECHNOLOGY & COMPUTER PROJECTS VOL. 35 No. 7 JULY 2006 Editorial Offices: EVERYDAY PRACTICAL ELECTRONICS EDITORIAL Wimborne Publishing Ltd., 408 Wimborne Road East, Ferndown, Dorset BH22 9ND Phone: (01202) 873872. Fax: (01202) 874562. Email: [email protected] Web Site: www.epemag.co.uk EPE Online (downloadable version of EPE): www.epemag.com EPE Online Shop: www.epemag.wimborne.co.uk/shopdoor.htm See notes on Readers’Technical Enquiries below – we regret technical enquiries cannot be answered over the telephone. Advertisement Offices: EVERYDAY PRACTICAL ELECTRONICS ADVERTISEMENTS 408 Wimborne Road East, Ferndown, Dorset BH22 9ND Phone: 01202 873872 Fax: 01202 874562 Email: [email protected] How Do They Do It? A DVD player for less than the cost of the latest films on DVD. An automatic cordless kettle for less than the price of a jar of coffee. It seems the world of technology is beating everything else on price hands down. These products are made in China and shipped half way around the world, then a wholesaler and a retailer add their mark-up before we pay for them. Whilst this is obviously good for the consumer in the short term, is it really sensible to be selling products at such low prices? Presumably the cost of the raw materials is a major part of the total, there can be very little for the manufacturer or the worker and few retailers can survive on ever falling profits, even if the percentage profit per item remains the same. We have seen it in the hobby electronics area – where there were a large number of component suppliers, say 20 years ago, few now survive as it is difficult to make a profit selling a handful of very inexpensive parts by mail order or over the shop counter. By the time you have sorted and stored them, picked and packed them, banked the payment and done the accounts, VAT etc., where is the profit to pay staff when all the components for a hobbyist project may only cost a few pounds. Problems I fear that this dramatic reduction in the cost of many household electrical and electronic items may significantly add to the problems of the local economy. What it might do for the Chinese economy is also questionable. I’m not a politician and don’t want to get into the politics of this – protectionism etc., besides that we have just purchased a new office kettle from a major supermarket for a fiver! It’s automatic and cordless too, looks smart and works a treat. I wonder how many they have to ship at once to get the carriage price right, and how much of our £5 is for raw materials and manufacturing? Most kettles don’t last too long in our office, where they are in very regular use, so it will be interesting to see how this one shapes up – I guess for a fiver if it lasts a year then it is a bargain, but it will add to the local waste: But that is another story. AVAILABILITY Copies of EPE are available on subscription anywhere in the world (see opposite), from all UK newsagents (distributed by SEYMOUR) and from the following electronic component retailers: Omni Electronics and Yebo Electronics (S. Africa). EPE can also be purchased from retail magazine outlets around the world. An Internet on-line version can be purchased and downloaded for just $15.99US (approx £9.50) per year available from www.epemag.com SUBSCRIPTIONS Subscriptions for delivery direct to any address in the UK: 6 months £17.50, 12 months £33, two years £61; Overseas: 6 months £20.50 standard air service or £29.50 express airmail, 12 months £39 standard air service or £57 express airmail, 24 months £73 standard air service or £109 express airmail. To subscribe from the USA or Canada see page 60. Online subscriptions, for downloading the magazine via the Internet, $15.99US (approx £9.50) for one year available from www.epemag.com. Cheques or bank drafts (in £ sterling only) payable to Everyday Practical Electronics and sent to EPE Subs. Dept., Wimborne Publishing Ltd. 408 Wimborne Road East, Ferndown, Dorset BH22 9ND. Tel: 01202 873872. Fax: 01202 874562. Email: [email protected]. Also via the Web at: http://www.epemag.wimborne.co.uk. Subscriptions start with the next available issue. We accept MasterCard, Amex, Diners Club, Maestro or Visa. (For past issues see the Back Issues page.) BINDERS Binders to hold one volume (12 issues) are available from the above address. These are finished in blue p.v.c., printed with the magazine logo in gold on the spine. Price £7.95 plus £3.50 p&p (for overseas readers the postage is £6.00 to everywhere except Australia and Papua New Guinea which cost £10.50). Normally sent within seven days but please allow 28 days for delivery – more for overseas. Payment in £ sterling only please. Visa, Amex, Diners Club, Maestro and MasterCard accepted. Send, fax or phone your card number, card expiry date and card security code (the last 3 digits on or just under the signature strip), with your name, address etc. Or order on our secure server via our UK web site. Overseas customers – your credit card will be charged by the card provider in your local currency at the existing exchange rate. Everyday Practical Electronics, July 2006 Editor: MIKE KENWARD Consulting Editors: DAVID BARRINGTON JOHN BECKER Business Manager: DAVID J. LEAVER Subscriptions: MARILYN GOLDBERG General Manager: FAY KEARN Editorial/Admin: (01202) 873872 Advertising Manager: STEWART KEARN (01202) 873872 On-Line Editor: ALAN WINSTANLEY EPE Online (Internet version) Editors: CLIVE (MAX) MAXFIELD and ALVIN BROWN READERS’ TECHNICAL ENQUIRIES E-mail: [email protected] We are unable to offer any advice on the use, purchase, repair or modification of commercial equipment or the incorporation or modification of designs published in the magazine. We regret that we cannot provide data or answer queries on articles or projects that are more than five years old. Letters requiring a personal reply must be accompanied by a stamped self-addressed envelope or a selfaddressed envelope and international reply coupons. We are not able to answer technical queries on the phone. PROJECTS AND CIRCUITS All reasonable precautions are taken to ensure that the advice and data given to readers is reliable. We cannot, however, guarantee it and we cannot accept legal responsibility for it. A number of projects and circuits published in EPE employ voltages than can be lethal. You should not build, test, modify or renovate any item of mains powered equipment unless you fully understand the safety aspects involved and you use an RCD adaptor. COMPONENT SUPPLIES We do not supply electronic components or kits for building the projects featured, these can be supplied by advertisers. We advise readers to check that all parts are still available before commencing any project in a back-dated issue. ADVERTISEMENTS Although the proprietors and staff of EVERYDAY PRACTICAL ELECTRONICS take reasonable precautions to protect the interests of readers by ensuring as far as practicable that advertisements are bona fide, the magazine and its Publishers cannot give any undertakings in respect of statements or claims made by advertisers, whether these advertisements are printed as part of the magazine, or in inserts. The Publishers regret that under no circumstances will the magazine accept liability for non-receipt of goods ordered, or for late delivery, or for faults in manufacture. TRANSMITTERS/BUGS/TELEPHONE EQUIPMENT We advise readers that certain items of radio transmitting and telephone equipment which may be advertised in our pages cannot be legally used in the UK. Readers should check the law before buying any transmitting or telephone equipment as a fine, confiscation of equipment and/or imprisonment can result from illegal use or ownership. The laws vary from country to country; readers should check local laws. 7 News . . . A roundup of the latest Everyday News from the world of electronics BIG BROTHER’S BROTHER’S COMING Barry Fox gives a stark warning to all drivers RIVERS could soon face a completely D new kind of Big Brother on the roads, which detects vehicle speed, and even loaded weight, using sound. The new system, being developed by the University of Tennessee’s Battelle Institute in Oak Ridge USA, is purely passive. Drivers who currently rely on radar or laser detectors to sense tell-tale radiation coming from any speed traps ahead will find their early warning equipment useless against the new system. Details of Battelle's research into audio trapping are revealed by recently filed patents. The patents also tell that the work is being undertaken for the US Department of Energy, and the funding contract has bought the US government the right to use the technology (Ref Contract No. DEAC05-00OR22725). Mic Monitored Microphones hidden by the roadside capture the sound of a passing vehicle and record it as a PC WAV file. Digital filtering removes background noise to leave the sound of the engine and any turbocharger used to increase power by forcing extra fuel into the cylinders. The Doppler shift which makes the pitch of this sound rise and fall as it approaches and passes the microphones gives an instant tell-tale of road speed – just as the sound of a car siren or clanking bell changes as it comes and goes. Engine speed and turbo speed in rotations per minute are detected from the pulsing sound of the pistons firing and the fuel-pumping turbo vanes. Loaded Weight To measure the loaded weight of a vehicle the microphones are put on a slope with known incline, so that the engine sound is recorded as it starts to climb and use more power. Correlating the simultaneous changes in road speed, engine speed and turbo speed as the vehicle starts labouring up the known slope angle gives a good estimation of its weight. Comparing the sound signature of the engine with a reference store of known signatures, makes the correlation more accurate. To prove the system concept, Battelle made 64 recordings and used a Windows PC (with LabVIEW software from National Instruments) to estimate truck speed successfully for 32 out of 33 experiments. “This result”, says Battelle's patent, "is very encouraging". Undetectable The microphones are easily hidden in street signs, adds the patent, so drivers do not get any advance warning. “An obvious application”, the patent says, “is as a new, undetectable vehicle speed gun used by law enforcement agencies”. It can be the core of a new device. “The person driving the vehicle being monitored is unaware that the speed of their vehicle is being measured”. Battelle claims that as well as telling the speed of the vehicle, engine, and turbocharger, the acoustic signature can also tell what type of vehicle it is e.g. tractortrailer, dump truck, cement truck. This, says the patent, is good for homeland security; it could also trap big trucks which speed through little villages. Battelle’s patent tells that the basic system can be extended to spy on “other vehicles”, which suggests ongoing research into ways of using audio to trap cars by acoustic signature and Doppler. The research institute was clearly none too pleased that publication of the patent has spilled the beans. Calls for comment were initially ignored, then stalled. Controversial Finally, Curtis Ayers, one of the three inventors of the system, made a comment which suggests that Battelle and the US government are well aware that news of the system could prove very controversial: “There is some ongoing work, still under development and sensitive, that is using aspects of this technology – vehicle speed and engine characterisation, but we are not free to describe that work as of yet” Easy Battery Tester Discharging batteries to check their performance is an expensive and time consuming business and in many situations, simply cannot be done economically in the time available. The new BZT1 fast battery tester from battery testing specialists Astratec Electronics provides a solution to this problem! In just 10 seconds, the easy to use BZT1 estimates the performance of the sealed lead-acid batteries that are found in a wide range of popular applications, including security alarms, fire alarms, golf trollies, electric scooters, mobility aids, electric wheelchairs, standby lighting and many more. The BZT1 uses a unique form of voltage and battery impedance analysis to estimate battery performance. The last 40 tests are automatically saved and can be easily downloaded to a printer or PC spreadsheet making this a really useful field service tool. An internal date and time marker records on the test report, the date and time of each test. Self-adhesive test result labels can also be printed at the end of each test and attached to the battery, providing a permanent record of the test date and results. The standard BZT1 works with both 12V and 24V batteries, other voltages including 6V versions are available. 8 Every unit carries a full 12 month warranty and comes complete with a soft protective carry case. For more information browse www.astratec.co.uk, tel +44 (0) 1327 705936 or email [email protected]. Everyday Practical Electronics, July 2006 VCR Security Role Don't relegate that VCR to the attic yet! Connect it to a video camera via a video motion detection module and you have an inexpensive state-of-the-art security system that will start a tape rolling whenever the camera detects movement – stopping automatically when there is no longer any motion. You can also connect a security light or alarm to complete the setup. Farco Technologies manufacture video motion detection systems that are used in high-end Traffic Enforcement and Traffic Management applications – red light cameras and signals controllers. This same high speed image processing technology can bring new life to that VCR, giving it a great new role in the home, monitoring and recording events in the field of view of the camera. One of the benefits with these systems is you don't have to scroll through endless tape footage to find activity. The tape only starts recording when there is activity and it shuts down when the activity stops. Of course, this makes a standard 180 or 240 minute VHS tape last a long time in most situations. The simplest solution is to connect Farco's Wachit in the line between a camera and the VCR. The Wachit is a neat little metal box all ready to be plugged into the cable. It will be positioned close to the VCR because it uses infra-red codes, the same as the remote control, to record, pause and stop the VCR. Farco cunningly designed it so it would learn the remote codes of most standard VCRs so there is no need to program it for your particular model. The Wachit can be New Design Website Knaresborough based GSPK Design Ltd have just announced the launch of their new website: www.gspkdesign.ltd.uk. The company are a dedicated electronic design team specialising in assisting innovative companies with new product development and existing product portfolios. By utilising emerging technologies, GSPK Design Ltd work extensively within consultancy, design and development, right through to manufacture and assembled product. The company's philosophy in supporting the local economy i.e. Yorkshire and the surrounding area, has led to astounding success – and as a result, they have needed to establish a website to reflect their market position. The company found the ideal solution to their web design requirements by enlisting the expertise of Extreme Creations based in Ripon, North Yorkshire, who have worked exclusively with the GSPK Design team. Paul Marsh, Managing Director for GSPK Design Ltd said, “The development of our new website will help us to fly the banner and raise the profile of GSPK Design Ltd. We know this initiative will help us to communicate our core capabilities to both existing and potential new customers – but it will also help raise brand awareness...” Paul continues, “We hope that this new marketing initiative will help us form valuable partnerships with predominantly Everyday Practical Electronics, July 2006 connected to a security system so it becomes armed when the security system is armed. There is a relay output on the back of the box that can be connected to activate an alarm system or security lights, both if you want – so you not only get the recording of activity, you get a warning as well. Another output is also available to trigger an alarm if the video signal is lost – which might mean the camera has been tampered with. Whereas most other sensors have range limitations, Video Motion Detection has the advantage that any image in the field of view of the video camera can be analyzed for movement and alerts triggered. A practically unlimited range of applications exists. The detection (or absence) of motion can be used to activate or de-activate many different types of device such as alarms, lighting systems, cameras, audio or video recording devices. Wachit features: VCR/DVD-R Record, Pause, Stop; Video Loss Detection Alarm/Alert; Security Lights On/Off; Alarm On/Off; Gates Locked/Unlocked; Door Up/Down; Lighting control. Yorkshire-based companies as we firmly believe in supporting business development within our local economy.” For more information browse the website or contact GSPK Design Ltd, Dept EPE, GSPK Technology Park, Manse Lane, Knaresborough, North Yorks HG5 8LF. Tel: Dianne Latham, 01423 865641. Email: [email protected] Microchip DC/DC Converters Microchip have announced a new family of positively regulated charge pump DC/DC converters that are amongst the most efficient charge pumps in the industry. Microchip’s first fractional charge pumps, the MCP1256, MCP1257, MCP1258 and MCP1259 automatically switch between 1·5× and 2× boost operation to increase efficiency. They are the ideal low-cost, low-power, high-efficiency devices for low-noise, longer-lasting dual-cell alkaline, Ni-Cad, Ni-MH, single-cell Mn02 and similar coin-cell battery systems. At light output loads, the MCP1256 and MCP1257 can be placed in a “Sleep” mode, where quiescent current is lowered but regulated output voltage stays the same. Additionally, the MCP1258 and MCP1259 devices provide a bypass feature that connects the input voltage to the output, which provides a bias voltage for the system with virtually no power drain from the charge pump itself. All of the MCP125X devices have a low-noise output ripple of less than We hope to be able to publish a constructional project based on the principal component of the Wachit, the VMD-19 module in a future issue. The project will use image processing technology to activate recording plus several security functions and video signal loss warning. The module is an 18-pin, standard 0·6 inch wide IC board. It can be directly connected to a composite video and detect motion of objects within the video signal. Designed for implementations by manufacturers and electronics enthusiasts, the VMD-19 costs less than £20. For information contact Murray Downes, Farco Technologies Limited, 200 Armagh Street, Christchurch, New Zealand. Tel: +64.3.374.5534. Web: www.farco.co.nz. 10mVpp at load currents up to 100mA, resulting in less system interference and better overall performance. Other features include soft start, short-circuit protection and thermal protection. In addition, they operate over an extended temperature range (-40 to +125 degrees C). The MCP125X charge pump DC/DC converters are ideal for battery-powered electronics devices that require low power and utilize white light-emitting-diode (LED) backlights for liquid-crystal displays. The MCP1256, MCP1257, MCP1258 and MCP1259 devices are available in 10-pin MSOP or 3×3mm DFN packages. For more information, contact Microchip Ltd. Microchip House, 505 Eskdale Road, Winnersh Triangle. Wokingham, Berks RG41 5TU. TEL: +44-(0) 118-921-5869 FAX: +44-(0) 118-921-5820. Web: www.microchip.com/MCP125X. IU APRIL 2006 We regret to report that the circuit published in our Ingenuity Unlimited column for a Sound Effects Generator by Craig Kendrick Sellen of Carbondale, PA, USA was in fact a copy of a circuit previously published in Radio Electronics, June 1987, We appologise to readers and the copyright holders for Mr Sellen’s deception. 9 PIC SUDOKU UNIT PIC S UDOK U Joining the ultimate brain challenge craze! By JOHN BECKER S OLVING Sudoku logic puzzles is an obsession that has swept the UK, and no doubt elsewhere. The Japanese puzzle was first introduced to the UK by The Times newspaper in November 2004. A certain Wayne Gould had apparently turned up at the paper’s headquarters carrying such a puzzle under his arm, wondering if it might prove an “absorbing time-filler” for readers (www.timesonline.co.uk). It certainly has! When travelling on public transport we are surrounded by people doing them in newspapers, magazines, and even on mobile phones. The puzzles are hailed by teachers, doctors and scientists as “the ultimate brain workout”. Sometime ago it occurred to the author that he could design a handheld PIC-based Sudoku unit with graphics LCD (GLCD) and keypad. He later went on to write a PC-based program to automatically solve Sudoku puzzles. More on this later. Basic Concept Most people will be aware that Sudoku puzzles are based on a grid of 81 squares, arranged in a 9x9 format, containing a selection of digits and blanks. The idea is to “fill in the grid so that every row, every column, and every 3x3 box contains the digits 1 through 9”. Puzzles are solved through reasoning and logic. 10 Fig.1. Pseudo random number generation across the 3×3 sub-squares formats Everyday Practical Electronics, July 2006 So, in designing a Sudoku puzzle generator, first a complete set of 81 digits must be created in which these simple logic rules apply. Then blanks are added to hide a selection of those digits. The rest is down to the player, to decide which digits the blanks represent. In the unit presented here, a pseudo random number generator (PRNG) is used to generate the first nine digits which comprise an initial 3x3 square. Permutations of those digits are then copied to the other squares, abiding by the basic rules of no repetition of digits in the rows,columns or the 3x3 sub-squares. Having generated the first nine digits, the remaining squares are filled using the technique shown in Fig.1, in which rows and columns are copied as indicated by the arrows. Blanks are then added, using the PRNG to select one of eight pre-arranged patterns. A very large assortment of different puzzles can be generated before repetition occurs. The resulting puzzle is displayed on the GLCD screen and it’s then up to the player to use the keypad keys to select the blanks and the digits to place in them. PIC Circuit The circuit diagram for the PIC Sudoku Unit is shown Fig.2. At its heart is a PIC16F877 microcontroller, IC1. This is controlled at 3·2768MHz, as set by crystal X1 in conjunction with capacitors C1 and C2. Power is provided by a 9V battery, B1, or an external 9V DC supply from a mains powered battery adapter if preferred. Diodes D2 and D3 prevent the two sources from adversely interacting. The 9V supply is regulated down to +5V by voltage regulator IC2, which feeds the rest of the circuit. Capacitors C3 to C5 and C8 provide power line smoothing. The keypad is a low-cost 4x4 matrixed device, S2. Which key is pressed is decoded via PIC lines RB0 to RB7. The keypad is arranged as shown in Fig.3. Keys 1 to 9 are the digits needed by the puzzle. Keys A and B are used to scroll the GLCD’s cursor up or down respectively, keys blank and 0 scroll it to the left or right respectively. Key D selects the generation of a new game. Key “ ” shows the answers to a puzzle if you want to take a peek!, it also clears those answers from the screen on the next press. It is an alternating cycle. * Fig.2. Complete circuit diagram for the handheld PIC Sudoku Unit Everyday Practical Electronics, July 2006 11 Table 1. Keypad keys use summary Key Function 1 to 9 digits 1 to 9 A cursor up B cursor down blank cursor left 0 cursor right show/hide answers C show/hide results check D start new game * Fig.3. Keypad layout and pin details Pressing key C checks the answers you have given against the known answers, highlighting any which are wrong. It too is on an alternating cycle, clearing the highlights on the next press. A summary of key use is in Table 1. The GLCD, X2, is the Powertip PG12864-F 128 x 64 pixel display described and used in the author’s previous GLCD designs. It is controlled by PIC lines RC0 to RC5 and RD0 to RD7. The display needs +5V, 0V and –5V DC power. The -5V is generated by voltage inverter IC3 in conjunction with capacitor C6. Capacitor C7 smooths this supply. The screen’s contrast is adjustable by preset VR1. The PIC can be programmed with its Hex code in the author’s usual fashion, from a suitable programmer such as Toolkit TK3, via pin connector TB1. Diode D1 and resistor R1 prevent the +5V power line from being affected by adverse programming voltages. The PIC source code and pre-programmed PICs are available as stated later. The remaining PIC pins are unused, as shown in Fig.1. Parts List – PIC Sudoku Unit 1 PC board, code 575, available from the EPE PCB Service, size 78 x 94mm 1 plastic case (190 x 110 x 60mm - see text) 1 9V PP3 battery and PCmounting battery clip 2 multi-way ribbon cables (see text) 1 socket to suit external 9V power source (optional - see text ) 1 8-pin DIL socket 1 40-pin DIL socket 221mm terminal pins or 1mm pin headers 8 nuts and bolts for mounting GLCD and keypad 1 22k min. round preset potentiometer (VR1) 1 min. s.p.s.t. toggle switch (S1) 1 4 x 4 matrixed data entry keypad (S2) 1 3·2768MHz crystal (X1) 12 1 PG12684-F graphics LCD, 128 x 64 pixels (X2) Semiconductors 1 PIC16F877 microcontroller, pre-programmed (see text) (IC1) 1 7805 1A +5V voltage regulator (IC2) 1 7660 voltage converter (IC3) 1 1N4148 signal diode (D1) 2 1N4001 rectifier diode (D2-D3) Capacitors 2 10pF ceramic disc (C1-C2) 1 220mF radial elect. 10V (C3) 3 100nF (0.1mF) ceramic disc (C4-C5, C8) 2 22mF radial elect. 10V (C6-C7) Resistors (0·25W 5% CF) 1 1k (R1) Assembly The printed circuit board component and track layout details are shown in Fig.4. This board is available from the EPE PCB Service, code 575. Assemble the board in the usual order of ascending component size, starting with the few wire links (some of which go under IC positions), ending with the 9V PP3 battery connector. Correctly observe the polarity of the electrolytic capacitors, and of the ICs, omitting the DIL (dual-in-line) ICs and GLCD until the correctness of the +5V supply has been checked. Connections for the GLCD are shown in Fig.4, and those for the keypad in Fig.3. It is recommended that colour-coded ribbon cable is used for the connections. A plastic case measuring approximately 190mm x 110mm x 60mm was used for the prototype. If you can find a suitable slimmer plastic case, use it! Carefully cut out the GLCD viewing slot, first drilling a series of peripheral holes, and then cutting out and filing smooth the edges. The GLCD has mounting holes for which matching holes should be drilled in the case, securing it using nuts and bolts. Also cut case holes for an external power socket if preferred, and one for the on-off switch, S1. Additionally cut a slot for the keypad pins and drill holes through which to mount it. First Tests When the fully assembled and checked unit is switched on, the GLCD will show an opening message as a display simply stating “Press key D”, horizontally, and the title “Sudoku”, vertically. Adjust preset VR1 until the Everyday Practical Electronics, July 2006 Fig.4. Printed circuit board component layout, fullsize copper foil master patern and wiring details for the graphics LCD. The prototype circuit board is shown below and differs slightly from the final version Fig.5. Representation of a typical screen display. The number immediately below the Sudoku title indicates which blanks pattern has been selected Everyday Practical Electronics, July 2006 13 screen contrast is satisfactory. Pressing key D will then clear that screen to display a Sudoku puzzle, such as that in Fig.5. The numeral immediately below the vertical Sudoku title indicates which blanks pattern has been selected. A different puzzle and pattern can be selected by pressing key D again, until you see one which suits you! Pressing cursor keys A, B, 0 and blank will cause a GLCD cell to be highlighted (reversed-out image). Any blank selected can then have a digit placed into it by pressing the appropriate digit key. The correctness of that choice can be checked by pressing key C. It will be highlighted if incorrect, and a message will appear at the left of the display indicating how many errors you have made so far! If a digit selection is incorrect, it may be changed by moving the cursor over it again and keying in another (more appropriate!) digit. Keep on filling in choices until the whole grid is filled. At any time you may press the “*” key to show the answers, pressing it again to hide them, leaving the display as previously. The next game can be selected at any time by pressing key D. PIC Program The PIC’s program is too complex to discuss in full detail, but a few points are worth highlighting. The GLCD has its own internal character generator, but this only allows eight lines to be shown, whereas a Sudoku puzzle needs a minimum of nine lines. Consequently, the PIC was programmed to generate a series of digits as bit maps for use with the GLCD. These digits are formed on a 5x5 matrix to make them smaller than the standard ones. They are held in the PIC’s EEPROM (electrically erasable read only memory), which retains data even when the PIC’s power is switched off. The pseudo random number generator is based on a technique which Mike Hibbett highlights in the June ’06 PIC n’ Mix column. A basic “seed” value is held in the PIC’s EEPROM. Each time the program is run, this seed is extracted, placed into the PRNG, incremented and returned to the EEPROM to be used on the next occasion. The PRNG is updated whenever the program is waiting for a key to be pressed. 14 Prototype PIC Sudoku model showing multi-coloured ribbon cable wiring from the PCB to the lid-mounted Powertip graphics display module The “blanks” patterns are also in the EEPROM. There is normally no way to change them. However, readers who have TK3 can write their own blanks patterns through TK3’s make and send EEPROM Message facility. To do so, first download the existing EEPROM data from the PIC via TK3. Make of copy of that file in case you want it again, then amend the blanks data in the copy, and send it back to the PIC. A 0 indicates a blank, and a 1 that the digit should be shown. It is imperative that the digit locations are not changed in any way. EEPROM locations 67 to 209 are those which hold the blanks data. Examine the ASM file to find their format. PC Program The Sudoku PC program was written for the author’s own entertainment and is not supplied as essential part of the EPE PIC Sudoku design, but it is hoped that you may also find it to be of interest. It is supplied “as is” without any guarantees. This first part of the text describing it is in two main parts, notes regarding the PC generation and playing of Sudoku puzzles, and then a description of the PC program which solves most published Sudoku puzzles with which it has been used by the author. It is not claimed that it will solve all Sudoku puzzles. The generation of Sudoku puzzles aspect was written prior to designing the published EPE PIC Sudoku unit to prove the technique required. The software for the PIC unit is based on this PC program, although there are differences. Puzzle Loading There are two ways to load this program with a puzzle, either via the internal generator, or by inputting them from a text file which has been created by the user. Each time the program is run it defaults to the internal puzzle generator, which gets its data through a random number generator. There are then eight patterns of blank spaces, any one of which it selects at random when the Random Blanks button is clicked to reveal a tick mark. When there is no tick shown, the same blanks pattern is always used, but the numbers themselves are always selected at random. The resulting pattern of numbers and blanks is then displayed in the lefthand set of 81 boxes. The answers to that puzzle can be shown in the Everyday Practical Electronics, July 2006 righthand set of 81 boxes by clicking the Show Answers button. They can be hidden again by clicking Hide Extras. A typical main screen image is given in Fig.6. Puzzle Playing The image may be saved to disk via the File/Save As option. The image may be edited in Paint to extract (cut) the area which you want, then click Image/Clear Image and then Edit/Paste to repaste the selected image on screen. Choose Paint’s Help button for info on how to extract an area (via the dotted box in its toolbars). To play a selected puzzle, click on the blank box to which you want to add a number to the pattern, then use External Puzzles your keyboard to enter the number Externally generyou want. Repeat Fig.6. PIC Sudoku’s main image function options screen shot ated puzzles can be the process until loaded and worked all blanks are filled, on via the DIR button. according to the normal simple rules options which are currently available This reveals a Directory screen through as shown on screen when the Rules to be used in any main box. You may which puzzle files can be loaded. button is clicked. Any chosen number also key in your own notes into any There is a selection of puzzles procan be changed in the same way if of the righthand boxes, indicating to vided with this program, those which you wish. Keying a “0” entirely clears yourself which are the options you the Author used when developing it. that box of a value. Only numbers think might apply. There is a limit Click the Directory screen’s Notes butyou have chosen (in black) can be of five consecutive digits which can ton for more info on using it. changed. Those coloured red can be entered into the RHS boxes. Such You may key in your own puzzles, notes are over-written when the say from the details published in never be changed. At any time during the game you Show Answers, Show Choices, Show newspapers etc, and then load that file may click Check Results to show Box Nos or Hide Extras buttons are into the program. Examine one of the which of your choices are correct (pro- clicked. existing files for the layout. Basically The Show Box Nos button probably the format is for the first nine lines viding answers have been included with the same text file). Correct choices has little practical benefit, but shows to hold the puzzle, with a space (“ “) are shown with a green background. in the RHS boxes the numbered order indicating each blank. Each line must of the LHS boxes, from 1 to 81, top left be nine characters long (blanks count Red indicates an incorrect choice. Remaining blanks are highlighted in to bottom right. as characters). If you already have the There are two main choices of blue. Click Clear Colours to remove answers, they can be entered as the background colour you may choose next nine lines, again nine characters the coloured highlights. If all boxes are filled correctly, you to use for the boxes, light blue or per line. If you don’t have the answers, will be told so when clicking Check white. Click Box Colour to alternate leave these lines blank (don’t enter between them. You may prefer light any data). Results. A new game may be started at any blue when working on a puzzle. To enter puzzle detail, either do so time by clicking Set New Game, or White may be chosen should you via Windows Notepad through the clicking Random Blanks. Clicking the wish to do a “screen dump” of the Windows normal selection option, latter always alternates between the whole screen, pasting it into the or go into Sudoku’s Directory screen Windows Paint facility prior to via DIR. At the bottom of the Directick being on or off. You may always click the Key printing out the image to paper via tory screen is an oblong box through Press ? button to reveal a tick mark, a printer. which you can create a blank file. when all subsequent data entries to Type in the name you wish to use for the main 81 boxes are automatically Screen Dump this file, then click the screen’s Make checked for correctness (again, proTo use the screen dump facility, File button. This creates a file of that viding answers have been supplied). jointly press the keyboard Alt and name, confirms that it’s been created Click the button again to clear the PRNT SCRN keys to place the cur- (or telling you that name already exists tick and checking facility. It is an rent image onto Windows’ Clipboard. – it cannot overwrite an existing file). alternating cycle. Then click the Windows Start button, Then it opens the new file in Notepad select Programs, Accessories and then so that you can enter your data, do so. Option Choices Paint. Once in Paint, click Edit and Save the file in the usual Notepad way Clicking Show Choices causes the then Paste to paste the image into when finished. A typical example of file data is shown in Fig.7. righthand set of 81 boxes to show the Paint’s screen. Everyday Practical Electronics, July 2006 15 Then click DIR on the Sudoku screen again and select that file to load it as a Sudoku puzzle. Each file when loaded is automatically checked for whether or not answers are provided. If they are, they are checked to see that they conform to the standard Sudoku rules. If they don’t, you will be told so (a typing error intercept routine); re-examine the file through the Edit Puzzle button and amend any errors (duplicated/missing numbers). Resave it and reload. The file name of the selected program is displayed near the bottom right of the main screen. If it is too long to be fully visible, left-click on it to display a Message box with the full details, Automatic Puzzle Solving The other main aspect of the Sudoku PC program is that of attempting to automatically solve a Sudoku Puzzle. The puzzle may be that automatically generated internally by the program, or an external one selected via the DIR button. With the puzzle you wish to have solved displayed on screen, click the Solve It button. The program uses logic to fill in the blanks on your behalf. It is not claimed that all Sudoku puzzles can be solved in this way, but most of the ones with which it has been used by the author have been solved automatically. It is worth noting, though, that it has been found that some more difficult puzzles may have more than one perfectly legitimate solution, each of which conforms to the basic Sudoku rules, but which does not necessarily match the published answers. This is particularly so with puzzles in which at some stage there is a choice of numbers which could be placed in a box, but there is no logical indication of which is the correct choice of two numbers, or of the correct route which should be taken following that choice. With some Sudokus encountered, several points have occurred at which such a choice must be made, and then later on another choice of options is presented at which further decisions must be made, and sometimes yet more decision points further on. With one puzzle there were at least four levels of options at which a choice was needed. In-depth analysis by the author failed to reveal any way in 16 Fig.7. An example file data image which the choices could be logically made. In all respects the grid usually could still be filled completely, but the results failed to correspond with the published answers, although such answers had been reached by the program in its various permutations of the options. It is worth commenting, though, that most Sudoku puzzles tried could be solved in one pass of the program, without any dual choices being encountered. Permutations The program has been written so that when choices are presented, it goes into a cycle in which all permutations of dual choices are performed, with the results put out to a file on the hard drive for later examination by the user. During this process, each set of options is examined to see if it would contravene the logical rules of Sudoku. If they do they are ignored. There are two conditions which are recorded to the file, those which result in the full grid being filled, and those in which the result is an equal number of blanks remaining compared to the number of unused further options which are possible. The file in which these results are recorded is shown by clicking the Show Records button, which loads the file into Notepad for viewing. Sometimes the file may be too long for Notepad, in which case the choice of opening it through Wordpad is presented. If so, accept the offering. The file shown is always the last one created when permutations are encountered. The file name to which it refers is given at the top of the first page. Only where there is a choice of one or the other of two values is the choice recorded and processed. Choices having multiple options greater than two are ignored as these will ultimately reduce as the program progresses. The program assesses how many permutations there are to process all the dual choices available. If there are more than 16 you are asked if you want to continue or abort at this point. Processing too many permutations would take too long for slower PCs, although with one of the author’s faster PCs several complete permutations of choices occur per second. With one puzzle there were first 128 permutations to begin with, later resulting in a choice of 2048 permutations offered. Another puzzle resulted in 524,288 permutations being offered (2 to the power of 19). As it turned out, there was only one result of that vast series which was worth pursuing further by manual examination – and then it was the second choice of the dual pair pointed to which was correct! On another occasion, the indication of filled and unused options was equal at a Perm value of 47, yet analysis of the published answer revealed that a Perm value of 43 was the correct route, but resulting in further choices having to be made along that route. Grid Copies Where permutations are encountered you are asked if you would like to make a copy of the grid as it now stands before the permutations are performed. This is created as a separate file with an extension number relevant to the base file name and which can be loaded later to try out and examine the results of suggested possibilities of choice. Normally, the same recording file name is used on each occasion, overwriting the data from a previous Everyday Practical Electronics, July 2006 Resources Fig.8. Sudoku’s basic puzzel-solving program flow chart run. If you want to keep a particular file’s details, make a copy of that file and rename it as you wish. Having selected a choice from those permutations listed, enter that permutation number into the Perm Value text box and press <Enter> on the keyboard. This reloads the file and applies just that permutation to the choices. The binary value of the permutation’s decimal number is used, in which each bit applies to a particular choice pair, 0 selecting the lefthand The source code for both the PIC and PC programs is available for free download from the EPE website, access via www.epemag.co.uk. It is in the Downloads section under PICs/Sudoku. The PIC’s ASM code was written in the TASM dialect, but may be translated to the MPASM format by those who have TK3, and the wish to make changes to the code. The supplied HEX file is in the MPASM format and does not need changing, If you wish to program your own PIC, simply load the code “as is” into your PIC via your PIC Programming software and hardware. Pre-programmed PICs can be bought from Magenta Electronics (contact details as in their advert in this issue). The PC program was written in Visual Basic 6 (VB6). It is supplied both as the source code files, and a standalone run file (sudoku.exe). The latter does not need VB6 to be installed on the PC, just double-click the EXE’s icon to run it. Copy all the supplied VB6 files into a new folder named Sudoku (or any name of your choosing) before running the EXE. value, 1 selecting the right. During the processing of multiple options, the Perm value is incremented by one for each permutation, to the full quantity of the permutations available (always 2 to the power of the number of pairs found). Step Mode When using the auto-solve facility, a step-mode can be entered so that each stage of solving can be examined. Having loaded a required puzzle file, click Start Step Mode, to reveal a Step button. The program then pauses each time a process results in a box being filled, highlighting the background colour of that box. Having examined the result, click Step again to move on to the next stage. So, have fun with this program. It kept the Author engrossed over about three month’s writing it. Excellent value and entertainment! The program’s basic Sudoku solving flow chart is shown in Fig.8. EPE NEWSAGENTS ORDER FORM Please reserve/deliver a copy of Everyday Practical Electronics for me each month Name and Address Postcode Tel Everyday Practical Electronics is published on the second Thursday of each month and distributed S.O.R. by SEYMOUR Make sure of your copy each month – cut out or photocopy this form, fill it in and hand it to your newsagent Everyday Practical Electronics, July 2006 17 T E C H N O - TALK MARK NELSON TERAHERTZ: THE ANTI-TERRORISM SOLUTION Sometimes described at the last unexplored frontier in electronics, terahertz frequencies offer considerable promise for combating terrorism, medical use and other applications, as Mark Nelson describes. I F the tribulations of terahertz and the infamous "terahertz gap" have passed you by, you're probably in good company. Just as people had a pretty hazy notion of short waves back in the early days of broadcasting, most of us have the same kind of disinterest in the terahertz region right now. Soon this may change. Recent developments in ultra-fast pulsed laser technology look set to generate bright prospects for the commercial exploitation of this dingy domain. So where does this terahertz territory lie and what are those unique characteristics that make it such attractive territory for prospectors? Cambridge-based research and development company TeraView Ltd provides a straightforward description, explaining that the Terahertz region is where radio waves and light meet. Terahertz (1THz = 1012Hz) radiation occupies the electromagnetic spectrum between 100GHz (1011Hz), just above the microwave region where satellite television and mobile phones operate, and 30THz (3 × 10¹³Hz), adjacent to infrared frequencies used in devices such as television remote controllers. We're talking about light waves but the frequencies are invisible to the naked eye. Mind the Gap The expression "terahertz gap" refers to the fact that until recently there were no bright sources of light or sensitive means of detection available for this frequency range. Conventional microwave sources do not work fast enough (i.e. at high enough frequencies) to produce radiation efficiently in these frequencies, whilst laser diode sources that might work adequately have been limited by thermal effects, says the company. However, recent advances in ultra-fast pulsed laser technology have led to the generation and detection of broad-bandwidth terahertz light for the first time. This dramatic advance was made possible by applying new concepts in semiconductor physics to these commercially available laser systems. TeraView Ltd, spun-out of Toshiba Research Europe in April 2001, is one of the new breed of companies looking to fill the gap. It aims to apply its proprietary Terahertz Pulsed Imaging (TPITM) technology platform to exploit the many medical and nonmedical applications that exist thanks to the unique imaging and spectral characteristics that lie in the terahertz light spectrum. Terrorists Take Note What makes terahertz radiation so special is its application in non-destructive and nonharmful imaging. In other words, it works like an X-ray but without any health risks, 18 making it ideal for scanning passengers at airports and railway stations for terrorist weapons and contraband. The reason, as a report on the THzNetwork website explains, is because although terahertz waves can penetrate materials such as paper, fabrics, plastics, wood and human tissue, they are blocked by many drugs and explosive compounds. This makes the invisible light potentially very useful for security or forensic scanning, spotting drugs and explosives concealed in packages or under clothes. Once perfected, scanning devices of this kind could become a standard fixture at airports and stations, in mail-sorting offices and police stations or deployed in mobile forensic labs. A demonstration of how this could work was given a few months ago by Professof Malcolm Dunn of the University of St Andrews in Scotland, when he showed off a prototype scanner to a meeting of forensic technologists in London. Although his concept model is "the size of a ski-boot box", Dunn says he is hoping it could ultimately become no bigger than a shoebox. The chief reason why miniature devices do not exist yet is the technology used to produce these waves. One way, says THzNetwork, is by firing a "pump laser" into a material known as a parametric generator, usually the chemical lithium niobate. Dunn and his team, it continues, created a compact terahertz generator by installing the parametric material inside the machinery that generates the pump laser, rather than outside. This also makes the device more efficient, they say, as less strength is lost from the laser source. And because it will be years rather than months before a compact scanner can be realised, Dunn and his team are now seeking industrial backers to develop a prototype that can be tested in the field. Medical Uses An important characteristic of scanning with terahertz light is its ability to distinguish different materials. Many common substances and living tissues are semi-transparent and have "terahertz fingerprints", permitting them to be imaged, identified and analyzed. Moreover, the non-ionizing properties of terahertz radiation and the relatively low power levels used make this a safe process. Medical applications of this technique present enormous potential savings to surgeons and health providers. Conventional body imaging methods, dedicated chiefly to scanning for cancer, are not particularly effective for problems in the epithelium, the area near the surface of various tissues located either inside or on the outside of the body. This is where 85 per cent of all cancers lie. TeraView's TPI technology is particularly suited to detecting early-stage epithelial tumours such as skin, breast, prostate or lung cancer. Tooth decay, one of the most common human disorders, is another potential beneficiary. X-rays, one of the accepted methods used to detect decay, reveal the problem only at a relatively late stage because of the absence of visual features on the tooth surface. Terahertz imaging, on the other hand, is able to distinguish between the different types of tissue in a human tooth by exploiting the differences between the refractive index in tooth enamel and dentine. Not New There's nothing new about terahertz radiation of course; the novelty is these new and more effective technologies for exploiting it. For instance, the notion of using terahertz waves to scan for drugs and bombs was already recognised five years ago. At that time a team at Japan's RIKEN Laboratories demonstrated a terahertz generator for this very application. According to THzNetwork, however, their device was huge and cumbersome because the way it created terahertz waves required "a clunky array of lasers". Other applications were under consideration even earlier. Back in the 1980s the maverick inventor Norman Rutherford set up a company called THz Technology to manufacture lightwave communication devices that could substitute for microwave links or cable circuits. The municipal authorities in Nottingham used his equipment to link surveillance television setups from a number of residential tower blocks to a central monitoring station. Norman Rutherford had a track record of developing new technologies ahead of their time. Even if you don't remember his name, you may just recall the "Telcan" home video recorder that he and business partner Michael Turner launched back in 1963; long before Philips and the Japanese entered the home video market. The Telcan recorder used standard open reel quarter-inch recording tape. This was run at the mind-boggling speed of 120 inches per second past a fixed head in a recorder mounted on the top of a television receiver cabinet. The tape carried two 15-minute tracks but delivered sub-standard images. The inventors earned their place in history but little else, as Telcan was never a commercial success. The components manufactured for factory assembly were eventually shipped to the USA and sold as construction kits for a hobby magazine project. Everyday Practical Electronics, July 2006 PIC N’ MIX MIKE HIBBETT Our periodic column for your PIC programming enlightenment Multiplexing – A Trick or Two NE of the great features of the Microchip range of processors is the variety they offer – around 300 variations on our last count, ranging from tiny 6-pin SOT-23 packages up to 100-pin devices offering 70 I/O pins. For the hobbyist that choice rapidly shrinks when you take into account what you can actually buy, and how skillful you are at soldering: few of us have the equipment to place a 100-pin QFP package onto a PCB when the pins are spaced 0·5mm apart! O PIC Choices The choices available to us still remain high though, and one of the main challenges when starting a new project is trying to choose the best part for the job. Does it have the right number of I/O pins? Does it have the peripherals I need? Will it run fast enough? Does it work at the voltage I want to operate at? Can I solder the darn thing? While one can simply throw the largest part available at the problem, that doesn’t satisfy the desire to “do the job right” – make it as small as possible, low power and cheap. And sometimes this may be a necessity: designing a handheld game or remote control that runs the batteries flat in an hour isn’t going to be very rewarding! Thankfully Microchip and others provide us with that range of choices to make these designs possible. Once Upon A Time It wasn’t always this way; in the ’70s and ‘80s microcontrollers were very much like microprocessors: you might get a few I/O pins and a serial port, but if you wanted any more you were on your own. A classic example was (and indeed, still is) the 8051, a processor that pretends to have lots of I/O, except that you need most of them to address your code in an external ROM. So we should be thankful that the problem has been, to a great extent, taken away from us, and now that our devices are equipped with on board Flash, RAM in the kilobytes range and a multitude of peripheral features we can relax and concentrate on coding. More often than not though, you discover that your perfect processor is one I/O pin short of meeting your requirements, or perhaps it’s not quite quick enough to generate the serial bit stream you want. When this happens, you discover that the next processor in the family has an additional 30 I/O pins, costs twice as much and cannot be soldered. Or worse, your supplier doesn’t stock it! Like most engineering tasks, solving this problem is a case of making the most of what you have, and examining your project in a bit more detail. The task is a balance between reduction in pin count verses code complexity. Can I live with the extra processing time? Can I cope with the restraint that I may not be able to refresh the LCD while processing a key press? One of the nicer points about some of the smaller parts like the PIC12F629 or the PIC16F688 is that they operate at very low voltages, and are well suited for running of 3V Lithium coin cells. But their I/O count is low, so let’s take a look at some of the possibilities for making the most of what we have. These ideas are very general and are not tied to any particular processor, so you are free to use them where you wish. We start with a common peripheral, keys. Keyed Up If you need lots of keys, say for a numeric or telephone keypad, then you are going to need lots of inputs. Fortunately there is a simple solution to this, one that keypad manufacturers are well aware of: multiplexing. Most 12 and 16 button keypads are designed to be multiplexed. A typical example is shown in Fig.1. Four input pins are required, pulled up in the normal fashion. Three output signals, normally driven low, are used to scan columns of keys, looking for a change from the default of “all ones”. When a change is detected – one of the inputs goes low – you raise each output signal in turn until the input returns high. This gives you the row and column of the button. Note that in Fig.1 the bottom “output” signal is actually tied to ground, since it does not need to be toggled. This means that a 16 button keypad can be implemented with just seven I/O pins. Within many PICs there is a feature that can be particularly useful when using keyboards like this, called “Interrupt on Change”. Typically implemented on PortA or PortB, it allows an interrupt to be generated when the level on a collection of inputs changes. This can be put to great use with battery powered equipment that only needs to run when a key is pressed, since you can put the PIC into sleep mode and wait for a keypress to wake it up. For an example of how this can been done, look at the Car Computer source files in the Downloads page on the EPE website (via www.epemag.co.uk). ADC Trick Fig.1. Multiplexing a 4 × 4 keypad 20 If you are really short of I/O lines for your key inputs, there is a rather cute trick that can be used if you have an analogue to digital port pin available. Many PICs implement 8-bit or 10-bit ADCs, many with multiple inputs. By using a resistor divider chain it is possible to have several keys – up to 10, maybe more – on a single input. The trick is to choose values of resistors (taking into account the resolution of the ADC and the tolerance of the resistors) Everyday Practical Electronics, July 2006 Fig.2. ADC monitoring for four keys that provide unique no-overlapping voltages. It then becomes a simple case of sampling the ADC input periodically and performing a series of comparisons on the analogue value to determine which key is pressed. In Fig.2 is shown an example with four keys, which will require just four byte subtractions to identify which key if any is pressed. The resistor values have been calculated on the basis that the ADC has been setup for 8-bit resolution and should have 5% tolerance. As you can see, there is a trade-of for the reduction in pin count – increased code complexity. The increase is marginal however, so if you have the need to free up a few I/O lines, the only cost is a few extra resistors and a little brain power! Going back to the idea of multiplexed keys, bear in mind that you are not limited to having keys on the 4-bit input “bus”; you can have other things too. Fig.3 shows how you can multiplex a keyboard with, for example, the data bus of an LCD. When the “Keyboard Enable” signal is low, the four transistors are switched off, so pressing a key will not affect the data on the 4-bit bus. When “Keyboard Enable” is high, however, pressing a key will pull the corresponding input low. The trade-off here is that the keyboard cannot be tested while the other device on the bus is being accessed. Again, with a little thought you can see in the case of an LCD update that this time is so short you will be able to poll the keyboard without any perceivable delays. Even this example can be improved upon; if you are using an I2C device, consider using the “Keyboard Enable” signal as the I2C clock line. It does work! Debouncing A final note about keyboard routines: you must “debounce” them, whichever technique you use. When you detect a key has been pressed, wait a short time, then check again. You should do the same on key release to minimise the chance of producing double-key events by accident. The debounce time can be quite long, and varies significantly between key types. For example the small PCB mounting “click feel” buttons have a much cleaner switching action than the panel mounting barrel switches, and therefore a shorter debounce time. Keys that have a positive click response will require a debounce time typically around 10ms to 20ms, whereas the larger keys may require up to 100ms. You will find that you need to tinker with the debouncing to get a good response. An example of how to scan and debounce a 12-button keypad is shown in the source file wakeup.asm which can be found in the PicNMix section of the Downloads area on the EPE website (address as earlier). This example also demonstrates how the “Interrupt on Change” feature may be used to enable the PIC to be placed in ultra low power sleep mode until a key is pressed. You will notice that the keyboard code is quite long; while this is only an example and may be optimised, it demonstrates the cost of multiplexing: increased code complexity. The I2C bus is an excellent way of expanding a PIC’s capabilities. Although normally only Fig.3. More sophisticated multiplexing for four keys and an LCD used for Everyday Practical Electronics, July 2006 EEPROM, there are many interesting expansion devices designed for it, including parallel I/O expanders and even dtmf/tone generators like the PCF8575 and PCD3312. Always bear in mind the cost of your additional hardware; it may be cheaper (although not easier) to just add another PIC, implement an I2C slave bus and have it provide all the extra functionality you need. Even a few logic chips can sometimes be more expensive than a simple PIC. If you need to drive a number of outputs, but only one will be active at any one time, consider using a BCD to Decimal converter like the 4028. This IC can take three or four inputs and drive eight or ten outputs. Logic ICs like the 74HC373 and 74HC374 provide a means of “latching” up to 8-output signals, ideal for driving large numbers of LEDs. The 74HC373 has a “Latch Enable” pin that will transfer the contents of its inputs to the output pins; the outputs will remain in their last state when the LE pin is de-asserted (this is referred to as a transparent latch). The 74HC374 is very similar except that data is only transferred to the outputs on the rising edge of the CP input pin. Several of these ICs can be paralleled together to provide a large number of outputs, each chip only requiring a single control signal. Ripple Counter Another useful logic device is a “ripple counter”, which can be used to “count” on a series of output lines. These devices are ideal for generating address lines to external parallel bus memory such as EPROM or SRAM. The 4020 CMOS IC is a 14-bit counter that only requires two input signals: a reset signal to clear the outputs to zero, and a clock input to perform the count. Although it has only 14 outputs it can be used in conjunction with other PIC outputs to form an address bus of any size – you can even use several of them together. The drawback of this is that it is slow; to set all output signals high you will have to send 16383 pulses to it, which could take several milliseconds. If, however, fast data access is not an issue, it could save you 12 I/O pins! The ultimate tool for expanding a microcontroller’s I/O capability has to be the Programmable Logic Device (PLD) or it’s big brother, the Field Programmable Gate Array (FPGA). These ICs contain large arrays of logic cells that can be “wired” together, either through fuse programming (in the case of PLDs) or by downloading to on-chip EEPROM or SRAM (in the case of FPGAs). FPGAs can hold hundreds of thousands of undedicated logic blocks, enough to be able to implement several microcontrollers inside, and provide hundreds of I/O pins. The downside? They are expensive. Devices like the PIC microcontroller have displaced the smaller PLDs, and the larger FPGAs are, at the moment at least, very expensive. Although the price will inevitably reduce, don’t expect the packages to get any easier to solder! For now, let’s count ourselves lucky that we can still purchase DIL ICs! 21 PC Power Monitor By JIM ROWE Does your PC crash intermittently? Maybe the hard disk or something else within the machine is not getting the right rail voltage but how would you know? This unit lets you easily monitor the main DC power rails – it clips into your PC and has three LED bargraphs and an alarm to indicate if any of the supply rails swings too high or too low. A s well as having to provide a number of different DC voltages, your PC’s power supply has to deliver an appreciable amount of power – hundreds of watts. This is the main reason why switchmode power supplies are used, because they’re much more efficient than the older “linear” type of power supply. However, they’re also more complex and this tends to make them slightly less reliable. 22 Also, some PC power supplies really do have trouble supplying all that current and sometimes they fail to deliver just the right voltage at critical times – like when you are in the middle of a big download off the Internet. If you build this unit, it will give you a visual and audible warning of the problem so that you can have it fixed. Of course, apart from data loss, if a PC’s power supply does happen to develop a fault, this can have quite disastrous (and costly) consequences. Replacing a blown CPU chip can involve hundreds of pounds, while replacing blown DIMM modules can be almost as costly. Fortunately, many of the latest PC power supplies incorporate special circuitry to detect when any of the main power rail voltages fail or go high and shut down the supply if such a fault occurs. However, such protection circuitry does not always do the job, so this monitoring circuit can still be a worthwhile addition. It’s good to know that if a fault develops, you’ll be warned straight away so you can “pull the plug” before much damage is done. So that’s the idea of this project. It’s a low-cost, easy-to-build circuit which can continuously monitor the main power rails in a PC and display their status via columns of LEDs. At the same time, whenever it senses that any of the rail voltages has moved out of the safe operating range (too high or too low), it sounds a small piezo Everyday Practical Electronics, July 2006 buzzer to draw your attention to a possible problem. How many supply rails does it monitor? The answer is “just three” but they are the three that are the most important. These are the +12V line (used for the motors on most disk drives), the +5V line (used for most of the logic on drives and plug-in cards) and the +3·3V line (used to power the memory modules, the chipset and motherboard logic and the CPU). By the way, as you can see from Table 1, PC processor voltages have varied a great deal in recent years. In most cases, the processor supply voltage(s) are derived from the +3·3V line from the power supply, either directly or via a DC-DC converter, which has its output voltage(s) set either manually by jumper shunts on the motherboard or automatically via “VID” (voltage identification) coding pins on the processor itself. So in most cases, it’s sufficient to monitor the +3·3V line in order to keep an eye on processor voltage. The only exception to this is with PCs using fast P4 processors, where the chip’s DC-DC converter is run from the motherboard’s auxiliary +12V line (rather than the +3·3V line) in order to be able to supply the extra power. In these cases, monitoring the +12V line is probably sufficient to keep an eye on processor voltage, although you’d still be advised to monitor the +3·3V line as well because this is used for the memory modules and the chipset. •3V Forget -5V and -12V It isn’t really necessary to monitor the -5V line any more, because this was actually only used by a few of the older ISA bus cards (like RS-232C serial port and modem cards). Similarly, it’s no longer necessary to monitor the -12V line, because this too is rarely used in most PCs made in the last 10 years or so. So by monitoring just the +12V, +5V and +3·3V lines, we’re likely to be able to detect just about any fault in a PC power supply that could result in data loss or damage to critical circuitry or components. It’s very easy to monitor the +12V and +5V lines, because these are available from any disk drive cable connector – and there’s usually at least one of these spare. The +3·3V line is a little more awkward, though. You generally have to run one or two wires connecting Everyday Practical Electronics, July 2006 Fig.1: the circuit is based on three LM3914 dot/bar display driver ICs (IC1-IC3) – one to monitor the +12V rail, one for the +5V rail and one for the +3·3V rail. Each IC drives five LEDs which indicate the status of each supply rail at a glance. directly to the motherboard at the main power connector. We’ll give you the details of this later in the article. How it works To keep the project as simple as possible, each of the three power lines is monitored by an expanded-scale LED voltmeter circuit based on an LM3914 dot/bar display driver IC. As you can see from the circuit diagram (Fig.1), IC1 is used to monitor the +12V line while IC2 and IC3 monitor the +5V and +3·3V lines respectively. 23 Fig.2: install the parts on the PC board as shown here, taking care to ensure that all polarised parts are oriented correctly. Note that trimpots VR1-VR3 are mounted on the copper side of the board. Although each LM3914 has 10 output lines, designed to drive 10 LEDs in a normal dot or bar type display, Table 1 24 here we use only nine of the outputs to drive a total of five LEDs per chip. Output O6 in the centre of each chip’s voltage range is used to drive the green “OK” LED for that power line, while the remaining eight outputs are connected as four tandem pairs to power the “HIGH”, “TOO HIGH”, “LOW” and “TOO LOW” LEDs for each supply line. All three ICs are actually powered from the PC’s +12V line and the LEDs are all connected to this line as well. This means, of course, that if the PC’s +12V line fails completely, the complete monitoring circuit will go dead as well. But as this in itself will be a clear indication that your PC’s power supply has a serious problem, we don’t see it as a disadvantage. As you can see, the inputs of IC2 and IC3 are connected directly to the +5V and +3·3V rails of the PC. However, to allow IC1 to correctly monitor the +12V rail, we use a simple 2:1 resistive voltage divider to allow it to monitor half the voltage – ie, a nominal +6V rail which is directly proportional to the +12V rail. The reference voltage and sensing range of each IC are tailored using the resistors connected to pins 4, 6, 7 & 8 to give the correct “centre voltage” and measuring range for each of the three voltage rails. But each IC also has a trimpot (VR1, VR2 and VR3), so that each monitor can be calibrated independently for correct indication and alarm sensing. By the way, calibration trimpot VR3 has a higher value than the other two so that the centre of IC3’s sensing range can be adjusted to suit whatever voltage is used in the PC for running the CPU. So you’re not forced to monitor just the motherboard’s +3·3V line; you can monitor the actual CPU supply voltage if you prefer. We recommend that you do monitor the +3·3V line though, because it’s easier to do this and therefore less risky. How do we do the alarm sensing? Ah, that’s easier than you’d think. As you can see, the three LEDs which are used to indicate “OK”, “HIGH” and “LOW” in each monitor are all connected directly to the +12V line. So when any of these LEDs is illuminated (because there’s no serious problem), nothing else happens. On the other hand, the LEDs at the top and bottom of each monitoring range (ie, LED1 and LED5, etc) are not connected directly to +12V but instead to an “alarm sense” rail which in turn connects to the +12V rail via the baseemitter junction of transistor Q1. This means that if any of the ICs happens to detect a “TOO HIGH” or “TOO LOW” condition and lights one of these LEDs, this draws base current through Q1 and turns the transistor on. As a result, it conducts collector current and turns on the piezo buzzer. Nifty, don’t you think? Construction All the components for the power monitor are mounted on a compact PC board measuring 146 x 38mm and coded 576. This board is designed so that it can be mounted directly behind a 5·25-inch drive blanking plate, with the status indicator LEDs protruding via matching 3·5mm holes. An array of even smaller holes at one end of the panel allows the sound from the piezo buzzer to emerge. Fig.2 shows the parts layout. All parts are mounted on the top side of the PC board except for the three calibration trimpots (VR1-VR3) and the PC board terminal pins, which are used for the power input connections. Everyday Practical Electronics, July 2006 The location and orientation of all of the components can be seen clearly in the board overlay diagram. As usual, fit the wire links first, so that you don’t forget them. The three short vertical links can be made from tinned copper wire or resistor lead offcuts, while the two longer horizontal links (near the bottom edge of the board) should be made from insulated hookup wire. Once the links are in, fit the six PC board terminal pins that are used for the input connections. As mentioned earlier, these are fitted from the rear of the board and soldered on that side as well. The fixed resistors can go in next, making sure that you fit each one in the correct position. That done, install the three 2·2µF tantalum capacitors – they all mount with their positive leads towards the top of Fig.2. The last capacitor to fit is the 100µF electrolytic but note that although it mounts on the front of the board as usual, it is mounted on its side to provide clearance when the board is mounted behind a blanking plate or box panel. This capacitor is also mounted with its positive lead uppermost. The next components to fit are transistor Q1 and the three LM3914 ICs. Note that the ICs all mount with their notched (pin 1) ends facing downwards, as shown in Fig.2. Fitting the LEDs You’re now ready to fit the 15 LEDs. These are all 3mm-diameter types and there are three green LEDs, six orange LEDs and six red LEDs as shown. They should all be mounted with 10mm lead lengths (ie, the bottom of each LED should be 10mm above the board), so they they’ll later all protrude evenly through the holes in the front panel when the board is mounted behind it. The easiest was to do this is to cut a short strip of cardboard 10mm wide and then fit each column of LEDs with their leads straddling the cardboard strip. That way, they’ll all be automatically set to the correct height before their leads are soldered. It’s a simple trick but it works well. By the way, notice that each LED is fitted with its cathode (flat side) towards the right. The last component to fit to the front of the board is the small piezo buzzer. This mounts directly to the board via two pins. Because there are several different types of buzzers available, with different pin spacings, we’ve provided extra pads and holes on the board for flexibility. Note that the buzzer’s negative pin should always go through the bottom hole. Installing the trimpots The final components to fit are the three trimpots, which mount on the back (ie, copper side) of the PC board. This is done so that they’re easy to adjust from the back when the board is mounted on a blanking plate or panel. Make sure you use the 1kΩ trimpots for VR1 and VR2, and the 5kΩ trimpot for VR3. Once the board is fully assembled, you can place it aside for a few minutes while you drill the holes in the blanking plate or box panel. You can use a photocopy of the front panel artwork (Fig.5) as a drilling guide and template. Note that the holes for the LEDs and the four board mounting holes (in the corners) are all 3·5mm diameter, while those for the buzzer “grille” are 2mm in diameter. Once the holes in the blanking plate have all been drilled and deburred, you might want to attach another Table 2: Resistor Colour Codes o o o o o o o o o o No. 1 1 1 3 1 1 1 2 1 Value 10kΩ 4·7kΩ 3·9kΩ 1·5kΩ 1·2kΩ 1kΩ 470Ω 270Ω 220Ω Everyday Practical Electronics, July 2006 4-Band Code (1%) brown black orange brown yellow violet red brown orange white red brown brown green red brown brown red red brown brown black red brown yellow violet brown brown red violet brown brown red red brown brown Fig.3: this diagram shows how the PC board is secured to the rear of the blanking plate using 12mm spacers and M3 × 6mm machine screws. The LEDs protrude through matching holes in the blanking plate – see text. Fig.4: here are the pin connections for a 20-pin ATX motherboard power connector and for a 6-pin ATX auxiliary power connector which is sometimes used on older motherboards. 5-Band Code (1%) brown black black red brown yellow violet black brown brown orange white black brown brown brown green black brown brown brown red black brown brown brown black black brown brown yellow violet black black brown red violet black black brown red red black black brown 25 576 VR3 Fig.5: here are the full size artworks for the PC board and front panel. Check your board carefully for defects by comparing it against the above pattern before installing any of the parts. photocopy of the artwork to the front using double-sided tape, so it will dress the panel up and give a professional look. The PC board assembly can now be mounted behind the panel on four 12mm-long M3 tapped spacers and secured using 6mm-long M3 machine screws. Fig.3 shows the details. We suggest that you also fit a star lockwasher under each of the rear mounting screws, to ensure that they don’t loosen with vibration. Connecting it up The easiest way to connect the +12V, +5V and earth (ground) inputs of the monitor board to the corresponding power rails of the PC is by cannibalising the 4-pin plug and one set of wires from a disk drive “Y adaptor” power cable. These are readily available from computer stores and electronics suppliers. The free ends of the wires are then soldered to the four main input pins on the monitor board but make sure you connect them correctly: the The completed PC Power Rail Monitor simply clips in the front of the PC’s case, in place of an existing drive blanking plate. 26 red wire goes to the +5V input, the yellow wire to the +12V input and the two black wires to the centre ground pins. The 4-pin plug can then be mated with one of the power connectors in the PC, to make all these connections. The connections to the PC’s +3·3V rail are a little trickier but simple and safe enough if you’re careful. To do this, solder a pair of insulated hookup leads about 500mm long to the two remaining pins on the monitor board, using wire with orange insulation for the +3·3V lead and wire with black insulation for the ground lead. That done, remove the cover from your PC so you can gain access to the underside of the motherboard, just below the main power connectors. In most PCs you should find that the main DC power lead from the power supply mates with the motherboard using a 20-pin Molex type plug and socket (called the ATX power connector). If that’s the case with your PC, you can connect the +3·3V and ground wires from the monitor to the underside of the 20-pin motherboard connector, to pins 1, 2 or 11 (orange wire) and 3 (black wire) respectively. Fig.4 shows how to identify the pins on the motherboard ATX connector. On some earlier model PCs, you may find that this 20-pin ATX connector is “missing”. Instead, there will be a pair Everyday Practical Electronics, July 2006 VR2 VR1 The above view shows the completed PC board from the top, while the inset shows how the three trimpots (VR1-VR3) are mounted on the copper side. of 6-pin in-line main power connectors (P1 and P2), together with a third 6-pin in-line connector providing the +3·3V power and an additional +5V line. This is known as the 6-pin ATX auxiliary power connector (see Fig.4) If your PC has this arrangement, the +3·3V lead from the monitor board (orange) should be connected to either pin 4 or pin 5 of the auxiliary connector (under the motherboard), while the remaining ground wire (black) can be connected to either pin 2 or pin 3. If your PC is even older and doesn’t even have the ATX auxiliary connector but just the P1 and P2 connectors, this means that it doesn’t have a +3·3V rail. In that case, you won’t need to worry about monitoring the non-existent +3·3V rail, so simply remove the orange and black wires from the monitor board pins and ignore the third column of LEDs (which won’t light anyway). Calibration Calibrating the monitor is quite easy but you’ll need a reliable digital voltmeter. The basic idea is that you will be adjusting the relevant trimpot for each of the monitor’s three LED voltmeters so that the green LED glows when the input voltage is at the correct nominal value for that power line. When this is done, the other LEDs will Everyday Practical Electronics, July 2006 glow for the correct higher and lower voltage levels. Step one is to measure the +12V line with your DVM. If it’s very close to the correct reading (say within ±100mV of +12V), all that you then need to do is adjust trimpot VR1 until the green LED glows steadily in the first column of LEDs. In fact, you should set VR1 to the centre of the small adjustment range over which the green LED glows. What if the PC’s +12V rail actually measures a little below 11·9V, or a little above 12·1V? That’s no great problem but it does mean that you should adjust VR1 so that one of the two orange LEDs glows instead – ie, adjust VR1 so that either the lower orange LED is just glowing if the voltage is just below 11·9V, or the upper orange LED is glowing if it’s just above 12·1V. Calibration of the +5V and +3·3V monitors is done in exactly the same way. You simply measure the actual voltage of these power rails first with your DVM, then adjust each trimpot so that either the green LED or one of the orange LEDs for that monitor is glowing, depending on the reading on the DVM. Once you’ve set all three trimpots in this way, your PC Power Rail Monitor is calibrated and ready for use. EPE Parts List 1 PC board, code 576. Available from the EPE PCB Service, 146 x 38mm 1 piezo buzzer, PC mount 6 1mm PC board terminal pins 4 12mm x M3 tapped spacers 8 M3 x 6mm machine screws 4 M3 star lockwashers 2 1kΩ horizontal trimpots (VR1, VR2) 1 5kΩ horizontal trimpot (VR3) Semiconductors 3 LM3914 display drivers (IC1IC3) 1 PN200 PNP transistor (Q1) 3 3mm green LEDs (LEDs 3, 8, 13) 6 3mm orange LEDs (LEDs 2, 4, 7, 9, 12, 14) 6 3mm red LEDs (LEDs 1, 5, 6, 10, 11, 15) Capacitors 1 100µF 16V radial electrolytic 3 2·2µF 35V TAG tantalum Resistors (0.25W, 1%) 1 10kΩ 1 1kΩ 1 4.7kΩ 1 470Ω 1 3.9kΩ 2 270Ω 3 1.5kΩ 1 220Ω 1 1.2kΩ Reproduced by arrangement with SILICON CHIP magazine 2006. www.siliconchip.com.au 27 PRACTICALLY SPEAKING Robert Penfold looks at the Techniques of Actually Doing It! HEN thinking about starting a new W hobby it is usually quite easy to find reasons for not bothering. Finding the courage to take the first step tends to be a bit more difficult. In the case of electronic project construction, concerns about the finished projects failing to work are probably the main reason for would-be constructors never “taking the plunge”. Duff projects are not a major worry for those with years of experience at building electronic projects. They have the technical knowledge and test equipment to deal with virtually any problem. On the face of it, the opposite situation applies to beginners, who lack the knowledge and resources to deal with projects that refuse to work. In reality the situation is not quite as dire as that. While it is not totally impossible that your first few projects will produce one or two really awkward problems that are difficult to solve, you would have to be incredibly unlucky for this to happen. An all-important point to bear in mind is that a project is virtually guaranteed to work provided you follow precisely the instructions and any special notes in the article. We would not try to pretend that there are never any errors in EPE, but those that do occur are very few and far between. On the rare occasion when an error does creep through it is usually detected quite quickly and a correction is printed one or two issues later. even switch it on! Letters from readers who have “bitten off more than they can chew” are now relatively rare, but it is still a trap that is easy to fall into. Main Point Projects that beginners should definitely avoid are those that connect direct to the mains supply. When dealing with the mains electricity supply you have to treat it as potentially lethal, because that is precisely what it is. It follows from this that any projects that connect to it are also potentially lethal. Projects that are powered from the mains or have any direct connection to it are only suitable for those with a reasonable amount of experience at project construction. Even if a project is extremely simple, if it connects to the mains supply it is certainly not suitable for beginners. Start with projects that are battery powered. If you should make a serious blunder it is possible that one or two of the components will be damaged, but you should be perfectly safe. In most cases all the components will survive the experience as well. A project that is powered from the mains via a ready-made adapter should also be safe for beginners. The adapter will presumably conform to the relevant safety standards. It should therefore provide complete isolation from the mains supply, as well as having any necessary fuses or safety cut-outs. circuit boards represent the more foolproof option. Stripboard (Fig.1 bottom) is a general-purpose circuit board that has a regular matrix of holes, but most projects utilize only a few percent of these holes. As implied by its name, a custom printed circuit board (Fig.1 top) is specifically designed to accommodate a particular circuit. Consequently, a PCB has just one hole per leadout wire or pin. This lack of excess holes means that there is relatively little risk of making a mistake, and any errors that should occur are likely to be spotted almost at once. However, the numerous unused holes in stripboard tend to disguise mistakes, and some very diligent checking is often needed to detect any errors in the positioning of the components. Bridge the Gap Having carefully constructed a well chosen project, what do you do if it fails to work? Always make sure that the first thing you do is to switch it off. Leaving a faulty project switched on risks damaging some of the components. The semiconductors are often the most expensive components in a project, and they are particularly vulnerable if a faulty project is left with its power on. So, switch off a faulty project immediately and recheck the component layout, wiring, and so on. This type of thing should really be checked very thoroughly as construction Basic Choice progresses. The circuit board should also The chances of success can be greatly be double-checked prior to installing it in increased by choosing suitable projects. the case. Spotting errors early in the proCustom Choice While it is tempting to dive straight in with ceedings can save a lot of hassle further A variety of construction methods have a “mega-project” that will impress your down the line. been used in the past, but these days every family and friends, the chances of making a Having checked for any obvious misproject is based on a printed circuit board. mistake with a large project are much takes, it is then a matter of searching for the There are two main types of board, which greater. It is perhaps less common now, but types of problem that are trickier to spot. are stripboard and custom printed circuit in the past it was not unusual to receive a Practical experience suggests that the boards (PCBs). Both types of board are slightly odd letter from someone having majority of problems are caused by shortstraightforward to use, but custom printed problems with a project. On circuits between the copper carefully reading through the tracks and pads on the underletter it became obvious that side of the circuit board. they had little idea of what the Accidental short-circuits are finished project was actually not a new problem, but the supposed to do! intricacies of modern boards It is not necessary to know have exacerbated matters. how a project works in order to Some boards are coated with a build it successfully. On the solder resist that is designed to other hand, it is necessary to discourage solder bridges. In have a proper understanding of the absence of this resist it is what it is supposed to do and likely that several bridges of how to use it. You can otherwise solder will be produced while end up in the position where a building each circuit board. supposedly faulty project is This is not as troublesome as actually functioning perfectly. one might think, since most of The usual recommendation is these bridges will be spotted to start with something fairly while the board is being consimple and straightforward like structed. In most cases they are a household gadget. A mundane easily wiped away using the project of this type provides a hot bit of the soldering iron. more apposite starting point Where there is a great deal of than an advanced piece of test excess solder it is better to use equipment where you need read desoldering equipment such an Fig.1. Two types of “printed circuit” boards; custom PCB (top) the article twice before you can inexpensive desoldering pump. and stripboard (bottom) 28 Everyday Practical Electronics, July 2006 Try to remove as much solder as possible and clean away burnt flux or other contamination. Then re-do the joint, avoiding an excess of solder the second time around. Solder bridges that you can see fairly easily are not the main problem. Any of these should soon be located and removed. Short-circuits are sometimes caused by minute trails of solder that are very difficult to see with the naked eye. In some cases the offending solder might not be visible at all by someone possessing average eyesight. Things are often made more difficult by the trails being hidden under excess flux from the solder. Flux tends to get liberally splattered across the underside of circuit boards during construction. There are various products that can be used to clean the flux from boards, but vigorous brushing with a small brush such as an old toothbrush is just as effective. It is a good idea to thoroughly clean the underside of the board when dealing with a faulty project. way, but clean any pad, lead, or tag if there is any hint of dirt or corrosion. Possibly the most common cause of “dry” joints is the soldering iron being left unused for a few minutes before producing the joint. There will often be a significant amount of solder left on the bit. Any flux in this solder will soon burn away and the solder itself will start to oxidise. This does not matter if you clean the end of the bit and tin it with some fresh solder before producing the next joint. Failure to do so results in the joint containing a significant proportion of old solder and an inadequate amount of flux. The flux should help the solder to flow over the joint properly, and with modern solders it also helps to clean slight traces of grease or corrosion from the two surfaces that are being joined. With too little flux it is likely that an inadequate joint will be produced. A continuity tester can be used to locate bad joints, but they can usually be found without the aid of any test equipment. There is often a large amount of flux or burnt flux around a “dry” joint, but this clue will be absent if the board has been more hesitant, which increases the risk of components being damaged by overheating. Semiconductors are the most vulnerable to heat damage, which is one reason they are mostly fitted on the board via holders rather than being soldered into place. Never be tempted to omit the holders for integrated circuits. The cost saving is minimal and the potential for causing problems is huge. When other types of component are damaged by heat there are usually some visual clues that all is not well. This can be something subtle like a slight darkening in the colour of the component, or something more obvious such as the component becoming misshapen or leadout wire becoming detached. Replace any components that are “off colour”, deformed, or show signs of physical damage. Second Time Around Having checked and made any necessary corrections to the circuit board, it is time to In Eyesight reassemble the project and try it out again. Even if you have good eyesight there is Obviously due care must be taken to avoid no guarantee that you will spot any tiny solerrors if it is necessary to reinstate any of der bridges. Some form of magnifier now the hard wiring, but this is also an opportuhas to be considered part of the stannity to thoroughly check all the wiring. It is relatively easy to make mistakes dard electronics toolkit, and even an with this wiring, so check every wire inexpensive plastic magnifying glass very carefully. will greatly increase the chances of If the project still does not work, finding an otherwise elusive solder take another look at the circuit board. If bridge. Using an 8x or 10x loupe the project is based on stripboard there (Fig.2) is better though. will probably be some link wires. Have These are sold as photographic any been omitted and are they in the accessories for viewing slides and negright places? Ideally you should get atives, and one of the cheaper ones is someone else to check your work. perfectly adequate for the present Having made a mistake it is easy to application. Provided the board is fool yourself into thinking that it properly cleaned first, a thorough visushould actually be that way. A fresh al check using a magnifier should pair of eyes might spot a glaring error always reveal any solder bridges. The that you have managed to repeatedly best approach is not to wait for proboverlook. Check every component on lems before cleaning and inspecting a Fig.2. Checking a circuit board with a magnifying the circuit board again. board. Inspect all completed circuit glass can highlight many soldering problems Are the polarised components such boards prior to installing them in the as diodes and electrolytic capacitors case. It is likely that problems will be cleaned. The surface of a soldered joint is connected the right way around? The comdiscovered quite often, and that a lot of disnormally quite shiny, whereas the surface ponent layout diagrams normally make the mantling and rebuilding will be avoided. of a bad joint tends to be dull or have a correct orientation of these components Problems with so-called “dry” joints date crazed appearance. A good joint has a sort perfectly clear, but the markings on the back to the pre printed circuit era. of mountain shape, but a “dry” joint is often components themselves are sometimes a Improvements in solders and components more globular in appearance, possibly lacktad confusing. Look carefully at the markhave greatly reduced the problem, but it has ing good symmetry as well. ings on the electrolytic capacitors to make certainly not gone away. Soldering is like It is a good idea to re-do any joints that sure that you have not misinterpreted anyany skill, and it is a case of “practice makes look in any way suspicious. Check the thing. The cathode of a diode is normally perfect”. The more projects you build the two surfaces before soldering the joint marked by a band around that end of the more proficient you will become at solderagain. With modern solders and compobody, but some diodes have several bands. ing. There is not enough space available nents it is unusual for minor deposits of With these there is one band that is wider here for a soldering tutorial, but a good one dirt or corrosion to cause difficulties. than the others, and this is at the cathode is available at the EPE web site. Soldering Occasional problems can still occur end of the body. irons and soldering kits are often supplied though, and it is a good idea to clean both with detailed instructions that have lots of Multimeter surfaces before re-doing the joint even if useful tips and helpful information. In the unlikely event that there really are there is no sign of any contamination. Dry Joints no errors and the project still does not work, Carefully scraping both surfaces with the The name tends to imply that a “dry” the problem is presumably due to a faulty small blade or a penknife, etc., is a good joint is one that has insufficient solder, but component. Finding the offending part way of cleaning the surfaces. it is not quite as simple as that. What usualwithout the aid of test equipment is probaTry to avoid the embarrassment of proly happens is that there is plenty of solder, bly not a practical proposition. ducing a genuinely “dry” joint, by which I but it does not flow over the joint properly. However, a great deal of useful checking mean one that you have forgotten to solder! The joint often looks perfectly plausible can be undertaken using an inexpensive mulFirmly pulling on resistors, capacitors, unless you look at it very closely. It might timeter, and it is advisable to buy one of diodes, etc., will reveal any missing joints, even be quite strong physically, but there is these sooner rather than later. Even some of or physically ineffective joints that look either no electrical connection at all the budget units have facilities for testing plausible. through the joint, or an intermittent contact. capacitors and simple semiconductors, as Hot Stuff The chances of producing a “dry” joint well as the usual resistance ranges, continuThere is a tendency to work faster as you can be greatly reduced by making sure that ity tester function, and so on. With a multibecome more proficient at soldering. the two surfaces to be connected are clean. meter of this type it should no be too difficult Initially, things are likely to be slower and They will normally be clean enough anyto find the cause of the problem. Everyday Practical Electronics, July 2006 29 A dirt cheap, high-current bench supply Got an old PC gathering dust somewhere? It mightn’t be much good these days but its power supply could be . . . especially if you want a high-current 13·5V bench supply! This article tells you how to modify one – at very little cost! By COL HODGSON, VK2ZCO This is NOT a projec t for the inexperien ced. DO NOT even think of opening the case of a PC switchmode po wer supply (SMPS) unless you have expe rience with the desig n or servicing of such devices or related high-voltage equipme nt. Note that much of the SMPS circuitry operates at full mains potentia l and contact with it could easily kill you. NEVER open up an SMPS case when it is connected to the mains, even if turne d off. Beware of any residu al charge on the ma ins capacitors, even if tur ned off for some tim e. DO NOT attempt to modify a SMPS unles s you are fully compete nt and confident to do so. T One of the nice things about using an old PC power supply is that it already comes in its own case, complete with fan. Some even include the mains switch – though none will have the large binding post terminals! This is a typical XT/AT-type supply, rated at about 230 watts (and therefore capable of 13·5V at 17A). You often find these PCs junked in council clean-ups, etc. Everyday Practical Electronics, July 2006 he concept of converting a disused computer power supply to 13·5V operation was first mooted in the November & December 1998 issues of the no-longer-published Radio and Communications magazine. This article builds on that information. The process is relatively straightforward and involves removing all the components involved with the existing 5V and 12V outputs, rewinding the main transformer and then changing the feedback components to give an output of 13·5V instead of 5V. First, a few words on selecting the power supply to be modified. It must be an XT/AT type. It must NOT be an ATX type since they work quite 31 Fig.1: inside a typical XT/AT type switch-mode power supply (SMPS). differently to the XT/AT types. Then, once you have a supply, check that it will maintain a constant output voltage under load; eg, one or two 12V 50W halogen lamps. Some SMPS may fail this test if the initial surge current drawn by the test load is too great (due to the overcurrent protection circuit being activated). In that case, switch off to allow the circuit to reset and retest it again, starting with lower wattage lamps and increasing the load in steps. Reverse engineering and conversion to a new output is difficult at the best of times and nigh on impossible if the thing doesn’t work in the first place! Second, consider your power requirements. If you only need about 10A at 13·5V, you probably don’t need to change the main transformer as the original +12V output can be modified to deliver +13·5V. This means that only the output voltage control sense circuits need changing. Third, choose a unit that contains the least amount of dust (possibly had the least use!) and check the fan for free movement and lack of “end play” in the bearings. Fourth, check if the unit uses two ICs in the control circuit: a TL494 and a LM339. Their IC pins and functions are easily identified, making analysis of the circuit much easier. If you can’t identify the ICs, you may still be able to modify the supply but you will be very much on your own and the information in this article may not be of much help. What’s involved? (1) The main transformer will have to be removed, rewound to achieve the desired output and replaced. The only way you can tell from this angle that this is the modified supply is the absence of a 110/230V switch. This was removed because (a) it is quite superfluous here in the UK and (b) because over the years we have seen too many people flick switches like this with (briefly) spectacular results. 32 Minor modifications are made to the mains circuitry. (2) The +5V, +12V, -12V and -5V output components are removed, with the exception of the +5V rectifying diodes and transient suppression network. A new output filtering circuit is installed. (3) The output voltage sensing resistors will need to be replaced. Jumper wires will need to be placed to supply the control circuit and the fan. Before we get too involved, some theory of operation is required. Basic principles The basic principles of typical PC power supplies can be described with reference to the block diagram of Fig.1. (1) The 230V AC mains input circuit contains the usual suppression components of chokes and capacitors before the four normal rectifier diodes in a bridge configuration. The rectified mains then passes to two storage capacitors connected in series. These capacitors will charge up to about 170V each and may be subject to ripple currents up to 5A or more. (2) Transistors Q1 and Q2 are alternately switched at 30kHz or more to provide a high-frequency alternating current to the main transformer primary. A small transformer with a single-turn primary winding senses the level of input current in the common line to the main transformer. Everyday Practical Electronics, July 2006 (3) The main transformer has three secondary windings providing the high current +5V and +12V outputs and a low current -12V output. (4) Large, fast-recovery double diodes (with a common cathode connection) in plastic TO-220 (or similar) packages rectify the high current +5V and +12V outputs, while smaller, fast recovery diodes rectify the -12V output. The -5V line is derived via a 7905 regulator from the -12V output. A large, multi-winding toroid provides initial filtering for the several outputs. Final filtering is provided by electrolytic capacitors and smaller inductors. (5) The main component in the control circuit is a TL494, Samsung KA7500B or equivalent IC. An RC network controls the operating frequency of the IC. The alternating drive to the switching transistors is pulse width modulated, depending on the load current demand, higher currents being supplied by longer duration pulses up to a maximum duty cycle of 45%. The output voltage feedback controls modulation width. The LM339 (and/or discrete transistors) senses over-current or over-voltage output conditions and shuts down the TL494. Features of the TL494 This is only a brief description of the operation of this IC. The IC contains an oscillator capable of operating between 1kHz and 300kHz. The frequency is controlled by an RC network on pins 5 (C) and 6 (R) – see Fig.2. Two error amplifiers are included: pin 1 (non-inverting) and pin 2 (inverting) for amplifier 1 while pin 16 (non-inverting) and pin 15 (inverting) are connected to amplifier 2. The outputs from these amplifiers are commoned and internally control the pulse width modulation section of the IC. The common output is also connected to pin 3 to provide external control over the pulse width modulation. There are two output transistors with open collectors and emitters: Transistor Q1 has pin 8 (C1) and pin 9 (E1) while transistor Q2 has pin 11 (C2) and pin 10 (E2). These transistors can handle up to 200mA. The Dead Time control (pin 4) limits the duty cycle for each transistor to a maximum of 45% (0V to Everyday Practical Electronics, July 2006 Fig.2: the two main chips you’ll find inside a typical SMPS are the TL494 and LM339. Here’s the pinout (and functionality) of both. pin 4). This provides a 5% protection interval, preventing both output transistors being on at the same time. The Dead Time control is also used to disable the chip if an overvoltage or over-current condition occurs. Pin 13 (output control) may be used in some circuits to disable the TL494. The input supply (Vcc) is to pin 12 and has a maximum value of 42V. Pin 7 is ground. A reference voltage of 5V ±5% is available at pin 14. to produce a grey scale image to fill an A4 page. The components can then be drawn on the page in a contrasting colour (eg, red) to assist tracing and identifying the various circuit features. By the way, if you haven’t already got the message, modifying one of these power supplies is not a quick or simple job but it does have the big advantage that you get a large output DC supply for very little cost. Make a drawing Some more recent PC power supplies derive their control circuit power from the +12V output. This feature allows the control circuit of these supplies to be powered and checked Before commencing testing and modification, I suggest that the underside of the PC board (track side) be scanned and printed (or photocopied) Pre-test before modification Here’s what you should find when you lift the lid on the switch-mode power supply. Usually it’s only four or so screws to get this far. All of the external cabling will be removed. Never run the supply with the lid removed unless testing – and then only with extreme care. These things can be lethal! 33 This waveform shows the ripple and noise output of the modified power supply. While it looks horrible it is only 67mV pk-pk. Note: measuring this waveform should be done on the external outputs, not inside the power supply (for safety’s sake!). without connection to the 230V AC mains. Connect a 33Ω 5W resistor between the +5V output (red) and ground (black) and a 47Ω 5W resistor between the +12V output (yellow) and the +5V output (red). This will maintain an approximate 5V to 12V ratio between the respective outputs. A variable DC power supply (8-14V range) is connected across the +12V output and ground. Check for power at pin 12 of TL494. It should be almost 0·6V less than the supplied voltage. In the absence of power, a jumper needs to be placed between pin 12 and the +12V line. An oscilloscope is used to view the waveforms and operation of the TL494 and LM339 as the applied voltage is slowly raised from 8V to 14V (no higher than 14V). A 30kHz (or higher) sawtooth waveform should be present at pin 5 and square waves should be visible on the ungrounded output pins 8 and 11 (or pins 9 & 10). These oscillations should stop as the voltage is raised to the level equivalent to the design output. The waveforms should reappear as the voltage is reduced. If the over-voltage circuit has been activated, the waveforms will not reappear until the circuit is reset by removing the power. Careful adjustment of the power supply is necessary to demonstrate these two very similar voltage levels. If no oscillations are observed, pin 4 of the TL494 will need to be isolated from the circuit and connected directly to ground. Follow the track from pin 4, desolder and lift one leg of each component connected to this track. The track can then be grounded by a jumper wire. The over-voltage protection circuit will now be inoperative. Re-connect the variable DC power supply and a sawtooth waveform should now be visible at pin 5 and square waveforms at pins 8 & 11 (or pins 9 & 10). Do not exceed 14V in an attempt to demonstrate the over-voltage protection mode – you have just disabled this circuit! Use a multimeter to measure the reference voltage at pin 14; this should remain constant at about 5V, as the supply is varied. Make a note of this reference voltage. Next, measure the voltages at the input pins to the error amplifiers, pins 1 & 2 and 15 & 16, as the supply voltage is varied. Note: one of these amplifiers may not be used in the circuit. The pin with the constant voltage, pin 2 or 15 (inverting input), is connected to pin 14 via a resistor or a potential divider network and serves as the reference voltage for the error amplifier. Make a note of this voltage too. The non-inverting input, pin 1 or 16, is connected to the +12V and +5V outputs via another potential divider network to sense the output voltage. You will need to trace the connections to this pin to identify the voltage feedback network. The signal from the TL494 to the driver transformer can also be check ed. The primary of this transformer is a centre-tapped winding with the centre pin grounded. The signal to the other two pins should be identical in shape and amplitude (sketch these waveforms). A dual trace oscilloscope will show the phase relationship between these waveforms (no overlap at all). The waveforms at the five output pins of this transformer will vary, as the circuitry to the “chopper” transistors is not symmetrical. However, the waveforms should be roughly similar. Voltage measurements also need to be made at the input pins of the comparators in the LM339 IC. Usually only two comparators are used; the remaining inputs are tied to ground or Vcc. Two pins (the inverting inputs) should maintain a fixed voltage equal to the reference voltage on the input to the error amplifier in the TL494. The pin with the varying voltage (a non-inverting input) is connected to the supply output via a voltage It’s dunked in paint stripper overnight . . . The original transformer, as removed from the PC board. 34 . . . allowing fairly easy disassembly. Make sure the ferrites and bobbin are very clean before going any further. Don’t worry about the wire – you won’t be using any of that. Everyday Practical Electronics, July 2006 Fig.3: rewinding both primary and secondary of the main transformer is arguably the most critical part of the whole exercise. The primary is rewound because its insulation will probably have been destroyed by the paint stripper. divider network and senses an overvoltage condition. This part of the circuit will also need to be identified and modified. The other non-inverting input pin is connected to the over-current protection circuit. This portion of the circuit does not require modification as the over-current condition is detected at the input to the main transformer. Take careful note of the results from the above testing procedure. The test will need to be repeated after the modifications and transformer rewind, as a final check before applying mains power. The only difference is that then there will be no output to the original +12V output, the new output appearing at the original +5V output. If your PC power supply cannot be tested with an external DC supply, you can still modify it but it will be far more difficult (and dangerous) to do any initial testing. However, you can still trace out the circuit and then follow the procedure within this article to make the necessary modifications. WARNING! The internal wiring of switchmode computer power supplies is dangerous when powered up. Not only do you have bare 230V AC wiring to the IEC sockets but a good portion of the circuitry is at +340V DC and is also floating at half the mains voltage. It is POTENTIALLY LETHAL! Use extreme care if you do decide to take measurements on the supply when the case is open and DO NOT TOUCH ANY PART OF THE CIRCUIT when it is plugged into the mains (operating or not). Make sure that it has been disconnected from the mains for about 15 minutes before making any modifications and make sure that all high-voltage capacitors have been discharged before touching any parts. IMPORTANT: although not shown here, fit PTFE sleeving over the primary wire ends (and to the inter-winding shield lead) before soldering them to the bobbin pins, so that no part of them will be exposed once the primaryto-secondary insulation tape is applied. PTFE SLEEVING Here’s what they should look like after disassembly. The next step is to wind on a new primary, as shown at right . . . Everyday Practical Electronics, July 2006 Make sure it is a tight, neat winding – otherwise you might run into space problems. The original inter-winding shield is re-used. Note the layer of insulation between the windings. 35 ing the transformer, to ensure adequate high voltage and high temp erature ratings. Rewinding the primary Rewind the primary with the same gauge wire and the same number of turns as initially used (usually 40 turns of 0·8mm enamelled copper). If the pri mary has been split into two windings (inside and outside the secondary windings) it should be replaced with a single winding. The primary is usually wound as two layers of 20 turns each. A single turn plus 10mm overlap of insulating tape is placed between the two layers during the rewind. The overlap must be located on a face of the bobbin not covered by the ferrite cores (see photo). After each primary layer is wound, install lengths of PTFE sleeving over the wire ends before terminating them at the bobbin pins. Another single turn plus 10mm over lap of polyester tape is then applied over the final primary layer and the interwinding shield is then replaced. Note: this shield is approximately one turn and must be insulated so it does not form a single shorted turn. Terminate the primary winding and shield to the appropriate pins (in ac cordance with your written notes!) and cover them with two layers of insulat ing tape (trim to exactly two turns, no overlap). Again, fit PTFE sleeving over the lead to the inter-winding shield. There are a few modifications that you need to make to the PC board. These will vary according to manufacturer so be careful as you trace the circuit out. Transformer rewind The main transformer operates at a frequency of between 30kHz and 85kHz and so is much smaller and has a surprisingly small number of turns compared to an equivalent mains transformer operating at 50Hz. Begin by desoldering and removing the main transformer. Then submerge it in a container of ordinary paint strip per overnight, before any attempt is made at disassembly. Note: paint stripper is highly caustic and care should be exercised during this operation; use gloves and eye protection! The next day, carefully wash all traces of paint stripper from the trans former. The ferrite cores should now slip easily out of the bobbin. Keep care ful WRITTEN notes of the windings (number of turns and pin connections on the bobbin) as the transformer is disassembled. In particular note the primary pin connected to the inter winding shield, if fitted. Note that ALL windings have to be removed as the primary has also been subjected to the effects of paint stripper. The ferrite core halves and bobbin should be thoroughly cleaned of all traces of adhesive, potting residue and paint stripper before rewinding. This may involve another overnight soak in paint stripper. Surprisingly, the paint stripper appears to have no effect on the bobbin. Care must be exercised during re winding due to the space limitations imposed by the ferrites. All windings must be tightly and closely spaced. Do not overdo the application of insula tion tape nor use larger gauge wire than suggested. Editor’s note: we recommend the use of a polyester tape when rewind Insulation at margins After terminating the primary wind ings and shield to the appropriate pins, use thin strips of insulation tape (trimmed to the appropriate width) to build up the gaps between the ends of the primary winding and the bobbin Then on go the secondaries. As with the primary winding, this should be nice and tight. The rubber bands are removed before adding the final layer of tape. As before, fit PTFE sleeving over the wire ends before terminating them to the bobbin pins. At right is one idea for the new output filter electros. 36 Everyday Practical Electronics, July 2006 shoulders, to give a complete uniform layer the full length of the bobbin. Once you have a uniform cylinder, cover the entire winding (right up to the bobbin shoulders) with exactly two turns of insulation tape (no overlap). The idea here is to ensure that all possible points of contact between the primary and secondary windings are doubly insulated. WARNING: for safety reasons, it’s vital that the primary winding be correctly insulated, so that it cannot possibly come into contact with the secondary. If you get it wrong, the supply could be LETHAL if the earthing is incorrect. Do NOT attempt any of this work unless you know exactly what you are doing. Apart from the obvious output terminals, the changes made to the original supply are not all that obvious in this modified one. Winding the secondary A total of 10 turns, double-wound and centre-tapped, of 1·25mm enamelled wire forms the secondary. This winding is rather difficult to apply because the larger gauge wire has a tendency to spring open. Use a rubber band as a temporary hold after completing each winding. Start by selecting one of the outside four pins used to terminate the original 5V winding (largest gauge wire). Wind on five turns, tight and closely spaced, in the direction away from the other three pins, bringing the end of the wire up through the notch in the bobbin top. Leave about 20cm of free wire. Now select the adjacent pin and wind another five turns in the same direction and placed between the turns of the first winding. Allow the first coil to expand lengthwise along the bobbin as needed. Terminate this winding as above. Check and recheck that you have exactly five turns on each winding, otherwise you will effectively have a shorted turn. Firmly cover this layer with one turn plus 10mm overlap of insulating tape. The second layer begins from the outer pin of the remaining original 5V winding pins. Wind five closely spaced turns in the opposite direction to the first layer and terminate through the top of the bobbin. Again, leave 20cm free. Starting from the remaining 5V pin, wind another five turns placed between the turns of this second layer. Terminate as above. Again, check and recheck for exactly five turns on each winding. Firmly cover this final double winding with two layers of tape. Here’s the stripped PC board with the rewound main transformer in place, ready for the new output filter components. Add a pair of polarised terminals on their own mounting plate and fasten it to the power supply case, as shown at right. Everyday Practical Electronics, July 2006 Refitting the ferrite core This is the real test of the rewind. Cautiously slide the ferrite core halves into the bobbin; remember, they are very brittle! If you are lucky and have been very careful, they will slip into the bobbin without any obstruction. If not, remove one turn of the outer tape layer and try again. If you are still unsuccessful, it may be possible to gently squeeze the windings in a vice, padded with two pieces of wood, to press the secondary into a slight oval shape. No vice? Place the bobbin between two pieces of wood and GENTLY tap with a hammer. If the 37 Modified, checked, tested . . . ready for the lid to go back on. And at the risk of sounding boring, for your own safety don’t apply power while the supply is in this condition. ferrites will still not fit, the secondary will have to be rewound Once the ferrite core halves have been fitted, with no spacing or foreign matter between the joining faces, two layers of tightly stretched tape will hold them together. Start across the base with the first length gently stretched, then tightly stretch the tape after the first corner. Finish with a gently stretched length across the base. Final assembly Gently twist the four 20cm centre- tap leads into a rope-like formation. Scrape the enamel off all wires and gently hook them around their corresponding termination pins and solder. Take care – the pins can be broken out very easily, particularly the pins for the secondary terminations. Replace the rewound transformer on the board and bend the flying centre-tap lead to its connection point on the board. This hole may need to be enlarged slightly. Trim, clean and tin the end of this lead before soldering. 38 PC board modifications After identifying the critical circuit features and rewinding the transformer, the PC board modifications are almost an anti-climax. First, remove, the input voltage selector from the board. Note: in the 230V position this switch is OPEN. Cover the vacant switch position with a suitable metal bracket. Next, connect three mains-rated 10nF capacitors (X2 class) across the back of the IEC socket to reduce rectifier noise imposed on the 230V AC mains. The capacitors are connected between Live & Neutral, Live & Earth and Neutral & Earth. Now we come to the output circuit. Do not remove the lower (earthed) output voltage sensing resistors. Starting from the output leads, work back to the transformer and remove all -5V and -12V components, including the spike suppression resistorcapacitor combination across the -12V winding. Repeat the procedure for the +12V components, including removing the double fast-recovery diode from the heatsink. Also, remove all +5V components back to the fast-recovery double diode. Leave the diode and the spike suppression components in place. The multiple-winding toroidal choke is also removed, stripped of its windings and then rewound with 14 turns of 1·25mm enamelled copper wire (ie, a single winding). Note that you will need two chokes of 14 turns each in the filter circuit – the second toroid can be scrounged from another power supply. This new +13·5V output filter is a low-pass “T” configuration, with the two rewound chokes in series and four 2200mF 25V electrolytic capacitors from their centre point to ground. Using the original +5V output copper tracks, insert and solder the rewound filter toroid (the original +5V output becomes the new +13·5V output). The placement of the remaining filter components depends on the physical layout of the original +5V output tracks. I used a small piece of PC board to hold the four 2200µF capacitors. This board was then mounted off the SMPS board using some spare 1·25mm wire. (Editor’s note: we strongly suggest that the four 2200µF 25V electrolytics should be low ESR types. The second toroid was soldered to the +5V output pad and to the first toroid. A ceramic disc capacitor (100nF 63V) was also added to the SMPS circuit board in parallel with the four 2200µF electrolytics. The following jumper wires are needed to complete the circuit: (1) Between the common cathode of the fast recovery diodes and the supply circuit for the TL494 IC; and (2) between the final output pad and the fan’s positive terminal (assuming, of course, that the fan is a 12V DC type). A resistor may be used for this jumper to reduce fan speed and noise. DO NOT make this connection if the fan is mains powered (rare). New values for the voltage and overvoltage sensing resistors now need to be calculated. These resistors are in divider networks and, in each case, you can leave one of the resistors in place and just change the value connecting to the output. For example, in the Seventeam ST230WHF unit shown in the accompanying photos, pin 1 of the TL494 is the non-inverting input of the relevant Everyday Practical Electronics, July 2006 And here’s the proof that it all works, with this test set-up following reassembly. The wooden contraption at right is a home-made dummy load (hey, don’t knock it: it works!). The DMM shows that we have achieved a perfect 13.5V output, while the ammeter (centre of pic) is reading almost 20A. Don’t even think about such a test before the lid is on the case! error amplifier. It has a 3·9kΩ resistor from pin 1 to ground and its reference voltage (set by a voltage divider connected to pin 2) is +2·5V. We want an output of +13·5V, so we need to calculate a new value for the resistor from pin 1 to the new 13·5V output. From here it is a simple ratio calculation. R= 3·9kΩ(13·5/2·5 - 1) = 3·9kΩ x 4·4 = 17·2kΩ So you merely have to replace the original resistor with 15kΩ and 2·2kΩ resistors in series. The over-voltage monitoring network to one of the LM339’s comparators may then need modifying to work with the new voltage output. The process of calculating the resistor is similar to that above; leave the resistor from the relevant comparator input to ground in place and calculate a new value for the resistor connected to the output. Note that the final output voltage may not be exactly 13·5V regulated due to resistance tolerances and the tolerance of the 5V reference from the TL494. Check that the potential dividers are connected between the new 13.5V line and ground. Jumpers may be needed to complete these connections. If the supply proves to be sensitive to RF fields, 100nF monolithic capaciEveryday Practical Electronics, July 2006 tors fitted between ground and all used inputs and outputs of the ICs should fix the problem. (Editor’s note: the addition of these capacitors will severely reduce the transient response of the supply and so it should only be done if the unit is used in conjunction with a radio transmitter). The configuration of the final output connections is left to the constructor’s requirements. Remember that these connections will have to handle up to 18A or so. The board should now be ready for its first test. Note that you will still need a minimum load such as a 47Ω 5W resistor. Repeat the lowvoltage pre-test procedure described earlier, using if necessary the 33Ω and 47Ω resistors connected in series across the output terminations. Hopefully, the earlier waveforms will be observed. If the connections to pin 4 of TL494 have been removed earlier, restore these connections and check if the oscillations cease as the voltage is increased to about 14V. If all is well and the modified board behaves as expected you are almost ready for the first big test but first, there’s one final safety check. Both the metal case and the ground (0V) output of the supply should be connected to mains earth. Use an Ohmmeter to verify that these connections are in place. Check also that the centretap of the rewound transformer is connected to mains earth. Under no circumstances should the output be floated! Now reassemble the supply into its case. Make sure that all connections are correct and close the case. Place a test load, (eg, a 12V 50W halogen lamp) across the output, plug in to the 230V AC mains and switch on. If the lamp lights, congratulations! Final testing can now proceed using a series of loads to measure the output current and voltage. If the lamp does not light, switch off, unplug the unit from the mains and wait for at least 15 minutes to discharge the high-voltage capacitors, before opening the case. If the lamp “blows” there is a good chance the output voltage sensing circuit is not correctly connected. Finally, note that PC power supply cases have ventilation slots. For safety’s sake, be sure to cover any slots or cutouts that give access to dangerous high-voltage circuitry (eg, by attaching aluminium panels) but make sure there is adequate EPE ventilation overall. Reproduced by arrangement with SILICON CHIP magazine 2006. www.siliconchip.com.au 39 Readers’ Circuits Ingenuity Unlimited -BASED WIN A PICO PC WORTH £586 torage OSCILLOSCOPE Dual Channel S Our regular round-up of readers’ own circuits. We pay between £10 and 5GS/s £50 for all material pubOscilloscope m u r t c e p lished, depending on length S z H M 0 5 Analyser and technical merit. We’re looking for novel applications and circuit designs, not simply mechani Multimeter ter cal, electrical or software ideas. Ideas must be the reader’s own work Frequency Me . e c a f r e t n I and must not have been published or submitted for publication else B S U el v o n a e where. The circuits shown have NOT been proven by us. Ingenuity v a h u o If y ch Unlimited is open to ALL abilities, but items for consideration in this circuit idea whi to column should be typed or word-processed, with a brief circuit would be of use a description (between 100 and 500 words maximum) and include a full n e h t s r e other read yours. circuit diagram showing all component values. Please draw all circuit scope could be C-based oscillo P y g ding a schematics as clearly as possible. Send your circuit ideas to: o r l a o n w h a c e e b T l Pico hnology wil c e T o c i P , s h t n the best IU Ingenuity Unlimited, Wimborne Publishing Ltd., 408 Wimborne Road Every 12 mo oscilloscope for e g a r o t s l e a t i g i d ta Logger/Scop East, Ferndown, Dorset BH22 9ND. (We do not accept submissions PicoScope 3205 on a DrDAQ Da i t i d d . for IU via email). Your ideas could earn you some cash and a prize! a p n u I r . e n n o n i u s the r submis be presented to worth £59 will Magic Bulb – Bewitched, Bothered and Bewildered? HIS simple device can provide fun and T interest at a children’s party. The illusion is created that a bulb can be turned on and off by magic. The key component in the Magic Bulb circuit in Fig.1 is the light-dependent resistor, LDR, whose resistance falls as the light around it increases. When its resistance is low enough, sufficient voltage is supplied to the base of transistor TR1 to turn it on. This in turn switches on TR2, used with TR1 to form a Darlington pair, and the bulb lights. For practical reasons it is best to use a miniature LDR and, as these can vary considerably in their minimum resistance, a different adjustment value for potentiometer VR1 may sometimes be more suitable, finding this by experiment. The bulb should be a fairly powerful one, such as the traditional 6V 3W bicycle headlamp bulb with its pleasingly large glass. Four 1·5V cells can be used in series to provide the 6V DC power supply. Transistor TR2 must be of a type able to handle the high current without overheating, such as the BD433 shown in Fig.1. After switching on, VR1 is adjusted to suit the room lighting (which should not be too bright) in such a way that the bulb is normally turned off, but goes on as soon as any extra light is made to fall on the LDR. This can be tested with a torch. Once lit, the bulb itself provides the extra light required to keep the circuit in the “on” state, but it should go out immediately if a shadow is made to fall on the LDR. It will also light, and stay lit, when switch S2 is 40 closed (providing base voltage and current to TR1 via VR1 and resistor R1). In the same way it will go out, and stay out, when S3 is closed (TR1 base voltage 0V). Construction and Operation in the end of the wand operates the reed switches when pointed at the correct spots on the box. In addition to this, the witch can extinguish the bulb by holding her hand over it, wagging her finger at it, or making any other movement that interrupts the flow of light from the bulb to the LDR. To complete the performance she can strike a match and light the bulb with it as if it were a candle, and she can appear to blow it out again by holding a cupped hand behind it while blowing. To suit children who are more familiar with Harry Potter than with traditional fairy-tale characters, the scene can easily be modernised! Francis Hall, Germany The following ideas for construction and operation are designed to enhance the “magical” effect. Most of the parts can be mounted on a baseboard cut to fit into a shoebox or similar cardboard box, which is either painted in a mixture of bright colours or covered with suitable giftwrap paper. The bulb is mounted on the lid, with the LDR a few centimetres behind it. A piece of translucent material with a hole in the middle for the bulb can be fitted to hide the LDR from view. The reed switches, S2 and S3 (and others if required), are glued to the inside walls of the box in positions which can easily be recognized from the outside, e.g. behind spots of a certain colour or a particular motif on the decorative paper. The box can be carried into the room by a “witch” and placed on a small table. The witch then dances round it, mumbling magic spells and waving her wand. A Fig.1. Circuit diagram for the Magic Bulb strong magnet concealed Everyday Practical Electronics, July 2006 EPE Tutorial Series TEACH-IN 2006 Part Nine – Bistable Investigation. Microprocessor systems. Data. Internal Architecture. Bus Systems. Interrupts. Input and Output. Programming. Microcontrollers. MIKE TOOLEY BA Our Teach-In 2006 series provides a broad-based introduction to electronics for the complete newcomer. The series also provides the more experienced reader with an opportunity to “brush up” on topics which may be less familiar. This month we shall be delving into the fascinating world of microprocessors. We begin, however, with a Practical Investigation based on the R-S bistable that we met last month. Practical Investigation 9.1 Objective: Following on from Part 8, to investigate the operation of a simple crosscoupled R-S bistable based on NOR gates. Components and materials: Plug-in breadboard; 9V DC power source (PP9 9V battery or AC mains adapter with a 9V 400mA output); 4001 14-pin DIL CMOS logic integrated circuit; red and green LEDs; resistors of 47kΩ (2 off) and 1kΩ (2 off); insulated wire links (various lengths); short lengths of black and red insulated solid wire. Circuit diagram: See Fig.9.1 Wiring diagram: See Fig.9.2 Procedure: The required breadboard wiring is shown in Table 9.1. 1. Connect the circuit as shown in Table 9.1 with the 4001 CMOS (quad two-input NOR gate) used for IC1. The wiring layout is also shown in Photo 9.1. 2. Ensure that both Link A and Link B are connected (this corresponds to an input state of SET = 0 and RESET = 0). Draw a table to show your results (similar to that shown in Fig.8.32 in Part 8), switch on (or connect the 9V supply) and note down the state of the two LEDs. Note that when the Red LED is illuminated this corresponds to Q = 1 and when not illuminated it indicates that Q = 0. Similarly, when the Green LED is illuminated this corresponds to /Q = 1 and when not illuminated it indicates that Q = 0. 3. Disconnect first link A (with link B in place) and then link B (with link A in place). In the first condition SET = 0 and RESET = 1 and in the second condition SET = 1 and RESET = 0. For each of these two conditions, observe the state of the LEDs and add the results to your table. 4. Next, replace link B and check Fig.9.1 Circuit diagram for Practical Investigation 9.1 42 that the R-S bistable remains in the SET condition. 5. Finally, remove both links (so that SET = 1 and RESET = 1), observe the result (which might be surprising!) and add this to your table. Conclusion: Verify that the circuit operates as expected and remains in the SET condition (step 4). Comment on the state of the outputs (Q and Q) when both the SET and RESET inputs are taken to logic 1. Why is this undesirable? Fig.9.2. Wiring diagram for Practical Investigation 9.1 Everyday Practical Electronics, July 2006 Table 9.1. Breadboard wiring for Practical Investigation 9.1 Step Connection, link or component From To 1 2 3 4 5 6 7 8 9 10 11 12 13 14 15 16 17 18 19 20 21 22 23 24 25 26 27 28 29 9V supply (negative) 9V supply (+9V) Red wire Black wire Link Link Link (Link A) Link (Link B) Link Link Link Link Link IC1 4001 IC1 (as above) IC1 (as above) IC1 (as above) R1 47kΩ R2 47kΩ R3 1kΩ R4 1kΩ D1 Red LED D1 (as above) D2 Green LED D2 (as above) Link Link Link Link Supply negative Supply positive Red terminal Black terminal –30 (top) J23 J11 J28 +11 +28 +17 H11 H22 Pin 1 Pin 7 Pin 8 Pin 14 D11 D28 +15 +25 anode(a) cathode(k) anode(a) cathode(k) I15 I20 G18 H19 Black terminal Red terminal +31 –31 –30 (bottom) –23 (bottom) –11 (bottom) –28 (bottom) A11 A28 A17 H17 H28 F17 F23 E23 E17 G11 G28 A15 G25 E15 F15 E25 F25 I19 I25 G20 H21 ɀ the address bus used to specify memory locations ɀ the data bus on which data is transferred between devices ɀ the control bus which provides timing and control signals throughout the system The number of individual lines present within the address bus and data bus depends upon the particular microprocessor employed. It’s important to remember that signals on all lines (no matter whether they are used for address, data, or control) can only exist in one of two basic states: logic 0 (low) or logic 1 (high). Data and addresses are represented by binary numbers (a sequence of 1s and 0s) that appear respectively on the data and address bus. Many general purpose microprocessors make use of an 8-bit data bus and a 16-bit address bus. The largest binary number that can appear on an 8-bit data bus corresponds to the condition when all eight lines are at logic 1. Therefore the largest value of data that can be present on the bus at any instant of time is equivalent to the binary number 11111111 (or 255). Similarly, the highest address that can appear on a 16-bit address bus is 1111111111111111 (or 65,535). The full range of data values and addresses for a simple microprocessor of this type is thus: Data: 00000000 to 11111111 Addresses: 0000000000000000 to 1111111111111111 Fig.9.3. Simplified block diagram of a microprocessor system ɀ a means of providing an input and output (I/O). For example, a keypad for input and a display for output. Photo 9.1. Wiring layout for Practical Microprocessor Systems Most of today’s complex electronic systems are based on the use of a complex device called a microprocessor or microcontroller. Such systems comprise hardware (one or more large-scale integrated circuits) that is controlled by software. If it is necessary to change the way that the system behaves it is usually the software – rather than the hardware – that is changed. The basic components of any microprocessor system are: ɀ a central processing unit (CPU) ɀ a memory, comprising both read/write and read only devices – commonly called RAM (random access memory) and ROM (read only memory) respectively In a microprocessor system (see Fig.9.7) the Investigation 9.1 functions of the CPU are provided by a single very large scale integrated (VLSI) microprocessor chip. This chip is equivalent to many thousands of individual transistors. Semiconductor devices are also used to provide the read/write and readonly memory. Strictly speaking, both types of memory permit “random access” since any item of data can be retrieved with equal ease regardless of its actual location within the memory. Despite this, the term RAM has become synonymous with semiconductor read/write memory. The basic components of the system (CPU, RAM, ROM and I/O) are linked together using a multiple-wire connecting system known as a bus. Three different buses are used in the system shown in Fig.9.3 (also see Photo 9.2), these are: Everyday Practical Electronics, July 2006 Check Point 9.1 A microprocessor bus is a multiple connecting system used to transfer data, addresses and control signals between the various parts of a microprocessor system, including the CPU, RAM, ROM and I/O. Data Representation Binary numbers – particularly large ones – are not very convenient. To make numbers easier to handle we often convert binary numbers to hexadecimal (base 16). This format is easier for mere humans to comprehend and offers the advantage over denary (base 10) in that it can be converted to and from binary with ease. The first sixteen numbers in binary, denary, and hexadecimal are shown in Table 9.2. A single hexadecimal character (in the range zero to F) is used to represent a group of four binary digits (bits). This group of four bits (or single hex character) is sometimes called a nibble. A byte of data comprises a group of eight bits. Thus a byte can be represented by just two hexadecimal (hex) characters. A group of 43 Note that, to avoid confusion about whether a number is hexadecimal or decimal, we often place a “$” symbol before a hexadecimal number or add an H (upper or lower case) to the end of the number. For example, 64 means decimal “sixtyfour”; whereas, $64 means “hexadecimal six-four,” which is equivalent to decimal 100. Similarly, 7FH means “7F’ hexadecimal which is equivalent to decimal 127. Photo 9.2. A typical microprocessor system showing CPU, RAM, ROM and I/O sixteen bits (a word) can be represented by four hex characters, thirty-two bits (a double word by eight hex. characters, and so on. The value of a byte expressed in binary can be easily converted to hex by arranging the bits in groups of four and converting each nibble (i.e. four byte group) into hexadecimal using the Table 9.2. Table 9.2. First 16 binary, decimal and hexadecimal values Binary (base 2) 0000 0001 0010 0011 0100 0101 0110 0111 1000 1001 1010 1011 1100 1101 1110 1111 Decimal (base 10) 0 1 2 3 4 5 6 7 8 9 10 11 12 13 14 15 Hexadecimal (base 16) 0 1 2 3 4 5 6 7 8 9 A B C D E F Example 9.1 Convert hexadecimal value B6 into a binary value. From Table 9.2, B = 1011 and 6 = 0110. Thus B6 in hexadecimal is equivalent to 10110110 in binary. Example 9.2 Convert binary value 11101001 to hexadecimal. From Table 9.2, 1110 = E and 1001 = 9. Thus 11101001 in binary is equivalent to E9 in hexadecimal. Check Point 9.2 Hexadecimal (base-16) numbers provide us with an easy way of representing data that is to be used by a microprocessor. Hexadecimal numbers can easily be converted to and from binary – remembering that one hexadecimal character is equivalent to four binary digits. 44 Data Types A byte of data can be stored at each address within the total memory space of a microprocessor system. Hence one byte can be stored at each of the 65,536 memory locations within a microprocessor system having a 16-bit address bus. Individual bits within a byte are numbered from 0 (least significant bit – positioned at the right) to 7 (most significant bit – positioned at the left). In the case of 16-bit words, the bits are numbered from 0 (least significant bit – rightmost) to 15 (most significant bit – leftmost). Negative (or signed) numbers can be represented using two’s complement notation where the leading (most significant) bit indicates the sign of the number (1 = negative, 0 = positive). The range of integer data values that can be represented as bytes, words and long words are shown in Table 9.3. Table 9.3. Range of integer data values that can be represented as bytes, words and long words Data type Bits Range of values Unsigned byte Signed byte Unsigned word Signed word 8 8 16 16 0 to 255 -128 to +127 0 to 65,535 -32,767 to +32,767 Data Storage The semiconductor ROM within a microprocessor system provides storage for the program code as well as any permanent data that requires storage (memory). All of this data is referred to as non-volatile because it remains intact when the power supply is disconnected. The semiconductor RAM within a microprocessor system provides storage for the transient data and variables that are used by programs. Part of the RAM is also used by the microprocessor as a temporary store for data whilst carrying out its normal processing tasks. It is important to note that any program or data stored in RAM will be lost when the power supply is switched off or disconnected. There are two exceptions to this: CMOS RAM that is kept alive by means of a small battery; this battery-backed memory is used to retain important data, such as the time and date. And secondly electrically erasable read only memory (EEPROM), which is used for a similar purpose. Note that, despite its name, EEPROM can also have data written to it. When expressing the amount of storage provided by a memory device we usually use Kilobytes (Kbyte). It is important to note that a Kilobyte of memory is actually 1,024 bytes (not 1,000 bytes). The reason for choosing the Kbyte rather than the kbyte (1,000 bytes) – note the use of upper and lower case “K” – is that 1,024 happens to be the nearest power of 2 (210 = 1,024). The capacity of a semiconductor ROM is usually specified in terms of an address range and the number of bits stored at each address. For example, 2K × 8 bits (capacity 2Kbytes), 4K × 8 bits (capacity 4Kbytes), and so on. The basic element of a semiconductor memory is known as a “cell”. Cells can be fabricated in one of two semiconductor technologies: MOS (metal oxide semiconductor) and bipolar. Bipolar memories are now rarely used even though they offer much faster access times. Their disadvantage is associated with power supply requirements (they need several voltage rails, both positive and negative, and use significantly more power than their MOS counterparts. Random Access Random access memories can be further divided into static and dynamic types. The important difference between the two types is that dynamic memories require periodic refreshing if they are not to lose their contents. While, in the normal course of events, this would be carried out whenever data was read and rewritten, this technique cannot be relied upon to refresh all of the dynamic memory space and steps must be taken to ensure that all dynamic memory cells are refreshed periodically. This function has to be integrated with the normal operation of the computer system or performed by a dedicated dynamic memory controller. Static memories do not need refreshing and can be relied upon to retain their memory until such time as new data is written or the power supply is interrupted (in which case all data is lost). The circuit of a typical bipolar static memory cell is shown in Fig.9.4. The transistors form an R-S bistable (see Part 8) that can be SET or RESET by means of a pulse applied to the appropriate emitter. The CELL SELECT line is used to identify the particular cell concerned. This type of cell uses emitter-coupled logic (ECL) and requires both negative and positive supply rails. Fig.9.4. Circuit diagram of a typical bipolar static memory cell Everyday Practical Electronics, July 2006 Microprocessors Fig.9.5. Circuit diagram of a typical MOS static memory cell The circuit of a typical MOS static memory cell is shown in Fig.9.5. This is also clearly recognizable as a bistable element. The CELL SELECT line is used to gate signals into and out of the memory cell. Note that, as for the bipolar cell, the SET and RESET lines are common to a number of cells. The circuit of a typical MOS dynamic memory cell is shown in Fig.9.6. In contrast to the previous types of cell this clearly does not use a bistable arrangement. Instead, a capacitor, C, is used as the storage element. The capacitor is in fact the input capacitance of an MOS transistor. This is charged or discharged according to the state of the INPUT, OUTPUT and CELL SELECT lines. The microprocessor central processing unit (CPU) forms the heart of any microprocessor or microcomputer system computer and, consequently, its operation is crucial to the entire system. The primary function of a microprocessor is that of fetching, decoding, and executing instructions resident in memory (either RAM or ROM). As such, the microprocessor must be able to transfer data from external memory into its own internal registers and vice versa. Furthermore, it must operate predictably, distinguishing, for example, between an operation contained within an instruction and any accompanying addresses of read/write memory locations. In addition, various system housekeeping tasks need to be performed including responding to interrupts from external devices. The main parts of a microprocessor CPU are: ɀ registers for temporary storage of addresses and data ɀ an arithmetic logic unit (ALU) that performs arithmetic and logic operations ɀ a means of controlling and timing operations within the system through the data bus. On the first part of each machine cycle, the instruction is fetched and decoded. The instruction is executed on the second (and subsequent) machine cycles. Each machine cycle takes a finite time (usually less than a microsecond) depending upon the frequency of the microprocessor’s clock (see later). Data Bus (D0 to D7) The external data bus provides a highway for data that links all of the system components (such as random access memory, read-only memory, and input/output devices) together. In an 8-bit system, there are eight data lines, labelled D0 (the least significant bit) to D7 (the most significant bit) and data is moved around in groups of eight bits, or bytes. Data Bus Buffer The data bus buffer is a temporary register through which bytes of data pass on their way into, and out of, the microprocessor. The buffer is thus referred to as bidirectional with data passing out of the microprocessor on a write operation and into the processor during a read operation. The direction of data transfer is determined by the control unit as it responds to each individual program instruction. OUTPUT Fig.9.6. Circuit diagram of a typical MOS dynamic memory cell Check Point 9.3 Digital data is stored in an array of individual memory cells. Each memory cell can store a 1 or 0. Static memories are made up from cells that will retain their contents indefinitely (as long as the power supply is present). Dynamic memories, on the other hand, comprise cells that require constant refreshing in order to retain their data. Questions 9.1 Q9.1. Convert 2A hexadecimal to binary. Q9.2. Convert 10011110 binary to hexadecimal. Q9.3. Which of the following numbers is the largest? (a) 10010 binary (b) 19 decimal. (c) 15 hexadecimal. Everyday Practical Electronics, July 2006 Fig.9.7. Simplified block schematic of a typical microprocessor Fig.9.7 shows the principal internal features of a typical 8-bit microprocessor. This is a very complex device so we will briefly explain each of these features in turn: Accumulator The accumulator functions as a source and destination register for many of the basic microprocessor operations. As a source register it contains the data that will be used in a particular operation whilst as a destination register it will be used to hold the result of a particular operation. The Accumulator (or A-register) features in a very large number of microprocessor operations, consequently more reference is made to this register than any others. Instruction Register The instruction register provides a temporary storage location in which the current microprocessor instruction is held whilst it is being decoded. Program instructions are passed into the microprocessor, one at time, Internal Data Bus The internal data bus is a high-speed data highway that links all of the microprocessor’s internal elements together. Data is constantly flowing backwards and forwards along the internal data bus lines. General Purpose Registers Many microprocessor operations (for example, adding two 8-bit numbers together) require the use of more than one register. There is also a requirement for temporarily storing the partial result of an operation whilst other operations take place. Both of these needs can be met by providing a number of general purpose registers. The use to which these registers are put is left mainly up to the programmer. Stack Pointer When the time comes to suspend a particular task in order to briefly attend to something else, most microprocessors make use of a region of external random access memory (RAM) known as a stack. When the 45 main program is interrupted, the microprocessor temporarily places in the stack the contents of its internal registers together with the address of the next instruction in the main program. When the interrupt has been attended to, the microprocessor recovers the data that has been stored temporarily in the stack together with the address of the next instruction within the main program. It is thus able to return to the main program exactly where it left off and with all the data preserved in its registers. The stack pointer is simply a register containing the address of the last used stack location. Program Counter Programs consist of a sequence of instructions that are executed by the microprocessor. These instructions are stored in external random access memory (RAM) or read-only memory (ROM). Instructions must be fetched and executed by the microprocessor in a strict sequence. By storing the address of the next instruction to be executed, the program counter allows the microprocessor to keep track of where it is within the program. The program counter is automatically incremented when each instruction is executed. Address Bus Buffer The address bus buffer is a temporary register through which addresses (in this case comprising 16-bits) pass on their way out of the microprocessor. In a simple microprocessor, the address buffer is unidirectional with addresses placed on the address bus during both read and write operations. The address bus lines are labelled A0 to A15, where A0 is the least-significant address bus line and A15 is the most significant address bus line. Note that a 16-bit address bus can be used to communicate with 65,536 individual memory locations. At each location a single byte of data is stored. Control Bus The control bus is a collection of signal lines that are both used to control the transfer of data around the system and also to interact with external devices. The control signals used by microprocessors tend to differ with different types, however the following are commonly found: READ: an output signal from the microprocessor that indicates that the current operation is a read operation WRITE: an output signal from the microprocessor that indicates that the current operation is a write operation RESET: a signal that resets the internal registers and initialises the program counter so that the program can be re-started from the beginning IRQ: an interrupt request from an external device attempting to gain the attention of the microprocessor (the request may be honoured or ignored according to the state of the microprocessor at the time that the interrupt request is received – see later). NMI: non-maskable interrupt (i.e. an interrupt signal that cannot be ignored by the microprocessor – see later). Address Bus (A0 to A15) The address bus provides a highway for addresses that links with all of the system components (such as random access memory, read-only memory, and input/output devices). In a system with a 16-bit address bus, there are sixteen address lines, labelled A0 (the least significant bit) to A15 (the most significant bit). 46 Instruction Decoder The instruction decoder is nothing more than an arrangement of logic gates that acts on the bits stored in the instruction register and determines which instruction is currently being referenced. The instruction decoder provides output signals for the microprocessor’s control unit. Control Unit The control unit is responsible for organising the orderly flow of data within the microprocessor as well as generating, and responding to, signals on the control bus. The control unit is also responsible for the timing of all data transfers. This process is synchronised using an internal or external clock signal (not shown in Fig.9.7). Arithmetic Logic Unit (ALU) As its name suggests, the ALU performs arithmetic and logic operations. The ALU has two inputs (in this case these are both 8-bits wide). One of these inputs is derived from the Accumulator whilst the other is taken from the internal data bus via a temporary register (not shown in Fig.9.7). The operations provided by the ALU usually include addition, subtraction, logical AND, logical OR, logical exclusive-OR, shift left, shift right, etc. The result of most ALU operations appears in the accumulator. Check Point 9.4 Microprocessors comprise a number of registers for temporary storage of addresses and data; an arithmetic logic unit (ALU) that performs arithmetic and logic operations; and a means of controlling and timing operations within the system. Flag Register (or Status Register) The result of an ALU operation is sometimes important in determining what subsequent action takes place. The flag register contains a number of individual bits that are set or reset according to the outcome of an ALU operation. These bits are referred to as flags. The following flags are available in most microprocessors: ZERO: the zero flag is set when the result of an ALU operation is zero (i.e. a byte value of 00000000) CARRY: the carry flag is set whenever the result of an ALU operation (such as addition) generates a carry bit (in other words, when the result cannot be contained within an 8-bit register) INTERRUPT: the interrupt flag indicates whether external interrupts are currently enabled or disabled. Clocks Fig.9.8. A typical quartz crystal controlled clock circuit and the clock signal waveform that it produces The clock used in a microprocessor system is simply an accurate and stable square wave generator. In most cases the frequency of the square wave generator is determined by a quartz crystal. A simple 4MHz square wave clock oscillator (together with the clock waveform that it produces) is shown in Fig.9.8. Note that one complete clock cycle is sometimes referred to as a “T-state”. Fig.9.9. External and internal clock arrangements Everyday Practical Electronics, July 2006 Clock frequencies from 1MHz, or lower, to even 40MHz for a basic microprocessor controller are common, and even to over 3GHz for the processors used in the latest Pentium-based personal computers. Microprocessors sometimes have an internal clock circuit in which case the quartz crystal (or other resonant device) is connected directly to pins on the microprocessor chip. In Fig.9.9a an external clock is shown connected to a microprocessor whilst in Fig.9.9b an internal clock oscillator is used. Microprocessor Operation The majority of operations performed by a microprocessor involve the movement of data. Indeed, the program code (a set of instructions stored in ROM or RAM) must itself be fetched from memory prior to execution. The microprocessor thus performs a continuous sequence of instruction fetch and execute cycles. The act of fetching an instruction code (or operand or data value) from memory involves a read operation whilst the act of moving data from the microprocessor to a memory location involves a write operation – see Fig.9.10. Each cycle of CPU operation is known as a machine cycle. Program instructions may require several machine cycles (typically between two and five). The first machine cycle in any cycle consists of an instruction fetch (the instruction code is read from the memory) and it is known as the M1 cycle. Subsequent cycles M2, M3, and so on, depend on the type of instruction that is being executed. This fetch-execute sequence is shown in Fig.9.11. Microprocessors determine the source of data (when it is being read) and the destination of data (when it is being written) by placing a unique address on the address bus. Fig.9.10. Microprocessor signals during (a) read and (b) write operations Everyday Practical Electronics, July 2006 Fig.9.11. A typical fetch-execute sequence The address at which the data is to be placed (during a write operation) or from which it is to be fetched (during a read operation) can either constitute part of the memory of the system (in which case it may be within ROM or RAM) or it can be considered to be associated with an input/output (I/O). Since the data bus is connected to a number of VLSI (very large scale integration) devices, an essential requirement of such chips (e.g., ROM or RAM) is that their data outputs should be capable of being isolated from the bus whenever necessary. These chips are fitted with select or enable inputs that are driven by address decoding logic (not shown in Fig.9.7). This logic ensures that ROM, RAM and I/O devices never simultaneously attempt to place data on the bus! The inputs of the address decoding logic are derived from one, or more, of the address bus lines. The address decoder effectively divides the available memory into blocks corresponding to a particular function (ROM, RAM, I/O, etc). Hence, where the processor is reading and writing to RAM, for example, the address decoding logic will ensure that only the RAM is selected whilst the ROM and I/O remain isolated from the data bus. Within the CPU, data is stored in several registers. Registers themselves can be thought of as a simple “pigeon-hole” arrangement that can store as many bits as there are holes available. Generally, these devices are can store groups of sixteen or thirty-two bits. Additionally, some registers may be configured as either one register of sixteen bits or two registers of thirtytwo bits. Some microprocessor registers are accessible to the programmer whereas others are used by the microprocessor itself. Registers may be classified as either general purpose or dedicated. In the latter case a particular function is associated with the register, such as holding the result of an operation or signalling the result of a comparison. The principal control and data signals Fig.9.12. Principal generated by a nal registers typical microprocessor (the Z80, of which there are many current derivatives) are shown (together with its internal registers) in Fig.9.12. Note that, whilst the data registers are 8bit registers (and so can hold eight bits of data) they can also be used “end-on” to store 16-bit data. Hence, if the B and C registers in Fig.9.12 respectively contain AF and C9 hexadecimal, the double-length register BC will contain 16-bit data, AFC9 hexadecimal. Programming Microprocessor programming is a vast subject and would require far more space than we have available in the whole of the Teach-In series. That said, it would be unfair to move on without mentioning the techniques used to program a microprocessor system. Software (consisting of a sequence of instructions that the microprocessor will recognise and execute) can be generated by various means and using various languages, as appropriate to the application and expertise of the programmer. The lowest level of language that the microprocessor can understand is often referred to as the machine code. This consists of a series of instructions and data coded in hexadecimal form. An improvement on machine code (at least as far as human beings are concerned!) is the use of a mnemonic-based language, known as “assembly language”. Z80 control and data signals and inter- 47 This isn’t too hard to learn and can be easily converted (using appropriate software) into the machine code that the microprocessor requires. A simple example of an assembly language program (written in Z80 assembly language) is shown in Fig.9.13. Note that the assembly language source code is shown in the upper window whilst the assembled code (in hexadecimal) is shown in the lower window. Note also how some brief comments have been added to the source code in order to explain the action of the program. These comments can be extremely useful – particularly in larger and more complex programs – when it comes to modifying or “debugging” a program! Unfortunately, programs written in assembly language will generally only work with a particular microprocessor family. A more “portable” solution is the use of a high-level language such as C or BASIC. These languages are relatively easy to learn and programs written in them can usually easily be transported from one type of microprocessor to another. The conversion process, from high-level language code to machine code is a task that is easily handled by a piece of software called a compiler. Fig.9.13. A simple Z80 assembly language program matter to transfer data into and out of the system in parallel form. This process is further simplified by using a Programmable Parallel I/O device which provides registers that can be used for the temporary storage Input and Output of data being transferred onto and out off The transfer of data within a microthe data bus. processor system involves moving groups Parallel data transfer is primarily suitof 8, 16 or 32-bits using the bus architeced to high-speed operation over relativeture that we described earlier. ly short distances, a typical example Consequently it is a relatively simple being the linking of a microcomputer to a local printer. There are, however, applications in which parallel data transfer is inappropriate, the most common example being data communication with other microcomputer systems. In such cases data must be sent serially (one bit after a n o t h e r ) rather than in parallel form. To transmit data in serial form, the parallel data from the microprocessor must be reorganized into a stream of bits. This task is greatly simplified by using an LSI interface device that contains a shift register that is loaded Fig.9.14. (a) Serial-to-parallel and (b) parallel-to-serial data with parallel conversion 48 data from the data bus. This data is then read out as a serial bit-stream by successive shifting. The reverse process, serial-to-parallel conversion, also uses a shift register. Here data is loaded in serial form, each bit shifting further into the register until it becomes full. Data is then placed simultaneously on the parallel output lines. The basic principles of parallel-toserial and serial-to-parallel data conversion are illustrated in Fig.9.14. Interrupts In most practical microprocessor systems we want to be able to interrupt the normal sequence of program flow in order to alert the microprocessor to the need to do something. We can do this with a signal known as an interrupt. There are two types of interrupt; maskable and non-maskable. When a non-maskable interrupt input is asserted, the processor must suspend execution of the current instruction and respond immediately to the interrupt. In the case of a maskable interrupt, the processor’s response will depend upon whether interrupts are currently enabled or disabled (when enabled, the CPU will suspend its current task and carry out the requisite interrupt service routine). The response to interrupts can be enabled or disabled by means of appropriate program instructions. In practice, interrupt signals may be generated from a number of sources and since each will require its own customised response a mechanism must be provided for identifying the source of the interrupt and calling the appropriate interrupt service routine. In order to assist in this task, the microprocessor may use an additional dedicated programmable interrupt controller chip. A Microcontroller System Finally, Fig.9.15 shows the arrangement of a typical microcontroller system. The sensed quantities (temperature, position, etc) are converted to corresponding electrical signals by means of a number of Everyday Practical Electronics, July 2006 Answers to Questions (Part 8) Q1. Q2. Q3. Q4. Q5. See Fig.9.17 See Fig.9.18 See Fig.9.19 (a) Y = /A + /B = /(A · B). Note that this gate arrangement performs the same logical function as a two-input NAND gate! (b) Y = /A · /B = /(A + B). Note that this gate arrangement performs the same logical function as a two-input NOR gate! See Fig.9.20 Fig.9.15. A typical microcontroller system sensors. The outputs from the sensors (in either digital or analogue form) are passed as input signals to the microcontroller. The microcontroller also accepts inputs from the user. These user-set options typically include target values for variables (such as desired room temperature), limit values (such as maximum shaft speed), or time constraints (such as “on” time and “off” time, delay time, etc). Questions 9.2 Q9.4. Fig.9.16 shows the block diagram of a microprocessor system. Identify each of the blocks. Answers to Questions (Part 9) Fig.9.17. See Answers to Questions Part 8 Q9.1 00101010 Q9.2 9E (158 decimal) Q9.3 c (21 decimal) (10010 binary is 18 decimal) Q9.4 P CPU; Q ROM; R RAM; S I/O; T address bus; U data bus; V control bus. Part 10 In Part 10, next month, we shall be developing our current microcontroller theme into the world of PIC chips and also introducing operational amplifiers (op.amps). In the meantime you might like to see how you get on with our on-line quiz for Part 9. You will find this at: www.miketooley.info/teach-in/quiz9.htm. Fig.9.18. See Answers to Questions Part 8 Fig.9.19. See Answers to Questions Part 8 Fig.9.16. See questions 9.2 Everyday Practical Electronics, July 2006 Fig.9.20. See Answers to Questions Part 8 49 EPE IS PLEASED TO BE ABLE TO OFFER YOU THESE ELECTRONICS CD-ROMS ELECTRONICS PROJECTS Electronic Projects is split into two main sections: Building Electronic Projects contains comprehensive information about the components, tools and techniques used in developing projects from initial concept through to final circuit board production. Extensive use is made of video presentations showing soldering and construction techniques. The second section contains a set of ten projects for students to build, ranging from simple sensor circuits through to power amplifiers. A shareware version of Matrix’s CADPACK schematic capture, circuit simulation and p.c.b. design software is included. The projects on the CD-ROM are: Logic Probe; Light, Heat and Moisture Sensor; NE555 Timer; Egg Timer; Dice Machine; Bike Alarm; Stereo Mixer; Power Amplifier; Sound Activated Switch; Reaction Tester. Full parts lists, schematics and p.c.b. layouts are included on the CD-ROM. Logic Probe testing ELECTRONIC CIRCUITS & COMPONENTS V2.0 N2 VERSIO Circuit simulation screen Provides an introduction to the principles and application of the most common types of electronic components and shows how they are used to form complete circuits. The virtual laboratories, worked examples and pre-designed circuits allow students to learn, experiment and check their understanding. Version 2 has been considerably expanded in almost every area following a review of major syllabuses (GCSE, GNVQ, A level and HNC). It also contains both European and American circuit symbols. Sections include: Fundamentals: units & multiples, electricity, electric circuits, alternating circuits. Passive Components: resistors, capacitors, inductors, transformers. Semiconductors: diodes, transistors, op.amps, logic gates. Passive Circuits. Active Circuits. The Parts Gallery will help students to recognise common electronic components and their corresponding symbols in circuit diagrams. Included in the Institutional Versions are multiple choice questions, exam style questions, fault finding virtual laboratories and investigations/worksheets. ANALOGUE ELECTRONICS Analogue Electronics is a complete learning resource for this most difficult branch of electronics. The CD-ROM includes a host of virtual laboratories, animations, diagrams, photographs and text as well as a SPICE electronic circuit simulator with over 50 pre-designed circuits. Sections on the CD-ROM include: Fundamentals – Analogue Signals (5 sections),Transistors (4 sections), Waveshaping Circuits (6 sections). Op.Amps – 17 sections covering everything from Symbols and Signal Connections to Differentiators. Amplifiers – Single Stage Amplifiers (8 sections), Multi-stage Amplifiers (3 sections). Filters – Passive Filters (10 sections), Phase Shifting Networks (4 sections), Active Filters (6 sections). Oscillators – 6 sections from Positive Feedback to Crystal Oscillators. Systems – 12 sections from Audio Pre-Amplifiers to 8-Bit ADC plus a gallery showing representative p.c.b. photos. ELECTRONICS CAD PACK PCB Layout Electronics CADPACK allows users to design complex circuit schematics, to view circuit animations using a unique SPICEbased simulation tool, and to design printed circuit boards. CADPACK is made up of three separate software modules. (These are restricted versions of the full Labcenter software.) ISIS Lite which provides full schematic drawing features including full control of drawing appearance, automatic wire routing, and over 6,000 parts. PROSPICE Lite (integrated into ISIS Lite) which uses unique animation to show the operation of any circuit with mouse-operated switches, pots. etc. The animation is compiled using a full mixed mode SPICE simulator. ARES Lite PCB layout software allows professional quality PCBs to be designed and includes advanced features such as 16-layer boards, SMT components, and an autorouter operating on user generated Net Lists. ROBOTICS & MECHATRONICS Complimentary output stage DIGITAL ELECTRONICS V2.0 N2 VERSIO Virtual laboratory – Traffic Lights Digital Electronics builds on the knowledge of logic gates covered in Electronic Circuits & Components (opposite), and takes users through the subject of digital electronics up to the operation and architecture of microprocessors. The virtual laboratories allow users to operate many circuits on screen. Covers binary and hexadecimal numbering systems, ASCII, basic logic gates, monostable action and circuits, and bistables – including JK and D-type flip-flops. Multiple gate circuits, equivalent logic functions and specialised logic functions. Introduces sequential logic including clocks and clock circuitry, counters, binary coded decimal and shift registers. A/D and D/A converters, traffic light controllers, memories and microprocessors – architecture, bus systems and their arithmetic logic units. Sections on Boolean Logic and Venn diagrams, displays and chip types have been expanded in Version 2 and new sections include shift registers, digital fault finding, programmable logic controllers, and microcontrollers and microprocessors. The Institutional versions now also include several types of assessment for supervisors, including worksheets, multiple choice tests, fault finding exercises and examination questions. Filter synthesis Analogue Filters is a complete course in designing active and passive filters that makes use of highly interactive virtual laboratories and simulations to explain how filters are designed. It is split into five chapters: Revision which provides underpinning knowledge required for those who need to design filters. Filter Basics which is a course in terminology and filter characterization, important classes of filter, filter order, filter impedance and impedance matching, and effects of different filter types. Advanced Theory which covers the use of filter tables, mathematics behind filter design, and an explanation of the design of active filters. Passive Filter Design which includes an expert system and filter synthesis tool for the design of low-pass, high-pass, band-pass, and band-stop Bessel, Butterworth and Chebyshev ladder filters. Active Filter Design which includes an expert system and filter synthesis tool for the design of low-pass, high-pass, band-pass, and band-stop Bessel, Butterworth and Chebyshev ANALOGUE FILTERS PRICES Prices for each of the CD-ROMs above are: (Order form on third page) Case study of the Milford Instruments Spider Robotics and Mechatronics is designed to enable hobbyists/students with little previous experience of electronics to design and build electromechanical systems. The CD-ROM deals with all aspects of robotics from the control systems used, the transducers available, motors/actuators and the circuits to drive them. Case study material (including the NASA Mars Rover, the Milford Spider and the Furby) is used to show how practical robotic systems are designed. The result is a highly stimulating resource that will make learning, and building robotics and mechatronic systems easier. The Institutional versions have additional worksheets and multiple choice questions. ɀ Interactive Virtual Laboratories ɀ Little previous knowledge required ɀ Mathematics is kept to a minimum and all calculations are explained ɀ Clear circuit simulations Hobbyist/Student ...................................................£45 inc VAT Institutional (Schools/HE/FE/Industry)..............£99 plus VAT Institutional 10 user (Network Licence) ..........£249 plus VAT Site Licence........................................................£499 plus VAT (UK and EU customers add VAT at 17.5% to “plus VAT’’ prices) Everyday Practical Electronics, July 2006 51 PICmicro TUTORIALS AND PROGRAMMING HARDWARE VERSION 3 PICmicro MCU DEVELOPMENT BOARD Suitable for use with the three software packages listed below. This flexible development board allows students to learn both how to program PICmicro microcontrollers as well as program a range of 8, 18, 28 and 40-pin devices from the 12, 16 and 18 series PICmicro ranges. For experienced programmers all programming software is included in the PPP utility that comes with the development board. For those who want to learn, choose one or all of the packages below to use with the Development Board. Makes it easier to develop PICmicro projects Supports low cost Flash-programmable PICmicro devices Fully featured integrated displays – 16 individual l.e.d.s, quad 7-segment display and alphanumeric l.c.d. display Supports PICmicro microcontrollers with A/D converters Fully protected expansion bus for project work USB programmable Can be powered by USB (no power supply required) SPE OFFCIAL FRE ER E FL OW ( COD hobb y E when ist/studen V2 t) you b Deve uy a lopm ent for a limite Board – d only time £158 including VAT and postage supplied with USB cable and programming software SOFTWARE Suitable for use with the Development Board shown above. ASSEMBLY FOR PICmicro V3 (Formerly PICtutor) Assembly for PICmicro microcontrollers V3.0 (previously known as PICtutor) by John Becker contains a complete course in programming the PIC16F84 PICmicro microcontroller from Arizona Microchip. It starts with fundamental concepts and extends up to complex programs including watchdog timers, interrupts and sleep modes. The CD makes use of the latest simulation techniques which provide a superb tool for learning: the Virtual PICmicro microcontroller. This is a simulation tool that allows users to write and execute MPASM assembler code for the PIC16F84 microcontroller on-screen. Using this you can actually see what happens inside the PICmicro MCU as each instruction is executed which enhances understanding. Comprehensive instruction through 45 tutorial sections Includes Vlab, a Virtual PICmicro microcontroller: a fully functioning simulator Tests, exercises and projects covering a wide range of PICmicro MCU applications Includes MPLAB assembler Visual representation of a PICmicro showing architecture and functions Expert system for code entry helps first time users Shows data flow and fetch execute cycle and has challenges (washing machine, lift, crossroads etc.) Imports MPASM files. ‘C’ FOR PICmicro VERSION 2 The C for PICmicro microcontrollers CDROM is designed for students and professionals who need to learn how to program embedded microcontrollers in C. The CD contains a course as well as all the software tools needed to create Hex code for a wide range of PICmicro devices – including a full C compiler for a wide range of PICmicro devices. Although the course focuses on the use of the PICmicro microcontrollers, this CDROM will provide a good grounding in C programming for any microcontroller. Complete course in C as well as C programming for PICmicro microcontrollers Highly interactive course Virtual C PICmicro improves understanding Includes a C compiler for a wide range of PICmicro devices Includes full Integrated Development Environment Includes MPLAB software Compatible with most PICmicro programmers Includes a compiler for all the PICmicro devices. FLOWCODE FOR PICmicro V2 Flowcode is a very high level language programming system for PICmicro microcontrollers based on flowcharts. Flowcode allows you to design and simulate complex robotics and control systems in a matter of minutes. Flowcode is a powerful language that uses macros to facilitate the control of complex devices like 7-segment displays, motor controllers and l.c.d. displays. The use of macros allows you to control these electronic devices without getting bogged down in understanding the programming involved. Flowcode produces MPASM code which is compatible with virtually all PICmicro programmers. When used in conjunction with the Version 2 development board this provides a seamless solution that allows you to program chips in minutes. Requires no programming experience Allows complex PICmicro applications to be designed quickly Uses international standard flow chart symbols (ISO5807) Full on-screen simulation allows debugging and speeds up the development process Facilitates learning via a full suite of demonstration tutorials Produces ASM code for a range of 18, 28 and 40-pin devices Professional versions include virtual systems (burglar alarm, buggy and maze, plus RS232, IrDa etc.). Minimum system requirements for these items: Pentium PC running Windows 98, NT, 2000, ME, XP; CD-ROM drive; 64MB RAM; 10MB hard disk space. PRICES Prices for each of the CD-ROMs above are: (Order form on next page) Hobbyist/Student Flowcode V2 Hobbyist/Student InstItutional (Schools/HE/FE/Industry) Flowcode Professional Institutional/Professional 10 user (Network Licence) Site Licence £45 inc VAT £57 inc VAT £99 plus VAT £99 plus VAT £300 plus VAT £599 plus VAT (UK and EU customers add VAT at 17.5% to “plus VAT’’ prices) 52 Everyday Practical Electronics, July 2006 TEACH-IN 2000 – LEARN ELECTRONICS WITH EPE EPE ’s own Teach-In CD-ROM, contains the full 12-part Teach-In 2000 series by John Becker in PDF form plus the TeachIn interactive software (Win 95, 98, ME and above) covering all aspects of the series. We have also added Alan Winstanley’s highly acclaimed Basic Soldering Guide which is fully illustrated and which also includes Desoldering. The Teach-In series covers: Colour Codes and Resistors, Capacitors, Potentiometers, Sensor Resistors, Ohm’s Law, Diodes and L.E.D.s, Waveforms, Frequency and Time, Logic Gates, Binary and Hex Logic, Op.amps, Comparators, Mixers, Audio Sine wave relationship values and Sensor Amplifiers, Transistors, Transformers and Rectifiers, Voltage Regulation, Integration, Differentiation, 7-segment Displays, L.C.D.s, Digital-to-Analogue. Each part has an associated practical section and the series includes a simple PC interface (Win 95, 98, ME ONLY) so you can use your PC as a basic oscilloscope with the various circuits. A hands-on approach to electronics with numerous breadboard circuits to try out. FREE TWO BOOKLETS PLUS CD-ROM WITH TEACH-IN 2000 £12.45 including VAT and postage. Requires Adobe Acrobat (available free from the Internet – www.adobe.com/acrobat). FREE WITH EACH TEACH-IN CD-ROM – Understanding Active Components booklet, Indentifying Electronic Components booklet and The Best Of Circuit Surgery CDROM. NEW PROJECT DESIGN WITH CROCODILE TECHNOLOGY An Interactive Guide to Circuit Design An interactive CD-ROM to guide you through the process of circuit design. Choose from an extensive range of input, process and output modules, including CMOS Logic, Op-Amps, PIC/PICAXE, Remote Control Modules (IR and Radio), Transistors, Thyristors, Relays and much more. Click Data for a complete guide to the pin layouts of i.c.s, transistors etc. Click More Information Ove r 15 for detailed background information with many animated diagrams. Over 6 0 pages 00 ima Nearly all the circuits can be instantly simulated in Crocodile Technology* (not ges included on the CD-ROM) and you can customise the designs as required. WHAT’S INCLUDED Light Modules, Temperature Modules, Sound Modules, Moisture Modules, Switch Modules, Astables including 555, Remote Control (IR & Radio), Transistor Amplifiers, Thyristor, Relay, Op-Amp Modules, Logic Modules, 555 Timer, PIC/PICAXE, Output Devices, Transistor Drivers, Relay Motor Direction & Speed Control, 7 Segment Displays. Data sections with pinouts etc., Example Projects, Full Search Facility, Further Background Information and Animated Diagrams. Runs in Microsoft Internet Explorer *All circuits can be viewed, but can only be simulated if your computer has Crocodile Technoloy version 410 or later. A free trial version of Crocodile Technology can be downloaded from: www.crocodile-clips.com. Animated diagrams run without Crocodile Technology. Single User £39.00 inc. VAT. Multiple Educational Users (under 500 students) £59.00 plus VAT. Over 500 students £79.00 plus VAT. (UK and EU customers add VAT at 17·5% to “plus VAT’’ prices) DIGITAL WORKS 3.0 Counter project Digital Works Version 3.0 is a graphical design tool that enables you to construct digital logic circuits and analyze their behaviour. It is so simple to use that it will take you less than 10 minutes to make your first digital design. It is so powerful that you will never outgrow its capability Software for simulating digital logic circuits Create your own macros – highly scalable Create your own circuits, components, and i.c.s Easy-to-use digital interface Animation brings circuits to life Vast library of logic macros and 74 series i.c.s with data sheets Powerful tool for designing and learning. Hobbyist/Student £45 inc. VAT. Institutional £99 plus VAT. Institutional 10 user £249 plus VAT. Site Licence £599 plus VAT. ELECTRONIC COMPONENTS PHOTOS A high quality selection of over 200 JPG images of electronic components. This selection of high resolution photos can be used to enhance projects and presentations or to help with training and educational material. They are royalty free for use in commercial or personal printed projects, and can also be used royalty free in books, catalogues, magazine articles as well as worldwide web pages (subject to restrictions – see licence for full details). Also contains a FREE 30-day evaluation of Paint Shop Pro 6 – Paint Shop Pro image editing tips and on-line help included! Price £19.95 inc. VAT Minimum system requirements for these CD-ROMs: Pentium PC, CD-ROM drive, 32MB RAM, 10MB hard disk space. Windows 95/98/NT/2000/ME/XP, mouse, sound card, web browser. CD-ROM ORDER FORM Please send me: Electronic Projects Electronic Circuits & Components V2.0 Analogue Electronics Digital Electronics V2.0 Analogue Filters Electronics CAD Pack Robotics & Mechatronics Assembly for PICmicro V3 ‘C’ for PICmicro V2 Flowcode V2 for PICmicro Digital Works 3.0 Version required: Hobbyist/Student Institutional Institutional/Professional 10 user Site licence ORDERING ALL PRICES INCLUDE UK POSTAGE Student/Single User/Standard Version price includes postage to most countries in the world EU residents outside the UK add £5 for airmail postage per order PICmicro Development Board V3 (hardware) Teach-In 2000 + FREE BOOK Electronic Components Photos Project Design – Single User Project Design – Multiple User (under 500 students) Project Design – Multiple User (over 500 students) } Note: The software on each version is the same, only the licence for use varies. Full name: . . . . . . . . . . . . . . . . . . . . . . . . . . . . . . . . . . . . . . . . . . . . . . . . . . . . . . . . . . . . . . . . . . . . . . . . . Address: . . . . . . . . . . . . . . . . . . . . . . . . . . . . . . . . . . . . . . . . . . . . . . . . . . . . . . . . . . . . . . . . . . . . . . . . . . . . . . . . . . . . . . . . . . . . . . . . . . . . . . . .Post code: . . . . . . . . . . . . . . . . .Tel. No: . . . . . . . . . . . . . . . . . . . . . Signature: . . . . . . . . . . . . . . . . . . . . . . . . . . . . . . . . . . . . . . . . . . . . . . . . . . . . . . . . . . . . . . . . . . . . . . . . . . . I enclose cheque/PO in £ sterling payable to WIMBORNE PUBLISHING LTD for £ Please charge my Visa/Mastercard/Amex/Diners Club/Switch: £ Valid From: . . . . . . . . . . . . . . . . . . . . .Card expiry date: . . . . . . . . . . . . . . . . . . . . . . . . . . . . . . Card No: . . . . . . . . . . . . . . . . . . . . . . . . . . . . . . . . . . . . . . . . . . . . . . . . . . . . . Switch Issue No. . . . . . . . . . Card Security Code . . . . . . . . . . (The last 3 digits on or just under the signature strip) Everyday Practical Electronics, July 2006 Institutional, Multiple User and Deluxe Versions – overseas readers add £5 to the basic price of each order for airmail postage (do not add VAT unless you live in an EU (European Union) country, then add 17½% VAT or provide your official VAT registration number). Send your order to: Direct Book Service Wimborne Publishing Ltd 408 Wimborne Road East Ferndown, Dorset BH22 9ND To order by phone ring 01202 873872. Fax: 01202 874562 Goods are normally sent within seven days E-mail: [email protected] Online shop: www.epemag.wimborne.co.uk/shopdoor.htm 53 Last month, we gave the circuit details for our Digital Instrument Display and showed you how to build it. This month, we describe how to connect different sensors to the unit and give the calibration details. Digital Instrument Display For Cars Pt.2: By JOHN CLARKE T he typical sensor and meter connections that are found a vehicle are shown in Fig.4. Generally, the sensor is grounded and the existing analogue meter connects in series with this to a regulated supply. The other possible configuration is when the meter itself is grounded and the sensor connects to the regulated supply instead. In either case, you can connect to the junction of the sensor and the meter (marked with an ‘x’) to obtain a signal to drive the Digital Instrument Display. Alternatively, the sensor can be rewired as shown in Fig.5, using a fixed resistor (R1) to replace the meter. Note that R1 can be installed on the microcontroller board. It is important to note that the Digital Instrument Display is designed to accept a signal voltage at its input which is within a certain range. So you will 54 need to make some measurements to check whether the voltage range from the sensor is suitable. If the signal voltage is outside the limits, it can be tailored using several adjustments at the input to make it suit. The voltage limits for the Digital Instrument Displays input are as follows: (1) with R3 out of circuit, the unit can be used with voltages ranging from 0·5 to 4·5V. (2) with R3 in circuit and VR1 adjusted so that the unit can read down to 0V, the Digital Instrument display can measure up to 2·7V when VR2 is fully clockwise (250kΩ) and up to 3·4V when VR2 is fully anticlockwise (0Ω). Attenuating the input voltage The value of R1 (see Fig.5) needs to be selected so that the voltage across the sensor remains within the allowable range. Typically, R1 would be a 330Ω (0·25W) resistor and the circuit would be configured with VR2 fully anticlockwise, R3 in circuit and R2 omitted. However, if the sensor voltage goes above 2·7V, you can adjust VR2 so that signal voltages up to 3·4V can be monitored. Higher input voltages will need to be attenuated by fitting resistor R2. R2 can be calculated if the maximum input voltage (Vin max.) to be applied to the input is known. The circuit for the attenuator is shown in Fig.6. If VR2 is set at its mid-position, the value for R2 = 30kΩ/(Vin max. - 3). For example if the maximum input voltage is 8V, R2 will be 30kΩ/5 or 6kΩ. A 5·6kΩ resistor would be suitable. VR2 is then used to adjust the range of the signal voltage that can be applied to the circuit. Trimpot VR1 will require adjustment if resistor R3 is installed. Also, Everyday Practical Electronics, July 2006 Fig.4: typical sensor and meter connections as found in a vehicle. Fig.6: resistor R2 is necessary only if the signal voltage (ie, from the sensor) goes above 3·4V. Its value is calculated as described in the text. this adjustment will need to be redone if VR2 is altered. In practice, VR1 is adjusted by connecting the input to the Digital Instrument Display to 0V and selecting the input mode by pressing the Mode switch four times (ie, four times from the normal display posi tion mode). Note, however, that trimpot VR1 is NOT adjusted for a display reading of 0 (if it does show 0, then trimpot VR1 is too far clockwise). Instead, you have to adjust VR1 so that the display shows a reading between about 97 and 110. Fig.7 shows how to use the Digital Instrument Display with an LM335 temperature sensor. Typically, the out put from the sensor varies by 10mV/°C, with the output at 2·73V at 0°C. Calibration We have already described how the calibration modes are accessed by pressing the Mode switch. As previ ously stated, calibration is performed Everyday Practical Electronics, July 2006 Fig.7: how to use the Digital Instrument Display with an LM335 temperature sensor (see text). at two different points and the instru ment then calculates the readings for the remaining input voltages. Before starting calibration, you must first decide on the display readings that are required at these two points. For example, for a temperature gauge, you might select 0°C and 100°C for the two calibration points. Alternatively, for a fuel gauge, you could calibrate the unit at 10 litres and 50 litres. These values are then entered as the first and second calibration numbers. Fig.5: R1 needs to be selected so that the voltage across the sensor remains within the allowable range. Typically, R1 would be a 330Ω (0·25W) resistor and the circuit would be configured with VR2 fully anticlockwise, R3 in circuit and R2 omitted. Fig.8: a 1kΩ trimpot connected between the +5V rail and ground can be used to set input voltages to calibrate the unit. Note that the first calibration number must correspond to the lower of the two voltages applied to the instru ment during calibration. So, taking our first example, if the sensor gives a lower signal voltage at 0°C than at 100°C, then the 0 is entered into the first calibration position and the 100 is entered into the second calibration position. Alternatively, if the sensor gives a lower voltage at 100°C compared to that at 0°C, the 100 must be entered into the Installing The Unit In A Vehicle Use automotive cable and connectors when installing the Digital Instrument Display into a vehicle. The +12V supply connection is derived via the ignition switch and a suitable connection point will usually be found inside the fusebox. Be sure to choose the fused side of the supply rail, so that the existing fuse is in series with the unit. The ground connection can be made by connecting a lead to the chassis via an eyelet and self-tapping screw. Similarly, use automotive cable to connect to the chosen vehicle sensor or sender unit. 55 Fig.9: here’s how to use the alarm output: (A) low current piezo siren; (B) driving an external 5V relay; and (C) driving an external 12V relay. Note that in (C), the alarm sense must be reversed (during calibration) so that a high alarm output drives the relay (see text). first calibration position and the 0 into the second calibration position. The same applies for a fuel gauge or oil pressure gauge – ie, use the figure that gives the lowest signal voltage in the first calibration position and the figure that gives the highest signal voltage in the second position. Calibration signals In order to calibrate the unit, you need to feed in a signal voltage that’s the same as that provided by the sensor at each calibration point. To do this, you can either use the actual sensor itself or you can use a 1kΩ trimpot connected to the input as shown in Fig.8. As mentioned before, the two calibration positions are selected using the Mode switch. If the first calibration position is to be calibrated, apply the calibration voltage, then select this 56 position by pressing the Mode switch once after the “normal” mode. Now wait for several seconds for the voltage at the input to be measured by the Digital Instrument Display. Now press the Up switch and then the Down switch, so that the value is the same as before. This needs to be done as calibration can only take place when the calibration value is changed. Simply selecting the calibration value with the Mode switch will not calibrate the Digital Instrument Display. The second calibration voltage is then applied and the Mode switch pressed again to show the second calibration number. Wait a few seconds, then press the Up and Down switches to calibrate this value. Note that there is no need to feed in both calibration values at the same time – calibration can be done for either the first or second position at any time (even weeks apart if that’s more convenient). In fact, if you are calibrating the unit for a fuel sensor, the best approach is to calibrate it for one value when the tank is full and then wait until the tank is almost empty to feed in the other calibration number. Alternatively, you can do this the other way around – ie, feed in one calibration number when the tank is empty, then fill up and feed in the other calibration number. Note that the “normal” readings will not be correct until both calibration values have been entered. Checking signal levels It’s important to check that the voltages applied to the Digital Instrument Display are not beyond its range. This can be done by pressing the Mode switch four times from its normal display mode to select the input reading mode. The display should show a value between about 100 and 940. Values much below 100 will go to “0” and values much above 940 will show “FUL” on the display. A “0” or “FUL” indicates that the voltage applied to the Digital Instrument Display is out of range and the voltage will need to be altered as previously described using R1, R2, VR1 and VR2. Measuring sensor voltages Calibration of the instrument with a fuel or oil pressure sensor can initially be done by measuring the voltage across the sensor in its standard form when connected to the original analogue meter. You will need to connect your multimeter so that the measurement can be made over the full range of outputs from the sensor during normal running of the car. That way, you will gain a good idea of the voltages that are produced by the sensor. During this time, record two voltages that correspond to two particular markings on the meter. The further apart the voltages are, the more accurate the calculation for other values will be. Be sure to check the voltages obtained during this process against the allowable limits. You can attenuate the level using R2 if the voltage range from the sensor is too great. Similarly, if the voltage goes below 0.5V, you will need to install R3 and then adjust VR1 as detailed above. You can then calibrate the instrument using the voltages found by measurement and by using a 1kΩ trimpot connected as shown in Fig.8. That done, disconnect the car instrument from its sensor and measure the instrument’s resistance to determine the value of R1. It’s then just a matter of installing R1 on the microcontroller board, as shown in Fig.5. Temp. sensor calibration Calibrating the unit for use with a temperature sensor can be done at 0°C and at 100°C. The 0°C calibration is done using freshwater ice which is stirred in a small amount of cold fresh water. Stir the solution with the sensor immersed in it to ensure it reaches the 0°C of the water/ice solution before entering “0” for the first calibration number. Note that if you connect a multi meter across the sensor, it will stop changing value when it reaches 0°C – ie, it will reach either a minimum or maximum output. By contrast, the 100°C calibration is done by immersing the sensor in boiling fresh water. Again ensure that the sensor output has stabilised in the boiling water by monitoring its output voltage before entering in the calibration number. Just remember that the calibration number corresponding to the lowest sensor voltage goes in the first calibration position. So if the sensor voltage Everyday Practical Electronics, July 2006 571 Fig.10: here are the full-size patterns for the two PC boards, together with the full-size front-panel artwork which can be used as a drilling template. Check your PC boards carefully for defects before installing any parts. 572 at 0°C is lower than at 100°C, then “0” goes in the first calibration position and vice versa. Once calibrated the instrument will display values based on a calculation that assumes a straight line (linear) relationship between the two calibration points. It will also calculate the values outside the two calibration points, again assuming a linear relationship. For example, when connected to a temperature sensor, the display will show temperatures below 0°C when the sensor is colder than this and also above 100°C if the sensor is hotter than this value. In fact, the display can show values between -99 and 999 but, in practice, may be restricted to a range that’s less than this, depending on the signal voltages applied to the unit and the voltage excursion of the sensor. Using the alarm output The alarm is set to the required value by first pressing the Mode switch three times from the “normal” mode position. You then set the value using the Up and Down switches and select the sense as described earlier. The latter determines whether the alarm Everyday Practical Electronics, July 2006 Reproduced by arrangement with SILICON CHIP magazine 2006. www.siliconchip.com.au activates as it goes above or below the calibrated value. The alarm output goes low under alarm conditions and this lights the alarm decimal point in DISP3. In addition, a low-current piezo siren could be connected between the +5V supply and the alarm output if an audible alarm is required – see Fig.9(a). External relay Fig.9(b) shows how to connect an external relay to the alarm output. You need to build up a small circuit consisting of a 10kΩ resistor, a BC327 PNP transistor and a diode. The relay needs to be a 5V or 6V type since it is powered from a 5V supply. Alternatively, the circuit shown at Fig.9(c) can be built. This circuit can drive a 12V relay but note that the alarm sense will have to be reversed (ie, during calibration), so that a high alarm output drives the relay rather than the normal low output level. In addition, you will have to delete the visual alarm indication, since this will no longer be valid. This simply involves removing resistor R6 to disable the decimal point indication in display DISP3. EPE 57 Radio Bygones The leading magazine for vintage radio enthusiasts Now Also Available to BUY ONLINE www.radiobygones.com Log on, pay by credit card and download the magazine to your PC ARTICLES on restoration and repair, history, circuit techniques, personalities, reminiscences and just plain ONLY $9.99 (US dollars) FOR 6 ISSUES nostalgia – you’ll find them all. Plus features on museums and private collections and a fullA free issue is colour photo-feature in every issue. available online IT’S MOSTLY about valves, of course, but ‘solid-state’ – whether of the coherer and spark-gap variety or early transistors – also has a place. FROM THE DAYS of Maxwell, Hertz, Lodge and Marconi to what was the state-of-the-art just a few short years ago . . . THERE IS ALSO a selection of free readers' For Sale and Wanted advertisements in every issue. Radio Bygones covers it all! THE MAGAZINE is published six times a year, and is only available by postal subscription. It is not available at newsagents. TO TAKE OUT a subscription, or to request a sample copy, please complete the form below and return it to: RADIO BYGONES, Wimborne Publishing Ltd, 408 Wimborne Road East, Ferndown, Dorset BH22 9ND. Tel: 01202 873872. Fax: 01202 874562. Web sites: www.radiobygones.co.uk www.radiobygones.com RADIO BYGONES ORDER FORM A SAMPLE COPY of Radio Bygones . . . . . . . . . . . .£3.75 (Add 75p for overseas Airmail postage) SUBSCRIPTIONS (post paid): 1 YEAR 2 YEAR UNITED KINGDOM £21.00 £40.00 REST OF EUROPE (AIRMAIL) £23.50 £45.00 REST OF THE WORLD (AIRMAIL) £29.00 £56.00 o Yes, I would like a sample copy for £3.75 My card number is: ........................................................... Please print clearly, and check that you have the number correct The card is valid from: . . . . . . . . . . .To: (Exp. date) . . . . . . . . . Maestro Issue No: . . . . . . . . . .Card Security Code . . . . . . . . . . (the last 3 digits on the signature strip) My name is . . . . . . . . . . . . . . . . . . . . . . . . . . . . . . . . . . . . . . . . . . . (A free issue is available for download from www.radiobygones.com) o Yes, I would like to take out a subscription for: o One year (6 issues) o Two years (12 issues) o I enclose a cheque/Eurocheque/PO for £ . . . . . . . . My address . . . . . . . . . . . . . . . . . . . . . . . . . . . . . . . . . . . . . . . . . . . .................................................... Post Code/Zip . . . . . . . . . . . . . .Tel . . . . . . . . . . . . . . . . . . . . . . . payable to Wimborne Publishing Ltd o Please debit my Visa/Mastercard/Switch/Maestro card Signed ............................................. If you do not wish to cut your issue, send a letter or a copy of this form. 58 Everyday Practical Electronics, July 2006 UK readers you can SAVE 55p on every issue of EPE How would you like to pay £2.75 instead of £3.30 for your copy of EPE? Well you can – just take out a one year subscription and save 55p an issue, or £6.60 over the year You can even save over 75p an issue if you subscribe for two years – a total saving of £18.20 Overseas rates also represent exceptional value You also: ɀ Avoid any cover price increase for the duration of your subscription ɀ Get your magazine delivered to your door each month ɀ Ensure your copy, even if the newsagents sell out Order by phone or fax with a credit card or by post with a cheque or postal order, or buy on-line from www.epemag.co.uk (click on “Subscribe Now”) EPE SUBSCRIPTION PRICES Subscriptions for delivery direct to any address in the UK: 6 months £17.50, 12 months £33, two years £61; Overseas: 6 months £20.50 standard air service or £29.50 express airmail, 12 months £39 standard air service or £57 express airmail, 24 months £73 standard air service or £109 express airmail. Cheques or bank drafts (in £ sterling only) payable to Everyday Practical Electronics and sent to EPE Subs. Dept., Wimborne Publishing Ltd., 408 Wimborne Road East, Ferndown, Dorset BH22 9ND. Tel: 01202 873872. Fax: 01202 874562. Email: [email protected]. Also via the Web at http://www.epemag.co.uk. Subscriptions start with the next available issue. We accept MasterCard, Amex, Diners Club, Maestro or Visa. (For past issues see the Back Issues page.) SUBSCRIPTION ORDER FORM 6 Months: UK £17.50, Overseas £20.50 (standard air service), £29.50 (express airmail) 1 Year: UK £33.00, Overseas £39.00 (standard air service) £57 (express airmail) 2 Years: UK £61.00, Overseas £73.00 (standard air service) £109 (express airmail) To: Everyday Practical Electronics, Wimborne Publishing Ltd., 408 Wimborne Road East, Ferndown, Dorset BH22 9ND Tel: 01202 873872 Fax: 01202 874562 E-mail: [email protected] ONLINE SUBSCRIPTIONS I enclose payment of £ ........... (cheque/PO in £ sterling only), payable to Everyday Practical Electronics Online subscriptions, for downloading the magazine via the Internet, $15.99US (approx. £9.50) for one year available from www.epemag.com. My card number is: ....................................................................... USA/CANADA SUBSCRIPTIONS To subscribe to EPE from the USA or Canada please telephone Express Mag toll free on 1877 363-1310 and have your credit card details ready. Or fax (514) 355 3332 or write to Express Mag, PO Box 2769, Plattsburgh, NY 12901-0239 or Express Mag, 8155 Larrey Street, Anjou, Quebec, H1J 2L5. Email address: [email protected]. Web site: www.expressmag.com. USA price $60(US) per annum, Canada price $97(Can) per annum – 12 issues per year. Everyday Practical Electronics, periodicals pending, ISSN 0262 3617 is published twelve times a year by Wimborne Publishing Ltd., USA agent USACAN at 1320 Route 9, Champlain, NY 12919. Subscription price in US $60(US) per annum. Periodicals postage paid at Champlain NY and at additional mailing offices. POSTMASTER: Send USA and Canada address changes to Everyday Practical Electronics, c/o Express Mag., PO Box 2769, Plattsburgh, NY, USA 12901-0239. 60 Please print clearly, and check that you have the number correct Signature ......................................................................................... Card Security Code .................. (The last 3 digits on or just under the signature strip) Card Ex. Date ..................................... Maestro Issue No. .............. Name ............................................................................................... Address ........................................................................................... Post code ................................. Tel. .............................................. Subscriptions can only start with the next available issue. Everyday Practical Electronics, July 2006 Regular Clinic Circuit Surgery Ian Bell Schmitt Trigger Circuits HATZONE user Scott2734 posted the C following question recently. “In another thread I asked about breaking a beam between an IR emitter and detector, and running the output through a transistor to a PIC pin. I got that part working, but I get a slow increase or decrease in voltage, or it will hang around one voltage on the lower half without cutting all the way off. I was wondering if anyone knows of a way to have the output from the transistor either on or off all the way without any floating voltages?” This has been a challenge to me because as you know, if you move something inbetween the beam slowly, the voltage goes up slowly, and vise versa. I also built an op amp circuit that acts the same way. Of course that's the way it is supposed to act. Any help would be thankfully received." Experienced contributors pointed Scott in the correct direction – use of a Schmitt trigger circuit. We will a look at this in more depth this month and discuss the selection of component values for the op amp Schmitt trigger circuit. is shown in Fig.1 – it is a non-inverting op amp amplifier. Problems There are a couple of problems with this approach. Firstly, the output from the sensor may take any value, so if it is connected directly to a digital input (either directly or after amplification) it may sit within the logic input's indeterminate voltage range. For more details on the voltage characteristics of basic logic inputs see Part 8 of Mike Tooley's Teach-In 2006 series last month. Intermediate level inputs may result in unpredictable behaviour from digital chips and undesirable effects such as increased power consumption. Any input to which a continuously varying analogue signal is connected should be capable of handling such a signal. A second potential problem is that the logic may switch states many times as a noisy, slowly changing input crosses the threshold. This is often undesirable, for example if the number of threshold-crossings is to be counted. Fig.2 illustrates this problem. The multiple-switching problem may be overcome by using two thresholds, e.g. VTH and VTL. The difference between VTH VIN VTH VTL Switching Requirement It is a common requirement to take the signal from a sensor, determine when that signal crosses a certain threshold level and switch a digital value cleanly between 0 and 1 to indicate above or below the threshold. A logic gate may do this if the required threshold corresponds to one of the logic levels, more generally an analogue comparator with detect if an input signal is above or below a threshold voltage. The later approach allows the threshold to be specifically set; otherwise we have to make do with the fixed threshold of the gate. We might need this threshold switching to detect when a certain parameter (e.g. temperature) has reached a level at which some action needs to be taken, or it might simply be to detect the presence of a signal against a varying background value. The latter case is applicable to Scott's enquiry, but we shall consider both situations. As previously implied, a simple approach to achieving threshold switching might be to amplify the sensor signal by the amount which causes the threshold level to be just above the logic 1 level of a digital input (e.g. on a logic gate or microcontroller). This is probably the approach Scott used. His circuit Everyday Practical Electronics, July 2006 Fig.1. Scott’s circuit VIN Fig.3. Using different thresholds depending on the direction of change provides clean switching VTH VOUT Fig.2. Threshold switching problem Fig.4. Switching characteristic of circuit with hysteresis 61 Fig.5. Comparator Input-Output characteristic. (a) schematic, (b) ideal response, and (c) realistic response and VTL is called the hysteresis. When the input increases past VTH, the comparator switches, but it does not switch if the input decreases past VTH. Instead, the input must decrease past a lower threshold, VTL before the comparator switches again. This is illustrated in Fig.3 and Fig.4. Schmitt Triggers Comparators or logic inputs with hysteresis are known as Schmitt Triggers. If the PIC or other microcontroller has Schmitt inputs it may not be necessary to use an external Schmitt Trigger, but you will need to check the datasheet for the device you are using to get the details. For example, on PIC18FXX2 devices PORTC, PORTD and PORTE in I/O mode, RA4/T0CKI and RB0/INT0 when configured as an interrupt have Schmitt Trigger input buffers. An external Schmitt logic gate, such as a 4093 (quad NAND) or 40106 (hex inverter) may also be used. Use of a logic gate or microcontroller Schmitt trigger input does not provide much control over the switching characteristics. Use of a circuit based on an op amp or comparator IC allows far more control over the switching behaviour. An op amp used without negative feedback has very high gain, thus for all but a small range of input voltage differences the output will be saturated. These two voltages (e.g. -Vsat and +Vsat) may represent logic 0 and 1 and will indicate which of the two inputs is at the higher voltage (see Fig.5). An op amp used in this way is known as a comparator. One input of the comparator is usually connected to a fixed reference or threshold level (VREF in Fig.5) and other input is connected to the signal of interest (e.g. from the sensor). A real op amp may not switch when the input is at exactly VREF due to offsets. Furthermore, for a range of input voltages the op amp will be in normal "linear" mode and will output intermediate voltages (see Fig.5.1c). This range of inputs is very small, however, and the Fig.6. Inverting Schmitt trigger 62 situation is much better using an op amp than say a single transistor. = VTH (upper threshold), where VTH = Comparator Ideals An ideal comparator would switch instantaneously when the input signals crossed the comparison threshold. A real comparator takes a finite time before it reacts; this time is known as the propagation delay. The rate of change of the comparator's output voltage as it switches is known as its slew rate. Any op amp may be used as a comparator, but the best performance is obtained by using devices that have been specifically designed as comparators. A comparator with hysteresis (Schmitt trigger) can be made using an op amp or single-threshold comparator by setting the threshold depending on the current output state. The comparator has two output states so these can be used to set the two thresholds as required using positive feedback. If the input noise level is known, the hysteresis can be set slightly larger than this. The comparator will then not switch as a result of the noise. A Schmitt trigger can be made using an op amp with positive feedback as shown in Fig.6. The comparator's switching point, Vcomp depends on VREF and VOut. VREF will usually be fixed but Vout depends on the current state of the comparator. VO can take one of two values, basically the op amp positive and negative saturation voltages, which for simplicity we will assume to have the same magnitude and opposite sign, that is ±VOut. This assumes a dual supply circuit. For a single supply circuit the formulae for the thresholds will be slightly different. To follow the operation of the circuit start by assuming that Vin is less than Vcomp so Vout = +VO. As Vin is slowly increased this condition remains until Vin = Vcomp Fig.7. A potential divider can be used for the reference voltage [ ] [ R2 R1 V + R1 + R2 ref R1 + R2 ] VO On switching at Vcomp = VTH the output changes to VOut = -VO, changing the threshold to a new value, Vcomp = VTL (lower threshold), where R2 R1 V – VO VTL = R1 + R2 ref R1 + R2 [ ] [ ] VOut will now stay at -VO until the input falls below Vcomp again. The difference in the switching points, i.e. the hysteresis, VH, is 2R1 V VH = VTH – VTL = R1 + R2 O [ ] VREF can be obtained from a potential divider connected to the supplies as shown in Fig.7. Ideally, in order to prevent the feedback network from loading the divider, the larger of R3 and R4 should be at least 10 times smaller than value of R1 + R2. Fig.6 and Fig.7 show inverting versions of the Schmitt trigger circuit. A non-inverting version can also be made, as shown in Fig.8. The equations are slightly different, but the fundamental operation of the circuit is the same. However, if the input is not connected to a low impedance source the source impedance may affect the switching points. For the non-inverting circuit, with the output switching between +VO and -VO, the thresholds are. R1 R1 VO 1+ Vref + R2 R2 [ and ] [ ] [ ] [ ] R1 1+ R2 R1 Vref – R2 VO Fig.8. Non-inverting Schmitt trigger with potential divider reference voltage Everyday Practical Electronics, July 2006 READOUT Email: [email protected] John Becker addresses some of the general points readers have raised. Have you anything interesting to say? Drop us a line! All letters quoted here have previously been replied to directly. WIN AN ATLAS LCR ANALYSER WORTH £79 An Atlas LCR Passive Component Analyser, kindly donated by Peak Electronic Design Ltd., will be awarded to the author of the Letter Of The Month each month. The Atlas LCR automatically measures inductance from 1µH to 10H, capacitance from 1pF to 10,000µF and resistance from 1Ω to 2MΩ with a basic accuracy of 1%. www.peakelec.co.uk ᗂ LETTER OF THE MONTH ᗂ ADC and PICs Dear EPE, When dealing with 10-bit ADC inputs such as those provided on PICs, you often want values in volts – a range of 0 to 1023 is not very helpful for most calculations. A range of 0 to 999 would be more useful (and a right-shift by one step would change that to 0 to 499 which gives you a value in hundredths of a volt). But how to do this on a PIC which doesn’t have multiply or divide instructions? Obviously you could use Microchip’s maths libraries if you wanted, but they’re very slow. Here’s how to do the job a lot faster. Obviously, 1023 is very close to 999. As you count up 0, 1, 2, 3, ... 1023, then the other side should count up 0, 0·977, 1·953, 2·930, ... 999 if we were using floating-point numbers. But our processors use integers, so we’re actually going to start counting up with 0, 1, 2, 3 and so on, and the rounding error gets increasingly large at each step. Every now and again, the rounding error will get large enough to be significant (i.e. more than half a bit of error), and the “0 to 999” side will stay on the same value when the “0 to 1023” side increments by one. This means that if we can work out where the rounding error will catch up (or a good approximation of it), then Banks and Pages Dear EPE, The correspondence in Readout on C has persuaded me that I should try harder. Like Jack Botner, EPE Mar ‘06, I spend a lot of time sorting out PIC banks and pages. If I can keep my program smaller than one bank and one page, it is manageable, but once it grows beyond that, it more or less spontaneously explodes to lots of banks and lots of pages as I insert banksel and pagesel statements trying to keep it working. I was very disappointed with the C system I bought a couple of years ago, but Jack seems happy with the system he bought, and other readers seem also to have discovered good systems. Jack might value his privacy and might not want me to pester him, but you might be able to contact him and ask him to contact me to tell me what system he bought. You might even want to tell all readers. Although suppliers become upset when 64 we can do this scaling simply by subtracting the total rounding error so far from the original value, without having to go through all the hassle of multiplies and divides. The total rounding error is proportional to the value, so we can use the value itself to calculate the total rounding error. The difference between 1023 and 999 is 24, which isn’t totally convenient. However, 24 = 32 – 8 and both of those are powers of 2, which are easy for integer arithmetic because we can use right-shifts to do division. For those who don’t know, shifting the bits of a number right by one will divide the number by 2, and shifting left will multiply by 2 (try it for yourself to see). If we divide 1023 by 32 then we get 31 and if we divide 1023 by 128 then we get 7 (allowing for integer division rounding down), which gets us to a total of 998. This is accurate enough since we’re going to be dividing by 2 at the end anyway to get a scaling of 0 to 499. So, our calculation to scale an ADC value (0 to 1023) into hundredths of a volt (0 to 499) is: Scaled value = ((ADC value – (ADC value/32)) – (ADC value/128))/2. We can implement this with the following pseudocode: A = ADC value (0-1023) B = A right-shifted by 5 (i.e. divide by 32) C = B right-shifted by 2 (i.e. divide by 4) B=B–C A=A–B A = A right-shifted by 1 (ie. divide by 2) Scaled value (0 to 499) = A This calculation isn’t entirely perfect, but it’s accurate to less than 1 bit, so you’ll get more error from the ADC noise and resistor tolerances than from this conversion. It’s very much faster for processors that don’t have multiply or divide instructions, and may well even be faster even for processors that do – since the scaling relies on maths rather than processor instructions, you can use this trick on any processor you like. Graham Bartlett, via email Graham, (or should I call you “Grab” as you use on our Chat Zone?), thanks for this. It’s an interesting solution, but there is a simpler more accurate way of doing it for those who have Peter Hemsley’s excellent maths suite of PIC progs, as published in EPE a while back (available via our Downloads site – access via www.epemag.co.uk). I have used Peter’s codes in many applications and find them highly useful. The codes don’t do what you want as an actual routine, but writing a specific routine using them would be very straightforward. we make bad remarks about their product, few are upset when we report that their product is terrific. Keith Anderson, Tasmania, Australia gers which is badly needed and have support for standard LCD displays. Good luck Keith! Jack Botner, via email Keith, the PIC18F series make bank and page handling somewhat easier. Jack replied: VB6 Sorting Dear EPE, I need a quick method of converting a string into its alphabetical equivalent. Power Basic for DOS has a function called Array Sort, so if you input the string “BASIC” you get “ABCIS”. I have searched through various help files but found nothing of any relevance. Perhaps VB6 has a similar function with a completely different name? Craig Patterson, via email I have been using the SourceBoost BoostC compiler from www.sourceboost.com/Products/BoostC/Overview. html. I have been very happy with it, since they provide a single-user non-commercial license at a very reasonable price. I have programmed PIC16F84/84A, 684/685, and 877 PICs and seen no glitches. My only complaint is that their function library is thin, I had to provide my own itoa function. They need a printf/sprintf but I realize that these functions are big and not well suited to small PICs. They do support long inte- No Craig, I’ve not come across the facility, but it’s only a matter of sorting the individual letters into sequence, a routine it should not take too long to write! Readers, do you know of anything that can help Craig? Everyday Practical Electronics, July 2006 Web Downloads, plus TK3 Dear EPE, I have been reading EPE for the past many years, I now use the on-line version. I have some concerns and some disappointments with the new style, for one thing, all the fancy colours have only managed to increase the size of the file, now the download time has doubled. The biggest disappointment comes when you find there are no PCB patterns for some circuits, I wanted to build the AudioVideo amplifier and the active crossover, there were no PCB patterns. For those of us outside the UK and who are capable of fabricating our own PCBs, a download area should be created on your website, from where good quality, EPS and PDF images can be downloaded. I also have something to say about the TK3 software. Good software like TK3 should include as many PIC types as possible, even the older C versions should be there. As an example, I wanted to build the PIC LCF Meter by John Becker, but the PIC16F628 it uses is just not available here, only the “A” version is available and TK3 has no support for it. I finally managed to program it using the excellent, ICcprog 105c-a, freely available on the internet. Finally, it will be unjust not to apppreciate the quality of electronics related material EPE provides. I think more useful circuits are needed, test gear such as a wide range signal generator, PIC and LCD based multifunction counter/frequency meter etc. Humayun Ali Mirza, via email Editor Mike first replied to Ali: Thanks for your comments. We have already instigated a PCB Master download area which has been up and running for a couple of months now. See my Editorial in the May issue – we did foresee the problems. I have passed your email to John for his comments on TK3. I replied to Ali: I have in fact asked someone else to arrange for the 628A facilities to be added sometime. You will appreciate that TK3 is mine and basically I’ve only designed it for those chips I use. But I’m quite happy if others update it for other chips under my supervision if they offer. But there’s no way in which it will ever cover all PICs. Commercial software/hardware is needed for those. Digital TV Again Dear EPE, There is some hope for Ken Wood’s acquaintances (Digital Terrestrial TV – Readout April), but still complex and not good value for money if needing to cover all five channels. CPC sell AV10363, an RF modulator to convert SCART audio/video to Channel 36 (it doesn’t say if Ken could get inside the box and retune the actual output channel). Needs mains power. Currently on offer at £8.86 plus VAT each. Of course, if the power fails, each of the five digiboxes will need Everyday Practical Electronics, July 2006 re-setting to select their appropriate offair channel once service resumes. As an aside, I’ve just bought a digibox and must say that the quality is rather capricious. I haven’t had the experience where the signal drops out and blanks the screen, but whether you get colour or monochrome seems to be a lottery. Sometimes it forgets its channels and has to re-acquire them. Consumer electronics, at the price we pay for such, is designed to make a profit. Who said it would work reliably? Probably also contains unleaded unreliable unsolder! They also say that every existing receiver in the land will be blacked out by the threatened move from MPEG 2 to version 4 compression encoding. More profits when they sell millions of new boxes, unless the “off-air software update” function copes with the change. I’m in the wrong business! Godfrey G4GLM, Edgware, Middx, via email Thank you for that Godfrey, But I wonder if you might get a few readers commenting on your latter somewhat cynical view of the world?! Light Detection And Ranging Dear EPE, Is it too late to comment on a letter titled Laser Radar in Readout, August ’05? Your correspondent, George Chatley, was bravely suggesting an improvement to the PIC Ultrasonic Radar (June ’05), by substituting an infra-red LED circuit in place of the ultrasonic original. Your reply was “I’ve thought about such techniques many times George, but it’s timing the return echo that is beyond me. Light travels at 186,000 miles a second. What sort of frequency would be needed to time an echo across say three metres? Beyond my calculator at this moment! And certainly beyond the scope of timing electronics on the hobbyist scene.” I thought of making a reply, suggesting that some kind of phase shift detector might be possible (i.e. let the light beam itself do the tricky work – I remember as a schoolboy one hundred years ago using interferometry to make tiny distance measurements, and we then had only stopwatches and 300mm rulers with which to measure), and the observation that these days 1ns is quite a long time, and the direct approach might now be possible. (Clock frequencies greater than 1GHz now being nothing special, all over the place in PCs for example.) However, both these points were more or less covered in Readout, Nov ’05, by John Waller, USA, and George Martin, Texas, so I kept quiet. Now, as you know, I am a very loyal reader, and I conscientiously retain all my back issues, so I immediately thought of you and looked these up when I received some information in my profession as an engineer, from the semiconductor company National Semiconductors. It was a document entitled “LIDAR (LIght Detection And Ranging) System Design for Automotive/Industrial/ Military Applications”, and gave practical details of how the required task may be accomplished. I can take no credit for this information, other than having had the sense to keep my eyes and ears open, and I can do no better than refer you to that document, entitled “national_sp_designer105.pdf” from www.national.com. Your original answer was correct insofar as the detection is sadly not performed using a cheap microprocessor running at a few Megahertz, but the new information should remind us in our trade that we should “Never say Never”. David M Parkins, Greenbank Electronics, via email Thank you David, that pdf does look interesting, and could well inspire me to look at the problem again sometime. Mains Safety Would you please advise me of the type of relay suitable for the IU Dog Alert of March ’06. J.E. Pryor, Hailsham, Sussex I’m sorry but we don’t give constructional guidance in IUs unless the reader quotes them when he sends the IU offering. In this instance, it is likely that the circuit will be used with mains operated devices and we never encourage people to build such unless they can justifiably call themselves competent at dealing with mains requirements, there being too much danger of killing themselves or others. We strongly recommend that you build something simpler and safer until you feel ready to tackle something potentially more dangerous. For your interest, relay contacts should be chosen to suit the voltage and amperage ratings, AC or DC, of the equipment being controlled. Best wishes for your continued enjoyment of electronics, which can be great fun, and safe! Front Panel Graphics Dear EPE, Following on from an article you ran about making front panels in the March issue, I recently had a couple of projects that needed some basic text overlay and some numbering along side an LCD display. I found a web site at www.craftycomputerpaper.co.uk and one of the papers enables you to create “dry rub off decals” with a laser or inkjet printer with either a clear or white background. The process is fairly straightforward but it’s best to follow their instructions exactly. Once you have created your design it can be “rubbed” directly on to the project case, where after a while it then hardens. This leaves you with a design without any edges that can lift. I then sealed it with clear acrylic spray, which probably wasn’t necessary, but does make it more durable. Roger Gibbs, via email Thank you Roger, that sounds useful. 65 C – A Final Word Dear EPE, In response to Readout May ’06 – Although a professional engineer (and therefore not supposed to admit I read the same magazines as hobbyists), I am delighted to inform you that I have been a keen reader of your excellent magazine for thirty or more years; in fact I think right back to the pocket sized issue number one. But this year particularly I have been eagerly looking forward to each issue with greatly increased anticipation. Why? Is it the shiny new paper, the attractively laid out editorial, the tasteful type-setting and clear graphic design, the wide range of practical articles? Well, although this is all true, the real reason is that my name seems to be in every issue. On page 72 May ’06, there I am again: “We’ve received more responses to the letters from David Parkins... ” Usually the vanity press charges for mentioning people’s names like this, but you do it for free. Check with your subscription department – I’ve just signed up for the maximum three year subscription. What did I write though, that has struck such a chord? I fear I do not deserve these mentions, because I have been slightly misrepresented. It sounds like I (and your other contributor Dr Jim Arlow) have become the new messiahs: the chosen ones who have brought forth the gift of C for you and your troubled masses. I think I had better stand down and let Dr Arlow be the one appointed as the leader of this new cult, with its creed “C is the one true language, thou shalt worship no other but C”. I’m no pusher of C, I use assembler quite happily. What I want is a wide ranging educational interesting and informative magazine. Sometimes I like a polycarbonate capacitor, sometimes polystyrene, but I’m not going to join a gang that wants to ram one particular type down another’s throat. You use 5k6 resistors, you cad; I demand you use 4k7, else you are nought but a fool. What is there to get so exited about? Sometimes one approach is best sometimes another, and I look to a magazine like EPE to educate us about all points of view. I am shocked at the fervour shown by the warring factions (the ancient “assemblers” and the young upstart “Cs”. Please, calm down lads, they’re only computer languages; there’s no need to start a war. (Tell you what though Mr Editor, I’ll bet you’re delighted – while competing magazines are stagnating and dying, yours seems alive with activity and excitement.) If I recall correctly, my original letter was a bit of a liverish reprimand to you at the way I thought you had patronised one of your Australian correspondents, John O’Hagan (Nov ’05), by telling him he was out of order for having the temerity to ask for a change from the regular diet of PIC and assembler. In reply you treated me so courteously and in such a friendly manner, that I realise that I was 66 committing the very same sin as that of which I was accusing you, and I am sorry that I put my points so impolitely. Your correspondents, those who are so passionate “for”, and the others who are equally passionate “against”, are justifiably proud of being self-educated, and, because the knowledge was so hard-won they clearly find it very hard to let it go. One very wise self-educated man (Benjamin Franklin) recognised the dangers when he cautioned: “He that teaches himself hath a fool for his master”. I don’t know what the Editor’s position is (although I can guess), but if he has any prejudices he is clearly putting them aside, and is generously allowing an even handed debate in the letters pages, and it sounds like he has commissioned some articles discussing the contentious topics. It would be a braver man than I who would declare he has nothing further to learn, so I for one will be eagerly looking forward to the future issues of this excellent magazine. A lifelong fan – David M Parkins, B Eng (Hons), C Eng, MIEE, Greenbank Electronics, Birkenhead Thank you David for those insights, and for sparking off what has been a long and interesting debate. There I think we leave this topic now, thank you all who have contributed, and apologies to those whose emails and letters I have not had space to include. By the way, lots of professionals read us – thank goodness! PIC Code Protect Dear EPE, As always, thanks for the fine articles in EPE. I have a Magenta PIC Toolkit 3 board and a TK3 program. My problem is how to erase the Code Protect bit from the chip (in my case PIC16F876/877) once the program has been burnt into the chip. I have read and re-read the procedure but it doesn’t seem to work. Is there a sure fire method of doing this? When I try to reprogram the microcontroller I get an error message stating that the Code Protect has been set. I am not setting the Code Protect bit ON in my programs as I rewrite to them quite often when debugging my programs. Somehow the Code Protect bit gets turned ON and I can’t get it OFF to reprogram the microcontroller. Could you describe to me (and maybe others) a simple way of doing this as I might be doing it wrong. Dick Gurske, via email Thanks for your kind comments, Dick. I have had similar problems and have usually cured them by simply using the TK3 Config option, via the Clear CP button. It’s a curious situation and I don’t know why it arises. Perhaps Mike Hibbett’s PIC n’ Mix in May issue provided the answer, external conditions altering bit values for no obvious reason, except for local electrical fields. I did once have a chip in which a program area of memory could not be changed from a 1 in a particular bit. That I put down to a manufacturing fault. TK3 can also say CP is set if it does not read data back cleanly from a PIC, indicating a fault at the TK3 board end, or on a prototype development board connected to TK3 for programming. I frequently reprogram chips when I’m developing something, usually preferring to test code live rather than by simulation. I wonder what others may have to say? Murphy’s Uncle Dear EPE, I know that John is also interested in the quirks of hardware and software and I have have come across another interesting case. I have been doing some work on a graphics LCD and following his article in EPE Feb ’01, which, by the way, is excellent. In the source for Gepe456.asm I noticed what I think is an error. The appropriate portions of code are reproduced below: PAUSIT: movlw 5 ; pause routine, 1/5th sec movwf CLKCNT clrf INTCON PAUSE: btfss INTCON,2 goto PAUSE bcf INTCON,2 decfsz CLKCNT,F goto PAUSE return PAUSE2: movlw 1 ; pause routine, 1/25th sec movwf CLKCNT clrf INTCON PAUS2: btfss INTCON,2 goto PAUSE ; ** I think this should be GOTO PAUS2 bcf INTCON,2 decfsz CLKCNT,F goto PAUS2 return Now in fact this does not matter as the code at PAUSE does the same thing and CLKCNT is decremented correctly. The program functions correctly. I have come across similar cases before, when maintaining programs, where you change a subroutine in one part of the program and another part in a completely different area stops working. I have a theory about this. I think it is due to Murphy’s uncle. We all know how Murphy goes around messing things up when he can and I think that Murphy’s uncle goes after him to try and ameliorate the situation by letting things work which really shouldn’t. What do you think? Peter, via email A wry smile on my face at this one Peter! You’re absolutely right on the code, but it works for the reason you say. Funny I’d not noticed before. I have used that routine several times. I wonder if Murphy does indeed have a benign relative? So I’ll ask readers ... Everyday Practical Electronics, July 2006 ELECTRONICS MANUALS ON CD-ROM £29.95 EACH THE MODERN ELECTRONICS MANUAL ELECTRONICS SERVICE MANUAL SPECIAL OFFER Order both Manuals together and Everything you need to know to get started in repairing electronic equipment SAVE £10 Around 900 pages Fundamental principles Troubleshooting techniques Servicing techniques Choosing and using test equipment Reference data Manufacturers’ web links Easy-to-use Adobe Acrobat format Clear and simple layout Vital safety precautions Professionally written Supplements SAFETY: Safety Regulations, Electrical Safety and First Aid. UNDERPINNING KNOWLEDGE: Electrical and Electronic Principles, Active and Passive Components, Circuit Diagrams, Circuit Measurements, Radio, Computers, Valves and Manufacturers’ Data, etc. PRACTICAL SKILLS: Learn how to identify Electronic Components, Avoid Static Hazards, Carry Out Soldering and Wiring, Remove and Replace Components. TEST EQUIPMENT: How to Choose and Use Test Equipment, Assemble a Toolkit, Set Up a Workshop, and Get the Most from Your Multimeter and Oscilloscope, etc. SERVICING TECHNIQUES: The Manual includes vital guidelines on how to Service Audio Amplifiers. The Supplements include similar guidelines for Radio Receivers, TV Receivers, Cassette Recorders, Video Recorders, Personal Computers, etc. TECHNICAL NOTES: Commencing with the IBM PC, this section and the Supplements deal with a very wide range of specific types of equipment – radios, TVs, cassette recorders, amplifiers, video recorders etc. REFERENCE DATA: Diodes, Small-Signal Transistors, Power Transistors, Thyristors, Triacs and Field Effect Transistors. Supplements include Operational Amplifiers, Logic Circuits, Optoelectronic Devices, etc. The essential reference work for everyone studying electronics Over 800 pages In-depth theory Projects to build Detailed assembly instructions Full components checklists Extensive data tables Manufacturers’ web links Easy-to-use Adobe Acrobat format Clear and simple layout Comprehensive subject range Professionally written Supplements BASIC PRINCIPLES: Electronic Components and their Characteristics; Circuits Using Passive Components; Power Supplies; The Amateur Electronics Workshop; The Uses of Semiconductors; Digital Electronics; Operational Amplifiers; Introduction to Physics, including practical experiments; Semiconductors and Digital Instruments. CIRCUITS TO BUILD: The Base Manual describes 12 projects including a Theremin and a Simple TENS Unit. ESSENTIAL DATA: Extensive tables on diodes, transistors, thyristors and triacs, digital and linear i.c.s. EXTENSIVE GLOSSARY: Should you come across a technical word, phrase or abbreviation you’re not familiar with, simply look up the glossary and you’ll find a comprehensive definition in plain English. The Manual also covers Safety and provides web links to component and equipment Manufacturers and Suppliers. Full contents list available online at: www.epemag.wimborne.co.uk SUPPLEMENTS: Additional CD-ROMs each containing approximately 500 pages of additional information on specific areas of electronics are available for £19.95 each. Information on the availability and content of each Supplement CD-ROM will be sent to you. Presentation: CD-ROM suitable for any modern PC. Requires Adobe Acrobat Reader which is included on the CD-ROM. Wimborne Publishing Ltd., 408 Wimborne Road East, Ferndown, Dorset BH22 9ND. Tel: 01202 873872. Fax: 01202 874562. PLEASE send me THE MODERN ELECTRONICS MANUAL CD-ROM ELECTRONICS SERVICE MANUAL CD-ROM I enclose payment of £29.95 (for one Manual) or £49.90 for both Manuals (saving £10 by ordering both together). FULL NAME . . . . . . . . . . . . . . . . . . . . . . . . . . . . . . . . . . . . . . . . . . . . . . . . . . . . . . . . . . . . . . . . (PLEASE PRINT) ADDRESS . . . . . . . . . . . . . . . . . . . . . . . . . . . . . . . . . . . . . . . . . . . . . . . . . . . . . . . . . . . . . . . . . .......................................................................... ORDER FORM Simply complete and return the order form with your payment to the following address: Wimborne Publishing Ltd, 408 Wimborne Road East, Ferndown, Dorset BH22 9ND Price includes postage to anywhere in the World . . . . . . . . . . . . . . . . . . . . . . . . . . . . . . . . . . . . . . . . . . . . . .POSTCODE . . . . . . . . . . . . . . . . . . SIGNATURE . . . . . . . . . . . . . . . . . . . . . . . . . . . . . . . . . . . . . . . . . . . . . . . . . . . . . . . . . . . . . . . . I enclose cheque/PO in UK pounds payable to Wimborne Publishing Ltd. Please charge my Visa/Mastercard/Amex/Diners Club/Switch/Maestro Card No . . . . . . . . . . . . . . . . . . . . . . . . . . . . . . . . . . . . . . . Switch/Maestro Issue No . . . . . . Valid From . . . . . . . . . . . . . Expiry Date . . . . . . . . . . . . . . . Card Security Code . . . . . . . . . . . . (The last 3 digits on or just under the signature strip) Everyday Practical Electronics, July 2006 We will happily exchange any faulty CD-ROMs but since the content can be printed out we do not offer a refund on these items. Your CD-ROM(s) will be posted to you by first class mail or airmail, normally within four working days of receipt of your order 67 Surfing The Internet Net Work Alan Winstanley ELCOME to Net Work – our Internet column to help readers get the most out of their hours spent online. Regular readers W will be aware of our popular web site at www.epemag.co.uk, which /netwkaz.html. In the future I hope to expand this to include a useful “toolbox” of handy online resources, links, software and more. Lastly, what if you ever need to contact us? The Contact Info. link on our web site provides the postal details and email addresses of all departments. Please grant a reasonable time for a reply, as “chaser” emails merely add to the workload. Next then, why not click onto our web site and see what is available online? is intended to support the magazine in a number of ways. For constructors seeking our PIC source codes, our Download page is at www.epemag.wimborne.co.uk/downloads.html which offers a web-browser front end to our file area. New additions are highlighted in bold and to access the files, single-click the “+” sign The Phone Age? next to each subheading and the navigation tree will open. Then Recently I highlighted Skype (www.skype.com), the voice and click the desired individual download, and the relevant files will video messaging package that enables you to “chat” with other appear in the window (see the screenshot example of the Digital Skype users around the world. Because Instruments for Cars). Skype utilises your existing broadband Most users have Microsoft Internet connection, the calls are essentially free. Explorer 6, so the easiest way to fetch the You can also call landlines (“skype out”) files is to right-click and drag an outline by paying a pre-paid toll. around all the files to highlight them: then There is a clear trend towards VoIP use the Copy to folder... option in the (Voice over Internet Protocol) communicabrowser’s right-click menu to save all the tions that exploits higher speed Internet files to your disk in one easy session. connections. However, whilst a broadband A new addition to the Downloads Area in connection can wire you to the world, if you recent weeks is p.c.b. artwork: for the first want to use Skype or similar services then time EPE can offer almost every new printobviously your computer must be running ed circuit board copper foil master pattern on the network. What about making an ordifor free download as a PDF file (for which nary phone call using your broadband line? the free Adobe Reader software is needed A number of hardwired VoIP solutions from www.adobe.com). Note that clicking are becoming available, including the on the relevant month in the Download Tree impressive package from Vonage makes a direct link to a .zip file containing (www.vonage.com/co.uk). For £7.99 per Highlight the required filenames then all available artwork for that month; there is month for domestic users, a Linksys phone no need to select individual files. right-click to save them to you computer adaptor is supplied that connects a POTS The “download tree” script works corded or cordless phone via an Ethernet cable to a broadband extremely well for almost all users, but if you use traditional FTP router, to provide a VoIP telephone line, without the need for a host software, it should be pointed to our FTP server address at computer to be online. Caller Display, Call Waiting, Call Diversion ftp://ftp.epemag.wimborne.co.uk/pub – or click the “classic FTP and more are bundled as well, at no extra charge; add in the fact that view” link near the top of the Downloads page to see a web folder a new phone line is supplied with no extra line rental, and this VoIP view of the FTP site. service adds up to great value: bear in mind their setup and activaIt is worth reminding all EPE readers that it is not necessary to tion charges of £26.97 in the first month though. own a computer nor a PICmicro programmer in order to enjoy buildSeparately, routers with built-in phone adaptors are available: ing EPE’s PICmicro-based projects. Ready-programmed PIC microthe Linksys RT31P2 avoids the need for some messy wiring. controllers can be purchased from Magenta Electronics Vonage offers unlimited phone calls to the UK and Ireland, and (www.magenta 2000.co.uk) who offer a valuable mail order service as well as an online shopping cart for those happy to buy online. international rates are attractive: Australia is 3p per minute. If Another useful resource is our EPE Chat Zone online forum at you are keen to get the most mileage from your broadband conwww.chatzones.co.uk. Many regulars use the friendly forum to nection, the commendably-clear Vonage web site is worth spendexchange hints, schematics and tips. After creating a unique usering time visiting. name and following the registration procedure, users may post mesNext month: another alternative to Skype? I investigate MSN sages into the forum. An archive stretches back at least 12 months. Messenger from Microsoft. You can email the writer at Don’t forget our online Project Index pages, summarising our [email protected] projects back to at least 1998 (back issues are usually unavailable for issues over five years old). If you are not sure of the issue in which a project was published, try entering some keyphrases into our search engine, which may then point you to the monthly update. From there you can visit our EPE Online Shop and buy back issues, printed circuit boards, electronics books and CD ROMs and more beside. There is no minimum order charge and EPE delivers worldwide. The Net Work column has its own page of The principle of VoIP from Vonage. A Linksys phone adaptor connects a standard useful links – the “Net Work A-Z Best of telephone and/or fax machine to a broadband connection (courtesy Vonage) the Net” at www.epemag.wimborne.co.uk 68 Everyday Practical Electronics, July 2006 FREE Two booklets and a Circuit Surgery CD-ROM with Teach-In 2000 CD-ROM DIRECT BOOK SERVICE NOTE: ALL PRICES INCLUDE UK POSTAGE The books listed have been selected by Everyday Practical Electronics editorial staff as being of special interest to everyone involved in electronics and computing. They are supplied by mail order to your door. Full ordering details are given on the last book EPE TEACH-IN 2000 CD-ROM The whole of the 12-part Teach-In 2000 series by John Becker (published in EPE Nov ’99 to Oct 2000) is now available on CD-ROM. Plus the Teach-In 2000 interactive software (Win 95, 98, ME and above) covering all aspects of the series and Alan Winstanley’s Basic Soldering Guide (including illustrations and Desoldering). Teach-In 2000 covers all the basic principles of electronics from Ohm’s Law to Displays, including Op.Amps, Logic Gates etc. Each part has its own section on the interactive software where you can also change component values in the various on-screen demonstration circuits. The series gives a hands-on approach to electronics with numerous breadboard circuits to try out, plus a simple computer interface (Win 95, 98, ME only) which allows a PC to be used as a basic oscilloscope. ONLY £12.45 including VAT and p&p Order code Teach-In CD-ROM Robotics Order code BP901 £14.99 MORE ADVANCED ROBOTICS WITH LEGO MINDSTORMS – Robert Penfold Covers the Vision Command System Shows the reader how to extend the capabilities of the brilliant Lego Mindstorms Robotic Invention System (RIS) by using Lego’s own accessories and some simple home constructed units. You will be able to build robots that can provide you with ‘waiter service’ when you clap your hands, perform tricks, ‘see’ and avoid objects by using ‘bats radar’, or accurately follow a line marked on the floor. Learn to use additional types of sensors including rotation, light, temperature, sound and ultrasonic and also explore the possibilities provided by using an additional (third) motor. For the less experienced, RCX code programs accompany most of the featured robots. However, the more adventurous reader is also shown how to write programs using Microsoft’s VisualBASIC running with the ActiveX control (Spirit.OCX) that is provided with the RIS kit. Detailed building instructions are provided for the featured robots, including numerous step-by-step photographs. The designs include rover vehicles, a virtual pet, a robot arm, an ‘intelligent’ sweet dispenser and a colour conscious robot that will try to grab objects of a specific colour. Order code BP902 298 pages £14.99 ANDROIDS, ROBOTS AND ANIMATRONS – Second Edition – John Iovine Build your own working robot or android using both offthe-shelf and workshop constructed materials and devices. Computer control gives these robots and androids two types of artificial intelligence (an expert system and a neural network). A lifelike android hand can be built and programmed to function doing repetitive tasks. A fully animated robot or android can also be built and programmed to perform a wide variety of functions. The contents include an Overview of State-of-the-Art Robots; Robotic Locomotion; Motors and Power Controllers; All Types of Sensors; Tilt; Bump; Road and Wall Detection; Light; Speech and Sound Recognition; Robotic Intelligence (Expert Type) Using a Single-Board Computer Programmed in BASIC; Robotic Intelligence (Neutral Type) Using Simple Neural Networks (Insect Intelligence); Making a Lifelike Android Hand; A Computer-Controlled Robotic Insect Programmed in BASIC; Telepresence Robots With Actual Arcade and Virtual Reality Applications; A Computer-Controlled Robotic Arm; Animated Robots and Androids; Real-World Robotic Applications. 224 pages Order code MGH1 Radio BASIC RADIO PRINCIPLES AND TECHNOLOGY Ian Poole Radio technology is becoming increasingly important in today’s high technology society. There are the traditional uses of radio which include broadcasting and point to point radio as well as the new technologies of satellites and cellular phones. All of these developments mean there is a growing need for radio engineers at all levels. Assuming a basic knowledge of electronics, this book provides an easy to understand grounding in the topic. Chapters in the book: Radio Today, Yesterday, and Tomorrow; Radio Waves and Propagation; Capacitors, Inductors, and Filters; Modulation; Receivers; Transmitters; Antenna Systems; Broadcasting; Satellites; Personal Communications; Appendix – Basic Calculations. 263 pages INTRODUCING ROBOTICS WITH LEGO MINDSTORMS Robert Penfold Shows the reader how to build a variety of increasingly sophisticated computer controlled robots using the brilliant Lego Mindstorms Robotic Invention System (RIS). Initially covers fundamental building techniques and mechanics needed to construct strong and efficient robots using the various “clicktogether’’ components supplied in the basic RIS kit. Then explains in simple terms how the “brain’’ of the robot may be programmed on screen using a PC and “zapped’’ to the robot over an infra-red link. Also, shows how a more sophisticated Windows programming language such as Visual BASIC may be used to control the robots. Details building and programming instructions provided, including numerous step-by-step photographs. 288 pages – large format For a further selection of books see the next two issues of EPE. £16.99 Everyday Practical Electronics, July 2006 Order code NE30 £18.99 PROJECTS FOR RADIO AMATEURS AND S.W.L.S. R. A. Penfold This book describes a number of electronic circuits, most of which are quite simple, which can be used to enhance the performance of most short wave radio systems. The circuits covered include: An aerial tuning unit; A simple active aerial; An add-on b.f.o. for portable sets; A wavetrap to combat signals on spurious responses; An audio notch filter; A parametric equaliser; C.W. and S.S.B. audio filters; Simple noise limiters; A speech processor; A volume expander. Other useful circuits include a crystal oscillator, and RTTY/C.W. tone decoder, and a RTTY serial to parallel converter. A full range of interesting and useful circuits for short wave enthusiasts. 92 pages Order code BP304 £4.45 AN INTRODUCTION TO AMATEUR RADIO I. D. Poole Amateur radio is a unique and fascinating hobby which has attracted thousands of people since it began at the turn of the century. This book gives the newcomer a comprehensive and easy to understand guide through the subject so that the reader can gain the most from the hobby. It then remains an essential reference volume to be used time and again. Topics covered include the basic aspects of the hobby, such as operating procedures, jargon and setting up a station. Technical topics covered include propagation, receivers, transmitters and aerials etc. 150 pages Order code BP257 £5.49 Computers and Computing THE INTERNET FOR THE OLDER GENERATION Jim Gatenby Especially written for the over 50s. Uses only clear and easy-to-understand language. Larger type size for easy reading. Provides basic knowledge to give you confidence to join the local computer class. This book explains how to use your PC on the Internet and covers amongst other things: Choosing and setting up your computer for the Internet. Getting connected to the Internet. Sending and receiving emails, photographs, etc., so that you can keep in touch with family and friends all over the world. Searching for and saving information on any subject. On-line shopping and home banking. Setting up your own simple web site. Order code BP600 228 pages £8.99 HOW TO BUILD YOUR OWN PC – Third Edition Morris Rosenthal More and more people are building their own PCs. They get more value for their money, they create exactly the machine they want, and the work is highly satisfying and actually fun. That is, if they have a unique beginner’s guide like this one, which visually demonstrates how to construct a state-of-the-art computer from start to finish. Through 150 crisp photographs and clear but minimal text, readers will confidently absorb the concepts of computer building. The extra-big format makes it easy to see what’s going on in the pictures. For non-specialists, there’s even a graphical glossary that clearly illustrates technical terms. The author goes “under the hood’’ and shows step-by-step how to create a socket 7 (Pentium and non-intel chipsets) and a Slot 1 (Pentium II) computer, covering: What first-time builders need to know; How to select and purchase parts; How to assemble the PC; How to install Windows 98. The few existing books on this subject, although badly outdated, are in steady demand. This one delivers the expertise and new technology that fledgling computer builders are eagerly looking for. 224 pages – large format Order code MGH2 £20.99 PIC YOUR PERSONAL INTRODUCTORY COURSE SECOND EDITION John Morton Discover the potential of the PIC microcontroller through graded projects – this book could revolutionise your electronics construction work! A uniquely concise and practical guide to getting up and running with the PIC Microcontroller. The PIC is one of the most popular of the microcontrollers that are transforming electronic project work and product design. Assuming no prior knowledge of microcontrollers and introducing the PIC’s capabilities through simple projects, this book is ideal for use in schools and colleges. It is the ideal introduction for students, teachers, technicians and electronics enthusiasts. The step-bystep explanations make it ideal for self-study too: this is not a reference book – you start work with the PIC straight away. The revised second edition covers the popular reprogrammable EEPROM PICs: P16C84/16F84 as well as the P54 and P71 families. 270 pages Order code NE36 £16.99 eBAY FOR BEGINNERS Cherry Nixon There are two kinds of people, those who are trading on eBay and the rest who are missing out. Though eBay has been embraced by entrepreneurs all over the world, it remains the peoples’ site and offers the largest market for the smallest fee. eBay presents an opportunity for everyone, the trick is to master it. This book shows you how to start trading on eBay UK. It also offers advice on getting organised and tips to put you ahead. The book has been developed from Cherry’s popular hands-on course “Buying and Selling on eBay for Technological Simpletons”. In addition to fully explaning eBay and how to trade on it there are sections on Paypal, producing pictures of your sale items, fees and accounts, safety and security including what to do when things go wrong and what protection is provided. Order code BP551 178 pages £8.99 NEWNES PC TROUBLESHOOTING POCKET BOOK – THIRD EDITION Howard Anderson, Mike Tooley All the essential data for PC fault-finding and upgrading. This book provides a concise and compact reference that describes, in a clear and straightforward manner, the principles and practice of fault-finding and upgrading PCs and peripherals. The book is aimed at anyone who is involved with the installation, configuration, maintenance, upgrading, repair or support of PC systems. It also provides non-technical users with sufficient background information, charts and checklists to enable the diagnosis of faults and help to carry out simple modifications and repairs. In order to reflect rapid changes in computer technology (both hardware and software) this new edition has been completely revised and rewritten. 256 pages Order code NE41 £19.99 71 Theory and Reference ELECTRONIC CIRCUITS – FUNDAMENTALS & APPLICATIONS NEW Third Edition Mike Tooley A comprehensive reference text and practical electronics handbook in one volume – at an affordable price! New chapter on PIC microcontrollers – the most popular chip family for use in project work by hobbyists and in colleges and universities. New companion website: spreadsheet design tools to simplify circuit calculations; circuit models and templates to enable virtual simulation; a bank of on-line questions for lecturers to set as assignments, and on-line self-test multiple choice questions for each chapter with automatic marking, to enable students to continually monitor their progress and understanding. The book’s content is matched to the latest pre-degree level courses, making this an invaluable reference for all study levels, and its broad coverage is combined with practical case studies, based in real-world engineering contexts throughout the text. The unique combination of a comprehensive reference text, incorporating a primary focus on practical applications, ensures this text will prove a vital guide for students and also for industry-based engineers, who are either new to the field of electronics, or who wish to refresh their knowledge. 400 pages Order code NE43 £21.99 BEBOP TO THE BOOLEAN BOOGIE BOOK PLUS Second Edition CD-ROM Clive (Max) Maxfield This book gives the “big picture’’ of digital electronics. This indepth, highly readable, up-to-the-minute guide shows you how electronic devices work and how they’re made. You’ll discover how transistors operate, how printed circuit boards are fabricated, and what the innards of memory ICs look like. You’ll also gain a working knowledge of Boolean Algebra and Karnaugh Maps, and understand what Reed-Muller logic is and how it’s used. And there’s much, MUCH more. The author’s tongue-in-cheek humour makes it a delight to read, but this is a REAL technical book, extremely detailed and accurate. Comes with a free CDROM which contains an eBook version with full text search plus bonus chapter – An Illustrated History of Electronics and Computing. Contents: Fundamental concepts; Analog versus digital; Conductors and insulators; Voltage, current, resistance, capacitance and inductance; Semiconductors; Primitive logic functions; Binary arithmetic; Boolean algebra; Karnaugh maps; State diagrams, tables and machines; Analog-to-digital and digital-to-analog; Integrated circuits (ICs); Memory ICs; Programmable ICs; Application-specific integrated circuits (ASICs); Circuit boards (PWBs and DWBs); Hybrids; Multichip modules (MCMs); Alternative and future technologies. 500 pages Order code BEB1 £27.50 BEBOP BYTES BACK (and the Beboputer Computer Simulator) CD-ROM Clive (Max) Maxfield and Alvin Brown CD-R OM This follow-on to Bebop to the Boolean Boogie is a multimedia extravaganza of information about how computers work. It picks up where “Bebop I’’ left off, guiding you through the fascinating world of computer design . . . and you’ll have a few chuckles, if not belly laughs, along the way. In addition to over 200 megabytes of mega-cool multimedia, the CD-ROM contains a virtual microcomputer, simulating the motherboard and standard computer peripherals in an extremely realistic manner. In addition to a wealth of technical information, myriad nuggets of trivia, and hundreds of carefully drawn illustrations, the CD-ROM contains a set of lab experiments for the virtual microcomputer that let you recreate the experiences of early computer pioneers. If you’re the slightest bit interested in the inner workings of computers, then don’t dare to miss this! Over 800 pages in Adobe Acrobat format CD-ROM Order code BEB2 CD-ROM £21.95 including tests for transistors, thyristors, resistors, capacitors and diodes. Circuit testing is covered in Chapter 3, with subjects such as voltage, current and continuity checks being discussed. In the main little or no previous knowledge or experience is assumed. Using these simple component and circuit testing techniques the reader should be able to confidently tackle servicing of most electronic projects. 96 pages STARTING ELECTRONICS, THIRD EDITION KEITH BRINDLEY A punchy practical introduction to self-build electronics. The ideal starting point for home experimenters, technicians and students who want to develop the real hands-on skills of electronics construction. A highly practical introduction for hobbyists, students, and technicians. Keith Brindley introduces readers to the functions of the main component types, their uses, and the basic principles of building and designing electronic circuits. Breadboard layouts make this very much a ready-to-run book for the experimenter, and the use of multimeter, but not oscilloscopes, and readily available, inexpensive components makes the practical work achievable in a home or school setting as well as a fully equiped lab. 288 pages GETTING THE MOST FROM YOUR MULTIMETER R. A. Penfold This book is primarily aimed at beginners and those of limited experience of electronics. Chapter 1 covers the basics of analogue and digital multimeters, discussing the relative merits and the limitations of the two types. In Chapter 2 various methods of component checking are described, £5.49 Order code BP239 £10.99 Order code NE42 THE AMATEUR SCIENTIST CD-ROM CD-ROM – VERSION 2 The complete collection of The Amateur Scientist articles from Scientific American magazine. Over 1,000 classic science projects from a renowned source of winning projects. All projects are rated for cost, difficulty and possible hazards. Plus over 1,000 pages of helpful science techniques that never Scientific appeared in American. Exciting science projects in: Astronomy; Earth Science; Biology; Physics; Chemistry; Weather . . . and much more! The most complete resource ever assembled for hobbyists, and professionals looking for novel solutions to research problems. Includes extensive Science Software Library with even more science tools. Suitable for Mac, Windows, Linux or UNIX. 32MB RAM minimum, Netscape 4.0 or higher or Internet Explorer 4.0 or higher. Over 1,000 projects CD-ROM Order code AS1 CD-ROM £19.95 Music, Audio and Video MAKING MUSIC WITH YOUR COMPUTER Stephen Bennett Nearly everyone with musical aspirations also has a computer. This same computer can double as a high quality recording studio capable of producing professional recordings. This book tells you what software and hardware you will need to get the best results. You’ll learn about recording techniques, software and effects, mixing, mastering and CD production. Suitable for PC and Mac users, the book is full of tips, “how to do” topics and illustrations. It’s the perfect answer to the question “How do I use my computer to produce my own CD?” 92 pages Order code PC120 Order code PC118 £7.45 QUICK GUIDE TO MP3 AND DIGITAL MUSIC Ian Waugh MP3 files, the latest digital music format, have taken the music industry by storm. What are they? Where do you get them? How do you use them? Why have they thrown record companies into a panic? Will they make music easier to buy? And cheaper? Is this the future of music? All these questions and more are answered in this concise and practical book which explains everything 72 60 pages Order code PC119 £7.45 £10.95 QUICK GUIDE TO ANALOGUE SYNTHESIS Ian Waugh Even though music production has moved into the digital domain, modern synthesisers invariably use analogue synthesis techniques. The reason is simple – analogue synthesis is flexible and versatile, and it’s relatively easy for us to understand. The basics are the same for all analogue synths, and you’ll quickly be able to adapt the principles to any instrument, to edit existing sounds and create exciting new ones. This book describes: How analogue synthesis works; The essential modules every synthesiser has; The three steps to synthesis; How to create phat bass sounds; How to generate filter sweeps; Advanced synth modules; How to create simple and complex synth patches; Where to find soft synths on the Web. If you want to take your synthesiser – of the hardware or software variety – past the presets, and program your own sounds and effects, this practical and wellillustrated book tells you what you need to know. 60 pages you need to know about MP3s in a simple and easy-tounderstand manner. It explains: How to play MP3s on your computer; How to use MP3s with handheld MP3 players; Where to find MP3s on the Web; How MP3s work; How to tune into Internet radio stations; How to create your own MP3s; How to record your own CDs from MP3 files; Other digital audio music formats. Whether you want to stay bang up to date with the latest music or create your own MP3s and join the on-line digital music revolution, this book will show you how. THE INVENTOR OF STEREO – THE LIFE AND WORKS OF ALAN DOWER BLUMLEIN Robert Charles Alexander This book is the definitive study of the life and works of one of Britain’s most important inventors who, due to a cruel set of circumstances, has all but been overlooked by history. Alan Dower Blumlein led an extraordinary life in which his inventive output rate easily surpassed that of Edison, but whose early death during the darkest days of World War Two led to a shroud of secrecy which has covered his life and achievements ever since. His 1931 Patent for a Binaural Recording System was so revolutionary that most of his contemporaries regarded it as more than 20 years ahead of its time. Even years after his death, the full magnitude of its detail had not been fully utilized. Among his 128 patents are the principal electronic circuits critical to the development of the world’s first elecronic television system. During his short working life, Blumlein produced patent after patent breaking entirely new ground in electronic and audio engineering. During the Second World War, Alan Blumlein was deeply engaged in the very secret work of radar development and contributed enormously to the system eventually to become ‘H2S’ – blind-bombing radar. Tragically, during an experimental H2S flight in June 1942, the Halifax bomber in which Blumlein and several colleagues were flying, crashed and all aboard were killed. He was just days short of his thirty-ninth birthday. 420 pages Order code NE32 VIDEO PROJECTS FOR THE ELECTRONICS CONSTRUCTOR R. A. Penfold Written by highly respected author R. A. Penfold, this book contains a collection of electronic projects specially designed for video enthusiasts. All the projects can be simply constructed, and most are suitable for the newcomer to project construction, as they are assembled on stripboard. There are faders, wipers and effects units which will add sparkle and originality to your video recordings, an audio mixer and noise reducer to enhance your soundtracks and a basic computer control interface. Also, there’s a useful selection on basic video production techniques to get you started. Complete with explanations of how the circuit works, shopping lists of components, advice on construction, and guidance on setting up and using the projects, this invaluable book will save you a small fortune. Circuits include: video enhancer, improved video enhancer, video fader, horizontal wiper, improved video wiper, negative video unit, fade to grey unit, black and white keyer, vertical wiper, audio mixer, stereo headphone amplifier, dynamic noise reducer, automatic fader, pushbutton fader, computer control interface, 12 volt mains power supply. 124 pages Order code PC115 £10.95 £5.45 ALL PRICES INCLUDE UK POST & PACKING £17.99 Everyday Practical Electronics, July 2006 Project Building & Testing Data and Design PRACTICAL ELECTRONIC FILTERS Owen Bishop This book deals with the subject in a non-mathematical way. It reviews the main types of filter, explaining in simple terms how each type works and how it is used. The book also presents a dozen filter-based projects with applications in and around the home or in the constructor’s workshop. These include a number of audio projects such as a rythm sequencer and a multi-voiced electronic organ. Concluding the book is a practical step-by-step guide to designing simple filters for a wide range of purposes, with circuit diagrams and worked examples. ELECTRONIC PROJECTS FOR EXPERIMENTERS R. A. Penfold Many electronic hobbyists who have been pursuing their hobby for a number of years seem to suffer from the dreaded “seen it all before’’ syndrome. This book is fairly and squarely aimed at sufferers of this complaint, plus any other electronics enthusiasts who yearn to try something a bit different. No doubt many of the projects featured here have practical applications, but they are all worth a try for their interest value alone. The subjects covered include:- Magnetic field detector, Basic Hall effect compass, Hall effect audio isolator, Voice scrambler/descrambler, Bat detector, Bat style echo location, Noise cancelling, LED stroboscope, Infra-red “torch’’, Electronic breeze detector, Class D power amplifier, Strain gauge amplifier, Super hearing aid. 88 pages 138 pages Order code BP299 £5.49 DIGITAL LOGIC GATES AND FLIP-FLOPS Ian R. Sinclair This book, intended for enthusiasts, students and technicians, seeks to establish a firm foundation in digital electronics by treating the topics of gates and flip-flops thoroughly and from the beginning. Topics such as Boolean algebra and Karnaugh mapping are explained, demonstrated and used extensively, and more attention is paid to the subject of synchronous counters than to the simple but less important ripple counters. No background other than a basic knowledge of electronics is assumed, and the more theoretical topics are explained from the beginning, as also are many working practices. The book concludes with an explaination of microprocessor techniques as applied to digital logic. 200 pages Order code PC106 £9.95 Order code BP371 £5.45 FAULT-FINDING ELECTRONIC PROJECTS R. A. Penfold Starting with mechanical faults such as dry joints, short-circuits etc, coverage includes linear circuits, using a meter to make voltage checks, signal tracing techniques and fault finding on logic circuits. The final chapter covers ways of testing a wide range of electronic components, such as resistors, capacitors, operational amplifiers, diodes, transistors, SCRs and triacs, with the aid of only a limited amount of test equipment. The construction and use of a Tristate Continuity Tester, a Signal Tracer, a Logic Probe and a CMOS Tester are also included. 136 pages Temporarily out of print PRACTICAL FIBRE-OPTIC PROJECTS R. A. Penfold While fibre-optic cables may have potential advantages over ordinary electric cables, for the electronics enthusiast it is probably their novelty value that makes them worthy of exploration. Fibre-optic cables provide an innovative interesting alternative to electric cables, but in most cases they also represent a practical approach to the problem. This book provides a number of tried and tested circuits for projects that utilize fibre-optic cables. The projects include:- Simple audio links, F.M. audio link, P.W.M. audio links, Simple d.c. links, P.W.M. d.c. link, P.W.M. motor speed control, RS232C data links, MIDI link, Loop alarms, R.P.M. meter. All the components used in these designs are readily available, none of them require the constructor to take out a second mortgage. 132 pages Order code BP374 £5.45 DISCOVERING PICS BOOK W.D.Phillips PLUS CDROM A good introduction to PIC programming, covering every- PLUS HARDWARE thing you need to know to get you started. No previous knowledge of microcontrollers is required, but some previous experience with electronic circuits is assumed. Covers the basic concept of a microcontroller, fundamentals of a PIC-based circuit and using the MPLAB program. Further chapters introduce binary, PIC architecture, the instruction set, the PIC memory map and special registers plus real world programming. Four simple projects are also fully described; a Wavy Wand, an Electronic Dice, a Games Timer and a Pulse Monitor. The associated CDROM contains the book in PDF format, MPLAB (plus instruction manuals in PDF format) and all the programs covered in the book as assembler (ASM) files. In addition a p.c.b. based hardware kit is also available that makes up into the Wavy Wand which will spell out a short message via a line of l.e.d.s when waved through the air. 190 pages, A4 spiral bound Book + CDROM Order code DOC1 £22.00 Book + CDROM + Hardware Order code DOC2 £28.50 For a further selection of books see the next two issues of EPE BOOK ORDERING DETAILS A BEGINNER’S GUIDE TO TTL DIGITAL ICs R. A. Penfold This book first covers the basics of simple logic circuits in general, and then progresses to specific TTL logic integrated circuits. The devices covered include gates, oscillators, timers, flip/flops, dividers, and decoder circuits. Some practical circuits are used to illustrate the use of TTL devices in the “real world’’. 142 pages Order code BP332 £5.45 MICROCONTROLLER COOKBOOK Mike James The practical solutions to real problems shown in this cookbook provide the basis to make PIC and 8051 devices really work. Capabilities of the variants are examined, and ways to enhance these are shown. A survey of common interface devices, and a description of programming models, lead on to a section on development techniques. The cookbook offers an introduction that will allow any user, novice or experienced, to make the most of microcontrollers. 240 pages Order code NE26 All prices include UK postage. For postage to Europe (air) and the rest of the world (surface) please add £2 per book. For the rest of the world airmail add £3 per book. CD-ROM prices include VAT and/or postage to anywhere in the world. Send a PO, cheque, international money order (£ sterling only) made payable to Direct Book Service or card details, Visa, Mastercard, Amex, Diners Club or Maestro to: DIRECT BOOK SERVICE, WIMBORNE PUBLISHING LTD., 408 WIMBORNE ROAD EAST, FERNDOWN, DORSET BH22 9ND. Orders are normally sent out within seven days of receipt, but please allow 28 days for delivery – more for overseas orders. Please check price and availability (see latest issue of Everyday Practical Electronics) before ordering from old lists. For a further selection of books and CD-ROMs see the next two issues of EPE. Tel 01202 873872 Fax 01202 874562. Email: [email protected] Order from our online shop at: www.epemag.co.uk/shopdoor.htm BOOK/CD-ROM ORDER FORM Full name: ............................................................................................................................................... Address: .................................................................................................................................................. £23.99 RADIO BYGONES We also carry a selection of books aimed at readers of EPE’s sister magazine on vintage radio Radio Bygones. These books include the Comprehensive Radio Valve Guides. Also Jonathan Hill’s excellent Radio Radio, a comprehensive book with hundreds of photos depicting the development of the British wireless set up to the late 1960s. The four volumes of our own Wireless For the Warrior by Louis Meulstee are also available. These are a technical history of radio communication equipment in the British Army and clandestine equipment from pre-war through to the 1960s. For details see the shop on our UK web site at www.epemag.co.uk or contact us for a list of Radio Bygones books. Everyday Practical Electronics, July 2006 ................................................................................................................................................................. ................................................................................................................................................................. .............................................. Post code: ........................... Telephone No: ............................................. Signature: ................................................................................................................................................ 1 I enclose cheque/PO payable to DIRECT BOOK SERVICE for £ ................................................... 1 Please charge my card £ .................................................................. Card expiry date.................... Card Number ........................................................................................... Maestro Issue No.................. Card Security Code ............... (The last 3 digits on or just below the signature strip) Please send book/CD-ROM order codes: .............................................................................................. ................................................................................................................................................................. Please continue on separate sheet of paper if necessary If you do not wish to cut your magazine, send a letter or copy of this form 73 WIRELESS for the WARRIOR Volume 1 ‘Wireless Sets No.1 to 88’ – covers the early radios, prior to the outbreak of World War II, and wartime sets which were never released in large quantities or were abandoned after trials. Contains 360 A4 pages in softback format. Volume 2 ‘Standard Sets for World War II’ – provides information in detail of mass-produced Wireless Sets such as No.18, 19, 22 and 38. Additionally included are a number of post-war sets on which development had been started during World War II. Contains 722 A4 pages in hardback format with more than 200 photographs, 750 line drawings and 180 data tables. Temporarily out of print Volume 3 ‘Reception Sets’ – the receivers described span the era 1932 to the 1960s, and coverage includes not only reception sets specifically designed or adapted for the British Army, but also sets adopted from other arms (RN and RAF), special receivers, direction finding receivers, army broadcast reception sets, Canadian and Australian army sets, commercial receivers adopted by the army, and army welfare reception sets. Contains 546 A4 pages in hardback format with more than 230 photographs, 470 line drawings and 200 data tables. Volumes 1 to 4 Volume 4 ‘Clandestine Radio’ – not only ‘spy’ equipment but sets used by Special Forces, Partisans, Resistance, ‘Stay Behind’ organisations, Diplomatic Service, Australian Coast Watchers, RDF and intercept receivers, bugs and radar beacons. The information has been compiled through the collaboration of a vast number of collectors and enthusiasts around the world. Volume 4 includes information on more than 230 sets and ancillaries. Contains 692 pages in hardback format, and features over 850 photographs, 360 line drawings and 440 data tables. PRICES INCLUDING POSTAGE Europe airmail, Rest of World Rest Of World surface mail airmail UK Vol 1 Vol 2 Vol 3 Vol 4 £36.50 £37.50 Temporarily out of print £48.50 £49 £49.50 £52.50* £45 £59 £64* *For delivery to Canada Vol.2 and Vol 4 can only be sent by surface post, this can take up to 8 weeks. Cheques made payable to Direct Book Service. Direct Book Service, Wimborne Publishing Ltd, 408 Wimborne Road East, Ferndown, Dorset BH22 9ND Tel: 0202 873872 Fax: 0202 874562 www.radiobygones.co.uk Please send me: Wireless For The Warrior ..........(quantity) Vol 1; ..........(quantity) Vol 2; ..........(quantity) Vol 3; ..........(quantity) Vol 4 Name ............................................................................... Address ...................................................................................... .................................................................................................................................................................................................. Post Code ................................................ 6 I enclose cheque/postal order/bank draft to the value of £..................... 6 Please charge my Visa/Mastercard/Amex/Diners Club/Maestro £........................... Card No: ....................................................................................... for the Card security No: ....................... (last 3 digits on the signature strip) Valid From .................... 74 Expiry Date .................... WIRELESS Maestro Issue No ................... WARRIOR Everyday Practical Electronics, July 2006 THE No1 UK MAGAZINE FOR ELECTRONICS TECHNOLOGY AND COMPUTER PROJECTS BACK ISSUES We can supply back issues of EPE by post, most issues from the past three years are available. An EPE index for the last five years is also available at www.epemag.co.uk or see order form below. Alternatively, indexes are published in the December issue for that year. Where we are unable to provide a back issue a photocopy of any one article (or one part of a series) can be purchased for the same price. Issues from Jan. 99 are available on CD-ROM – see next page – and issues from the last six months are also available to download from www.epemag.com. Please make sure all components are still available before commencing any project from a back-dated issue. DID YOU MISS THESE? . MAR ’05 MAR ’06 PROJECTS Cat Flap Stereo Headphone Monitor PIC Electric Mk2 Pt2 Smart Karts 6 Bingo Box. FEATURES TK3 Simulator and PIC18F Upgrade Circuit Surgery Ingenuity Unlimited Techno Talk PIC ‘N’ Mix Practically Speaking Net Work – The Internet Page “TIPTRONIC” STYLE GEAR INDICATOR F O R C A R S A N D M O T O R C Y C L E S I N D I C AT E S U P T O 9 G E A R S D I S P L AY D I M M I N G EASY TO FIT MAY ’05 PROJECTS Crossword Solver DAB Radio Aerial 20W Amplifier Module Smart Karts - 8 Water Level Detector Burglar Alarm FEATURES Back To Logic Basics - 2 Circuit Surgery Ingenuity Unlimited Passive Component Testing Practically Speaking Techno Talk Net Work – The Internet Page JUNE ’05 PROJECTS PIC Ultrasonic Radar Radio Control Model Switcher Super-Ear Audio Telescope Electronic Scarecrow Digital Lock FEATURES Catch the Wave (Tsunami) Back To Basics – 3 Digital TV Switchover Programming PIC 18F Interrupts Circuit Surgery Interface Ingenuity Unlimited Net Work – The Internet Page APR ’06 S U N S E T S W I T CH APR ’05 PROJECTS Spontaflex Radio Receiver Safety Interface Fridge/Freezer Door Alarm Smart Karts - 7. FEATURES Back To Logic Basics - 1 Circuit Surgery Ingenuity Unlimited Interface PIC18F Microcontroller Family Introduction Techno Talk Net Work – The Internet Page PLUS !b PICb Ambil ux !b Cur rent C lamp Adapt or Multim For eters For4 Security 4 Safety JANUARY 2006 £3.30 T E A CH - I N 2 0 0 6 – 3 4Charge and Capacitance 4Introducing Capacitors Surgery Techno Talk PIC ‘N’ Mix Interface NetWork – The Internet Page NOV ’05 Photocopies only DEC ’05 PROJECTS Vehicle Frost Box Mk2 Propeller Monitor Solid-State Hammond Solid State Valve Power Supply FEATURES Teach-In 2006 – Part 2 Techno Talk Viewing The Future Circuit Surgery Interface PIC ‘N’ Mix NetWork – The Internet Page JAN ’06 Photocopies only PROJECTS A “Tiptronic-Style” Gear Indicator Sunset Switch PIC Ambilux Current Clamp Adapter For Multimeters FEATURES Teach-In 2006 – Part 3 Circuit Surgery Techno Talk Practically Speaking PIC ‘N’ Mix NetWork – The Internet Page FEB ’06 PROJECTS Cybervox LF and VLF Converter Multi-Clap Switch Doorchime Electronic Dice FEATURES Discovering PICs Reviewed Back To Basics – 4 Digital TV Switchover Practically Speaking Circuit Surgery Interface Net Work – The Internet Page AUG ’05 PROJECTS Motor Amplifier Pain Monitor Audio System-Communications Kitchen Timer Room Thermometer FEATURES Back To Basics – 5 Circuit Surgery Interface Ingenuity Unlimited Techno Talk PIC ‘N’ Mix NetWork – The Internet Page SEPT ’05 PROJECTS All Band Radio Snooker and Darts Scoreboard Multicore Cable Tester Controlling Model Railway Signals Daily Reminder Whistle Switch FEATURES Back To Logic Basics – 6 Circuit Surgery Practically Speaking Ingenuity Unlimited Techno Talk PIC ‘N’ Mix Net Work – The Internet Page OCT ’05 PROJECTS Haloween Howler PIC Based USB Interface Photic Phone Telephone Switch Parking Radar FEATURES Introducing the Virtual DIY Calculator Ingenuity Unlimited Back To Basics – 7 Circuit 76 PROJECTS A Programmable Continuity Tester Omni Pendulum PortaPAL Public Address Amplifier – Part 2 ‘Smart’ Slave Flash Trigger FEATURES Teach-In 2006 – Part 6 Consumer Electronics Show E-Chip Review Techno Talk PIC-’N’-Mix Net Work – The Internet Page PROJECTS Speed Camera Watch Mk2 PIC Chromatone Multi-Function R/C Switch Noughts and Crosses Enigma Weather Vane Repeater FEATURES Teach-In 2006 – Part 1 Circuit Surgery Back To Basics – 8 Techno Talk Practically Speaking Ingenuity Unlimed PIC ‘N’ Mix NetWork – The Internet Page Photocopies only PROJECTS Highly Flexible Keypad Alarm Active 3-way Crossover Status Monitor Jazzy Heart. FEATURES Teach-In 2006 – Part 4 Techno Talk Circuit Surgery Interface PIC-’N’-Mix Network – The Internet Page JULY ’05 PROJECTS PortaPAL Public Address Amplifier – Part 1 Telescope Interface Power Up Video – Audio Booster FEATURES Teach-In 2006 – Part 5 Practically Speaking Circuit Surgery Techno Talk PIC-’N’Mix Net Work – The Internet Page MAY ’06 PROJECTS LED Lighting For Your Car Smart Card Reader and Programmer Nail Sniffer and Volts Hound Digital Reaction Timer. FEATURES Teach-In 2006 – Part 7 Practically Speaking Ingenuity Unlimited Circuit Surgery Techo Talk PIC ‘N’ Mix Net Work – The Internet Page JUN ’06 PROJECTS Poor Man’s Metal Locator Widgy Box Distortion Effects For Your Guitar Phone Ring & Test Digital Instrument Display For Cars – Part 1. FEATURES Interface Circuit Surgery Ingenuity Unlimited Techno Talk PIC ‘N’ Mix Teach-In 2006 – Part 8 Net Work – The Internet Page BACK ISSUES ONLY £3.80 each inc. UK p&p. Overseas prices £4.50 each surface mail, £5.50 each airmail. We can also supply issues from earlier years: 2001 (except Feb., May, Aug., to Nov.), 2002 (except Feb., June, Aug. to Nov.), 2003 (except June), 2004 (except June, July, Oct. and Dec). 2005 (except Feb., Nov.), 2006 (except Jan., Feb.) Where we do not have an issue a photocopy of any one article or one part of a series can be provided at the same price. ORDER FORM – BACK ISSUES – PHOTOCOPIES– INDEXES Send back issues dated . . . . . . . . . . . . . . . . . . . . . . . . . . . . . . . . . . . . . . . . . . . . . . . . . . . . . . . . . . . . . . . . . . . . . . . Send photocopies of (article title and issue date) . . . . . . . . . . . . . . . . . . . . . . . . . . . . . . . . . . . . . . . . . . . . . . . . . . . Send copies of last five years indexes (£3.80 for five inc. p&p – Overseas £4.50 surface, £5.50 airmail) Name . . . . . . . . . . . . . . . . . . . . . . . . . . . . . . . . . . . . . . . . . . . . . . . . . . . . . . . . . . . . . . . . . . . . . . . . . . . . . . . . . . . . . . . . Address . . . . . . . . . . . . . . . . . . . . . . . . . . . . . . . . . . . . . . . . . . . . . . . . . . . . . . . . . . . . . . . . . . . . . . . . . . . . . . . . . . . . . . . . . . . . . . . . . . . . . . . . . . . . . . . . . . . . . . . . . . . . . . . . . . . . . . . . . . . . . . . . .Tel: . . . . . . . . . . . . . . . . . . . . . . . . . . . . . . . I enclose cheque/P.O./bank draft to the value of £ . . . . . . . . . . . . . . . . . . . . . . . . . . . . . . . . . . . . . . . . . . . . . . . . . . Please charge my Visa/Mastercard/Amex/Diners Club/Switch £ . . . . . . . . . . . . . . . . . . . . . . . . . . . . . . . . . . . . . . . Card No. . . . . . . . . . . . . . . . . . . . . . . . . . . . . . . . . . . . . . . . . . . . . . . . . . . . . . . . . . . . . . Switch Issue No . . . . . . . . . . . . . . . . Valid From . . . . . . . . . . . . . . . . . .Card Expiry Date . . . . . . . . . . . . Card Security Code . . . . . . . . . . (The last 3 digits on or just under the signature strip) SEND TO: Everyday Practical Electronics, Wimborne Publishing Ltd., 408 Wimborne Road East, Ferndown, Dorset BH22 9ND. Tel: 01202 873872. Fax: 01202 874562. E-mail: [email protected] On-line Shop: www.epemag.wimborne.co.uk/shopdoor.htm Payments must be in £ sterling – cheque or bank draft drawn on a UK bank. Normally supplied within seven days of receipt of order. Send a copy of this form, or order by letter if you do not wish to cut your issue. M07/06 Everyday Practical Electronics, July 2006 STORE YOUR BACK ISSUES ON CD-ROMS NOW VOL 13 AVAI LABL E ONLY £14.45 each including VAT and p&p A great way to buy EPE Back Issues – our CD-ROMs contain back issues from our EPE Online website plus bonus articles, all the relevant PIC software and web links. Note: no free gifts are included. All this for just £14.45 each including postage and packing. VOL 1: BACK ISSUES – January 1999 to June 1999 Plus some bonus material from Nov and Dec 1998 VOL VOL VOL VOL VOL VOL VOL VOL VOL VOL VOL VOL 2: BACK ISSUES – July 1999 to December 1999 3: BACK ISSUES – January 2000 to June 2000 4: BACK ISSUES – July 2000 to December 2000 5: BACK ISSUES – January 2001 to June 2001 6: BACK ISSUES – July 2001 to December 2001 7: BACK ISSUES – January 2002 to June 2002 8: BACK ISSUES – July 2002 to December 2002 9: BACK ISSUES – January 2003 to June 2003 10: BACK ISSUES – July 2003 to December 2003 11: BACK ISSUES – January 2004 to June 2004 12: BACK ISSUES – July 2004 to December 2004 13: BACK ISSUES – January 2005 to June 2005 Order on-line from www.epemag.wimborne.co.uk/ shopdoor.htm or www.epemag.com (USA $ prices) or by phone, Fax, E-mail or Post BACK ISSUES CD-ROM ORDER FORM Please send me the following Back Issue CD-ROMs. Volume Numbers:. . . . . . . . . . . . . . . . . . . . . . . . . . . . . . . . . . . . . . . . . . . . . . . . . . ........................................................... ........................................................... Price £14.45 each – includes postage to anywhere in the world. Name . . . . . . . . . . . . . . . . . . . . . . . . . . . . . . . . . . . . . . . . . . . . . . NOTE: These CD-ROMs are suitable for use on any PC with a CD-ROM drive. They require Adobe Acrobat Reader (available free from the Internet – www.adobe.com/acrobat) WHAT IS INCLUDED All volumes include the EPE Online editorial content of every listed issue, plus all the available PIC Project Codes for the PIC projects published in those issues. Note: Some supplements etc. can be downloaded free from the Library on the EPE Online website at www.epemag.com. No advertisements are included in Volumes 1 and 2; from Volume 5 onwards the available relevant software for Interface articles is also included. EXTRA ARTICLES – ON ALL VOLUMES BASIC SOLDERING GUIDE – Alan Winstanley’s internationally acclaimed fully illustrated guide. UNDERSTANDING PASSIVE COMPONENTS – Introduction to the basic principles of passive components. HOW TO USE INTELLIGENT L.C.Ds, by Julyan Ilett – An utterly practical guide to interfacing and programming intelligent liquid crystal display modules. PhyzzyB COMPUTERS BONUS ARTICLE 1 – Signed and Unsigned Binary Numbers. By Clive “Max” Maxfield and Alvin Brown. PhyzzyB COMPUTERS BONUS ARTICLE 2 – Creating an Event Counter. By Clive “Max” Maxfield and Alvin Brown. INTERGRAPH COMPUTER SYSTEMS 3D GRAPHICS – A chapter from Intergraph’s book that explains computer graphics technology. FROM RUSSIA WITH LOVE, by Barry Fox – Russian rockets launching American Satellites. PC ENGINES, by Ernest Flint – The evolution of Intel’s microprocessors. THE END TO ALL DISEASE, by Aubrey Scoon – The original work of Rife. COLLECTING AND RESTORING VINTAGE RADIOS, by Paul Stenning. THE LIFE & WORKS OF KONRAD ZUSE – a brilliant pioneer in the evolution of computers. A bonus article on his life and work written by his eldest son, including many previously unpublished photographs. Address . . . . . . . . . . . . . . . . . . . . . . . . . . . . . . . . . . . . . . . . . . . . ................................................... . . . . . . . . . . . . . . . . . . . . . . . . . . . Post Code . . . . . . . . . . . . . I enclose cheque/P.O./bank draft to the value of £ . . . . . . . . . Please charge my Visa/Mastercard/Amex/Diners Club/Maestro £ .................................................. Card No. . . . . . . . . . . . . . . . . . . . . . . . . . . . . . . . . . . . . . . . . . . . Card Security Code . . . . . . . . . . (The last 3 digits on or just under the signature strip) Valid From . . . . . . . . . . .Expiry Date . . . . . . . . . Maestro Issue No. . . . . . . . . . . . . . . SEND TO: Everyday Practical Electronics, Wimborne Publishing Ltd., 408 Wimborne Road East, Ferndown, Dorset BH22 9ND. Tel: 01202 873872. Fax: 01202 874562. E-mail: [email protected] Payments must be by card or in £ Sterling – cheque or bank draft drawn on a UK bank. Normally supplied within seven days of receipt of order. Note: Some of the EXTRA ARTICLES require WinZip to unzip them. Everyday Practical Electronics, July 2006 77 PCB SERVICE Printed circuit boards for most recent EPE constructional projects are available from the PCB Service, see list. These are fabricated in glass fibre, and are fully drilled and roller tinned. All prices include VAT and postage and packing. Add £1 per board for airmail outside of Europe. Remittances should be sent to The PCB Service, Everyday Practical Electronics, Wimborne Publishing Ltd., 408 Wimborne Road East, Ferndown, Dorset BH22 9ND. Tel: 01202 873872; Fax 01202 874562; Email: [email protected]. On-line Shop: www.epemag. wimborne.co.uk/shopdoor.htm. Cheques should be crossed and made payable to Everyday Practical Electronics (Payment in £ sterling only). NOTE: While 95% of our boards are held in stock and are dispatched within seven days of receipt of order, please allow a maximum of 28 days for delivery – overseas readers allow extra if ordered by surface mail. Back numbers or photocopies of articles are available if required – see the Back Issues page for details. We do not supply kits or components for our projects. Please check price and availability in the latest issue. A large number of older boards are listed on our website. Boards can only be supplied on a payment with order basis. PROJECT TITLE Super Vibration Switch DEC ‘04 Wind Direction Indicator PIC Flasher Mk2 – Control Board – Transmitter – Multipurpose Board – Simple Cycler – Luxeon V Controller – Power Supply Light Detector JAN ‘05 Camera Watch Gate Alarm – Oscillator – Delay/Timer FEB ‘05 Sneaky – Transmitter – Receiver PIC Electric Mk2 – Control – Sensor Sound Card Mixer Headphone Monitor MAR ’05 EPE Cat Flap Bingo Box – Main – Big Digit Display APR ‘05 Spontaflex Radio– Tuner – Coil Pack – Audio Amplifier – Tuning Capacitor Board Safety Interface Back-To-Basics 1– Fridge/Freezer Door Alarm MAY ’05 Crossword Solver 20W Amplifier Module Back-To-Basics 2 – Water Level Alarm – Burglar Alarm PIC Ultrasonic Scanner JUN ’05 Radio Control Model Switcher Back-To-Basics 3 – Scarecrow – Digital Lock CompactFlash Interface Board LF/VLF Converter JUL ’05 – Fixed Capacitor Board – Mixer/Oscillator Board – Buffer Amplifier – Q-Multiplier – Tuning Capacitor Board Back-To-Basics 4 – Doorchime – Electronic Dice Cybervox Multi-Clap Switch Audio System AUG ‘05 – Preamplifier – Mic. Supply Board – Power Amp Pain Monitor MotorAmp Back-To-Basics 5 – Kitchen Timer – Room Thermometer SEPT ’05 All-Band Radio – Full Version – Mini Version Multicore Cable Tester – Main – Active Back-To-Basics 6 – Daily Reminder – Whistle Switch Model Railway Signal Control Snooker/Darts Scoreboard Photic Phone – Transmitter OCT ’05 – Receiver Back-To-Basics 7 – Parking Radar – Telephone Switch Haloween Howler PIC-Based USB Interface PIC Chromatone NOV ’05 Back-To-Basics 8 – Noughts and Crosses Enigma – Weather Vane Repeater Multi-Function R/C Switch Speed Camera Watch Mk2 78 Order Code Cost 474 475 476 477 478 479 480 473 481 482 483 484 485 486 487 488 489 490 491 492 493 494 495 496 406 497 498 499 500 501 502 503 504 505 506 507 £4.75 £6.18 £4.75 £4.44 £4.75 £4.44 £4.44 £4.76 £4.44 £6.03 £4.92 £4.92 £4.60 £4.91 £5.87 £5.71 £7.29 £5.71 £6.02 £9.04 £10.31 £5.55 £5.71 £5.55 £4.28 £6.18 £5.39 £6.66 £5.14 £5.39 £5.87 £6.66 £5.87 £5.55 £6.66 £6.66 508 509 510 511 406 512 513 514 515 £5.71 £5.86 £5.23 £5.23 £4.28 £6.34 £6.02 £6.82 £6.66 516 £6.02 517 £5.23 518 £6.02 519 £7.14 520 £7.45 521 £5.87 522 £6.02 523 £5.71 524 £5.23 525 £6.19 526 £5.55 527 £6.19 528 £5.87 529 £6.19 530 £8.72 531 pair £6.98 532 533 £5.71 534 £5.55 535 £6.02 536 £6.19 537 £6.82 538 £6.66 539 £6.18 540 £5.87 541 £6.35 } PROJECT TITLE Solid-State Valve Power Supply Vehicle Frost Box Mk2 Propeller Monitor Solid-State Hammond PIC Ambilux Sunset Switch Current Clamp Adaptor for Multimeters Tiptronic-Style Gear Indicator – Micro Board – Display Board – Hall Speed Board Keypad Alarm 3-Way Active Crossover Jazzy Heart Status Monitor – Transmitter – Reciever Power Up Video/Audio Booster (double-sided) Telescope Interface ‘Smart’ Slave Flash Programmable Continuity Tester PortaPAL – Microphone Board – Auxilary Board – Main Board – Charger Board Omni Pendulum Smart Card Reader/Programmer LED Lighting For Your Car (set of 15 boards) Digital Reaction Timer Poor Man’s Metal Locator Digital Instrument Display for Cars – Micro Board – Display Board Widgy Box Phone Ring & Test Sudoku Unit PC Power Monitor Order Code Cost 542 543 544 545 546 547 548 £6.35 £5.71 £6.02 £6.18 £5.71 £6.98 £5.39 DEC ’05 JAN ’06 } FEB ’06 549 per 550 £7.61 set 551 552 £6.02 553 £9.20 554 £6.02 555 pair £7.61 556 557 £6.82 558 £12.00 559 £6.50 560 £6.18 561 £5.87 } MAR ’06 APR ‘06 MAY ’06 JUN ’06 562 563 564 565 566 567 568 569 570 £6.18 £5.87 £8.56 £6.66 £6.34 £7.61 £14.75 £7.13 £5.71 } JUL ’06 571 pair £7.77 572 573 £7.29 574 £6.82 575 £6.66 576 £6.50 EPE SOFTWARE All software programs for EPE Projects marked with an asterisk, and others previously published, can be downloaded free from our Downloads site, accessible via our home page at: www.epemag.co.uk. PCB MASTERS PCB masters for boards published from the March ‘06 issue onwards can also be downloaded from our UK website (www.epemag.co.uk); go to the “Downloads” section. EPE PRINTED CIRCUIT BOARD SERVICE Order Code Project Quantity Price ..................................................................................... Name ........................................................................... Address ....................................................................... .............................................................................. Tel. No. ......................................................................... I enclose payment of £................ (cheque/PO in £ sterling only) to: Everyday Practical Electronics MasterCard, Amex, Diners Club, Visa or Switch/Maestro Card No ................................................................................ Valid From ....................... Expiry Date ............................... Card Security Code ............. Switch/Maestro Issue No ......... (The last 3 digits on or just under the signature strip) Signature .............................................................................. NOTE: You can also order p.c.b.s by phone, Fax, Email or via our Web site on a secure server: http://www.epemag.wimborne.co.uk/shopdoor.htm Everyday Practical Electronics, July 2006 NEXT MONTH A TELEPHONE DIALLER FOR BURGLAR ALARMS This project will dial a preprogrammed telephone number and send a warning tone via a modem when its input is triggered. Although primarily intended to connect to the output of an alarm system, it could be used for any purpose where you need to be notified immediately when an event has occurred. LEVEL METER FOR HOME THEATRE SYSTEMS Setting up a home theatre system? Want to adjust all the speaker levels precisely? Here is the way to do it, with this handy little Loudspeaker Level Meter. It has its own inbuilt microphone and a 10-LED bargraph display to let you quickly set all channels to the same relative level. And you can use it to set up the levels on a PA system as well. ADJUSTABLE DC–DC CONVERTER FOR CARS Need to run electronic equipment in your car but require more than 12V? Or do you want more voltage than your 12V battery can deliver? This versatile circuit will let you do it. Run your laptop, charge 12V SLA batteries or whatever. AUGUST ’06 ISSUE ON SALE JULY 13 ADVERTISERS INDEX AGAR . . . . . . . . . . . . . . . . . . . . . . . . . . . . . . . . . . . . . . .75 AUDON ELECTRONICS . . . . . . . . . . . . . . . . . . . . . . . . .70 BETA-LAYOUT . . . . . . . . . . . . . . . . . . . . . . . . . . . . . . . . .75 BREADBOARDING SYSTEMS . . . . . . . . . . . . . . . . . . . .19 BULL GROUP . . . . . . . . . . . . . . . . . . . . . . . . . . . .Cover (ii) BYVAC . . . . . . . . . . . . . . . . . . . . . . . . . . . . . . . . . . . . . . .75 DISPLAY ELECTRONICS . . . . . . . . . . . . . . . . . . . . . . . 80 EASYSYNC . . . . . . . . . . . . . . . . . . . . . . . . . . . . . . . . . . .59 ESR ELECTRONIC COMPONENTS . . . . . . . . . . . . . . . .6 FERN ELECTRONICS . . . . . . . . . . . . . . . . . . . . . . . . . .75 FOREST ELECTRONIC DEVELOPMENTS . . . . . . . . . .41 FUTURE TECHNOLOGY DEVICES . . . . . . . . . . . . . . . .69 JAYCAR ELECTRONICS . . . . . . . . . . . . . . . . . . . . . . . .30 JPG ELECTRONICS . . . . . . . . . . . . . . . . . . . . . . . . . . . .80 LABCENTER . . . . . . . . . . . . . . . . . . . . . . . . . . . .Cover (iv) LASER . . . . . . . . . . . . . . . . . . . . . . . . . . . . . . . . . . . . . . .75 MAGENTA ELECTRONICS . . . . . . . . . . . . . . . . . . . . . . . .5 MILFORD INSTRUMENTS . . . . . . . . . . . . . . . . . . . . . . .63 NURVE NETWORKS LLC . . . . . . . . . . . . . . . . . . . . . . . .57 PEAK ELECTRONIC DESIGN . . . . . . . . . . . . . .Cover (iii) PICO TECHNOLOGY . . . . . . . . . . . . . . . . . . . . . . . . . . . .4 QUASAR ELECTRONICS . . . . . . . . . . . . . . . . . . . . . . .2/3 RAPID ELECTRONICS . . . . . . . . . . . . . . . . . . . . . . . . . .50 SCANTOOL . . . . . . . . . . . . . . . . . . . . . . . . . . . . . . . . . . .70 SHERWOOD ELECTRONICS . . . . . . . . . . . . . . . . . . . . .70 STEWART OF READING . . . . . . . . . . . . . . . . . . . . . . . . .4 ADVERTISEMENT OFFICES: 408 WIMBORNE ROAD EAST, FERNDOWN, DORSET BH22 9ND PHONE: 01202 873872 FAX: 01202 874562 EMAIL: [email protected] For Editorial address and phone numbers see page 7 Everyday Practical Electronics, periodicals pending, ISSN 0262 3617 is published twelve times a year by Wimborne Publishing Ltd., USA agent USACAN at 1320 Route 9, Champlain, NY 12919. Subscription price in US $60(US) per annum. Periodicals postage paid at Champlain NY and at additional mailing offices. POSTMASTER: Send USA and Canada address changes to Everyday Practical Electronics, c/o Express Mag., PO Box 2769, Plattsburgh, NY, USA 12901-0239. Published on approximately the second Thursday of each month by Wimborne Publishing Ltd., 408 Wimborne Road East, Ferndown, Dorset BH22 9ND. Printed in England by Apple Web Offset Ltd., Warrington, WA1 4RW. Distributed by Seymour, 86 Newman St., London W1T 3EX. Subscriptions INLAND: £17.50 (6 months); £33 (12 months); £61 (2 years). OVERSEAS: Standard air service, £20.50 (6 months); £39 (12 months); £73 (2 years). Express airmail, £29.50 (6 months); £57 (12 months); £109 (2 years). Payments payable to “Everyday Practical Electronics’’, Subs Dept, Wimborne Publishing Ltd. Email: [email protected]. EVERYDAY PRACTICAL ELECTRONICS is sold subject to the following conditions, namely that it shall not, without the written consent of the Publishers first having been given, be lent, resold, hired out or otherwise disposed of by way of Trade at more than the recommended selling price shown on the cover, and that it shall not be lent, resold, hired out or otherwise disposed of in a mutilated condition or in any unauthorised cover by way of Trade or affixed to or as part of any publication or advertising, literary or pictorial matter whatsoever.